|
Entire Thread
|

 Paint job on a budget!? CONTINUED..page 44............
|
69chargeryeehaa
|
05/27/06 12:45 AM
|
 Re: Paint job on a budget!? CONTINUED..page 44........
|
Exit1965
|
05/27/06 01:01 AM
|
|
Re: Paint job on a budget!? CONTINUED..page 44........
|
69chargeryeehaa
|
05/27/06 01:07 AM
|
|
Re: Paint job on a budget!? CONTINUED..page 44............
|
Anonymous
|
05/27/06 01:12 AM
|
|
Re: Paint job on a budget!? CONTINUED..page 44............
|
Ira
|
05/27/06 01:21 AM
|
|
Re: Paint job on a budget!? CONTINUED..page 44........
|
Exit1965
|
05/27/06 01:22 AM
|
|
Re: Paint job on a budget!? CONTINUED..page 44........
|
GTSDave
|
05/27/06 04:32 AM
|
|
Re: Paint job on a budget!? CONTINUED..page 44........
|
Magnum
|
05/27/06 07:34 AM
|
|
Re: Paint job on a budget!? CONTINUED..page 44........
|
69chargeryeehaa
|
05/28/06 07:13 PM
|
|
Re: Paint job on a budget!? CONTINUED..page 44........
|
dalbers
|
05/29/06 04:49 AM
|
|
Re: Paint job on a budget!? CONTINUED..page 44........
|
Anonymous
|
05/29/06 05:08 AM
|
|
Re: Paint job on a budget!? CONTINUED..page 44........
|
Anonymous
|
05/29/06 05:10 AM
|
|
Re: Paint job on a budget!? CONTINUED..page 44........
|
Exit1965
|
05/29/06 05:22 PM
|
|
Re: Paint job on a budget!? CONTINUED..page 44........
|
GTSDave
|
05/29/06 05:27 PM
|
|
Re: Paint job on a budget!? CONTINUED..page 44........
|
Anonymous
|
05/29/06 06:23 PM
|
|
Re: Paint job on a budget!? CONTINUED..page 44........
|
sunroofgtx
|
05/29/06 09:37 PM
|
|
Re: Paint job on a budget!? CONTINUED..page 44........
|
69chargeryeehaa
|
05/30/06 12:30 AM
|
|
Re: Paint job on a budget!? CONTINUED..page 44........
|
Exit1965
|
05/30/06 04:49 AM
|
|
Re: Paint job on a budget!? CONTINUED..page 44........
|
Anonymous
|
05/30/06 07:30 AM
|
|
Re: Paint job on a budget!? CONTINUED..page 44........
|
Anonymous
|
05/30/06 11:48 AM
|
|
Re: Paint job on a budget!? CONTINUED..page 44........
|
Exit1965
|
05/30/06 01:02 PM
|
|
Re: Paint job on a budget!? CONTINUED..page 44........
|
Exit1965
|
05/30/06 10:27 PM
|
|
Re: Paint job on a budget!? CONTINUED..page 44........
|
Exit1965
|
05/30/06 12:35 AM
|
|
Re: Paint job on a budget!? CONTINUED..page 44........
|
Anonymous
|
05/30/06 10:52 PM
|
|
Re: Paint job on a budget!? CONTINUED..page 44........
|
Exit1965
|
05/30/06 11:01 PM
|
|
Re: Paint job on a budget!? CONTINUED..page 44........
|
Anonymous
|
05/31/06 01:17 AM
|
|
Re: Paint job on a budget!? CONTINUED..page 44........
|
Exit1965
|
05/31/06 01:26 AM
|
|
Re: Paint job on a budget!? CONTINUED..page 44........
|
Anonymous
|
05/31/06 02:13 AM
|
|
Re: Paint job on a budget!? CONTINUED..page 44........
|
Exit1965
|
05/31/06 04:10 AM
|
|
Re: Paint job on a budget!? CONTINUED..page 44........
|
Anonymous
|
05/31/06 05:01 PM
|
|
Re: Paint job on a budget!? CONTINUED..page 44........
|
Anonymous
|
05/31/06 05:24 PM
|
|
Re: Paint job on a budget!? CONTINUED..page 44........
|
Anonymous
|
05/31/06 09:16 PM
|
|
Re: Paint job on a budget!? CONTINUED..page 44........
|
69chargeryeehaa
|
05/31/06 09:31 PM
|
|
Re: Paint job on a budget!? CONTINUED..page 44........
|
Exit1965
|
05/31/06 09:37 PM
|
|
Re: Paint job on a budget!? CONTINUED..page 44........
|
69chargeryeehaa
|
05/31/06 10:34 PM
|
|
Re: Paint job on a budget!? CONTINUED..page 44........
|
Anonymous
|
06/02/06 06:44 AM
|
|
Re: Paint job on a budget!? CONTINUED..page 44........
|
Exit1965
|
06/02/06 01:27 PM
|
|
Re: Paint job on a budget!? CONTINUED..page 44........
|
Anonymous
|
06/02/06 02:50 PM
|
|
Re: Paint job on a budget!? CONTINUED..page 44........
|
340wedge
|
05/31/06 11:40 PM
|
|
Re: Paint job on a budget!? CONTINUED..page 44........
|
Anonymous
|
06/01/06 01:18 AM
|
|
Re: Paint job on a budget!? CONTINUED..page 44........
|
Anonymous
|
06/01/06 02:06 AM
|
|
Re: Paint job on a budget!? CONTINUED..page 44........
|
Anonymous
|
06/01/06 02:13 AM
|
|
Re: Paint job on a budget!? CONTINUED..page 44........
|
Anonymous
|
06/01/06 02:41 AM
|
|
Re: Paint job on a budget!? CONTINUED..page 44........
|
Anonymous
|
06/01/06 03:40 AM
|
|
Re: Paint job on a budget!? CONTINUED..page 44........
|
DaytonaTurbo
|
06/01/06 03:55 AM
|
 Re: Paint job on a budget!? CONTINUED..page 44........
|
Anonymous
|
06/02/06 04:00 AM
|
|
Re: Paint job on a budget!? CONTINUED..page 44........
|
Exit1965
|
06/02/06 04:41 AM
|
|
Re: Paint job on a budget!? CONTINUED..page 44........
|
Anonymous
|
06/02/06 05:12 AM
|
|
Re: Paint job on a budget!? CONTINUED..page 44........
|
Anonymous
|
06/04/06 12:51 AM
|
|
Re: Paint job on a budget!? CONTINUED..page 44........
|
Anonymous
|
06/04/06 01:30 AM
|
|
Re: Paint job on a budget!? CONTINUED..page 44........
|
Anonymous
|
06/04/06 01:41 AM
|
|
Re: Paint job on a budget!? CONTINUED..page 44........
|
Anonymous
|
06/04/06 01:44 AM
|
|
Re: Paint job on a budget!? CONTINUED..page 44........
|
Anonymous
|
06/04/06 03:43 AM
|
|
Re: Paint job on a budget!? CONTINUED..page 44........
|
Marq
|
06/04/06 03:45 AM
|
|
Re: Paint job on a budget!? CONTINUED..page 44........
|
Anonymous
|
06/04/06 02:06 PM
|
|
Re: Paint job on a budget!? CONTINUED..page 44........
|
Marq
|
06/04/06 04:05 PM
|
|
Re: Paint job on a budget!? CONTINUED..page 44........
|
Anonymous
|
06/04/06 05:09 PM
|
|
Re: Paint job on a budget!? CONTINUED..page 44........
|
Exit1965
|
06/04/06 05:21 PM
|
|
Re: Paint job on a budget!? CONTINUED..page 44........
|
Anonymous
|
06/04/06 05:27 PM
|
|
Re: Paint job on a budget!? CONTINUED..page 44........
|
Anonymous
|
06/04/06 11:46 PM
|
|
Re: Paint job on a budget!? CONTINUED..page 44........
|
Anonymous
|
06/04/06 11:48 PM
|
|
Re: Paint job on a budget!? CONTINUED..page 44........
|
Exit1965
|
06/05/06 01:19 AM
|
|
Re: Paint job on a budget!? CONTINUED..page 44........
|
Marq
|
06/05/06 02:45 AM
|
|
Re: Paint job on a budget!? CONTINUED..page 44........
|
Anonymous
|
06/05/06 03:49 AM
|
|
Re: Paint job on a budget!? CONTINUED..page 44........
|
69chargeryeehaa
|
06/05/06 02:53 PM
|
|
Re: Paint job on a budget!? CONTINUED..page 44........
|
GTSDave
|
06/05/06 03:15 PM
|
|
Re: Paint job on a budget!? CONTINUED..page 44........
|
69chargeryeehaa
|
06/05/06 03:20 PM
|
|
Problem with Penetrol mixture....
|
Anonymous
|
06/05/06 05:26 PM
|
|
Re: Problem with Penetrol mixture....
|
69chargeryeehaa
|
06/05/06 09:03 PM
|
|
Re: Problem with Penetrol mixture....
|
Anonymous
|
06/05/06 09:28 PM
|
|
Re: Problem with Penetrol mixture....
|
DaytonaTurbo
|
06/05/06 10:28 PM
|
|
Re: Paint job on a budget!? CONTINUED..page 44........
|
Anonymous
|
06/06/06 01:42 AM
|
|
Re: Paint job on a budget!? CONTINUED..page 44........
|
Anonymous
|
06/06/06 01:43 AM
|
|
Re: Paint job on a budget!? CONTINUED..page 44........
|
Marq
|
06/06/06 04:06 AM
|
|
Re: Paint job on a budget!? CONTINUED..page 44........
|
Anonymous
|
06/06/06 04:48 AM
|
|
Re: Paint job on a budget!? CONTINUED..page 44........
|
patrick
|
06/06/06 01:57 PM
|
|
Re: Paint job on a budget!? CONTINUED..page 44........
|
69chargeryeehaa
|
06/06/06 02:32 PM
|
|
Re: Paint job on a budget!? CONTINUED..page 44........
|
69chargeryeehaa
|
06/06/06 02:38 PM
|
|
Re: Paint job on a budget!? CONTINUED..page 44........
|
Anonymous
|
06/06/06 01:52 PM
|
|
Re: Paint job on a budget!? CONTINUED..page 44........
|
69chargeryeehaa
|
06/06/06 02:28 PM
|
|
Re: Paint job on a budget!? CONTINUED..page 44........
|
Anonymous
|
06/06/06 09:00 PM
|
|
Re: Paint job on a budget!? CONTINUED..page 44........
|
Exit1965
|
06/06/06 09:02 PM
|
|
Re: Paint job on a budget!? CONTINUED..page 44........
|
batjac
|
06/06/06 09:51 PM
|
|
Re: Paint job on a budget!? CONTINUED..page 44........
|
Exit1965
|
06/06/06 10:29 PM
|
|
Re: Paint job on a budget!? CONTINUED..page 44........
|
Exit1965
|
06/04/06 03:46 AM
|
|
Re: Paint job on a budget!? CONTINUED..page 44........
|
Anonymous
|
06/04/06 06:52 AM
|
|
Re: Paint job on a budget!? CONTINUED..page 44........
|
Anonymous
|
06/04/06 06:55 AM
|
|
Re: Paint job on a budget!? CONTINUED..page 44........
|
Anonymous
|
06/02/06 03:34 PM
|
|
Re: Paint job on a budget!? CONTINUED..page 44........
|
Anonymous
|
06/02/06 03:58 PM
|
|
Re: Paint job on a budget!? CONTINUED..page 44........
|
Anonymous
|
06/02/06 04:22 PM
|
|
Re: Paint job on a budget!? CONTINUED..page 44........
|
Exit1965
|
06/02/06 04:35 PM
|
|
Re: Paint job on a budget!? CONTINUED..page 44........
|
Anonymous
|
06/02/06 05:11 PM
|
|
Re: Paint job on a budget!? CONTINUED..page 44........
|
Exit1965
|
06/02/06 05:44 PM
|
|
Re: Paint job on a budget!? CONTINUED..page 44........
|
Anonymous
|
06/02/06 06:39 PM
|
|
Re: Paint job on a budget!? CONTINUED..page 44........
|
Exit1965
|
06/02/06 07:52 PM
|
|
Re: Paint job on a budget!? CONTINUED..page 44........
|
roe
|
06/02/06 07:59 PM
|
|
Re: Paint job on a budget!? CONTINUED..page 44........
|
Exit1965
|
06/02/06 09:50 PM
|
 Re: Paint job on a budget!? CONTINUED..page 44........
|
Anonymous
|
06/02/06 10:18 PM
|
|
Re: Paint job on a budget!? CONTINUED..page 44........
|
The Avg. Valiant
|
06/03/06 12:47 AM
|
|
Re: Paint job on a budget!? CONTINUED..page 44........
|
Anonymous
|
06/03/06 12:48 AM
|
|
Re: Paint job on a budget!? CONTINUED..page 44........
|
Exit1965
|
06/03/06 12:55 AM
|
|
Re: Paint job on a budget!? CONTINUED..page 44........
|
Anonymous
|
06/03/06 01:25 AM
|
|
Re: Paint job on a budget!? CONTINUED..page 44........
|
roe
|
06/03/06 07:46 PM
|
|
Re: Paint job on a budget!? CONTINUED..page 44........
|
Exit1965
|
06/03/06 10:28 PM
|
|
Re: Paint job on a budget!? CONTINUED..page 44........
|
Anonymous
|
06/03/06 10:45 PM
|
|
Re: Paint job on a budget!? CONTINUED..page 44........
|
Anonymous
|
06/01/06 05:30 AM
|
|
Re: Paint job on a budget!? CONTINUED..page 44........
|
Anonymous
|
06/01/06 11:13 PM
|
|
Re: Paint job on a budget!? CONTINUED..page 44........
|
Anonymous
|
06/09/06 02:28 PM
|
|
Re: Paint job on a budget!? CONTINUED..page 44........
|
Exit1965
|
06/09/06 03:44 PM
|
|
Re: Paint job on a budget!? CONTINUED..page 44........
|
Anonymous
|
06/26/06 03:58 AM
|
|
Re: Paint job on a budget!? CONTINUED..page 44........
|
Anonymous
|
06/26/06 05:50 AM
|
|
Re: Paint job on a budget!? CONTINUED..page 44........
|
Anonymous
|
06/26/06 08:21 AM
|
|
Re: Paint job on a budget!? CONTINUED..page 44........
|
Anonymous
|
06/26/06 10:05 AM
|
|
Re: Paint job on a budget!? CONTINUED..page 44........
|
Anonymous
|
06/26/06 01:17 PM
|
|
Re: Paint job on a budget!? CONTINUED..page 44........
|
Anonymous
|
06/26/06 04:24 PM
|
|
Re: Paint job on a budget!? CONTINUED..page 44........
|
Anonymous
|
06/26/06 07:39 PM
|
|
Re: Paint job on a budget!? CONTINUED..page 44........
|
Anonymous
|
06/27/06 12:57 AM
|
|
Re: Paint job on a budget!? CONTINUED..page 44........ *DELETED*
|
Anonymous
|
06/27/06 04:28 AM
|
|
Re: Paint job on a budget!? CONTINUED..page 44........ *DELETED*
|
Anonymous
|
06/27/06 12:51 PM
|
|
Re: Paint job on a budget!? CONTINUED..page 44........
|
Exit1965
|
06/27/06 01:30 PM
|
|
Re: Paint job on a budget!? CONTINUED..page 44........
|
Anonymous
|
06/28/06 12:31 AM
|
|
Re: Paint job on a budget!? CONTINUED..page 44........
|
Anonymous
|
06/28/06 11:51 AM
|
|
Re: Paint job on a budget!? CONTINUED..page 44........
|
Anonymous
|
06/28/06 12:11 PM
|
|
Re: Paint job on a budget!? CONTINUED..page 44........
|
Anonymous
|
06/28/06 12:31 PM
|
|
Re: Paint job on a budget!? CONTINUED..page 44........
|
pdqvsix
|
06/28/06 07:52 PM
|
|
Re: Paint job on a budget!? CONTINUED..page 44........
|
Exit1965
|
06/28/06 09:08 PM
|
|
Re: Paint job on a budget!? CONTINUED..page 44........
|
Anonymous
|
06/28/06 10:02 PM
|
|
Re: Paint job on a budget!? CONTINUED..page 44........
|
Anonymous
|
06/29/06 10:25 PM
|
|
Re: Paint job on a budget!? CONTINUED..page 44........
|
Marq
|
06/30/06 01:15 AM
|
|
Re: Paint job on a budget!? CONTINUED..page 44........
|
Anonymous
|
06/30/06 03:14 AM
|
|
Re: Paint job on a budget!? CONTINUED..page 44........
|
Anonymous
|
06/30/06 12:31 PM
|
|
Re: Paint job on a budget!? CONTINUED..page 44........
|
Marq
|
06/30/06 02:12 PM
|
|
Re: Paint job on a budget!? CONTINUED..page 44........
|
69chargeryeehaa
|
06/30/06 02:14 PM
|
|
Re: Paint job on a budget!? CONTINUED..page 44........
|
69chargeryeehaa
|
06/30/06 02:35 PM
|
|
Re: Paint job on a budget!? CONTINUED..page 44........
|
Anonymous
|
06/30/06 02:56 PM
|
|
Re: Paint job on a budget!? CONTINUED..page 44........
|
Anonymous
|
06/30/06 03:22 PM
|
|
Re: Paint job on a budget!? CONTINUED..page 44........
|
Anonymous
|
06/30/06 03:32 PM
|
|
Re: Paint job on a budget!? CONTINUED..page 44........
|
Marq
|
06/30/06 04:15 PM
|
|
Re: Paint job on a budget!? CONTINUED..page 44........
|
Anonymous
|
06/30/06 03:41 PM
|
|
Re: Paint job on a budget!? CONTINUED..page 44........
|
Anonymous
|
06/30/06 04:52 PM
|
|
Re: Paint job on a budget!? CONTINUED..page 44........
|
Exit1965
|
06/30/06 05:49 PM
|
|
Re: Paint job on a budget!? CONTINUED..page 44........
|
69chargeryeehaa
|
06/30/06 06:23 PM
|
|
Re: Paint job on a budget!? CONTINUED..page 44........
|
Anonymous
|
06/30/06 06:49 PM
|
|
Re: Paint job on a budget!? CONTINUED..page 44........
|
Marq
|
06/30/06 10:44 PM
|
|
Re: Paint job on a budget!? CONTINUED..page 44........
|
Exit1965
|
06/30/06 07:16 PM
|
|
Re: Paint job on a budget!? CONTINUED..page 44........
|
69chargeryeehaa
|
06/30/06 07:51 PM
|
|
Re: Paint job on a budget!? CONTINUED..page 44........
|
Exit1965
|
06/30/06 08:36 PM
|
|
Re: Paint job on a budget!? CONTINUED..page 44........
|
Anonymous
|
07/01/06 12:05 AM
|
|
Re: Paint job on a budget!? CONTINUED..page 44........
|
Anonymous
|
07/01/06 12:06 AM
|
|
Re: Paint job on a budget!? CONTINUED..page 44........
|
Exit1965
|
07/01/06 05:53 AM
|
 Re: Paint job on a budget!? CONTINUED..page 44........
|
Anonymous
|
07/01/06 11:34 AM
|
|
Re: Paint job on a budget!? CONTINUED..page 44........
|
Anonymous
|
07/03/06 11:19 PM
|
|
Re: Paint job on a budget!? CONTINUED..page 44........
|
Marq
|
07/04/06 02:05 AM
|
|
Re: Paint job on a budget!? CONTINUED..page 44........
|
Exit1965
|
07/04/06 02:32 AM
|
|
Re: Paint job on a budget!? CONTINUED..page 44........
|
Marq
|
07/04/06 02:52 AM
|
|
Re: Paint job on a budget!? CONTINUED..page 44........
|
Anonymous
|
07/04/06 03:00 AM
|
|
Re: Paint job on a budget!? CONTINUED..page 44........
|
Marq
|
07/04/06 03:17 AM
|
|
Re: Paint job on a budget!? CONTINUED..page 44........
|
Anonymous
|
07/04/06 03:24 AM
|
|
Re: Paint job on a budget!? CONTINUED..page 44........
|
Anonymous
|
07/04/06 04:22 AM
|
|
Re: Paint job on a budget!? CONTINUED..page 44........
|
Exit1965
|
07/04/06 05:09 AM
|
|
Re: Paint job on a budget!? CONTINUED..page 44........
|
Anonymous
|
07/04/06 06:12 AM
|
|
Re: Paint job on a budget!? CONTINUED..page 44........
|
Anonymous
|
07/04/06 07:39 AM
|
|
Re: Paint job on a budget!? CONTINUED..page 44........
|
Anonymous
|
07/04/06 08:05 AM
|
|
Re: Paint job on a budget!? CONTINUED..page 44........
|
Anonymous
|
07/04/06 02:30 PM
|
|
Re: Paint job on a budget!? CONTINUED..page 44........
|
Exit1965
|
07/04/06 03:27 PM
|
|
Re: Paint job on a budget!? CONTINUED..page 44........
|
Anonymous
|
07/04/06 06:55 PM
|
|
Re: Paint job on a budget!? CONTINUED..page 44........
|
Exit1965
|
07/04/06 08:57 PM
|
|
Re: Paint job on a budget!? CONTINUED..page 44........
|
Anonymous
|
07/04/06 08:52 PM
|
|
Re: Paint job on a budget!? CONTINUED..page 44........
|
Anonymous
|
07/05/06 10:34 AM
|
|
Re: Paint job on a budget!? CONTINUED..page 44........
|
Anonymous
|
07/04/06 06:04 PM
|
|
Re: Paint job on a budget!? CONTINUED..page 44........
|
Anonymous
|
07/04/06 07:02 PM
|
|
Re: Paint job on a budget!? CONTINUED..page 44........
|
Anonymous
|
07/04/06 08:47 PM
|
|
Re: Paint job on a budget!? CONTINUED..page 44........
|
Anonymous
|
07/05/06 03:56 PM
|
|
Re: Paint job on a budget!? CONTINUED..page 44........
|
Exit1965
|
07/05/06 04:43 PM
|
|
Re: Paint job on a budget!? CONTINUED..page 44........
|
Anonymous
|
07/05/06 06:09 PM
|
 Re: Paint job on a budget!? CONTINUED..page 44........
|
Anonymous
|
07/06/06 12:49 AM
|
|
Re: Paint job on a budget!? CONTINUED..page 44........
|
Marq
|
07/06/06 01:18 AM
|
|
Re: Paint job on a budget!? CONTINUED..page 44........
|
Exit1965
|
07/06/06 01:23 AM
|
|
Re: Paint job on a budget!? CONTINUED..page 44........
|
Anonymous
|
07/06/06 02:06 AM
|
|
Re: Paint job on a budget!? CONTINUED..page 44........
|
Anonymous
|
07/06/06 02:30 AM
|
|
Re: Paint job on a budget!? CONTINUED..page 44........
|
Anonymous
|
07/06/06 02:35 AM
|
|
Re: Paint job on a budget!? CONTINUED..page 44........
|
QuickDodge
|
07/06/06 03:07 AM
|
|
Re: Paint job on a budget!? CONTINUED..page 44........
|
69chargeryeehaa
|
07/06/06 02:10 PM
|
|
Re: Paint job on a budget!? CONTINUED..page 44........
|
Anonymous
|
07/06/06 09:52 PM
|
|
Re: Paint job on a budget!? CONTINUED..page 44........
|
Exit1965
|
07/06/06 10:25 PM
|
|
Re: Paint job on a budget!? CONTINUED..page 44........
|
Anonymous
|
07/06/06 10:54 PM
|
|
Re: Paint job on a budget!? CONTINUED..page 44........
|
Anonymous
|
07/06/06 11:07 PM
|
|
Re: Paint job on a budget!? CONTINUED..page 44........
|
Anonymous
|
07/07/06 12:53 PM
|
|
Re: Paint job on a budget!? CONTINUED..page 44........
|
Exit1965
|
07/07/06 01:37 PM
|
|
Re: Paint job on a budget!? CONTINUED..page 44........
|
Anonymous
|
07/07/06 08:47 PM
|
|
Re: Paint job on a budget!? CONTINUED..page 44........
|
Exit1965
|
07/07/06 09:51 PM
|
|
Re: Paint job on a budget!? CONTINUED..page 44........
|
Anonymous
|
07/08/06 12:21 AM
|
|
Re: Paint job on a budget!? CONTINUED..page 44........
|
69chargeryeehaa
|
07/08/06 02:20 AM
|
|
Re: Paint job on a budget!? CONTINUED..page 44........
|
78D150CLUB
|
07/08/06 03:37 AM
|
|
Re: Paint job on a budget!? CONTINUED..page 44........
|
Anonymous
|
07/08/06 07:54 AM
|
|
Re: Paint job on a budget!? CONTINUED..page 44........
|
Anonymous
|
07/08/06 03:53 PM
|
|
Re: Paint job on a budget!? CONTINUED..page 44........
|
78D150CLUB
|
07/08/06 04:56 PM
|
|
Re: Paint job on a budget!? CONTINUED..page 44........
|
78D150CLUB
|
07/08/06 04:56 PM
|
|
Re: Paint job on a budget!? CONTINUED..page 44........
|
78D150CLUB
|
07/08/06 04:58 PM
|
|
Re: Paint job on a budget!? CONTINUED..page 44........
|
Marq
|
07/08/06 06:26 PM
|
|
Re: Paint job on a budget!? CONTINUED..page 44........
|
Anonymous
|
07/09/06 01:20 AM
|
|
Re: Paint job on a budget!? CONTINUED..page 44........
|
Exit1965
|
07/09/06 01:54 AM
|
|
Re: Paint job on a budget!? CONTINUED..page 44........
|
Anonymous
|
07/09/06 02:55 AM
|
|
Re: Paint job on a budget!? CONTINUED..page 44........
|
Exit1965
|
07/09/06 05:27 PM
|
|
Re: Paint job on a budget!? CONTINUED..page 44........
|
Anonymous
|
07/09/06 07:24 PM
|
|
Re: Paint job on a budget!? CONTINUED..page 44........
|
Anonymous
|
07/09/06 07:34 PM
|
 Re: Paint job on a budget!? CONTINUED..page 44........
|
78D150CLUB
|
07/09/06 08:16 PM
|
|
Re: Paint job on a budget!? CONTINUED..page 44........
|
78D150CLUB
|
07/09/06 08:18 PM
|
|
Re: Paint job on a budget!? CONTINUED..page 44........
|
78D150CLUB
|
07/09/06 08:19 PM
|
|
Re: Paint job on a budget!? CONTINUED..page 44........
|
Anonymous
|
07/09/06 11:57 PM
|
|
Re: Paint job on a budget!? CONTINUED..page 44........
|
Exit1965
|
07/10/06 12:03 AM
|
|
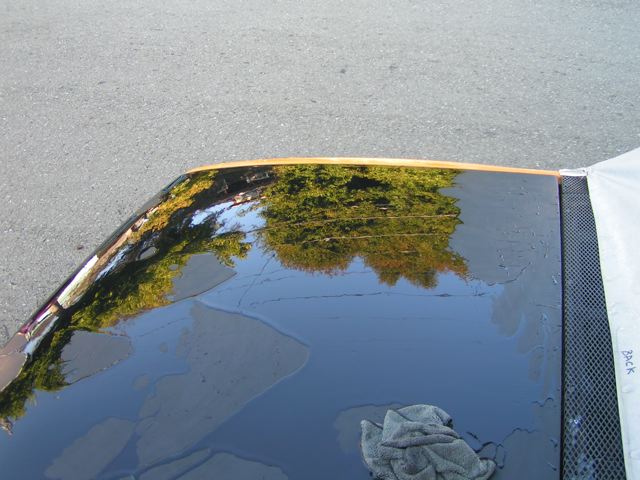
After four coats....
|
Anonymous
|
07/10/06 12:35 AM
|
|
and another shot from the front....
|
Anonymous
|
07/10/06 12:38 AM
|
|
Re: and another shot from the front....
|
78D150CLUB
|
07/10/06 01:02 AM
|
|
Re: After four coats....
|
Exit1965
|
07/10/06 01:47 AM
|
|
Re: After four coats....
|
Anonymous
|
07/10/06 10:55 AM
|
|
Thinning with Penetrol
|
Anonymous
|
07/10/06 01:38 PM
|
|
Re: Thinning with Penetrol
|
Anonymous
|
07/10/06 08:37 PM
|
|
Re: Thinning with Penetrol
|
Anonymous
|
07/11/06 05:02 AM
|
|
Re: Thinning with Penetrol...nice job, Bugg!
|
Anonymous
|
07/11/06 10:17 AM
|
|
Re: Thinning with Penetrol...nice job, Bugg!
|
Anonymous
|
07/11/06 03:38 PM
|
|
Re: Paint job on a budget!? CONTINUED..page 44........
|
Exit1965
|
07/09/06 11:19 PM
|
|
Re: Paint job on a budget!? CONTINUED..page 44........
|
Anonymous
|
07/08/06 06:20 PM
|
|
Re: Paint job on a budget!? CONTINUED..page 44........
|
Anonymous
|
07/07/06 08:49 PM
|
|
Re: Paint job on a budget!? CONTINUED..page 44........
|
Anonymous
|
07/11/06 04:55 PM
|
|
Re: Paint job on a budget!? CONTINUED..page 44........
|
Exit1965
|
07/06/06 03:21 AM
|
|
Re: Paint job on a budget!? CONTINUED..page 44........
|
Anonymous
|
07/06/06 11:08 AM
|
|
Re: Paint job on a budget!? CONTINUED..page 44........
|
QuickDodge
|
07/06/06 02:24 AM
|
|
Re: Paint job on a budget!? CONTINUED..page 44........
|
Marq
|
07/06/06 03:19 AM
|
|
Re: Paint job on a budget!? CONTINUED..page 44........
|
Anonymous
|
07/06/06 06:12 PM
|
|
Re: Paint job on a budget!? CONTINUED..page 44........
|
Anonymous
|
07/11/06 12:50 AM
|
|
Re: Paint job on a budget!? CONTINUED..page 44........
|
78D150CLUB
|
07/11/06 01:48 AM
|
|
Re: Paint job on a budget!? CONTINUED..page 44........
|
Marq
|
07/11/06 04:29 AM
|
|
Re: Paint job on a budget!? CONTINUED..page 44........
|
Anonymous
|
07/11/06 11:46 AM
|
|
Re: Paint job on a budget!? CONTINUED..page 44........
|
Marq
|
07/11/06 03:19 PM
|
|
Re: Paint job on a budget!? CONTINUED..page 44........
|
Anonymous
|
07/11/06 03:37 PM
|
|
Re: Paint job on a budget!? CONTINUED..page 44........
|
Anonymous
|
07/11/06 07:15 PM
|
|
Re: Paint job on a budget!? CONTINUED..page 44........
|
Anonymous
|
07/12/06 01:34 PM
|
|
Re: Paint job on a budget!? CONTINUED..page 44........
|
Exit1965
|
07/12/06 04:14 PM
|
|
Re: Paint job on a budget!? CONTINUED..page 44........
|
Anonymous
|
07/12/06 04:57 PM
|
|
Re: Paint job on a budget!? CONTINUED..page 44........
|
Anonymous
|
07/12/06 09:11 PM
|
|
Re: Paint job on a budget!? CONTINUED..page 44........
|
Anonymous
|
07/12/06 09:23 PM
|
|
Re: Paint job on a budget!? CONTINUED..page 44........
|
69chargeryeehaa
|
07/12/06 09:25 PM
|
|
Re: Paint job on a budget!? CONTINUED..page 44........
|
Anonymous
|
07/12/06 09:59 PM
|
|
Re: Paint job on a budget!? CONTINUED..page 44........
|
Marq
|
07/12/06 10:00 PM
|
|
Re: Paint job on a budget!? CONTINUED..page 44........
|
Anonymous
|
07/12/06 10:30 PM
|
|
Re: Paint job on a budget!? CONTINUED..page 44........
|
Anonymous
|
07/12/06 10:52 PM
|
|
Re: Paint job on a budget!? CONTINUED..page 44........
|
Anonymous
|
07/12/06 11:02 PM
|
|
Re: Paint job on a budget!? CONTINUED..page 44........
|
69chargeryeehaa
|
07/12/06 11:41 PM
|
|
Re: Paint job on a budget!? CONTINUED..page 44........
|
Anonymous
|
07/13/06 12:10 AM
|
|
Re: Paint job on a budget!? CONTINUED..page 44........
|
Anonymous
|
07/13/06 12:23 AM
|
|
Re: Paint job on a budget!? CONTINUED..page 44........
|
Anonymous
|
07/13/06 05:35 PM
|
|
Re: Paint job on a budget!? CONTINUED..page 44........
|
Anonymous
|
07/13/06 05:36 PM
|
|
Re: Paint job on a budget!? CONTINUED..page 44........
|
Anonymous
|
07/13/06 05:38 PM
|
|
Re: Paint job on a budget!? CONTINUED..page 44........
|
Anonymous
|
07/13/06 05:39 PM
|
|
Re: Paint job on a budget!? CONTINUED..page 44........
|
Anonymous
|
07/13/06 06:01 PM
|
|
Re: Paint job on a budget!? CONTINUED..page 44........
|
Anonymous
|
07/13/06 06:18 PM
|
|
Re: Paint job on a budget!? CONTINUED..page 44........
|
Anonymous
|
07/13/06 06:32 PM
|
|
Re: Paint job on a budget!? CONTINUED..page 44........
|
C38coupe
|
07/13/06 06:53 PM
|
|
Re: Paint job on a budget!? CONTINUED..page 44........
|
Anonymous
|
07/13/06 07:42 PM
|
|
Re: Paint job on a budget!? CONTINUED..page 44........
|
C38coupe
|
07/13/06 09:02 PM
|
|
Re: Paint job on a budget!? CONTINUED..page 44........
|
Anonymous
|
07/16/06 08:53 AM
|
|
Re: Paint job on a budget!? CONTINUED..page 44........
|
Anonymous
|
07/13/06 07:06 PM
|
|
Re: Paint job on a budget!? CONTINUED..page 44........
|
Anonymous
|
07/13/06 07:43 PM
|
|
Re: Paint job on a budget!? CONTINUED..page 44........
|
_Scott_
|
07/13/06 12:10 AM
|
|
Re: Paint job on a budget!? CONTINUED..page 44........
|
Anonymous
|
07/13/06 01:30 AM
|
|
Re: Paint job on a budget!? CONTINUED..page 44........
|
Anonymous
|
07/13/06 02:25 AM
|
|
Re: Paint job on a budget!? CONTINUED..page 44........
|
Exit1965
|
07/13/06 03:35 AM
|
|
Re: Paint job on a budget!? CONTINUED..page 44........
|
Anonymous
|
07/13/06 03:48 AM
|
|
Re: Paint job on a budget!? CONTINUED..page 44........
|
Anonymous
|
07/13/06 01:28 PM
|
|
Re: Paint job on a budget!? CONTINUED..page 44........
|
Anonymous
|
07/13/06 11:35 PM
|
|
Re: Paint job on a budget!? CONTINUED..page 44........
|
Marq
|
07/14/06 02:04 AM
|
|
Re: Paint job on a budget!? CONTINUED..page 44........
|
texczech
|
07/14/06 02:05 PM
|
|
Re: Paint job on a budget!? CONTINUED..page 44........
|
Marq
|
07/14/06 03:43 PM
|
|
Re: Paint job on a budget!? CONTINUED..page 44........
|
Anonymous
|
07/14/06 05:51 PM
|
|
Re: Paint job on a budget!? CONTINUED..page 44........
|
Marq
|
07/15/06 03:50 AM
|
|
Re: Paint job on a budget!? CONTINUED..page 44........
|
Anonymous
|
07/15/06 04:42 AM
|
|
Re: Paint job on a budget!? CONTINUED..page 44........
|
Marq
|
07/15/06 01:34 PM
|
|
Re: Paint job on a budget!? CONTINUED..page 44........
|
Anonymous
|
07/15/06 06:02 PM
|
|
Re: Paint job on a budget!? CONTINUED..page 44........
|
kenzo42
|
07/15/06 06:21 PM
|
|
Re: Paint job on a budget!? CONTINUED..page 44........
|
Anonymous
|
07/15/06 07:00 PM
|
|
Re: Paint job on a budget!? CONTINUED..page 44........
|
78D150CLUB
|
07/15/06 08:34 PM
|
|
Re: Paint job on a budget!? CONTINUED..page 44........
|
78D150CLUB
|
07/15/06 08:35 PM
|
|
Re: Paint job on a budget!? CONTINUED..page 44........
|
Marq
|
07/16/06 02:04 AM
|
|
Re: Paint job on a budget!? CONTINUED..page 44........
|
78D150CLUB
|
07/16/06 02:22 AM
|
|
Re: Paint job on a budget!? CONTINUED..page 44........
|
Marq
|
07/16/06 02:29 AM
|
|
Re: Paint job on a budget!? CONTINUED..page 44........
|
78D150CLUB
|
07/16/06 02:39 AM
|
|
Re: Paint job on a budget!? CONTINUED..page 44........
|
Anonymous
|
07/16/06 03:07 AM
|
|
Re: Paint job on a budget!? CONTINUED..page 44........
|
Anonymous
|
07/16/06 03:08 AM
|
|
Re: Paint job on a budget!? CONTINUED..page 44........
|
Anonymous
|
07/16/06 03:10 AM
|
|
Re: Paint job on a budget!? CONTINUED..page 44........
|
Exit1965
|
07/16/06 04:33 AM
|
|
Re: Paint job on a budget!? CONTINUED..page 44........
|
Anonymous
|
07/16/06 09:06 AM
|
 One question and I'll decide on color....
|
RebelDart
|
07/16/06 01:25 PM
|
|
Re: One question and I'll decide on color....
|
Anonymous
|
07/16/06 01:42 PM
|
|
Re: One question and I'll decide on color....
|
Marq
|
07/16/06 02:41 PM
|
|
Re: One question and I'll decide on color....
|
Anonymous
|
07/16/06 04:40 PM
|
|
Re: One question and I'll decide on color....
|
Anonymous
|
07/16/06 10:58 PM
|
|
Re: One question and I'll decide on color....
|
Anonymous
|
07/17/06 01:16 AM
|
|
Re: One question and I'll decide on color....
|
Anonymous
|
07/17/06 01:18 AM
|
|
Re: One question and I'll decide on color....
|
Anonymous
|
07/17/06 03:35 AM
|
|
Re: One question and I'll decide on color....
|
C38coupe
|
07/17/06 12:53 PM
|
|
Well said, Marq!
|
Anonymous
|
07/16/06 06:44 PM
|
|
Re: Well said, Marq!
|
69chargeryeehaa
|
07/16/06 07:16 PM
|
|
Re: Well said, Marq!
|
Anonymous
|
07/16/06 08:13 PM
|
|
Re: Well said, Marq!
|
78D150CLUB
|
07/17/06 01:34 AM
|
|
Re: Well said, Marq!
|
69chargeryeehaa
|
07/17/06 02:59 PM
|
|
Re: Well said, Marq!
|
Anonymous
|
07/17/06 02:17 PM
|
|
Re: Well said, Marq!
|
Exit1965
|
07/17/06 04:18 PM
|
|
Re: Well said, Marq!
|
Anonymous
|
07/17/06 04:51 PM
|
|
Re: Well said, Marq!
|
BigTerry
|
07/17/06 05:46 PM
|
|
Re: Well said, Marq!
|
Marq
|
07/17/06 06:35 PM
|
|
Re: Well said, Marq!
|
BigTerry
|
07/17/06 07:06 PM
|
|
Re: Well said, Marq!
|
Marq
|
07/17/06 08:01 PM
|
|
Re: Well said, Marq!
|
Marq
|
07/17/06 06:02 PM
|
|
Re: Well said, Marq!
|
Anonymous
|
07/17/06 06:39 PM
|
|
Re: Well said, Marq!
|
Anonymous
|
07/17/06 06:41 PM
|
|
Show quality vs. shame quality....
|
Anonymous
|
07/16/06 06:38 PM
|
|
Re: Paint job on a budget!? CONTINUED..page 44........
|
Anonymous
|
07/21/06 03:59 PM
|
|
Re: Paint job on a budget!? CONTINUED..page 44........
|
Exit1965
|
07/21/06 05:00 PM
|
|
Re: Paint job on a budget!? CONTINUED..page 44........
|
Anonymous
|
07/21/06 07:22 PM
|
|
Re: Paint job on a budget!? CONTINUED..page 44........
|
Exit1965
|
07/21/06 07:56 PM
|
|
Re: Paint job on a budget!? CONTINUED..page 44........
|
Anonymous
|
07/22/06 12:25 AM
|
|
Re: Paint job on a budget!? CONTINUED..page 44........
|
Exit1965
|
07/22/06 06:51 PM
|
|
Re: Paint job on a budget!? CONTINUED..page 44........
|
Anonymous
|
07/22/06 12:41 AM
|
|
Re: Paint job on a budget!? CONTINUED..page 44........
|
Anonymous
|
07/22/06 06:09 AM
|
|
Re: Paint job on a budget!? CONTINUED..page 44........
|
78D150CLUB
|
07/22/06 05:46 PM
|
|
Re: Paint job on a budget!? CONTINUED..page 44........
|
Exit1965
|
07/22/06 06:09 PM
|
 Re: Paint job on a budget!? CONTINUED..page 44........
|
78D150CLUB
|
07/15/06 02:54 AM
|
 Re: Paint job on a budget!? CONTINUED..page 44........
|
Anonymous
|
07/15/06 04:26 PM
|
|
Re: Paint job on a budget!? CONTINUED..page 44........
|
C38coupe
|
07/15/06 08:58 PM
|
|
Re: Paint job on a budget!? CONTINUED..page 44........
|
Anonymous
|
07/15/06 09:29 PM
|
|
Re: Paint job on a budget!? CONTINUED..page 44........
|
Anonymous
|
07/16/06 12:13 AM
|
|
Re: Paint job on a budget!? CONTINUED..page 44........
|
Anonymous
|
07/16/06 12:17 AM
|
|
Re: Paint job on a budget!? CONTINUED..page 44........
|
78D150CLUB
|
07/16/06 12:38 AM
|
|
Re: Paint job on a budget!? CONTINUED..page 44........
|
Anonymous
|
07/16/06 01:16 AM
|
|
Re: Paint job on a budget!? CONTINUED..page 44........
|
Anonymous
|
07/16/06 01:30 AM
|
|
Re: Paint job on a budget!? CONTINUED..page 44........
|
Anonymous
|
07/16/06 05:02 AM
|
|
Re: Paint job on a budget!? CONTINUED..page 44........
|
Anonymous
|
07/16/06 08:22 AM
|
|
Re: Paint job on a budget!? CONTINUED..page 44........
|
Anonymous
|
07/17/06 08:07 PM
|
|
Re: Paint job on a budget!? CONTINUED..page 44........
|
Anonymous
|
07/17/06 09:31 PM
|
|
Re: Paint job on a budget!? CONTINUED..page 44........
|
Anonymous
|
07/17/06 10:07 PM
|
|
Re: Paint job on a budget!? CONTINUED..page 44........
|
C38coupe
|
07/18/06 12:34 AM
|
|
Re: Paint job on a budget!? CONTINUED..page 44........
|
Marq
|
07/18/06 01:04 AM
|
|
Re: Paint job on a budget!? CONTINUED..page 44........
|
Anonymous
|
07/18/06 01:53 AM
|
|
Re: Paint job on a budget!? CONTINUED..page 44........
|
Anonymous
|
07/18/06 01:56 AM
|
|
Re: Paint job on a budget!? CONTINUED..page 44........
|
Anonymous
|
07/18/06 04:18 AM
|
|
Re: Paint job on a budget!? CONTINUED..page 44........
|
Exit1965
|
07/18/06 05:13 AM
|
|
Re: Paint job on a budget!? CONTINUED..page 44........
|
Anonymous
|
07/18/06 11:02 AM
|
|
Re: Paint job on a budget!? CONTINUED..page 44........
|
Marq
|
07/18/06 07:36 PM
|
|
Re: Paint job on a budget!? CONTINUED..page 44........
|
Exit1965
|
07/18/06 08:48 PM
|
|
Re: Paint job on a budget!? CONTINUED..page 44........
|
Anonymous
|
07/18/06 09:36 PM
|
|
Tell him he has two options....
|
Anonymous
|
07/18/06 09:54 PM
|
|
Re: Paint job on a budget!? CONTINUED..page 44........
|
Anonymous
|
07/18/06 11:02 PM
|
|
Re: Paint job on a budget!? CONTINUED..page 44........
|
Marq
|
07/18/06 11:32 PM
|
|
Re: Paint job on a budget!? CONTINUED..page 44........
|
Exit1965
|
07/19/06 01:11 AM
|
|
Re: Paint job on a budget!? CONTINUED..page 44........
|
Marq
|
07/19/06 02:08 AM
|
|
Re: Paint job on a budget!? CONTINUED..page 44........
|
Anonymous
|
07/19/06 01:11 AM
|
|
Re: Paint job on a budget!? CONTINUED..page 44........
|
Anonymous
|
07/19/06 04:22 AM
|
|
Re: Paint job on a budget!? CONTINUED..page 44........
|
Anonymous
|
07/19/06 05:11 AM
|
|
Re: Paint job on a budget!? CONTINUED..page 44........
|
Anonymous
|
07/19/06 09:42 AM
|
|
Re: Paint job on a budget!? CONTINUED..page 44........
|
Jerry
|
07/19/06 11:34 AM
|
|
Re: Paint job on a budget!? CONTINUED..page 44........
|
Anonymous
|
07/19/06 02:29 PM
|
|
Re: Paint job on a budget!? CONTINUED..page 44........
|
Anonymous
|
07/19/06 03:05 PM
|
|
Re: Paint job on a budget!? CONTINUED..page 44........
|
69chargeryeehaa
|
07/19/06 03:20 PM
|
|
Re: Paint job on a budget!? CONTINUED..page 44........
|
Anonymous
|
07/19/06 05:22 PM
|
|
Re: Paint job on a budget!? CONTINUED..page 44........
|
78D150CLUB
|
07/19/06 11:21 PM
|
|
Re: Paint job on a budget!? CONTINUED..page 44........
|
78D150CLUB
|
07/19/06 11:22 PM
|
|
Re: Paint job on a budget!? CONTINUED..page 44........
|
78D150CLUB
|
07/19/06 11:23 PM
|
|
Re: Paint job on a budget!? CONTINUED..page 44........
|
Anonymous
|
07/20/06 01:57 PM
|
|
Re: Paint job on a budget!? CONTINUED..page 44........
|
69chargeryeehaa
|
07/20/06 02:45 PM
|
|
Re: Paint job on a budget!? CONTINUED..page 44........
|
Anonymous
|
07/20/06 03:19 PM
|
|
Re: Paint job on a budget!? CONTINUED..page 44........
|
Anonymous
|
07/20/06 06:09 PM
|
|
Re: Paint job on a budget!? CONTINUED..page 44........
|
Anonymous
|
07/20/06 06:26 PM
|
|
Re: Paint job on a budget!? CONTINUED..page 44........
|
Anonymous
|
07/21/06 03:39 PM
|
|
Re: Paint job on a budget!? CONTINUED..page 44........
|
Anonymous
|
07/21/06 04:00 PM
|
|
Re: Paint job on a budget!? CONTINUED..page 44........
|
Anonymous
|
07/21/06 04:58 PM
|
|
Re: Paint job on a budget!? CONTINUED..page 44........
|
Anonymous
|
07/21/06 05:04 PM
|
|
Re: Paint job on a budget!? CONTINUED..page 44........
|
Anonymous
|
07/21/06 05:24 PM
|
 Re: Paint job on a budget!? CONTINUED..page 44........
|
Anonymous
|
07/22/06 08:16 PM
|
|
Re: Paint job on a budget!? CONTINUED..page 44........
|
Marq
|
07/22/06 08:50 PM
|
|
Re: Paint job on a budget!? CONTINUED..page 44........
|
Exit1965
|
07/22/06 09:03 PM
|
|
Re: Paint job on a budget!? CONTINUED..page 44........
|
Marq
|
07/22/06 09:38 PM
|
|
Re: Paint job on a budget!? CONTINUED..page 44........
|
78D150CLUB
|
07/22/06 10:13 PM
|
|
Re: Paint job on a budget!? CONTINUED..page 44........
|
pdqvsix
|
07/23/06 04:25 PM
|
|
Re: Paint job on a budget!? CONTINUED..page 44........
|
Exit1965
|
07/23/06 05:35 PM
|
|
Re: Paint job on a budget!? CONTINUED..page 44........
|
Anonymous
|
07/23/06 07:02 PM
|
|
Re: Paint job on a budget!? CONTINUED..page 44........
|
Anonymous
|
07/23/06 07:24 PM
|
|
Re: Paint job on a budget!? CONTINUED..page 44........
|
Anonymous
|
07/23/06 07:36 PM
|
|
Re: Paint job on a budget!? CONTINUED..page 44........
|
Exit1965
|
07/23/06 10:53 PM
|
|
Re: Paint job on a budget!? CONTINUED..page 44........
|
Anonymous
|
07/24/06 01:44 AM
|
|
Re: Paint job on a budget!? CONTINUED..page 44........
|
Anonymous
|
07/24/06 02:17 PM
|
|
Re: Paint job on a budget!? CONTINUED..page 44........
|
Anonymous
|
07/24/06 10:45 PM
|
|
Re: Paint job on a budget!? CONTINUED..page 44........
|
Exit1965
|
07/24/06 11:42 PM
|
|
Re: Paint job on a budget!? CONTINUED..page 44........
|
Anonymous
|
07/23/06 06:22 PM
|
|
Re: Paint job on a budget!? CONTINUED..page 44........
|
Anonymous
|
07/23/06 06:52 PM
|
|
Re: Paint job on a budget!? CONTINUED..page 44........
|
darenrt
|
07/22/06 10:21 PM
|
|
Re: Paint job on a budget!? CONTINUED..page 44........
|
Anonymous
|
07/23/06 03:39 AM
|
|
Re: Paint job on a budget!? CONTINUED..page 44........
|
Marq
|
07/23/06 12:33 PM
|
|
Re: Paint job on a budget!? CONTINUED..page 44........
|
Anonymous
|
07/23/06 01:07 PM
|
|
Re: Paint job on a budget!? CONTINUED..page 44........
|
Marq
|
07/23/06 02:24 PM
|
|
Re: Paint job on a budget!? CONTINUED..page 44........
|
78D150CLUB
|
07/23/06 07:01 PM
|
|
Re: Paint job on a budget!? CONTINUED..page 44........
|
Anonymous
|
07/23/06 07:22 PM
|
|
Re: Paint job on a budget!? CONTINUED..page 44........
|
78D150CLUB
|
07/23/06 07:39 PM
|
 Re: Paint job on a budget!? CONTINUED..page 44........
|
78D150CLUB
|
07/23/06 01:35 PM
|
|
Re: Paint job on a budget!? CONTINUED..page 44........
|
Anonymous
|
07/24/06 10:24 PM
|
|
Re: Paint job on a budget!? CONTINUED..page 44........
|
Marq
|
07/25/06 01:52 AM
|
|
Re: Paint job on a budget!? CONTINUED..page 44........
|
Anonymous
|
07/25/06 02:20 AM
|
|
Re: Paint job on a budget!? CONTINUED..page 44........
|
Exit1965
|
07/25/06 04:03 AM
|
|
Re: Paint job on a budget!? CONTINUED..page 44........
|
Anonymous
|
07/25/06 02:28 PM
|
|
Re: Paint job on a budget!? CONTINUED..page 44........
|
Anonymous
|
07/25/06 03:18 PM
|
|
Re: Paint job on a budget!? CONTINUED..page 44........
|
Anonymous
|
07/25/06 04:19 PM
|
|
Re: Paint job on a budget!? CONTINUED..page 44........
|
texczech
|
07/25/06 01:17 PM
|
|
Re: Paint job on a budget!? CONTINUED..page 44........
|
Marq
|
07/25/06 03:26 PM
|
|
Hey Grimster! Another old truck on the way!
|
Anonymous
|
07/23/06 09:18 PM
|
|
Re: Hey Grimster! Another old truck on the way!
|
Anonymous
|
07/23/06 10:25 PM
|
|
Re: Hey Grimster! Another old truck on the way!
|
Anonymous
|
07/23/06 10:34 PM
|
|
Re: Paint job on a budget!? CONTINUED..page 44........
|
Anonymous
|
07/26/06 03:26 AM
|
|
Re: Paint job on a budget!? CONTINUED..page 44........
|
Anonymous
|
07/26/06 04:47 AM
|
|
Re: Paint job on a budget!? CONTINUED..page 44........
|
roe
|
07/26/06 06:55 AM
|
|
Re: Paint job on a budget!? CONTINUED..page 44........
|
69chargeryeehaa
|
07/26/06 02:06 PM
|
|
Re: Paint job on a budget!? CONTINUED..page 44........
|
Anonymous
|
07/26/06 02:25 PM
|
|
Re: Paint job on a budget!? CONTINUED..page 44........
|
Anonymous
|
07/26/06 03:21 PM
|
|
Re: Paint job on a budget!? CONTINUED..page 44........
|
69chargeryeehaa
|
07/26/06 03:33 PM
|
|
Re: Paint job on a budget!? CONTINUED..page 44........
|
BattleCruiser71
|
07/26/06 04:27 PM
|
|
Re: Paint job on a budget!? CONTINUED..page 44........
|
69chargeryeehaa
|
07/27/06 01:25 AM
|
|
Re: Paint job on a budget!? CONTINUED..page 44........
|
roe
|
07/26/06 08:06 PM
|
|
Re: Paint job on a budget!? CONTINUED..page 44........
|
roe
|
07/26/06 08:31 PM
|
|
Re: Paint job on a budget!? CONTINUED..page 44........
|
Marq
|
07/26/06 09:18 PM
|
|
Re: Paint job on a budget!? CONTINUED..page 44........
|
Anonymous
|
07/27/06 01:18 PM
|
|
Re: Paint job on a budget!? CONTINUED..page 44........
|
Anonymous
|
07/29/06 09:10 AM
|
|
Re: Paint job on a budget!? CONTINUED..page 44........
|
Marq
|
07/29/06 12:36 PM
|
|
Re: Paint job on a budget!? CONTINUED..page 44........
|
Anonymous
|
07/29/06 04:38 PM
|
|
Re: Paint job on a budget!? CONTINUED..page 44........
|
_Scott_
|
07/26/06 10:44 PM
|
|
Re: Paint job on a budget!? CONTINUED..page 44........
|
darenrt
|
07/27/06 12:44 AM
|
|
Re: Paint job on a budget!? CONTINUED..page 44........
|
Anonymous
|
07/27/06 01:21 AM
|
|
Re: Paint job on a budget!? CONTINUED..page 44........
|
roe
|
07/27/06 01:28 AM
|
|
Re: Paint job on a budget!? CONTINUED..page 44........
|
78D150CLUB
|
07/27/06 11:26 PM
|
|
Re: Paint job on a budget!? CONTINUED..page 44........
|
78D150CLUB
|
07/27/06 11:29 PM
|
|
Re: Paint job on a budget!? CONTINUED..page 44........
|
Exit1965
|
07/28/06 12:57 AM
|
|
Re: Paint job on a budget!? CONTINUED..page 44........
|
78D150CLUB
|
07/28/06 01:11 AM
|
|
Re: Paint job on a budget!? CONTINUED..page 44........
|
69chargeryeehaa
|
07/28/06 02:12 AM
|
|
Re: Paint job on a budget!? CONTINUED..page 44........
|
Exit1965
|
07/28/06 04:08 AM
|
|
Re: Paint job on a budget!? CONTINUED..page 44........
|
Anonymous
|
07/28/06 12:31 PM
|
|
Re: Paint job on a budget!? CONTINUED..page 44........
|
Exit1965
|
07/28/06 01:00 PM
|
|
Re: Paint job on a budget!? CONTINUED..page 44........
|
Anonymous
|
07/28/06 04:45 PM
|
|
Re: Paint job on a budget!? CONTINUED..page 44........
|
69chargeryeehaa
|
07/28/06 01:41 PM
|
|
Re: Paint job on a budget!? CONTINUED..page 44........
|
GoodysGotaCuda
|
07/29/06 07:53 AM
|
|
Re: Paint job on a budget!? CONTINUED..page 44........
|
Marq
|
07/29/06 12:50 PM
|
|
Re: Paint job on a budget!? CONTINUED..page 44........
|
GoodysGotaCuda
|
07/29/06 07:07 PM
|
|
Re: Paint job on a budget!? CONTINUED..page 44........
|
Marq
|
07/30/06 02:10 AM
|
|
Re: Paint job on a budget!? CONTINUED..page 44........
|
GoodysGotaCuda
|
07/30/06 05:58 AM
|
|
Re: Paint job on a budget!? CONTINUED..page 44........
|
GoodysGotaCuda
|
07/30/06 04:54 PM
|
|
Re: Paint job on a budget!? CONTINUED..page 44........
|
GoodysGotaCuda
|
08/03/06 11:15 PM
|
|
Re: Paint job on a budget!? CONTINUED..page 44........
|
Anonymous
|
07/29/06 11:52 PM
|
|
Re: Paint job on a budget!? CONTINUED..page 44........
|
78D150CLUB
|
07/30/06 12:37 AM
|
|
Re: Paint job on a budget!? CONTINUED..page 44........
|
Marq
|
07/30/06 02:17 AM
|
|
Re: Paint job on a budget!? CONTINUED..page 44........
|
Anonymous
|
07/30/06 02:36 AM
|
|
Re: Paint job on a budget!? CONTINUED..page 44........
|
Exit1965
|
07/30/06 02:57 AM
|
|
Re: Paint job on a budget!? CONTINUED..page 44........
|
Anonymous
|
07/28/06 03:31 PM
|
|
Re: Paint job on a budget!? CONTINUED..page 44........
|
GoodysGotaCuda
|
07/28/06 10:29 PM
|
|
Re: Paint job on a budget!? CONTINUED..page 44........
|
Exit1965
|
07/28/06 10:46 PM
|
|
Re: Paint job on a budget!? CONTINUED..page 44........
|
Anonymous
|
07/29/06 03:59 AM
|
|
Re: Paint job on a budget!? CONTINUED..page 44........
|
Exit1965
|
07/29/06 04:40 AM
|
|
Re: Paint job on a budget!? CONTINUED..page 44........
|
Anonymous
|
07/29/06 04:56 AM
|
|
Re: Paint job on a budget!? CONTINUED..page 44........
|
Anonymous
|
07/30/06 09:38 AM
|
|
Re: Paint job on a budget!? CONTINUED..page 44........
|
Exit1965
|
07/30/06 01:02 PM
|
|
Re: Paint job on a budget!? CONTINUED..page 44........
|
Anonymous
|
07/30/06 02:23 PM
|
|
Re: Paint job on a budget!? CONTINUED..page 44........
|
Anonymous
|
07/30/06 02:53 PM
|
|
Re: Paint job on a budget!? CONTINUED..page 44........
|
Anonymous
|
07/30/06 03:20 PM
|
|
Re: Paint job on a budget!? CONTINUED..page 44........
|
_Scott_
|
07/30/06 03:45 PM
|
|
Re: Paint job on a budget!? CONTINUED..page 44........
|
69chargeryeehaa
|
07/30/06 05:03 PM
|
|
Re: Paint job on a budget!? CONTINUED..page 44........
|
GoodysGotaCuda
|
07/30/06 08:50 PM
|
|
Re: Paint job on a budget!? CONTINUED..page 44........
|
69chargeryeehaa
|
07/31/06 04:12 PM
|
|
Re: Paint job on a budget!? CONTINUED..page 44........
|
GoodysGotaCuda
|
07/31/06 04:16 PM
|
|
Re: Paint job on a budget!? CONTINUED..page 44........
|
69chargeryeehaa
|
07/31/06 04:24 PM
|
|
Re: Paint job on a budget!? CONTINUED..page 44........
|
78D150CLUB
|
07/30/06 09:45 PM
|
|
Re: Paint job on a budget!? CONTINUED..page 44........
|
Anonymous
|
07/30/06 11:57 PM
|
|
Re: Paint job on a budget!? CONTINUED..page 44........
|
Anonymous
|
07/31/06 01:19 AM
|
|
Re: Paint job on a budget!? CONTINUED..page 44........
|
Anonymous
|
07/31/06 03:33 AM
|
|
Re: Paint job on a budget!? CONTINUED..page 44........
|
Anonymous
|
07/31/06 04:54 AM
|
|
Re: Paint job on a budget!? CONTINUED..page 44........
|
GoodysGotaCuda
|
07/31/06 07:16 AM
|
|
Re: Paint job on a budget!? CONTINUED..page 44........
|
Exit1965
|
07/31/06 12:49 PM
|
|
Re: Paint job on a budget!? CONTINUED..page 44........
|
BattleCruiser71
|
07/31/06 01:36 PM
|
|
Re: Paint job on a budget!? CONTINUED..page 44........
|
Exit1965
|
07/31/06 03:35 PM
|
|
Re: Paint job on a budget!? CONTINUED..page 44........
|
GoodysGotaCuda
|
07/31/06 04:09 PM
|
|
Re: Paint job on a budget!? CONTINUED..page 44........
|
Exit1965
|
07/31/06 06:39 PM
|
|
Re: Paint job on a budget!? CONTINUED..page 44........
|
GoodysGotaCuda
|
07/31/06 09:36 PM
|
|
Re: Paint job on a budget!? CONTINUED..page 44........
|
Anonymous
|
08/01/06 01:11 AM
|
|
Re: Paint job on a budget!? CONTINUED..page 44........
|
Exit1965
|
08/01/06 01:36 AM
|
|
Re: Paint job on a budget!? CONTINUED..page 44........
|
69chargeryeehaa
|
08/01/06 01:52 AM
|
|
Re: Paint job on a budget!? CONTINUED..page 44........
|
Anonymous
|
08/01/06 04:55 AM
|
|
Re: Paint job on a budget!? CONTINUED..page 44........
|
kenzo42
|
08/01/06 06:11 AM
|
|
Re: Paint job on a budget!? CONTINUED..page 44........
|
69chargeryeehaa
|
08/01/06 01:45 PM
|
|
Re: Paint job on a budget!? CONTINUED..page 44........
|
Anonymous
|
08/01/06 08:07 PM
|
|
Re: Paint job on a budget!? CONTINUED..page 44........
|
Exit1965
|
08/01/06 09:04 PM
|
|
Re: Paint job on a budget!? CONTINUED..page 44........
|
Anonymous
|
08/01/06 09:24 PM
|
|
Re: Paint job on a budget!? CONTINUED..page 44........
|
Anonymous
|
08/01/06 09:57 PM
|
|
Re: Paint job on a budget!? CONTINUED..page 44........
|
Anonymous
|
08/02/06 03:03 AM
|
|
Re: Paint job on a budget!? CONTINUED..page 44........
|
Exit1965
|
08/01/06 01:58 PM
|
|
Re: Paint job on a budget!? CONTINUED..page 44........
|
Anonymous
|
08/01/06 04:07 PM
|
|
Re: Paint job on a budget!? CONTINUED..page 44........
|
Marq
|
08/01/06 04:36 PM
|
|
Re: Paint job on a budget!? CONTINUED..page 44........
|
Anonymous
|
08/01/06 09:27 PM
|
|
Re: Paint job on a budget!? CONTINUED..page 44........
|
Anonymous
|
08/01/06 09:48 PM
|
|
Re: Paint job on a budget!? CONTINUED..page 44........
|
Anonymous
|
08/01/06 09:59 PM
|
|
Re: Paint job on a budget!? CONTINUED..page 44........
|
Anonymous
|
08/01/06 10:05 PM
|
|
Re: Paint job on a budget!? CONTINUED..page 44........
|
Anonymous
|
08/01/06 11:49 PM
|
|
Re: Paint job on a budget!? CONTINUED..page 44........
|
69chargeryeehaa
|
08/01/06 11:52 PM
|
|
Re: Paint job on a budget!? CONTINUED..page 44........
|
Anonymous
|
08/02/06 02:29 AM
|
|
Re: Paint job on a budget!? CONTINUED..page 44........
|
Anonymous
|
08/02/06 02:52 AM
|
|
Re: Paint job on a budget!? CONTINUED..page 44........
|
Anonymous
|
08/02/06 03:11 AM
|
|
Re: Paint job on a budget!? CONTINUED..page 44........
|
Anonymous
|
08/02/06 06:38 PM
|
|
Re: Paint job on a budget!? CONTINUED..page 44........
|
Anonymous
|
08/03/06 03:08 PM
|
|
Re: Paint job on a budget!? CONTINUED..page 44........
|
Anonymous
|
08/03/06 03:14 PM
|
|
Re: Paint job on a budget!? CONTINUED..page 44........
|
Anonymous
|
08/01/06 09:55 PM
|
|
Re: Paint job on a budget!? CONTINUED..page 44........
|
Marq
|
08/01/06 04:30 PM
|
|
Re: Paint job on a budget!? CONTINUED..page 44........
|
69chargeryeehaa
|
08/01/06 01:34 PM
|
|
Re: Paint job on a budget!? CONTINUED..page 44........
|
Anonymous
|
08/01/06 12:31 AM
|
|
Re: Paint job on a budget!? CONTINUED..page 44........
|
Anonymous
|
08/02/06 03:14 AM
|
|
Re: Paint job on a budget!? CONTINUED..page 44........
|
DaytonaTurbo
|
08/02/06 04:15 AM
|
|
Re: Paint job on a budget!? CONTINUED..page 44........
|
Marq
|
08/02/06 07:00 AM
|
|
Re: Paint job on a budget!? CONTINUED..page 44........
|
Anonymous
|
08/02/06 02:14 PM
|
|
Re: Paint job on a budget!? CONTINUED..page 44........
|
Marq
|
08/02/06 02:36 PM
|
|
Re: Paint job on a budget!? CONTINUED..page 44........
|
Anonymous
|
08/02/06 10:56 PM
|
|
Re: Paint job on a budget!? CONTINUED..page 44........
|
GoodysGotaCuda
|
08/02/06 10:58 PM
|
|
Re: Paint job on a budget!? CONTINUED..page 44........
|
Exit1965
|
08/03/06 01:03 AM
|
|
Re: Paint job on a budget!? CONTINUED..page 44........
|
Marq
|
08/03/06 01:47 AM
|
|
Re: Paint job on a budget!? CONTINUED..page 44........
|
Anonymous
|
08/03/06 02:01 AM
|
|
Re: Paint job on a budget!? CONTINUED..page 44........
|
Marq
|
08/03/06 03:11 AM
|
|
Re: Paint job on a budget!? CONTINUED..page 44........
|
Anonymous
|
08/03/06 05:29 AM
|
|
Re: Paint job on a budget!? CONTINUED..page 44........
|
Anonymous
|
08/03/06 07:00 PM
|
|
Re: Paint job on a budget!? CONTINUED..page 44........
|
Anonymous
|
08/03/06 07:53 PM
|
|
Re: Paint job on a budget!? CONTINUED..page 44........
|
GoodysGotaCuda
|
08/03/06 08:13 PM
|
|
Re: Paint job on a budget!? CONTINUED..page 44........
|
Marq
|
08/03/06 08:37 PM
|
|
Re: Paint job on a budget!? CONTINUED..page 44........
|
GoodysGotaCuda
|
08/03/06 09:01 PM
|
|
Re: Paint job on a budget!? CONTINUED..page 44........
|
Dart360sav
|
08/03/06 09:27 PM
|
|
Re: Paint job on a budget!? CONTINUED..page 44........
|
Marq
|
08/03/06 08:23 PM
|
|
Re: Paint job on a budget!? CONTINUED..page 44........
|
Anonymous
|
08/03/06 09:09 PM
|
|
Re: Paint job on a budget!? CONTINUED..page 44........
|
Marq
|
08/03/06 11:08 PM
|
|
Re: Paint job on a budget!? CONTINUED..page 44........
|
Anonymous
|
08/04/06 01:02 AM
|
|
Re: Paint job on a budget!? CONTINUED..page 44........
|
Anonymous
|
08/04/06 03:14 AM
|
|
Re: Paint job on a budget!? CONTINUED..page 44........
|
Anonymous
|
08/04/06 03:28 AM
|
|
Re: Paint job on a budget!? CONTINUED..page 44........
|
Anonymous
|
08/04/06 03:34 AM
|
|
Re: Paint job on a budget!? CONTINUED..page 44........
|
Anonymous
|
08/04/06 07:28 AM
|
|
Re: Paint job on a budget!? CONTINUED..page 44........
|
Anonymous
|
08/04/06 03:19 PM
|
|
Re: Paint job on a budget!? CONTINUED..page 44........
|
Anonymous
|
08/05/06 12:55 AM
|
|
Re: Paint job on a budget!? CONTINUED..page 44........
|
Marq
|
08/05/06 01:52 AM
|
|
Re: Paint job on a budget!? CONTINUED..page 44........
|
Anonymous
|
08/05/06 04:57 AM
|
|
Re: Paint job on a budget!? CONTINUED..page 44........
|
Anonymous
|
08/05/06 06:20 AM
|
|
Re: Paint job on a budget!? CONTINUED..page 44........
|
Anonymous
|
08/05/06 12:50 PM
|
|
Re: Paint job on a budget!? CONTINUED..page 44........
|
Exit1965
|
08/05/06 12:59 PM
|
|
Re: Paint job on a budget!? CONTINUED..page 44........
|
Anonymous
|
08/05/06 07:34 PM
|
|
Re: Paint job on a budget!? CONTINUED..page 44........
|
69chargeryeehaa
|
08/05/06 08:58 PM
|
|
Re: Paint job on a budget!? CONTINUED..page 44........
|
78D150CLUB
|
08/05/06 10:46 PM
|
|
Re: Paint job on a budget!? CONTINUED..page 44........
|
Anonymous
|
08/06/06 01:22 AM
|
|
Re: Paint job on a budget!? CONTINUED..page 44........
|
78D150CLUB
|
08/06/06 02:25 AM
|
|
Re: Paint job on a budget!? CONTINUED..page 44........
|
78D150CLUB
|
08/06/06 02:37 AM
|
|
Re: Paint job on a budget!? CONTINUED..page 44........
|
Anonymous
|
08/05/06 08:38 PM
|
|
Re: Paint job on a budget!? CONTINUED..page 44........
|
Anonymous
|
08/06/06 01:20 AM
|
|
Re: Paint job on a budget!? CONTINUED..page 44........
|
Marq
|
08/05/06 09:34 PM
|
|
Re: Paint job on a budget!? CONTINUED..page 44........
|
Exit1965
|
08/07/06 09:30 PM
|
|
Re: Paint job on a budget!? CONTINUED..page 44........
|
Marq
|
08/07/06 11:16 PM
|
|
Re: Paint job on a budget!? CONTINUED..page 44........
|
Anonymous
|
08/08/06 01:10 AM
|
|
Re: Paint job on a budget!? CONTINUED..page 44........
|
Anonymous
|
08/08/06 06:26 AM
|
|
Re: Paint job on a budget!? CONTINUED..page 44........
|
Marq
|
08/08/06 01:17 PM
|
|
Re: Paint job on a budget!? CONTINUED..page 44........
|
Anonymous
|
08/08/06 09:18 PM
|
|
Re: Paint job on a budget!? CONTINUED..page 44........
|
Anonymous
|
08/08/06 10:46 PM
|
|
Re: Paint job on a budget!? CONTINUED..page 44........
|
78D150CLUB
|
08/08/06 11:05 PM
|
|
Re: Paint job on a budget!? CONTINUED..page 44........
|
78D150CLUB
|
08/08/06 11:06 PM
|
|
Re: Paint job on a budget!? CONTINUED..page 44........
|
78D150CLUB
|
08/08/06 11:09 PM
|
|
Re: Paint job on a budget!? CONTINUED..page 44........
|
69chargeryeehaa
|
08/08/06 11:45 PM
|
|
Re: Paint job on a budget!? CONTINUED..page 44........
|
78D150CLUB
|
08/09/06 12:25 AM
|
|
Re: Paint job on a budget!? CONTINUED..page 44........
|
Marq
|
08/08/06 11:33 PM
|
|
Re: Paint job on a budget!? CONTINUED..page 44........
|
Anonymous
|
08/09/06 12:08 AM
|
|
Re: Paint job on a budget!? CONTINUED..page 44........
|
Anonymous
|
08/09/06 01:41 AM
|
|
Re: Paint job on a budget!? CONTINUED..page 44........
|
Anonymous
|
08/09/06 01:42 AM
|
|
Re: Paint job on a budget!? CONTINUED..page 44........
|
Anonymous
|
08/09/06 01:43 AM
|
|
Re: Paint job on a budget!? CONTINUED..page 44........
|
Exit1965
|
08/09/06 01:56 AM
|
|
Re: Paint job on a budget!? CONTINUED..page 44........
|
Marq
|
08/09/06 02:43 AM
|
|
Re: Paint job on a budget!? CONTINUED..page 44........
|
Anonymous
|
08/09/06 06:53 AM
|
|
Re: Paint job on a budget!? CONTINUED..page 44........
|
Anonymous
|
08/09/06 10:06 AM
|
|
Re: Paint job on a budget!? CONTINUED..page 44........
|
Anonymous
|
08/09/06 03:39 PM
|
|
Re: Paint job on a budget!? CONTINUED..page 44........
|
Anonymous
|
08/10/06 01:45 AM
|
|
Re: Paint job on a budget!? CONTINUED..page 44........
|
Anonymous
|
08/10/06 01:46 AM
|
|
Re: Paint job on a budget!? CONTINUED..page 44........
|
Exit1965
|
08/10/06 01:48 AM
|
|
Re: Paint job on a budget!? CONTINUED..page 44........
|
Anonymous
|
08/10/06 02:03 AM
|
|
Re: Paint job on a budget!? CONTINUED..page 44........
|
Anonymous
|
08/10/06 02:37 AM
|
|
Re: Paint job on a budget!? CONTINUED..page 44........
|
Anonymous
|
08/10/06 02:55 AM
|
|
Re: Paint job on a budget!? CONTINUED..page 44........
|
Marq
|
08/10/06 03:36 AM
|
|
Re: Paint job on a budget!? CONTINUED..page 44........
|
Exit1965
|
08/10/06 04:11 AM
|
|
Re: Paint job on a budget!? CONTINUED..page 44........
|
_Scott_
|
08/10/06 04:26 AM
|
|
Re: Paint job on a budget!? CONTINUED..page 44........
|
Anonymous
|
08/10/06 05:07 AM
|
|
Re: Paint job on a budget!? CONTINUED..page 44........
|
admactanium
|
08/10/06 08:05 AM
|
|
Re: Paint job on a budget!? CONTINUED..page 44........
|
Anonymous
|
08/10/06 08:21 AM
|
|
Re: Paint job on a budget!? CONTINUED..page 44........
|
Anonymous
|
08/10/06 02:45 PM
|
|
Re: Paint job on a budget!? CONTINUED..page 44........
|
Marq
|
08/10/06 05:34 PM
|
|
Re: Paint job on a budget!? CONTINUED..page 44........
|
Dart360sav
|
08/10/06 06:31 PM
|
|
Re: Paint job on a budget!? CONTINUED..page 44........
|
Anonymous
|
08/10/06 07:03 PM
|
|
Re: Paint job on a budget!? CONTINUED..page 44........
|
Anonymous
|
08/10/06 06:40 PM
|
|
Re: Paint job on a budget!? CONTINUED..page 44........
|
Anonymous
|
08/10/06 10:38 PM
|
|
Re: Paint job on a budget!? CONTINUED..page 44........
|
440charger70
|
08/10/06 10:51 PM
|
|
Re: Paint job on a budget!? CONTINUED..page 44........
|
Anonymous
|
08/10/06 10:54 PM
|
|
Re: Paint job on a budget!? CONTINUED..page 44........
|
admactanium
|
08/11/06 04:14 AM
|
|
Re: Paint job on a budget!? CONTINUED..page 44........
|
Exit1965
|
08/11/06 05:09 AM
|
|
Re: Paint job on a budget!? CONTINUED..page 44........
|
Anonymous
|
08/11/06 09:07 PM
|
|
Re: Paint job on a budget!? CONTINUED..page 44........
|
GoodysGotaCuda
|
08/11/06 10:26 PM
|
|
Re: Paint job on a budget!? CONTINUED..page 44........
|
Exit1965
|
08/11/06 10:29 PM
|
|
Re: Paint job on a budget!? CONTINUED..page 44........
|
Dart360sav
|
08/12/06 01:23 AM
|
|
Re: Paint job on a budget!? CONTINUED..page 44........
|
Anonymous
|
08/12/06 12:43 PM
|
|
Re: Paint job on a budget!? CONTINUED..page 44........
|
Exit1965
|
08/12/06 01:57 PM
|
|
Re: Paint job on a budget!? CONTINUED..page 44........
|
Anonymous
|
08/12/06 06:31 PM
|
|
Re: Paint job on a budget!? CONTINUED..page 44........
|
Marq
|
08/12/06 10:32 PM
|
|
Re: Paint job on a budget!? CONTINUED..page 44........
|
Marq
|
08/12/06 10:56 PM
|
|
Re: Paint job on a budget!? CONTINUED..page 44........
|
Anonymous
|
08/13/06 01:42 AM
|
|
Re: Paint job on a budget!? CONTINUED..page 44........
|
Marq
|
08/13/06 09:04 AM
|
|
Re: Paint job on a budget!? CONTINUED..page 44........
|
Anonymous
|
08/13/06 05:43 PM
|
|
Re: Paint job on a budget!? CONTINUED..page 44........
|
Anonymous
|
08/13/06 06:14 PM
|
|
Re: Paint job on a budget!? CONTINUED..page 44........
|
Exit1965
|
08/13/06 06:16 PM
|
|
Re: Paint job on a budget!? CONTINUED..page 44........
|
Anonymous
|
08/13/06 06:25 PM
|
|
Re: Paint job on a budget!? CONTINUED..page 44........
|
Anonymous
|
08/13/06 06:53 PM
|
|
Re: Paint job on a budget!? CONTINUED..page 44........
|
Anonymous
|
08/13/06 06:54 PM
|
|
Re: Paint job on a budget!? CONTINUED..page 44........
|
Anonymous
|
08/13/06 06:56 PM
|
|
Re: Paint job on a budget!? CONTINUED..page 44........
|
Anonymous
|
08/13/06 06:58 PM
|
|
Re: Paint job on a budget!? CONTINUED..page 44........
|
Marq
|
08/14/06 01:28 AM
|
|
Re: Paint job on a budget!? CONTINUED..page 44........
|
Anonymous
|
08/14/06 10:04 PM
|
|
Re: Paint job on a budget!? CONTINUED..page 44........
|
Anonymous
|
08/14/06 10:28 PM
|
|
Re: Paint job on a budget!? CONTINUED..page 44........
|
Anonymous
|
08/15/06 04:51 AM
|
|
Re: Paint job on a budget!? CONTINUED..page 44........
|
Anonymous
|
08/15/06 04:52 AM
|
|
Re: Paint job on a budget!? CONTINUED..page 44........
|
Anonymous
|
08/15/06 04:54 AM
|
|
Man! Glad you didn't end up with Tar Heel blue!
|
Anonymous
|
08/14/06 07:37 PM
|
|
Re: Paint job on a budget!? CONTINUED..page 44........
|
Anonymous
|
08/13/06 07:44 PM
|
|
Re: Paint job on a budget!? CONTINUED..page 44........
|
Exit1965
|
08/13/06 10:40 PM
|
|
Re: Paint job on a budget!? CONTINUED..page 44........
|
Marq
|
08/14/06 01:40 AM
|
|
Re: Paint job on a budget!? CONTINUED..page 44........
|
78D150CLUB
|
08/14/06 05:19 AM
|
|
Re: Paint job on a budget!? CONTINUED..page 44........
|
Anonymous
|
08/14/06 01:54 PM
|
|
Re: Paint job on a budget!? CONTINUED..page 44........
|
Marq
|
08/14/06 09:54 PM
|
|
Re: Paint job on a budget!? CONTINUED..page 44........
|
Anonymous
|
08/15/06 10:09 AM
|
|
Re: Paint job on a budget!? CONTINUED..page 44........
|
Anonymous
|
08/15/06 05:00 PM
|
|
Re: Paint job on a budget!? CONTINUED..page 44........
|
Anonymous
|
08/15/06 08:59 PM
|
|
Re: Paint job on a budget!? CONTINUED..page 44........
|
Anonymous
|
08/15/06 05:06 PM
|
|
Re: Paint job on a budget!? CONTINUED..page 44........
|
Anonymous
|
08/15/06 05:06 PM
|
|
Re: Paint job on a budget!? CONTINUED..page 44........
|
Anonymous
|
08/15/06 06:00 PM
|
|
Re: Paint job on a budget!? CONTINUED..page 44........
|
Anonymous
|
08/15/06 06:11 PM
|
|
Re: Paint job on a budget!? CONTINUED..page 44........
|
Marq
|
08/15/06 06:27 PM
|
|
Re: Paint job on a budget!? CONTINUED..page 44........
|
Anonymous
|
08/19/06 01:49 AM
|
|
Re: Paint job on a budget!? CONTINUED..page 44........
|
Anonymous
|
08/19/06 06:38 PM
|
|
Re: Paint job on a budget!? CONTINUED..page 44........
|
Marq
|
08/19/06 10:11 PM
|
|
Re: Paint job on a budget!? CONTINUED..page 44........
|
Anonymous
|
08/20/06 12:46 AM
|
|
Re: Paint job on a budget!? CONTINUED..page 44........
|
Exit1965
|
08/20/06 02:13 AM
|
|
Very important point, Exit...
|
Anonymous
|
08/20/06 10:29 AM
|
|
Re: Very important point, Exit...
|
Anonymous
|
08/20/06 12:21 PM
|
|
Re: Very important point, Exit...
|
pdqvsix
|
08/20/06 02:29 PM
|
|
Re: Paint job on a budget!? CONTINUED..page 44........
|
Anonymous
|
08/21/06 03:15 AM
|
|
Re: Paint job on a budget!? CONTINUED..page 44........
|
Anonymous
|
08/21/06 03:45 AM
|
|
Re: Paint job on a budget!? CONTINUED..page 44........
|
Marq
|
08/21/06 11:48 AM
|
|
Re: Paint job on a budget!? CONTINUED..page 44........
|
Anonymous
|
08/21/06 12:11 PM
|
|
Re: Paint job on a budget!? CONTINUED..page 44........
|
Anonymous
|
08/21/06 07:04 PM
|
|
Re: Paint job on a budget!? CONTINUED..page 44........
|
Marq
|
08/21/06 07:39 PM
|
 Re: Paint job on a budget!? CONTINUED..page 44........
|
Anonymous
|
08/21/06 11:14 PM
|
|
Re: Paint job on a budget!? CONTINUED..page 44........
|
Sazman
|
08/24/06 04:26 AM
|
|
Re: Paint job on a budget!? CONTINUED..page 44........
|
Exit1965
|
08/24/06 05:12 AM
|
|
Re: Paint job on a budget!? CONTINUED..page 44........
|
Marq
|
08/24/06 12:45 PM
|
|
Re: Paint job on a budget!? CONTINUED..page 44........
|
Anonymous
|
08/24/06 06:13 PM
|
|
Re: Paint job on a budget!? CONTINUED..page 44........
|
Anonymous
|
08/24/06 07:22 PM
|
|
Re: Paint job on a budget!? CONTINUED..page 44........
|
Anonymous
|
08/25/06 12:18 AM
|
|
Re: Paint job on a budget!? CONTINUED..page 44........
|
Marq
|
08/25/06 01:25 AM
|
|
Re: Paint job on a budget!? CONTINUED..page 44........
|
Marq
|
08/20/06 05:45 PM
|
|
Re: Paint job on a budget!? CONTINUED..page 44........
|
Anonymous
|
08/20/06 04:44 PM
|
|
Re: Paint job on a budget!? CONTINUED..page 44........
|
Marq
|
08/20/06 05:49 PM
|
|
Re: Paint job on a budget!? CONTINUED..page 44........
|
Marq
|
08/20/06 06:07 PM
|
|
Re: Paint job on a budget!? CONTINUED..page 44........
|
Anonymous
|
08/20/06 07:12 PM
|
|
Re: Paint job on a budget!? CONTINUED..page 44........
|
Exit1965
|
08/20/06 07:19 PM
|
|
Re: Paint job on a budget!? CONTINUED..page 44........
|
Marq
|
08/20/06 08:30 PM
|
|
Re: Paint job on a budget!? CONTINUED..page 44........
|
Exit1965
|
08/20/06 10:31 PM
|
|
Re: Paint job on a budget!? CONTINUED..page 44........
|
Anonymous
|
08/20/06 11:40 PM
|
|
Re: Paint job on a budget!? CONTINUED..page 44........
|
Anonymous
|
08/21/06 12:53 AM
|
|
Re: Paint job on a budget!? CONTINUED..page 44........
|
Anonymous
|
08/21/06 01:10 AM
|
|
Re: Paint job on a budget!? CONTINUED..page 44........
|
Anonymous
|
08/21/06 03:45 AM
|
|
Re: Paint job on a budget!? CONTINUED..page 44........
|
Anonymous
|
08/21/06 09:18 AM
|
|
Re: Paint job on a budget!? CONTINUED..page 44........
|
Marq
|
08/21/06 11:56 AM
|
|
Re: Paint job on a budget!? CONTINUED..page 44........
|
Anonymous
|
08/20/06 08:39 PM
|
|
Re: Paint job on a budget!? CONTINUED..page 44........
|
Anonymous
|
08/22/06 04:06 AM
|
|
Re: Paint job on a budget!? CONTINUED..page 44........
|
Anonymous
|
08/22/06 04:07 AM
|
|
Re: Paint job on a budget!? CONTINUED..page 44........
|
Anonymous
|
08/22/06 04:08 AM
|
|
Re: Paint job on a budget!? CONTINUED..page 44........
|
Dart360sav
|
08/22/06 05:37 AM
|
|
Re: Paint job on a budget!? CONTINUED..page 44........
|
Anonymous
|
08/22/06 08:12 PM
|
|
Re: Paint job on a budget!? CONTINUED..page 44........
|
78D150CLUB
|
08/22/06 11:34 PM
|
|
Re: Paint job on a budget!? CONTINUED..page 44........
|
78D150CLUB
|
08/22/06 11:41 PM
|
|
Re: Paint job on a budget!? CONTINUED..page 44........
|
pdqvsix
|
08/23/06 12:01 AM
|
|
Re: Paint job on a budget!? CONTINUED..page 44........
|
69chargeryeehaa
|
08/23/06 12:13 AM
|
|
Re: Paint job on a budget!? CONTINUED..page 44........
|
78D150CLUB
|
08/23/06 02:15 AM
|
|
Re: Paint job on a budget!? CONTINUED..page 44........
|
79_WARLOCK
|
08/23/06 01:12 AM
|
|
Re: Paint job on a budget!? CONTINUED..page 44........
|
79_WARLOCK
|
08/23/06 01:14 AM
|
|
Re: Paint job on a budget!? CONTINUED..page 44........
|
Anonymous
|
08/24/06 12:09 AM
|
|
Re: Paint job on a budget!? CONTINUED..page 44........
|
69chargeryeehaa
|
08/15/06 06:52 PM
|
|
Re: Paint job on a budget!? CONTINUED..page 44........
|
Anonymous
|
08/15/06 11:52 PM
|
|
Re: Paint job on a budget!? CONTINUED..page 44........
|
69chargeryeehaa
|
08/16/06 02:16 AM
|
|
Re: Paint job on a budget!? CONTINUED..page 44........
|
Anonymous
|
08/16/06 11:34 AM
|
|
Re: Paint job on a budget!? CONTINUED..page 44........
|
Marq
|
08/16/06 12:16 PM
|
|
Re: Paint job on a budget!? CONTINUED..page 44........
|
darenrt
|
08/17/06 02:20 AM
|
|
Re: Paint job on a budget!? CONTINUED..page 44........
|
78D150CLUB
|
08/16/06 08:41 PM
|
|
Re: Paint job on a budget!? CONTINUED..page 44........
|
69chargeryeehaa
|
08/17/06 01:03 AM
|
|
Re: Paint job on a budget!? CONTINUED..page 44........
|
Anonymous
|
08/17/06 01:25 AM
|
|
Re: Paint job on a budget!? CONTINUED..page 44........
|
78D150CLUB
|
08/17/06 02:08 AM
|
|
Re: Paint job on a budget!? CONTINUED..page 44........
|
Anonymous
|
08/17/06 02:15 AM
|
|
Re: Paint job on a budget!? CONTINUED..page 44........
|
Exit1965
|
08/17/06 02:31 AM
|
|
Re: Paint job on a budget!? CONTINUED..page 44........
|
Anonymous
|
08/17/06 09:02 PM
|
|
Re: Paint job on a budget!? CONTINUED..page 44........
|
Exit1965
|
08/18/06 03:29 AM
|
|
Re: Paint job on a budget!? CONTINUED..page 44........
|
GTSDave
|
08/18/06 03:37 AM
|
|
Re: Paint job on a budget!? CONTINUED..page 44........
|
Exit1965
|
08/18/06 04:21 AM
|
|
Re: Paint job on a budget!? CONTINUED..page 44........
|
Anonymous
|
08/18/06 05:02 PM
|
|
Re: Paint job on a budget!? CONTINUED..page 44........
|
Anonymous
|
08/18/06 07:43 PM
|
|
Re: Paint job on a budget!? CONTINUED..page 44........
|
Anonymous
|
09/17/06 06:27 PM
|
|
Re: Paint job on a budget!? CONTINUED..page 44........
|
69DartGT
|
09/17/06 07:12 PM
|
|
Re: Paint job on a budget!? CONTINUED..page 44........
|
Anonymous
|
09/17/06 07:31 PM
|
|
Re: Paint job on a budget!? CONTINUED..page 44........
|
Anonymous
|
09/17/06 09:19 PM
|
|
Re: Paint job on a budget!? CONTINUED..page 44........
|
pdqvsix
|
09/18/06 01:20 AM
|
|
Re: Paint job on a budget!? CONTINUED..page 44........
|
Anonymous
|
09/18/06 03:10 AM
|
|
Re: Paint job on a budget!? CONTINUED..page 44........
|
Anonymous
|
09/18/06 04:18 PM
|
|
Re: Paint job on a budget!? CONTINUED..page 44........
|
Anonymous
|
09/18/06 05:00 PM
|
|
Re: Paint job on a budget!? CONTINUED..page 44........
|
Anonymous
|
09/18/06 05:23 PM
|
|
Re: Paint job on a budget!? CONTINUED..page 44........
|
Anonymous
|
09/18/06 07:20 PM
|
|
Re: Paint job on a budget!? CONTINUED..page 44........
|
69DartGT
|
09/18/06 09:36 PM
|
|
Re: Paint job on a budget!? CONTINUED..page 44........
|
Anonymous
|
09/18/06 10:49 PM
|
|
Re: Paint job on a budget!? CONTINUED..page 44........
|
Marq
|
09/19/06 12:00 AM
|
|
Re: Paint job on a budget!? CONTINUED..page 44........
|
78D150CLUB
|
08/17/06 02:04 AM
|
|
Re: Paint job on a budget!? CONTINUED..page 44........
|
ONEBADBIRD
|
08/29/06 02:16 AM
|
|
Re: Paint job on a budget!? CONTINUED..page 44........
|
Anonymous
|
08/29/06 03:37 AM
|
|
Re: Paint job on a budget!? CONTINUED..page 44........
|
Anonymous
|
08/29/06 09:15 AM
|
|
Re: Paint job on a budget!? CONTINUED..page 44........
|
Anonymous
|
08/29/06 05:50 PM
|
|
Re: Paint job on a budget!? CONTINUED..page 44........
|
Anonymous
|
08/15/06 07:04 PM
|
|
Re: Paint job on a budget!? CONTINUED..page 44........
|
GTSDave
|
08/14/06 05:13 AM
|
|
Re: Paint job on a budget!? CONTINUED..page 44........
|
Exit1965
|
08/11/06 10:27 PM
|
|
Re: Paint job on a budget!? CONTINUED..page 44........
|
Anonymous
|
08/11/06 01:19 AM
|
|
Re: Paint job on a budget!? CONTINUED..page 44........
|
Anonymous
|
08/11/06 06:08 AM
|
|
Re: Paint job on a budget!? CONTINUED..page 44........
|
_Scott_
|
08/10/06 04:53 PM
|
|
Re: Paint job on a budget!? CONTINUED..page 44........
|
Anonymous
|
08/10/06 05:05 PM
|
|
Re: Paint job on a budget!? CONTINUED..page 44........
|
admactanium
|
08/10/06 07:17 PM
|
|
Re: Paint job on a budget!? CONTINUED..page 44........
|
Anonymous
|
08/09/06 12:20 PM
|
|
Re: Paint job on a budget!? CONTINUED..page 44........
|
Marq
|
08/09/06 12:50 PM
|
|
Re: Paint job on a budget!? CONTINUED..page 44........
|
Anonymous
|
08/09/06 02:41 PM
|
|
Re: Paint job on a budget!? CONTINUED..page 44........
|
Exit1965
|
08/09/06 04:07 PM
|
|
Re: Paint job on a budget!? CONTINUED..page 44........
|
Marq
|
08/09/06 04:48 PM
|
|
Re: Paint job on a budget!? CONTINUED..page 44........
|
C38coupe
|
08/10/06 01:05 AM
|
|
Re: Paint job on a budget!? CONTINUED..page 44........
|
_Scott_
|
08/09/06 05:33 AM
|
|
Re: Paint job on a budget!? CONTINUED..page 44........
|
78D150CLUB
|
08/05/06 10:53 PM
|
|
Re: Paint job on a budget!? CONTINUED..page 44........
|
Exit1965
|
08/06/06 12:49 AM
|
|
Re: Paint job on a budget!? CONTINUED..page 44........
|
69chargeryeehaa
|
08/06/06 06:32 PM
|
|
Re: Paint job on a budget!? CONTINUED..page 44........
|
Exit1965
|
08/06/06 10:39 PM
|
|
Re: Paint job on a budget!? CONTINUED..page 44........
|
Anonymous
|
08/06/06 10:39 PM
|
|
Re: Paint job on a budget!? CONTINUED..page 44........
|
Exit1965
|
08/06/06 10:40 PM
|
|
Re: Paint job on a budget!? CONTINUED..page 44........
|
Anonymous
|
08/06/06 10:58 PM
|
|
Re: Paint job on a budget!? CONTINUED..page 44........
|
Marq
|
08/06/06 02:47 AM
|
|
Re: Paint job on a budget!? CONTINUED..page 44........
|
78D150CLUB
|
08/06/06 03:04 AM
|
|
Re: Paint job on a budget!? CONTINUED..page 44........
|
Anonymous
|
08/06/06 03:54 AM
|
|
Re: Paint job on a budget!? CONTINUED..page 44........
|
78D150CLUB
|
08/06/06 04:28 AM
|
|
Re: Paint job on a budget!? CONTINUED..page 44........
|
Anonymous
|
08/06/06 04:35 AM
|
|
Re: Paint job on a budget!? CONTINUED..page 44........
|
78D150CLUB
|
08/06/06 04:49 AM
|
|
Re: Paint job on a budget!? CONTINUED..page 44........
|
Marq
|
08/06/06 02:16 PM
|
|
Re: Paint job on a budget!? CONTINUED..page 44........
|
Marq
|
08/06/06 02:28 PM
|
|
Re: Paint job on a budget!? CONTINUED..page 44........
|
Anonymous
|
08/06/06 03:54 PM
|
|
Re: Paint job on a budget!? CONTINUED..page 44........
|
Marq
|
08/06/06 05:47 PM
|
|
Re: Paint job on a budget!? CONTINUED..page 44........
|
Anonymous
|
08/06/06 11:04 PM
|
|
Re: Paint job on a budget!? CONTINUED..page 44........
|
78D150CLUB
|
08/06/06 11:15 PM
|
|
Re: Paint job on a budget!? CONTINUED..page 44........
|
Marq
|
08/06/06 11:22 PM
|
|
Re: Paint job on a budget!? CONTINUED..page 44........
|
Anonymous
|
08/07/06 04:48 AM
|
|
Re: Paint job on a budget!? CONTINUED..page 44........
|
Anonymous
|
08/07/06 05:04 AM
|
|
Re: Paint job on a budget!? CONTINUED..page 44........
|
Marq
|
08/07/06 11:43 AM
|
|
Re: Paint job on a budget!? CONTINUED..page 44........
|
Anonymous
|
08/07/06 02:25 PM
|
|
Re: Paint job on a budget!? CONTINUED..page 44........
|
Anonymous
|
08/07/06 04:45 PM
|
|
Re: Paint job on a budget!? CONTINUED..page 44........
|
Marq
|
08/07/06 11:33 AM
|
|
Re: Paint job on a budget!? CONTINUED..page 44........
|
Anonymous
|
08/07/06 05:18 PM
|
|
Re: Paint job on a budget!? CONTINUED..page 44........
|
Marq
|
08/07/06 07:30 PM
|
|
Re: Paint job on a budget!? CONTINUED..page 44........
|
Anonymous
|
08/07/06 08:20 PM
|
|
Re: Paint job on a budget!? CONTINUED..page 44........
|
78D150CLUB
|
08/07/06 09:58 PM
|
|
Re: Paint job on a budget!? CONTINUED..page 44........
|
Marq
|
08/07/06 11:20 PM
|
|
Re: Paint job on a budget!? CONTINUED..page 44........
|
78D150CLUB
|
08/08/06 02:28 AM
|
|
Re: Paint job on a budget!? CONTINUED..page 44........
|
Anonymous
|
08/08/06 03:11 AM
|
|
Re: Paint job on a budget!? CONTINUED..page 44........
|
Anonymous
|
08/25/06 02:51 AM
|
|
Re: Paint job on a budget!? CONTINUED..page 44........
|
Anonymous
|
08/25/06 12:19 PM
|
|
Re: Paint job on a budget!? CONTINUED..page 44........
|
Marq
|
08/25/06 01:16 PM
|
|
Re: Paint job on a budget!? CONTINUED..page 44........
|
Anonymous
|
08/25/06 01:34 PM
|
|
Re: Paint job on a budget!? CONTINUED..page 44........
|
Anonymous
|
08/25/06 04:40 PM
|
|
Re: Paint job on a budget!? CONTINUED..page 44........
|
69chargeryeehaa
|
08/25/06 05:13 PM
|
|
Re: Paint job on a budget!? CONTINUED..page 44........
|
Marq
|
08/25/06 06:17 PM
|
|
Re: Paint job on a budget!? CONTINUED..page 44........
|
Anonymous
|
10/08/06 09:16 PM
|
|
Re: Paint job on a budget!? CONTINUED..page 44........
|
Anonymous
|
10/08/06 09:48 PM
|
|
Re: Paint job on a budget!? CONTINUED..page 44........
|
Anonymous
|
10/08/06 11:54 PM
|
|
Re: Paint job on a budget!? CONTINUED..page 44........
|
Anonymous
|
10/09/06 12:52 AM
|
|
Re: Paint job on a budget!? CONTINUED..page 44........
|
Anonymous
|
10/09/06 03:12 AM
|
|
Re: Paint job on a budget!? CONTINUED..page 44........ *DELETED*
|
Wyl E Coyote
|
10/10/06 12:40 AM
|
|
Re: Paint job on a budget!? CONTINUED..page 44........
|
Exit1965
|
10/10/06 01:09 AM
|
|
Re: Paint job on a budget!? CONTINUED..page 44........ *DELETED* *DELETED*
|
Wyl E Coyote
|
10/10/06 01:40 AM
|
|
Re: Paint job on a budget!? CONTINUED..page 44........
|
Anonymous
|
10/10/06 01:58 AM
|
|
Re: Paint job on a budget!? CONTINUED..page 44........
|
Anonymous
|
10/10/06 02:05 AM
|
|
Re: Paint job on a budget!? CONTINUED..page 44........
|
admactanium
|
10/10/06 08:16 AM
|
|
Re: Paint job on a budget!? CONTINUED..page 44........
|
Anonymous
|
10/10/06 01:03 PM
|
|
Re: Paint job on a budget!? CONTINUED..page 44........
|
admactanium
|
10/10/06 05:47 PM
|
|
Re: Paint job on a budget!? CONTINUED..page 44........
|
Anonymous
|
10/11/06 11:05 PM
|
|
Re: Paint job on a budget!? CONTINUED..page 44........
|
69DartGT
|
10/10/06 01:36 PM
|
|
Re: Paint job on a budget!? CONTINUED..page 44........
|
kenzo42
|
10/09/06 05:32 AM
|
|
Re: Paint job on a budget!? CONTINUED..page 44........
|
78D150CLUB
|
08/06/06 04:34 AM
|
|
Re: Paint job on a budget!? CONTINUED..page 44........
|
Anonymous
|
08/05/06 06:04 PM
|
|
Re: Paint job on a budget!? CONTINUED..page 44........
|
Marq
|
08/05/06 09:42 PM
|
|
Re: Paint job on a budget!? CONTINUED..page 44........
|
Pool Fixer
|
08/05/06 11:42 PM
|
|
Re: Paint job on a budget!? CONTINUED..page 44........
|
Anonymous
|
08/05/06 09:11 PM
|
|
Re: Paint job on a budget!? CONTINUED..page 44........
|
Anonymous
|
08/11/06 03:39 AM
|
|
Re: Paint job on a budget!? CONTINUED..page 44........
|
GoodysGotaCuda
|
08/03/06 05:34 AM
|
|
Re: Paint job on a budget!? CONTINUED..page 44........
|
Exit1965
|
08/03/06 01:57 PM
|
|
Re: Paint job on a budget!? CONTINUED..page 44........
|
Anonymous
|
08/03/06 03:03 PM
|
|
Re: Paint job on a budget!? CONTINUED..page 44........
|
Exit1965
|
08/03/06 04:56 PM
|
|
Re: Paint job on a budget!? CONTINUED..page 44........
|
69chargeryeehaa
|
08/03/06 02:05 PM
|
|
Re: Paint job on a budget!? CONTINUED..page 44........
|
GoodysGotaCuda
|
08/03/06 02:48 PM
|
|
Re: Paint job on a budget!? CONTINUED..page 44........
|
Anonymous
|
08/03/06 03:01 PM
|
|
Re: Paint job on a budget!? CONTINUED..page 44........
|
Anonymous
|
08/04/06 05:03 AM
|
|
Re: Paint job on a budget!? CONTINUED..page 44........
|
Anonymous
|
08/04/06 05:05 AM
|
|
Dang, that looks familiar, Grimster!
|
Anonymous
|
08/02/06 06:31 PM
|
|
Very nice work on the GN!
|
Anonymous
|
07/31/06 10:18 AM
|
|
Re: Paint job on a budget!? CONTINUED..page 44........
|
Anonymous
|
07/31/06 02:27 PM
|
|
Re: Paint job on a budget!? CONTINUED..page 44........
|
Anonymous
|
07/31/06 03:35 PM
|
|
Re: Paint job on a budget!? CONTINUED..page 44........
|
Marq
|
07/31/06 04:43 PM
|
|
Re: Paint job on a budget!? CONTINUED..page 44........
|
pdqvsix
|
07/31/06 03:41 PM
|
|
Re: Paint job on a budget!? CONTINUED..page 44........
|
Anonymous
|
08/01/06 08:15 PM
|
|
Re: Paint job on a budget!? CONTINUED..page 44........
|
69chargeryeehaa
|
07/31/06 04:17 PM
|
|
Re: Paint job on a budget!? CONTINUED..page 44........
|
Anonymous
|
07/31/06 04:26 PM
|
|
Re: Paint job on a budget!? CONTINUED..page 44........
|
Marq
|
07/31/06 05:08 PM
|
|
Re: Paint job on a budget!? CONTINUED..page 44........
|
Anonymous
|
07/31/06 05:45 PM
|
|
Re: Paint job on a budget!? CONTINUED..page 44........
|
Anonymous
|
08/01/06 05:33 PM
|
|
Re: Paint job on a budget!? CONTINUED..page 44........
|
Anonymous
|
08/01/06 07:34 PM
|
|
Re: Paint job on a budget!? CONTINUED..page 44........
|
Anonymous
|
08/01/06 07:44 PM
|
|
Re: Paint job on a budget!? CONTINUED..page 44........
|
69chargeryeehaa
|
07/31/06 04:06 PM
|
|
Re: Paint job on a budget!? CONTINUED..page 44........
|
78D150CLUB
|
08/01/06 02:10 AM
|
|
Re: Paint job on a budget!? CONTINUED..page 44........
|
Anonymous
|
08/23/06 05:50 PM
|
|
Re: Paint job on a budget!? CONTINUED..page 44........
|
Anonymous
|
08/23/06 08:23 PM
|
|
Re: Paint job on a budget!? CONTINUED..page 44........
|
Anonymous
|
08/23/06 08:56 PM
|
|
Re: Paint job on a budget!? CONTINUED..page 44........
|
Marq
|
08/24/06 01:07 AM
|
|
Re: Paint job on a budget!? CONTINUED..page 44........
|
Anonymous
|
08/24/06 02:47 AM
|
|
Re: Paint job on a budget!? CONTINUED..page 44........
|
pdqvsix
|
07/28/06 12:59 AM
|
|
Re: Paint job on a budget!? CONTINUED..page 44........
|
pdqvsix
|
07/28/06 01:10 AM
|
|
Re: Paint job on a budget!? CONTINUED..page 44........
|
69chargeryeehaa
|
07/28/06 02:11 AM
|
|
Re: Paint job on a budget!? CONTINUED..page 44........
|
Anonymous
|
07/27/06 01:26 PM
|
|
Re: Paint job on a budget!? CONTINUED..page 44........
|
69chargeryeehaa
|
07/27/06 01:28 AM
|
|
Re: Paint job on a budget!? CONTINUED..page 44........
|
Anonymous
|
07/27/06 02:27 AM
|
|
Re: Paint job on a budget!? CONTINUED..page 44........
|
Exit1965
|
07/27/06 04:48 AM
|
|
Re: Paint job on a budget!? CONTINUED..page 44........
|
Anonymous
|
07/27/06 12:44 PM
|
|
Re: Paint job on a budget!? CONTINUED..page 44........
|
69chargeryeehaa
|
07/27/06 01:54 PM
|
|
Re: Paint job on a budget!? CONTINUED..page 44........
|
Anonymous
|
07/27/06 02:42 PM
|
|
Re: Paint job on a budget!? CONTINUED..page 44........
|
_Scott_
|
07/19/06 05:49 PM
|
|
Re: Paint job on a budget!? CONTINUED..page 44........
|
Anonymous
|
07/19/06 11:57 AM
|
|
Re: Paint job on a budget!? CONTINUED..page 44........
|
69chargeryeehaa
|
07/19/06 02:09 PM
|
 Re: Paint job on a budget!? CONTINUED..page 44........
|
Anonymous
|
07/18/06 07:38 AM
|
|
Re: Paint job on a budget!? CONTINUED..page 44........
|
Anonymous
|
07/18/06 07:53 PM
|
|
Re: Paint job on a budget!? CONTINUED..page 44........
|
slantvaliant
|
07/18/06 08:31 PM
|
|
Re: Paint job on a budget!? CONTINUED..page 44........
|
slantvaliant
|
07/18/06 08:34 PM
|
|
Re: Paint job on a budget!? CONTINUED..page 44........
|
Anonymous
|
07/19/06 02:10 AM
|
|
Re: Paint job on a budget!? CONTINUED..page 44........
|
69chargeryeehaa
|
07/19/06 02:42 AM
|
|
Re: Paint job on a budget!? CONTINUED..page 44........
|
C38coupe
|
07/19/06 03:37 AM
|
|
Re: Paint job on a budget!? CONTINUED..page 44........
|
Exit1965
|
07/19/06 04:20 AM
|
|
Re: Paint job on a budget!? CONTINUED..page 44........
|
Anonymous
|
07/19/06 08:27 PM
|
|
Re: Paint job on a budget!? CONTINUED..page 44........
|
Anonymous
|
07/18/06 09:46 PM
|
|
Re: Paint job on a budget!? CONTINUED..page 44........
|
Anonymous
|
07/18/06 09:59 PM
|
|
Re: Paint job on a budget!? CONTINUED..page 44........
|
78D150CLUB
|
07/18/06 12:35 AM
|
|
Re: Paint job on a budget!? CONTINUED..page 44........
|
Anonymous
|
07/19/06 04:12 AM
|
|
Re: Paint job on a budget!? CONTINUED..page 44........
|
Anonymous
|
07/16/06 01:19 AM
|
 Re: Paint job on a budget!? CONTINUED..page 44........
|
78D150CLUB
|
07/16/06 01:35 AM
|
|
Re: Paint job on a budget!? CONTINUED..page 44........
|
Marq
|
07/16/06 01:56 AM
|
|
Re: Paint job on a budget!? CONTINUED..page 44........
|
Anonymous
|
07/13/06 04:52 PM
|
|
Re: Paint job on a budget!? CONTINUED..page 44........
|
Anonymous
|
07/11/06 11:46 PM
|
|
Re: Paint job on a budget!? CONTINUED..page 44........
|
Anonymous
|
07/12/06 12:30 AM
|
|
Re: Paint job on a budget!? CONTINUED..page 44........
|
Marq
|
07/12/06 01:37 AM
|
 Re: Paint job on a budget!? CONTINUED..page 44........
|
Anonymous
|
07/17/06 02:48 PM
|
|
Re: Paint job on a budget!? CONTINUED..page 44........
|
Anonymous
|
07/05/06 10:11 PM
|
|
Re: Paint job on a budget!? CONTINUED..page 44........
|
Exit1965
|
07/04/06 04:58 AM
|
|
Re: Paint job on a budget!? CONTINUED..page 44........
|
Anonymous
|
07/05/06 12:02 AM
|
|
Re: Paint job on a budget!? CONTINUED..page 44........
|
Anonymous
|
07/07/06 01:11 AM
|
|
Re: Paint job on a budget!? CONTINUED..page 44........
|
Anonymous
|
07/07/06 02:45 AM
|
|
Re: Paint job on a budget!? CONTINUED..page 44........
|
Exit1965
|
07/07/06 03:12 AM
|
|
Re: Paint job on a budget!? CONTINUED..page 44........
|
Anonymous
|
07/01/06 11:35 AM
|
|
Re: Paint job on a budget!? CONTINUED..page 44........
|
Marq
|
07/01/06 01:36 PM
|
|
Re: Paint job on a budget!? CONTINUED..page 44........
|
pdqvsix
|
07/01/06 03:24 PM
|
|
Re: Paint job on a budget!? CONTINUED..page 44........
|
Marq
|
07/01/06 04:42 PM
|
|
Re: Paint job on a budget!? CONTINUED..page 44........
|
pdqvsix
|
07/01/06 05:54 PM
|
|
Re: Paint job on a budget!? CONTINUED..page 44........
|
Anonymous
|
07/01/06 06:59 PM
|
|
Re: Paint job on a budget!? CONTINUED..page 44........
|
Anonymous
|
07/02/06 03:35 AM
|
|
Re: Paint job on a budget!? CONTINUED..page 44........
|
Marq
|
07/02/06 05:05 AM
|
|
Re: Paint job on a budget!? CONTINUED..page 44........
|
Anonymous
|
07/02/06 04:40 PM
|
|
Re: Paint job on a budget!? CONTINUED..page 44........
|
Exit1965
|
07/02/06 04:59 PM
|
|
Re: Paint job on a budget!? CONTINUED..page 44........
|
Anonymous
|
07/02/06 08:40 PM
|
|
Re: Paint job on a budget!? CONTINUED..page 44........
|
Exit1965
|
07/02/06 11:59 PM
|
|
Re: Paint job on a budget!? CONTINUED..page 44........
|
Anonymous
|
07/03/06 11:38 PM
|
|
Re: Paint job on a budget!? CONTINUED..page 44........
|
_Scott_
|
07/03/06 01:07 AM
|
|
Re: Paint job on a budget!? CONTINUED..page 44........
|
Anonymous
|
07/03/06 07:48 AM
|
|
Re: Paint job on a budget!? CONTINUED..page 44........
|
Anonymous
|
07/02/06 11:39 PM
|
|
Re: Paint job on a budget!? CONTINUED..page 44........
|
Marq
|
07/03/06 12:36 AM
|
|
Re: Paint job on a budget!? CONTINUED..page 44........
|
Anonymous
|
07/03/06 08:37 AM
|
|
Re: Paint job on a budget!? CONTINUED..page 44........
|
Marq
|
07/03/06 02:48 PM
|
|
Re: Paint job on a budget!? CONTINUED..page 44........
|
Anonymous
|
07/03/06 04:52 PM
|
|
Re: Paint job on a budget!? CONTINUED..page 44........
|
Marq
|
07/03/06 09:27 PM
|
|
Re: Paint job on a budget!? CONTINUED..page 44........
|
Anonymous
|
07/03/06 10:12 PM
|
|
Re: Paint job on a budget!? CONTINUED..page 44........
|
Marq
|
07/04/06 02:22 AM
|
|
Re: Paint job on a budget!? CONTINUED..page 44........
|
Anonymous
|
07/04/06 02:33 AM
|
|
Re: Paint job on a budget!? CONTINUED..page 44........
|
Pool Fixer
|
07/01/06 04:21 PM
|
|
Re: Paint job on a budget!? CONTINUED..page 44........
|
Anonymous
|
07/03/06 02:39 PM
|
|
Re: Paint job on a budget!? CONTINUED..page 44........
|
Exit1965
|
07/01/06 01:42 PM
|
|
Re: Paint job on a budget!? CONTINUED..page 44........
|
texczech
|
07/01/06 02:06 PM
|
|
Re: Paint job on a budget!? CONTINUED..page 44........
|
Anonymous
|
07/03/06 09:25 AM
|
|
Re: Paint job on a budget!? CONTINUED..page 44........
|
Marq
|
06/30/06 04:06 PM
|
|
Re: Paint job on a budget!? CONTINUED..page 44........
|
Anonymous
|
06/28/06 10:36 PM
|
|
Re: Paint job on a budget!? CONTINUED..page 44........
|
Anonymous
|
06/28/06 11:16 PM
|
|
Re: Paint job on a budget!? CONTINUED..page 44........
|
Anonymous
|
06/29/06 01:38 AM
|
|
Re: Paint job on a budget!? CONTINUED..page 44........ *DELETED*
|
Anonymous
|
06/29/06 07:12 AM
|
|
Re: Paint job on a budget!? CONTINUED..page 44........ *DELETED*
|
Marq
|
06/29/06 11:34 AM
|
|
Re: Paint job on a budget!? CONTINUED..page 44........ *DELETED*
|
Anonymous
|
06/29/06 05:15 PM
|
|
Re: Paint job on a budget!? CONTINUED..page 44........ *DELETED*
|
Anonymous
|
06/29/06 01:41 PM
|
|
Re: Paint job on a budget!? CONTINUED..page 44........
|
69chargeryeehaa
|
06/29/06 02:50 PM
|
|
Re: Paint job on a budget!? CONTINUED..page 44........
|
Marq
|
06/29/06 04:16 PM
|
|
Re: Paint job on a budget!? CONTINUED..page 44........
|
Anonymous
|
06/29/06 04:52 PM
|
|
Re: Paint job on a budget!? CONTINUED..page 44........
|
Marq
|
06/29/06 04:57 PM
|
|
Re: Paint job on a budget!? CONTINUED..page 44........
|
Exit1965
|
06/29/06 04:59 PM
|
|
Re: Paint job on a budget!? CONTINUED..page 44........
|
Marq
|
06/29/06 05:10 PM
|
|
Re: Paint job on a budget!? CONTINUED..page 44........
|
Anonymous
|
06/29/06 07:07 PM
|
|
Re: Paint job on a budget!? CONTINUED..page 44........
|
Anonymous
|
06/29/06 07:32 PM
|
|
Re: Paint job on a budget!? CONTINUED..page 44........
|
Marq
|
06/29/06 07:59 PM
|
|
Re: Paint job on a budget!? CONTINUED..page 44........
|
Anonymous
|
06/29/06 09:16 PM
|
|
Re: Paint job on a budget!? CONTINUED..page 44........
|
Exit1965
|
06/29/06 10:16 PM
|
|
Re: Paint job on a budget!? CONTINUED..page 44........
|
Anonymous
|
06/29/06 10:47 PM
|
|
Re: Paint job on a budget!? CONTINUED..page 44........
|
Exit1965
|
06/29/06 11:18 PM
|
|
Re: Paint job on a budget!? CONTINUED..page 44........
|
Anonymous
|
06/30/06 11:36 AM
|
|
Re: Paint job on a budget!? CONTINUED..page 44........
|
Exit1965
|
06/29/06 04:58 PM
|
|
Re: Paint job on a budget!? CONTINUED..page 44........ *DELETED*
|
Anonymous
|
06/29/06 05:35 PM
|
|
Re: Paint job on a budget!? CONTINUED..page 44........
|
Anonymous
|
06/29/06 05:46 PM
|
|
Re: Paint job on a budget!? CONTINUED..page 44........ *DELETED*
|
Ira
|
06/29/06 06:47 PM
|
|
Re: Paint job on a budget!? CONTINUED..page 44........ *DELETED*
|
Anonymous
|
06/29/06 07:15 PM
|
|
Re: Paint job on a budget!? CONTINUED..page 44........
|
Anonymous
|
06/29/06 03:41 PM
|
|
Re: Paint job on a budget!? CONTINUED..page 44........
|
Anonymous
|
06/29/06 04:07 PM
|
|
Re: Paint job on a budget!? CONTINUED..page 44........
|
Anonymous
|
06/28/06 10:40 PM
|
|
Re: Paint job on a budget!? CONTINUED..page 44........
|
69chargeryeehaa
|
06/27/06 02:24 PM
|
|
Re: Paint job on a budget!? CONTINUED..page 44........
|
Exit1965
|
06/27/06 04:00 PM
|
|
Re: Paint job on a budget!? CONTINUED..page 44........
|
Anonymous
|
06/27/06 04:33 PM
|
|
Re: Paint job on a budget!? CONTINUED..page 44........
|
69chargeryeehaa
|
06/27/06 06:02 PM
|
|
Re: Paint job on a budget!? CONTINUED..page 44........
|
Anonymous
|
06/27/06 08:52 PM
|
|
Re: Paint job on a budget!? CONTINUED..page 44........
|
Exit1965
|
06/27/06 09:04 PM
|
|
Re: Paint job on a budget!? CONTINUED..page 44........
|
Anonymous
|
06/28/06 12:48 AM
|
|
Re: Paint job on a budget!? CONTINUED..page 44........
|
Anonymous
|
06/28/06 01:20 AM
|
|
Re: Paint job on a budget!? CONTINUED..page 44........
|
Anonymous
|
06/28/06 01:29 AM
|
|
Re: Paint job on a budget!? CONTINUED..page 44........
|
Ira
|
06/28/06 02:33 AM
|
|
Re: Paint job on a budget!? CONTINUED..page 44........
|
Exit1965
|
06/28/06 03:10 AM
|
|
Re: Paint job on a budget!? CONTINUED..page 44........
|
Anonymous
|
06/28/06 06:51 AM
|
|
Re: Paint job on a budget!? CONTINUED..page 44........
|
Exit1965
|
06/28/06 03:16 AM
|
|
Re: Paint job on a budget!? CONTINUED..page 44........
|
Anonymous
|
06/28/06 03:25 AM
|
|
Re: Paint job on a budget!? CONTINUED..page 44........
|
Exit1965
|
06/28/06 03:54 AM
|
|
Re: Paint job on a budget!? CONTINUED..page 44........
|
Anonymous
|
06/28/06 04:20 AM
|
|
Re: Paint job on a budget!? CONTINUED..page 44........
|
Exit1965
|
06/28/06 04:41 AM
|
|
Re: Paint job on a budget!? CONTINUED..page 44........
|
Anonymous
|
06/28/06 04:48 AM
|
|
Re: Paint job on a budget!? CONTINUED..page 44........
|
Marq
|
06/26/06 12:05 PM
|
|
Re: Paint job on a budget!? CONTINUED..page 44........
|
Anonymous
|
06/26/06 12:20 PM
|
 Re: Paint job on a budget!? CONTINUED..page 44........
|
Anonymous
|
11/24/06 01:30 AM
|
|
Re: Paint job on a budget!? CONTINUED..page 44........
|
Anonymous
|
11/24/06 12:18 PM
|
|
Re: Paint job on a budget!? CONTINUED..page 44........
|
Exit1965
|
11/24/06 01:56 PM
|
|
Re: Paint job on a budget!? CONTINUED..page 44........
|
69chargeryeehaa
|
11/24/06 03:06 PM
|
|
Re: Paint job on a budget!? CONTINUED..page 44........
|
Anonymous
|
11/24/06 06:50 PM
|
|
Re: Paint job on a budget!? CONTINUED..page 44........
|
69chargeryeehaa
|
11/24/06 11:42 PM
|
|
Re: Paint job on a budget!? CONTINUED..page 44........
|
Anonymous
|
11/25/06 12:13 AM
|
|
Re: Paint job on a budget!? CONTINUED..page 44........
|
69chargeryeehaa
|
11/25/06 12:52 AM
|
|
Re: Paint job on a budget!? CONTINUED..page 44........
|
Anonymous
|
11/26/06 09:28 PM
|
|
Re: Paint job on a budget!? CONTINUED..page 44........
|
kenzo42
|
11/26/06 10:52 PM
|
|
Re: Paint job on a budget!? CONTINUED..page 44........
|
Anonymous
|
11/27/06 12:57 AM
|
|
Re: Paint job on a budget!? CONTINUED..page 44........
|
Exit1965
|
11/27/06 01:35 AM
|
|
Re: Paint job on a budget!? CONTINUED..page 44........
|
Anonymous
|
11/27/06 02:43 AM
|
|
Re: Paint job on a budget!? CONTINUED..page 44........
|
Anonymous
|
11/27/06 02:56 AM
|
|
Re: Paint job on a budget!? CONTINUED..page 44........
|
Anonymous
|
11/27/06 04:18 AM
|
|
Re: Paint job on a budget!? CONTINUED..page 44........
|
kenzo42
|
11/27/06 03:03 AM
|
|
Re: Paint job on a budget!? CONTINUED..page 44........
|
Exit1965
|
11/27/06 12:43 PM
|
|
Re: Paint job on a budget!? CONTINUED..page 44........
|
69DartGT
|
11/27/06 05:19 PM
|
|
Re: Paint job on a budget!? CONTINUED..page 44........
|
Anonymous
|
11/28/06 03:44 AM
|
|
Re: Paint job on a budget!? CONTINUED..page 44........
|
Exit1965
|
11/28/06 04:30 AM
|
|
Re: Paint job on a budget!? CONTINUED..page 44........
|
69DartGT
|
11/28/06 02:24 PM
|
|
Re: Paint job on a budget!? CONTINUED..page 44........
|
Anonymous
|
11/28/06 02:45 PM
|
|
Re: Paint job on a budget!? CONTINUED..page 44........
|
Java
|
11/28/06 07:37 PM
|
|
Re: Paint job on a budget!? CONTINUED..page 44........
|
Anonymous
|
11/28/06 07:53 PM
|
|
Re: Paint job on a budget!? CONTINUED..page 44........
|
Anonymous
|
11/28/06 07:58 PM
|
|
Re: Paint job on a budget!? CONTINUED..page 44........
|
69chargeryeehaa
|
11/28/06 08:25 PM
|
|
Re: Paint job on a budget!? CONTINUED..page 44........
|
Anonymous
|
12/02/06 02:17 AM
|
|
Re: Paint job on a budget!? CONTINUED..page 44........
|
Jolly_Raj_R
|
11/29/06 05:42 AM
|
|
Re: Paint job on a budget!? CONTINUED..page 44........
|
Anonymous
|
11/29/06 01:40 PM
|
|
Re: Paint job on a budget!? CONTINUED..page 44........
|
69DartGT
|
11/29/06 02:53 PM
|
|
Re: Paint job on a budget!? CONTINUED..page 44........
|
Anonymous
|
11/29/06 03:51 PM
|
|
Re: Paint job on a budget!? CONTINUED..page 44........
|
Anonymous
|
11/29/06 08:05 PM
|
|
Re: Paint job on a budget!? CONTINUED..page 44........
|
Anonymous
|
11/30/06 01:24 AM
|
 Re: Paint job on a budget!? CONTINUED..page 44........
|
C38coupe
|
12/01/06 03:04 AM
|
|
Re: Paint job on a budget!? CONTINUED..page 44........
|
C38coupe
|
12/01/06 04:25 AM
|
|
Re: Paint job on a budget!? CONTINUED..page 44........
|
69DartGT
|
12/01/06 02:55 PM
|
|
Re: Paint job on a budget!? CONTINUED..page 44........
|
Anonymous
|
12/01/06 06:29 PM
|
|
Re: Paint job on a budget!? CONTINUED..page 44........
|
C38coupe
|
12/02/06 12:47 AM
|
|
Re: Paint job on a budget!? CONTINUED..page 44........
|
C38coupe
|
12/02/06 01:53 AM
|
|
Re: Paint job on a budget!? CONTINUED..page 44........
|
Exit1965
|
05/31/06 09:32 PM
|
|
Re: Paint job on a budget!? CONTINUED..page 44........
|
Anonymous
|
05/31/06 09:45 PM
|
|
Re: Paint job on a budget!? CONTINUED..page 44........
|
Anonymous
|
05/31/06 02:14 AM
|
|
Re: Paint job on a budget!? CONTINUED..page 44........
|
Anonymous
|
05/31/06 02:17 AM
|
|
Re: Paint job on a budget!? CONTINUED..page 44........
|
GTSDave
|
05/31/06 02:58 AM
|
|
Re: Paint job on a budget!? CONTINUED..page 44........
|
Anonymous
|
05/31/06 03:55 AM
|
|
Re: Paint job on a budget!? CONTINUED..page 44........
|
Anonymous
|
05/30/06 07:18 AM
|
|
Re: Paint job on a budget!? CONTINUED..page 44............
|
Anonymous
|
06/06/06 02:38 PM
|
|
Re: Paint job on a budget!? CONTINUED..page 44............
|
69chargeryeehaa
|
06/06/06 02:48 PM
|
|
Re: Paint job on a budget!? CONTINUED..page 44............
|
Anonymous
|
06/06/06 10:39 PM
|
|
Re: Paint job on a budget!? CONTINUED..page 44............
|
69chargeryeehaa
|
06/06/06 11:19 PM
|
|
Re: Paint job on a budget!? CONTINUED..page 44............
|
Anonymous
|
06/06/06 11:23 PM
|
|
Re: Paint job on a budget!? CONTINUED..page 44........
|
Anonymous
|
06/07/06 10:13 PM
|
|
Re: Paint job on a budget!? CONTINUED..page 44........
|
Anonymous
|
06/08/06 12:04 AM
|
|
Re: Paint job on a budget!? CONTINUED..page 44........
|
Exit1965
|
06/08/06 04:50 AM
|
|
Re: Paint job on a budget!? CONTINUED..page 44........
|
dalbers
|
06/08/06 05:40 AM
|
|
Re: Paint job on a budget!? CONTINUED..page 44........
|
69chargeryeehaa
|
06/08/06 02:00 PM
|
|
Re: Paint job on a budget!? CONTINUED..page 44........
|
BigTerry
|
06/08/06 03:27 PM
|
|
Re: Paint job on a budget!? CONTINUED..page 44........
|
Exit1965
|
06/08/06 03:58 PM
|
|
Re: Paint job on a budget!? CONTINUED..page 44............
|
Anonymous
|
06/08/06 06:21 PM
|
|
Re: Paint job on a budget!? CONTINUED..page 44............
|
dynorad
|
06/08/06 06:52 PM
|
|
Re: Paint job on a budget!? CONTINUED..page 44........
|
Exit1965
|
06/08/06 08:07 PM
|
|
Re: Paint job on a budget!? CONTINUED..page 44........
|
69chargeryeehaa
|
06/08/06 08:55 PM
|
|
Re: Paint job on a budget!? CONTINUED..page 44........
|
Anonymous
|
06/08/06 10:27 PM
|
|
Re: Paint job on a budget!? CONTINUED..page 44........
|
Anonymous
|
06/08/06 11:46 PM
|
|
Re: Paint job on a budget!? CONTINUED..page 44........
|
Anonymous
|
06/09/06 02:33 AM
|
|
Re: Paint job on a budget!? CONTINUED..page 44........
|
Anonymous
|
06/09/06 03:57 AM
|
|
Re: Paint job on a budget!? CONTINUED..page 44........
|
Exit1965
|
06/09/06 04:37 AM
|
|
Re: Paint job on a budget!? CONTINUED..page 44........
|
Anonymous
|
06/09/06 04:58 AM
|
|
Re: Paint job on a budget!? CONTINUED..page 44........
|
Anonymous
|
06/09/06 06:54 AM
|
|
Re: Paint job on a budget!? CONTINUED..page 44........
|
70Coronet500Vert
|
06/09/06 11:45 AM
|
|
Re: Paint job on a budget!? CONTINUED..page 44........
|
69chargeryeehaa
|
06/09/06 02:36 PM
|
|
Re: Paint job on a budget!? CONTINUED..page 44........
|
69chargeryeehaa
|
06/09/06 03:09 PM
|
|
Re: Paint job on a budget!? CONTINUED..page 44........
|
Exit1965
|
06/09/06 03:47 PM
|
|
Re: Paint job on a budget!? CONTINUED..page 44........
|
Anonymous
|
06/09/06 05:20 PM
|
|
Re: Paint job on a budget!? CONTINUED..page 44........
|
69chargeryeehaa
|
06/09/06 05:48 PM
|
|
Re: Paint job on a budget!? CONTINUED..page 44........
|
Exit1965
|
06/09/06 09:35 PM
|
|
Re: Paint job on a budget!? CONTINUED..page 44........
|
Anonymous
|
06/10/06 02:21 AM
|
|
Re: Paint job on a budget!? CONTINUED..page 44........
|
Anonymous
|
06/10/06 02:55 AM
|
|
Re: Paint job on a budget!? CONTINUED..page 44........
|
Exit1965
|
06/10/06 04:49 AM
|
|
Re: Paint job on a budget!? CONTINUED..page 44........
|
Anonymous
|
06/10/06 11:13 AM
|
|
Re: Paint job on a budget!? CONTINUED..page 44........
|
Exit1965
|
06/10/06 02:56 PM
|
|
Re: Paint job on a budget!? CONTINUED..page 44........
|
Anonymous
|
06/10/06 08:10 PM
|
|
Re: Paint job on a budget!? CONTINUED..page 44........
|
Anonymous
|
06/10/06 08:15 PM
|
|
Re: Paint job on a budget!? CONTINUED..page 44........
|
Anonymous
|
06/10/06 08:20 PM
|
|
Re: Paint job on a budget!? CONTINUED..page 44........
|
Exit1965
|
06/10/06 10:15 PM
|
|
Re: Paint job on a budget!? CONTINUED..page 44........
|
Anonymous
|
06/10/06 11:01 PM
|
|
Re: Paint job on a budget!? CONTINUED..page 44........
|
Anonymous
|
06/10/06 11:52 PM
|
|
Re: Paint job on a budget!? CONTINUED..page 44........
|
Anonymous
|
06/11/06 12:09 AM
|
|
Re: Paint job on a budget!? CONTINUED..page 44........
|
318Bruiser
|
06/11/06 06:08 AM
|
|
Re: Paint job on a budget!? CONTINUED..page 44........
|
Anonymous
|
06/11/06 06:17 PM
|
|
Re: Paint job on a budget!? CONTINUED..page 44........
|
Marq
|
06/11/06 07:51 PM
|
|
Re: Paint job on a budget!? CONTINUED..page 44........
|
Anonymous
|
12/21/06 03:11 AM
|
|
Re: Paint job on a budget!? CONTINUED..page 44........
|
Anonymous
|
06/12/06 07:02 PM
|
|
Re: Paint job on a budget!? CONTINUED..page 44........
|
Anonymous
|
06/12/06 08:50 PM
|
|
Re: Paint job on a budget!? CONTINUED..page 44........
|
Anonymous
|
06/12/06 09:50 PM
|
|
Re: Paint job on a budget!? CONTINUED..page 44........
|
Anonymous
|
06/12/06 11:05 PM
|
|
Re: Paint job on a budget!? CONTINUED..page 44........
|
Anonymous
|
06/12/06 11:46 PM
|
|
Re: Paint job on a budget!? CONTINUED..page 44........
|
Marq
|
06/13/06 02:51 AM
|
|
Re: Paint job on a budget!? CONTINUED..page 44........
|
Anonymous
|
06/13/06 03:56 AM
|
|
Re: Paint job on a budget!? CONTINUED..page 44........
|
Anonymous
|
06/11/06 08:12 PM
|
|
Morning all! Weekend update....
|
Anonymous
|
06/12/06 10:56 AM
|
|
Here's the orange peel....
|
Anonymous
|
06/12/06 10:59 AM
|
|
Bugs in paint
|
Anonymous
|
06/12/06 11:08 PM
|
|
Re: Morning all! Weekend update....
|
Marq
|
06/13/06 01:49 AM
|
|
Re: Morning all! Weekend update....
|
69chargeryeehaa
|
06/13/06 02:39 AM
|
|
Re: Paint job on a budget!? CONTINUED..page 44............
|
6T6Cuda
|
06/09/06 12:34 PM
|
|
Re: Paint job on a budget!? CONTINUED..page 44........
|
Exit1965
|
06/09/06 01:24 PM
|
|
Re: Paint job on a budget!? CONTINUED..page 44............
|
Anonymous
|
06/13/06 12:09 AM
|
|
Re: Paint job on a budget!? CONTINUED..page 44............
|
Anonymous
|
06/13/06 12:07 PM
|
|
Re: Paint job on a budget!? CONTINUED..page 44........
|
Anonymous
|
06/13/06 03:26 AM
|
|
Re: Paint job on a budget!? CONTINUED..page 44........
|
Anonymous
|
06/13/06 04:02 AM
|
|
Re: Paint job on a budget!? CONTINUED..page 44........
|
Anonymous
|
06/13/06 10:03 AM
|
|
Different folks have tried different ratios
|
Anonymous
|
06/13/06 10:42 AM
|
|
Re: Paint job on a budget!? CONTINUED..page 44........
|
Exit1965
|
06/13/06 01:12 PM
|
|
Re: Paint job on a budget!? CONTINUED..page 44........
|
Anonymous
|
06/13/06 06:56 PM
|
|
Re: Paint job on a budget!? CONTINUED..page 44........
|
Exit1965
|
06/13/06 07:12 PM
|
|
Re: Paint job on a budget!? CONTINUED..page 44........
|
Anonymous
|
06/13/06 09:52 PM
|
|
Re: Paint job on a budget!? CONTINUED..page 44........
|
Anonymous
|
06/13/06 10:44 PM
|
|
Re: Paint job on a budget!? CONTINUED..page 44........
|
Marq
|
06/14/06 12:38 AM
|
|
Re: Paint job on a budget!? CONTINUED..page 44........
|
Anonymous
|
06/13/06 10:45 PM
|
|
Re: Paint job on a budget!? CONTINUED..page 44........
|
Marq
|
06/14/06 12:48 AM
|
|
Re: Paint job on a budget!? CONTINUED..page 44........
|
Anonymous
|
06/14/06 01:04 AM
|
|
Re: Paint job on a budget!? CONTINUED..page 44........
|
Anonymous
|
06/14/06 04:34 AM
|
|
Re: Paint job on a budget!? CONTINUED..page 44........
|
Anonymous
|
06/14/06 05:58 AM
|
|
Re: Paint job on a budget!? CONTINUED..page 44........
|
Anonymous
|
06/14/06 08:26 AM
|
|
Re: Paint job on a budget!? CONTINUED..page 44........
|
Marq
|
06/14/06 02:02 PM
|
|
Re: Paint job on a budget!? CONTINUED..page 44........
|
Marq
|
06/14/06 02:18 PM
|
|
Re: Paint job on a budget!? CONTINUED..page 44........
|
vynn3
|
06/14/06 04:05 PM
|
|
Re: Paint job on a budget!? CONTINUED..page 44........
|
Anonymous
|
06/14/06 05:47 PM
|
|
Re: Paint job on a budget!? CONTINUED..page 44........
|
69chargeryeehaa
|
06/14/06 06:44 PM
|
|
Re: Paint job on a budget!? CONTINUED..page 44........
|
Anonymous
|
06/14/06 10:41 PM
|
|
Re: Paint job on a budget!? CONTINUED..page 44........
|
Exit1965
|
06/14/06 11:42 PM
|
|
Re: Paint job on a budget!? CONTINUED..page 44........
|
Anonymous
|
06/14/06 11:48 PM
|
|
Re: Paint job on a budget!? CONTINUED..page 44........
|
Anonymous
|
06/15/06 12:27 AM
|
|
Re: Paint job on a budget!? CONTINUED..page 44........
|
Marq
|
06/15/06 01:36 AM
|
|
Re: Paint job on a budget!? CONTINUED..page 44........
|
Anonymous
|
06/15/06 02:21 AM
|
|
Re: Paint job on a budget!? CONTINUED..page 44........
|
Anonymous
|
06/15/06 02:33 AM
|
|
Re: Paint job on a budget!? CONTINUED..page 44........
|
Anonymous
|
06/15/06 03:07 AM
|
|
Re: Paint job on a budget!? CONTINUED..page 44........
|
Marq
|
06/15/06 03:28 AM
|
|
Re: Paint job on a budget!? CONTINUED..page 44........
|
Exit1965
|
06/15/06 04:54 AM
|
|
Re: Paint job on a budget!? CONTINUED..page 44........
|
Anonymous
|
06/15/06 05:20 PM
|
|
Re: Paint job on a budget!? CONTINUED..page 44........
|
69chargeryeehaa
|
06/15/06 05:54 PM
|
|
Re: Paint job on a budget!? CONTINUED..page 44........
|
Exit1965
|
06/15/06 06:09 PM
|
|
Re: Paint job on a budget!? CONTINUED..page 44........
|
Anonymous
|
06/15/06 06:33 PM
|
|
Re: Paint job on a budget!? CONTINUED..page 44........
|
Marq
|
06/15/06 08:54 PM
|
|
Re: Paint job on a budget!? CONTINUED..page 44........
|
69chargeryeehaa
|
06/15/06 09:11 PM
|
|
Re: Paint job on a budget!? CONTINUED..page 44........
|
Anonymous
|
06/15/06 09:40 PM
|
|
Re: Paint job on a budget!? CONTINUED..page 44........
|
ct71rr
|
06/15/06 10:07 PM
|
|
Re: Paint job on a budget!? CONTINUED..page 44........
|
69chargeryeehaa
|
06/15/06 11:54 PM
|
|
Re: Paint job on a budget!? CONTINUED..page 44........
|
Anonymous
|
06/16/06 01:44 AM
|
|
Re: Paint job on a budget!? CONTINUED..page 44........
|
Anonymous
|
06/16/06 02:55 PM
|
|
Re: Paint job on a budget!? CONTINUED..page 44........
|
Anonymous
|
06/16/06 04:51 AM
|
|
Re: Paint job on a budget!? CONTINUED..page 44........
|
Marq
|
06/16/06 01:57 AM
|
|
Re: Paint job on a budget!? CONTINUED..page 44........
|
Anonymous
|
06/15/06 06:43 PM
|
|
Re: Paint job on a budget!? CONTINUED..page 44........
|
Anonymous
|
06/15/06 07:00 PM
|
|
Re: Paint job on a budget!? CONTINUED..page 44........
|
69chargeryeehaa
|
06/15/06 08:22 PM
|
|
Re: Paint job on a budget!? CONTINUED..page 44........
|
Anonymous
|
06/15/06 08:40 PM
|
|
Re: Paint job on a budget!? CONTINUED..page 44........
|
69chargeryeehaa
|
06/15/06 08:46 PM
|
|
Re: Paint job on a budget!? CONTINUED..page 44........
|
Anonymous
|
06/16/06 01:06 PM
|
|
Re: Paint job on a budget!? CONTINUED..page 44........
|
Exit1965
|
06/16/06 01:36 PM
|
|
Re: Paint job on a budget!? CONTINUED..page 44........
|
Anonymous
|
06/16/06 03:49 PM
|
|
Re: Paint job on a budget!? CONTINUED..page 44........
|
Exit1965
|
06/16/06 06:25 PM
|
|
Re: Paint job on a budget!? CONTINUED..page 44........
|
Anonymous
|
06/16/06 06:47 PM
|
|
Re: Paint job on a budget!? CONTINUED..page 44........
|
Exit1965
|
06/16/06 06:50 PM
|
|
Re: Paint job on a budget!? CONTINUED..page 44........
|
patrick
|
06/16/06 07:02 PM
|
|
Re: Paint job on a budget!? CONTINUED..page 44........
|
69chargeryeehaa
|
06/16/06 09:10 PM
|
|
Re: Paint job on a budget!? CONTINUED..page 44........
|
Anonymous
|
06/17/06 01:18 AM
|
|
Re: Paint job on a budget!? CONTINUED..page 44........
|
roe
|
06/17/06 03:40 AM
|
|
Re: Paint job on a budget!? CONTINUED..page 44........
|
Anonymous
|
06/17/06 04:27 AM
|
|
Re: Paint job on a budget!? CONTINUED..page 44........
|
roe
|
06/17/06 08:52 AM
|
|
Re: Paint job on a budget!? CONTINUED..page 44........
|
Anonymous
|
06/17/06 02:30 PM
|
|
Re: Paint job on a budget!? CONTINUED..page 44........
|
Anonymous
|
06/17/06 06:41 PM
|
|
Re: Paint job on a budget!? CONTINUED..page 44........
|
69chargeryeehaa
|
06/17/06 07:06 PM
|
|
Re: Paint job on a budget!? CONTINUED..page 44........
|
Anonymous
|
06/18/06 12:29 AM
|
|
Re: Paint job on a budget!? CONTINUED..page 44........
|
Anonymous
|
06/18/06 12:49 AM
|
|
Re: Paint job on a budget!? CONTINUED..page 44........
|
Marq
|
06/18/06 01:45 AM
|
|
Re: Paint job on a budget!? CONTINUED..page 44........
|
Anonymous
|
06/18/06 02:07 AM
|
|
Re: Paint job on a budget!? CONTINUED..page 44........
|
Anonymous
|
06/18/06 02:16 AM
|
|
Re: Paint job on a budget!? CONTINUED..page 44........
|
Anonymous
|
06/18/06 02:27 PM
|
|
Re: Paint job on a budget!? CONTINUED..page 44........
|
Anonymous
|
06/18/06 02:25 AM
|
|
Re: Paint job on a budget!? CONTINUED..page 44........
|
Anonymous
|
06/18/06 03:49 AM
|
|
Re: Paint job on a budget!? CONTINUED..page 44........
|
Anonymous
|
06/18/06 04:23 AM
|
|
Re: Paint job on a budget!? CONTINUED..page 44........
|
Anonymous
|
06/18/06 02:17 PM
|
|
Re: Paint job on a budget!? CONTINUED..page 44........
|
Anonymous
|
06/18/06 02:33 PM
|
|
Re: Paint job on a budget!? CONTINUED..page 44........
|
Anonymous
|
06/18/06 02:41 PM
|
|
Re: Paint job on a budget!? CONTINUED..page 44........
|
69chargeryeehaa
|
06/18/06 05:00 PM
|
|
Re: Paint job on a budget!? CONTINUED..page 44........
|
Anonymous
|
06/18/06 10:47 PM
|
|
Re: Paint job on a budget!? CONTINUED..page 44........
|
Exit1965
|
06/18/06 11:47 PM
|
|
Re: Paint job on a budget!? CONTINUED..page 44........
|
Anonymous
|
06/19/06 12:30 AM
|
|
Re: Paint job on a budget!? CONTINUED..page 44........
|
Exit1965
|
06/19/06 04:50 AM
|
|
Re: Paint job on a budget!? CONTINUED..page 44........
|
Anonymous
|
06/19/06 12:33 AM
|
|
Re: Paint job on a budget!? CONTINUED..page 44........
|
Exit1965
|
06/19/06 04:48 AM
|
|
Re: Paint job on a budget!? CONTINUED..page 44........
|
roe
|
06/19/06 04:50 AM
|
|
Re: Paint job on a budget!? CONTINUED..page 44........
|
Anonymous
|
06/19/06 05:56 AM
|
|
Re: Paint job on a budget!? CONTINUED..page 44........
|
Anonymous
|
06/19/06 06:04 AM
|
|
Re: Paint job on a budget!? CONTINUED..page 44........
|
Anonymous
|
06/19/06 07:43 AM
|
|
Re: Paint job on a budget!? CONTINUED..page 44........
|
Anonymous
|
06/19/06 10:38 AM
|
|
Re: Paint job on a budget!? CONTINUED..page 44........
|
Marq
|
06/19/06 11:56 AM
|
|
Re: Paint job on a budget!? CONTINUED..page 44........
|
Anonymous
|
06/19/06 01:54 PM
|
|
Re: Paint job on a budget!? CONTINUED..page 44........
|
Anonymous
|
06/19/06 05:45 PM
|
|
Re: Paint job on a budget!? CONTINUED..page 44........
|
Anonymous
|
06/19/06 06:57 PM
|
|
Re: Paint job on a budget!? CONTINUED..page 44........
|
69chargeryeehaa
|
06/19/06 06:58 PM
|
|
Re: Paint job on a budget!? CONTINUED..page 44........
|
69chargeryeehaa
|
06/19/06 10:08 PM
|
|
Re: Paint job on a budget!? CONTINUED..page 44........
|
Anonymous
|
06/20/06 05:03 AM
|
|
Re: Paint job on a budget!? CONTINUED..page 44........
|
Exit1965
|
06/20/06 12:55 PM
|
 Re: Paint job on a budget!? CONTINUED..page 44........
|
Anonymous
|
06/20/06 02:19 PM
|
|
Re: Paint job on a budget!? CONTINUED..page 44........
|
Anonymous
|
06/20/06 03:05 PM
|
|
Re: Paint job on a budget!? CONTINUED..page 44........
|
Exit1965
|
06/20/06 04:12 PM
|
|
Re: Paint job on a budget!? CONTINUED..page 44........
|
Marq
|
06/19/06 12:05 PM
|
|
Re: Paint job on a budget!? CONTINUED..page 44........
|
Anonymous
|
06/21/06 09:23 AM
|
|
Re: Paint job on a budget!? CONTINUED..page 44........
|
Anonymous
|
06/21/06 10:18 AM
|
|
Re: Paint job on a budget!? CONTINUED..page 44........
|
BigTerry
|
06/20/06 04:19 PM
|
|
Re: Paint job on a budget!? CONTINUED..page 44........
|
Anonymous
|
06/20/06 07:39 PM
|
|
Re: Paint job on a budget!? CONTINUED..page 44........
|
Anonymous
|
06/21/06 03:35 AM
|
|
Re: Paint job on a budget!? CONTINUED..page 44........
|
DaytonaTurbo
|
06/21/06 03:55 AM
|
|
Re: Paint job on a budget!? CONTINUED..page 44........
|
Exit1965
|
06/21/06 04:15 AM
|
|
Re: Paint job on a budget!? CONTINUED..page 44........
|
Anonymous
|
06/21/06 04:29 AM
|
|
Re: Paint job on a budget!? CONTINUED..page 44........
|
Exit1965
|
06/21/06 12:57 PM
|
|
Re: Paint job on a budget!? CONTINUED..page 44........
|
Anonymous
|
06/21/06 05:19 PM
|
|
Re: Paint job on a budget!? CONTINUED..page 44........
|
Anonymous
|
06/21/06 05:28 PM
|
|
Re: Paint job on a budget!? CONTINUED..page 44........
|
Anonymous
|
06/21/06 06:55 PM
|
|
Re: Paint job on a budget!? CONTINUED..page 44........
|
69chargeryeehaa
|
06/21/06 07:08 PM
|
|
Re: Paint job on a budget!? CONTINUED..page 44........
|
Anonymous
|
06/22/06 01:17 AM
|
|
Re: Paint job on a budget!? CONTINUED..page 44........
|
Anonymous
|
06/22/06 01:18 AM
|
|
Re: Paint job on a budget!? CONTINUED..page 44........
|
Exit1965
|
06/22/06 02:20 AM
|
|
Re: Paint job on a budget!? CONTINUED..page 44........
|
Anonymous
|
06/22/06 02:55 AM
|
|
Re: Paint job on a budget!? CONTINUED..page 44........
|
Anonymous
|
06/22/06 03:57 AM
|
|
Re: Paint job on a budget!? CONTINUED..page 44........
|
Exit1965
|
06/21/06 07:11 PM
|
|
Re: Paint job on a budget!? CONTINUED..page 44........
|
Anonymous
|
06/21/06 07:40 PM
|
|
Re: Paint job on a budget!? CONTINUED..page 44........
|
Anonymous
|
06/22/06 04:41 AM
|
|
Re: Paint job on a budget!? CONTINUED..page 44........
|
Marq
|
06/22/06 02:04 AM
|
|
Re: Paint job on a budget!? CONTINUED..page 44........
|
darenrt
|
06/22/06 02:26 AM
|
|
Re: Paint job on a budget!? CONTINUED..page 44........
|
Anonymous
|
06/22/06 04:35 AM
|
|
Re: Paint job on a budget!? CONTINUED..page 44........
|
Anonymous
|
06/22/06 11:48 AM
|
|
Re: Paint job on a budget!? CONTINUED..page 44........
|
Marq
|
06/22/06 12:09 PM
|
|
Re: Paint job on a budget!? CONTINUED..page 44........
|
Anonymous
|
06/22/06 02:40 PM
|
|
Re: Paint job on a budget!? CONTINUED..page 44........
|
Anonymous
|
06/21/06 09:20 PM
|
|
Re: Paint job on a budget!? CONTINUED..page 44........
|
Anonymous
|
06/21/06 09:29 PM
|
|
Re: Paint job on a budget!? CONTINUED..page 44........
|
Exit1965
|
06/21/06 11:01 PM
|
|
Re: Paint job on a budget!? CONTINUED..page 44........
|
Anonymous
|
06/21/06 09:00 PM
|
|
Re: Paint job on a budget!? CONTINUED..page 44........
|
Exit1965
|
06/22/06 02:23 AM
|
|
Re: Paint job on a budget!? CONTINUED..page 44........
|
Anonymous
|
06/22/06 09:13 PM
|
|
Re: Paint job on a budget!? CONTINUED..page 44........
|
Exit1965
|
06/22/06 09:37 PM
|
|
Re: Paint job on a budget!? CONTINUED..page 44........
|
Anonymous
|
06/22/06 10:10 PM
|
|
Re: Paint job on a budget!? CONTINUED..page 44........
|
Anonymous
|
06/22/06 11:27 PM
|
|
Re: Paint job on a budget!? CONTINUED..page 44........
|
Exit1965
|
06/23/06 01:32 AM
|
|
Re: Paint job on a budget!? CONTINUED..page 44........
|
Anonymous
|
06/23/06 04:13 AM
|
|
Re: Paint job on a budget!? CONTINUED..page 44........
|
493_DART
|
06/23/06 07:11 AM
|
|
Re: Paint job on a budget!? CONTINUED..page 44........
|
Anonymous
|
06/23/06 10:00 AM
|
|
Re: Paint job on a budget!? CONTINUED..page 44........
|
69chargeryeehaa
|
06/23/06 02:56 PM
|
|
Re: Paint job on a budget!? CONTINUED..page 44........
|
69chargeryeehaa
|
06/23/06 03:06 PM
|
|
Re: Paint job on a budget!? CONTINUED..page 44........
|
Exit1965
|
06/23/06 03:40 PM
|
|
Re: Paint job on a budget!? CONTINUED..page 44........
|
pdqvsix
|
06/24/06 01:21 AM
|
|
Re: Paint job on a budget!? CONTINUED..page 44........
|
Anonymous
|
06/24/06 02:43 AM
|
|
Re: Paint job on a budget!? CONTINUED..page 44........
|
Anonymous
|
06/24/06 12:16 PM
|
|
Re: Paint job on a budget!? CONTINUED..page 44........
|
pdqvsix
|
06/24/06 01:40 PM
|
|
Re: Paint job on a budget!? CONTINUED..page 44........
|
BigTerry
|
06/24/06 01:45 PM
|
|
Re: Paint job on a budget!? CONTINUED..page 44........
|
Anonymous
|
06/24/06 02:19 PM
|
|
Re: Paint job on a budget!? CONTINUED..page 44........
|
Anonymous
|
06/24/06 04:18 PM
|
|
Re: Paint job on a budget!? CONTINUED..page 44........
|
Exit1965
|
06/24/06 04:54 PM
|
|
Re: Paint job on a budget!? CONTINUED..page 44........
|
pdqvsix
|
06/24/06 10:08 PM
|
|
Re: Paint job on a budget!? CONTINUED..page 44........
|
Anonymous
|
06/25/06 02:08 AM
|
|
Re: Paint job on a budget!? CONTINUED..page 44........
|
Marq
|
06/26/06 02:00 AM
|
|
Re: Paint job on a budget!? CONTINUED..page 44........
|
Anonymous
|
06/26/06 03:28 AM
|
|
Re: Paint job on a budget!? CONTINUED..page 44........
|
Exit1965
|
06/23/06 12:24 PM
|
|
Re: Paint job on a budget!? CONTINUED..page 44........
|
Anonymous
|
06/22/06 11:44 AM
|
|
Re: Paint job on a budget!? CONTINUED..page 44........
|
Anonymous
|
06/23/06 01:29 AM
|
|
Re: Paint job on a budget!? CONTINUED..page 44........
|
Anonymous
|
06/23/06 11:36 AM
|
|
Re: Paint job on a budget!? CONTINUED..page 44........
|
Anonymous
|
06/22/06 03:36 PM
|
|
Re: Paint job on a budget!? CONTINUED..page 44........
|
Anonymous
|
06/22/06 07:27 PM
|
|
see attachment
|
Anonymous
|
06/23/06 06:41 PM
|
|
and another
|
Anonymous
|
06/23/06 06:44 PM
|
|
Re: and another
|
Anonymous
|
06/23/06 06:47 PM
|
|
Re: and another
|
Anonymous
|
06/24/06 12:48 AM
|
|
Re: and another
|
Exit1965
|
06/24/06 01:08 AM
|
|
Re: Paint job on a budget!? CONTINUED..page 44........
|
texczech
|
06/20/06 05:36 PM
|
|
Re: Paint job on a budget!? CONTINUED..page 44........
|
Anonymous
|
06/17/06 06:49 AM
|
|
Re: Paint job on a budget!? CONTINUED..page 44........
|
Anonymous
|
06/16/06 06:26 PM
|
|
Re: Paint job on a budget!? CONTINUED..page 44........
|
Anonymous
|
06/16/06 01:52 AM
|
|
Re: Paint job on a budget!? CONTINUED..page 44........
|
GTSDave
|
06/16/06 01:18 PM
|
|
Re: Paint job on a budget!? CONTINUED..page 44........
|
69chargeryeehaa
|
06/16/06 01:49 PM
|
|
Re: Paint job on a budget!? CONTINUED..page 44........
|
Anonymous
|
06/14/06 05:53 AM
|
|
Re: Paint job on a budget!? CONTINUED..page 44............
|
C38coupe
|
07/13/06 12:22 AM
|
|
Re: Paint job on a budget!? CONTINUED..page 44............
|
Anonymous
|
08/25/06 07:22 PM
|
|
Re: Paint job on a budget!? CONTINUED..page 44............
|
69chargeryeehaa
|
08/25/06 08:11 PM
|
|
Re: Paint job on a budget!? CONTINUED..page 44............
|
ONEBADBIRD
|
08/26/06 03:42 AM
|
|
Re: Paint job on a budget!? CONTINUED..page 44............
|
69chargeryeehaa
|
08/28/06 09:31 PM
|
|
Re: Paint job on a budget!? CONTINUED..page 44............
|
69chargeryeehaa
|
08/28/06 09:34 PM
|
|
Re: Paint job on a budget!? CONTINUED..page 44........
|
Anonymous
|
08/28/06 10:59 PM
|
|
Re: Paint job on a budget!? CONTINUED..page 44........
|
69chargeryeehaa
|
08/28/06 11:19 PM
|
|
Re: Paint job on a budget!? CONTINUED..page 44........
|
Anonymous
|
08/29/06 03:27 AM
|
|
Re: Paint job on a budget!? CONTINUED..page 44........
|
Exit1965
|
08/29/06 03:48 AM
|
|
Re: Paint job on a budget!? CONTINUED..page 44........
|
Anonymous
|
08/29/06 08:21 PM
|
|
Re: Paint job on a budget!? CONTINUED..page 44........
|
Exit1965
|
08/30/06 12:49 AM
|
|
we
|
Anonymous
|
08/30/06 12:53 AM
|
|
Re: we
|
Anonymous
|
08/30/06 12:57 AM
|
|
Re: we
|
Marq
|
08/30/06 01:17 AM
|
|
Re: Paint job on a budget!? CONTINUED..page 44........
|
78D150CLUB
|
08/30/06 01:45 AM
|
|
Re: Paint job on a budget!? CONTINUED..page 44........
|
Marq
|
08/30/06 02:30 AM
|
|
Re: Paint job on a budget!? CONTINUED..page 44........
|
78D150CLUB
|
08/30/06 03:19 AM
|
|
Re: Paint job on a budget!? CONTINUED..page 44........
|
Anonymous
|
08/30/06 03:37 AM
|
|
Re: Paint job on a budget!? CONTINUED..page 44........
|
Anonymous
|
08/30/06 03:38 AM
|
|
Re: Paint job on a budget!? CONTINUED..page 44........
|
Anonymous
|
08/31/06 03:25 AM
|
|
Re: Paint job on a budget!? CONTINUED..page 44........
|
Anonymous
|
08/30/06 02:29 AM
|
|
Re: Paint job on a budget!? CONTINUED..page 44........
|
Anonymous
|
08/30/06 03:32 AM
|
|
Re: Paint job on a budget!? CONTINUED..page 44........
|
Exit1965
|
08/30/06 04:35 AM
|
|
Re: Paint job on a budget!? CONTINUED..page 44........
|
Anonymous
|
08/30/06 07:01 AM
|
|
Re: Paint job on a budget!? CONTINUED..page 44........
|
Anonymous
|
08/31/06 01:01 AM
|
|
Re: Paint job on a budget!? CONTINUED..page 44........
|
Anonymous
|
08/31/06 01:26 AM
|
|
Re: Paint job on a budget!? CONTINUED..page 44........
|
Anonymous
|
08/31/06 02:20 AM
|
|
Re: Paint job on a budget!? CONTINUED..page 44........
|
Anonymous
|
09/06/06 10:18 PM
|
|
Re: Paint job on a budget!? CONTINUED..page 44........
|
Anonymous
|
08/31/06 03:35 AM
|
|
Re: Paint job on a budget!? CONTINUED..page 44........
|
Anonymous
|
08/31/06 04:24 AM
|
|
Re: Paint job on a budget!? CONTINUED..page 44........
|
Exit1965
|
08/31/06 05:13 AM
|
|
Re: Paint job on a budget!? CONTINUED..page 44........
|
Anonymous
|
08/31/06 07:36 AM
|
|
Re: Paint job on a budget!? CONTINUED..page 44........
|
Exit1965
|
08/31/06 01:11 PM
|
|
Re: Paint job on a budget!? CONTINUED..page 44........
|
Anonymous
|
08/31/06 02:46 PM
|
|
Re: Paint job on a budget!? CONTINUED..page 44........
|
Anonymous
|
08/31/06 02:40 PM
|
|
Re: Paint job on a budget!? CONTINUED..page 44........
|
Anonymous
|
08/31/06 05:10 PM
|
|
Re: Paint job on a budget!? CONTINUED..page 44........
|
Anonymous
|
08/31/06 07:25 PM
|
|
Re: Paint job on a budget!? CONTINUED..page 44........
|
69chargeryeehaa
|
08/31/06 09:04 PM
|
|
Re: Paint job on a budget!? CONTINUED..page 44........
|
Anonymous
|
09/01/06 04:51 PM
|
|
Re: Paint job on a budget!? CONTINUED..page 44........
|
Marq
|
09/01/06 06:12 PM
|
|
Re: Paint job on a budget!? CONTINUED..page 44........
|
Anonymous
|
09/01/06 05:16 PM
|
|
Re: Paint job on a budget!? CONTINUED..page 44........
|
69chargeryeehaa
|
09/01/06 05:32 PM
|
 Re: Paint job on a budget!? CONTINUED..page 44........
|
Anonymous
|
09/04/06 11:48 PM
|
|
Re: Paint job on a budget!? CONTINUED..page 44........
|
Anonymous
|
09/05/06 04:59 AM
|
|
Re: Paint job on a budget!? CONTINUED..page 44........
|
Marq
|
09/05/06 10:25 AM
|
|
Re: Paint job on a budget!? CONTINUED..page 44........
|
Anonymous
|
09/05/06 01:12 PM
|
|
Re: Paint job on a budget!? CONTINUED..page 44........
|
78D150CLUB
|
09/05/06 08:52 PM
|
|
Re: Paint job on a budget!? CONTINUED..page 44........
|
Anonymous
|
09/06/06 06:57 PM
|
|
Re: Paint job on a budget!? CONTINUED..page 44........
|
Anonymous
|
09/06/06 08:32 PM
|
|
Re: Paint job on a budget!? CONTINUED..page 44........
|
69chargeryeehaa
|
09/06/06 10:06 PM
|
|
Re: Paint job on a budget!? CONTINUED..page 44........
|
Anonymous
|
09/13/06 12:31 AM
|
|
Re: Paint job on a budget!? CONTINUED..page 44........
|
Marq
|
09/13/06 01:43 AM
|
|
Re: Paint job on a budget!? CONTINUED..page 44........
|
Anonymous
|
09/13/06 02:16 AM
|
|
Re: Paint job on a budget!? CONTINUED..page 44........
|
Marq
|
09/13/06 07:50 PM
|
|
Re: Paint job on a budget!? CONTINUED..page 44........
|
Anonymous
|
09/13/06 12:53 PM
|
|
Re: Paint job on a budget!? CONTINUED..page 44........
|
Anonymous
|
09/13/06 05:21 PM
|
|
Re: Paint job on a budget!? CONTINUED..page 44........
|
Anonymous
|
09/13/06 06:02 PM
|
|
Re: Paint job on a budget!? CONTINUED..page 44........
|
Anonymous
|
09/13/06 07:39 PM
|
|
Re: Paint job on a budget!? CONTINUED..page 44........
|
Anonymous
|
09/13/06 09:47 PM
|
|
Re: Paint job on a budget!? CONTINUED..page 44........
|
Marq
|
09/13/06 11:22 PM
|
|
Re: Paint job on a budget!? CONTINUED..page 44........
|
Anonymous
|
09/14/06 12:48 AM
|
|
Re: Paint job on a budget!? CONTINUED..page 44........
|
Anonymous
|
09/14/06 01:42 AM
|
|
Re: Paint job on a budget!? CONTINUED..page 44........
|
Marq
|
09/14/06 02:04 AM
|
|
Re: Paint job on a budget!? CONTINUED..page 44........
|
Anonymous
|
09/14/06 11:53 PM
|
|
Re: Paint job on a budget!? CONTINUED..page 44........
|
Anonymous
|
09/15/06 03:49 AM
|
|
Re: Paint job on a budget!? CONTINUED..page 44........
|
Anonymous
|
09/15/06 03:55 PM
|
|
Re: Paint job on a budget!? CONTINUED..page 44........
|
Exit1965
|
09/15/06 05:35 PM
|
|
Re: Paint job on a budget!? CONTINUED..page 44........
|
Marq
|
09/15/06 06:53 PM
|
|
Re: Paint job on a budget!? CONTINUED..page 44........
|
69DartGT
|
09/16/06 12:03 AM
|
|
Re: Paint job on a budget!? CONTINUED..page 44........
|
Marq
|
09/16/06 02:07 AM
|
|
Re: Paint job on a budget!? CONTINUED..page 44........
|
69DartGT
|
09/16/06 02:14 AM
|
|
Re: Paint job on a budget!? CONTINUED..page 44........
|
Anonymous
|
09/16/06 12:35 AM
|
|
Re: Paint job on a budget!? CONTINUED..page 44........
|
Marq
|
09/16/06 02:11 AM
|
|
Re: Paint job on a budget!? CONTINUED..page 44........
|
darenrt
|
09/18/06 11:49 PM
|
|
Re: Paint job on a budget!? CONTINUED..page 44........
|
Marq
|
09/19/06 12:15 AM
|
|
Re: Paint job on a budget!? CONTINUED..page 44........
|
78D150CLUB
|
09/19/06 12:36 AM
|
|
Re: Paint job on a budget!? CONTINUED..page 44........
|
69chargeryeehaa
|
09/19/06 01:46 AM
|
|
Re: Paint job on a budget!? CONTINUED..page 44........
|
Anonymous
|
09/19/06 02:08 AM
|
|
Re: Paint job on a budget!? CONTINUED..page 44........
|
69DartGT
|
09/19/06 10:58 PM
|
|
Re: Paint job on a budget!? CONTINUED..page 44........
|
Joshs68
|
09/19/06 11:06 PM
|
|
Re: Paint job on a budget!? CONTINUED..page 44........
|
Marq
|
09/19/06 11:24 PM
|
|
Re: Paint job on a budget!? CONTINUED..page 44........
|
darenrt
|
09/19/06 11:59 PM
|
|
Re: Paint job on a budget!? CONTINUED..page 44........
|
Anonymous
|
09/20/06 12:45 AM
|
|
Re: Paint job on a budget!? CONTINUED..page 44........
|
69DartGT
|
09/20/06 01:12 AM
|
|
Re: Paint job on a budget!? CONTINUED..page 44........
|
Anonymous
|
11/03/06 12:38 AM
|
|
Re: Paint job on a budget!? CONTINUED..page 44........
|
Exit1965
|
11/03/06 04:51 AM
|
|
Re: Paint job on a budget!? CONTINUED..page 44........
|
Anonymous
|
09/15/06 10:34 PM
|
|
Re: Paint job on a budget!? CONTINUED..page 44........
|
v8mirage
|
09/16/06 04:17 AM
|
|
Re: Paint job on a budget!? CONTINUED..page 44........
|
69chargeryeehaa
|
09/16/06 09:52 PM
|
|
Re: Paint job on a budget!? CONTINUED..page 44........
|
Anonymous
|
09/17/06 02:02 PM
|
|
Re: Paint job on a budget!? CONTINUED..page 44........
|
Anonymous
|
09/14/06 01:44 AM
|
|
Re: Paint job on a budget!? CONTINUED..page 44........
|
Anonymous
|
09/18/06 12:45 PM
|
|
Re: Paint job on a budget!? CONTINUED..page 44........
|
Exit1965
|
09/18/06 01:45 PM
|
|
Re: Paint job on a budget!? CONTINUED..page 44........
|
Marq
|
09/18/06 11:49 PM
|
|
Re: Paint job on a budget!? CONTINUED..page 44........
|
Marq
|
09/18/06 11:43 PM
|
|
Re: Paint job on a budget!? CONTINUED..page 44........
|
70blackfish
|
02/15/07 07:25 PM
|
|
Re: Paint job on a budget!? CONTINUED..page 44........
|
Anonymous
|
09/02/06 04:47 AM
|
|
Re: Paint job on a budget!? CONTINUED..page 44........
|
Anonymous
|
09/02/06 05:30 AM
|
|
Re: Paint job on a budget!? CONTINUED..page 44........
|
Anonymous
|
09/02/06 06:10 AM
|
|
Re: Paint job on a budget!? CONTINUED..page 44........
|
Marq
|
09/02/06 07:37 PM
|
|
Re: Paint job on a budget!? CONTINUED..page 44........
|
Anonymous
|
09/02/06 08:41 PM
|
|
Re: Paint job on a budget!? CONTINUED..page 44........
|
Anonymous
|
09/02/06 12:07 PM
|
|
Re: Paint job on a budget!? CONTINUED..page 44........
|
Anonymous
|
09/02/06 05:02 PM
|
|
Re: Paint job on a budget!? CONTINUED..page 44........
|
Anonymous
|
09/03/06 05:35 PM
|
|
Re: Paint job on a budget!? CONTINUED..page 44........
|
Anonymous
|
11/02/06 04:37 AM
|
|
Re: Paint job on a budget!? CONTINUED..page 44........
|
Exit1965
|
11/02/06 05:00 AM
|
|
Re: Paint job on a budget!? CONTINUED..page 44........
|
Anonymous
|
08/30/06 12:56 PM
|
|
Re: Paint job on a budget!? CONTINUED..page 44........
|
Anonymous
|
08/30/06 03:12 PM
|
|
Re: Paint job on a budget!? CONTINUED..page 44........
|
Exit1965
|
08/30/06 03:33 PM
|
|
Re: Paint job on a budget!? CONTINUED..page 44........
|
Marq
|
08/30/06 04:09 PM
|
|
Re: Paint job on a budget!? CONTINUED..page 44........
|
Anonymous
|
08/30/06 04:18 PM
|
|
Re: Paint job on a budget!? CONTINUED..page 44........
|
Anonymous
|
08/30/06 05:27 PM
|
|
Re: Paint job on a budget!? CONTINUED..page 44........
|
Exit1965
|
08/29/06 03:53 AM
|
|
Re: Paint job on a budget!? CONTINUED..page 44........
|
Anonymous
|
08/29/06 04:05 AM
|
|
Re: Paint job on a budget!? CONTINUED..page 44........
|
Marq
|
08/29/06 11:13 AM
|
|
Re: Paint job on a budget!? CONTINUED..page 44........
|
Anonymous
|
08/29/06 02:23 PM
|
|
Re: Paint job on a budget!? CONTINUED..page 44........
|
Marq
|
08/29/06 03:09 PM
|
|
Re: Paint job on a budget!? CONTINUED..page 44........
|
Anonymous
|
08/29/06 05:23 PM
|
|
Re: Paint job on a budget!? CONTINUED..page 44........
|
Anonymous
|
08/29/06 08:28 PM
|
|
Re: Paint job on a budget!? CONTINUED..page 44........
|
Anonymous
|
08/29/06 10:57 PM
|
|
Re: Paint job on a budget!? CONTINUED..page 44........
|
Marq
|
08/29/06 11:10 PM
|
|
Re: Paint job on a budget!? CONTINUED..page 44............
|
Anonymous
|
08/26/06 02:08 PM
|
|
Re: Paint job on a budget!? CONTINUED..page 44............
|
Anonymous
|
08/27/06 12:57 AM
|
|
Re: Paint job on a budget!? CONTINUED..page 44............
|
Marq
|
08/27/06 02:13 AM
|
|
Re: Paint job on a budget!? CONTINUED..page 44........
|
Anonymous
|
08/28/06 12:43 AM
|
|
Re: Paint job on a budget!? CONTINUED..page 44........
|
sogtx
|
08/28/06 03:11 AM
|
|
Re: Paint job on a budget!? CONTINUED..page 44........
|
Marq
|
08/28/06 07:17 PM
|
|
Re: Paint job on a budget!? CONTINUED..page 44........
|
Anonymous
|
08/28/06 03:35 PM
|
|
Re: Paint job on a budget!? CONTINUED..page 44............
|
Anonymous
|
09/07/06 12:17 AM
|
|
Re: Paint job on a budget!? CONTINUED..page 44............
|
78D150CLUB
|
09/07/06 02:19 AM
|
|
Re: Paint job on a budget!? CONTINUED..page 44............
|
Anonymous
|
09/07/06 09:32 AM
|
|
Re: Paint job on a budget!? CONTINUED..page 44........
|
Exit1965
|
09/07/06 01:22 PM
|
|
Re: Paint job on a budget!? CONTINUED..page 44............
|
Anonymous
|
09/07/06 06:29 PM
|
|
Re: Paint job on a budget!? CONTINUED..page 44............
|
78D150CLUB
|
09/07/06 08:33 PM
|
|
Re: Paint job on a budget!? CONTINUED..page 44............
|
Anonymous
|
09/07/06 10:55 PM
|
|
Re: Paint job on a budget!? CONTINUED..page 44............
|
78D150CLUB
|
09/08/06 12:06 AM
|
|
Re: Paint job on a budget!? CONTINUED..page 44............
|
Anonymous
|
09/08/06 01:07 AM
|
|
Re: Paint job on a budget!? CONTINUED..page 44............
|
Anonymous
|
09/08/06 05:21 AM
|
|
Re: Paint job on a budget!? CONTINUED..page 44........
|
Anonymous
|
09/08/06 12:51 PM
|
|
Re: Paint job on a budget!? CONTINUED..page 44........
|
v8mirage
|
09/08/06 08:16 PM
|
|
Re: Paint job on a budget!? CONTINUED..page 44........
|
Anonymous
|
09/08/06 11:58 PM
|
|
Re: Paint job on a budget!? CONTINUED..page 44........
|
Anonymous
|
09/09/06 12:39 AM
|
|
Re: Paint job on a budget!? CONTINUED..page 44........
|
Anonymous
|
09/09/06 11:04 PM
|
|
Re: Paint job on a budget!? CONTINUED..page 44........
|
Marq
|
09/10/06 01:03 AM
|
|
Re: Paint job on a budget!? CONTINUED..page 44........
|
Anonymous
|
09/11/06 03:20 PM
|
|
Re: Paint job on a budget!? CONTINUED..page 44........
|
Anonymous
|
09/11/06 06:33 PM
|
|
Re: Paint job on a budget!? CONTINUED..page 44........
|
Anonymous
|
09/11/06 08:28 PM
|
|
Re: Paint job on a budget!? CONTINUED..page 44........
|
Anonymous
|
09/10/06 04:42 AM
|
|
Re: Paint job on a budget!? CONTINUED..page 44........
|
Anonymous
|
09/11/06 01:03 AM
|
|
Re: Paint job on a budget!? CONTINUED..page 44........
|
Anonymous
|
09/11/06 01:02 PM
|
|
Paint Type Summary Request
|
Anonymous
|
09/20/06 03:41 AM
|
|
Re: Paint Type Summary Request
|
69DartGT
|
09/20/06 04:20 AM
|
|
Re: Paint Type Summary Request
|
v8mirage
|
09/20/06 11:19 AM
|
|
Re: Paint Type Summary Request
|
Exit1965
|
09/20/06 07:27 PM
|
|
Re: Paint Type Summary Request
|
Marq
|
09/20/06 08:25 PM
|
|
Re: Paint Type Summary Request
|
Anonymous
|
09/20/06 08:43 PM
|
|
Another first
|
Anonymous
|
09/20/06 09:25 PM
|
|
Re: Another first
|
70Cuda383
|
09/20/06 09:34 PM
|
|
Re: Another first
|
69chargeryeehaa
|
09/20/06 09:42 PM
|
|
Re: Another first
|
Marq
|
09/21/06 07:40 PM
|
|
Re: Paint Type Summary Request
|
Marq
|
09/21/06 07:29 PM
|
|
Re: Paint Type Summary Request
|
Exit1965
|
09/20/06 09:48 PM
|
|
Re: Paint Type Summary Request
|
admactanium
|
09/20/06 10:41 PM
|
|
Re: Paint Type Summary Request
|
Anonymous
|
09/21/06 05:04 AM
|
|
Re: Paint Type Summary Request
|
Anonymous
|
09/21/06 12:07 PM
|
|
Re: Paint Type Summary Request
|
Anonymous
|
09/21/06 12:36 PM
|
|
Re: Paint Type Summary Request
|
Anonymous
|
09/21/06 02:13 PM
|
|
Re: Paint Type Summary Request
|
69DartGT
|
09/21/06 02:49 PM
|
|
Re: Paint Type Summary Request
|
Anonymous
|
09/21/06 04:53 PM
|
|
Re: Paint Type Summary Request
|
Anonymous
|
09/21/06 05:07 PM
|
|
Re: Paint Type Summary Request
|
v8mirage
|
09/21/06 05:45 PM
|
|
Re: Paint Type Summary Request
|
Exit1965
|
09/21/06 06:22 PM
|
|
Re: Paint Type Summary Request
|
Anonymous
|
09/21/06 06:53 PM
|
|
Re: Paint Type Summary Request
|
admactanium
|
09/21/06 07:32 PM
|
|
Re: Paint Type Summary Request
|
Anonymous
|
09/21/06 10:41 PM
|
|
Re: Paint Type Summary Request
|
Anonymous
|
09/21/06 11:37 PM
|
|
Re: Paint Type Summary Request
|
Anonymous
|
09/22/06 12:24 AM
|
|
Re: Paint Type Summary Request
|
Marq
|
09/22/06 10:17 AM
|
|
Re: Paint Type Summary Request
|
v8mirage
|
09/22/06 11:01 AM
|
|
Re: Paint Type Summary Request
|
v8mirage
|
09/22/06 11:04 AM
|
|
Re: Paint Type Summary Request
|
Exit1965
|
09/22/06 05:58 PM
|
|
Re: Paint Type Summary Request
|
Anonymous
|
09/22/06 08:40 PM
|
|
Re: Paint Type Summary Request
|
Marq
|
09/22/06 10:11 PM
|
|
Re: Paint Type Summary Request
|
Marq
|
09/22/06 09:59 PM
|
|
Re: Paint Type Summary Request
|
Anonymous
|
09/23/06 12:17 AM
|
|
Re: Paint Type Summary Request
|
Marq
|
09/23/06 01:54 AM
|
|
Re: Paint Type Summary Request
|
Exit1965
|
09/23/06 02:28 AM
|
|
Re: Paint Type Summary Request
|
Anonymous
|
09/23/06 03:20 AM
|
|
Re: Paint Type Summary Request
|
Marq
|
09/23/06 05:36 AM
|
|
Re: Paint Type Summary Request
|
Anonymous
|
09/23/06 07:40 PM
|
|
Re: Paint Type Summary Request
|
69DartGT
|
09/23/06 07:54 PM
|
|
Re: Paint Type Summary Request
|
Marq
|
09/23/06 08:24 PM
|
|
Re: Paint Type Summary Request
|
Anonymous
|
09/23/06 10:31 PM
|
|
Re: Paint Type Summary Request
|
darenrt
|
09/23/06 11:36 PM
|
|
Re: Paint Type Summary Request
|
69DartGT
|
09/24/06 03:03 AM
|
|
Re: Paint Type Summary Request
|
Marq
|
09/24/06 12:53 PM
|
|
Re: Paint Type Summary Request
|
Anonymous
|
09/24/06 06:25 PM
|
|
Re: Paint Type Summary Request
|
69DartGT
|
09/24/06 06:46 PM
|
|
Re: Paint Type Summary Request
|
Anonymous
|
09/24/06 07:47 PM
|
|
Re: Paint Type Summary Request
|
Clair_Davis
|
09/24/06 07:47 PM
|
|
Re: Paint Type Summary Request
|
Marq
|
09/24/06 09:45 PM
|
|
Re: Paint Type Summary Request
|
Anonymous
|
09/24/06 11:08 PM
|
|
Re: Paint Type Summary Request
|
Anonymous
|
09/24/06 11:57 PM
|
|
Re: Paint Type Summary Request
|
dalbers
|
09/25/06 12:59 AM
|
|
Re: Paint Type Summary Request
|
dalbers
|
09/25/06 01:00 AM
|
|
Re: Paint Type Summary Request
|
dalbers
|
09/25/06 01:00 AM
|
|
Re: Paint Type Summary Request
|
dalbers
|
09/25/06 01:00 AM
|
|
Re: Paint Type Summary Request
|
dalbers
|
09/25/06 01:01 AM
|
|
Re: Paint Type Summary Request
|
Marq
|
09/25/06 01:38 AM
|
|
Re: Paint Type Summary Request
|
Jerry
|
09/25/06 11:56 AM
|
|
Re: Paint Type Summary Request
|
dalbers
|
09/25/06 04:19 PM
|
|
Re: Paint Type Summary Request
|
Marq
|
09/25/06 01:31 AM
|
|
hanks
|
Anonymous
|
09/25/06 08:09 AM
|
|
Re: Paint Type Summary Request
|
Anonymous
|
09/25/06 02:16 PM
|
|
Re: Paint Type Summary Request
|
Anonymous
|
09/25/06 04:07 PM
|
|
Re: Paint Type Summary Request
|
QuickDodge
|
09/24/06 03:28 PM
|
|
Re: Paint Type Summary Request
|
Anonymous
|
09/22/06 08:42 PM
|
|
Re: Paint Type Summary Request
|
darenrt
|
09/22/06 02:01 AM
|
|
Re: Paint Type Summary Request
|
Anonymous
|
09/22/06 05:38 AM
|
|
Re: Paint Type Summary Request
|
admactanium
|
09/25/06 05:31 PM
|
|
Re: Paint Type Summary Request
|
Anonymous
|
09/25/06 09:57 PM
|
|
Re: Paint Type Summary Request
|
Exit1965
|
09/25/06 10:10 PM
|
|
Re: Paint Type Summary Request
|
69DartGT
|
09/27/06 01:48 AM
|
|
Re: Paint Type Summary Request
|
Marq
|
09/27/06 02:23 AM
|
|
Re: Paint Type Summary Request
|
Anonymous
|
09/27/06 08:55 AM
|
|
Re: Paint Type Summary Request
|
Anonymous
|
09/27/06 01:09 PM
|
|
Re: Paint Type Summary Request
|
Anonymous
|
09/27/06 05:13 PM
|
|
Re: Paint Type Summary Request
|
Anonymous
|
09/27/06 06:02 PM
|
|
Re: Paint Type Summary Request
|
Cudajon
|
09/27/06 06:25 PM
|
|
Re: Paint Type Summary Request
|
Anonymous
|
09/28/06 01:17 AM
|
|
Re: Paint Type Summary Request
|
Anonymous
|
09/28/06 01:19 AM
|
|
Re: Paint Type Summary Request
|
Wyl E Coyote
|
09/28/06 02:14 AM
|
|
Re: Paint Type Summary Request
|
Wyl E Coyote
|
09/28/06 02:27 AM
|
|
Re: Paint Type Summary Request
|
Wyl E Coyote
|
09/28/06 02:28 AM
|
|
Re: Paint Type Summary Request
|
Anonymous
|
09/28/06 12:31 PM
|
|
Re: Paint Type Summary Request
|
Wyl E Coyote
|
09/28/06 01:21 PM
|
|
Re: Paint Type Summary Request
|
Anonymous
|
09/28/06 03:35 PM
|
|
Re: Paint Type Summary Request
|
Wyl E Coyote
|
09/28/06 08:57 PM
|
|
Re: Paint Type Summary Request
|
Anonymous
|
09/28/06 11:56 PM
|
|
Re: Paint Type Summary Request
|
Wyl E Coyote
|
09/29/06 12:10 AM
|
|
Re: Paint Type Summary Request
|
Anonymous
|
10/01/06 12:26 PM
|
|
Re: Paint Type Summary Request
|
Anonymous
|
10/02/06 12:25 AM
|
|
Re: Paint Type Summary Request
|
Marq
|
10/02/06 01:14 AM
|
|
Re: Paint Type Summary Request
|
69chargeryeehaa
|
09/28/06 04:44 PM
|
|
Re: Paint Type Summary Request
|
Anonymous
|
09/28/06 07:08 PM
|
|
Re: Paint Type Summary Request
|
Anonymous
|
09/28/06 07:35 PM
|
|
Re: Paint Type Summary Request
|
Anonymous
|
09/28/06 12:05 PM
|
|
Re: Paint Type Summary Request
|
Anonymous
|
09/28/06 01:23 PM
|
|
Re: Paint Type Summary Request
|
Anonymous
|
09/29/06 12:30 AM
|
|
Re: Paint Type Summary Request
|
Exit1965
|
09/29/06 03:48 AM
|
|
Re: Paint Type Summary Request
|
Anonymous
|
09/29/06 06:31 AM
|
|
Re: Paint Type Summary Request
|
Anonymous
|
09/29/06 09:14 AM
|
|
Re: Paint Type Summary Request
|
69DartGT
|
09/29/06 02:05 PM
|
|
Re: Paint Type Summary Request
|
69chargeryeehaa
|
09/29/06 04:04 PM
|
|
Profesional Results?
|
Anonymous
|
09/29/06 05:25 PM
|
|
Re: Profesional Results?
|
Wyl E Coyote
|
09/29/06 05:42 PM
|
|
Re: Profesional Results?
|
Anonymous
|
09/29/06 06:43 PM
|
|
Re: Profesional Results?
|
moparguy
|
09/29/06 07:48 PM
|
|
Re: Profesional Results?
|
Exit1965
|
09/29/06 08:02 PM
|
|
Re: Profesional Results?
|
Exit1965
|
09/29/06 08:01 PM
|
|
Re: Profesional Results?
|
Anonymous
|
10/01/06 05:48 PM
|
|
Re: Profesional Results?
|
Marq
|
09/29/06 10:38 PM
|
|
Re: Profesional Results?
|
Wyl E Coyote
|
09/29/06 10:48 PM
|
|
Re: Profesional Results?
|
Anonymous
|
09/30/06 12:57 AM
|
|
Re: Profesional Results?
|
_Scott_
|
09/30/06 05:50 AM
|
|
Re: Profesional Results?
|
79asspin
|
09/30/06 09:46 AM
|
|
Re: Profesional Results?
|
admactanium
|
10/07/06 07:00 AM
|
|
Re: Profesional Results?
|
Anonymous
|
10/07/06 05:50 PM
|
|
Re: Profesional Results?
|
admactanium
|
10/08/06 10:35 AM
|
|
Re: Profesional Results?
|
Anonymous
|
10/09/06 04:54 PM
|
|
Re: Profesional Results?
|
admactanium
|
10/09/06 07:47 PM
|
|
Re: Profesional Results?
|
Anonymous
|
10/09/06 10:17 PM
|
 Re: Profesional Results?
|
Anonymous
|
10/09/06 10:25 PM
|
|
Re: Profesional Results?
|
Anonymous
|
10/10/06 02:46 PM
|
|
Re: Profesional Results?
|
69chargeryeehaa
|
10/10/06 03:20 PM
|
|
Re: Profesional Results?
|
Anonymous
|
10/18/06 09:28 PM
|
|
Re: Profesional Results?
|
Anonymous
|
10/19/06 04:46 AM
|
|
Re: Profesional Results?
|
admactanium
|
10/09/06 10:33 PM
|
|
sprayed
|
Exit1965
|
10/09/06 11:51 PM
|
|
Re: sprayed
|
69DartGT
|
10/10/06 12:10 AM
|
|
Re: sprayed
|
Exit1965
|
10/10/06 01:05 AM
|
|
Re: Profesional Results?
|
Exit1965
|
09/30/06 04:15 PM
|
|
Re: Profesional Results?
|
69DartGT
|
09/30/06 06:02 PM
|
|
Re: Profesional Results?
|
Marq
|
09/29/06 10:24 PM
|
|
Re: Paint Type Summary Request
|
Anonymous
|
09/30/06 09:06 AM
|
|
Re: Paint Type Summary Request
|
Exit1965
|
09/30/06 04:15 PM
|
|
Re: Paint Type Summary Request
|
Anonymous
|
09/30/06 10:49 PM
|
|
Re: Paint Type Summary Request
|
Exit1965
|
09/30/06 11:49 PM
|
|
Re: Paint Type Summary Request
|
Anonymous
|
10/01/06 01:07 AM
|
|
Re: Paint Type Summary Request
|
Exit1965
|
10/01/06 03:13 AM
|
|
Re: Paint Type Summary Request
|
Anonymous
|
10/01/06 07:48 AM
|
|
Re: Paint Type Summary Request
|
Wyl E Coyote
|
10/01/06 02:15 PM
|
|
Re: Paint Type Summary Request
|
Exit1965
|
10/01/06 02:29 PM
|
|
Re: Paint Type Summary Request
|
Marq
|
10/01/06 05:39 PM
|
|
Re: Paint Type Summary Request
|
Anonymous
|
10/01/06 05:42 PM
|
|
Re: Paint Type Summary Request
|
Marq
|
10/01/06 06:14 PM
|
|
Re: Paint Type Summary Request
|
Wyl E Coyote
|
10/01/06 06:45 PM
|
|
Re: Paint Type Summary Request
|
Anonymous
|
10/01/06 09:03 PM
|
|
Re: Paint Type Summary Request
|
Exit1965
|
10/01/06 09:42 PM
|
|
Re: Paint Type Summary Request
|
Anonymous
|
10/01/06 10:08 PM
|
|
Re: Paint Type Summary Request
|
Exit1965
|
10/01/06 10:19 PM
|
|
Re: Paint Type Summary Request
|
Anonymous
|
10/01/06 10:44 PM
|
|
Re: Paint Type Summary Request
|
Marq
|
10/02/06 01:24 AM
|
|
Re: Paint Type Summary Request
|
Anonymous
|
10/02/06 03:18 AM
|
|
Re: Paint Type Summary Request
|
Anonymous
|
10/02/06 03:32 AM
|
|
Re: Paint Type Summary Request
|
kenzo42
|
10/02/06 05:32 AM
|
|
Re: Paint Type Summary Request
|
Exit1965
|
10/02/06 05:59 AM
|
|
Re: Paint Type Summary Request
|
Anonymous
|
10/02/06 08:43 AM
|
|
Re: Paint Type Summary Request
|
Anonymous
|
10/02/06 12:25 PM
|
|
Re: Paint Type Summary Request
|
69DartGT
|
10/02/06 01:35 PM
|
|
Re: Paint Type Summary Request
|
mopowered
|
10/02/06 03:39 PM
|
|
Re: Paint Type Summary Request
|
Anonymous
|
10/02/06 04:06 PM
|
|
Re: Paint Type Summary Request
|
Anonymous
|
10/03/06 02:55 AM
|
|
Re: Paint Type Summary Request
|
Anonymous
|
10/03/06 11:35 AM
|
|
Re: Paint Type Summary Request
|
Anonymous
|
10/03/06 12:40 PM
|
|
Re: Paint Type Summary Request
|
Anonymous
|
10/03/06 03:58 PM
|
|
Re: Paint Type Summary Request
|
darenrt
|
10/03/06 06:41 PM
|
|
Re: Paint Type Summary Request
|
Anonymous
|
10/03/06 08:10 PM
|
|
Re: Paint Type Summary Request
|
Anonymous
|
10/03/06 08:31 PM
|
|
Re: Paint Type Summary Request
|
Anonymous
|
10/03/06 11:41 PM
|
|
Re: Paint Type Summary Request
|
Marq
|
10/03/06 11:58 PM
|
|
Re: Paint Type Summary Request
|
69chargeryeehaa
|
10/04/06 12:03 AM
|
|
Re: Paint Type Summary Request
|
Anonymous
|
10/04/06 01:20 AM
|
|
Re: Paint Type Summary Request
|
Anonymous
|
10/04/06 03:44 AM
|
|
Re: Paint Type Summary Request
|
Anonymous
|
10/04/06 02:19 PM
|
|
Re: Paint Type Summary Request
|
Anonymous
|
10/04/06 03:09 PM
|
|
Re: Paint Type Summary Request
|
Anonymous
|
10/04/06 03:40 PM
|
|
Re: Paint Type Summary Request
|
Anonymous
|
10/04/06 06:47 PM
|
|
Re: Paint Type Summary Request
|
Exit1965
|
10/04/06 08:19 PM
|
|
Re: Paint Type Summary Request
|
kenzo42
|
10/05/06 07:03 AM
|
|
Re: Paint Type Summary Request
|
Marq
|
10/05/06 09:26 AM
|
|
Re: Paint Type Summary Request
|
Exit1965
|
10/05/06 12:14 PM
|
|
Re: Paint Type Summary Request
|
Anonymous
|
10/06/06 02:50 AM
|
|
Re: Paint Type Summary Request
|
Exit1965
|
10/06/06 04:51 AM
|
|
Re: Paint Type Summary Request
|
Anonymous
|
10/06/06 02:51 PM
|
|
Re: Paint Type Summary Request
|
Marq
|
10/06/06 03:11 PM
|
|
Buying Interlux Brightside in Canada?
|
Anonymous
|
10/07/06 04:58 AM
|
|
Re: Buying Interlux Brightside in Canada?
|
Exit1965
|
10/07/06 07:44 AM
|
|
Re: Buying Interlux Brightside in Canada?
|
69DartGT
|
10/07/06 02:14 PM
|
|
240sx 91 red gloss tremclad 2 tones
|
Anonymous
|
10/07/06 03:06 PM
|
|
Re: Buying Interlux Brightside in Canada?
|
Anonymous
|
10/07/06 03:20 PM
|
|
Re: Buying Interlux Brightside in Canada?
|
Exit1965
|
10/07/06 05:55 PM
|
|
Re: Buying Interlux Brightside in Canada?
|
Marq
|
10/07/06 12:33 PM
|
|
Re: Buying Interlux Brightside in Canada?
|
Anonymous
|
10/07/06 02:01 PM
|
|
Re: Buying Interlux Brightside in Canada?
|
Marq
|
10/07/06 03:21 PM
|
|
Re: Buying Interlux Brightside in Canada?
|
Marq
|
10/07/06 03:42 PM
|
|
Re: Buying Interlux Brightside in Canada?
|
Anonymous
|
10/07/06 05:56 PM
|
|
Re: Paint Type Summary Request
|
Wyl E Coyote
|
10/07/06 07:10 PM
|
|
Re: Paint Type Summary Request
|
Anonymous
|
10/08/06 01:17 AM
|
|
Re: Paint Type Summary Request
|
Wyl E Coyote
|
10/08/06 01:39 AM
|
|
Re: Paint Type Summary Request
|
Anonymous
|
10/08/06 02:17 AM
|
|
Re: Paint Type Summary Request
|
Anonymous
|
10/08/06 03:11 AM
|
|
Re: Paint Type Summary Request
|
Anonymous
|
10/08/06 03:17 AM
|
|
Paint guns!
|
Anonymous
|
10/08/06 05:42 AM
|
|
Re: Paint guns!
|
Anonymous
|
10/08/06 11:33 AM
|
|
Re: Paint guns!
|
Marq
|
10/08/06 12:36 PM
|
|
Rustoleum hardness
|
Anonymous
|
10/08/06 04:49 PM
|
|
Re: Rustoleum hardness
|
Exit1965
|
10/09/06 05:46 AM
|
|
Re: Rustoleum hardness
|
kenzo42
|
10/09/06 06:41 AM
|
|
Re: Rustoleum hardness
|
kenzo42
|
10/09/06 06:48 AM
|
|
Re: Rustoleum hardness
|
Exit1965
|
10/09/06 04:24 PM
|
|
Re: Rustoleum hardness
|
Exit1965
|
10/09/06 04:27 PM
|
|
Re: Rustoleum hardness
|
69DartGT
|
10/09/06 08:54 PM
|
|
Paint Job
|
440charger70
|
10/11/06 12:58 AM
|
|
Re: Paint Job
|
Exit1965
|
10/11/06 02:14 AM
|
|
Re: Paint Job
|
Anonymous
|
10/11/06 07:40 PM
|
|
Re: Paint Job
|
Anonymous
|
10/11/06 08:48 PM
|
|
Re: Paint Job
|
Exit1965
|
10/11/06 09:42 PM
|
|
Re: Paint Job
|
69DartGT
|
10/11/06 10:13 PM
|
|
Re: Paint Job
|
Marq
|
10/11/06 11:29 PM
|
|
Re: Paint Job
|
Exit1965
|
10/12/06 01:07 AM
|
|
Re: Paint Job
|
Exit1965
|
10/12/06 01:12 AM
|
|
Re: Paint Job
|
69DartGT
|
10/12/06 01:36 AM
|
|
Re: Paint Job
|
Anonymous
|
10/12/06 05:38 PM
|
|
Re: Paint Job
|
69DartGT
|
10/12/06 09:29 PM
|
|
Re: Paint Job
|
Exit1965
|
10/12/06 09:53 PM
|
|
Re: Paint Job
|
Anonymous
|
10/13/06 12:56 AM
|
|
Re: Paint Job
|
Marq
|
10/13/06 03:55 AM
|
|
Re: Paint Job
|
v8mirage
|
10/13/06 05:55 PM
|
|
Re: Porter Cable 7424 knockoff?
|
Anonymous
|
10/13/06 06:50 PM
|
|
Re: Porter Cable 7424 knockoff?
|
Wyl E Coyote
|
10/13/06 07:08 PM
|
|
Re: Porter Cable 7424 knockoff?
|
Anonymous
|
10/13/06 09:00 PM
|
|
Re: Porter Cable 7424 knockoff?
|
Marq
|
10/13/06 10:47 PM
|
|
OK round one and orange peel galore... *DELETED*
|
Anonymous
|
10/14/06 11:32 PM
|
|
Re: OK round one and orange peel galore...
|
Anonymous
|
10/14/06 11:36 PM
|
|
Re: OK round one and orange peel galore...
|
69DartGT
|
10/15/06 12:29 AM
|
|
Re: OK round one and orange peel galore...
|
Exit1965
|
10/14/06 11:56 PM
|
|
Re: OK round one and orange peel galore...
|
Anonymous
|
10/15/06 12:06 AM
|
|
Re: OK round one and orange peel galore...
|
Anonymous
|
10/15/06 12:08 AM
|
|
How to remove orange peel amazingly
|
Anonymous
|
10/15/06 12:10 AM
|
|
Paint job on a budget!? CONTINUED..page 44............
|
69DartGT
|
10/15/06 12:25 AM
|
|
Re: How to remove orange peel amazingly
|
Anonymous
|
10/15/06 02:38 AM
|
|
Re: How to remove orange peel amazingly
|
Anonymous
|
10/15/06 03:03 AM
|
|
Re: Paint job on a budget!? CONTINUED..page 44........
|
Exit1965
|
10/15/06 06:09 PM
|
|
Re: Paint job on a budget!? CONTINUED..page 44........
|
Anonymous
|
10/16/06 12:04 AM
|
|
Re: Paint job on a budget!? CONTINUED..page 44........
|
Anonymous
|
10/16/06 01:30 AM
|
|
From some other car forum using West Marine Sea Gloss
|
Anonymous
|
10/16/06 01:25 AM
|
|
Re: From some other car forum using West Marine Sea Gloss
|
Anonymous
|
10/16/06 02:04 AM
|
|
Re: From some other car forum using West Marine Sea Glo
|
Exit1965
|
10/16/06 04:54 AM
|
|
Re: From some other car forum using West Marine Sea Glo
|
Anonymous
|
10/16/06 05:43 AM
|
|
Re: From some other car forum using West Marine Sea Glo
|
Anonymous
|
10/17/06 01:43 AM
|
|
Re: From some other car forum using West Marine Sea Glo
|
Exit1965
|
10/17/06 02:01 AM
|
|
Re: From some other car forum using West Marine Sea Glo
|
Anonymous
|
10/17/06 02:18 AM
|
|
Re: From some other car forum using West Marine Sea Glo
|
Anonymous
|
10/19/06 11:15 AM
|
|
My results using Safety Orange Rustoleum
|
Anonymous
|
10/19/06 01:49 PM
|
|
Re: My results using Safety Orange Rustoleum
|
69chargeryeehaa
|
10/19/06 01:57 PM
|
|
Re: My results using Safety Orange Rustoleum
|
Anonymous
|
10/19/06 06:18 PM
|
|
Re: My results using Safety Orange Rustoleum
|
Anonymous
|
10/20/06 01:02 AM
|
|
Re: My results using Safety Orange Rustoleum
|
Anonymous
|
10/20/06 02:10 AM
|
|
Re: My results using Safety Orange Rustoleum
|
Anonymous
|
10/20/06 06:05 PM
|
|
Re: My results using Safety Orange Rustoleum
|
Anonymous
|
10/20/06 06:16 PM
|
|
Re: My results using Safety Orange Rustoleum
|
Anonymous
|
10/20/06 08:40 PM
|
|
Re: My results using Safety Orange Rustoleum
|
Anonymous
|
10/20/06 08:42 PM
|
|
Re: My results using Safety Orange Rustoleum
|
Anonymous
|
10/20/06 08:43 PM
|
|
Re: From some other car forum using West Marine Sea Glo
|
Exit1965
|
10/16/06 04:48 AM
|
|
Re: From some other car forum using West Marine Sea Glo
|
Anonymous
|
10/16/06 12:15 PM
|
|
Re: From some other car forum using West Marine Sea Gloss
|
Marq
|
10/16/06 12:18 PM
|
|
Re: Paint Job
|
Anonymous
|
10/16/06 12:56 AM
|
|
Re: Paint Job
|
69chargeryeehaa
|
10/16/06 01:48 PM
|
|
Re: Paint Job
|
Anonymous
|
10/17/06 04:27 AM
|
|
Re: Paint job on a budget!? CONTINUED..page 44.........
|
Anonymous
|
10/17/06 01:49 PM
|
|
Re: Paint job on a budget!? CONTINUED..page 44.........
|
Exit1965
|
10/17/06 05:42 PM
|
|
Re: Paint job on a budget!? CONTINUED..page 44.........
|
kenzo42
|
10/17/06 07:53 PM
|
|
Re: Paint job on a budget!? CONTINUED..page 44.........
|
Exit1965
|
10/17/06 10:01 PM
|
|
Exit Brightside paint
|
Anonymous
|
10/18/06 12:01 AM
|
|
Re: Exit Brightside paint
|
Exit1965
|
10/18/06 01:12 AM
|
|
Re: Exit Brightside paint
|
Anonymous
|
10/18/06 03:07 PM
|
|
Re: Paint job on a budget!? CONTINUED..page 44.........
|
Anonymous
|
10/20/06 10:00 PM
|
|
Re: Paint job on a budget!? CONTINUED..page 44.........
|
69chargeryeehaa
|
10/20/06 11:54 PM
|
|
Re: Paint job on a budget!? CONTINUED..page 44.........
|
Anonymous
|
10/21/06 01:17 AM
|
|
Re: Paint job on a budget!? CONTINUED..page 44.........
|
Anonymous
|
10/21/06 04:58 AM
|
|
Re: Paint job on a budget!? CONTINUED..page 44.........
|
69DartGT
|
10/21/06 02:55 PM
|
|
Re: Paint job on a budget!? CONTINUED..page 44.........
|
Anonymous
|
10/21/06 10:35 PM
|
|
Re: Paint job on a budget!? CONTINUED..page 44.........
|
Anonymous
|
10/22/06 12:21 AM
|
|
Re: Paint job on a budget!? CONTINUED..page 44.........
|
Anonymous
|
10/22/06 12:21 AM
|
|
Re: Paint job on a budget!? CONTINUED..page 44.........
|
Anonymous
|
10/22/06 01:02 AM
|
|
Re: Paint job on a budget!? CONTINUED..page 44.........
|
Anonymous
|
10/22/06 03:27 PM
|
|
Re: Paint job on a budget!? CONTINUED..page 44.........
|
Anonymous
|
10/22/06 05:47 PM
|
|
Re: Paint job on a budget!? CONTINUED..page 44.........
|
Anonymous
|
10/22/06 06:48 PM
|
|
Re: Paint job on a budget!? CONTINUED..page 44.........
|
kenzo42
|
10/22/06 09:58 PM
|
|
Re: Paint job on a budget!? CONTINUED..page 44.........
|
Anonymous
|
10/23/06 01:43 AM
|
|
Re: Paint job on a budget!? CONTINUED..page 44.........
|
Marq
|
10/23/06 02:13 AM
|
|
Re: Paint job on a budget!? CONTINUED..page 44.........
|
69DartGT
|
10/23/06 02:18 AM
|
|
Re: Paint job on a budget!? CONTINUED..page 44.........
|
Anonymous
|
10/23/06 02:18 AM
|
|
Re: Paint job on a budget!? CONTINUED..page 44.........
|
Anonymous
|
10/23/06 02:21 AM
|
|
Re: Paint job on a budget!? CONTINUED..page 44.........
|
Anonymous
|
10/23/06 02:22 AM
|
|
Re: Paint job on a budget!? CONTINUED..page 44.........
|
Anonymous
|
10/23/06 02:23 AM
|
|
Re: Paint job on a budget!? CONTINUED..page 44.........
|
69DartGT
|
10/23/06 02:29 AM
|
|
Re: Paint job on a budget!? CONTINUED..page 44.........
|
Anonymous
|
10/23/06 02:45 AM
|
|
Re: Paint job on a budget!? CONTINUED..page 44.........
|
69DartGT
|
10/24/06 01:51 PM
|
|
Re: Paint job on a budget!? CONTINUED..page 44.........
|
69chargeryeehaa
|
10/24/06 02:50 PM
|
|
Re: Paint job on a budget!? CONTINUED..page 44.........
|
Anonymous
|
10/24/06 02:52 PM
|
|
Re: Paint job on a budget!? CONTINUED..page 44.........
|
69chargeryeehaa
|
10/24/06 03:17 PM
|
|
Re: Paint job on a budget!? CONTINUED..page 44.........
|
Anonymous
|
10/24/06 03:53 PM
|
|
Re: Paint job on a budget!? CONTINUED..page 44.........
|
69chargeryeehaa
|
10/24/06 03:55 PM
|
|
Re: Paint job on a budget!? CONTINUED..page 44.........
|
Exit1965
|
10/26/06 07:45 PM
|
|
Re: Paint job on a budget!? CONTINUED..page 44.........
|
69chargeryeehaa
|
10/27/06 12:28 AM
|
|
Re: Paint job on a budget!? CONTINUED..page 44.........
|
Anonymous
|
10/27/06 01:34 PM
|
|
Re: Paint job on a budget!? CONTINUED..page 44.........
|
Anonymous
|
10/29/06 08:43 AM
|
|
Re: Paint job on a budget!? CONTINUED..page 44.........
|
Anonymous
|
10/27/06 02:39 AM
|
|
Re: Paint job on a budget!? CONTINUED..page 44.........
|
kenzo42
|
10/27/06 03:07 AM
|
|
Re: Paint job on a budget!? CONTINUED..page 44.........
|
Anonymous
|
10/25/06 12:46 AM
|
|
Re: Paint job on a budget!? CONTINUED..page 44.........
|
Anonymous
|
10/25/06 03:31 AM
|
|
Re: Paint job on a budget!? CONTINUED..page 44.........
|
Anonymous
|
10/25/06 09:34 PM
|
|
Re: Paint job on a budget!? CONTINUED..page 44.........
|
Anonymous
|
10/25/06 11:24 PM
|
|
Re: Paint job on a budget!? CONTINUED..page 44.........
|
Anonymous
|
10/26/06 02:35 AM
|
|
Re: Paint job on a budget!? CONTINUED..page 44.........
|
Anonymous
|
10/26/06 04:21 AM
|
|
Re: Paint job on a budget!? CONTINUED..page 44.........
|
Marq
|
10/27/06 03:25 AM
|
|
Re: Paint job on a budget!? CONTINUED..page 44.........
|
69DartGT
|
10/27/06 02:31 PM
|
|
Re: Paint job on a budget!? CONTINUED..page 44.........
|
admactanium
|
10/28/06 07:02 AM
|
|
Re: Paint job on a budget!? CONTINUED..page 44.........
|
69DartGT
|
10/28/06 02:51 PM
|
|
Re: Paint job on a budget!? CONTINUED..page 44.........
|
Marq
|
10/28/06 06:38 PM
|
|
Re: Paint job on a budget!? CONTINUED..page 44.........
|
Anonymous
|
10/29/06 01:09 PM
|
|
Re: Paint job on a budget!? CONTINUED..page 44.........
|
Anonymous
|
10/29/06 07:54 PM
|
|
Re: Paint job on a budget!? CONTINUED..page 44.........
|
Anonymous
|
10/29/06 08:47 PM
|
|
Re: Paint job on a budget!? CONTINUED..page 44.........
|
Anonymous
|
10/29/06 09:23 PM
|
|
Re: Paint job on a budget!? CONTINUED..page 44.........
|
Anonymous
|
10/29/06 10:39 PM
|
|
Re: Paint job on a budget!? CONTINUED..page 44.........
|
Anonymous
|
10/29/06 11:17 PM
|
|
Re: Paint job on a budget!? CONTINUED..page 44.........
|
Anonymous
|
10/29/06 11:25 PM
|
|
Re: Paint job on a budget!? CONTINUED..page 44.........
|
Anonymous
|
10/30/06 12:02 AM
|
|
Re: Paint job on a budget!? CONTINUED..page 44.........
|
Anonymous
|
10/30/06 01:50 AM
|
|
Re: Paint job on a budget!? CONTINUED..page 44.........
|
Anonymous
|
10/30/06 05:02 PM
|
|
Re: Paint job on a budget!? CONTINUED..page 44.........
|
69chargeryeehaa
|
10/30/06 05:13 PM
|
|
Re: Paint job on a budget!? CONTINUED..page 44.........
|
Anonymous
|
10/31/06 08:38 AM
|
|
Re: Paint job on a budget!? CONTINUED..page 44.........
|
Exit1965
|
10/31/06 01:12 PM
|
|
Re: Paint job on a budget!? CONTINUED..page 44.........
|
69DartGT
|
10/31/06 02:33 PM
|
|
Re: Paint job on a budget!? CONTINUED..page 44.........
|
Anonymous
|
10/31/06 06:09 PM
|
|
Re: Paint job on a budget!? CONTINUED..page 44.........
|
Anonymous
|
10/31/06 06:35 PM
|
|
Re: Paint job on a budget!? CONTINUED..page 44.........
|
Anonymous
|
10/31/06 06:44 PM
|
|
Re: Paint job on a budget!? CONTINUED..page 44.........
|
69chargeryeehaa
|
10/31/06 07:40 PM
|
|
Re: Paint job on a budget!? CONTINUED..page 44.........
|
Anonymous
|
10/31/06 08:15 PM
|
|
Re: Paint job on a budget!? CONTINUED..page 44.........
|
Anonymous
|
10/31/06 09:43 PM
|
|
Re: Paint job on a budget!? CONTINUED..page 44.........
|
69chargeryeehaa
|
10/31/06 09:57 PM
|
|
Re: Paint job on a budget!? CONTINUED..page 44.........
|
Anonymous
|
10/31/06 10:33 PM
|
|
Re: Paint job on a budget!? CONTINUED..page 44.........
|
Anonymous
|
11/01/06 04:12 AM
|
|
Re: Paint job on a budget!? CONTINUED..page 44.........
|
Anonymous
|
11/01/06 04:45 AM
|
|
Re: Paint job on a budget!? CONTINUED..page 44.........
|
Exit1965
|
11/01/06 04:56 AM
|
|
Re: Paint job on a budget!? CONTINUED..page 44.........
|
Anonymous
|
11/01/06 02:02 PM
|
|
Re: Paint job on a budget!? CONTINUED..page 44.........
|
Anonymous
|
11/01/06 02:50 PM
|
|
Re: Paint job on a budget!? CONTINUED..page 44.........
|
Anonymous
|
11/01/06 03:05 PM
|
|
Re: Paint job on a budget!? CONTINUED..page 44.........
|
69chargeryeehaa
|
11/01/06 03:20 PM
|
|
Re: Paint job on a budget!? CONTINUED..page 44.........
|
69chargeryeehaa
|
11/01/06 03:20 PM
|
|
Re: Paint job on a budget!? CONTINUED..page 44.........
|
Exit1965
|
11/01/06 04:49 PM
|
|
Re: Paint job on a budget!? CONTINUED..page 44.........
|
Exit1965
|
11/02/06 05:07 AM
|
|
Re: Paint job on a budget!? CONTINUED..page 44.........
|
Anonymous
|
11/02/06 05:50 PM
|
|
Re: Paint job on a budget!? CONTINUED..page 44.........
|
Anonymous
|
11/02/06 06:27 PM
|
|
Re: Paint job on a budget!? CONTINUED..page 44.........
|
Anonymous
|
11/02/06 07:25 PM
|
|
Re: Paint job on a budget!? CONTINUED..page 44.........
|
Anonymous
|
11/03/06 02:54 AM
|
|
Re: Paint job on a budget!? CONTINUED..page 44.........
|
Anonymous
|
11/03/06 04:07 AM
|
|
Re: Paint job on a budget!? CONTINUED..page 44.........
|
Anonymous
|
11/03/06 02:29 PM
|
|
Re: Paint job on a budget!? CONTINUED..page 44.........
|
Anonymous
|
11/03/06 04:53 PM
|
|
Re: Paint job on a budget!? CONTINUED..page 44.........
|
Anonymous
|
11/04/06 04:11 AM
|
|
Re: Paint job on a budget!? CONTINUED..page 44.........
|
Exit1965
|
11/04/06 04:23 PM
|
|
Re: Paint job on a budget!? CONTINUED..page 44.........
|
69chargeryeehaa
|
11/04/06 06:11 PM
|
|
Re: Paint job on a budget!? CONTINUED..page 44.........
|
Anonymous
|
11/05/06 12:48 AM
|
|
Re: Paint job on a budget!? CONTINUED..page 44.........
|
69chargeryeehaa
|
11/05/06 01:16 AM
|
|
Re: Paint job on a budget!? CONTINUED..page 44.........
|
Anonymous
|
11/05/06 02:00 AM
|
|
Re: Paint job on a budget!? CONTINUED..page 44.........
|
Anonymous
|
11/05/06 06:54 AM
|
|
Re: Paint job on a budget!? CONTINUED..page 44.........
|
texczech
|
11/07/06 12:16 AM
|
|
Re: Paint job on a budget!? CONTINUED..page 44.........
|
ONEBADBIRD
|
11/05/06 03:45 AM
|
|
Re: Paint job on a budget!? CONTINUED..page 44.........
|
Pool Fixer
|
11/05/06 03:10 PM
|
|
Re: Paint job on a budget!? CONTINUED..page 44.........
|
Exit1965
|
11/05/06 05:13 PM
|
|
Re: Paint job on a budget!? CONTINUED..page 44.........
|
Anonymous
|
11/05/06 06:45 PM
|
|
Re: Paint job on a budget!? CONTINUED..page 44.........
|
Anonymous
|
11/05/06 07:18 PM
|
|
Re: Paint job on a budget!? CONTINUED..page 44.........
|
Anonymous
|
11/05/06 08:20 PM
|
|
Re: Paint job on a budget!? CONTINUED..page 44.........
|
kenzo42
|
11/06/06 07:43 AM
|
|
Re: Paint job on a budget!? CONTINUED..page 44.........
|
69DartGT
|
11/06/06 02:30 PM
|
|
Re: Paint job on a budget!? CONTINUED..page 44.........
|
69chargeryeehaa
|
11/06/06 03:08 PM
|
|
Re: Paint job on a budget!? CONTINUED..page 44.........
|
Marq
|
11/06/06 07:11 PM
|
|
Re: Paint job on a budget!? CONTINUED..page 44.........
|
kenzo42
|
11/06/06 08:59 PM
|
|
Re: Paint job on a budget!? CONTINUED..page 44.........
|
Anonymous
|
11/06/06 10:13 PM
|
|
Re: Paint job on a budget!? CONTINUED..page 44.........
|
Anonymous
|
11/07/06 02:07 AM
|
|
Re: Paint job on a budget!? CONTINUED..page 44.........
|
Anonymous
|
11/07/06 02:08 AM
|
|
Re: Paint job on a budget!? CONTINUED..page 44.........
|
Anonymous
|
11/07/06 02:46 AM
|
|
Re: Paint job on a budget!? CONTINUED..page 44.........
|
69chargeryeehaa
|
11/07/06 03:54 AM
|
|
Re: Paint job on a budget!? CONTINUED..page 44.........
|
texczech
|
11/09/06 12:13 AM
|
|
Re: Paint job on a budget!? CONTINUED..page 44.........
|
Anonymous
|
11/09/06 01:34 AM
|
|
Re: Paint job on a budget!? CONTINUED..page 44.........
|
Anonymous
|
11/09/06 08:01 PM
|
|
Re: Paint job on a budget!? CONTINUED..page 44.........
|
69DartGT
|
11/09/06 08:22 PM
|
|
Re: Paint job on a budget!? CONTINUED..page 44.........
|
Anonymous
|
11/09/06 09:04 PM
|
|
Re: Paint job on a budget!? CONTINUED..page 44.........
|
kenzo42
|
11/10/06 02:11 AM
|
|
Re: Paint job on a budget!? CONTINUED..page 44.........
|
69DartGT
|
11/10/06 02:28 AM
|
|
Re: Paint job on a budget!? CONTINUED..page 44.........
|
Anonymous
|
11/10/06 02:29 AM
|
|
Re: Paint job on a budget!? CONTINUED..page 44.........
|
Exit1965
|
11/10/06 05:13 AM
|
|
Re: Paint job on a budget!? CONTINUED..page 44.........
|
kenzo42
|
11/10/06 06:50 AM
|
|
Re: Paint job on a budget!? CONTINUED..page 44.........
|
Anonymous
|
11/10/06 01:18 PM
|
|
Re: Paint job on a budget!? CONTINUED..page 44.........
|
Anonymous
|
11/10/06 02:05 PM
|
|
Re: Paint job on a budget!? CONTINUED..page 44.........
|
69chargeryeehaa
|
11/10/06 03:57 PM
|
|
Re: Paint job on a budget!? CONTINUED..page 44.........
|
Anonymous
|
11/11/06 12:09 AM
|
|
Re: Paint job on a budget!? CONTINUED..page 44.........
|
v8mirage
|
11/10/06 02:20 PM
|
|
Re: Paint job on a budget!? CONTINUED..page 44.........
|
69chargeryeehaa
|
11/10/06 04:03 PM
|
|
Re: Paint job on a budget!? CONTINUED..page 44.........
|
Anonymous
|
11/11/06 12:24 AM
|
|
Re: Paint job on a budget!? CONTINUED..page 44.........
|
kenzo42
|
11/11/06 02:43 AM
|
|
Re: Paint job on a budget!? CONTINUED..page 44.........
|
Anonymous
|
11/11/06 04:32 AM
|
|
Re: Paint job on a budget!? CONTINUED..page 44.........
|
kenzo42
|
11/11/06 06:18 AM
|
|
Re: Paint job on a budget!? CONTINUED..page 44.........
|
v8mirage
|
11/13/06 02:22 AM
|
|
Re: Paint job on a budget!? CONTINUED..page 44.........
|
noisydart
|
11/13/06 02:44 AM
|
|
Re: Paint job on a budget!? CONTINUED..page 44.........
|
69chargeryeehaa
|
11/15/06 06:18 PM
|
|
Re: Paint job on a budget!? CONTINUED..page 44.........
|
Anonymous
|
11/13/06 06:11 AM
|
|
Re: Paint job on a budget!? CONTINUED..page 44.........
|
Exit1965
|
11/13/06 01:30 PM
|
|
Re: Paint job on a budget!? CONTINUED..page 44.........
|
Marq
|
11/13/06 07:03 PM
|
|
Re: Paint job on a budget!? CONTINUED..page 44.........
|
Anonymous
|
11/13/06 10:44 PM
|
|
Re: Paint job on a budget!? CONTINUED..page 44.........
|
Anonymous
|
11/14/06 11:12 AM
|
|
Re: Paint job on a budget!? CONTINUED..page 44.........
|
texczech
|
11/15/06 12:21 AM
|
|
Re: Paint job on a budget!? CONTINUED..page 44.........
|
69chargeryeehaa
|
11/15/06 12:41 AM
|
|
Re: Paint job on a budget!? CONTINUED..page 44.........
|
Anonymous
|
11/15/06 12:51 AM
|
|
Re: Paint job on a budget!? CONTINUED..page 44.........
|
kenzo42
|
11/15/06 05:58 AM
|
|
Re: Paint job on a budget!? CONTINUED..page 44.........
|
Anonymous
|
11/15/06 12:20 PM
|
|
Re: Paint job on a budget!? CONTINUED..page 44.........
|
texczech
|
11/15/06 01:15 PM
|
|
Re: Paint job on a budget!? CONTINUED..page 44.........
|
Anonymous
|
11/15/06 06:09 PM
|
|
Re: Paint job on a budget!? CONTINUED..page 44.........
|
Anonymous
|
11/16/06 08:10 AM
|
|
Re: Paint job on a budget!? CONTINUED..page 44.........
|
Anonymous
|
11/16/06 01:11 PM
|
|
Re: Paint job on a budget!? CONTINUED..page 44.........
|
Exit1965
|
11/16/06 01:46 PM
|
|
Re: Paint job on a budget!? CONTINUED..page 44.........
|
Java
|
11/16/06 05:03 PM
|
|
Re: Paint job on a budget!? CONTINUED..page 44.........
|
v8mirage
|
11/16/06 11:24 PM
|
|
Re: Paint job on a budget!? CONTINUED..page 44.........
|
Anonymous
|
11/16/06 11:51 PM
|
|
Re: Paint job on a budget!? CONTINUED..page 44.........
|
Anonymous
|
11/17/06 04:06 AM
|
|
Re: Paint job on a budget!? CONTINUED..page 44.........
|
Exit1965
|
11/17/06 04:18 AM
|
|
Re: Paint job on a budget!? CONTINUED..page 44.........
|
admactanium
|
11/17/06 08:40 AM
|
|
Re: Paint job on a budget!? CONTINUED..page 44.........
|
Anonymous
|
11/17/06 04:46 PM
|
|
Re: Paint job on a budget!? CONTINUED..page 44.........
|
Exit1965
|
11/17/06 09:52 PM
|
|
Re: Paint job on a budget!? CONTINUED..page 44.........
|
Anonymous
|
11/18/06 10:37 PM
|
|
Re: Paint job on a budget!? CONTINUED..page 44.........
|
Anonymous
|
11/19/06 12:04 AM
|
|
Re: Paint job on a budget!? CONTINUED..page 44.........
|
Anonymous
|
11/11/06 02:05 AM
|
|
Re: Paint job on a budget!? CONTINUED..page 44.........
|
Anonymous
|
11/17/06 08:17 PM
|
|
Re: Paint job on a budget!? CONTINUED..page 44.........
|
Exit1965
|
11/17/06 09:54 PM
|
|
Re: Paint job on a budget!? CONTINUED..page 44.........
|
v8mirage
|
11/17/06 10:02 PM
|
|
Re: Paint job on a budget!? CONTINUED..page 44.........
|
Anonymous
|
11/18/06 12:05 AM
|
|
Re: Paint job on a budget!? CONTINUED..page 44.........
|
Anonymous
|
11/18/06 02:28 AM
|
|
Re: Paint job on a budget!? CONTINUED..page 44.........
|
Anonymous
|
11/18/06 09:22 AM
|
|
Re: Paint job on a budget!? CONTINUED..page 44.........
|
Anonymous
|
11/19/06 12:15 AM
|
|
Re: Paint job on a budget!? CONTINUED..page 44.........
|
Anonymous
|
11/19/06 12:52 AM
|
|
Re: Paint job on a budget!? CONTINUED..page 44.........
|
Anonymous
|
11/19/06 01:26 AM
|
|
Re: Paint job on a budget!? CONTINUED..page 44.........
|
Anonymous
|
11/19/06 03:32 AM
|
|
Re: Paint job on a budget!? CONTINUED..page 44.........
|
69chargeryeehaa
|
11/19/06 09:32 PM
|
|
Re: Paint job on a budget!? CONTINUED..page 44.........
|
Anonymous
|
11/19/06 10:49 PM
|
|
Re: Paint job on a budget!? CONTINUED..page 44.........
|
pdqvsix
|
11/20/06 01:22 AM
|
|
Re: Paint job on a budget!? CONTINUED..page 44.........
|
69chargeryeehaa
|
11/20/06 04:15 PM
|
|
Re: Paint job on a budget!? CONTINUED..page 44.........
|
Anonymous
|
11/20/06 04:28 PM
|
|
Re: Paint job on a budget!? CONTINUED..page 44.........
|
69chargeryeehaa
|
11/20/06 04:13 PM
|
|
Re: Paint job on a budget!? CONTINUED..page 44.........
|
Anonymous
|
11/20/06 08:09 PM
|
|
Re: Paint job on a budget!? CONTINUED..page 44.........
|
Anonymous
|
11/20/06 10:05 PM
|
|
Re: Paint job on a budget!? CONTINUED..page 44.........
|
Anonymous
|
11/20/06 10:09 PM
|
|
Re: Paint job on a budget!? CONTINUED..page 44.........
|
Anonymous
|
11/20/06 11:25 PM
|
|
Re: Paint job on a budget!? CONTINUED..page 44.........
|
Anonymous
|
11/21/06 06:48 AM
|
|
Re: Paint job on a budget!? CONTINUED..page 44.........
|
Exit1965
|
11/21/06 01:54 PM
|
|
Re: Paint job on a budget!? CONTINUED..page 44.........
|
Anonymous
|
11/21/06 04:13 PM
|
|
Re: Paint job on a budget!? CONTINUED..page 44.........
|
Jolly_Raj_R
|
11/28/06 04:05 AM
|
|
Re: Paint job on a budget!? CONTINUED..page 44.........
|
Anonymous
|
11/21/06 09:22 PM
|
|
Re: Paint job on a budget!? CONTINUED..page 44.........
|
Anonymous
|
11/22/06 03:54 AM
|
|
Re: Paint job on a budget!? CONTINUED..page 44.........
|
Anonymous
|
11/22/06 11:19 AM
|
|
Re: Paint job on a budget!? CONTINUED..page 44.........
|
Exit1965
|
11/22/06 01:24 PM
|
|
Re: Paint job on a budget!? CONTINUED..page 44.........
|
Anonymous
|
11/22/06 01:59 PM
|
|
Re: Paint job on a budget!? CONTINUED..page 44.........
|
69chargeryeehaa
|
11/22/06 03:26 PM
|
|
Re: Paint job on a budget!? CONTINUED..page 44.........
|
texczech
|
11/20/06 06:25 PM
|
|
Re: Paint job on a budget!? CONTINUED..page 44.........
|
Anonymous
|
11/20/06 07:56 PM
|
|
Re: Paint job on a budget!? CONTINUED..page 44.........
|
texczech
|
11/22/06 01:22 PM
|
|
Re: Paint job on a budget!? CONTINUED..page 44.........
|
Anonymous
|
11/22/06 07:14 PM
|
|
Re: Paint job on a budget!? CONTINUED..page 44.........
|
texczech
|
11/07/06 02:48 AM
|
|
Re: Paint job on a budget!? CONTINUED..page 44.........
|
69chargeryeehaa
|
11/07/06 04:01 AM
|
|
Re: Paint job on a budget!? CONTINUED..page 44.........
|
Anonymous
|
11/08/06 01:25 AM
|
|
Re: Paint job on a budget!? CONTINUED..page 44.........
|
Anonymous
|
11/08/06 02:16 AM
|
|
Re: Paint job on a budget!? CONTINUED..page 44.........
|
kenzo42
|
11/08/06 02:44 AM
|
|
Re: Paint job on a budget!? CONTINUED..page 44.........
|
Exit1965
|
11/08/06 04:40 AM
|
|
Re: Paint job on a budget!? CONTINUED..page 44.........
|
admactanium
|
11/08/06 10:46 AM
|
|
Re: Paint job on a budget!? CONTINUED..page 44.........
|
Jolly_Raj_R
|
11/07/06 04:04 AM
|
|
Re: Paint job on a budget!? CONTINUED..page 44.........
|
admactanium
|
11/07/06 06:55 AM
|
|
Re: Paint job on a budget!? CONTINUED..page 44.........
|
Exit1965
|
11/07/06 05:02 PM
|
|
Re: Paint job on a budget!? CONTINUED..page 44.........
|
Anonymous
|
11/07/06 07:28 PM
|
|
Re: Paint job on a budget!? CONTINUED..page 44.........
|
Anonymous
|
11/07/06 10:30 PM
|
|
Re: Paint job on a budget!? CONTINUED..page 44.........
|
Anonymous
|
11/02/06 09:54 PM
|
|
Re: Paint job on a budget!? CONTINUED..page 44.........
|
Anonymous
|
11/02/06 11:05 PM
|
|
Re: Paint job on a budget!? CONTINUED..page 44.........
|
Anonymous
|
11/02/06 07:46 PM
|
|
Re: Paint job on a budget!? CONTINUED..page 44.........
|
Anonymous
|
11/02/06 10:06 PM
|
|
Re: Paint job on a budget!? CONTINUED..page 44.........
|
Anonymous
|
11/03/06 03:54 PM
|
|
Re: Paint job on a budget!? CONTINUED..page 44.........
|
Anonymous
|
11/03/06 02:52 PM
|
|
Re: Paint job on a budget!? CONTINUED..page 44.........
|
69DartGT
|
11/03/06 04:02 PM
|
|
Re: Paint job on a budget!? CONTINUED..page 44.........
|
kenzo42
|
10/17/06 07:45 PM
|
|
Re: Paint Job
|
69DartGT
|
10/11/06 02:28 AM
|
|
Re: Paint Job
|
Marq
|
10/11/06 12:35 PM
|
|
Re: Paint Type Summary Request
|
Anonymous
|
10/03/06 12:41 PM
|
|
Re: Paint Type Summary Request
|
kenzo42
|
10/02/06 05:35 AM
|
|
Re: Paint Type Summary Request
|
Anonymous
|
10/02/06 03:45 PM
|
|
Re: Paint Type Summary Request
|
Wyl E Coyote
|
10/02/06 04:03 PM
|
|
Re: Paint Type Summary Request
|
Anonymous
|
10/02/06 04:55 PM
|
|
Re: Paint Type Summary Request
|
Wyl E Coyote
|
10/02/06 06:08 PM
|
|
Re: Paint Type Summary Request
|
Marq
|
10/03/06 12:40 AM
|
|
Re: Paint Type Summary Request
|
Anonymous
|
10/01/06 07:48 PM
|
|
Re: Paint Type Summary Request
|
Wyl E Coyote
|
10/01/06 09:09 PM
|
|
Re: Paint Type Summary Request
|
Anonymous
|
10/03/06 12:52 AM
|
|
Re: Paint Type Summary Request
|
Marq
|
09/30/06 07:10 PM
|
|
Re: Paint Type Summary Request
|
Anonymous
|
09/21/06 05:58 PM
|
|
Re: Paint Type Summary Request
|
Anonymous
|
09/21/06 07:29 PM
|
|
Re: Paint Type Summary Request
|
Marq
|
09/21/06 08:38 PM
|
|
Re: Paint Type Summary Request
|
Anonymous
|
09/21/06 10:44 PM
|
|
Re: Paint Type Summary Request
|
Marq
|
09/21/06 08:24 PM
|
|
Re: Paint Type Summary Request
|
69DartGT
|
09/21/06 08:35 PM
|
|
Re: Paint Type Summary Request
|
Exit1965
|
09/21/06 08:52 PM
|
|
Re: Paint Type Summary Request
|
Anonymous
|
09/21/06 10:51 PM
|
|
mineral spirits in California
|
Anonymous
|
09/22/06 05:15 PM
|
|
Re: mineral spirits in California
|
Anonymous
|
09/22/06 05:16 PM
|
|
Re: mineral spirits in California
|
mopowered
|
09/22/06 05:22 PM
|
|
Re: Paint Type Summary Request
|
Marq
|
09/21/06 11:30 PM
|
|
Re: Paint Type Summary Request
|
69DartGT
|
09/22/06 01:36 AM
|
|
Re: Paint Type Summary Request
|
Marq
|
09/21/06 08:15 PM
|
|
Re: Paint Type Summary Request
|
Anonymous
|
09/20/06 08:28 PM
|
|
Re: Paint Type Summary Request
|
Anonymous
|
09/20/06 08:29 PM
|
|
Re: Paint Type Summary Request
|
Anonymous
|
09/20/06 08:30 PM
|
|
Re: Paint Type Summary Request
|
Anonymous
|
09/20/06 08:32 PM
|
|
Re: Paint Type Summary Request
|
Exit1965
|
09/21/06 05:06 PM
|
|
Re: Paint Type Summary Request
|
Anonymous
|
09/30/06 09:30 PM
|
|
Re: Paint Type Summary Request
|
69DartGT
|
09/30/06 09:41 PM
|
|
Re: Paint Type Summary Request
|
Marq
|
10/01/06 01:18 AM
|
|
Re: Paint Type Summary Request
|
Anonymous
|
10/01/06 01:42 AM
|
|
Re: Paint Type Summary Request
|
Marq
|
10/01/06 05:20 PM
|
|
Re: Paint Type Summary Request
|
Anonymous
|
10/01/06 05:25 PM
|
|
Re: Paint Type Summary Request
|
Marq
|
10/01/06 06:06 PM
|
|
Re: Paint Type Summary Request
|
Anonymous
|
10/03/06 11:23 AM
|
|
Re: Paint Type Summary Request
|
rallyerick
|
10/01/06 02:20 AM
|
|
Re: Paint job on a budget!? CONTINUED..page 44............
|
Anonymous
|
12/02/06 12:39 PM
|
|
Re: Paint job on a budget!? CONTINUED..page 44........
|
Anonymous
|
12/02/06 11:10 PM
|
|
Re: Paint job on a budget!? CONTINUED..page 44........
|
Sasquatch4406
|
12/03/06 03:25 AM
|
|
Real world testing
|
Anonymous
|
12/03/06 04:31 PM
|
|
Re: Paint job on a budget!? CONTINUED..page 44........
|
Anonymous
|
12/04/06 01:48 AM
|
|
Re: Paint job on a budget!? CONTINUED..page 44........
|
Anonymous
|
12/04/06 03:47 AM
|
|
Re: Paint job on a budget!? CONTINUED..page 44........
|
Anonymous
|
12/12/06 09:24 PM
|
|
Re: Paint job on a budget!? CONTINUED..page 44........
|
Anonymous
|
12/20/06 01:11 AM
|
|
Re: Paint job on a budget!? CONTINUED..page 44........
|
Anonymous
|
12/22/06 06:06 PM
|
|
Re: Paint job on a budget!? CONTINUED..page 44........
|
69DartGT
|
12/22/06 06:40 PM
|
|
Re: Paint job on a budget!? CONTINUED..page 44........
|
69DartGT
|
12/22/06 06:43 PM
|
|
Re: Paint job on a budget!? CONTINUED..page 44........
|
Anonymous
|
12/04/06 03:48 AM
|
|
Re: Paint job on a budget!? CONTINUED..page 44............
|
kenzo42
|
12/04/06 04:15 AM
|
|
Re: Paint job on a budget!? CONTINUED..page 44............
|
Anonymous
|
12/05/06 05:03 PM
|
|
Re: Paint job on a budget!? CONTINUED..page 44........
|
Anonymous
|
12/08/06 06:31 AM
|
|
Re: Paint job on a budget!? CONTINUED..page 44........
|
69DartGT
|
12/08/06 02:20 PM
|
|
Re: Paint job on a budget!? CONTINUED..page 44........
|
69DartGT
|
12/08/06 06:37 PM
|
|
Re: Paint job on a budget!? CONTINUED..page 44........
|
Anonymous
|
12/08/06 03:57 PM
|
|
Re: Paint job on a budget!? CONTINUED..page 44........
|
Anonymous
|
12/08/06 09:30 PM
|
|
Re: Paint job on a budget!? CONTINUED..page 44........
|
kenzo42
|
12/09/06 06:16 AM
|
|
Re: Paint job on a budget!? CONTINUED..page 44........
|
69DartGT
|
12/09/06 08:47 PM
|
|
Re: Paint job on a budget!? CONTINUED..page 44........
|
69DartGT
|
12/09/06 09:18 PM
|
|
Re: Paint job on a budget!? CONTINUED..page 44........
|
Anonymous
|
12/09/06 09:55 PM
|
|
Re: Paint job on a budget!? CONTINUED..page 44........
|
69DartGT
|
12/09/06 10:12 PM
|
|
Re: Paint job on a budget!? CONTINUED..page 44........
|
Anonymous
|
12/09/06 10:29 PM
|
|
Re: Paint job on a budget!? CONTINUED..page 44........
|
69chargeryeehaa
|
12/09/06 11:46 PM
|
|
Re: Paint job on a budget!? CONTINUED..page 44........
|
C38coupe
|
12/10/06 12:17 AM
|
|
Re: Paint job on a budget!? CONTINUED..page 44........
|
69DartGT
|
12/10/06 12:41 AM
|
|
Re: Paint job on a budget!? CONTINUED..page 44........
|
Exit1965
|
12/10/06 02:43 PM
|
|
Re: Paint job on a budget!? CONTINUED..page 44........
|
69DartGT
|
12/10/06 08:01 PM
|
|
Re: Paint job on a budget!? CONTINUED..page 44........
|
dalbers
|
12/11/06 05:08 AM
|
|
Re: Paint job on a budget!? CONTINUED..page 44........
|
Anonymous
|
12/11/06 06:07 AM
|
|
Re: Paint job on a budget!? CONTINUED..page 44........
|
dalbers
|
12/11/06 06:38 AM
|
 Re: Paint job on a budget!? CONTINUED..page 44........
|
Anonymous
|
12/11/06 09:34 AM
|
|
Re: Paint job on a budget!? CONTINUED..page 44........
|
69DartGT
|
12/11/06 02:46 PM
|
|
Re: Paint job on a budget!? CONTINUED..page 44........
|
dalbers
|
12/11/06 05:16 PM
|
|
Re: Paint job on a budget!? CONTINUED..page 44........
|
Anonymous
|
12/11/06 05:26 PM
|
|
Re: Paint job on a budget!? CONTINUED..page 44........
|
Anonymous
|
12/11/06 06:54 PM
|
|
Re: Paint job on a budget!? CONTINUED..page 44........
|
Anonymous
|
12/13/06 05:58 AM
|
|
Re: Paint job on a budget!? CONTINUED..page 44........
|
Anonymous
|
12/13/06 10:10 AM
|
|
Re: Paint job on a budget!? CONTINUED..page 44........
|
69DartGT
|
12/13/06 02:31 PM
|
|
Re: Paint job on a budget!? CONTINUED..page 44........
|
69DartGT
|
12/13/06 07:54 PM
|
|
Re: Paint job on a budget!? CONTINUED..page 44........
|
Anonymous
|
12/14/06 02:52 AM
|
|
Re: Paint job on a budget!? CONTINUED..page 44........
|
Exit1965
|
12/14/06 03:31 AM
|
|
Re: Paint job on a budget!? CONTINUED..page 44........
|
Anonymous
|
12/14/06 05:48 AM
|
|
Re: Paint job on a budget!? CONTINUED..page 44........
|
Anonymous
|
12/14/06 03:12 PM
|
|
Re: Paint job on a budget!? CONTINUED..page 44........
|
Pool Fixer
|
12/14/06 06:55 PM
|
|
Re: Paint job on a budget!? CONTINUED..page 44........
|
Anonymous
|
12/14/06 07:05 PM
|
|
Re: Paint job on a budget!? CONTINUED..page 44........
|
Anonymous
|
12/22/06 07:03 PM
|
|
Re: Paint job on a budget!? CONTINUED..page 44........
|
69DartGT
|
12/22/06 07:24 PM
|
|
Re: Paint job on a budget!? CONTINUED..page 44........
|
C38coupe
|
12/22/06 10:15 PM
|
|
Re: Paint job on a budget!? CONTINUED..page 44........
|
Anonymous
|
12/22/06 10:32 PM
|
|
Re: Paint job on a budget!? CONTINUED..page 44........
|
69chargeryeehaa
|
12/22/06 11:26 PM
|
|
Re: Paint job on a budget!? CONTINUED..page 44........
|
Anonymous
|
12/23/06 01:39 AM
|
|
Re: Paint job on a budget!? CONTINUED..page 44........
|
Exit1965
|
12/23/06 02:34 AM
|
|
Re: Paint job on a budget!? CONTINUED..page 44........
|
Anonymous
|
12/23/06 02:46 AM
|
|
Re: Paint job on a budget!? CONTINUED..page 44........
|
69chargeryeehaa
|
12/23/06 03:14 AM
|
|
Re: Paint job on a budget!? CONTINUED..page 44........
|
Anonymous
|
12/23/06 03:20 AM
|
|
Re: Paint job on a budget!? CONTINUED..page 44........
|
69chargeryeehaa
|
12/23/06 03:28 AM
|
|
Re: Paint job on a budget!? CONTINUED..page 44........
|
Anonymous
|
12/23/06 03:32 AM
|
|
Re: Paint job on a budget!? CONTINUED..page 44........
|
69chargeryeehaa
|
12/23/06 03:34 AM
|
|
Re: Paint job on a budget!? CONTINUED..page 44........
|
Anonymous
|
12/23/06 03:42 AM
|
|
Re: Paint job on a budget!? CONTINUED..page 44........
|
Anonymous
|
12/23/06 03:59 AM
|
|
Re: Paint job on a budget!? CONTINUED..page 44........
|
Anonymous
|
12/23/06 03:42 AM
|
|
Re: Paint job on a budget!? CONTINUED..page 44........
|
69chargeryeehaa
|
12/23/06 03:58 AM
|
|
Re: Paint job on a budget!? CONTINUED..page 44........
|
Anonymous
|
12/23/06 01:12 PM
|
|
Re: Paint job on a budget!? CONTINUED..page 44........
|
69DartGT
|
12/23/06 03:28 PM
|
|
Re: Paint job on a budget!? CONTINUED..page 44........
|
Anonymous
|
12/23/06 06:14 PM
|
|
Re: Paint job on a budget!? CONTINUED..page 44........
|
Anonymous
|
12/23/06 07:27 PM
|
|
Re: Paint job on a budget!? CONTINUED..page 44........
|
Anonymous
|
12/23/06 07:32 PM
|
|
Re: Paint job on a budget!? CONTINUED..page 44........
|
Marq
|
12/24/06 03:58 AM
|
|
Re: Paint job on a budget!? CONTINUED..page 44........
|
Anonymous
|
12/25/06 03:31 PM
|
|
Re: Paint job on a budget!? CONTINUED..page 44........
|
Marq
|
12/25/06 04:54 PM
|
|
Re: Paint job on a budget!? CONTINUED..page 44........
|
Anonymous
|
12/25/06 08:16 PM
|
|
Re: Paint job on a budget!? CONTINUED..page 44........
|
Anonymous
|
12/25/06 08:18 PM
|
|
Re: Paint job on a budget!? CONTINUED..page 44........
|
Anonymous
|
12/26/06 01:23 PM
|
|
Re: Paint job on a budget!? CONTINUED..page 44........
|
Anonymous
|
12/26/06 01:01 PM
|
|
Re: Paint job on a budget!? CONTINUED..page 44........
|
patrick
|
12/30/06 01:34 PM
|
|
Re: Paint job on a budget!? CONTINUED..page 44........
|
Anonymous
|
12/30/06 11:16 PM
|
|
Re: Paint job on a budget!? CONTINUED..page 44........
|
Exit1965
|
12/31/06 12:50 AM
|
|
Re: Paint job on a budget!? CONTINUED..page 44........
|
Anonymous
|
12/31/06 02:03 AM
|
|
Re: Paint job on a budget!? CONTINUED..page 44........
|
Anonymous
|
12/31/06 03:51 PM
|
|
Re: Paint job on a budget!? CONTINUED..page 44........
|
Anonymous
|
12/31/06 08:17 PM
|
|
Re: Paint job on a budget!? CONTINUED..page 44........
|
Anonymous
|
12/31/06 08:23 PM
|
|
Re: Paint job on a budget!? CONTINUED..page 44........
|
Anonymous
|
12/31/06 08:52 PM
|
|
Re: Paint job on a budget!? CONTINUED..page 44........
|
kenzo42
|
01/01/07 02:30 AM
|
|
Re: Paint job on a budget!? CONTINUED..page 44........
|
Anonymous
|
01/03/07 02:38 AM
|
|
Re: Paint job on a budget!? CONTINUED..page 44........
|
Exit1965
|
01/03/07 02:53 AM
|
|
Re: Paint job on a budget!? CONTINUED..page 44........
|
kenzo42
|
01/03/07 03:41 AM
|
|
Re: Paint job on a budget!? CONTINUED..page 44........
|
Anonymous
|
01/03/07 12:58 PM
|
|
Re: Paint job on a budget!? CONTINUED..page 44........
|
Anonymous
|
01/01/07 04:40 AM
|
|
Re: Paint job on a budget!? CONTINUED..page 44........
|
Anonymous
|
01/01/07 04:59 PM
|
|
Re: Paint job on a budget!? CONTINUED..page 44........
|
Anonymous
|
01/01/07 09:46 PM
|
|
Re: Paint job on a budget!? CONTINUED..page 44........
|
Exit1965
|
01/01/07 11:33 PM
|
|
Re: Paint job on a budget!? CONTINUED..page 44........
|
Anonymous
|
01/02/07 05:01 PM
|
|
Re: Paint job on a budget!? CONTINUED..page 44........
|
Anonymous
|
01/03/07 12:50 AM
|
|
Re: Paint job on a budget!? CONTINUED..page 44........
|
Anonymous
|
01/03/07 09:15 PM
|
|
Re: Paint job on a budget!? CONTINUED..page 44........
|
Anonymous
|
12/23/06 04:18 AM
|
|
Re: Paint job on a budget!? CONTINUED..page 44........
|
69chargeryeehaa
|
12/23/06 04:41 AM
|
|
Re: Paint job on a budget!? CONTINUED..page 44........
|
69DartGT
|
12/23/06 05:24 AM
|
|
Re: Paint job on a budget!? CONTINUED..page 44........
|
Anonymous
|
12/23/06 05:26 PM
|
|
Re: Paint job on a budget!? CONTINUED..page 44........
|
Marq
|
12/24/06 03:08 AM
|
|
Re: Paint job on a budget!? CONTINUED..page 44........
|
Anonymous
|
12/24/06 06:54 AM
|
|
Re: Paint job on a budget!? CONTINUED..page 44........
|
Marq
|
12/24/06 02:56 PM
|
|
Re: Paint job on a budget!? CONTINUED..page 44........
|
chessman90
|
12/25/06 05:53 AM
|
|
Re: Paint job on a budget!? CONTINUED..page 44........
|
Anonymous
|
12/26/06 01:53 PM
|
|
Re: Paint job on a budget!? CONTINUED..page 44........
|
Exit1965
|
12/26/06 03:52 PM
|
|
Re: Paint job on a budget!? CONTINUED..page 44........
|
69DartGT
|
12/26/06 08:44 PM
|
|
Re: Paint job on a budget!? CONTINUED..page 44........
|
Anonymous
|
12/26/06 10:04 PM
|
|
Re: Paint job on a budget!? CONTINUED..page 44........
|
69DartGT
|
12/27/06 12:04 AM
|
|
Re: Paint job on a budget!? CONTINUED..page 44........
|
chessman90
|
12/27/06 04:15 AM
|
|
Re: Paint job on a budget!? CONTINUED..page 44........
|
Anonymous
|
12/27/06 04:59 AM
|
|
Re: Paint job on a budget!? CONTINUED..page 44........
|
69DartGT
|
12/27/06 05:26 AM
|
|
Re: Paint job on a budget!? CONTINUED..page 44........
|
Anonymous
|
12/27/06 08:38 AM
|
|
Re: Paint job on a budget!? CONTINUED..page 44........
|
Anonymous
|
12/27/06 03:04 PM
|
|
Re: Paint job on a budget!? CONTINUED..page 44........
|
Anonymous
|
12/27/06 03:17 PM
|
 Re: Paint job on a budget!? CONTINUED..page 44........
|
Anonymous
|
12/27/06 07:27 PM
|
|
Re: Paint job on a budget!? CONTINUED..page 44........
|
Anonymous
|
12/28/06 12:12 AM
|
|
Re: Paint job on a budget!? CONTINUED..page 44........
|
Anonymous
|
12/28/06 06:25 AM
|
|
Re: Paint job on a budget!? CONTINUED..page 44........
|
Anonymous
|
12/28/06 03:02 PM
|
|
Re: Paint job on a budget!? CONTINUED..page 44........
|
Anonymous
|
12/28/06 04:40 PM
|
|
Re: Paint job on a budget!? CONTINUED..page 44........
|
Anonymous
|
12/28/06 05:08 PM
|
|
Re: Paint job on a budget!? CONTINUED..page 44........
|
Anonymous
|
12/29/06 03:21 AM
|
|
Re: Paint job on a budget!? CONTINUED..page 44........
|
Exit1965
|
12/29/06 05:35 AM
|
|
Re: Paint job on a budget!? CONTINUED..page 44........
|
Marq
|
12/29/06 07:51 AM
|
|
Re: Paint job on a budget!? CONTINUED..page 44........
|
v8mirage
|
12/29/06 01:53 PM
|
|
Re: Paint job on a budget!? CONTINUED..page 44........
|
Anonymous
|
12/29/06 03:11 PM
|
|
Re: Paint job on a budget!? CONTINUED..page 44........
|
Anonymous
|
12/29/06 03:38 PM
|
|
Re: Paint job on a budget!? CONTINUED..page 44........
|
Anonymous
|
12/29/06 05:38 PM
|
|
Re: Paint job on a budget!? CONTINUED..page 44........
|
Anonymous
|
12/29/06 06:40 PM
|
|
Re: Paint job on a budget!? CONTINUED..page 44........
|
Anonymous
|
12/29/06 06:44 PM
|
|
Re: Paint job on a budget!? CONTINUED..page 44........
|
Anonymous
|
12/30/06 12:45 AM
|
|
Re: Paint job on a budget!? CONTINUED..page 44........
|
Anonymous
|
01/05/07 05:38 PM
|
|
Re: Paint job on a budget!? CONTINUED..page 44........
|
69chargeryeehaa
|
01/05/07 09:31 PM
|
 Re: Paint job on a budget!? CONTINUED..page 44........
|
batjac
|
01/06/07 12:58 AM
|
|
Re: Paint job on a budget!? CONTINUED..page 44........
|
C38coupe
|
01/06/07 02:30 AM
|
|
Re: Paint job on a budget!? CONTINUED..page 44........
|
Anonymous
|
01/06/07 03:26 AM
|
|
Re: Paint job on a budget!? CONTINUED..page 44........
|
Pool Fixer
|
01/06/07 02:59 PM
|
|
Re: Paint job on a budget!? CONTINUED..page 44........
|
69chargeryeehaa
|
01/06/07 06:05 PM
|
|
Re: Paint job on a budget!? CONTINUED..page 44........
|
Anonymous
|
01/06/07 06:09 PM
|
|
Re: Paint job on a budget!? CONTINUED..page 44........
|
69chargeryeehaa
|
01/06/07 06:26 PM
|
|
Re: Paint job on a budget!? CONTINUED..page 44........
|
Anonymous
|
01/08/07 04:03 PM
|
|
Re: Paint job on a budget!? CONTINUED..page 44........
|
69chargeryeehaa
|
01/08/07 04:23 PM
|
|
Re: Paint job on a budget!? CONTINUED..page 44........
|
Anonymous
|
01/08/07 07:45 PM
|
|
Re: Paint job on a budget!? CONTINUED..page 44........
|
69chargeryeehaa
|
01/09/07 12:23 AM
|
|
Re: Paint job on a budget!? CONTINUED..page 44........
|
Anonymous
|
01/09/07 01:54 AM
|
|
Re: Paint job on a budget!? CONTINUED..page 44........
|
69DartGT
|
01/09/07 03:04 AM
|
|
Re: Paint job on a budget!? CONTINUED..page 44........
|
Anonymous
|
01/09/07 09:25 AM
|
|
Re: Paint job on a budget!? CONTINUED..page 44........
|
69DartGT
|
01/09/07 02:41 PM
|
|
Re: Paint job on a budget!? CONTINUED..page 44........
|
69DartGT
|
01/08/07 06:21 PM
|
|
Re: Paint job on a budget!? CONTINUED..page 44........
|
Anonymous
|
01/09/07 03:17 AM
|
|
Re: Paint job on a budget!? CONTINUED..page 44........
|
69DartGT
|
01/09/07 03:46 AM
|
|
Re: Paint job on a budget!? CONTINUED..page 44........
|
Anonymous
|
01/07/07 01:21 AM
|
|
Re: Paint job on a budget!? CONTINUED..page 44........
|
69DartGT
|
01/07/07 01:28 AM
|
|
Re: Paint job on a budget!? CONTINUED..page 44........
|
Anonymous
|
01/07/07 01:40 AM
|
|
Re: Paint job on a budget!? CONTINUED..page 44........
|
69DartGT
|
01/07/07 02:03 AM
|
|
Re: Paint job on a budget!? CONTINUED..page 44........
|
Anonymous
|
01/07/07 02:08 AM
|
|
Re: Paint job on a budget!? CONTINUED..page 44........
|
69DartGT
|
01/07/07 02:42 AM
|
|
Re: Paint job on a budget!? CONTINUED..page 44........
|
Anonymous
|
01/07/07 03:21 AM
|
|
Re: Paint job on a budget!? CONTINUED..page 44........
|
Anonymous
|
01/07/07 03:27 AM
|
|
Re: Paint job on a budget!? CONTINUED..page 44........
|
Anonymous
|
01/07/07 03:32 AM
|
|
Re: Paint job on a budget!? CONTINUED..page 44........
|
Exit1965
|
01/07/07 01:44 PM
|
|
Re: Paint job on a budget!? CONTINUED..page 44........
|
Anonymous
|
01/07/07 03:26 AM
|
|
Re: Paint job on a budget!? CONTINUED..page 44........
|
Anonymous
|
01/07/07 08:04 AM
|
|
Re: Paint job on a budget!? CONTINUED..page 44........
|
Anonymous
|
01/07/07 02:21 PM
|
|
Re: Paint job on a budget!? CONTINUED..page 44........
|
Anonymous
|
01/07/07 04:26 PM
|
|
Re: Paint job on a budget!? CONTINUED..page 44........
|
Anonymous
|
01/07/07 05:59 PM
|
|
Re: Paint job on a budget!? CONTINUED..page 44........
|
Exit1965
|
01/08/07 01:13 AM
|
|
Re: Paint job on a budget!? CONTINUED..page 44........
|
Anonymous
|
01/08/07 01:28 AM
|
|
Re: Paint job on a budget!? CONTINUED..page 44........
|
Anonymous
|
12/28/06 06:43 PM
|
|
Re: Paint job on a budget!? CONTINUED..page 44........
|
Ledman_70
|
12/28/06 07:53 PM
|
|
Re: Paint job on a budget!? CONTINUED..page 44........
|
Anonymous
|
12/28/06 09:00 PM
|
|
Re: Paint job on a budget!? CONTINUED..page 44........
|
Ledman_70
|
12/29/06 05:24 PM
|
|
Re: Paint job on a budget!? CONTINUED..page 44........
|
Anonymous
|
01/03/07 11:00 AM
|
|
Re: Paint job on a budget!? CONTINUED..page 44........
|
Anonymous
|
01/03/07 02:48 PM
|
|
Re: Paint job on a budget!? CONTINUED..page 44........
|
Anonymous
|
01/07/07 06:09 PM
|
|
Re: Paint job on a budget!? CONTINUED..page 44........
|
C38coupe
|
01/03/07 05:02 PM
|
|
Re: Paint job on a budget!? CONTINUED..page 44........
|
Anonymous
|
01/03/07 05:51 PM
|
|
Re: Paint job on a budget!? CONTINUED..page 44........
|
Anonymous
|
01/08/07 06:56 AM
|
|
Re: Paint job on a budget!? CONTINUED..page 44........
|
Anonymous
|
12/26/06 05:53 AM
|
|
Re: Paint job on a budget!? CONTINUED..page 44........
|
Anonymous
|
12/23/06 02:27 AM
|
|
Re: Paint job on a budget!? CONTINUED..page 44........
|
Anonymous
|
12/14/06 07:46 PM
|
|
Re: Paint job on a budget!? CONTINUED..page 44........
|
69DartGT
|
12/14/06 09:41 PM
|
|
Re: Paint job on a budget!? CONTINUED..page 44........
|
Anonymous
|
12/14/06 09:50 PM
|
|
Re: Paint job on a budget!? CONTINUED..page 44........
|
Exit1965
|
12/14/06 10:02 PM
|
|
Re: Paint job on a budget!? CONTINUED..page 44........
|
69DartGT
|
12/14/06 10:40 PM
|
|
Re: Paint job on a budget!? CONTINUED..page 44........
|
69DartGT
|
12/15/06 05:45 PM
|
|
Re: Paint job on a budget!? CONTINUED..page 44........
|
Anonymous
|
12/15/06 07:41 PM
|
|
Re: Paint job on a budget!? CONTINUED..page 44........
|
69DartGT
|
12/15/06 08:26 PM
|
|
Re: Paint job on a budget!? CONTINUED..page 44........
|
toplescuda
|
12/15/06 08:44 PM
|
|
Re: Paint job on a budget!? CONTINUED..page 44........
|
69DartGT
|
12/15/06 09:17 PM
|
|
Re: Paint job on a budget!? CONTINUED..page 44........
|
Anonymous
|
12/15/06 10:27 PM
|
|
Re: Paint job on a budget!? CONTINUED..page 44........
|
69DartGT
|
12/15/06 11:31 PM
|
|
Re: Paint job on a budget!? CONTINUED..page 44........
|
kenzo42
|
12/16/06 04:56 AM
|
|
Re: Paint job on a budget!? CONTINUED..page 44........
|
Anonymous
|
12/16/06 01:38 PM
|
|
Re: Paint job on a budget!? CONTINUED..page 44........
|
dalbers
|
12/17/06 05:33 AM
|
|
Re: Paint job on a budget!? CONTINUED..page 44........
|
dalbers
|
12/17/06 05:34 AM
|
|
Re: Paint job on a budget!? CONTINUED..page 44........
|
dalbers
|
12/17/06 05:37 AM
|
|
Re: Paint job on a budget!? CONTINUED..page 44........
|
dalbers
|
12/17/06 07:47 AM
|
|
Re: Paint job on a budget!? CONTINUED..page 44........
|
Anonymous
|
12/17/06 04:28 PM
|
|
Re: Paint job on a budget!? CONTINUED..page 44........
|
Anonymous
|
12/17/06 07:32 PM
|
|
Cliff Notes/Summary??
|
Anonymous
|
12/18/06 01:27 PM
|
|
Re: Cliff Notes/Summary??
|
Exit1965
|
12/18/06 01:36 PM
|
|
Re: Cliff Notes/Summary??
|
Anonymous
|
12/18/06 01:49 PM
|
|
Re: Cliff Notes/Summary??
|
69chargeryeehaa
|
12/18/06 05:11 PM
|
|
Re: Cliff Notes/Summary??
|
toplescuda
|
12/18/06 06:43 PM
|
|
Re: Cliff Notes/Summary??
|
Anonymous
|
12/18/06 07:18 PM
|
|
Re: Cliff Notes/Summary??
|
Anonymous
|
12/18/06 08:35 PM
|
|
Re: Cliff Notes/Summary??
|
69DartGT
|
12/19/06 12:28 AM
|
|
Re: Paint job on a budget!? CONTINUED..page 44........
|
Java
|
12/18/06 07:32 PM
|
|
Re: Paint job on a budget!? CONTINUED..page 44........
|
Anonymous
|
12/19/06 05:17 AM
|
|
Re: Paint job on a budget!? CONTINUED..page 44........
|
69DartGT
|
12/19/06 08:15 PM
|
|
Re: Paint job on a budget!? CONTINUED..page 44........
|
texczech
|
12/20/06 01:02 PM
|
|
Re: Paint job on a budget!? CONTINUED..page 44........
|
69DartGT
|
12/20/06 04:41 PM
|
|
Re: Paint job on a budget!? CONTINUED..page 44........
|
Anonymous
|
12/20/06 08:37 PM
|
|
Re: Paint job on a budget!? CONTINUED..page 44........
|
Anonymous
|
12/20/06 09:15 PM
|
|
Re: Paint job on a budget!? CONTINUED..page 44........
|
Anonymous
|
12/21/06 04:52 AM
|
|
Re: Paint job on a budget!? CONTINUED..page 44........
|
Anonymous
|
12/21/06 01:48 PM
|
|
Re: Paint job on a budget!? CONTINUED..page 44........
|
Anonymous
|
12/22/06 03:00 AM
|
|
Re: Paint job on a budget!? CONTINUED..page 44........
|
69DartGT
|
12/22/06 05:09 AM
|
|
Re: Paint job on a budget!? CONTINUED..page 44........
|
Anonymous
|
12/22/06 05:09 PM
|
|
Re: Paint job on a budget!? CONTINUED..page 44........
|
69DartGT
|
12/22/06 05:47 PM
|
|
Re: Paint job on a budget!? CONTINUED..page 44........
|
Anonymous
|
12/19/06 09:49 PM
|
|
Re: Paint job on a budget!? CONTINUED..page 44........
|
Anonymous
|
12/23/06 07:55 PM
|
|
Re: Paint job on a budget!? CONTINUED..page 44........
|
69DartGT
|
12/23/06 08:04 PM
|
|
Re: Paint job on a budget!? CONTINUED..page 44........
|
Anonymous
|
12/23/06 10:08 PM
|
|
Re: Paint job on a budget!? CONTINUED..page 44........
|
Anonymous
|
12/24/06 12:03 AM
|
|
Re: Paint job on a budget!? CONTINUED..page 44........
|
Anonymous
|
12/24/06 03:10 AM
|
|
Re: Paint job on a budget!? CONTINUED..page 44........
|
dalbers
|
12/24/06 04:06 AM
|
|
Re: Paint job on a budget!? CONTINUED..page 44........
|
Anonymous
|
01/24/07 01:04 AM
|
|
Re: Paint job on a budget!? CONTINUED..page 44........
|
Exit1965
|
01/24/07 02:25 AM
|
|
Re: Paint job on a budget!? CONTINUED..page 44........
|
69chargeryeehaa
|
12/14/06 10:03 PM
|
|
Re: Paint job on a budget!? CONTINUED..page 44........
|
Anonymous
|
12/14/06 10:43 PM
|
|
Re: Paint job on a budget!? CONTINUED..page 44........
|
Anonymous
|
12/14/06 10:53 PM
|
|
Re: Paint job on a budget!? CONTINUED..page 44........
|
69DartGT
|
12/15/06 04:56 PM
|
|
Re: Paint job on a budget!? CONTINUED..page 44........
|
69chargeryeehaa
|
12/15/06 05:10 PM
|
|
Re: Paint job on a budget!? CONTINUED..page 44........
|
69DartGT
|
12/15/06 05:22 PM
|
|
Re: Paint job on a budget!? CONTINUED..page 44........
|
Anonymous
|
02/05/07 10:07 PM
|
|
Re: Paint job on a budget!? CONTINUED..page 44........
|
Anonymous
|
02/06/07 02:36 AM
|
|
Re: Paint job on a budget!? CONTINUED..page 44........
|
Anonymous
|
12/14/06 09:23 PM
|
|
Re: Paint job on a budget!? CONTINUED..page 44........
|
69DartGT
|
12/11/06 07:17 PM
|
|
Re: Paint job on a budget!? CONTINUED..page 44........
|
69DartGT
|
12/11/06 07:20 PM
|
|
Re: Paint job on a budget!? CONTINUED..page 44............
|
Anonymous
|
12/21/06 07:40 PM
|
|
Re: Paint job on a budget!? CONTINUED..page 44........
|
Exit1965
|
12/21/06 08:23 PM
|
|
Re: Paint job on a budget!? CONTINUED..page 44........
|
C38coupe
|
12/21/06 09:33 PM
|
|
Re: Paint job on a budget!? CONTINUED..page 44........
|
_Scott_
|
12/22/06 12:45 AM
|
|
Re: Paint job on a budget!? CONTINUED..page 44........
|
69chargeryeehaa
|
12/22/06 04:57 PM
|
|
Re: Paint job on a budget!? CONTINUED..page 44........
|
69chargeryeehaa
|
12/21/06 10:07 PM
|
|
Re: Paint job on a budget!? CONTINUED..page 44........
|
C38coupe
|
12/21/06 11:58 PM
|
|
Re: Paint job on a budget!? CONTINUED..page 44............
|
4mulaS
|
01/06/07 06:29 PM
|
|
Re: Paint job on a budget!? CONTINUED..page 44............
|
Anonymous
|
01/06/07 06:35 PM
|
|
Re: Paint job on a budget!? CONTINUED..page 44............
|
69chargeryeehaa
|
01/06/07 06:44 PM
|
|
Re: Paint job on a budget!? CONTINUED..page 44............
|
69DartGT
|
01/06/07 08:53 PM
|
|
Re: Paint job on a budget!? CONTINUED..page 44............
|
Anonymous
|
01/08/07 08:45 AM
|
|
Re: Paint job on a budget!? CONTINUED..page 44............
|
69DartGT
|
01/08/07 02:40 PM
|
|
Re: Paint job on a budget!? CONTINUED..page 44............
|
Anonymous
|
01/08/07 07:14 PM
|
|
Re: Paint job on a budget!? CONTINUED..page 44............
|
Anonymous
|
01/08/07 11:00 PM
|
|
Re: Paint job on a budget!? CONTINUED..page 44............
|
69DartGT
|
01/08/07 11:07 PM
|
|
Re: Paint job on a budget!? CONTINUED..page 44............
|
Anonymous
|
01/08/07 11:14 PM
|
|
Re: Paint job on a budget!? CONTINUED..page 44............
|
69DartGT
|
01/08/07 11:19 PM
|
|
Re: Paint job on a budget!? CONTINUED..page 44............
|
69DartGT
|
01/08/07 11:29 PM
|
|
Re: Paint job on a budget!? CONTINUED..page 44........
|
_Scott_
|
01/09/07 04:08 AM
|
|
Re: Paint job on a budget!? CONTINUED..page 44........
|
Anonymous
|
01/09/07 05:17 AM
|
|
Re: Paint job on a budget!? CONTINUED..page 44........
|
Anonymous
|
01/09/07 05:19 AM
|
|
Re: Paint job on a budget!? CONTINUED..page 44........
|
Anonymous
|
01/09/07 05:21 AM
|
|
Re: Paint job on a budget!? CONTINUED..page 44........
|
Marq
|
01/09/07 05:51 AM
|
|
Re: Paint job on a budget!? CONTINUED..page 44........
|
Anonymous
|
01/09/07 06:16 AM
|
|
Re: Paint job on a budget!? CONTINUED..page 44........
|
Anonymous
|
01/09/07 07:20 AM
|
|
Re: Paint job on a budget!? CONTINUED..page 44........
|
Anonymous
|
01/09/07 08:50 AM
|
|
Re: Paint job on a budget!? CONTINUED..page 44........
|
Anonymous
|
01/09/07 09:23 AM
|
|
Re: Paint job on a budget!? CONTINUED..page 44........
|
Anonymous
|
01/09/07 10:33 AM
|
|
Re: Paint job on a budget!? CONTINUED..page 44........
|
Anonymous
|
01/09/07 11:15 AM
|
|
Re: Paint job on a budget!? CONTINUED..page 44........
|
69chargeryeehaa
|
01/09/07 03:14 PM
|
|
Re: Paint job on a budget!? CONTINUED..page 44........
|
69DartGT
|
01/09/07 04:11 PM
|
|
Re: Paint job on a budget!? CONTINUED..page 44........
|
Anonymous
|
01/09/07 05:50 PM
|
|
Re: Paint job on a budget!? CONTINUED..page 44........
|
Anonymous
|
01/09/07 06:54 PM
|
|
Re: Paint job on a budget!? CONTINUED..page 44........
|
69DartGT
|
01/09/07 09:36 PM
|
|
Re: Paint job on a budget!? CONTINUED..page 44........
|
Anonymous
|
01/09/07 10:53 PM
|
|
Re: Paint job on a budget!? CONTINUED..page 44........
|
69DartGT
|
01/10/07 01:27 AM
|
|
Re: Paint job on a budget!? CONTINUED..page 44........
|
Anonymous
|
01/10/07 01:48 AM
|
|
Re: Paint job on a budget!? CONTINUED..page 44........
|
69DartGT
|
01/10/07 01:59 AM
|
|
Re: Paint job on a budget!? CONTINUED..page 44........
|
Anonymous
|
01/10/07 02:25 AM
|
|
Re: Paint job on a budget!? CONTINUED..page 44........
|
Anonymous
|
01/10/07 04:58 AM
|
|
Re: Paint job on a budget!? CONTINUED..page 44........
|
Anonymous
|
01/10/07 07:06 AM
|
|
Re: Paint job on a budget!? CONTINUED..page 44........
|
Anonymous
|
01/10/07 07:34 AM
|
|
Re: Paint job on a budget!? CONTINUED..page 44........
|
Anonymous
|
01/10/07 02:17 PM
|
|
Re: Paint job on a budget!? CONTINUED..page 44........
|
69chargeryeehaa
|
01/10/07 04:55 PM
|
|
Re: Paint job on a budget!? CONTINUED..page 44........
|
Anonymous
|
01/10/07 05:07 PM
|
|
Re: Paint job on a budget!? CONTINUED..page 44........
|
Anonymous
|
01/10/07 06:44 PM
|
|
Re: Paint job on a budget!? CONTINUED..page 44........
|
Anonymous
|
01/10/07 08:52 PM
|
|
Re: Paint job on a budget!? CONTINUED..page 44........
|
1BAD68
|
01/10/07 10:07 PM
|
|
Re: Paint job on a budget!? CONTINUED..page 44........
|
Anonymous
|
01/11/07 12:13 AM
|
|
Re: Paint job on a budget!? CONTINUED..page 44........
|
Anonymous
|
01/11/07 12:29 AM
|
|
Re: Paint job on a budget!? CONTINUED..page 44........
|
1BAD68
|
01/11/07 03:33 AM
|
|
Re: Paint job on a budget!? CONTINUED..page 44........
|
C38coupe
|
01/12/07 01:22 AM
|
|
Re: Paint job on a budget!? CONTINUED..page 44........
|
Anonymous
|
01/12/07 01:38 AM
|
|
Re: Paint job on a budget!? CONTINUED..page 44........
|
69DartGT
|
01/12/07 02:41 AM
|
|
Re: Paint job on a budget!? CONTINUED..page 44........
|
Anonymous
|
01/12/07 02:43 AM
|
|
Re: Paint job on a budget!? CONTINUED..page 44........
|
Anonymous
|
01/12/07 03:49 AM
|
|
Re: Paint job on a budget!? CONTINUED..page 44........
|
Anonymous
|
01/12/07 06:09 AM
|
|
Re: Paint job on a budget!? CONTINUED..page 44........
|
Anonymous
|
01/12/07 11:25 AM
|
|
Re: Paint job on a budget!? CONTINUED..page 44........
|
Anonymous
|
01/11/07 12:35 AM
|
|
Re: Paint job on a budget!? CONTINUED..page 44........
|
69DartGT
|
01/11/07 01:05 AM
|
|
Re: Paint job on a budget!? CONTINUED..page 44........
|
Anonymous
|
01/11/07 01:18 AM
|
|
Re: Paint job on a budget!? CONTINUED..page 44........
|
Anonymous
|
01/11/07 04:34 PM
|
|
Re: Paint job on a budget!? CONTINUED..page 44........
|
Anonymous
|
01/11/07 05:02 PM
|
|
Re: Paint job on a budget!? CONTINUED..page 44........
|
Anonymous
|
01/11/07 05:05 PM
|
|
Re: Paint job on a budget!? CONTINUED..page 44........
|
Anonymous
|
01/11/07 05:38 PM
|
|
Re: Paint job on a budget!? CONTINUED..page 44........
|
Anonymous
|
01/12/07 01:12 PM
|
|
Re: Paint job on a budget!? CONTINUED..page 44........
|
Anonymous
|
01/12/07 02:34 PM
|
|
Re: Paint job on a budget!? CONTINUED..page 44........
|
69DartGT
|
01/12/07 02:41 PM
|
|
Re: Paint job on a budget!? CONTINUED..page 44........
|
Anonymous
|
01/12/07 04:18 PM
|
|
Re: Paint job on a budget!? CONTINUED..page 44........
|
69DartGT
|
01/12/07 05:36 PM
|
|
Re: Paint job on a budget!? CONTINUED..page 44........
|
Anonymous
|
01/13/07 05:59 PM
|
|
Re: Paint job on a budget!? CONTINUED..page 44........
|
Exit1965
|
01/12/07 08:17 PM
|
|
Re: Paint job on a budget!? CONTINUED..page 44........
|
Anonymous
|
01/12/07 10:31 PM
|
|
Re: Paint job on a budget!? CONTINUED..page 44........
|
Anonymous
|
01/12/07 11:15 PM
|
|
Re: Paint job on a budget!? CONTINUED..page 44........
|
Anonymous
|
01/13/07 01:22 AM
|
|
Re: Paint job on a budget!? CONTINUED..page 44........
|
kenzo42
|
01/13/07 02:36 AM
|
|
Re: Paint job on a budget!? CONTINUED..page 44........
|
Marq
|
01/13/07 05:10 PM
|
|
Re: Paint job on a budget!? CONTINUED..page 44........
|
kenzo42
|
01/13/07 09:06 PM
|
|
Re: Paint job on a budget!? CONTINUED..page 44........
|
Anonymous
|
01/13/07 03:41 AM
|
|
Re: Paint job on a budget!? CONTINUED..page 44........
|
Anonymous
|
01/14/07 04:40 AM
|
|
Re: Paint job on a budget!? CONTINUED..page 44........
|
Anonymous
|
01/14/07 02:04 PM
|
|
Re: Paint job on a budget!? CONTINUED..page 44........
|
Ledman_70
|
01/14/07 08:20 PM
|
|
Re: Paint job on a budget!? CONTINUED..page 44........
|
Anonymous
|
01/15/07 03:53 AM
|
|
Re: Paint job on a budget!? CONTINUED..page 44........
|
chris1970
|
01/15/07 04:13 AM
|
|
Re: Paint job on a budget!? CONTINUED..page 44........
|
Anonymous
|
01/15/07 08:30 AM
|
|
Re: Paint job on a budget!? CONTINUED..page 44........
|
Anonymous
|
01/16/07 12:10 AM
|
|
Re: Paint job on a budget!? CONTINUED..page 44........
|
Anonymous
|
01/16/07 01:06 AM
|
|
Re: Paint job on a budget!? CONTINUED..page 44........
|
Anonymous
|
01/16/07 01:32 AM
|
|
Re: Paint job on a budget!? CONTINUED..page 44........
|
Anonymous
|
01/16/07 12:46 PM
|
|
Re: Paint job on a budget!? CONTINUED..page 44........
|
Anonymous
|
01/16/07 10:55 PM
|
|
Re: Paint job on a budget!? CONTINUED..page 44........
|
Anonymous
|
01/17/07 06:06 AM
|
|
Re: Paint job on a budget!? CONTINUED..page 44........
|
Anonymous
|
01/17/07 09:44 AM
|
|
Re: Paint job on a budget!? CONTINUED..page 44........
|
Anonymous
|
01/17/07 10:22 AM
|
|
Re: Paint job on a budget!? CONTINUED..page 44........
|
79asspin
|
01/17/07 01:05 PM
|
|
Re: Paint job on a budget!? CONTINUED..page 44........
|
Anonymous
|
01/17/07 08:22 PM
|
|
Re: Paint job on a budget!? CONTINUED..page 44........
|
Marq
|
01/17/07 10:49 PM
|
|
Re: Paint job on a budget!? CONTINUED..page 44........
|
Anonymous
|
01/18/07 12:04 AM
|
|
Re: Paint job on a budget!? CONTINUED..page 44........
|
Anonymous
|
01/18/07 10:05 PM
|
|
Re: Paint job on a budget!? CONTINUED..page 44........
|
Anonymous
|
01/19/07 06:15 PM
|
|
Re: Paint job on a budget!? CONTINUED..page 44........
|
Anonymous
|
01/19/07 06:37 PM
|
|
Re: Paint job on a budget!? CONTINUED..page 44........
|
Anonymous
|
01/19/07 08:35 PM
|
|
Re: Paint job on a budget!? CONTINUED..page 44........
|
Anonymous
|
01/20/07 11:42 AM
|
|
Re: Paint job on a budget!? CONTINUED..page 44........
|
Anonymous
|
01/21/07 03:29 PM
|
|
Re: Paint job on a budget!? CONTINUED..page 44........
|
plymouthfan
|
01/21/07 04:12 PM
|
|
Re: Paint job on a budget!? CONTINUED..page 44........
|
Anonymous
|
01/21/07 06:07 PM
|
|
Re: Paint job on a budget!? CONTINUED..page 44........
|
Anonymous
|
01/21/07 07:00 PM
|
|
Re: Paint job on a budget!? CONTINUED..page 44........
|
Anonymous
|
01/21/07 09:19 PM
|
|
Re: Paint job on a budget!? CONTINUED..page 44........
|
Anonymous
|
01/22/07 12:07 AM
|
|
Re: Paint job on a budget!? CONTINUED..page 44........
|
Anonymous
|
01/22/07 06:15 AM
|
|
Re: Paint job on a budget!? CONTINUED..page 44........
|
Anonymous
|
01/22/07 10:10 AM
|
|
Re: Paint job on a budget!? CONTINUED..page 44........
|
Anonymous
|
01/22/07 02:00 PM
|
|
Re: Paint job on a budget!? CONTINUED..page 44........
|
69chargeryeehaa
|
01/22/07 07:42 PM
|
|
Re: Paint job on a budget!? CONTINUED..page 44........
|
Anonymous
|
01/22/07 03:39 PM
|
|
Re: Paint job on a budget!? CONTINUED..page 44........
|
ONEBADBIRD
|
01/23/07 01:41 AM
|
|
Re: Paint job on a budget!? CONTINUED..page 44........
|
Anonymous
|
01/23/07 03:45 AM
|
|
Re: Paint job on a budget!? CONTINUED..page 44........
|
Anonymous
|
01/23/07 04:47 AM
|
|
Re: Paint job on a budget!? CONTINUED..page 44........
|
v8mirage
|
01/23/07 12:36 PM
|
|
Re: Paint job on a budget!? CONTINUED..page 44........
|
Anonymous
|
01/23/07 05:58 PM
|
|
Re: Paint job on a budget!? CONTINUED..page 44........
|
Anonymous
|
01/23/07 07:58 PM
|
|
Re: Paint job on a budget!? CONTINUED..page 44........
|
Anonymous
|
01/24/07 01:08 AM
|
|
Re: Paint job on a budget!? CONTINUED..page 44........
|
Anonymous
|
01/23/07 09:14 PM
|
|
Re: Paint job on a budget!? CONTINUED..page 44........
|
Anonymous
|
01/23/07 09:30 PM
|
|
Re: Paint job on a budget!? CONTINUED..page 44........
|
69DartGT
|
01/23/07 09:35 PM
|
|
Re: Paint job on a budget!? CONTINUED..page 44........
|
Anonymous
|
01/23/07 09:37 PM
|
|
Re: Paint job on a budget!? CONTINUED..page 44........
|
Marq
|
01/24/07 03:20 AM
|
|
Re: Paint job on a budget!? CONTINUED..page 44........
|
Anonymous
|
01/24/07 06:11 AM
|
|
Re: Paint job on a budget!? CONTINUED..page 44........
|
Anonymous
|
01/24/07 07:18 AM
|
|
Re: Paint job on a budget!? CONTINUED..page 44........
|
Anonymous
|
01/24/07 11:41 AM
|
|
Re: Paint job on a budget!? CONTINUED..page 44........
|
Marq
|
01/24/07 02:17 PM
|
|
Re: Paint job on a budget!? CONTINUED..page 44........
|
Anonymous
|
01/24/07 07:17 PM
|
|
Re: Paint job on a budget!? CONTINUED..page 44........
|
Anonymous
|
01/24/07 07:27 PM
|
|
Re: Paint job on a budget!? CONTINUED..page 44........
|
Anonymous
|
01/25/07 12:19 AM
|
|
Re: Paint job on a budget!? CONTINUED..page 44........
|
Anonymous
|
01/25/07 12:57 AM
|
|
Re: Paint job on a budget!? CONTINUED..page 44........
|
RebelDart
|
01/25/07 04:02 AM
|
|
Re: Paint job on a budget!? CONTINUED..page 44........
|
v8mirage
|
01/25/07 12:27 PM
|
|
Re: Paint job on a budget!? CONTINUED..page 44........
|
Anonymous
|
01/25/07 12:50 PM
|
|
Re: Paint job on a budget!? CONTINUED..page 44........
|
Anonymous
|
01/25/07 07:59 PM
|
|
Re: Paint job on a budget!? CONTINUED..page 44........
|
69chargeryeehaa
|
01/25/07 08:05 PM
|
|
Re: Paint job on a budget!? CONTINUED..page 44........
|
kenzo42
|
01/25/07 08:52 PM
|
|
Re: Paint job on a budget!? CONTINUED..page 44........
|
Anonymous
|
01/25/07 09:11 PM
|
|
Re: Paint job on a budget!? CONTINUED..page 44........
|
69DartGT
|
01/25/07 10:14 PM
|
|
Re: Paint job on a budget!? CONTINUED..page 44........
|
69chargeryeehaa
|
01/26/07 12:27 AM
|
|
Re: Paint job on a budget!? CONTINUED..page 44........
|
69DartGT
|
01/26/07 12:46 AM
|
|
Re: Paint job on a budget!? CONTINUED..page 44........
|
69chargeryeehaa
|
01/26/07 01:07 AM
|
|
Re: Paint job on a budget!? CONTINUED..page 44........
|
Anonymous
|
01/26/07 01:45 AM
|
|
Re: Paint job on a budget!? CONTINUED..page 44........
|
Pool Fixer
|
01/25/07 12:53 PM
|
|
Re: Paint job on a budget!? CONTINUED..page 44........
|
69chargeryeehaa
|
01/25/07 04:29 PM
|
|
Re: Paint job on a budget!? CONTINUED..page 44........
|
RebelDart
|
01/26/07 03:12 AM
|
|
Re: Paint job on a budget!? CONTINUED..page 44........
|
Marq
|
01/25/07 04:33 AM
|
|
Re: Paint job on a budget!? CONTINUED..page 44........
|
v8mirage
|
01/25/07 12:16 PM
|
|
Re: Paint job on a budget!? CONTINUED..page 44........
|
Anonymous
|
01/26/07 03:13 AM
|
|
Re: Paint job on a budget!? CONTINUED..page 44........
|
Anonymous
|
01/26/07 04:29 AM
|
|
Re: Paint job on a budget!? CONTINUED..page 44........
|
Pool Fixer
|
01/26/07 04:45 AM
|
|
Re: Paint job on a budget!? CONTINUED..page 44........
|
Anonymous
|
01/26/07 01:25 PM
|
|
Re: Paint job on a budget!? CONTINUED..page 44........
|
Anonymous
|
01/30/07 04:17 PM
|
|
Re: Paint job on a budget!? CONTINUED..page 44........
|
Anonymous
|
01/30/07 04:31 PM
|
|
Re: Paint job on a budget!? CONTINUED..page 44........
|
Anonymous
|
01/30/07 05:12 PM
|
|
Radiator id numbers
|
andyBEE
|
02/04/07 07:12 PM
|
|
Re: Paint job on a budget!? CONTINUED..page 44........
|
Anonymous
|
01/26/07 01:41 PM
|
|
Re: Paint job on a budget!? CONTINUED..page 44........
|
Anonymous
|
01/26/07 04:41 PM
|
|
Re: Paint job on a budget!? CONTINUED..page 44........
|
Anonymous
|
01/26/07 05:23 PM
|
|
Re: Paint job on a budget!? CONTINUED..page 44........
|
Anonymous
|
01/26/07 05:40 PM
|
|
Re: Paint job on a budget!? CONTINUED..page 44........
|
Anonymous
|
01/26/07 06:42 PM
|
|
Re: Paint job on a budget!? CONTINUED..page 44........
|
Anonymous
|
01/26/07 07:11 PM
|
|
Re: Paint job on a budget!? CONTINUED..page 44........
|
Anonymous
|
01/26/07 08:09 PM
|
|
Re: Paint job on a budget!? CONTINUED..page 44........
|
Anonymous
|
01/26/07 08:17 PM
|
|
Re: Paint job on a budget!? CONTINUED..page 44........
|
Anonymous
|
01/26/07 08:53 PM
|
|
Re: Paint job on a budget!? CONTINUED..page 44........
|
Anonymous
|
01/26/07 05:52 PM
|
|
Re: Paint job on a budget!? CONTINUED..page 44........
|
C38coupe
|
01/28/07 12:02 AM
|
|
Re: Paint job on a budget!? CONTINUED..page 44........
|
Anonymous
|
01/28/07 02:20 AM
|
|
Re: Paint job on a budget!? CONTINUED..page 44........
|
Anonymous
|
01/28/07 07:40 PM
|
|
Re: Paint job on a budget!? CONTINUED..page 44........
|
Anonymous
|
01/29/07 02:57 AM
|
|
Re: Paint job on a budget!? CONTINUED..page 44........
|
1BAD68
|
01/29/07 04:01 AM
|
|
Re: Paint job on a budget!? CONTINUED..page 44........
|
Anonymous
|
01/29/07 12:01 PM
|
|
Re: Paint job on a budget!? CONTINUED..page 44........
|
Anonymous
|
01/30/07 01:13 AM
|
|
Re: Paint job on a budget!? CONTINUED..page 44........
|
Anonymous
|
01/28/07 02:31 AM
|
|
Re: Paint job on a budget!? CONTINUED..page 44........
|
Marq
|
01/27/07 12:09 AM
|
|
Re: Paint job on a budget!? CONTINUED..page 44........
|
Anonymous
|
01/27/07 01:21 AM
|
|
Re: Paint job on a budget!? CONTINUED..page 44........
|
Anonymous
|
01/27/07 03:09 AM
|
|
Re: Paint job on a budget!? CONTINUED..page 44........
|
kenzo42
|
01/27/07 04:48 AM
|
|
Re: Paint job on a budget!? CONTINUED..page 44........
|
Anonymous
|
01/27/07 05:33 AM
|
|
Re: Paint job on a budget!? CONTINUED..page 44........
|
Anonymous
|
01/27/07 08:05 PM
|
|
Re: Paint job on a budget!? CONTINUED..page 44........
|
69DartGT
|
01/27/07 02:15 PM
|
|
Re: Paint job on a budget!? CONTINUED..page 44........
|
Marq
|
01/29/07 03:11 PM
|
|
Re: Paint job on a budget!? CONTINUED..page 44........
|
Anonymous
|
01/29/07 07:33 PM
|
|
Re: Paint job on a budget!? CONTINUED..page 44........
|
Anonymous
|
01/29/07 07:37 PM
|
|
Re: Paint job on a budget!? CONTINUED..page 44........
|
v8mirage
|
01/29/07 07:48 PM
|
|
Re: Paint job on a budget!? CONTINUED..page 44........
|
Anonymous
|
01/30/07 12:32 AM
|
|
Re: Paint job on a budget!? CONTINUED..page 44........
|
Anonymous
|
01/30/07 12:44 AM
|
|
Re: Paint job on a budget!? CONTINUED..page 44........
|
Anonymous
|
01/30/07 01:26 AM
|
|
Re: Paint job on a budget!? CONTINUED..page 44........
|
69chargeryeehaa
|
01/30/07 12:13 AM
|
|
Re: Paint job on a budget!? CONTINUED..page 44........
|
Anonymous
|
01/30/07 01:25 AM
|
|
Re: Paint job on a budget!? CONTINUED..page 44........
|
Anonymous
|
01/30/07 02:43 AM
|
|
Re: Paint job on a budget!? CONTINUED..page 44........
|
Anonymous
|
01/30/07 11:51 AM
|
|
Re: Paint job on a budget!? CONTINUED..page 44........
|
Marq
|
01/30/07 01:23 PM
|
|
Re: Paint job on a budget!? CONTINUED..page 44........
|
Anonymous
|
01/30/07 04:02 PM
|
|
Re: Paint job on a budget!? CONTINUED..page 44........
|
Anonymous
|
01/30/07 04:10 PM
|
|
Re: Paint job on a budget!? CONTINUED..page 44........
|
Marq
|
01/31/07 05:47 AM
|
|
Re: Paint job on a budget!? CONTINUED..page 44........
|
Anonymous
|
01/31/07 06:11 AM
|
|
Re: Paint job on a budget!? CONTINUED..page 44........
|
Anonymous
|
01/31/07 11:41 AM
|
|
Re: Paint job on a budget!? CONTINUED..page 44........
|
69DartGT
|
01/31/07 02:50 PM
|
|
Re: Paint job on a budget!? CONTINUED..page 44........
|
Marq
|
01/31/07 06:45 PM
|
|
Re: Paint job on a budget!? CONTINUED..page 44........
|
Anonymous
|
02/01/07 05:39 AM
|
|
Re: Paint job on a budget!? CONTINUED..page 44........
|
Anonymous
|
02/01/07 05:57 AM
|
|
Re: Paint job on a budget!? CONTINUED..page 44........
|
Anonymous
|
02/01/07 07:48 PM
|
|
Re: Paint job on a budget!? CONTINUED..page 44........
|
Anonymous
|
02/01/07 11:51 PM
|
|
Re: Paint job on a budget!? CONTINUED..page 44........
|
Marq
|
02/02/07 01:36 AM
|
|
Re: Paint job on a budget!? CONTINUED..page 44........
|
Anonymous
|
02/02/07 03:13 AM
|
|
Re: Paint job on a budget!? CONTINUED..page 44........
|
Anonymous
|
02/02/07 05:46 PM
|
|
Re: Paint job on a budget!? CONTINUED..page 44........
|
Anonymous
|
02/02/07 06:49 PM
|
|
Re: Paint job on a budget!? CONTINUED..page 44........
|
Anonymous
|
02/04/07 04:51 AM
|
|
Re: Paint job on a budget!? CONTINUED..page 44........
|
Marq
|
02/04/07 03:58 PM
|
|
Re: Paint job on a budget!? CONTINUED..page 44........
|
Marq
|
02/04/07 04:50 PM
|
|
Re: Paint job on a budget!? CONTINUED..page 44........
|
batjac
|
02/04/07 06:33 PM
|
|
Re: Paint job on a budget!? CONTINUED..page 44........
|
Anonymous
|
02/04/07 06:37 PM
|
|
Re: Paint job on a budget!? CONTINUED..page 44........
|
Anonymous
|
02/04/07 09:12 PM
|
|
Re: Paint job on a budget!? CONTINUED..page 44........
|
Marq
|
02/05/07 05:44 AM
|
|
Re: Paint job on a budget!? CONTINUED..page 44........
|
Anonymous
|
02/07/07 09:00 PM
|
|
Re: Paint job on a budget!? CONTINUED..page 44........
|
C38coupe
|
02/08/07 03:30 AM
|
|
Re: Paint job on a budget!? CONTINUED..page 44........
|
Anonymous
|
02/08/07 04:14 PM
|
|
Re: Paint job on a budget!? CONTINUED..page 44........
|
Anonymous
|
02/08/07 05:40 PM
|
|
Re: Paint job on a budget!? CONTINUED..page 44........
|
Anonymous
|
02/08/07 05:55 PM
|
|
Re: Paint job on a budget!? CONTINUED..page 44........
|
69DartGT
|
02/08/07 08:01 PM
|
|
Re: Paint job on a budget!? CONTINUED..page 44........
|
Anonymous
|
02/08/07 08:02 PM
|
|
Re: Paint job on a budget!? CONTINUED..page 44........
|
Anonymous
|
02/08/07 08:40 PM
|
|
Re: Paint job on a budget!? CONTINUED..page 44........
|
Anonymous
|
02/08/07 10:25 PM
|
|
Re: Paint job on a budget!? CONTINUED..page 44........
|
Anonymous
|
02/09/07 12:28 AM
|
|
Re: Paint job on a budget!? CONTINUED..page 44........
|
69DartGT
|
02/09/07 03:33 AM
|
|
Re: Paint job on a budget!? CONTINUED..page 44........
|
Anonymous
|
02/09/07 02:42 PM
|
|
Re: Paint job on a budget!? CONTINUED..page 44........
|
Anonymous
|
02/09/07 05:11 PM
|
|
Re: Paint job on a budget!? CONTINUED..page 44........
|
Anonymous
|
02/09/07 04:44 PM
|
|
Re: Paint job on a budget!? CONTINUED..page 44........
|
Anonymous
|
02/09/07 05:51 PM
|
|
Re: Paint job on a budget!? CONTINUED..page 44........
|
Anonymous
|
02/10/07 03:24 PM
|
|
Re: Paint job on a budget!? CONTINUED..page 44........
|
69DartGT
|
02/10/07 04:18 PM
|
|
Re: Paint job on a budget!? CONTINUED..page 44........
|
Marq
|
02/12/07 02:33 AM
|
|
Re: Paint job on a budget!? CONTINUED..page 44........
|
v8mirage
|
02/10/07 04:27 PM
|
|
Re: Paint job on a budget!? CONTINUED..page 44........
|
Anonymous
|
02/10/07 11:03 PM
|
|
Re: Paint job on a budget!? CONTINUED..page 44........
|
C38coupe
|
02/10/07 11:16 PM
|
|
Re: Paint job on a budget!? CONTINUED..page 44........
|
69DartGT
|
02/11/07 05:02 AM
|
|
Re: Paint job on a budget!? CONTINUED..page 44........
|
cudaman1969
|
02/11/07 03:47 PM
|
|
Re: Paint job on a budget!? CONTINUED..page 44........
|
Anonymous
|
02/11/07 06:57 PM
|
|
Re: Paint job on a budget!? CONTINUED..page 44........
|
cudaman1969
|
02/11/07 07:08 PM
|
|
Re: Paint job on a budget!? CONTINUED..page 44........
|
v8mirage
|
02/11/07 07:41 PM
|
|
Re: Paint job on a budget!? CONTINUED..page 44........
|
Anonymous
|
02/12/07 12:07 AM
|
|
Re: Paint job on a budget!? CONTINUED..page 44........
|
Marq
|
02/12/07 02:48 AM
|
|
Re: Paint job on a budget!? CONTINUED..page 44........
|
cudaman1969
|
02/12/07 03:51 AM
|
|
Re: Paint job on a budget!? CONTINUED..page 44........
|
Anonymous
|
02/12/07 03:56 AM
|
|
Re: Paint job on a budget!? CONTINUED..page 44........
|
Anonymous
|
02/12/07 01:33 PM
|
|
Re: Paint job on a budget!? CONTINUED..page 44........
|
Anonymous
|
02/12/07 04:09 PM
|
|
Re: Paint job on a budget!? CONTINUED..page 44........
|
Anonymous
|
02/13/07 01:06 AM
|
|
Re: Paint job on a budget!? CONTINUED..page 44........
|
69DartGT
|
02/13/07 01:30 AM
|
|
Re: Paint job on a budget!? CONTINUED..page 44........
|
Anonymous
|
02/13/07 02:03 PM
|
|
Re: Paint job on a budget!? CONTINUED..page 44........
|
Anonymous
|
02/13/07 04:37 PM
|
|
Re: Paint job on a budget!? CONTINUED..page 44........
|
69DartGT
|
02/13/07 04:44 PM
|
|
Re: Paint job on a budget!? CONTINUED..page 44........
|
Anonymous
|
02/13/07 04:53 PM
|
|
Re: Paint job on a budget!? CONTINUED..page 44........
|
69DartGT
|
02/13/07 05:10 PM
|
|
Re: Paint job on a budget!? CONTINUED..page 44........
|
Anonymous
|
02/13/07 02:31 PM
|
|
Re: Paint job on a budget!? CONTINUED..page 44........
|
Jolly_Raj_R
|
02/14/07 02:19 AM
|
|
Re: Paint job on a budget!? CONTINUED..page 44........
|
Anonymous
|
02/14/07 09:09 AM
|
|
Re: Paint job on a budget!? CONTINUED..page 44........
|
Anonymous
|
02/14/07 10:54 AM
|
|
Re: Paint job on a budget!? CONTINUED..page 44........
|
Anonymous
|
02/14/07 03:55 PM
|
|
Re: Paint job on a budget!? CONTINUED..page 44........
|
Anonymous
|
02/14/07 05:32 PM
|
|
Re: Paint job on a budget!? CONTINUED..page 44........
|
Marq
|
02/14/07 08:12 PM
|
|
Re: Paint job on a budget!? CONTINUED..page 44........
|
Anonymous
|
02/14/07 09:33 PM
|
|
Re: Paint job on a budget!? CONTINUED..page 44........
|
Anonymous
|
02/15/07 01:02 AM
|
|
Re: Paint job on a budget!? CONTINUED..page 44........
|
Anonymous
|
02/15/07 06:55 AM
|
|
Re: Paint job on a budget!? CONTINUED..page 44........
|
Anonymous
|
02/15/07 06:48 PM
|
|
Re: Paint job on a budget!? CONTINUED..page 44........
|
Anonymous
|
02/15/07 08:17 PM
|
|
Re: Paint job on a budget!? CONTINUED..page 44........
|
ONEBADBIRD
|
02/15/07 08:28 PM
|
|
Re: Paint job on a budget!? CONTINUED..page 44........
|
v8mirage
|
02/16/07 12:09 AM
|
|
Re: Paint job on a budget!? CONTINUED..page 44........
|
Anonymous
|
02/16/07 03:38 AM
|
|
Re: Paint job on a budget!? CONTINUED..page 44........
|
Anonymous
|
02/16/07 03:59 AM
|
|
Re: Paint job on a budget!? CONTINUED..page 44........
|
Anonymous
|
02/16/07 05:23 AM
|
|
Re: Paint job on a budget!? CONTINUED..page 44........
|
v8mirage
|
02/16/07 01:35 PM
|
|
Re: Paint job on a budget!? CONTINUED..page 44........
|
Anonymous
|
02/16/07 01:37 PM
|
|
Re: Paint job on a budget!? CONTINUED..page 44........
|
Anonymous
|
02/16/07 01:36 PM
|
|
Re: Paint job on a budget!? CONTINUED..page 44........
|
Anonymous
|
02/22/07 10:32 PM
|
|
Re: Paint job on a budget!? CONTINUED..page 44........
|
C38coupe
|
02/23/07 01:30 AM
|
|
Re: Paint job on a budget!? CONTINUED..page 44........
|
69chargeryeehaa
|
02/23/07 02:11 PM
|
|
Re: Paint job on a budget!? CONTINUED..page 44........
|
C38coupe
|
02/23/07 02:35 PM
|
|
Re: Paint job on a budget!? CONTINUED..page 44........
|
StevesBug
|
02/23/07 06:38 PM
|
|
Re: Paint job on a budget!? CONTINUED..page 44........
|
Anonymous
|
02/24/07 02:51 AM
|
|
Re: Paint job on a budget!? CONTINUED..page 44........
|
Anonymous
|
02/24/07 05:30 AM
|
|
Re: Paint job on a budget!? CONTINUED..page 44........
|
StevesBug
|
02/24/07 04:34 PM
|
|
Re: Paint job on a budget!? CONTINUED..page 44........
|
StevesBug
|
02/25/07 01:13 AM
|
|
Re: Paint job on a budget!? CONTINUED..page 44........
|
Anonymous
|
02/25/07 01:44 AM
|
|
Re: Paint job on a budget!? CONTINUED..page 44........
|
Anonymous
|
02/25/07 02:23 AM
|
|
Re: Paint job on a budget!? CONTINUED..page 44........
|
Exit1965
|
02/25/07 05:28 AM
|
|
Re: Paint job on a budget!? CONTINUED..page 44........
|
Anonymous
|
02/25/07 06:05 AM
|
|
Re: Paint job on a budget!? CONTINUED..page 44........
|
StevesBug
|
02/25/07 02:09 PM
|
|
Re: Paint job on a budget!? CONTINUED..page 44........
|
Anonymous
|
02/26/07 03:32 AM
|
|
Re: Paint job on a budget!? CONTINUED..page 44........
|
Anonymous
|
02/26/07 05:47 AM
|
|
Re: Paint job on a budget!? CONTINUED..page 44........
|
Anonymous
|
02/26/07 01:49 PM
|
|
Re: Paint job on a budget!? CONTINUED..page 44........
|
Anonymous
|
02/26/07 02:45 PM
|
|
Re: Paint job on a budget!? CONTINUED..page 44........
|
Anonymous
|
02/26/07 06:51 PM
|
|
Re: Paint job on a budget!? CONTINUED..page 44........
|
Anonymous
|
02/26/07 11:43 PM
|
|
Re: Paint job on a budget!? CONTINUED..page 44........
|
Anonymous
|
02/27/07 03:08 AM
|
|
Re: Paint job on a budget!? CONTINUED..page 44........
|
Anonymous
|
02/27/07 03:36 AM
|
|
Re: Paint job on a budget!? CONTINUED..page 44........
|
Exit1965
|
02/27/07 05:12 AM
|
|
Re: Paint job on a budget!? CONTINUED..page 44........
|
StevesBug
|
02/27/07 02:20 PM
|
|
Re: Paint job on a budget!? CONTINUED..page 44........
|
69chargeryeehaa
|
02/27/07 03:30 PM
|
|
Re: Paint job on a budget!? CONTINUED..page 44........
|
Anonymous
|
02/27/07 06:14 PM
|
|
Re: Paint job on a budget!? CONTINUED..page 44........
|
StevesBug
|
02/27/07 08:13 PM
|
|
Re: Paint job on a budget!? CONTINUED..page 44........
|
Marq
|
02/27/07 10:23 PM
|
|
Re: Paint job on a budget!? CONTINUED..page 44........
|
69DartGT
|
02/27/07 10:52 PM
|
|
Re: Paint job on a budget!? CONTINUED..page 44........
|
Anonymous
|
02/27/07 11:21 PM
|
|
Re: Paint job on a budget!? CONTINUED..page 44........
|
Anonymous
|
02/27/07 11:29 PM
|
|
Re: Paint job on a budget!? CONTINUED..page 44........
|
Anonymous
|
02/27/07 11:31 PM
|
|
Re: Paint job on a budget!? CONTINUED..page 44........
|
Anonymous
|
02/27/07 11:33 PM
|
|
Re: Paint job on a budget!? CONTINUED..page 44........
|
Exit1965
|
02/28/07 12:22 AM
|
|
Re: Paint job on a budget!? CONTINUED..page 44........
|
69DartGT
|
02/28/07 12:45 AM
|
|
Re: Paint job on a budget!? CONTINUED..page 44........
|
Anonymous
|
02/28/07 01:59 AM
|
|
Re: Paint job on a budget!? CONTINUED..page 44........
|
Anonymous
|
02/28/07 05:45 AM
|
|
Re: Paint job on a budget!? CONTINUED..page 44........
|
Anonymous
|
03/01/07 05:15 AM
|
|
Re: Paint job on a budget!? CONTINUED..page 44........
|
69DartGT
|
02/28/07 02:29 PM
|
|
Re: Paint job on a budget!? CONTINUED..page 44........
|
dalbers
|
03/01/07 05:48 PM
|
|
Re: Paint job on a budget!? CONTINUED..page 44........
|
Anonymous
|
03/02/07 07:07 AM
|
|
Re: Paint job on a budget!? CONTINUED..page 44........
|
Anonymous
|
03/02/07 06:39 PM
|
|
Re: Paint job on a budget!? CONTINUED..page 44........
|
Anonymous
|
03/02/07 08:34 PM
|
|
Re: Paint job on a budget!? CONTINUED..page 44........
|
Anonymous
|
03/04/07 03:28 AM
|
|
Re: Paint job on a budget!? CONTINUED..page 44........
|
s4dustin
|
03/04/07 06:10 AM
|
|
Re: Paint job on a budget!? CONTINUED..page 44........
|
Exit1965
|
03/04/07 01:14 PM
|
|
Re: Paint job on a budget!? CONTINUED..page 44........
|
Anonymous
|
03/04/07 03:11 PM
|
|
Re: Paint job on a budget!? CONTINUED..page 44........
|
Exit1965
|
03/04/07 03:42 PM
|
|
Re: Paint job on a budget!? CONTINUED..page 44........
|
dalbers
|
03/04/07 07:39 PM
|
|
Re: Paint job on a budget!? CONTINUED..page 44........
|
dalbers
|
03/04/07 07:39 PM
|
|
Re: Paint job on a budget!? CONTINUED..page 44........
|
dalbers
|
03/04/07 07:40 PM
|
|
Re: Paint job on a budget!? CONTINUED..page 44........
|
dalbers
|
03/04/07 07:40 PM
|
|
Re: Paint job on a budget!? CONTINUED..page 44........
|
dalbers
|
03/04/07 07:41 PM
|
|
Re: Paint job on a budget!? CONTINUED..page 44........
|
69DartGT
|
03/04/07 09:21 PM
|
|
Re: Paint job on a budget!? CONTINUED..page 44........
|
Marq
|
03/05/07 01:57 AM
|
|
Re: Paint job on a budget!? CONTINUED..page 44........
|
Anonymous
|
03/05/07 02:50 AM
|
|
Re: Paint job on a budget!? CONTINUED..page 44........
|
Marq
|
03/05/07 09:28 AM
|
|
Re: Paint job on a budget!? CONTINUED..page 44........
|
Anonymous
|
03/05/07 12:30 PM
|
|
Re: Paint job on a budget!? CONTINUED..page 44........
|
s4dustin
|
03/06/07 12:12 AM
|
|
Re: Paint job on a budget!? CONTINUED..page 44........
|
Anonymous
|
03/06/07 09:53 AM
|
|
Re: Paint job on a budget!? CONTINUED..page 44........
|
s4dustin
|
03/07/07 04:15 AM
|
|
Re: Paint job on a budget!? CONTINUED..page 44........
|
Anonymous
|
03/07/07 04:20 PM
|
|
Re: Paint job on a budget!? CONTINUED..page 44........
|
69DartGT
|
03/08/07 02:42 PM
|
|
Rustoleum stress test and nail test
|
Anonymous
|
03/09/07 12:37 AM
|
|
Re: Rustoleum stress test and nail test
|
Anonymous
|
03/09/07 05:42 AM
|
|
Re: Rustoleum stress test and nail test
|
Exit1965
|
03/09/07 01:20 PM
|
|
Re: Rustoleum stress test and nail test
|
Anonymous
|
03/09/07 03:22 PM
|
|
Re: Paint job on a budget!? CONTINUED..page 44........
|
Anonymous
|
03/09/07 03:42 PM
|
|
Re: Paint job on a budget!? CONTINUED..page 44........
|
Anonymous
|
03/09/07 06:23 PM
|
|
Re: Paint job on a budget!? CONTINUED..page 44........
|
Marq
|
03/09/07 08:48 PM
|
|
Re: Paint job on a budget!? CONTINUED..page 44........
|
Anonymous
|
03/09/07 08:51 PM
|
|
Re: Paint job on a budget!? CONTINUED..page 44........
|
Anonymous
|
03/09/07 09:05 PM
|
|
Re: Paint job on a budget!? CONTINUED..page 44........
|
Anonymous
|
03/10/07 12:12 AM
|
|
Re: Paint job on a budget!? CONTINUED..page 44........
|
Anonymous
|
03/11/07 05:26 AM
|
|
Re: Paint job on a budget!? CONTINUED..page 44........
|
Anonymous
|
03/12/07 09:15 PM
|
|
Re: Paint job on a budget!? CONTINUED..page 44........
|
Anonymous
|
03/12/07 09:55 PM
|
|
Re: Paint job on a budget!? CONTINUED..page 44........
|
Anonymous
|
03/12/07 09:58 PM
|
|
Re: Paint job on a budget!? CONTINUED..page 44........
|
Anonymous
|
03/12/07 11:03 PM
|
|
Re: Paint job on a budget!? CONTINUED..page 44........
|
69chargeryeehaa
|
03/12/07 11:24 PM
|
|
Re: Paint job on a budget!? CONTINUED..page 44........
|
Anonymous
|
03/13/07 01:01 AM
|
|
Re: Paint job on a budget!? CONTINUED..page 44........
|
ONEBADBIRD
|
03/13/07 01:18 AM
|
|
Re: Paint job on a budget!? CONTINUED..page 44........
|
Anonymous
|
03/13/07 02:15 AM
|
|
Re: Paint job on a budget!? CONTINUED..page 44........
|
Anonymous
|
03/13/07 02:21 AM
|
|
Re: Paint job on a budget!? CONTINUED..page 44........
|
Anonymous
|
03/13/07 03:07 AM
|
|
Re: Paint job on a budget!? CONTINUED..page 44........
|
Exit1965
|
03/13/07 12:38 PM
|
|
Re: Paint job on a budget!? CONTINUED..page 44........
|
Anonymous
|
03/13/07 01:11 PM
|
|
Re: Paint job on a budget!? CONTINUED..page 44........
|
69DartGT
|
03/13/07 01:40 PM
|
|
Re: Paint job on a budget!? CONTINUED..page 44........
|
Anonymous
|
03/13/07 09:54 PM
|
|
Re: Paint job on a budget!? CONTINUED..page 44........
|
Anonymous
|
03/14/07 01:19 AM
|
|
Re: Paint job on a budget!? CONTINUED..page 44........
|
s4dustin
|
03/14/07 02:01 AM
|
|
Re: Paint job on a budget!? CONTINUED..page 44........
|
Exit1965
|
03/14/07 03:33 AM
|
|
Re: Paint job on a budget!? CONTINUED..page 44........
|
s4dustin
|
03/14/07 03:51 AM
|
|
Re: Paint job on a budget!? CONTINUED..page 44........
|
Anonymous
|
03/14/07 03:55 AM
|
|
Re: Paint job on a budget!? CONTINUED..page 44........
|
Anonymous
|
03/14/07 09:32 AM
|
|
Re: Paint job on a budget!? CONTINUED..page 44........
|
Exit1965
|
03/14/07 01:01 PM
|
|
Re: Paint job on a budget!? CONTINUED..page 44........
|
Anonymous
|
03/15/07 05:45 AM
|
|
Re: Paint job on a budget!? CONTINUED..page 44........
|
Anonymous
|
03/15/07 12:59 PM
|
|
Re: Paint job on a budget!? CONTINUED..page 44........
|
Anonymous
|
03/15/07 02:16 PM
|
|
Re: Paint job on a budget!? CONTINUED..page 44........
|
Anonymous
|
03/15/07 09:25 PM
|
|
Re: Paint job on a budget!? CONTINUED..page 44........
|
Anonymous
|
03/15/07 11:10 PM
|
|
Re: Paint job on a budget!? CONTINUED..page 44........
|
Exit1965
|
03/16/07 01:18 AM
|
|
Re: Paint job on a budget!? CONTINUED..page 44........
|
Anonymous
|
03/16/07 05:15 AM
|
|
Re: Paint job on a budget!? CONTINUED..page 44........
|
Anonymous
|
03/16/07 02:47 PM
|
|
Re: Paint job on a budget!? CONTINUED..page 44........
|
Anonymous
|
03/16/07 03:06 PM
|
|
Re: Paint job on a budget!? CONTINUED..page 44........
|
texczech
|
03/16/07 05:59 PM
|
|
Re: Paint job on a budget!? CONTINUED..page 44........
|
Anonymous
|
03/16/07 09:17 PM
|
|
Re: Paint job on a budget!? CONTINUED..page 44........
|
Anonymous
|
03/17/07 04:01 AM
|
|
Re: Paint job on a budget!? CONTINUED..page 44........
|
Anonymous
|
03/17/07 04:52 AM
|
|
Re: Paint job on a budget!? CONTINUED..page 44........
|
Marq
|
03/17/07 01:04 PM
|
|
Re: Paint job on a budget!? CONTINUED..page 44........
|
Anonymous
|
03/18/07 02:36 AM
|
|
Re: Paint job on a budget!? CONTINUED..page 44........
|
Anonymous
|
03/18/07 06:50 AM
|
|
Re: Paint job on a budget!? CONTINUED..page 44........
|
Anonymous
|
03/18/07 06:19 AM
|
|
Re: Paint job on a budget!? CONTINUED..page 44........
|
Anonymous
|
03/18/07 10:33 PM
|
|
Re: Paint job on a budget!? CONTINUED..page 44........
|
StevesBug
|
03/18/07 11:38 PM
|
|
Re: Paint job on a budget!? CONTINUED..page 44........
|
Anonymous
|
03/19/07 12:58 AM
|
|
Re: Paint job on a budget!? CONTINUED..page 44........
|
Anonymous
|
03/18/07 11:55 PM
|
|
Re: Paint job on a budget!? CONTINUED..page 44........
|
admactanium
|
03/19/07 12:49 AM
|
|
Re: Paint job on a budget!? CONTINUED..page 44........
|
Anonymous
|
03/19/07 02:03 AM
|
|
Re: Paint job on a budget!? CONTINUED..page 44........
|
Anonymous
|
03/19/07 02:19 AM
|
|
Re: Paint job on a budget!? CONTINUED..page 44........
|
Anonymous
|
03/19/07 02:32 AM
|
|
Re: Paint job on a budget!? CONTINUED..page 44........
|
Exit1965
|
03/19/07 02:37 AM
|
|
Re: Paint job on a budget!? CONTINUED..page 44........
|
Exit1965
|
03/19/07 02:46 AM
|
|
Re: Paint job on a budget!? CONTINUED..page 44........
|
Anonymous
|
03/19/07 04:12 AM
|
|
Re: Paint job on a budget!? CONTINUED..page 44........
|
Anonymous
|
03/19/07 04:22 AM
|
|
Re: Paint job on a budget!? CONTINUED..page 44........
|
dalbers
|
03/19/07 06:47 AM
|
|
Re: Paint job on a budget!? CONTINUED..page 44........
|
Anonymous
|
03/19/07 11:47 AM
|
|
Re: Paint job on a budget!? CONTINUED..page 44........
|
Marq
|
03/20/07 01:14 AM
|
|
Re: Paint job on a budget!? CONTINUED..page 44........
|
Anonymous
|
03/19/07 09:43 PM
|
|
Re: Paint job on a budget!? CONTINUED..page 44........
|
Exit1965
|
03/19/07 10:15 PM
|
|
Re: Paint job on a budget!? CONTINUED..page 44........
|
Anonymous
|
03/20/07 12:16 AM
|
|
Re: Paint job on a budget!? CONTINUED..page 44........
|
Marq
|
03/20/07 12:21 AM
|
|
Re: Paint job on a budget!? CONTINUED..page 44........
|
kenzo42
|
03/20/07 12:29 AM
|
|
Re: Paint job on a budget!? CONTINUED..page 44........
|
Marq
|
03/20/07 01:01 AM
|
|
Re: Paint job on a budget!? CONTINUED..page 44........
|
Anonymous
|
03/20/07 03:14 AM
|
|
Re: Paint job on a budget!? CONTINUED..page 44........
|
Anonymous
|
03/20/07 06:25 AM
|
|
Re: Paint job on a budget!? CONTINUED..page 44........
|
Anonymous
|
03/21/07 08:58 PM
|
|
Re: Paint job on a budget!? CONTINUED..page 44........
|
pdqvsix
|
03/22/07 01:28 PM
|
|
Re: Paint job on a budget!? CONTINUED..page 44........
|
Anonymous
|
03/22/07 02:33 PM
|
|
Re: Paint job on a budget!? CONTINUED..page 44........
|
Exit1965
|
03/22/07 03:02 PM
|
|
Re: Paint job on a budget!? CONTINUED..page 44........
|
69stanger
|
03/22/07 05:38 PM
|
|
Re: Paint job on a budget!? CONTINUED..page 44........
|
Anonymous
|
03/22/07 08:56 PM
|
|
Re: Paint job on a budget!? CONTINUED..page 44........
|
QuickDodge
|
03/23/07 12:12 AM
|
|
Re: Paint job on a budget!? CONTINUED..page 44........
|
Anonymous
|
03/23/07 09:02 PM
|
|
Re: Paint job on a budget!? CONTINUED..page 44........
|
69stanger
|
03/24/07 07:51 PM
|
|
Re: Paint job on a budget!? CONTINUED..page 44........
|
Anonymous
|
03/25/07 12:29 AM
|
|
Re: Paint job on a budget!? CONTINUED..page 44........
|
admactanium
|
03/25/07 01:21 AM
|
|
Re: Paint job on a budget!? CONTINUED..page 44........
|
69stanger
|
03/23/07 02:23 AM
|
|
Re: Paint job on a budget!? CONTINUED..page 44........
|
Marq
|
03/23/07 04:02 AM
|
|
Re: Paint job on a budget!? CONTINUED..page 44........
|
69chargeryeehaa
|
03/23/07 01:21 PM
|
|
Re: Paint job on a budget!? CONTINUED..page 44........
|
Anonymous
|
03/29/07 03:25 PM
|
|
Re: Paint job on a budget!? CONTINUED..page 44........
|
Anonymous
|
03/30/07 03:06 PM
|
|
Re: Paint job on a budget!? CONTINUED..page 44........
|
69chargeryeehaa
|
03/30/07 03:47 PM
|
|
Re: Paint job on a budget!? CONTINUED..page 44........
|
69stanger
|
03/30/07 03:54 PM
|
|
Re: Paint job on a budget!? CONTINUED..page 44........
|
s4dustin
|
03/31/07 02:16 AM
|
|
Re: Paint job on a budget!? CONTINUED..page 44........
|
Anonymous
|
03/31/07 07:42 AM
|
|
Re: Paint job on a budget!? CONTINUED..page 44........
|
Exit1965
|
03/31/07 01:11 PM
|
|
Re: Paint job on a budget!? CONTINUED..page 44........
|
Anonymous
|
03/31/07 02:41 PM
|
|
Re: Paint job on a budget!? CONTINUED..page 44........
|
69DartGT
|
03/31/07 03:08 PM
|
|
Re: Paint job on a budget!? CONTINUED..page 44........
|
Anonymous
|
03/31/07 07:29 PM
|
|
Re: Paint job on a budget!? CONTINUED..page 44........
|
Anonymous
|
03/31/07 07:48 PM
|
|
Re: Paint job on a budget!? CONTINUED..page 44........
|
Anonymous
|
03/31/07 07:55 PM
|
|
Re: Paint job on a budget!? CONTINUED..page 44........
|
Anonymous
|
03/31/07 11:13 PM
|
|
Re: Paint job on a budget!? CONTINUED..page 44........
|
Anonymous
|
04/01/07 02:51 AM
|
|
Re: Paint job on a budget!? CONTINUED..page 44........
|
Exit1965
|
04/01/07 04:59 AM
|
|
Re: Paint job on a budget!? CONTINUED..page 44........
|
Anonymous
|
04/01/07 03:52 AM
|
|
Re: Paint job on a budget!? CONTINUED..page 44........
|
Anonymous
|
04/01/07 04:38 AM
|
|
Re: Paint job on a budget!? CONTINUED..page 44........
|
Anonymous
|
04/01/07 01:03 PM
|
|
Re: Paint job on a budget!? CONTINUED..page 44........
|
Anonymous
|
04/05/07 04:57 AM
|
|
Re: Paint job on a budget!? CONTINUED..page 44........
|
Anonymous
|
04/06/07 01:24 AM
|
|
Re: Paint job on a budget!? CONTINUED..page 44........
|
Exit1965
|
04/06/07 03:59 AM
|
|
Re: Paint job on a budget!? CONTINUED..page 44........
|
Anonymous
|
04/09/07 05:05 PM
|
|
Re: Paint job on a budget!? CONTINUED..page 44........
|
Anonymous
|
04/09/07 07:25 PM
|
|
Re: Paint job on a budget!? CONTINUED..page 44........
|
78D150CLUB
|
04/09/07 07:56 PM
|
|
Re: Paint job on a budget!? CONTINUED..page 44........
|
Anonymous
|
04/10/07 01:38 AM
|
|
Re: Paint job on a budget!? CONTINUED..page 44........
|
78D150CLUB
|
04/10/07 02:19 AM
|
|
Re: Paint job on a budget!? CONTINUED..page 44........
|
andyoucankeepit
|
04/10/07 04:17 AM
|
|
Re: Paint job on a budget!? CONTINUED..page 44........
|
Anonymous
|
04/10/07 01:31 PM
|
|
Re: Paint job on a budget!? CONTINUED..page 44........
|
Anonymous
|
04/10/07 10:32 PM
|
|
Re: Paint job on a budget!? CONTINUED..page 44........
|
78D150CLUB
|
04/11/07 12:29 AM
|
|
Re: Paint job on a budget!? CONTINUED..page 44........
|
78D150CLUB
|
04/09/07 07:58 PM
|
|
Re: Paint job on a budget!? CONTINUED..page 44........
|
Anonymous
|
04/09/07 10:22 PM
|
|
Re: Paint job on a budget!? CONTINUED..page 44........
|
Anonymous
|
04/09/07 11:48 PM
|
|
Re: Paint job on a budget!? CONTINUED..page 44........
|
Anonymous
|
04/10/07 06:05 PM
|
|
Re: Paint job on a budget!? CONTINUED..page 44........
|
Anonymous
|
04/10/07 10:30 PM
|
|
Re: Paint job on a budget!? CONTINUED..page 44........
|
Anonymous
|
04/11/07 12:16 AM
|
|
Re: Paint job on a budget!? CONTINUED..page 44........
|
Anonymous
|
04/11/07 03:52 PM
|
|
Re: Paint job on a budget!? CONTINUED..page 44........
|
Jolly_Raj_R
|
04/11/07 06:23 PM
|
|
Re: Paint job on a budget!? CONTINUED..page 44........
|
Anonymous
|
04/12/07 05:58 PM
|
|
Re: Paint job on a budget!? CONTINUED..page 44........
|
Anonymous
|
04/12/07 09:34 PM
|
|
Re: Paint job on a budget!? CONTINUED..page 44........
|
Anonymous
|
04/12/07 11:23 PM
|
|
Re: Paint job on a budget!? CONTINUED..page 44........
|
texczech
|
04/17/07 02:04 AM
|
|
Re: Paint job on a budget!? CONTINUED..page 44........
|
Anonymous
|
04/17/07 06:30 AM
|
|
Re: Paint job on a budget!? CONTINUED..page 44........
|
Exit1965
|
04/17/07 01:22 PM
|
|
Re: Paint job on a budget!? CONTINUED..page 44........
|
td325ic
|
04/01/07 05:44 AM
|
|
Re: Paint job on a budget!? CONTINUED..page 44........
|
Anonymous
|
04/01/07 08:19 AM
|
|
Re: Paint job on a budget!? CONTINUED..page 44........
|
Anonymous
|
04/01/07 06:22 PM
|
|
Re: Paint job on a budget!? CONTINUED..page 44........
|
Anonymous
|
04/02/07 01:51 AM
|
|
Re: Paint job on a budget!? CONTINUED..page 44........
|
ramman16248
|
04/02/07 03:09 AM
|
|
Re: Paint job on a budget!? CONTINUED..page 44........
|
Anonymous
|
04/02/07 08:28 AM
|
|
Re: Paint job on a budget!? CONTINUED..page 44........
|
Anonymous
|
04/02/07 12:24 PM
|
|
Re: Paint job on a budget!? CONTINUED..page 44........
|
Anonymous
|
04/02/07 08:19 PM
|
|
Re: Paint job on a budget!? CONTINUED..page 44........
|
td325ic
|
04/03/07 02:14 AM
|
|
Re: Paint job on a budget!? CONTINUED..page 44........
|
Anonymous
|
04/03/07 02:49 AM
|
|
Re: Paint job on a budget!? CONTINUED..page 44........
|
ramman16248
|
04/03/07 02:53 AM
|
|
Re: Paint job on a budget!? CONTINUED..page 44........
|
ramman16248
|
04/03/07 02:54 AM
|
|
Re: Paint job on a budget!? CONTINUED..page 44........
|
ramman16248
|
04/03/07 02:55 AM
|
|
Re: Paint job on a budget!? CONTINUED..page 44........
|
ramman16248
|
04/03/07 02:58 AM
|
|
Re: Paint job on a budget!? CONTINUED..page 44........
|
Jolly_Raj_R
|
04/03/07 05:07 AM
|
|
Re: Paint job on a budget!? CONTINUED..page 44........
|
ramman16248
|
04/03/07 12:02 PM
|
|
Re: Paint job on a budget!? CONTINUED..page 44........
|
Anonymous
|
04/24/07 03:19 AM
|
|
Re: Paint job on a budget!? CONTINUED..page 44........
|
Exit1965
|
04/24/07 04:20 AM
|
|
Re: Paint job on a budget!? CONTINUED..page 44........
|
Anonymous
|
04/24/07 12:36 PM
|
|
Re: Paint job on a budget!? CONTINUED..page 44........
|
Anonymous
|
04/01/07 01:04 PM
|
|
Re: Paint job on a budget!? CONTINUED..page 44........
|
Anonymous
|
04/01/07 02:20 PM
|
|
Re: Paint job on a budget!? CONTINUED..page 44........
|
Anonymous
|
04/02/07 04:07 PM
|
|
Re: Paint job on a budget!? CONTINUED..page 44........
|
Anonymous
|
04/02/07 04:14 PM
|
|
Re: Paint job on a budget!? CONTINUED..page 44........
|
Anonymous
|
04/02/07 07:05 PM
|
|
Re: Paint job on a budget!? CONTINUED..page 44........
|
Anonymous
|
04/03/07 02:26 AM
|
|
Re: Paint job on a budget!? CONTINUED..page 44........
|
Anonymous
|
04/03/07 02:55 PM
|
|
Re: Paint job on a budget!? CONTINUED..page 44........
|
Radio Joe
|
04/03/07 04:50 PM
|
|
Re: Paint job on a budget!? CONTINUED..page 44........
|
v8mirage
|
04/03/07 05:36 PM
|
|
Re: Paint job on a budget!? CONTINUED..page 44........
|
Anonymous
|
04/03/07 05:39 PM
|
|
Re: Paint job on a budget!? CONTINUED..page 44........
|
Anonymous
|
04/03/07 06:19 PM
|
|
Re: Paint job on a budget!? CONTINUED..page 44........
|
Marq
|
04/04/07 04:11 AM
|
|
Re: Paint job on a budget!? CONTINUED..page 44........
|
Anonymous
|
04/04/07 04:46 AM
|
|
Re: Paint job on a budget!? CONTINUED..page 44........
|
Anonymous
|
04/04/07 09:16 AM
|
|
Re: Paint job on a budget!? CONTINUED..page 44........
|
Anonymous
|
04/04/07 10:56 AM
|
|
Re: Paint job on a budget!? CONTINUED..page 44........
|
Anonymous
|
04/04/07 12:54 PM
|
|
Re: Paint job on a budget!? CONTINUED..page 44........
|
Exit1965
|
04/04/07 04:09 PM
|
|
Re: Paint job on a budget!? CONTINUED..page 44........
|
Exit1965
|
04/03/07 06:47 PM
|
|
Re: Paint job on a budget!? CONTINUED..page 44........
|
v8mirage
|
04/03/07 07:08 PM
|
|
Re: Paint job on a budget!? CONTINUED..page 44........
|
Radio Joe
|
04/03/07 08:01 PM
|
|
Re: Paint job on a budget!? CONTINUED..page 44........
|
Exit1965
|
04/03/07 09:03 PM
|
|
Re: Paint job on a budget!? CONTINUED..page 44........
|
Radio Joe
|
04/04/07 04:32 PM
|
|
Re: Paint job on a budget!? CONTINUED..page 44........
|
Radio Joe
|
04/04/07 05:43 PM
|
|
Re: Paint job on a budget!? CONTINUED
|
Anonymous
|
04/04/07 06:26 PM
|
|
Re: Paint job on a budget!? CONTINUED
|
69DartGT
|
04/04/07 06:48 PM
|
|
Re: Paint job on a budget!? CONTINUED
|
Anonymous
|
04/04/07 08:34 PM
|
|
Re: Paint job on a budget!? CONTINUED
|
Anonymous
|
04/05/07 01:29 AM
|
|
Re: Paint job on a budget!? CONTINUED
|
Marq
|
04/05/07 05:44 AM
|
|
Re: Paint job on a budget!? CONTINUED
|
Exit1965
|
04/05/07 12:41 PM
|
|
Re: Paint job on a budget!? CONTINUED
|
v8mirage
|
04/05/07 01:39 PM
|
|
Re: Paint job on a budget!? CONTINUED
|
Radio Joe
|
04/05/07 01:48 PM
|
|
Re: Paint job on a budget!? CONTINUED
|
Anonymous
|
04/05/07 01:29 PM
|
|
Re: Paint job on a budget!? CONTINUED
|
Marq
|
04/05/07 08:12 PM
|
|
Re: Paint job on a budget!? CONTINUED
|
DaytonaTurbo
|
04/06/07 12:09 AM
|
|
Re: Paint job on a budget!? CONTINUED
|
Marq
|
04/06/07 01:08 PM
|
|
Re: Paint job on a budget!? CONTINUED
|
Anonymous
|
04/05/07 05:16 PM
|
|
Re: Paint job on a budget!? CONTINUED
|
Anonymous
|
04/05/07 05:42 PM
|
|
Re: Paint job on a budget!? CONTINUED
|
Anonymous
|
04/05/07 07:53 PM
|
|
Re: Paint job on a budget!? CONTINUED
|
Anonymous
|
04/06/07 12:17 AM
|
|
Re: Paint job on a budget!? CONTINUED
|
Anonymous
|
04/06/07 04:46 AM
|
|
Re: Paint job on a budget!? CONTINUED
|
Anonymous
|
04/06/07 04:56 AM
|
|
Re: Paint job on a budget!? CONTINUED
|
Marq
|
04/06/07 01:39 PM
|
|
Re: Paint job on a budget!? CONTINUED
|
Anonymous
|
04/06/07 06:42 AM
|
|
Re: Paint job on a budget!? CONTINUED
|
Anonymous
|
04/06/07 10:54 AM
|
|
Re: Paint job on a budget!? CONTINUED
|
Anonymous
|
04/06/07 12:45 PM
|
|
Re: Paint job on a budget!? CONTINUED
|
Anonymous
|
04/06/07 10:18 PM
|
|
Re: Paint job on a budget!? CONTINUED
|
Radio Joe
|
04/06/07 02:43 PM
|
|
Re: Paint job on a budget!? CONTINUED
|
DaytonaTurbo
|
04/06/07 03:33 PM
|
|
Re: Paint job on a budget!? CONTINUED
|
Marq
|
04/07/07 12:06 AM
|
|
Re: Paint job on a budget!? CONTINUED
|
Anonymous
|
04/06/07 04:32 PM
|
|
Re: Paint job on a budget!? CONTINUED
|
Anonymous
|
04/06/07 11:02 PM
|
|
Re: Paint job on a budget!? CONTINUED
|
Anonymous
|
04/06/07 11:03 PM
|
|
Re: Paint job on a budget!? CONTINUED
|
Marq
|
04/07/07 12:11 AM
|
|
Re: Paint job on a budget!? CONTINUED
|
DaytonaTurbo
|
04/07/07 12:50 AM
|
|
Re: Paint job on a budget!? CONTINUED
|
Anonymous
|
04/07/07 04:39 AM
|
|
Re: Paint job on a budget!? CONTINUED
|
dalbers
|
04/08/07 05:24 AM
|
|
Re: Paint job on a budget!? CONTINUED
|
Anonymous
|
04/08/07 04:56 PM
|
|
Re: Paint job on a budget!? CONTINUED
|
Anonymous
|
04/08/07 06:10 PM
|
|
Re: Paint job on a budget!? CONTINUED
|
dalbers
|
04/08/07 06:13 PM
|
|
Re: Paint job on a budget!? CONTINUED
|
Anonymous
|
04/08/07 07:41 PM
|
|
Re: Paint job on a budget!? CONTINUED
|
andyoucankeepit
|
04/08/07 10:49 PM
|
|
Re: Paint job on a budget!? CONTINUED
|
Anonymous
|
04/08/07 06:20 PM
|
|
Re: Paint job on a budget!? CONTINUED
|
Anonymous
|
04/08/07 06:23 PM
|
|
Re: Paint job on a budget!? CONTINUED
|
Anonymous
|
04/08/07 06:25 PM
|
|
Re: Paint job on a budget!? CONTINUED
|
Anonymous
|
04/08/07 07:36 PM
|
|
Re: Paint job on a budget!? CONTINUED
|
Radio Joe
|
04/09/07 12:32 PM
|
|
Re: Paint job on a budget!? CONTINUED
|
texczech
|
04/09/07 04:18 PM
|
|
Re: Paint job on a budget!? CONTINUED
|
blue195
|
04/09/07 04:54 PM
|
|
Re: Paint job on a budget!? CONTINUED
|
texczech
|
04/13/07 02:24 AM
|
|
Re: Paint job on a budget!? CONTINUED
|
Anonymous
|
04/13/07 03:55 AM
|
|
Re: Paint job on a budget!? CONTINUED
|
Exit1965
|
04/13/07 01:00 PM
|
|
Re: Paint job on a budget!? CONTINUED
|
Anonymous
|
04/13/07 03:16 PM
|
|
Re: Paint job on a budget!? CONTINUED
|
69DartGT
|
04/13/07 03:27 PM
|
|
Re: Paint job on a budget!? CONTINUED
|
78D150CLUB
|
04/13/07 11:04 PM
|
|
Re: Paint job on a budget!? CONTINUED
|
Anonymous
|
04/14/07 04:01 PM
|
|
Re: Paint job on a budget!? CONTINUED
|
Anonymous
|
04/15/07 12:05 AM
|
|
Re: Paint job on a budget!? CONTINUED
|
Anonymous
|
04/15/07 07:32 AM
|
|
Re: Paint job on a budget!? CONTINUED
|
Exit1965
|
04/15/07 01:29 PM
|
|
Re: Paint job on a budget!? CONTINUED
|
Anonymous
|
04/15/07 03:31 PM
|
|
Re: Paint job on a budget!? CONTINUED
|
Anonymous
|
04/15/07 06:30 PM
|
|
Re: Paint job on a budget!? CONTINUED
|
Anonymous
|
04/15/07 08:56 PM
|
|
Re: Paint job on a budget!? CONTINUED
|
Anonymous
|
04/16/07 03:42 PM
|
|
Re: Paint job on a budget!? CONTINUED
|
admactanium
|
04/16/07 04:49 PM
|
|
Re: Paint job on a budget!? CONTINUED
|
Anonymous
|
04/17/07 04:49 PM
|
|
Re: Paint job on a budget!? CONTINUED
|
Anonymous
|
04/16/07 06:28 AM
|
|
Re: Paint job on a budget!? CONTINUED
|
Radio Joe
|
04/16/07 02:10 PM
|
|
Re: Paint job on a budget!? CONTINUED
|
78D150CLUB
|
04/16/07 08:55 PM
|
|
Re: Paint job on a budget!? CONTINUED
|
Anonymous
|
04/16/07 09:29 PM
|
|
Re: Paint job on a budget!? CONTINUED
|
Anonymous
|
04/17/07 06:34 AM
|
|
Re: Paint job on a budget!? CONTINUED
|
Radio Joe
|
04/17/07 01:11 PM
|
|
Re: Paint job on a budget!? CONTINUED
|
texczech
|
04/17/07 01:22 PM
|
|
Re: Paint job on a budget!? CONTINUED
|
_Scott_
|
04/18/07 03:47 AM
|
|
Re: Paint job on a budget!? CONTINUED
|
Anonymous
|
04/18/07 04:09 AM
|
|
Re: Paint job on a budget!? CONTINUED
|
Anonymous
|
04/18/07 12:49 PM
|
|
Re: Paint job on a budget!? CONTINUED
|
Anonymous
|
04/18/07 01:55 PM
|
|
Re: Paint job on a budget!? CONTINUED
|
Marq
|
04/19/07 06:10 PM
|
|
Re: Paint job on a budget!? CONTINUED
|
Anonymous
|
04/20/07 05:38 AM
|
|
Re: Paint job on a budget!? CONTINUED
|
Anonymous
|
04/20/07 11:11 AM
|
|
Re: Paint job on a budget!? CONTINUED
|
Anonymous
|
04/20/07 04:09 PM
|
|
Re: Paint job on a budget!? CONTINUED
|
Anonymous
|
04/20/07 05:03 PM
|
|
Re: Paint job on a budget!? CONTINUED
|
ramman16248
|
04/20/07 07:26 PM
|
|
Re: Paint job on a budget!? CONTINUED
|
ramman16248
|
04/20/07 07:27 PM
|
|
Re: Paint job on a budget!? CONTINUED
|
Anonymous
|
04/20/07 08:12 PM
|
|
Re: Paint job on a budget!? CONTINUED
|
Anonymous
|
04/20/07 10:44 PM
|
|
Re: Paint job on a budget!? CONTINUED
|
Anonymous
|
04/21/07 12:30 AM
|
|
Re: Paint job on a budget!? CONTINUED
|
Anonymous
|
04/21/07 12:41 AM
|
|
Re: Paint job on a budget!? CONTINUED
|
Exit1965
|
04/21/07 12:44 AM
|
|
Re: Paint job on a budget!? CONTINUED
|
DaytonaTurbo
|
04/23/07 03:04 AM
|
|
Re: Paint job on a budget!? CONTINUED
|
Anonymous
|
04/23/07 04:44 AM
|
|
Re: Paint job on a budget!? CONTINUED
|
Anonymous
|
04/21/07 01:20 AM
|
|
Re: Paint job on a budget!? CONTINUED
|
Marq
|
04/21/07 01:18 AM
|
|
Re: Paint job on a budget!? CONTINUED
|
Anonymous
|
04/21/07 05:04 AM
|
|
Re: Paint job on a budget!? CONTINUED
|
Anonymous
|
04/21/07 02:28 PM
|
|
Re: Paint job on a budget!? CONTINUED
|
Anonymous
|
04/21/07 09:44 PM
|
|
Re: Paint job on a budget!? CONTINUED
|
Anonymous
|
04/22/07 01:02 AM
|
|
Re: Paint job on a budget!? CONTINUED
|
pdqvsix
|
04/22/07 02:30 AM
|
|
Re: Paint job on a budget!? CONTINUED
|
Anonymous
|
04/22/07 04:05 AM
|
|
Re: Paint job on a budget!? CONTINUED
|
Anonymous
|
04/22/07 04:12 AM
|
|
Re: Paint job on a budget!? CONTINUED
|
Anonymous
|
04/22/07 04:34 AM
|
|
Re: Paint job on a budget!? CONTINUED
|
Anonymous
|
04/22/07 11:52 AM
|
|
Re: Paint job on a budget!? CONTINUED
|
Anonymous
|
04/22/07 05:15 PM
|
|
Re: Paint job on a budget!? CONTINUED
|
69chargeryeehaa
|
04/24/07 02:24 PM
|
|
Re: Paint job on a budget!? CONTINUED
|
Anonymous
|
04/24/07 05:20 PM
|
|
Re: Paint job on a budget!? CONTINUED
|
Anonymous
|
04/25/07 10:12 PM
|
|
Re: Paint job on a budget!? CONTINUED
|
Anonymous
|
04/24/07 09:38 PM
|
|
Re: Paint job on a budget!? CONTINUED
|
Marq
|
04/25/07 11:20 AM
|
|
Re: Paint job on a budget!? CONTINUED
|
Marq
|
04/25/07 11:40 AM
|
|
Re: Paint job on a budget!? CONTINUED
|
Anonymous
|
04/25/07 07:19 PM
|
|
Re: Paint job on a budget!? CONTINUED
|
Marq
|
04/25/07 10:05 PM
|
|
Re: Paint job on a budget!? CONTINUED
|
Anonymous
|
04/25/07 10:58 PM
|
|
Re: Paint job on a budget!? CONTINUED
|
Anonymous
|
04/25/07 11:24 PM
|
|
Re: Paint job on a budget!? CONTINUED
|
Marq
|
04/26/07 12:21 AM
|
|
Re: Paint job on a budget!? CONTINUED
|
Anonymous
|
04/26/07 01:42 AM
|
|
Re: Paint job on a budget!? CONTINUED
|
ramman16248
|
04/26/07 02:33 AM
|
|
Re: Paint job on a budget!? CONTINUED
|
ramman16248
|
04/26/07 02:34 AM
|
|
Re: Paint job on a budget!? CONTINUED
|
Anonymous
|
04/26/07 12:16 PM
|
|
Re: Paint job on a budget!? CONTINUED
|
Anonymous
|
04/26/07 01:18 PM
|
|
Re: Paint job on a budget!? CONTINUED
|
69chargeryeehaa
|
04/26/07 01:59 PM
|
|
Re: Paint job on a budget!? CONTINUED
|
Anonymous
|
04/26/07 03:57 PM
|
|
Re: Paint job on a budget!? CONTINUED
|
69stanger
|
04/26/07 06:25 PM
|
|
Re: Paint job on a budget!? CONTINUED
|
Anonymous
|
04/26/07 08:05 PM
|
|
Re: Paint job on a budget!? CONTINUED
|
69stanger
|
04/26/07 08:49 PM
|
|
Re: Paint job on a budget!? CONTINUED
|
Anonymous
|
04/26/07 09:11 PM
|
|
Re: Paint job on a budget!? CONTINUED
|
Anonymous
|
04/29/07 05:44 PM
|
|
Re: Paint job on a budget!? CONTINUED
|
69stanger
|
04/30/07 01:20 AM
|
|
Re: Paint job on a budget!? CONTINUED
|
Anonymous
|
04/30/07 04:26 AM
|
|
Re: Paint job on a budget!? CONTINUED
|
Radio Joe
|
04/30/07 04:47 PM
|
|
Re: Paint job on a budget!? CONTINUED
|
Anonymous
|
04/30/07 08:09 PM
|
|
Re: Paint job on a budget!? CONTINUED
|
Anonymous
|
05/04/07 02:57 PM
|
|
Re: Paint job on a budget!? CONTINUED
|
Anonymous
|
05/04/07 03:45 PM
|
|
Re: Paint job on a budget!? CONTINUED
|
Anonymous
|
05/04/07 03:55 PM
|
|
Re: Paint job on a budget!? CONTINUED
|
Anonymous
|
05/04/07 05:22 PM
|
|
Re: Paint job on a budget!? CONTINUED
|
Anonymous
|
05/04/07 06:45 PM
|
|
Metallics
|
Anonymous
|
05/04/07 09:07 PM
|
|
Re: Metallics
|
Sasquatch4406
|
05/04/07 09:26 PM
|
|
Re: Metallics
|
Anonymous
|
05/05/07 12:51 AM
|
|
Re: Paint job on a budget!? CONTINUED
|
Anonymous
|
05/04/07 09:06 PM
|
|
Re: Paint job on a budget!? CONTINUED
|
Anonymous
|
04/26/07 02:42 PM
|
|
Re: Paint job on a budget!? CONTINUED
|
1BAD68
|
04/26/07 02:54 PM
|
|
Re: Paint job on a budget!? CONTINUED
|
shawge
|
04/26/07 04:21 PM
|
|
Re: Paint job on a budget!? CONTINUED
|
Anonymous
|
04/26/07 08:10 PM
|
|
Re: Paint job on a budget!? CONTINUED
|
1BAD68
|
04/26/07 08:21 PM
|
|
Re: Paint job on a budget!? CONTINUED
|
Gusteve
|
04/26/07 08:18 PM
|
|
Re: Paint job on a budget!? CONTINUED
|
Marq
|
04/26/07 03:05 PM
|
|
Re: Paint job on a budget!? CONTINUED
|
Anonymous
|
04/26/07 03:38 PM
|
|
Re: Paint job on a budget!? CONTINUED
|
Anonymous
|
04/26/07 03:55 PM
|
|
Re: Paint job on a budget!? CONTINUED
|
Anonymous
|
04/26/07 10:29 PM
|
|
Re: Paint job on a budget!? CONTINUED
|
Anonymous
|
04/27/07 10:07 PM
|
|
Re: Paint job on a budget!? CONTINUED
|
Anonymous
|
04/28/07 08:26 AM
|
|
Re: Paint job on a budget!? CONTINUED
|
Anonymous
|
04/28/07 08:34 AM
|
|
Re: Paint job on a budget!? CONTINUED
|
Marq
|
04/28/07 08:40 PM
|
|
Re: Paint job on a budget!? CONTINUED
|
Exit1965
|
04/28/07 09:33 PM
|
|
Re: Paint job on a budget!? CONTINUED
|
69chargeryeehaa
|
04/28/07 11:46 PM
|
|
Re: Paint job on a budget!? CONTINUED
|
78D150CLUB
|
04/29/07 12:31 AM
|
|
Re: Paint job on a budget!? CONTINUED
|
Anonymous
|
04/29/07 06:08 AM
|
|
Re: Paint job on a budget!? CONTINUED
|
Anonymous
|
04/30/07 08:16 PM
|
|
Re: Paint job on a budget!? CONTINUED
|
Anonymous
|
04/30/07 09:24 PM
|
|
Re: Paint job on a budget!? CONTINUED
|
shawge
|
04/30/07 09:41 PM
|
|
Re: Paint job on a budget!? CONTINUED
|
Anonymous
|
05/01/07 12:21 AM
|
|
Re: Paint job on a budget!? CONTINUED
|
Anonymous
|
05/01/07 12:52 AM
|
|
Re: Paint job on a budget!? CONTINUED
|
Anonymous
|
05/01/07 01:20 AM
|
|
Re: Paint job on a budget!? CONTINUED
|
1BAD68
|
05/01/07 02:11 AM
|
|
Re: Paint job on a budget!? CONTINUED
|
Anonymous
|
05/01/07 02:36 AM
|
|
Re: Paint job on a budget!? CONTINUED
|
Anonymous
|
05/01/07 03:24 AM
|
|
Re: Paint job on a budget!? CONTINUED
|
Anonymous
|
05/01/07 12:44 PM
|
|
Re: Paint job on a budget!? CONTINUED
|
Anonymous
|
05/01/07 01:33 PM
|
|
Re: Paint job on a budget!? CONTINUED
|
1BAD68
|
05/01/07 05:15 PM
|
|
Re: Paint job on a budget!? CONTINUED
|
Anonymous
|
05/01/07 08:44 PM
|
|
Re: Paint job on a budget!? CONTINUED
|
Anonymous
|
05/01/07 09:27 PM
|
|
Re: Paint job on a budget!? CONTINUED
|
Anonymous
|
05/01/07 09:45 PM
|
|
Re: Paint job on a budget!? CONTINUED
|
Anonymous
|
05/01/07 10:42 PM
|
|
Re: Paint job on a budget!? CONTINUED
|
Anonymous
|
05/01/07 10:50 PM
|
|
Re: Paint job on a budget!? CONTINUED
|
Anonymous
|
05/01/07 10:54 PM
|
|
Re: Paint job on a budget!? CONTINUED
|
Anonymous
|
05/02/07 12:13 AM
|
|
Re: Paint job on a budget!? CONTINUED
|
ramman16248
|
05/02/07 01:21 AM
|
|
Re: Paint job on a budget!? CONTINUED
|
78D150CLUB
|
05/02/07 01:56 AM
|
|
Re: Paint job on a budget!? CONTINUED
|
ramman16248
|
05/02/07 02:57 AM
|
|
Re: Paint job on a budget!? CONTINUED
|
Anonymous
|
05/02/07 03:25 AM
|
|
Re: Paint job on a budget!? CONTINUED
|
texczech
|
05/03/07 07:03 PM
|
|
Re: Paint job on a budget!? CONTINUED
|
Anonymous
|
05/03/07 11:46 PM
|
|
Re: Paint job on a budget!? CONTINUED
|
kenzo42
|
05/04/07 01:24 AM
|
|
Re: Paint job on a budget!? CONTINUED
|
Anonymous
|
05/04/07 01:31 AM
|
|
Re: Paint job on a budget!? CONTINUED
|
Anonymous
|
05/04/07 01:33 AM
|
|
Re: Paint job on a budget!? CONTINUED
|
Anonymous
|
05/04/07 01:25 AM
|
|
Re: Paint job on a budget!? CONTINUED
|
Anonymous
|
05/04/07 01:35 AM
|
|
Re: Paint job on a budget!? CONTINUED
|
Anonymous
|
05/02/07 02:48 AM
|
|
Re: Paint job on a budget!? CONTINUED
|
Anonymous
|
05/02/07 03:43 AM
|
|
Re: Paint job on a budget!? CONTINUED
|
Anonymous
|
05/02/07 09:32 AM
|
|
Re: Paint job on a budget!? CONTINUED
|
Anonymous
|
05/02/07 01:47 PM
|
|
Re: Paint job on a budget!? CONTINUED
|
Anonymous
|
05/06/07 11:09 AM
|
|
Re: Paint job on a budget!? CONTINUED
|
71valiant
|
05/06/07 02:38 PM
|
|
Re: Paint job on a budget!? CONTINUED
|
Gusteve
|
05/02/07 01:56 PM
|
|
Re: Paint job on a budget!? CONTINUED
|
Anonymous
|
05/02/07 02:57 PM
|
|
Re: Paint job on a budget!? CONTINUED
|
v8mirage
|
05/02/07 05:00 PM
|
|
Re: Paint job on a budget!? CONTINUED
|
Anonymous
|
05/02/07 09:24 PM
|
|
Re: Paint job on a budget!? CONTINUED
|
Anonymous
|
05/02/07 11:12 PM
|
|
Re: Paint job on a budget!? CONTINUED
|
Anonymous
|
05/02/07 11:41 PM
|
|
Re: Paint job on a budget!? CONTINUED
|
kenzo42
|
05/03/07 01:16 AM
|
|
Re: Paint job on a budget!? CONTINUED
|
Anonymous
|
05/03/07 02:04 AM
|
|
Re: Paint job on a budget!? CONTINUED
|
Anonymous
|
05/03/07 02:12 AM
|
|
Re: Paint job on a budget!? CONTINUED
|
Anonymous
|
05/03/07 02:34 AM
|
|
Re: Paint job on a budget!? CONTINUED
|
Anonymous
|
05/03/07 02:35 AM
|
|
Re: Paint job on a budget!? CONTINUED
|
Anonymous
|
05/03/07 02:47 AM
|
|
Galvanized Bodies
|
Anonymous
|
05/03/07 01:38 PM
|
|
Re: Galvanized Bodies
|
Anonymous
|
05/03/07 01:45 PM
|
|
Re: Galvanized Bodies
|
Anonymous
|
05/03/07 03:46 PM
|
|
Re: Galvanized Bodies
|
Anonymous
|
05/03/07 05:00 PM
|
|
Re: Paint job on a budget!? CONTINUED
|
Anonymous
|
05/03/07 02:35 AM
|
|
Re: Paint job on a budget!? CONTINUED
|
Gusteve
|
05/03/07 12:18 PM
|
|
Re: Paint job on a budget!? CONTINUED
|
Anonymous
|
05/03/07 01:31 PM
|
|
Re: Paint job on a budget!? CONTINUED
|
Gusteve
|
05/03/07 02:20 PM
|
|
Re: Paint job on a budget!? CONTINUED
|
Anonymous
|
05/03/07 03:23 PM
|
|
Re: Paint job on a budget!? CONTINUED
|
Anonymous
|
05/03/07 04:55 PM
|
|
Re: Paint job on a budget!? CONTINUED
|
Anonymous
|
05/03/07 05:19 PM
|
|
Re: Paint job on a budget!? CONTINUED
|
Exit1965
|
05/03/07 11:15 PM
|
|
Re: Paint job on a budget!? CONTINUED
|
Anonymous
|
05/04/07 01:53 AM
|
|
Re: Paint job on a budget!? CONTINUED
|
Anonymous
|
05/04/07 02:09 AM
|
|
Re: Paint job on a budget!? CONTINUED
|
Anonymous
|
05/04/07 02:11 AM
|
|
Re: Paint job on a budget!? CONTINUED
|
Anonymous
|
05/04/07 12:17 PM
|
|
Re: Paint job on a budget!? CONTINUED
|
Anonymous
|
05/04/07 01:48 PM
|
|
Re: Paint job on a budget!? CONTINUED
|
Anonymous
|
05/03/07 06:38 PM
|
|
Re: Paint job on a budget!? CONTINUED
|
Anonymous
|
05/03/07 09:13 PM
|
|
Re: Paint job on a budget!? CONTINUED
|
78D150CLUB
|
05/01/07 03:37 AM
|
|
Re: Paint job on a budget!? CONTINUED
|
Anonymous
|
05/06/07 06:02 PM
|
|
Re: Paint job on a budget!? CONTINUED
|
Anonymous
|
05/06/07 07:28 PM
|
|
Re: Paint job on a budget!? CONTINUED
|
Anonymous
|
05/07/07 02:16 AM
|
|
Re: Paint job on a budget!? CONTINUED
|
Anonymous
|
05/07/07 02:22 AM
|
|
Re: Paint job on a budget!? CONTINUED
|
Anonymous
|
05/07/07 12:45 PM
|
|
Re: Paint job on a budget!? CONTINUED
|
Anonymous
|
05/07/07 03:41 PM
|
|
Re: Paint job on a budget!? CONTINUED
|
Radio Joe
|
05/07/07 05:16 PM
|
|
Re: Paint job on a budget!? CONTINUED
|
Anonymous
|
05/08/07 06:46 PM
|
|
Re: Paint job on a budget!? CONTINUED
|
Anonymous
|
05/08/07 08:23 PM
|
|
Re: Paint job on a budget!? CONTINUED
|
Anonymous
|
05/08/07 10:37 PM
|
|
Re: Paint job on a budget!? CONTINUED
|
Anonymous
|
05/09/07 04:02 AM
|
|
Re: Paint job on a budget!? CONTINUED
|
Radio Joe
|
05/09/07 01:51 PM
|
|
Re: Paint job on a budget!? CONTINUED
|
Radio Joe
|
05/09/07 01:52 PM
|
|
Re: Paint job on a budget!? CONTINUED
|
Anonymous
|
05/09/07 03:01 PM
|
|
Re: Paint job on a budget!? CONTINUED
|
Anonymous
|
05/09/07 08:02 PM
|
|
Re: Paint job on a budget!? CONTINUED
|
Anonymous
|
05/09/07 05:00 PM
|
|
Re: Paint job on a budget!? CONTINUED
|
Anonymous
|
05/09/07 11:34 AM
|
|
Re: Paint job on a budget!? CONTINUED
|
78D150CLUB
|
04/28/07 11:22 PM
|
|
Re: Paint job on a budget!? CONTINUED
|
Anonymous
|
04/29/07 06:23 AM
|
|
Re: Paint job on a budget!? CONTINUED
|
Anonymous
|
04/29/07 12:00 PM
|
|
Re: Paint job on a budget!? CONTINUED
|
Anonymous
|
04/29/07 08:51 PM
|
|
Re: Paint job on a budget!? CONTINUED
|
Anonymous
|
04/25/07 02:55 PM
|
|
Re: Paint job on a budget!? CONTINUED
|
Marq
|
04/25/07 10:09 PM
|
|
Re: Paint job on a budget!? CONTINUED
|
Anonymous
|
04/18/07 03:36 PM
|
|
Re: Paint job on a budget!? CONTINUED
|
69chargeryeehaa
|
04/18/07 04:53 PM
|
|
Re: Paint job on a budget!? CONTINUED
|
Anonymous
|
04/18/07 07:52 PM
|
|
Re: Paint job on a budget!? CONTINUED
|
Anonymous
|
04/18/07 08:25 PM
|
|
Re: Paint job on a budget!? CONTINUED
|
Anonymous
|
04/22/07 05:32 PM
|
|
Re: Paint job on a budget!? CONTINUED
|
Exit1965
|
04/22/07 10:05 PM
|
|
Re: Paint job on a budget!? CONTINUED
|
Anonymous
|
04/23/07 12:13 AM
|
|
Re: Paint job on a budget!? CONTINUED
|
Anonymous
|
04/23/07 12:58 AM
|
|
Re: Paint job on a budget!? CONTINUED
|
Anonymous
|
04/23/07 01:54 AM
|
|
Re: Paint job on a budget!? CONTINUED
|
Anonymous
|
04/23/07 05:16 PM
|
|
Re: Paint job on a budget!?
|
Anonymous
|
04/23/07 10:56 PM
|
|
Re: Paint job on a budget!? CONTINUED
|
Anonymous
|
04/23/07 11:42 PM
|
|
Re: Paint job on a budget!? CONTINUED
|
Anonymous
|
04/24/07 12:02 AM
|
|
Re: Paint job on a budget!? CONTINUED
|
Anonymous
|
04/23/07 06:18 AM
|
|
Re: Paint job on a budget!? CONTINUED
|
Anonymous
|
04/23/07 05:04 PM
|
|
Re: Paint job on a budget!? CONTINUED
|
Anonymous
|
04/24/07 06:22 AM
|
|
Re: Paint job on a budget!? CONTINUED
|
Anonymous
|
04/24/07 08:04 PM
|
|
Re: Paint job on a budget!? CONTINUED
|
Anonymous
|
04/24/07 08:48 PM
|
|
Re: Paint job on a budget!? CONTINUED
|
Anonymous
|
04/19/07 12:54 AM
|
|
Re: Paint job on a budget!? CONTINUED
|
Anonymous
|
04/19/07 01:21 AM
|
|
Re: Paint job on a budget!? CONTINUED
|
Anonymous
|
04/19/07 01:22 AM
|
|
Re: Paint job on a budget!?
|
Anonymous
|
04/19/07 01:50 AM
|
|
Re: Paint job on a budget!?
|
Anonymous
|
04/19/07 03:29 AM
|
|
Re: Paint job on a budget!?
|
Anonymous
|
04/19/07 04:29 AM
|
|
Re: Paint job on a budget!?
|
Anonymous
|
04/19/07 04:16 AM
|
|
Re: Paint job on a budget!?
|
Anonymous
|
04/20/07 12:23 AM
|
|
Re: Paint job on a budget!?
|
Anonymous
|
04/20/07 12:49 AM
|
|
Re: Paint job on a budget!?
|
Anonymous
|
04/20/07 02:28 AM
|
|
Re: Paint job on a budget!?
|
Anonymous
|
04/20/07 03:31 AM
|
|
Re: Paint job on a budget!?
|
Anonymous
|
04/20/07 04:15 AM
|
|
Re: Paint job on a budget!?
|
Exit1965
|
04/20/07 04:31 AM
|
|
Re: Paint job on a budget!?
|
Anonymous
|
04/20/07 04:41 AM
|
|
Re: Paint job on a budget!?
|
Marq
|
04/21/07 01:16 AM
|
|
Re: Paint job on a budget!?
|
Anonymous
|
04/21/07 02:36 AM
|
|
Re: Paint job on a budget!?
|
Anonymous
|
04/27/07 12:34 AM
|
|
Re: HELP!
|
Anonymous
|
04/27/07 02:45 AM
|
|
Re: HELP!
|
Anonymous
|
04/27/07 03:22 AM
|
|
Re: HELP!
|
Anonymous
|
04/27/07 05:36 PM
|
|
Re: HELP!
|
69chargeryeehaa
|
04/27/07 08:27 PM
|
|
Re: HELP!
|
Anonymous
|
04/27/07 09:46 PM
|
|
Re: HELP!
|
Anonymous
|
04/27/07 10:38 PM
|
|
Re: HELP!
|
Anonymous
|
04/27/07 03:36 AM
|
|
Re: oops
|
Radio Joe
|
04/27/07 03:12 PM
|
|
Hello All
|
Anonymous
|
04/27/07 03:18 PM
|
|
Hello All
|
Anonymous
|
04/27/07 04:51 PM
|
|
Re: Paint job on a budget!?
|
Marq
|
04/27/07 12:06 PM
|
|
Re: Paint job on a budget!? CONTINUED
|
Anonymous
|
04/19/07 04:41 AM
|
|
Re: Paint job on a budget!? CONTINUED
|
Marq
|
04/19/07 06:20 PM
|
|
Re: Paint job on a budget!? CONTINUED
|
Anonymous
|
04/06/07 04:17 PM
|
|
Re: Paint job on a budget!? CONTINUED
|
69DartGT
|
04/05/07 02:10 AM
|
|
Re: Paint job on a budget!? CONTINUED..page 44........
|
78D150CLUB
|
04/05/07 02:11 AM
|
|
Re: Paint job on a budget!? CONTINUED..page 44........
|
78D150CLUB
|
04/05/07 02:22 AM
|
|
Re: Paint job on a budget!? CONTINUED..page 44........
|
Anonymous
|
04/05/07 04:39 AM
|
|
Re: Paint job on a budget!? CONTINUED..page 44........
|
Radio Joe
|
04/09/07 12:36 PM
|
|
Re: Paint job on a budget!? CONTINUED..page 44........
|
Anonymous
|
04/09/07 02:53 PM
|
|
Re: Paint job on a budget!? CONTINUED..page 44........
|
Anonymous
|
04/01/07 12:06 PM
|
|
Re: Paint job on a budget!? CONTINUED..page 44........
|
Anonymous
|
04/01/07 04:42 AM
|
|
Re: Paint job on a budget!? CONTINUED..page 44........
|
Anonymous
|
03/31/07 03:30 AM
|
|
Re: Paint job on a budget!? CONTINUED..page 44........
|
69stanger
|
03/23/07 01:29 PM
|
|
Re: Paint job on a budget!? CONTINUED..page 44........
|
QuickDodge
|
03/23/07 12:05 AM
|
|
Re: Paint job on a budget!? CONTINUED..page 44........
|
69stanger
|
03/23/07 02:35 AM
|
|
Re: Paint job on a budget!? CONTINUED..page 44........
|
Anonymous
|
03/23/07 03:59 AM
|
|
Re: Paint job on a budget!? CONTINUED..page 44........
|
Marq
|
03/23/07 04:12 AM
|
|
Re: Paint job on a budget!? CONTINUED..page 44........
|
Anonymous
|
03/23/07 04:25 AM
|
|
Re: Paint job on a budget!? CONTINUED..page 44........
|
Anonymous
|
03/23/07 05:36 PM
|
|
Re: Paint job on a budget!? CONTINUED..page 44........
|
shawge
|
03/23/07 06:07 PM
|
|
Re: Paint job on a budget!? CONTINUED..page 44........
|
Anonymous
|
03/20/07 01:15 AM
|
|
Re: Paint job on a budget!? CONTINUED..page 44........
|
Anonymous
|
03/20/07 02:01 AM
|
|
Re: Paint job on a budget!? CONTINUED..page 44........
|
Exit1965
|
03/20/07 02:05 AM
|
|
Re: Paint job on a budget!? CONTINUED..page 44........
|
Anonymous
|
03/20/07 02:52 AM
|
|
Re: Paint job on a budget!? CONTINUED..page 44........
|
69DartGT
|
03/20/07 03:11 AM
|
|
Re: Paint job on a budget!? CONTINUED..page 44........
|
Anonymous
|
03/20/07 05:32 PM
|
|
Re: Paint job on a budget!? CONTINUED..page 44........
|
Anonymous
|
03/20/07 05:34 AM
|
|
Re: Paint job on a budget!? CONTINUED..page 44........
|
kenzo42
|
03/21/07 06:22 AM
|
|
Re: Paint job on a budget!? CONTINUED..page 44........
|
Anonymous
|
03/21/07 08:18 AM
|
|
Re: Paint job on a budget!? CONTINUED..page 44........
|
69chargeryeehaa
|
03/21/07 01:31 PM
|
|
Re: Paint job on a budget!? CONTINUED..page 44........
|
Anonymous
|
03/21/07 07:35 PM
|
|
Re: Paint job on a budget!? CONTINUED..page 44........
|
Anonymous
|
03/21/07 07:37 PM
|
|
Re: Paint job on a budget!? CONTINUED..page 44........
|
ONEBADBIRD
|
03/22/07 02:26 PM
|
|
Re: Paint job on a budget!? CONTINUED..page 44........
|
Anonymous
|
03/18/07 03:43 PM
|
|
Re: Paint job on a budget!? CONTINUED..page 44........
|
Anonymous
|
03/18/07 09:10 PM
|
|
Re: Paint job on a budget!? CONTINUED..page 44........
|
Anonymous
|
03/19/07 12:08 PM
|
|
Re: Paint job on a budget!? CONTINUED..page 44........
|
Anonymous
|
03/19/07 03:49 PM
|
|
Re: Paint job on a budget!? CONTINUED..page 44........
|
Anonymous
|
03/19/07 06:01 PM
|
|
Re: Paint job on a budget!? CONTINUED..page 44........
|
Anonymous
|
03/19/07 06:03 PM
|
|
Re: Paint job on a budget!? CONTINUED..page 44........
|
Anonymous
|
03/19/07 06:06 PM
|
|
Re: Paint job on a budget!? CONTINUED..page 44........
|
Anonymous
|
03/20/07 04:40 PM
|
|
Re: Paint job on a budget!? CONTINUED..page 44........
|
Anonymous
|
03/20/07 08:02 PM
|
|
Re: Paint job on a budget!? CONTINUED..page 44........
|
Anonymous
|
03/20/07 08:35 PM
|
|
Re: Paint job on a budget!? CONTINUED..page 44........
|
Anonymous
|
03/20/07 09:27 PM
|
|
Re: Paint job on a budget!? CONTINUED..page 44........
|
Anonymous
|
03/21/07 12:42 AM
|
|
Re: Paint job on a budget!? CONTINUED..page 44........
|
Anonymous
|
03/21/07 01:23 AM
|
|
Re: Paint job on a budget!? CONTINUED..page 44........
|
Anonymous
|
03/21/07 02:38 AM
|
|
Re: Paint job on a budget!? CONTINUED..page 44........
|
Anonymous
|
03/19/07 09:07 PM
|
|
Re: Paint job on a budget!? CONTINUED..page 44........
|
Marq
|
03/20/07 12:40 AM
|
|
Re: Paint job on a budget!? CONTINUED..page 44........
|
Anonymous
|
03/16/07 05:57 PM
|
|
Re: Paint job on a budget!? CONTINUED..page 44........
|
Anonymous
|
03/13/07 05:00 AM
|
|
Re: Paint job on a budget!? CONTINUED..page 44........
|
Anonymous
|
03/10/07 12:20 AM
|
|
Re: Paint job on a budget!? CONTINUED..page 44........
|
dalbers
|
03/03/07 06:58 AM
|
|
Re: Paint job on a budget!? CONTINUED..page 44........
|
Anonymous
|
03/03/07 03:21 PM
|
|
Re: Paint job on a budget!? CONTINUED..page 44........
|
69DartGT
|
03/03/07 03:25 PM
|
|
Re: Paint job on a budget!? CONTINUED..page 44........
|
69chargeryeehaa
|
03/03/07 05:15 PM
|
|
Re: Paint job on a budget!? CONTINUED..page 44........
|
Anonymous
|
03/04/07 02:58 AM
|
|
Re: Paint job on a budget!? CONTINUED..page 44........
|
C38coupe
|
03/04/07 09:33 PM
|
|
Re: Paint job on a budget!? CONTINUED..page 44........
|
s4dustin
|
03/04/07 09:53 PM
|
|
Re: Paint job on a budget!? CONTINUED..page 44........
|
Anonymous
|
03/05/07 12:50 AM
|
|
Re: Paint job on a budget!? CONTINUED..page 44........
|
StevesBug
|
02/28/07 05:31 PM
|
|
Re: Paint job on a budget!? CONTINUED..page 44........
|
Anonymous
|
02/12/07 06:39 PM
|
|
Re: Paint job on a budget!? CONTINUED..page 44........
|
Anonymous
|
02/12/07 07:38 PM
|
|
Re: Paint job on a budget!? CONTINUED..page 44........
|
Anonymous
|
02/05/07 11:52 PM
|
|
Re: Paint job on a budget!? CONTINUED..page 44........
|
Anonymous
|
02/06/07 12:06 AM
|
|
Re: Paint job on a budget!? CONTINUED..page 44........
|
Anonymous
|
02/06/07 03:07 PM
|
|
Re: Paint job on a budget!? CONTINUED..page 44........
|
69chargeryeehaa
|
02/06/07 03:36 PM
|
|
Re: Paint job on a budget!? CONTINUED..page 44........
|
Anonymous
|
02/06/07 04:17 PM
|
|
Re: Paint job on a budget!? CONTINUED..page 44........
|
Anonymous
|
02/06/07 05:27 PM
|
|
Re: Paint job on a budget!? CONTINUED..page 44........
|
Anonymous
|
02/07/07 02:02 AM
|
|
Re: Paint job on a budget!? CONTINUED..page 44........
|
Marq
|
02/07/07 07:04 AM
|
|
Re: Paint job on a budget!? CONTINUED..page 44........
|
Anonymous
|
02/07/07 05:52 PM
|
|
Re: Paint job on a budget!? CONTINUED..page 44........
|
Anonymous
|
02/07/07 09:17 PM
|
|
Re: Paint job on a budget!? CONTINUED..page 44........
|
Marq
|
02/08/07 07:21 AM
|
|
Re: Paint job on a budget!? CONTINUED..page 44........
|
Anonymous
|
02/08/07 05:13 PM
|
|
Re: Paint job on a budget!? CONTINUED..page 44........
|
Anonymous
|
02/16/07 06:34 AM
|
|
Re: Paint job on a budget!? CONTINUED..page 44........
|
Anonymous
|
02/16/07 01:51 PM
|
|
Re: Paint job on a budget!? CONTINUED..page 44........
|
Anonymous
|
02/17/07 01:09 AM
|
|
Re: Paint job on a budget!? CONTINUED..page 44........
|
Anonymous
|
02/17/07 09:41 PM
|
|
Re: Paint job on a budget!? CONTINUED..page 44........
|
Anonymous
|
02/18/07 02:28 AM
|
|
Re: Paint job on a budget!? CONTINUED..page 44........
|
Anonymous
|
02/18/07 05:19 AM
|
|
Re: Paint job on a budget!? CONTINUED..page 44........
|
Exit1965
|
02/18/07 06:10 AM
|
|
Re: Paint job on a budget!? CONTINUED..page 44........
|
Anonymous
|
02/18/07 07:14 AM
|
|
Re: Paint job on a budget!? CONTINUED..page 44........
|
Exit1965
|
02/18/07 02:38 PM
|
|
Re: Paint job on a budget!? CONTINUED..page 44........
|
Anonymous
|
02/18/07 04:24 PM
|
|
Re: Paint job on a budget!? CONTINUED..page 44........
|
69DartGT
|
02/18/07 07:06 PM
|
|
Re: Paint job on a budget!? CONTINUED..page 44........
|
Exit1965
|
02/19/07 01:17 AM
|
|
Re: Paint job on a budget!? CONTINUED..page 44........
|
Anonymous
|
02/22/07 03:16 AM
|
|
Re: Paint job on a budget!? CONTINUED..page 44........
|
Exit1965
|
02/18/07 06:07 AM
|
|
Re: Paint job on a budget!? CONTINUED..page 44........
|
Anonymous
|
02/19/07 01:59 AM
|
|
Re: Paint job on a budget!? CONTINUED..page 44........
|
Exit1965
|
02/19/07 03:03 AM
|
|
Re: Paint job on a budget!? CONTINUED..page 44........
|
Anonymous
|
02/19/07 03:22 AM
|
|
Re: Paint job on a budget!? CONTINUED..page 44........
|
Exit1965
|
02/19/07 08:08 PM
|
|
Re: Paint job on a budget!? CONTINUED..page 44........
|
kenzo42
|
02/19/07 09:16 PM
|
|
Re: Paint job on a budget!? CONTINUED..page 44........
|
Anonymous
|
02/20/07 02:08 AM
|
|
Re: Paint job on a budget!? CONTINUED..page 44........
|
Anonymous
|
02/20/07 03:29 PM
|
|
Re: Paint job on a budget!? CONTINUED..page 44........
|
Anonymous
|
02/20/07 03:59 PM
|
|
Re: Paint job on a budget!? CONTINUED..page 44........
|
Anonymous
|
02/20/07 07:25 PM
|
|
Re: Paint job on a budget!? CONTINUED..page 44........
|
Anonymous
|
02/20/07 07:28 PM
|
|
Re: Paint job on a budget!? CONTINUED..page 44........
|
Anonymous
|
02/20/07 11:30 PM
|
|
Re: Paint job on a budget!? CONTINUED..page 44........
|
69chargeryeehaa
|
02/21/07 12:34 AM
|
|
Re: Paint job on a budget!? CONTINUED..page 44........
|
Anonymous
|
02/21/07 12:54 AM
|
|
Re: Paint job on a budget!? CONTINUED..page 44........
|
C38coupe
|
02/21/07 01:36 AM
|
|
Re: Paint job on a budget!? CONTINUED..page 44........
|
Exit1965
|
02/21/07 12:39 AM
|
|
Re: Paint job on a budget!? CONTINUED..page 44........
|
Anonymous
|
02/21/07 03:46 AM
|
|
Re: Paint job on a budget!? CONTINUED..page 44........
|
69chargeryeehaa
|
02/21/07 02:24 PM
|
|
Re: Paint job on a budget!? CONTINUED..page 44........
|
Anonymous
|
02/21/07 04:17 PM
|
|
Re: Paint job on a budget!? CONTINUED..page 44........
|
Exit1965
|
02/21/07 04:27 PM
|
|
Re: Paint job on a budget!? CONTINUED..page 44........
|
Anonymous
|
02/21/07 08:31 PM
|
|
Re: Paint job on a budget!? CONTINUED..page 44........
|
Anonymous
|
02/22/07 02:58 AM
|
|
Re: Paint job on a budget!? CONTINUED..page 44........
|
Exit1965
|
02/22/07 04:59 AM
|
|
Re: Paint job on a budget!? CONTINUED..page 44........
|
69DartGT
|
02/22/07 02:55 PM
|
|
Re: Paint job on a budget!? CONTINUED..page 44........
|
69chargeryeehaa
|
02/22/07 04:51 PM
|
|
Re: Paint job on a budget!? CONTINUED..page 44........
|
Anonymous
|
02/22/07 08:27 PM
|
|
Re: Paint job on a budget!? CONTINUED..page 44........
|
Anonymous
|
02/21/07 12:46 AM
|
|
Re: Paint job on a budget!? CONTINUED..page 44........
|
Marq
|
02/19/07 02:36 PM
|
|
Re: Paint job on a budget!? CONTINUED..page 44........
|
kenzo42
|
02/16/07 06:48 AM
|
|
Re: Paint job on a budget!? CONTINUED..page 44........
|
Marq
|
02/19/07 02:21 PM
|
|
Re: Paint job on a budget!? CONTINUED..page 44........
|
Anonymous
|
02/04/07 11:34 PM
|
|
Re: Paint job on a budget!? CONTINUED..page 44........
|
Marq
|
02/05/07 06:06 AM
|
|
Re: Paint job on a budget!? CONTINUED..page 44........
|
Anonymous
|
02/05/07 12:02 PM
|
|
Re: Paint job on a budget!? CONTINUED..page 44........
|
69DartGT
|
02/05/07 06:20 PM
|
|
Re: Paint job on a budget!? CONTINUED..page 44........
|
Anonymous
|
02/05/07 06:40 PM
|
|
Re: Paint job on a budget!? CONTINUED..page 44........
|
C38coupe
|
02/05/07 07:59 PM
|
|
Re: Paint job on a budget!? CONTINUED..page 44........
|
Marq
|
02/05/07 08:31 PM
|
|
Re: Paint job on a budget!? CONTINUED..page 44........
|
_Scott_
|
02/02/07 05:16 AM
|
|
Re: Paint job on a budget!? CONTINUED..page 44........
|
Anonymous
|
02/02/07 06:26 AM
|
|
Re: Paint job on a budget!? CONTINUED..page 44........
|
Anonymous
|
02/02/07 01:27 PM
|
|
Re: Paint job on a budget!? CONTINUED..page 44........
|
Anonymous
|
02/04/07 10:18 PM
|
|
Re: Paint job on a budget!? CONTINUED..page 44........
|
Anonymous
|
02/05/07 03:33 AM
|
|
Re: Paint job on a budget!? CONTINUED..page 44........
|
Marq
|
01/31/07 05:38 AM
|
|
Re: Paint job on a budget!? CONTINUED..page 44........
|
Anonymous
|
01/31/07 10:51 PM
|
|
Re: Paint job on a budget!? CONTINUED..page 44........
|
Anonymous
|
01/21/07 05:05 PM
|
|
Re: Paint job on a budget!? CONTINUED..page 44........
|
Anonymous
|
01/22/07 08:50 PM
|
|
Re: Paint job on a budget!? CONTINUED..page 44........
|
Anonymous
|
01/22/07 09:04 PM
|
|
Re: Paint job on a budget!? CONTINUED..page 44........
|
69chargeryeehaa
|
01/22/07 11:51 PM
|
|
Re: Paint job on a budget!? CONTINUED..page 44........
|
Anonymous
|
01/18/07 03:41 AM
|
|
Re: Paint job on a budget!? CONTINUED..page 44........
|
69DartGT
|
01/18/07 04:01 AM
|
|
Re: Paint job on a budget!? CONTINUED..page 44........
|
v8mirage
|
01/18/07 03:47 PM
|
|
Re: Paint job on a budget!? CONTINUED..page 44........
|
69DartGT
|
01/11/07 03:16 PM
|
|
Re: Paint job on a budget!? CONTINUED..page 44........
|
Anonymous
|
01/10/07 05:00 PM
|
|
Re: Paint job on a budget!? CONTINUED..page 44........
|
Anonymous
|
01/10/07 01:10 AM
|
|
Re: Paint job on a budget!?
|
Anonymous
|
03/10/07 11:14 AM
|
|
Re: Paint job on a budget!?
|
Exit1965
|
03/10/07 02:34 PM
|
|
Re: Paint job on a budget!?
|
v8mirage
|
03/10/07 03:03 PM
|
|
Re: Paint job on a budget!?
|
v8mirage
|
03/10/07 03:05 PM
|
|
Re: Paint job on a budget!?
|
v8mirage
|
03/10/07 03:06 PM
|
|
Re: Paint job on a budget!?
|
v8mirage
|
03/10/07 03:06 PM
|
|
Re: Paint job on a budget!?
|
Anonymous
|
03/10/07 06:53 PM
|
|
Re: Paint job on a budget!?
|
v8mirage
|
03/10/07 07:46 PM
|
|
Re: Paint job on a budget!?
|
1BAD68
|
03/10/07 08:30 PM
|
|
Re: Paint job on a budget!?
|
Anonymous
|
03/10/07 09:10 PM
|
|
Re: Paint job on a budget!?
|
1BAD68
|
03/10/07 10:40 PM
|
|
Re: Paint job on a budget!?
|
pdqvsix
|
03/11/07 04:38 AM
|
|
Re: Paint job on a budget!?
|
Anonymous
|
03/11/07 11:57 AM
|
|
Re: Paint job on a budget!?
|
pdqvsix
|
03/11/07 01:50 PM
|
|
Re: Paint job on a budget!?
|
Anonymous
|
03/11/07 05:39 PM
|
|
Re: Paint job on a budget!?
|
1BAD68
|
03/11/07 06:17 PM
|
|
Re: Paint job on a budget!?
|
Anonymous
|
03/12/07 01:15 AM
|
|
Re: Paint job on a budget!?
|
69DartGT
|
03/11/07 07:11 PM
|
|
Re: Paint job on a budget!?
|
Anonymous
|
03/12/07 12:28 AM
|
|
Re: Paint job on a budget!?
|
Anonymous
|
03/12/07 12:53 AM
|
|
Re: Paint job on a budget!?
|
Anonymous
|
03/12/07 01:05 AM
|
|
Re: Paint job on a budget!?
|
pdqvsix
|
03/12/07 03:05 AM
|
|
Re: Paint job on a budget!?
|
Anonymous
|
03/12/07 04:28 AM
|
|
Re: Paint job on a budget!?
|
pdqvsix
|
03/12/07 05:13 AM
|
|
Re: Paint job on a budget!?
|
Anonymous
|
03/11/07 05:43 AM
|
|
Re: Paint job on a budget!? CONTINUED..page 44........
|
Anonymous
|
03/25/07 05:58 AM
|
|
Re: Paint job on a budget!? CONTINUED..page 44........
|
Anonymous
|
03/25/07 02:15 PM
|
|
Re: Paint job on a budget!? CONTINUED..page 44........
|
Anonymous
|
03/25/07 04:03 PM
|
|
Re: Paint job on a budget!? CONTINUED..page 44........
|
Anonymous
|
03/25/07 05:08 PM
|
|
Re: Paint job on a budget!? CONTINUED..page 44........
|
Anonymous
|
03/25/07 06:14 PM
|
|
Re: Paint job on a budget!? CONTINUED..page 44........
|
Anonymous
|
03/26/07 03:17 AM
|
|
Re: Paint job on a budget!? CONTINUED..page 44........
|
Anonymous
|
03/27/07 01:25 AM
|
|
Re: Paint job on a budget!? CONTINUED..page 44........
|
Anonymous
|
03/27/07 04:13 AM
|
|
Re: Paint job on a budget!? CONTINUED..page 44........
|
Marq
|
03/27/07 01:00 PM
|
|
Re: Paint job on a budget!? CONTINUED..page 44........
|
Exit1965
|
03/27/07 02:05 PM
|
|
Re: Paint job on a budget!? CONTINUED..page 44........
|
Anonymous
|
03/28/07 03:39 AM
|
|
Re: Paint job on a budget!? CONTINUED..page 44........
|
Anonymous
|
03/28/07 03:52 AM
|
|
Re: Paint job on a budget!? CONTINUED..page 44........
|
Anonymous
|
03/28/07 04:50 AM
|
|
Re: Paint job on a budget!? CONTINUED..page 44........
|
Anonymous
|
03/28/07 08:31 PM
|
|
Re: Paint job on a budget!? CONTINUED..page 44........
|
Anonymous
|
03/28/07 10:40 PM
|
|
Re: Paint job on a budget!? CONTINUED..page 44........
|
pdqvsix
|
03/29/07 03:18 AM
|
|
Re: Paint job on a budget!? CONTINUED..page 44........
|
Anonymous
|
03/26/07 08:19 PM
|
|
Re: Paint job on a budget!? CONTINUED..page 44........
|
Anonymous
|
05/01/07 11:24 PM
|
|
Re: Paint job on a budget!? CONTINUED..page 44........
|
Anonymous
|
05/05/07 01:54 AM
|
|
Re: Paint job on a budget!? CONTINUED..page 44........
|
Anonymous
|
05/05/07 02:05 AM
|
|
Re: Paint job on a budget!? CONTINUED..page 44........
|
Anonymous
|
05/05/07 04:37 AM
|
|
Re: Paint job on a budget!? CONTINUED..page 44........
|
Anonymous
|
05/05/07 04:44 AM
|
|
Re: Paint job on a budget!? CONTINUED..page 44........
|
Anonymous
|
05/05/07 09:53 AM
|
|
Re: Paint job on a budget!? CONTINUED..page 44........
|
Marq
|
05/05/07 01:52 PM
|
|
Re: Paint job on a budget!? CONTINUED..page 44........
|
Anonymous
|
05/05/07 02:16 PM
|
|
Re: Paint job on a budget!? CONTINUED..page 44........
|
Anonymous
|
05/05/07 03:53 PM
|
|
Re: Paint job on a budget!? CONTINUED..page 44........
|
Anonymous
|
05/06/07 02:48 AM
|
|
Re: Paint job on a budget!? CONTINUED..page 44........
|
Anonymous
|
05/09/07 01:14 AM
|
|
Re: Paint job on a budget!? CONTINUED..page 44........
|
trikar
|
05/09/07 06:34 AM
|
|
Re: Paint job on a budget!? CONTINUED..page 44........
|
Marq
|
05/09/07 05:04 PM
|
|
Re: Paint job on a budget!? CONTINUED..page 44........
|
Anonymous
|
05/09/07 08:02 PM
|
|
Re: Paint job on a budget!? CONTINUED..page 44........
|
Anonymous
|
05/10/07 01:30 AM
|
|
Re: Paint job on a budget!? CONTINUED..page 44........
|
trikar
|
05/10/07 05:56 AM
|
|
Re: Paint job on a budget!? CONTINUED..page 44........
|
Anonymous
|
05/10/07 02:12 PM
|
|
Re: Paint job on a budget!? CONTINUED..page 44........
|
Radio Joe
|
05/10/07 03:32 PM
|
|
Re: Paint job on a budget!? CONTINUED..page 44........
|
69DartGT
|
05/10/07 08:33 PM
|
|
Re: Paint job on a budget!? CONTINUED..page 44........
|
69DartGT
|
05/13/07 04:08 AM
|
|
Re: Paint job on a budget!? CONTINUED..page 44........
|
Anonymous
|
05/10/07 08:12 AM
|