|
|
 Re: Challenger - Rear Bumper Guards
[Re: Greentween]
#143260
Re: Challenger - Rear Bumper Guards
[Re: Greentween]
#143260
11/02/08 05:55 PM
11/02/08 05:55 PM
|
Joined: Jan 2003
Posts: 1,019
Eau Claire, WI
ResQ911

super gas
|
super gas
Joined: Jan 2003
Posts: 1,019
Eau Claire, WI
|
Quote:
You cannot remount the 73-74 front bracket inwards on a Challenger (maybe a cuda its ok). The frame rail is in the way.
Quote:
First you need to acquire the shorter front & rear bumper brackets from a 70-72. These will pull the bumper in flush, and allow you to do away with the rubber/plastic (whatever the heck they are) filler pieces, as well as the extremely heavy metal inner bumper re-inforcement bars. I've heard that on the front, you can re-drill the brackets to move them in further, but I'm not sure about that.
You'll need 70-72 bumpers, since the bracket holes are in a different position from the 73-74, as well as the previously noted jack slot vs. cut-out difference. Don't forget, your jack with the "tab" will not work. You will need a different jack mechanism, as well as a 70-72 Challenger specific jack hook. The last 3 digits of the part no. on the hook are "102", and the 102 hooks are being reproed.
To finish the front, I bought the 70-72 style rubber bumper "wedges" which fit in each end of the bumper, by the fender indentation. I also bought what I believe was a 72 style license plate bracket, as my old one was badly rusted. This hangs from the license plate opening in the bumper. The 2 holes in the bracket aligned perfectly with the 2 existing holes in the bumper opening. I did not compare my old rusted 73 plate bracket to the repro I bought, so I don't know if they are the same.
For the rear, you will need the narrow metal filler piece which goes between the bumper & the body.
Not true. Both front and rear 1972-74 bumpers and brackets move in just fine. For the front. Use the one square hole to mount brackets to framerail and drill a new hole for the other bolt. For rear bumper, cut bumper brackets. Move inward by overlapping and reweld. Works great. Use 1972-74 bumpers, brackets,fillers, everything. Then add 1970-72 bumper guard to fill slots in valance.
Done.

Here's more:
Piece of cake... you wont need any other parts...just a 5/8" drill bit..
OK, here's some instructions and pictures...
1) a picture showing the rear most hole on the brackets.. (held together with a vice grip)
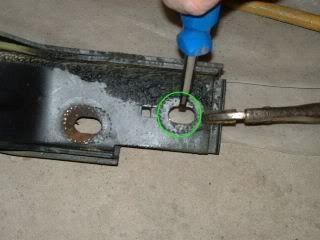
Re-drill this mounting hole. you will see a square hole about an inch forward of the original hole..
drill this hole to 5/8" as shown below
This will be you new rear most mounting hole.
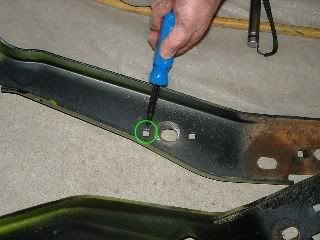
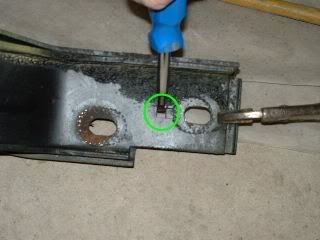
Now remove the vice grip and look to the inner straight bracket... you will see another square hole as shown below
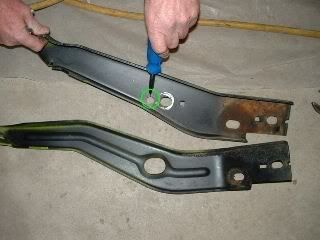
drill this to 5/8" inch like shown below
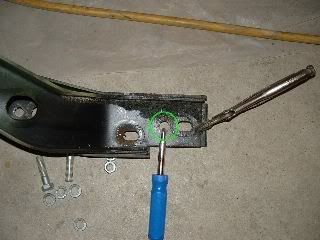
Here is a before and after shot of the bumper bracket location...
before
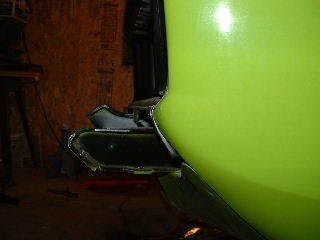
after
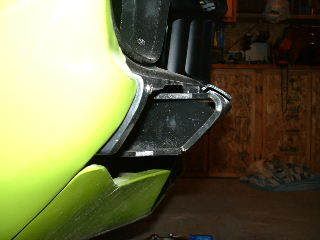
Now remove the bumperettes and fill the bumperette mounting holes with a set of bumper bolts and you are done...There were no clearance issues with this procedure... I hope this helps anyone who was thinking of trying this!!!!
You could also slot the newly drilled holes horizontally if you want to get a little front to back adjustment on the bumper alignment. I didn't think it was nessecary though. There is about a 1/8" gap between the bumper and grill now. It looks very clean.
Just be sure now....if you are going to run in to anything head on... be sure you're going under 5 mph
|
|
|
|
|
|
|


