|
 Re: paint job on a budget!?
#22150
Re: paint job on a budget!?
#22150
03/12/06 08:27 PM
03/12/06 08:27 PM
|
Joined: Jan 2003
Posts: 4,820
near Alexandria, VA
Gas_Bandit

master
|
master
Joined: Jan 2003
Posts: 4,820
near Alexandria, VA
|
That random orbital buffer will not cut paint anywhere near enough to buff out sanding haze. It has very low pad speed and a very large contact area. That is designed for people who have never used a buffer before because it makes it impossible for you to burn the paint. If you have a buffer that will not burn the paint when used improperly, it really isn't doing anything. You need a real 7" rotory buffer with a wool pad.
2003 Mercury Marauder, 34k miles, 3.73s and custom flash tuned
1981 Camaro, 350 w/ Holley Stealth Ram MPEFI, Sportsman heads, roller cam, self-burned chips, wideband O2
1983 Firebird TA
1993 Saturn SL2 83k
|
|
|
Re: paint job on a budget!?
[Re: Gas_Bandit]
#22151
03/12/06 08:31 PM
03/12/06 08:31 PM
|
Anonymous
OP
Unregistered
|
Anonymous
OP
Unregistered
|
I have a Porter Cable 7424 and it works great! 
|
|
|
Re: paint job on a budget!?
[Re: Gas_Bandit]
#22152
03/12/06 10:04 PM
03/12/06 10:04 PM
|
Joined: Jul 2003
Posts: 3,377
Rancho Cordova, CA
Exit1965
master
|
master
Joined: Jul 2003
Posts: 3,377
Rancho Cordova, CA
|
Quote:
That random orbital buffer will not cut paint anywhere near enough to buff out sanding haze. It has very low pad speed and a very large contact area. That is designed for people who have never used a buffer before because it makes it impossible for you to burn the paint. If you have a buffer that will not burn the paint when used improperly, it really isn't doing anything. You need a real 7" rotory buffer with a wool pad.
The buffer in the link is somewhat similar to the one I'm using, the same kind you can buy at walmart for instance. It seemed to polish fine for me. I don't think polish alone would remove sanding scratches, wouldn't you need rubbing compound for that?
I know what you guys are saying that the final coat is glossy on its own, then wetsanding takes the gloss away. But polishing for me made it shiny again (not as shiny as before wetsanding, but I had tiny imperfections in the final coat that wetsanding got rid of). The final coat for me was still slightly uneven so wetsanding made it glass like in terms of smoothness.
For the polishing technique, just wet it down good and rub some polish on the car (go head and be liberal with it on a small area), make sure the bonnet is wet then polish an area. After polishing for 10-20 seconds (a small area), wipe it clean with a papertowl and you should see smoothness and a reflection at an angle. Keep trying different things on a small area, and wiping the polish away and looking for a reflection, until you see what works, then do the whole area..
|
|
|
Re: paint job on a budget!?
[Re: Exit1965]
#22153
03/12/06 10:57 PM
03/12/06 10:57 PM
|
Anonymous
OP
Unregistered
|
Anonymous
OP
Unregistered
|
I have spent the last 2 days reading this entire thread. I started from a link from the mr2oc.com forums. I will probably paint my car this way and will keep reading here. I just wanted to thank you guys for all the testing and posting. To bad a lot of the pictures do not show. Keep up the good work
|
|
|
Re: paint job on a budget!?
#22154
03/12/06 11:32 PM
03/12/06 11:32 PM
|
Anonymous
OP
Unregistered
|
Anonymous
OP
Unregistered
|
Quote:
I have spent the last 2 days reading this entire thread. I started from a link from the mr2oc.com forums. I will probably paint my car this way and will keep reading here. I just wanted to thank you guys for all the testing and posting. To bad a lot of the pictures do not show.
Keep up the good work
Im actually might try and paint my MR2 with this 
I practiced on a fender. Half of the fender was sanded prepped down to the metal; the other half, I left the primer that was on there. I thought I read on the board mix about 20% of mineral spirits to the paint, however when I mixed to 20% the paint was still too thick- probably weather conditions, it was about mid 50s outside (in farenheit). I think I mixed it to about to 300% and the consistency was still more than 'water'. It had the consistency more of baby oil, however I think it might work out better. One layer of paint so far and it covered the fender pretty well. I was worried at first because there seems to be a lot of bubbles, but after it dried there are less, still a lot but less. However I think if I sand it down with 600-800 grit or so then sand and put another layer of paint, it should take care of that. So maybe 3-4 layers and then a final buffing. So mixing it a little thick doesnt seem too bad. However the paint has not dried to the touch yet, still a little sticky after about 5 hours, but thats with the temperature only getting colder it should take a little longer. And I'm sure it doesnt help that I added more mineral spirits and that will delay the cureing process. I took some pictures but I will upload them later on- probably when I finish the fender.
Ill report back on the hardness of the paint after a while. I intend to bake the paint a little with a heater see if that will harden it a bit.
|
|
|
Re: paint job on a budget!?
#22155
03/13/06 02:04 AM
03/13/06 02:04 AM
|
Anonymous
OP
Unregistered
|
Anonymous
OP
Unregistered
|
You really have to thin the paint out. I was putting it on too thick. I just did the hood. I thinned it way down on the hood and what a difference.
|
|
|
Re: paint job on a budget!?
[Re: dalbers]
#22157
03/13/06 03:09 AM
03/13/06 03:09 AM
|
Anonymous
OP
Unregistered
|
Anonymous
OP
Unregistered
|
The lines sounds like you have it too thick. 
|
|
|
Re: paint job on a budget!?
#22158
03/13/06 03:21 AM
03/13/06 03:21 AM
|
Anonymous
OP
Unregistered
|
Anonymous
OP
Unregistered
|
Quote:
You really have to thin the paint out. I was putting it on too thick. I just did the hood. I thinned it way down on the hood and what a difference.
Whats wrong if its too thick?
|
|
|
Re: paint job on a budget!?
#22159
03/13/06 01:30 PM
03/13/06 01:30 PM
|
Anonymous
OP
Unregistered
|
Anonymous
OP
Unregistered
|
I could see some roller lines in my hood, I went over them with a new roller. It seems to have taken them down. I just went out to the car, it is still a bit tacky. I think I put too much paint on. I really thinned out the paint when I did my hood and it is dry. I will try wet sanding tonight when I get home from work.
|
|
|
 Re: paint job on a budget!?
#22160
Re: paint job on a budget!?
#22160
03/13/06 05:25 PM
03/13/06 05:25 PM
|
Anonymous
OP
Unregistered
|
Anonymous
OP
Unregistered
|
Ok...the problem from my earlier post was solved with my variable speed buffer/polisher. I have enclosed some pix. This is from an aftermarket fender i had lying around. I taped off approximately one foot and a half square and followed the procedure: 
|
|
|
Re: paint job on a budget!?
#22161
03/13/06 05:32 PM
03/13/06 05:32 PM
|
Anonymous
OP
Unregistered
|
Anonymous
OP
Unregistered
|
Here is a closer shot: 
|
|
|
Re: paint job on a budget!?
#22162
03/13/06 05:33 PM
03/13/06 05:33 PM
|
Anonymous
OP
Unregistered
|
Anonymous
OP
Unregistered
|
I'm now moving on to the trunk lid of my car. This is a shot of coat #1: 
|
|
|
 Re: paint job on a budget!?
#22163
Re: paint job on a budget!?
#22163
03/13/06 05:53 PM
03/13/06 05:53 PM
|
Anonymous
OP
Unregistered
|
Anonymous
OP
Unregistered
|
Ok, now a few insights: 1.) The paint suggested very early in these postings was called "acrylic/enamel paint"...this is not exactly what you're looking for. The proper paint type is "aklyd enamel". The "acrylic/enamel" is water based, and that isn't what you want (read about "acrylic/enamel" on this web page). As a matter of fact, you do not necessarily have to buy "rustoleum". I bought mine from the local "Do-It-Center" and it is the house brand made by Sherwin Williams...worked fine. The easiest way to tell if you have the right thing is to look at the directions and see what "clean-up" instructions are...if it says "clean with Mineral Spirits", than you have the right stuff. Many people make compatible brands. 2.) It may also say in the instructions that you do not have to thin...in this case, you have to thin. My ratio was 10:1, worked great. It will bubble and look "orange peely" at first, but relax, the paint self-levels as it drys. 3.) At first, I understood that we could use a $20 orbital buffer/polisher like you buy a Wal-Mart, etc...Although it seems to have worked for others, it did NOT work for me. It would not eliminate the scratches from the final 1500 grit wetsanding. Luckily, I had a 7" ELECTRONIC POLISHER/SANDER just like the one on this web page. It worked wonders!! Will write more later if I think of anything. If you have questions about my procedure, I will do my best to help...thanks guys
|
|
|
Re: paint job on a budget!?
#22164
03/13/06 08:55 PM
03/13/06 08:55 PM
|
Joined: Jan 2006
Posts: 1,220
toronto canada
69chargeryeehaa
pro stock
|
pro stock
Joined: Jan 2006
Posts: 1,220
toronto canada
|
Quote:
Ok, now a few insights:
1.) The paint suggested very early in these postings was called "acrylic/enamel paint"...this is not exactly what you're looking for. The proper paint type is "aklyd enamel". The "acrylic/enamel" is water based, and that isn't what you want (read about "acrylic/enamel" on this web page). As a matter of fact, you do not necessarily have to buy "rustoleum". I bought mine from the local "Do-It-Center" and it is the house brand made by Sherwin Williams...worked fine. The easiest way to tell if you have the right thing is to look at the directions and see what "clean-up" instructions are...if it says "clean with Mineral Spirits", than you have the right stuff. Many people make compatible brands.
2.) It may also say in the instructions that you do not have to thin...in this case, you have to thin. My ratio was 10:1, worked great. It will bubble and look "orange peely" at first, but relax, the paint self-levels as it drys.
3.) At first, I understood that we could use a $20 orbital buffer/polisher like you buy a Wal-Mart, etc...Although it seems to have worked for others, it did NOT work for me. It would not eliminate the scratches from the final 1500 grit wetsanding. Luckily, I had a 7" ELECTRONIC POLISHER/SANDER just like the one on this web page. It worked wonders!!
Will write more later if I think of anything. If you have questions about my procedure, I will do my best to help...thanks guys
i allways have suggested the alklyd enamel (rust paint) to roller on, i think the confusion comes from the 71 midnight metalic blue beetle in my pics that was SPRAYED with dupli color single stage acrylic enamel. just to clear things up. 
by the way, nice job, i hope to see it all done
|
|
|
Re: paint job on a budget!?
[Re: 69chargeryeehaa]
#22165
03/13/06 08:57 PM
03/13/06 08:57 PM
|
Anonymous
OP
Unregistered
|
Anonymous
OP
Unregistered
|
Hi there I have read this entire thread within 24 hours and I have to say it's one of the most interesting threads I have ever read! And the timing couldn't be any better, since I just bought a 1985 Honda CRX yesterday that really needs a paintjob  If I remember correctly, a CRX was the first car "69charger" painted with this method, right? My car even came with 2 extra doors, perfect for practicing  I haven't seen RustOleum or Tremclad in Denmark though, so I'll have to see what to use instead. Perhaps "Hammerite" would work... it's made for the same use...But I have too check around... It will probably be some time before I start painting, since I don't have a good garage/workshop to work in, and it's currently insanely cold here... -10 degress celsius (14 fahrenheit) even though it's supposed to be spring  Well, just wanted to let you all know that the wealth of information in this thread is appreciated by people all over the world
Last edited by 85CRX_Denmark; 03/13/06 08:59 PM.
|
|
|
Re: paint job on a budget!?
[Re: Exit1965]
#22166
03/13/06 10:28 PM
03/13/06 10:28 PM
|
Anonymous
OP
Unregistered
|
Anonymous
OP
Unregistered
|
all this talk about the big orbital polisher not working is a bit discouraging. The last coat went on beautifully and I hesitated to sand it down one more time, but thought i needed to at least try. Put the first few coats of striping on and everything looks good, gonna put another coat on tonight before I call it a day.
|
|
|
Re: paint job on a budget!?
#22167
03/13/06 11:30 PM
03/13/06 11:30 PM
|
Joined: Jul 2003
Posts: 3,377
Rancho Cordova, CA
Exit1965
master
|
master
Joined: Jul 2003
Posts: 3,377
Rancho Cordova, CA
|
Quote:
Ok, now a few insights:
1.) The paint suggested very early in these postings was called "acrylic/enamel paint"...this is not exactly what you're looking for. The proper paint type is "aklyd enamel". The "acrylic/enamel" is water based, and that isn't what you want (read about "acrylic/enamel" on this web page). As a matter of fact, you do not necessarily have to buy "rustoleum". I bought mine from the local "Do-It-Center" and it is the house brand made by Sherwin Williams...worked fine. The easiest way to tell if you have the right thing is to look at the directions and see what "clean-up" instructions are...if it says "clean with Mineral Spirits", than you have the right stuff. Many people make compatible brands.
2.) It may also say in the instructions that you do not have to thin...in this case, you have to thin. My ratio was 10:1, worked great. It will bubble and look "orange peely" at first, but relax, the paint self-levels as it drys.
3.) At first, I understood that we could use a $20 orbital buffer/polisher like you buy a Wal-Mart, etc...Although it seems to have worked for others, it did NOT work for me. It would not eliminate the scratches from the final 1500 grit wetsanding. Luckily, I had a 7" ELECTRONIC POLISHER/SANDER just like the one on this web page. It worked wonders!!
Will write more later if I think of anything. If you have questions about my procedure, I will do my best to help...thanks guys
Hi Chuck - at first glance, your test area looks kind of dull and it looks like the surface is blotchy, in the light reflections. Granted the light isn't that great, but the surface doesn't look smooth - was it straight to begin with?
What did you use when wetsanding, did you do it by hand or with a block of some sort? If the surface really is as uneven as it looks you might want to try a soft foam sanding block with your paper wrapped around it.
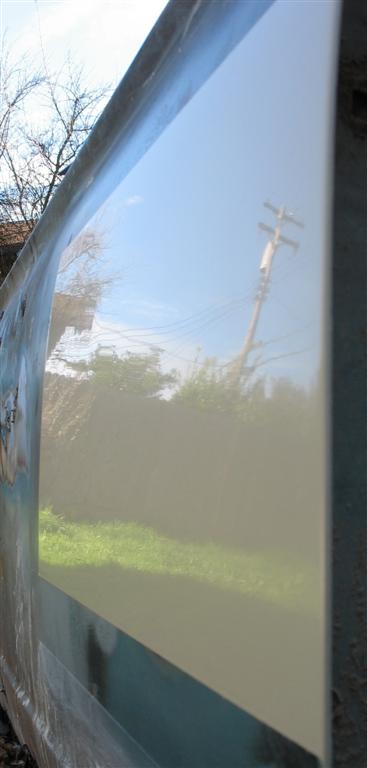
If you did everything as prescribed in this thread and the job came out lacking lustre as it appears to, you might want to try actual rustoleum, e.g. from walmart. I don't know if the paint is the difference or if it's the technique but your surface does not seem to be as glossy or mirror like as it could be. for example this is with the same technique, foam sanding block used when wetsanding, and with cheap rustoleum gloss from walmart.
If the paint surface is uneven, I would go back at it with 600 grit and water, with a soft foam block, till it's smooth, then build it up again with 2-3 more thin coats.

|
|
|
Re: paint job on a budget!?
[Re: Exit1965]
#22168
03/14/06 04:46 AM
03/14/06 04:46 AM
|
Anonymous
OP
Unregistered
|
Anonymous
OP
Unregistered
|
Quote:
Hi Chuck - at first glance, your test area looks kind of dull and it looks like the surface is blotchy, in the light reflections. Granted the light isn't that great, but the surface doesn't look smooth - was it straight to begin with?
What did you use when wetsanding, did you do it by hand or with a block of some sort? If the surface really is as uneven as it looks you might want to try a soft foam sanding block with your paper wrapped around it.
If you did everything as prescribed in this thread and the job came out lacking lustre as it appears to, you might want to try actual rustoleum, e.g. from walmart. I don't know if the paint is the difference or if it's the technique but your surface does not seem to be as glossy or mirror like as it could be. for example this is with the same technique, foam sanding block used when wetsanding, and with cheap rustoleum gloss from walmart.
If the paint surface is uneven, I would go back at it with 600 grit and water, with a soft foam block, till it's smooth, then build it up again with 2-3 more thin coats.
Hi Guys...to be honest, I had my biggest problem with the "inexpensive" orbital polisher. Everything went fine until the final wetsand/polish but the orbital polisher would not bring back the shine! So, I wiped it down with mineral spirits and applied another coat of paint. It started to become a bit of a "dull mess" at this time (wax coat, mineral spirit coat, new paint coat!!). In a last ditch effort, I wetsanded again with all three grades starting with 600 up to 1500 again then used the "pro" grade buffer. I could tell this was the problem (for me).
So, I decided instead of redoing this test-area, I would just move on to the trunk. I seemed to have found the proper technique and hopefully will get better results in the end with the trunk lid...i'll let you know as I go along.
Thanks again guys, Chuck
PS...it does look alot better outside in natural lighting, but it was stormy the day I took the pictures and white doesn't reflect well on a cloudy day!!
|
|
|
Re: paint job on a budget!?
#22169
03/14/06 11:23 AM
03/14/06 11:23 AM
|
Joined: Jan 2006
Posts: 1,220
toronto canada
69chargeryeehaa
pro stock
|
pro stock
Joined: Jan 2006
Posts: 1,220
toronto canada
|
ok, here's the deal on the polishers, the random orbit low rpm polishers (under 4000rpm) take a long time to polish a given area. for example i would spend about 30 mins on the trunk lid of the charger. the high end ones that are just a spin type that are variable speed up to 10000rpm are hard to master, and granted work faster, they also have more potential to screw things up fast!!! the paint is not fully cured, and polishing it faster is just asking for trouble. the paint will heat up fast, and is eaisly burned. i would reccommend using the random orbit polisher and polishing compound for a beginner. the rubbing compound is too harsh for fresh paint. remember you have to take your time, patience is the key. both polishers achieve the same results, the only thing is that the random orbit <4000rpm takes longer, but there is no chance of burning thru the paint. don't push on the polisher, just use the weight of the polisher, maybe a tiny bit of pressure. keep the bonnet wet, i start by loading up the bonnet up with polishing compound, then work a 3'x3' area for about 2 mins, then i spray the bonnet with water in a spray bottle, then go back to polishing, i'd wet the bonnet about 3 times on a particular area, then when i'm finishing up i let it dry up a bit until it's done. even though i have some expirence with polishing i choose to use the random orbit polisher just because it's much eaiser to use, and you can basically do it blindfolded, the other polishers are just to powerfull, and eaisly screw all your work up fast if your not carefull. for bonnets i use the cotton cheese cloth bonnets and not the fuzzy buffing bonnets.
|
|
|
|
|


