|
 Re: Steps to Convert a 1970 440 4bbl to a Six Pack Setup
[Re: Alaskan_TA]
#562474
Re: Steps to Convert a 1970 440 4bbl to a Six Pack Setup
[Re: Alaskan_TA]
#562474
12/25/09 10:37 PM
12/25/09 10:37 PM
|
Joined: Nov 2006
Posts: 533
Williamsport, PA
Rob440Magnum
 OP
OP
mopar addict
|
OP
mopar addict
Joined: Nov 2006
Posts: 533
Williamsport, PA
|
Quote:
Step 1. Save up a bunch of money.
(LOL)
Ok step-1 is complete. Step-2 is place the order. Ok what's next?
|
|
|
Re: Steps to Convert a 1970 440 4bbl to a Six Pack Setup
[Re: 1_WILD_RT]
#562478
12/26/09 09:39 AM
12/26/09 09:39 AM
|
Joined: Jan 2003
Posts: 9,436
Blair County,PA
62maxwgn
master
|
master
Joined: Jan 2003
Posts: 9,436
Blair County,PA
|
Quote:
Automatic or 4spd?? If it's an auto unless your running a manual valve body, you'll need kick down (throttle pressure) linkage....
Boy am I glad you clarified the linkage terminology!  
|
|
|
Re: Steps to Convert a 1970 440 4bbl to a Six Pack Setup
[Re: 440abody]
#562482
12/26/09 11:08 AM
12/26/09 11:08 AM
|
Joined: Jan 2003
Posts: 42,714
Spokane Washington
ScottSmith_Harms
Mr Wizzard
|
Mr Wizzard
Joined: Jan 2003
Posts: 42,714
Spokane Washington
|
As far as steps, the above posters have pretty much called it. It's a very easy swap, just remove your current intake and replace it with the Six Barrel intake and start bolting on the pieces to complete it, it's pretty straight forward. As mentioned, if you buy new reproductions they tend to come out of the box on the lean side so be aware of that once you start adjusting your base settings.
I'd highly reccomend that you put a sharp tune on your car before starting the swap to eliminate non carburetor related gremlins when you do the swap, set your timing, check your vaccuum, make sure all of your other ignition componants are in good working order, etc. The last thing you want to do is chase your tail when tuning your six pack (which is not that difficult BTW).
As far as cost, it varies. I'd suggest making a shopping list and having a look around the internet, right here on Moparts is a good place to start, allot of vendors advertise here as well as other members selling new or used parts they no longer need, and of course ebay is a good place to shop as well.
Basic shopping list for a stock setup:
Intake manifold
Intake gasket set
Carburetors
Progressive carburetor linkage
Fuel lines
Vaccuum hose w/T-fitting
Carburetors
Carb base gaskets
Carb air cleaner gaskets
Carb air cleaner studs & wing nuts
Carb hold down bolts
Throttle cable
Throttle cable bracket
Throttle return spring bracket
Throttle return spring set
Coil braket
Idle stop solenoid
Throttle stud & nut
Automatic choke assembly
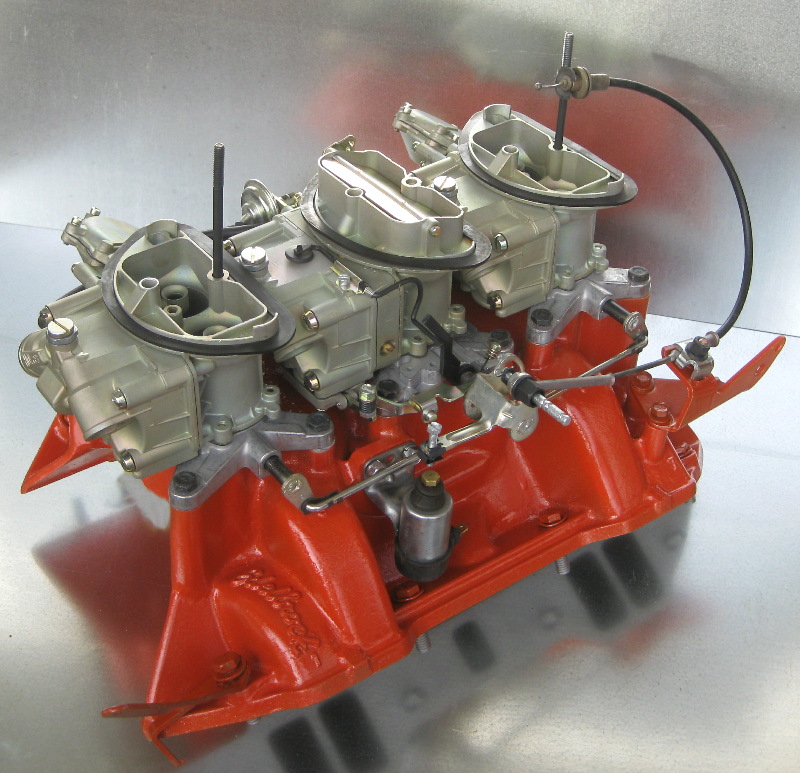
Air cleaner base
Air cleaner lid
Appropriate valve cover breather package for year of car
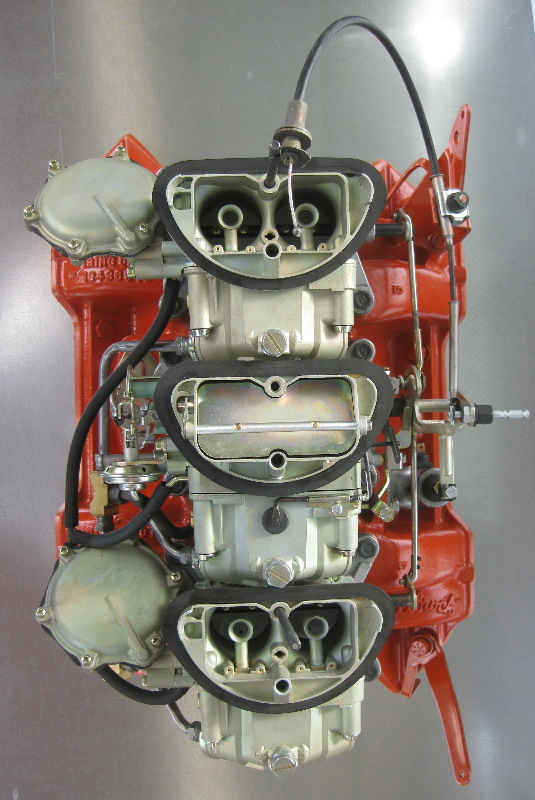
*Picture below shows a fairly complete setup off of a car for a better look.
|
|
|
Re: Steps to Convert a 1970 440 4bbl to a Six Pack Setup
[Re: Rob440Magnum]
#562485
12/26/09 12:42 PM
12/26/09 12:42 PM
|
Joined: Jan 2003
Posts: 75,036
U.S.S.A.
JohnRR

I Win
|
I Win
Joined: Jan 2003
Posts: 75,036
U.S.S.A.
|
Quote:
It's a 4 speed.
Should I buy the valley pan with the heat crossover's blocked off? Should I buy the paper gaskets to use with the tray?
Thanks, Rob
If you plan on running the stock thermostatic choke then you should not block off the heat crossover as it will take longer for the choke to open . as far as the papergaskets , some use them , some don't , some NEED them some don't ...
|
|
|
Re: Steps to Convert a 1970 440 4bbl to a Six Pack Setup
[Re: JohnRR]
#562486
12/26/09 01:04 PM
12/26/09 01:04 PM
|
Joined: Nov 2006
Posts: 533
Williamsport, PA
Rob440Magnum
OP
mopar addict
|
OP
mopar addict
Joined: Nov 2006
Posts: 533
Williamsport, PA
|
Quote:
If you plan on running the stock thermostatic choke then you should not block off the heat crossover as it will take longer for the choke to open
What if you buy the tray with the heat crossover blocked off but drill a 1/4" hole where the crossover is. Do you think that would help keep it running cooler and still allow the choke to work properly? Any suggestions?
This car will be for street use only.
|
|
|
Re: Steps to Convert a 1970 440 4bbl to a Six Pack Setup
[Re: Rob440Magnum]
#562488
12/26/09 02:15 PM
12/26/09 02:15 PM
|
Joined: Jan 2003
Posts: 75,036
U.S.S.A.
JohnRR
I Win
|
I Win
Joined: Jan 2003
Posts: 75,036
U.S.S.A.
|
Quote:
Quote:
If you plan on running the stock thermostatic choke then you should not block off the heat crossover as it will take longer for the choke to open
What if you buy the tray with the heat crossover blocked off but drill a 1/4" hole where the crossover is. Do you think that would help keep it running cooler and still allow the choke to work properly? Any suggestions?
This car will be for street use only.
Total waste of effort to do that , doesn't matter how small a hole you make but if you make it too small it will still take a long time to open and either way you'll be heating up the intake , which is fine till the engine is up to operating temp.
Just buy the std tray.
|
|
|
Re: Steps to Convert a 1970 440 4bbl to a Six Pack Setu
[Re: mickm]
#562489
12/27/09 04:18 AM
12/27/09 04:18 AM
|
Joined: Nov 2006
Posts: 511
Jasper, Indiana
fastnos
mopar
|
mopar
Joined: Nov 2006
Posts: 511
Jasper, Indiana
|
Here you go... Saved from previous 6-pack posts
macmic87-Moparts
here is some advice given to by another moparts member. a little lengthy, but if done in order makes a difference.
have to agree strongly with Mike(HPMike) I've been running six pack inductions for about 30 years now, sm blk, big blk, and even the custom 6 pak cast HEMI intake manifolds that I made for the 71 wingcars,.....I don't have anything but, sixpack cars,,,,,,,,I've rebuilt countless numbers of carbs, along with countless installations and tunings,....when there are troubles, it usally due to someone unfamilar with there tuning or functions, or attempts at trying to improve them,......which usally results in "problem" carbs, starting, stalling, flooding issuse!.....seeing your have "new" carbs/ set-uo,....I'd recommend you use a Carter street pump, don't use rubber hose, it's problems down the road!, use a factory style/ repro steel, or stainless steel fuel line kit,a good quality hi flow fuel filter, AFTER the pump!, not before!, you'll restrict the fuel flow, Factory style linkage, no junk progrssive/ mech linkage!, change out the brass side float screw on the fuel bowls (all 3 bowls) with Holleys clear sight plugs, this way you can see your float level, and no gas spills trying to adjust, their like $4 each,.....when setting the fuel level, I've found that it's best to bring it up to half the height of the clear sight plug, (can't do this with the brass sight screw!, unless you have X-ray vision, hence the need to install the clear plastic sights).....plus "if" you ever have a starting problem, just shaking the car side to side will slosh the fuel in the clear site, and you'll know wether or not you have fuel in the bowl,....after you have basically installed the set-up, and started the car, and set an acceptable idle after warm up, with the engine running, set the floats, start with the center carb, the slotted screw on top of the float adjuster, is just a lock screw, you can remove it for now, the 5/8" nut is the adjuster/needle seat nut, rotating it counter clockwise will raise fuel level in the bowl, clockwise will lower it, make small 1/2 turns let the car run a bit, check the fuel in the clear site window, half the window is ideal height, esp. in the front and rear carbs, when they dump in, you don't wanna lean the engine, which on a sixpack car, might "melt" a piston or two!....really!, been, there, done that!....after you set the fuel level in all 3 carbs, reset the idle on the center carb, by disconnecting the linkage on the end carbs, if your using an idle solenoid, make sure it's energized in the up position contacting the center carbs solenoid idle arm screw, set the desired idle, that keeps your car running, factory specs are a guide line, your cam, vacumm, etc, will affect your desired RPM range, after you establish this idle, this is what your car will run with, now de-energize the solenoid, using the idle srew located on the ceter carbs main throttle shaft, set the idle to a bare minimum running idle, this is were your throttle shaft will close down too when you shut off the car, and the idle solenoid de-energizes, if later you have shut down problems of the car desieling, (sputtering run on after shut down) keep lowering the idle screw on the center carb main shaft, untill this is condition is eliminated, the idle solenoid was added to maintain an idle, and allow the throttle blade to choke off the engine on shutdown if needed, when it de-energized, after your center card idle is set, now comes the fun, start the car, in idle, the front and rear carbs are still disconnected at their main throttle linkage, (important note: make sure no vacumm source is hooked up to the front and rear carbs when main linkage is disconnected, cause any reving you may do, might tip in a end carb! with vacumm!, and if you can't shut it down in time, you might lose an engine!....seen it done!)to properly set the fuel/ air mixture idle screws, start with the center carb, hook up a tach.......warmed up, good idle (low)....turn the fuel/ air mixture screws (2) located on each side of the center carb metering block, do one at a time, run it in slowly, until the engine begins to stumble, slowy back it out watching the tach needle, stop when you've obtained the highest rpm reading,....you can also do this with a vacumm gauge attached to MANIFOLD vacumm, I like to use both at the same time, ...repeat the process for the other side, when done, now re-do-it, again, just to confirm settings, now some of the end carbs, have their fuel idle screws "plugged" with lead, they are located in the base, in the front of the carb base plate, under the bowl, if plugged, dig out lead plug, most people think ones for fuel, ones for air , their not!, you'll adjust these screws just like the center carb, except you can't just use a vacumm/ tach gauge,....look into the top of the front end carb, you see 2 small projections in each bore on each side, just below the neck, these are the air bleeds, block off the outer bleed using your finger over the small tiny hole, with the motor running at idle (low), it should stumble or pick up in idle, when you block off, either outboard bleed, set the front carb first, pick a bore, left or right, with it's coresponding baseplate idle screw, block the bleed off with your finger,(make sure the carbs throttle plate is fully closed) do one side at a time, when you block the bleed, if the idle increases, too much fuel, remove your finger, turn the base screw on the side your blocking the bleed on, in, one turn, block the bleed again, listen for the idle, (you could use a tach gauge at this point), if it stumbles/ decreases, no fuel, back the base screw off a half turn, block the air bleed again see where the "idle" is,......keep adjusting in this fashion until there's no change in idle, no increase/ decrease, you now have the ideal fuel/ air ratio for the vacummm requirement on your motor, complete this for both sides of the front carb, shut off the motor, disconnect this carb remove it, re-install it in the rear,....install the rear carb, now in the front, adjust this carb like you did to the last one, after you hook up everything, now here's when most guys will balk at this move,....they'll insist the air/fuel mixture won't be 100% by moving the tuned front carb to the rear, well if your truly familiar with the sixpack set-up, you know getting to the rear carbs base screws is fustrating to say the least, unless your squeezeing every ounze of effeciency out of the motor, this technique is far better than leaving the factory setting/ lead plugs in, with is usally a lean set-up,,,,,,, after setting this relocated carb up, if you wish you can "play" trying to "tweak" the rear carb, this may include a round of removal the "tweak" the screws to obtain that last ounze of "tuning", I've yet to see a "tool", truly capable of fitting into the installed rear carbs "idle screws"......anybody?,
Well, when your "done" setting the air/ fuel "idle" mixtures on the end carbs, connect the end linkages, to the end carbs, do it with the idle solenoid energized, the rods are threaded were they join together on the center carb, they install on the end carbs with rod clips, there is a F/R or left?right handed clip, energize solenoid, do the front carb first, make sure the linkage is pulled far forward on the center carb secondary rail, thread the rod, in or out, until it fits nicely in the hole, then proceed to the rear, repeat this proceedure, now check the linkage for any binding, you should be able to chrack open (engine off!) the center car, WOT, and manually open both carbs by rotating the front carb throttle arm, close the center carb, check all linkage for binding, readjust if needed, now de-energize the idle solenoid, see if any bind is preventing the center carb from closing on the main throttle shaft idle screw, you may have to comprimise on some idle/ and or end carb linkage adjustments to have an ideal, functioning set-up, but once you take the time to do this, you'll appreciate your efforts!,....as far as altering the end carb secondary springs in the vacumm pods,.....I like a sixpack to come in quick,....you'll have to buy 2 sping kits, replace with the "white" springs if you want a quick responding set-up,....if you what a mid range set-up use the "yellow" springs,.....any thing in the brown or black range is worthless.,,,,,Hell I could write a book here, I probally have, if you have any other questions, PM me.......I wrote this for others, to utilize as well,.......
A True Hybrid: Burns Gas AND Rubber!
|
|
|
|
|


 and as said before,you might need a new air breather to your passenger valve cover with a extra connection on it
.JPG)