|
 Re: New Paint job on a budget thread Part III
[Re: Marq]
#38995
Re: New Paint job on a budget thread Part III
[Re: Marq]
#38995
09/07/09 10:51 PM
09/07/09 10:51 PM
|
Joined: Jan 2007
Posts: 13
toronto, ohio
andyoucankeepit

member
|
member
Joined: Jan 2007
Posts: 13
toronto, ohio
|
i think my first tries with this method last year were due to using window cleaner as the wipe instead of mineral spirits...
i was getting the same effect as the white panels shown.
i have really been soaking my rags with mineral spirits when wiping down, and haven't had a problem with it making paint separate...
i paint outside, only a few times IN the garage, and usually in the sun.
03 cobra, 85 mustang, 59 galaxie, 68 sportster
|
|
|
Re: New Paint job on a budget thread Part III
[Re: v8mirage]
#38997
09/08/09 05:27 PM
09/08/09 05:27 PM
|
Anonymous
Unregistered
|
Anonymous
Unregistered
|
Anyone here ever use Duplicolor's primers? I'm currently sanding down OG paint(not to bare metal)and doing some filler work. I'm mostly curious about Duplicolor's sandable and high build primers. Does the high build or sandable fill 80, 180, or 220 grit?
Can I sand the entire car with 80 then 220..then spray either the filler or high build primer?
I would then dry sand the entire car with 400 grit, then roll first coats of paint?
Last edited by toddyvol; 09/08/09 07:06 PM.
|
|
|
Re: New Paint job on a budget thread Part III
#38998
09/08/09 05:29 PM
09/08/09 05:29 PM
|
Anonymous
Unregistered
|
Anonymous
Unregistered
|
also 
|
|
|
Re: New Paint job on a budget thread Part III
[Re: joeshmo]
#38999
09/08/09 05:29 PM
09/08/09 05:29 PM
|
Joined: Nov 2008
Posts: 9
WA
Davemutt
member
|
member
Joined: Nov 2008
Posts: 9
WA
|
Quote:
Hey guys, long time follower, first time poster. I recently sanded down the rear half of car, I started with a whipe over of all the panels with goo-gone( a common household solvent) and soap and water. After I was satisfied with the clean, I sanded with 100, 150, 220, 320 and finally 400. It felt pretty smooth. I washed it down with smelly mineral spirits and then let it dry for 45 minutes. Since I had quite a bit of filler,I then rolled on a layer of rustoleum, clean metal primer (white colored stuff). I rolled it on with a 9" roller for some odd reason, it was just what I had around and it had a black foam cover thing on it. This was ultimately not the best idea as it gave it quite a bit of texture and was hard to maneuver. However, I saw no drips and the orange peel was very easy to deal with. I was satisfied with my result even though several places I had accidentally sanded down to bear metal when sanding down some more bondo I had put over the primer and then covered with rattlecan filler primer. So yesterday, I had cleaned the car and whipped down my panels with odor MS. Letting these dry for roughly half an hour, I mixed my rustoleum black *came in a quart* with mineral spirits till it seemed to be about the thickness of water *It ended up being about 60% mineral spirits*. I then rolled it onto my car with a 4 inch high-density roller. Instantly, I noticed a TON of bubbles which I needed to blow on very very hard to pop. So I tried chasing it with a 3" black foam brush. First thing I noticed were brush marks from the brush, it seemed to push the paint around too much and the primer underneath was exposed. It looked bad. So I decided not to chase it and see if I could just pop these bubbles with my roller, just rolling back over them with my roller. The roller seemed to even the paint out a bit but still left plenty of bubbles. This annoys me like crazy but I figured the bubbles would pop and self level. Well they did pop, but they seemed to leave thicker spots of paint around them so now it looks very blotchy. I also noticed I have tons of runs. In sanding out the runs and bubbles, I wetsanded with 400 grit like I did on the primer coat. This seems to cut quickly through the paint around the imperfections. it took a long time to get through the drips and bubbles and often cut straight through to the factory paint. I was using a block for most of this sanding. Also, the paint is not very even at all but seems to be alot better on verticle panels like my rear fenders rather than the hood lid. Any suggestions? I'm thinking thicker paint, any other ideas? Thanks for the help!
I've been using both a foam brush and a roller for the second pass and my experience is that the timing is critical and is dependant on which tool you're using.
If you're using a brush for the second pass then you should hit it immediately to avoid leaving brush strokes. If you do this and you're still getting brush strokes, then you're paint is probably too thick.
If you're using a roller for the second pass, its best to wait 3 - 4 minutes for the paint to begin to set. You want to use very light pressure to just pop the bubbles. If you start the second roller too soon, you'll just be creating more bubbles in the meantime.
Regardless of method, thin paint applied sparingly will reduce the amount of sanding and give a better finish. 
|
|
|
Re: New Paint job on a budget thread Part III
#39000
09/08/09 07:08 PM
09/08/09 07:08 PM
|
Joined: Feb 2006
Posts: 2,590
Piqua, Ohio
dodgeram440
master
|
master
Joined: Feb 2006
Posts: 2,590
Piqua, Ohio
|
Well, here is what I got. The fender on my truck has been sanded to bare metal with an electric orbital sander with 80 grit paper. Then the holes for the emblems have been welded in, ground down, and filled smooth with bondo. There were also some minor areas that also have a thin coat of bondo. These areas have all been block sanded with 80, 220, 400 grit paper with Rustoleum spray can primer between each working. After everything was done to my satisfaction, I rolled on 2 coats of Rustoleum Rusty Metal Primer, straight with no diluting. I haven't sanded this primer yet, I was going to wait til I'm ready to paint the whole truck, but the fender looks perfect. Absolutely no sanding marks at all and you can't even tell where the filler is. BTW, the hood was also sanded with 80 grit on the orbital, then straight to the Rusty Metal Primer rolled on with no sanding marks there either. 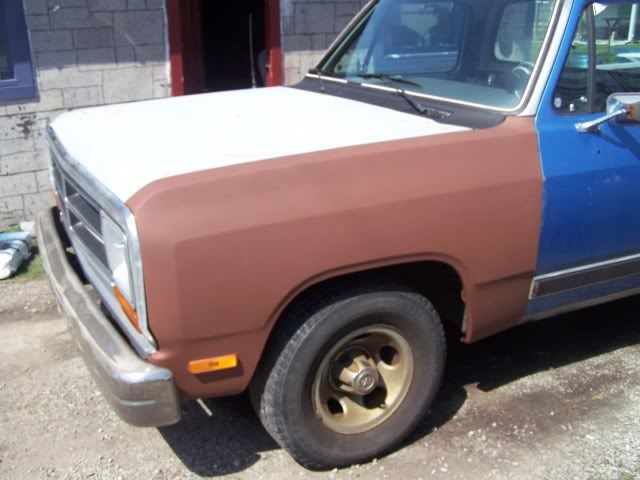 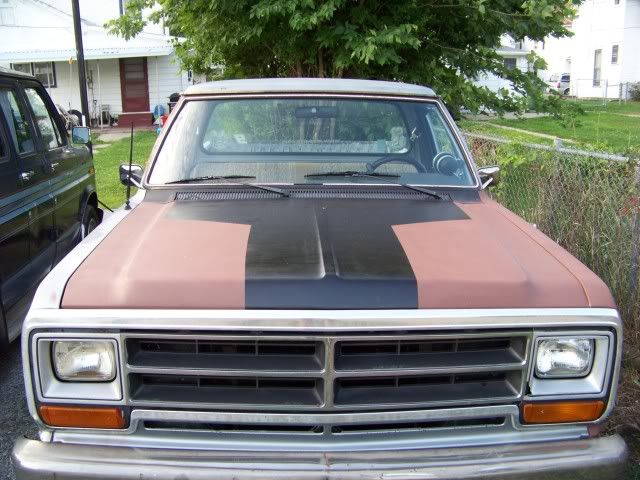
|
|
|
Re: New Paint job on a budget thread Part III
[Re: dodgeram440]
#39002
09/08/09 08:09 PM
09/08/09 08:09 PM
|
Anonymous
Unregistered
|
Anonymous
Unregistered
|
So I assume that I could use the rusty metal primer on painted surfaces that have been sanded down also?
My car is going to be white, wouldn't the red primer be hard to cover?
Does the Clean Metal Primer, which is white, work as well as the rusty metal primer?
|
|
|
Re: New Paint job on a budget thread Part III
#39004
09/08/09 11:46 PM
09/08/09 11:46 PM
|
Joined: Jul 2006
Posts: 44
USA
_Scott_
member
|
member
Joined: Jul 2006
Posts: 44
USA
|
Quote:
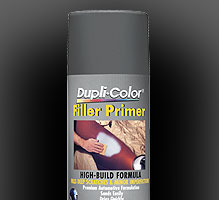
Anyone here ever use Duplicolor's primers?
I've used it. I was not impressed. I don't know how it compares to other rattle-can primers, but I suspect any primer that has to go through the nozzle of a rattle can isn't really "high build." It takes forever to dry and clogs up sand paper like crazy too.
Quote:
Can I sand the entire car with 80 then 220..then spray either the filler or high build primer?
Only use 80-grit to sand areas where the paint needs to be stripped off. If the paint is in OK condition and just needs scuffed up, go straight to 220, 240, 320. Any of those are ok for regular sanding.
Quote:
I would then dry sand the entire car with 400 grit, then roll first coats of paint?
Change that to _wetsand_ with 400.
Fine grits, 400 and above, clog up really quick when used dry. You'll find sanding with 400-wet to just work better.
|
|
|
Re: New Paint job on a budget thread Part III
#39005
09/09/09 07:23 AM
09/09/09 07:23 AM
|
Joined: Sep 2009
Posts: 66
NY
joeshmo
member
|
member
Joined: Sep 2009
Posts: 66
NY
|
Quote:
Anyone here ever use Duplicolor's primers? I'm currently sanding down OG paint(not to bare metal)and doing some filler work. I'm mostly curious about Duplicolor's sandable and high build primers. Does the high build or sandable fill 80, 180, or 220 grit?
Can I sand the entire car with 80 then 220..then spray either the filler or high build primer?
I would then dry sand the entire car with 400 grit, then roll first coats of paint?
I would not use high build primer anywhere that you don't have chips. When I used it, it filled in chips in my original paint very nicely but it did take a little while to sand down. I didn't notice any problems with clogging or the like, and it sprayed on pretty nice. Just make sure to clear the nozzle after each use and you should be okay. I don't recommend doing an entire panel with it however as it really does build and you'll have trouble keeping some of the original shape. Just my .
|
|
|
Re: New Paint job on a budget thread Part III
#39006
09/09/09 10:34 AM
09/09/09 10:34 AM
|
Joined: Feb 2006
Posts: 2,590
Piqua, Ohio
dodgeram440
master
|
master
Joined: Feb 2006
Posts: 2,590
Piqua, Ohio
|
Todd, yes you can use the primer on painted surfaces after sanding those surfaces first. And you can also use the clean metal primer instead of the rusty metal primer like I did. The reason I used the rusty metal primer is because I have some rust issues on my beater and even though I sanded the rust away, this primer is supposed to help seal it. Peck, the biggest reason to use primer over sanded painted surfaces is to provide a uniform surface to paint over. An example would be my truck. It is currently at least 5 different colors and each color would cause the paint to appear differently, especially with the first thin coats. If it was all one uniform color, the paint will cover more evenly. Also, the key is to not sand down to the base coat. 
|
|
|
Re: New Paint job on a budget thread Part III
[Re: dodgeram440]
#39007
09/09/09 12:41 PM
09/09/09 12:41 PM
|
Anonymous
Unregistered
|
Anonymous
Unregistered
|
Quote:
Peck, the biggest reason to use primer over sanded painted surfaces is to provide a uniform surface to paint over. An example would be my truck. It is currently at least 5 different colors and each color would cause the paint to appear differently, especially with the first thin coats. If it was all one uniform color, the paint will cover more evenly. Also, the key is to not sand down to the base coat.
This is exactly my issue, plus some bare metal.
Thanks, I'll try the clean metal primer. I'll roll it straight also.
|
|
|
Re: New Paint job on a budget thread Part III
#39008
09/09/09 03:50 PM
09/09/09 03:50 PM
|
Joined: Aug 2009
Posts: 51
CA
Peckinpah
member
|
member
Joined: Aug 2009
Posts: 51
CA
|
Sounds like a good plan. However, don't tell yourself, "Oh it's only primer, I don't need to be too careful laying it down."
That's what I did and wound up with a lot of drips and rough areas and roller marks. These areas take a week or more to dry all the way through (because the paint is so thick) so most of them didn't get sanded smooth.
As a result, not only do they show through my main coat, but I also kept sanding through to them while wet sanding later coats, and they really stuck out because my primer is a darker color. And once that happens, you have to try to build the paint back up to the same level as the surrounding paint and let it dry and that's an f'in nightmare.
So be really careful to avoid drips, roller marks and rough areas, and when it's dry, wet sand your primer as absolutely flat as you can get it, because believe me, any rough areas will definitely show through your main coat and cause big headaches. .
|
|
|
Re: New Paint job on a budget thread Part III
[Re: Peckinpah]
#39009
09/09/09 04:11 PM
09/09/09 04:11 PM
|
Joined: Sep 2009
Posts: 66
NY
joeshmo
member
|
member
Joined: Sep 2009
Posts: 66
NY
|
Quote:
Sounds like a good plan. However, don't tell yourself, "Oh it's only primer, I don't need to be too careful laying it down."
That's what I did and wound up with a lot of drips and rough areas and roller marks. These areas take a week or more to dry all the way through (because the paint is so thick) so most of them didn't get sanded smooth.
As a result, not only do they show through my main coat, but I also kept sanding through to them while wet sanding later coats, and they really stuck out because my primer is a darker color. And once that happens, you have to try to build the paint back up to the same level as the surrounding paint and let it dry and that's an f'in nightmare.
So be really careful to avoid drips, roller marks and rough areas, and when it's dry, wet sand your primer as absolutely flat as you can get it, because believe me, any rough areas will definitely show through your main coat and cause big headaches. .
I had good results in mixing my can of primer with mineral spirits, about a 10:2 dilution. It rolls on very nice and stays workable for a long time. No drips in my final coat, and this was with a 9 inch foam roller *shakes head*.
|
|
|
Re: New Paint job on a budget thread Part III
[Re: Peckinpah]
#39012
09/10/09 06:33 AM
09/10/09 06:33 AM
|
Joined: Sep 2006
Posts: 58
MD, USA
v8mirage
member
|
member
Joined: Sep 2006
Posts: 58
MD, USA
|
Quote:
Apparently when you're dealing with Armor All, something a bit stronger than Mineral Spirits is needed, but what?
Lacquer thinner!
|
|
|
|
|


