|
 Re: New Paint job on a budget thread Part III
[Re: Marq]
#38194
Re: New Paint job on a budget thread Part III
[Re: Marq]
#38194
04/20/08 11:50 PM
04/20/08 11:50 PM
|
Anonymous
Unregistered
|
Anonymous
Unregistered
|
Wow Marq, thank you for taking your time for the explanation about painting the undercarriage. You made a great point the possible use of a torch later on after painting the undercarriage.
I too would be interested in hearing what everyone else thinks in regards to the issue of using a torch on the undercarriage of a vehicle, after the undercarriage has been painted using Rust-Oleum.
Could any Rust-Oleum experts give their opinions on this?
|
|
|
Re: New Paint job on a budget thread Part III
#38195
04/22/08 04:37 PM
04/22/08 04:37 PM
|
Anonymous
Unregistered
|
Anonymous
Unregistered
|
Can anyone tell me or point me to a post that discusses the difference between the Rustoleum professional "high performance" paint as opposed to the qt size "Stops rust" paint. I am having a time trying to find the "high performance" sunburst yellow. The only place I've found it was acehardwareoutlet.com and they only sell it as 2 gallons. Would I gain anything by getting the "professional high performance" stuff.
|
|
|
 Re: New Paint job on a budget thread Part III
#38196
Re: New Paint job on a budget thread Part III
#38196
04/22/08 11:00 PM
04/22/08 11:00 PM
|
Joined: Apr 2008
Posts: 28
Molino, Fl.
ace250xr84

member
|
member
Joined: Apr 2008
Posts: 28
Molino, Fl.
|
I have been lurking for well over a year and I have read it all from the beginning. I do love MOPARS I just don't have one on the road anymore ( 1978 Volare, 1963 dart ) thats later projects. The current project 1988 OLD's delta 88 that I saved from the scrap heap But I need to make it look like it does not belong their anymore. The question I have for the GURU's of restoration  is how does the side molding come of this semi modern GM car without totaly shredding it.  I hope to be able post progress pics.soon The car is Fadded silver hardly any clear coat left anywhere and light surface rust on all top surfaces.  . The plan prime atleast all horizontal surfaces, maybe all and Rusto royal Blue. Thanks to all for this GREAT thread.
|
|
|
Re: New Paint job on a budget thread Part III
#38197
04/23/08 07:23 AM
04/23/08 07:23 AM
|
Joined: May 2006
Posts: 575
Canada
Marq
mopar addict
|
mopar addict
Joined: May 2006
Posts: 575
Canada
|
One of the best and most straightforward articles that I have read on wetsanding and buffering the paint job ( also known as color sanding ) is at : Automedia.com http://www.automedia.com/Color-Sanding_and_Buffing/res20030601cs/1    I hope everyone finds this as informative as I did... .
Last edited by Marq; 04/23/08 07:40 AM.
|
|
|
Re: New Paint job on a budget thread Part III
[Re: ace250xr84]
#38199
04/24/08 11:57 AM
04/24/08 11:57 AM
|
Anonymous
Unregistered
|
Anonymous
Unregistered
|
DAMN! I got some real bad luck here! For the past month, we haven't gotten any rain. So today I wake up extra early to work on my project. I go outside and check out the conditions. No rain clouds? check. warm temp? check. all signs were go. this time, I'm done with rusty paint and I bust out the interlux brightside black and start on the trunk. While prepping the surface, i looked up for rainclouds and looked good so far. I start to lay down the BS paint. this paint is THICK, like tar thick, lol. I was really tempted to mix some mineral spirits with it. but i was told I didn't have to do so. well, the first coat gave complete coverage and sure enough, I had orange peel, not much though.I'm hoping when I sand it with 600g and when it dries, it'll get rid of the orange peel. or maybe i didn't squeeze the excess paint before rolling? I went to triple check the weather online. So after painting, i went inside for about 30 min. ate breakfast and went to weather.com. turns out we had %30 chance of scattered rain clouds. so I go outside to see dark clouds out in the distance and the ground wet. i ran over to my car and saw this  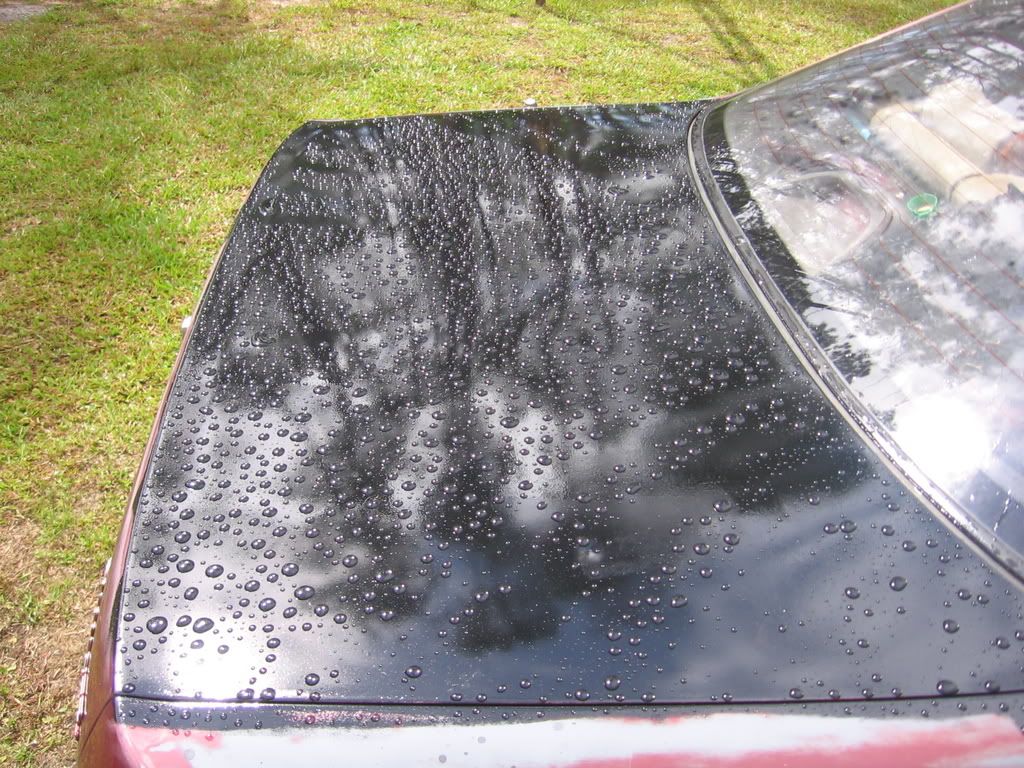 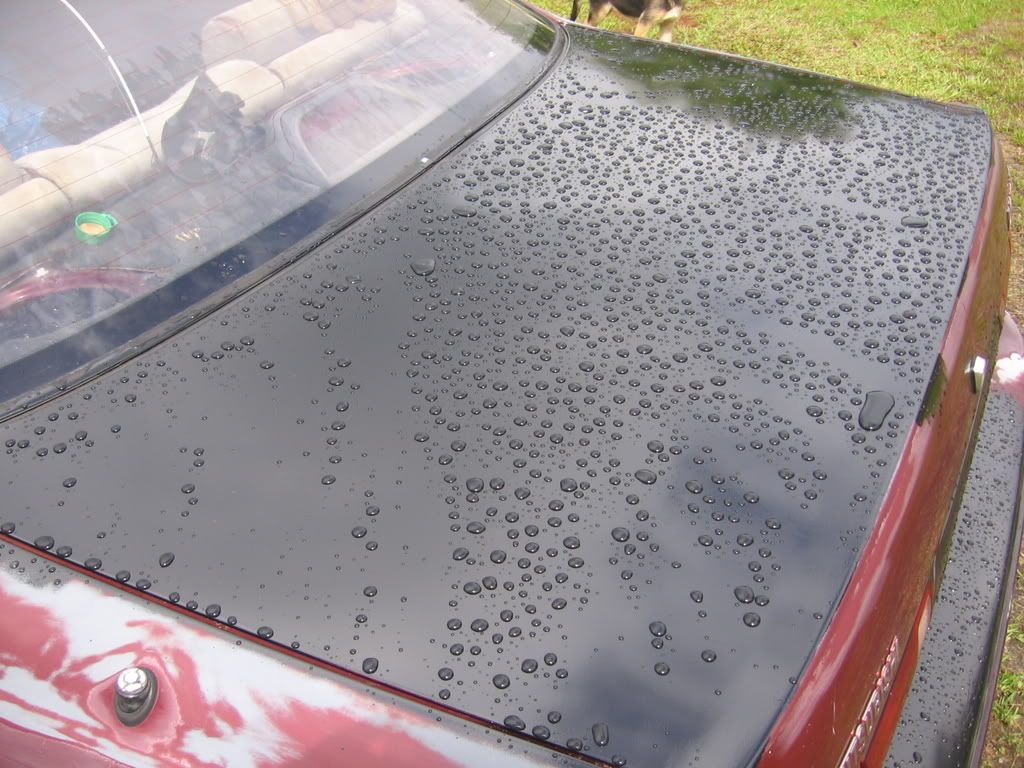 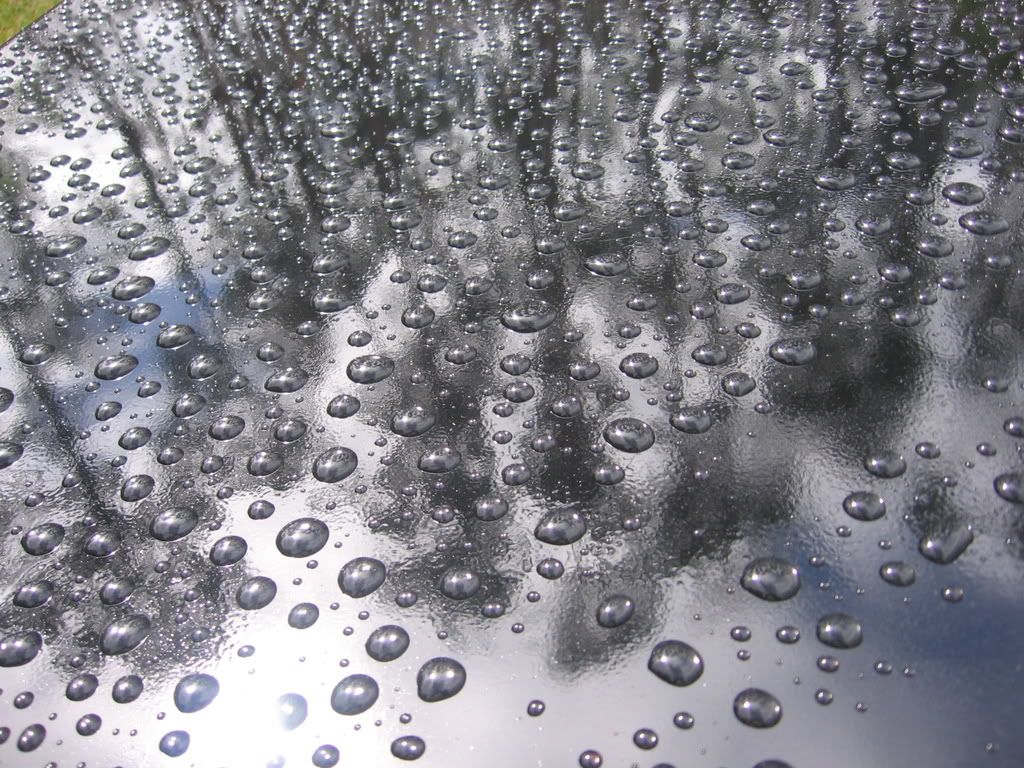  in those 30 min while i was inside, it rained. I go outside to find it sunny.
|
|
|
Re: New Paint job on a budget thread Part III
[Re: 69DartGT]
#38201
04/24/08 06:54 PM
04/24/08 06:54 PM
|
Anonymous
Unregistered
|
Anonymous
Unregistered
|
ok... Long time reader, first time poster.
I have decided to roller my '79 Fiat Spider (hi, Dwight!) with a combination of Hunter Green and Sunburst Yellow in an attempt to get Green Go.
I grew up in Mopars- my first six cars were Mopars ('67 Coronet, 66 Polara, 75 Cordoba, 71 Charger RT, 70 'Cuda, and a 90 Dakota)... Add in my brother's 71 Duster, my best friend's 72 Charger and 71 Challenger, and we bleed Mopar!
Anyway, I'm partial to the Green Go color, even though I never had a car that color.
The paint I'll be using is Rustoleum's regular paint, since I don't see a suitable green or yellow to mix on their website. Are the techniques the same for using the regular Rustoleum as opposed to the Professional Rustoleum?
Al
(Splitting time between Vegas and Houston)
'79 Fiat Spider2000
|
|
|
Re: New Paint job on a budget thread Part III
#38202
04/24/08 09:45 PM
04/24/08 09:45 PM
|
Joined: May 2006
Posts: 575
Canada
Marq
mopar addict
|
mopar addict
Joined: May 2006
Posts: 575
Canada
|
Quote:
The paint I'll be using is Rustoleum's regular paint, since I don't see a suitable green or yellow to mix on their website. Are the techniques the same for using the regular Rustoleum as opposed to the Professional Rustoleum?
Al
(Splitting time between Vegas and Houston)
'79 Fiat Spider2000
Hi Al... yes both paints are quite similar and you use the same techniques for both...
.
|
|
|
Re: New Paint job on a budget thread Part III
[Re: Blackstone]
#38203
04/24/08 11:28 PM
04/24/08 11:28 PM
|
Joined: Apr 2008
Posts: 28
Molino, Fl.
ace250xr84
member
|
member
Joined: Apr 2008
Posts: 28
Molino, Fl.
|
Your right about being a good cumfy ride sometimes it is hard to believe it is front wheel drive it really rides like a big car and the 3800 V6 is strong and tuff. The whole body work prep and paint has me alittle nervous. My last attempt at body work was in the late 80's on the 63 dart project I never finished but I did get it painted with no real idea ( I was still in High school )at what I was doing 5 gal. of bondo, wire screen, fiberglass, cheap spray gun, cheap paint, osfo disaster,,,, Lets just say it was not to good. I will say that I redid the dash (metal) with a spray bomb two tone krylon I think and it looked awsome atleast compared with rest of the car.
|
|
|
Re: New Paint job on a budget thread Part III
[Re: ace250xr84]
#38204
04/26/08 12:27 AM
04/26/08 12:27 AM
|
Anonymous
Unregistered
|
Anonymous
Unregistered
|
hey all... long time lurker... first post. Found this thread through the nastyz28.com forums and have read avidly. I must say... this is the greatest idea in a LONG time, and I am quite glad to have happened upon it! I picked up my 1981 Camaro for $75. Non-running, has not been registered since 1994 with 130k miles on it. The poor car had been horrifically tagged when I got it. I went about doing all the necessary body work, which in actuality was minor. The hardest part was getting off the spray paint... but now I am seeing I didn't even need to do that! :O However... I am glad to have gotten it all smooth for the experience, and my peace of mind. I then proceeded to roll on the ACE Rust Stop flat black in a THICK coat, which I let dry for 2 days here in the AZ sun, wetsanded with 600, and now have put on 2 coats of the blue..... the results are nothing less than extraordinary!   This is how it looked when I started.....  I look forward to doing my 1991 Camaro RS convertible next!
|
|
|
Re: New Paint job on a budget thread Part III
#38205
04/26/08 05:15 AM
04/26/08 05:15 AM
|
Anonymous
Unregistered
|
Anonymous
Unregistered
|
New to the board, but I've been reading quite a bit about rolling on paint on a car. It's great to see a way to get a paint job without having to get a second mortgage out on a house.
Anyway, I have to ask what's likely a stupid question. Never painted a car before and the car I'd like to paint has faded and had the clear coat coming off with the paint underneath going too, showing bare metal in spots. I drive it to work every day and was hoping I could get some advice on whether I should do take up this project on my days off and it'd be fine to drive to work and back without messing the whole thing up, or would it only be possible to make this project work if I found alternate transportation and parked this car while I painted?
Either way, it's going to get done. If all goes well, I've got a '56 Studebaker Transtar pickup I'd love to finish the bodywork on and paint up.
|
|
|
Re: New Paint job on a budget thread Part III
#38206
04/26/08 02:11 PM
04/26/08 02:11 PM
|
Joined: May 2006
Posts: 575
Canada
Marq
mopar addict
|
mopar addict
Joined: May 2006
Posts: 575
Canada
|
Quote:
New to the board, but I've been reading quite a bit about rolling on paint on a car. It's great to see a way to get a paint job without having to get a second mortgage out on a house.
Anyway, I have to ask what's likely a stupid question. Never painted a car before and the car I'd like to paint has faded and had the clear coat coming off with the paint underneath going too, showing bare metal in spots. I drive it to work every day and was hoping I could get some advice on whether I should do take up this project on my days off and it'd be fine to drive to work and back without messing the whole thing up, or would it only be possible to make this project work if I found alternate transportation and parked this car while I painted?
Either way, it's going to get done. If all goes well, I've got a '56 Studebaker Transtar pickup I'd love to finish the bodywork on and paint up.
The biggest advantage of doing the car without making use of it between painting stages, is that you would lessen a lot of the additional cleaning up and 'remedying' prior to the addition of the next coat of paint.
For example, lets say you put a coat of paint on the car on Friday night. Let it dry and do a second coat on Saturday morning. Let it dry and maybe do a third light coat of paint on Sunday.
At this point you would not want to do a wetsanding - BECAUSE - you plan now to drive it as it is for the next Monday to Friday.
When the next Friday evening comes along, you would at that time do your wetsanding that you skipped the week earlier. The reason for this is that by driving the car through the week you have added dead bugs and just about everything else that can flip up on to your car during your weekday driving. So this wetsanding would do two jobs.. it would be your time to smooth out the surface of any roughness - while at the same time removing the surface layer of the previous coat of paint that all the road crap 'contaminated'.
So on that second Friday you would do the wet sanding, lay on the next coat of paint, let it dry til the next day and then add the next coat of paint.
Now... if it happens that some areas of the car are masked off with newspaper or tape - you may find that you will be adding and removing that tape at the beginning and finishing of each painting sesssion. I don't think any of us would want to bear the embarrasment of driving down the road with painters masking tape all over our cars. But then again, it would be such a ghetto look that it might start a new car fashion trend ( sort of like those guys who wear baseball hats with the price tags still attached - or who wear pants so low down to their knees that although questionably fashionable, it presents a real problem when they are trying to run from the police hahahhah ).
So I guess it is "do-able'... you just have to plan ahead a bit for the debris, rain, squirrels, tree and bird droppings, flying insects and other nasty things that will land on your coats of paint.
The advantage of the car sitting in one place is that you are not under the gun to complete the task and you are not exposing the freshly dried paint to potential contaminants. In the end, this means less actual work for you - in that you are not having to take three steps forward and one step backward each week due to circumstances beyond your control.
Overall, if the car sits in one place... you would have the ability to make use of a few hours each weekday when you come home from work, to add a coat of paint.. or to wetsand.... etc. Overall, this could reduce the amount of actual 'downtime' of not having your car to drive. You might be able to get the real grunt work down over a two week period instead of spreading it out over a four or six weeks of part time painting..
But as we have seen earlier in this thread... there have been some 'daily drivers' that have been used all while coats of paint were being applied. I recall a white Camaro that added his paint and did his work each day when he drove to College. Prior and after going to class he did his work in the College parking lot.
So it is 'do-able' - it just takes a different type of planning - to plan the logical steps of doing the painting to fit your 'daily drivers' actual time that it is required to be on the road and being driven.
Last edited by Marq; 04/26/08 02:33 PM.
|
|
|
Re: New Paint job on a budget thread Part III
[Re: Marq]
#38207
04/27/08 02:50 AM
04/27/08 02:50 AM
|
Anonymous
Unregistered
|
Anonymous
Unregistered
|
That all was exactly what I was thinking. I just was curious if I needed to allow the paint to cure for so long before letting it take the chance in the elements. I don't mind an extra sanding session every weekend and considering that the boat paint sounds terribly promising on cutting down the number of coats, I may well jump into this. Don't mind if my car looks less than par in between the weekends anyway since it's not exactly A-class style at the moment anyway. Still, once all is said and done, should I let the last coat cure for a while before driving it about? I would imagine an overnight setting then a final buffing. Should that then sit for a week or would it be good to go after another night setting? Thanks so much for all the info, btw Marq. I noticed you've been an incredible help to so many already. Then again, makes me wonder if you have too much to do with so many very detailed replies. 
|
|
|
Re: New Paint job on a budget thread Part III
#38208
04/27/08 06:52 PM
04/27/08 06:52 PM
|
Anonymous
Unregistered
|
Anonymous
Unregistered
|
Hey guys I had a question. Part of my car is already bare metal while parts of it still have the old paint of when it was first bought. Now im told to prime the bare metal part only but I'm not sure if that will really level out the surface of the car. Also, its almost impossible doing it that way for my car because the bare metal parts of the car are random so it would be impossible to mask it off and then only prime those parts. I was wondering if I could priming the entire car (so I would be priming the bare metal parts and the already painted parts) layer by layer that eventaully they would both become the same shade of the primer colour (which would tell me that they are now level). Will this idea work or does anyone have any other ideas/solutions on this one? Many thanks   P.S I did use a paint stripper (came in spray form) from my local Canadian tire (the only thing they had to strip paint) and it didn't work out that well. If anyone has used a certain product/chemical that worked amazingly, please do tell!
Last edited by ripthejacker; 04/27/08 07:41 PM.
|
|
|
Re: New Paint job on a budget thread Part III
#38209
04/27/08 11:30 PM
04/27/08 11:30 PM
|
Joined: May 2006
Posts: 575
Canada
Marq
mopar addict
|
mopar addict
Joined: May 2006
Posts: 575
Canada
|
Quote:
Still, once all is said and done, should I let the last coat cure for a while before driving it about? I would imagine an overnight setting then a final buffing. Should that then sit for a week or would it be good to go after another night setting?
Thanks so much for all the info, btw Marq. I noticed you've been an incredible help to so many already. Then again, makes me wonder if you have too much to do with so many very detailed replies.
Well... I would try to plan my weekend painting schedule so that one coat goes on Saturday in the morning... and the second coat goes on Sunday in the morning. This would give that second coat the rest of Sunday and the early morning hours up to when you drive to work on Monday to dry.
When you reach the point were you have gotten to the 'last' coat of paint I would let that coat sit on the car for a week or two before going to the final wetsanding, polishing, waxing and buffing stage. The key reason for delaying that final stage is to let the paint fully evaporate and get hardened. It would be great if you got a few clear days where the final coat of paint could be left out in the sun to get some additional baking. The reason we don't want to rush to that final finishing up stage is that the waxing will be sealing up the surface. If there are any gases still evaporating from the curing paint, it will cause the waxed surface to whiten slightly - which will require further polishing and waxing to get rid of.
I don't mind slapping out as much info as I can when I try to answer a question. In a way it saves me work, because it sometimes will answer or explain other questions that might arise if I just gave a skimpy answer. ( and that fact that I type at 240 words a minute makes it no big deal to try to give a full explanation ). If the more detailed answer ends up answering other peoples questions, then I have saved myself from some future typing 
.
|
|
|
Re: New Paint job on a budget thread Part III
#38210
04/28/08 12:04 AM
04/28/08 12:04 AM
|
Joined: May 2006
Posts: 575
Canada
Marq
mopar addict
|
mopar addict
Joined: May 2006
Posts: 575
Canada
|
Quote:
Hey guys I had a question. Part of my car is already bare metal while parts of it still have the old paint of when it was first bought. Now im told to prime the bare metal part only but I'm not sure if that will really level out the surface of the car. Also, its almost impossible doing it that way for my car because the bare metal parts of the car are random so it would be impossible to mask it off and then only prime those parts. I was wondering if I could priming the entire car (so I would be priming the bare metal parts and the already painted parts) layer by layer that eventaully they would both become the same shade of the primer colour (which would tell me that they are now level). Will this idea work or does anyone have any other ideas/solutions on this one? Many thanks
P.S I did use a paint stripper (came in spray form) from my local Canadian tire (the only thing they had to strip paint) and it didn't work out that well. If anyone has used a certain product/chemical that worked amazingly, please do tell!
The short answer ( as if I have ever done that... ) is that you should get out your powersander with a nice 180 or 240 grit paper on it and sand down the surfaces to narrow the gap between the edge of the old paint and the areas where it is already bare metal. This will at the least feather the edges so that they blend in and are not so prominent.
Then I would probably use the Brightside primer ( which you can roll on ) to lay down a coat of primer over the entire surface. Now.. the reason I am specifying the Brightside primer in this instance is that it is thicker when rolled on then some of the areosol spray bomb primers which go on pretty thin. This would be your best shot at getting the bare metal surface to level off with the sanded painted surfaces.
Once you roll on your first coat of the Brightside primer you can let it dry and then put the car under some sunlight and start inspecting to see if you were able to get one level surface coating where you can't detect where the bare metal layer was and the sanded painted surfaces were.
IF you are able to spot slight differences in the elevations of the two surfaces, I would be tempted to lay down a second coat of the primer.
At this point you would have 100% color coverage of the primed surfaces and enough of a build up of primer so that you could now wetsand the primer with a nice 1200 grit wet sanding paper to smooth out the surface.
I would probably want to put the wet sanding paper on something wide and flat - with a bit of firmness to it. The idea here is that you want the wetsanding paper to maintain a wide flat surface for when it is in contact with the primered surface. IF you used a flexible backing or too small a surface the wetsanding would ride up and down between any surface deviations and not really help the situation any. But with the wider and firmer wetsanding, it will be spread over a wider surface and tend to produce a smoother overall surface.
Imagine this : YOu are on a bicycle and you ride the bike into a pothole. The odds are that the thin bike wheel or tire will drop down in to the pothole. BUT if you had a nice wide low profile car tire on your bike, like a 235 x 50 x 15, it would tend to ride over the pothole and give you a smoother ride. So in the example about the wetsanding, you won't be riding the 'potholes' ( if any ).
But I suspect with two coats of Brightside primer rolled on to your car there will be sufficient build up of primer that there probably won't be much in the way of potholes.
IF you go with a spray on primer, I don't think I could guarantee that you would be happy with the results. It simply can't lay down a thick enough layer of primer.
And to answer your other question... primer tends to 'build up'. That means when you are spray primering, it is building up the bare metal surface at the same rate that it is building up the painted surface. So they tend to go up in height similarly, leaving the original difference in surface elevation still visible. AND if you go and spray extra primer on the metal surface to try to level it up with the painted surface, what you will notice is that it tends to crack as it dries. ( the only way to avoid that is spread out that type of spray over a couple of days so that each previous days priming has fully dried ).
Just to confirm some other questions :
Yes you can substitute the liquid Rustoleum/Tremclad primer for the Brightside primer when rolling.
Yes... you can use either primer with either type of paint. There are no problems in compatibility.
AND don't forget that you can add 15% of paint to your primer to help get it started at pre-coloring the primer for when you start actually using that color of paint on the car. Be sure to allow a little extra time for drying when you are adding that tinting touch of paint to the primer.
OH... and bye the bye... the only canned paint stripper that I can think of that would really rip the old paint down to metal is AIRCRAFT PAINT STRIPPER... That can rip a paint down to metal pretty quickly BUT IT IS NASTY stuff to work with. That stuff eats rubber, hands and driveways.
Because you mentioned that you had attempted to use a 'stripper' on your old paint - I would strongly suggest :
a ) take a bucket with some dish detergent in it and warm water. Take a clean cloth and wash down the car thoroughly. I know it will look funny to your neighbors giving your patchy looking car such a loving sudsy washing... but do it. Then rinse it down like you were planning to eat your dinner on it... !
b ) once it dries, give the entire body a really thorough wiping down of the surface of the car with a rag that is damp with mineral spirits.
You really have to take this extra bit of effort to assure yourself that NOT A HINT OF that previous stripper remains embedded or absorbed in your old paint or in the old exposed primer. The dang spray stripper stuff is at this point a potential contaminant that may have an effect on your primering or painting. So be Mr Clean and get that surface contaminant free before you get moving on to the next stages..
.
Last edited by Marq; 04/28/08 12:11 AM.
|
|
|
Re: New Paint job on a budget thread Part III
#38211
04/28/08 12:59 AM
04/28/08 12:59 AM
|
Joined: Jul 2006
Posts: 44
USA
_Scott_
member
|
member
Joined: Jul 2006
Posts: 44
USA
|
Quote:
If anyone has used a certain product/chemical that worked amazingly, please do tell!
Years ago, 20+, I used this stuff:
http://www.3m.com/US/auto_marine_aero/Bondo/catalog_item0969.html?itemNbr=235
At least that's the closest I could find to what I remembered using. I tried a lot of other chemical paint stripper products, and nothing else came close to working as well.
That said, unless you have several paint jobs worth of paint to remove, three or more, you are usually better off sanding. Everywhere you strip chemically, still has to be sanded. If you leave any trace of stripper residue, the new paint on top will do something you don't like. That goes for all the lesser stripper products too.
If you apply stripper to paint, and that paint doesn't all come off, then it must be completely removed because it has absorbed some of the stripper and will cause problems later if painted over.
I would say that there are few cases where chemical strippers are less work than just sanding.
|
|
|
Re: New Paint job on a budget thread Part III
[Re: _Scott_]
#38212
04/28/08 10:15 AM
04/28/08 10:15 AM
|
Anonymous
Unregistered
|
Anonymous
Unregistered
|
Thanks guys. If i do use brightside, and god forbid I am not able to level it out, I assume I'd have to go to the extent of sanding down my whole car down to metal. To do this, I was thinking of using a orbital sander with an 80 grit disk. Then once that is done (is 80 grit okay?) Now i know before I prime the metal has to be sanded but wouldnt it already be sanded with the 80 grit disk or do I need to sand again? And then I would prime, and then etc. A friend of mine showed me the idea as atelast 60% of my car is bare metal :/. And when I do prime, do I only need one coat since the tremclad has its own primer in it anwaysor would I need more than once coat of primer?
|
|
|
|
|


 did you notice 78 in the back ground it's been off the road for about 6 years