|
 Re: Paint job on a budget!? CONTINUED..page 44........
#26818
Re: Paint job on a budget!? CONTINUED..page 44........
#26818
01/30/07 12:17 PM
01/30/07 12:17 PM
|
Anonymous
Unregistered
|
Anonymous
Unregistered
|
Okay, one question for the roller boys. My Satellite I bought last year was painted black by the previous owner with a brush. It's pretty bad. You can still see the brush streaks, orange peel everywhere, more runs than a Reds game, and the original sherwood green metallic can be seen in a lot of spots. I'm thinking that since I don't know what kind of paint this is and it's such a bad job that I should just go ahead and sand down to the original paint and start from that point. I think that it's a bit more work, but it should vastly improve the quality of the new roller paint job. What would you guys do? 
|
|
|
Re: Paint job on a budget!? CONTINUED..page 44........
#26819
01/30/07 12:31 PM
01/30/07 12:31 PM
|
Anonymous
Unregistered
|
Anonymous
Unregistered
|
Hoosier. I would do exactly as you said, unless you have major dings or body work to correct. If you do, you are going to have to go to bare metal to get the bondo to stick and I found leveling it after a guide coat was a bit harder than if I had completely stripped the whole surface to metal in the first place.
If the old paint is well bonded and you trust it and don't go the bare metal route, I would only worry about gettting it smooth by wetsanding. Rustoleum sticks to almost anything. I would be cautious, however about getting too much cumulative paint thickness on the car. That will make it easier to chip.
Last edited by smyrna5; 01/30/07 12:36 PM.
|
|
|
Re: Paint job on a budget!? CONTINUED..page 44........
#26820
01/30/07 01:12 PM
01/30/07 01:12 PM
|
Anonymous
Unregistered
|
Anonymous
Unregistered
|
Thanks Smyrna. Come to think of it, I may have to wait and see what I find underneath this black attack of the whacked out paint brush. I just found painted over duct tape on the right rear wheel hiding a bad rust hole. I know duct tape is used for everything, but this stretches the imagination! It looks like I just may have to go to bare metal and see what's left of the original steel. Well, if you're gonna do it, do it right.
|
|
|
Re: Paint job on a budget!? CONTINUED..page 44........
#26821
01/31/07 01:38 AM
01/31/07 01:38 AM
|
Joined: May 2006
Posts: 575
Canada
Marq

mopar addict
|
mopar addict
Joined: May 2006
Posts: 575
Canada
|
Quote:
I did a wet sand on it and it came up good, so I will continue on. What I found was that the thinned paint was thickening up in the container. Is the list consensus that this is because I have used odorless mineral spirits as "Mike Da Wrench" has suggested - no offense Mike, I appreciate the feedback and I am just polling a larger sample size.
The main difference between the odorless mineral spirit and the 'regular smelly' mineral spirits is the evaporating time.
The reason the odorless mineral spirit is odorless is that it evaporates more slowly. Hence less smell gets into the air in a short time.
The regular mineral spirit evaporates more quickly and hence it evaporates a denser concentration of smell into the air during the same period of time.
With regards to how this all impacts your roller job... the quicker the spirit evaporates the quicker you will have a dry and hardened surface to work on.
The odorless mineral spirit does the same job as the regular mineral spirit - BUT you have to allow a lot longer for the drying time between coats of paint.
IF you apply 'another' coat before the previous coat has adequately dried, you will find orange peel occuring.
The last FAQ to the mineral spirit topic is to make sure that it is 100% mineral spirit that you are using. There are a number of products in the stores that 'mention' mineral spirits on the container - BUT - the mineral spirit is only a component of the thinner. So just make sure it is 100% mineral spirit.
In the case of the Brightside paint... you are better off using the genuine thinner that is sold by Interlux for the thinning of Brightside paint. However, you can get away with the 100% pure mineral spirit with the Brightside IF you can't get your hands on the thinner by Interlux for their Brightside paints.
.
|
|
|
Re: Paint job on a budget!? CONTINUED..page 44........
#26822
01/31/07 01:47 AM
01/31/07 01:47 AM
|
Joined: May 2006
Posts: 575
Canada
Marq
mopar addict
|
mopar addict
Joined: May 2006
Posts: 575
Canada
|
Quote:
Another question. I always thought that you should knock the shine off paint before applying another coat over it. The instructions here are to do 2 coats before wet sanding, but do you knock the shine off in between the 2? I have been, and I am wondering if it is unnecessary with the Rustoleum Pro; I have a lot of car left to do.
This is one of those yes and no type answers...
Yes.. you could knock the shine off EACH layer IF you wish. That would ensure better adhesion of each of the layers of paint. However, you would have to knock the shine off, wipe the surface down with a cloth dampened in mineral spirit, let it dry, wipe it down with a tack cloth after it is thoroughly dried and then add your next layer of paint.
BUT NO you don't have to knock the shine off each coating. Since you are applying the next coat onto a fairly fresh and dry coat of paint, there is no problem with adhesion. The new coat is able to bond well enough with the previous coating.
I think the rule of always knocking the shine off before painting applies more to when you are painting on to an OLD LAYER of paint or an older shiny surface. In that case the sanding of the shiny surface serves to provide adhesion AND to rid the shiny surface of any contaminants that may have embedded in the original layer.
.
|
|
|
Re: Paint job on a budget!? CONTINUED..page 44........
[Re: Marq]
#26823
01/31/07 02:11 AM
01/31/07 02:11 AM
|
Anonymous
Unregistered
|
Anonymous
Unregistered
|
well I have read every page of this thread so I feel I can now get into the conversation without rehashing old details. by the way this thread is amazing and 69 charger (or is it Mr. Porsche now) you're the man.
I am interested in the roll on primers, has anyone used them yet. These products were mentioned early in the thread. I have prepped many cars for paint (worked at a body shop as sanding/primer dummy to cover my bill for all my wrecked cars) and painted a few so I am pretty particular about my prep work even on a beater. Im wanting the body to be right before using the roll on method instead of discovering flaws later and having to repaint as some members here have had to do. any info on the roll on primers would be appreciated.
Ill be doing some test panels this summer to get the method down most likely with briteside and different primers.
I am surprised that none of our members across the border have set up an way to ship tremclad to the states. briteside seems to give the best results but the ability to mix colors leads to using rustoleum. the results with rustoleum that ive seen here have been good but the tremclad seem superior to it and gives the ability to mix colors. Id be interested in any info on briteside color mixing that has been done.
im intersted to see if a black basecoat/primer would darken up the red briteside some compared to a white base coat.
|
|
|
Re: Paint job on a budget!? CONTINUED..page 44........
#26824
01/31/07 07:41 AM
01/31/07 07:41 AM
|
Anonymous
Unregistered
|
Anonymous
Unregistered
|
Quote:
well I have read every page of this thread so I feel I can now get into the conversation without rehashing old details. by the way this thread is amazing and 69 charger (or is it Mr. Porsche now) you're the man.
I am interested in the roll on primers, has anyone used them yet. These products were mentioned early in the thread. I have prepped many cars for paint (worked at a body shop as sanding/primer dummy to cover my bill for all my wrecked cars) and painted a few so I am pretty particular about my prep work even on a beater. Im wanting the body to be right before using the roll on method instead of discovering flaws later and having to repaint as some members here have had to do. any info on the roll on primers would be appreciated.
Ill be doing some test panels this summer to get the method down most likely with briteside and different primers.
I am surprised that none of our members across the border have set up an way to ship tremclad to the states. briteside seems to give the best results but the ability to mix colors leads to using rustoleum. the results with rustoleum that ive seen here have been good but the tremclad seem superior to it and gives the ability to mix colors. Id be interested in any info on briteside color mixing that has been done.
im intersted to see if a black basecoat/primer would darken up the red briteside some compared to a white base coat.
Maybe I missed something somewhere, but my understanding from reading the thread multiple times is that Rustoleum and Tremclad are basically the same paint. Any difference in the quality of the paint jobs is probably due to the rollee. It is also my understanding that the Company no longer mixes colors for either Rustoleum or Tremclad. If I am wrong about that, someone please correct me, as I make frequent trips to Canada and don't mind stopping in a Canadian Tire store and a Canadian Post Office.
I agree that Brightside seems to give a superior finish at a higher but still low price and less hassle than a regular sprayed on finish.
Regards.
|
|
|
Re: Paint job on a budget!? CONTINUED..page 44........
#26825
01/31/07 10:50 AM
01/31/07 10:50 AM
|
Joined: Jan 2003
Posts: 12,405
Southern, Ca.
69DartGT
moparts member
|
moparts member
Joined: Jan 2003
Posts: 12,405
Southern, Ca.
|
Quote:
I am interested in the roll on primers, has anyone used them yet
indyjps
I used rustoleums brown rusty metal primer in the bed of my truck, I used a foam brush for the tailgate it was off at the time and foam roller on the inside of the bed. Both went on easy and laid down flat without runs orangepeel etc. I used it straight out of the can no thinning.
Not sure thats what you had in mind but it is primer 
|
|
|
Re: Paint job on a budget!? CONTINUED..page 44........
#26826
01/31/07 02:45 PM
01/31/07 02:45 PM
|
Joined: May 2006
Posts: 575
Canada
Marq
mopar addict
|
mopar addict
Joined: May 2006
Posts: 575
Canada
|
Quote:
Id be interested in any info on briteside color mixing that has been done.
im intersted to see if a black basecoat/primer would darken up the red briteside some compared to a white base coat.
IF you use the Interlux primer for Brightside, it comes in blue/gray or white. So yes, the blue/gray color will help give a darker overall look to the Brightside Red paint that is coated on it. BUT one nice feature of the Brightside primer is that you can ADD up to 25% of the Brightside paint to give the primer color a push towards the color you will subsequently be painting over the primer.
In my case, I supplemented the blue/gray primer with the 25% Brightside fire red. The main advantage to this initial push is that it gives the final paint job more depth.
As I was typing this... I realized that what I COULD HAVE DONE is use a 25% Brightside Black paint with 75% Brightside primer. That would have laid an even darker sub-surface for the subsequent Fire Red paint layers that would be painted.
BUT please note that you can only toss the Brightside Black paint in with the 'blue/gray' primer. DO NOT try later to put black or any other color PAINT in with the Fire Red PAINT as it will end up resulting in a pottery or poo poo brown color.
IF you use a 'white' Brightside primer coat, the end result will be that your Fire Red paint layers will end up with a more 'Firey Orange' appearance when the sun is beating down on it.
.
|
|
|
Re: Paint job on a budget!? CONTINUED..page 44........
[Re: Marq]
#26827
01/31/07 06:51 PM
01/31/07 06:51 PM
|
Anonymous
Unregistered
|
Anonymous
Unregistered
|
"The last FAQ to the mineral spirit topic is to make sure that it is 100% mineral spirit that you are using. There are a number of products in the stores that 'mention' mineral spirits on the container - BUT - the mineral spirit is only a component of the thinner. So just make sure it is 100% mineral spirit."
Good info, thanks. Any comment on using VM&P Naptha with the Rustoleum Pro? I understand that it flashes faster. I ask because I went looking for 100% mineral spirits and could only find the odorless version that I have.
.
|
|
|
Re: Paint job on a budget!? CONTINUED..page 44........
[Re: Marq]
#26828
02/01/07 01:39 AM
02/01/07 01:39 AM
|
Anonymous
Unregistered
|
Anonymous
Unregistered
|
Can I get a quick refresher on wet sanding? After reading the entire thread I am of the belief that this may be the most critical aspect of the process in order to get a smooth glosssy final finish.
So, two coats and wet sand with 400 or 600; 2 more coats and wet sand with 600, 2 more and wet sand with 1200-1500. But how do you sand? in one direction? circular? And how do you know when you are getting close to going through the most recent coat? When do you stop?
I bet these are basic questions but it would help to know.
|
|
|
Re: Paint job on a budget!? CONTINUED..page 44........
#26829
02/01/07 01:57 AM
02/01/07 01:57 AM
|
Anonymous
Unregistered
|
Anonymous
Unregistered
|
thanks for the hlep guys. The primer I was wondering about was the roll on that was marketed to body shops to be used instead of spray on primer/surfacer. it seems like a lot of the color sanding being done with the roller method is actually sanding that levels the paint and helps smooth the body. I want my primer to be perfectly flat prior to roller paint. I am thinking of using this paint on a 63 impala and I think the briteside red is going to be too bright for this car, i was looking more for a maroon/dark red so I guess ill have to experiment with the briteside mixing and see how it goes.
|
|
|
Re: Paint job on a budget!? CONTINUED..page 44........
#26830
02/01/07 03:48 PM
02/01/07 03:48 PM
|
Anonymous
Unregistered
|
Anonymous
Unregistered
|
Ok so I want this color exactly:  With the brightside paint tinted to this color. Do I need a primer? And if so what color should I do?
|
|
|
Re: Paint job on a budget!? CONTINUED..page 44........
#26831
02/01/07 07:51 PM
02/01/07 07:51 PM
|
Anonymous
Unregistered
|
Anonymous
Unregistered
|
it seems to be trial and error to get a color match with briteside. so get a few quarts and start mixing. Marq should chime in on the best method of mixing.
|
|
|
Re: Paint job on a budget!? CONTINUED..page 44........
#26832
02/01/07 09:36 PM
02/01/07 09:36 PM
|
Joined: May 2006
Posts: 575
Canada
Marq
mopar addict
|
mopar addict
Joined: May 2006
Posts: 575
Canada
|
Quote:
Ok so I want this color exactly:
With the brightside paint tinted to this color. Do I need a primer? And if so what color should I do?
Sadly there isn't a sea foam green in the can for Brightside. The ONLY green color that Brightside offers is : Sea Green Y4247. But to my eyes it is a dark jade green.
The good news is that you want a light and lofty green color... and so you should be able to use a blend of the Sea Green Y4247 and White Y4359.
The current color on your car leans more heavily towards the white... and so I would suspect that you will probably need a 1, 2 or 3 parts green to 10 parts white ( something in the range of 10% to 25% green to white ).
So the experiment you would have to do is this : Get about 20 Q Tip swabs, a bright white chunk of card board, one can of white and one can of green.
Take one Q Tip and dip it in the green paint. Now go and place ONE DROP of the GREEN paint in NINE different spots on your white cardboard.
For this mixing experiment you can think of the cardboard as being like a painter's pallete.
Ok... now take a fresh Q Tip cotton swab and dip it into the WHITE paint.
Next to the first Green drop, place ONE drop of the White paint. ( this is a 50/50 mix )
Next to the next Green drop, place TWO drops of the White paint. ( this is a 33% green to 66% white mix )
Next to the next Green drop, place THREE drops of the White paint. ( this is a 25% green to 75% white mix )
Next to the next Green drop, place FOUR drops of the White paint. ( this is a 20% green to 80% white mix )
Next to the next Green drop, place FIVE drops of the White paint. ( this is a 16% green to 84% white mix )
Next to the next Green drop, place SIX drops of the White paint. ( this is a 14% green to 86% white mix ).
Next to the next Green drop, place SEVEN drops of the White paint. ( this is a 12.5 green to a 87.5% white mix )
Next to the next Green drop, place EIGHT drops of White paint. ( this is an 11% green to an 89% white mix )
And lastly.. next to the last Green drop, place NINE drops of White paint. ( this is your 10% green to a 90% white mix ).
NOW... take a CLEAN Q Tip cotton swab and blend the first two color samples together. Take another clean cotton swab and blend the next two color samples together. Keep grabbing a new cotton swab for each of the remaining color samples.
Hopefully by the time you reach the last blended sample, you will have a rainbow of different shades of Green, going from a darker blend to a lighter blend.
That paint pallete will give you your first visual representation of what the blend ratios will give you.
And you should now also have NINE cotton swabs with each of them having the different blends on them. IF you happen to see a few of your samples that look somewhat 'close' you can take the 'closest' swaps and rub them onto your car's paint job. After all, you are going to be sanding it later, so it doesn't matter about the three or four small splotches of blended paint that you will dab onto the car's paint.
This will give you your second visual confirmation about how close the blended mix is.
My last tidbit of advice on this color mixing experiment is to leave your paint samples out to dry for several days before you make a final decision on what percentage mix is going to be closest to the end result that you want. My reason for suggesting this is that when the paint has dried it may shift a shade or two in color. This is normal for most paints that go on in one color and yet dry in a slightly different color. So by delaying your decision about which color sample best matches your desired end result, you will probably end up with something that will ultimately dry closer to what you are hoping to achieve.
NOW.... as for your car... I would probably lean towards using the WHITE Brightside primer. This will provide a bright and light undersurface for whatever Brightside paint you will later apply over it.
And remember that you can also add some of the Green paint to the white primer. Brightside says to not put more than 20% Brightside paint in with the Brightside primer. BUT based on the paint pallete you will have created already, you will have a pretty accurate idea of what percentage of Brightside paint that you can add to the Brightside primer and still fall within range of the end color that you are hoping to end up with.
Sorry for the essay... but I wanted to clearly explain this process all the way through so that you can envision the process and understand the logic for these steps.
.
Last edited by Marq; 02/01/07 09:46 PM.
|
|
|
Re: Paint job on a budget!? CONTINUED..page 44........
[Re: Marq]
#26833
02/01/07 11:13 PM
02/01/07 11:13 PM
|
Anonymous
Unregistered
|
Anonymous
Unregistered
|
Having tried to do my mixing experiments with both q-tips and an eye dropper and even a calibrated plastic beaker, I would suggest a more accurate and more satisfactory method.
Get yourself a small (1/4-1/2 tsp size) stainless steel measuring spoon. It is both more accurate than drops off a q-tip and easier to clean than plastic. After each dip of paint swish it around in some mineral spirits and wipe it off with a paper towel. I used my wifes stainless steel measuring spoon set from the kitchen, but mums the word on that.
Last edited by smyrna5; 02/01/07 11:15 PM.
|
|
|
Re: Paint job on a budget!? CONTINUED..page 44........
#26834
02/02/07 01:16 AM
02/02/07 01:16 AM
|
Joined: Jul 2006
Posts: 44
USA
_Scott_
member
|
member
Joined: Jul 2006
Posts: 44
USA
|
Quote:
this may be the most critical aspect of the process in order to get a smooth glosssy final finish.
Assuming all the prep work under the paint is up to par, then yes, the wetsanding is critical to a good end result.
Quote:
So, two coats and wet sand with 400 or 600; 2 more coats and wet sand with 600, 2 more and wet sand with 1200-1500.
That should work.
Quote:
But how do you sand? in one direction? circular?
The direction is not that important. What is important is that you are sanding uniformly and not allowing anything to dig into the paint. If you use a sanding block, it's possible for the edges of the block to cut faster than the center area and if you are sanding parallel to those edges, they will dig in. I don't mean to discourage the use of a block, but be very conscious of where the pressure is and how much paint you are removing at all points of contact.
Quote:
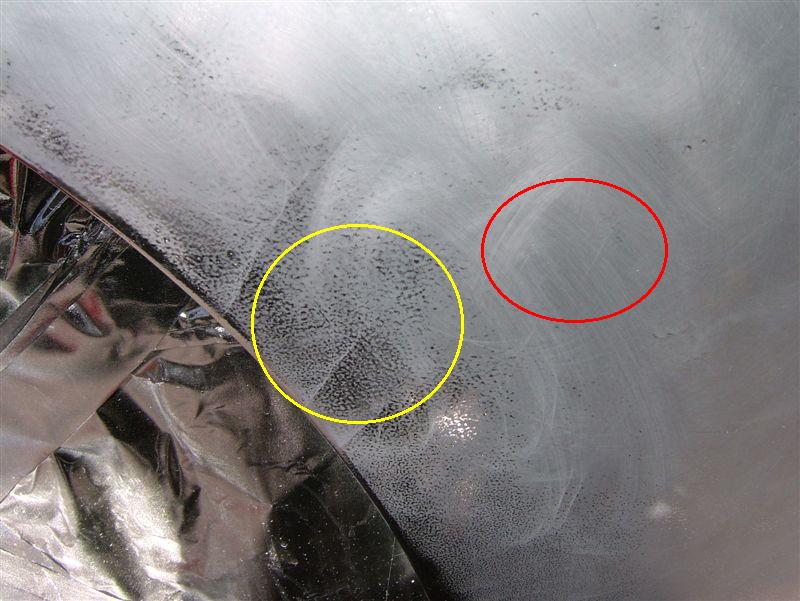
And how do you know when you are getting close to going through the most recent coat? When do you stop?
At first you'll find that with a light sanding the surface will look like the area in yellow. Keep sanding until it is uniformly smooth like the area in red. No more and no less.
And... regarding the mixing of paint, precise ratios are usually achieved by weighing the additive colors as they are added to the main color on a very precise scale.
|
|
|
Re: Paint job on a budget!? CONTINUED..page 44........
[Re: _Scott_]
#26835
02/02/07 02:26 AM
02/02/07 02:26 AM
|
Anonymous
Unregistered
|
Anonymous
Unregistered
|
The orange peel on the hood, roof, & trunk is getting more pronounced with time. I haven't done a final colorsand/buff with 1500 yet but it's to the point that I wonder if 1500 will be enough to knock it down. It's shiny I don't want to lose that trying to get it flat. Do I need to sand it flat & paint another THIN coat or will wetsand/compound/buff/wax bring it back to this level? 
|
|
|
Re: Paint job on a budget!? CONTINUED..page 44........
#26836
02/02/07 09:27 AM
02/02/07 09:27 AM
|
Anonymous
Unregistered
|
Anonymous
Unregistered
|
Quote:
The orange peel on the hood, roof, & trunk is getting more pronounced with time.
I haven't done a final colorsand/buff with 1500 yet but it's to the point that I wonder if 1500 will be enough to knock it down.
It's shiny
I don't want to lose that trying to get it flat.
Do I need to sand it flat & paint another THIN coat or will wetsand/compound/buff/wax bring it back to this level?
You have a choice to make. If you keep putting paint on it without sanding it smooth the orange peel and those waves and ripples you see in the picture are going to keep getting more pronounced, as you have noticed. It is possible to get a very wavy and orange peely surface that is shiny. If that is what you want just keep painting. If you are happy with it now, just stop.
I know it is tempting to want to hold on to the shine, even when the surface is clearly not flat enough for a really nice job. At least it was for me, as well. However, the shine will come back each time you add a new coat to a smoothed surface, or after you wet sand then polish.
With my my tests I think 2-4 coats of Rustoleum without sanding the final coat look almost as good as a cheap Maaco paint job, if not better. They don't however look like a mirror until you do the proper sanding work.
Are you thinning your paint enough? I found that when I put my on too thick I ended up with the ripples you are seeing. I think I agree with you that you are probably not ready for 1500 until you get those ripples out, but I am only judging from the picture.
Last edited by smyrna5; 02/02/07 09:39 AM.
|
|
|
Re: Paint job on a budget!? CONTINUED..page 44........
[Re: Marq]
#26837
02/02/07 01:46 PM
02/02/07 01:46 PM
|
Anonymous
Unregistered
|
Anonymous
Unregistered
|
Quote:
Quote:
Sadly there isn't a sea foam green in the can for Brightside. The ONLY green color that Brightside offers is : Sea Green Y4247. But to my eyes it is a dark jade green.
The Brightside I have is called Norfolk Green and it looks quite a lot like this. 
|
|
|
|
|


