|
 Re: Paint job on a budget!? CONTINUED..page 44........
#24898
Re: Paint job on a budget!? CONTINUED..page 44........
#24898
06/30/06 08:06 PM
06/30/06 08:06 PM
|
Anonymous
Unregistered
|
Anonymous
Unregistered
|
|
|
|
Re: Paint job on a budget!? CONTINUED..page 44........
#24899
07/01/06 01:53 AM
07/01/06 01:53 AM
|
Joined: Jul 2003
Posts: 3,378
Rancho Cordova, CA
Exit1965

master
|
master
Joined: Jul 2003
Posts: 3,378
Rancho Cordova, CA
|
Quote:
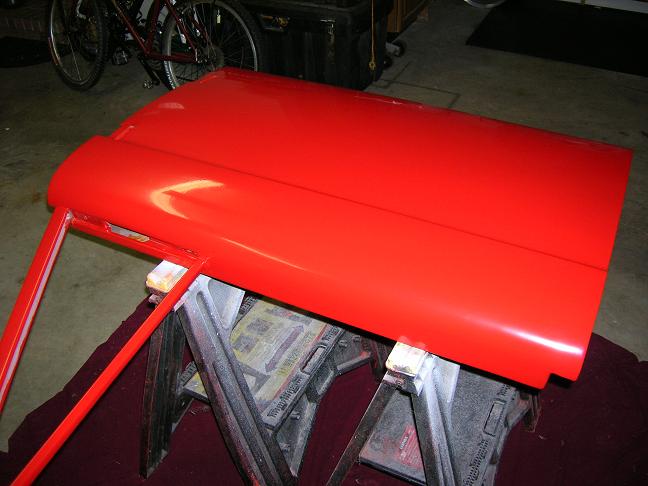
Edge, your paint job looked amazing and caused me to pick the same color. I have just finished the one door (in case it did not turn out too well) but I will start on the rest of the truck this weekend (1970 Ford Bronco). I am very happy with the results. The pictures are with the 6 coats per the original instructions and I have yet to wetsand and polish the final coat. I figure I will wait until I finish with the rest of the truck and then wetsand the final coat on the whle truck at the same time.
Thanks again for this tip and keep up the great progress. One of the best threads I have read in a while.
Bill
Edge? If that's me, thanks for the compliment! 
Looks like you've got the technique down. Did you paint it as it sits or was it vertical like a door would be? I only ask because people tend to practice on things that are laying flat, but really the tough part is painting something that's not flat and keeping it from running and avoiding orange peel too.
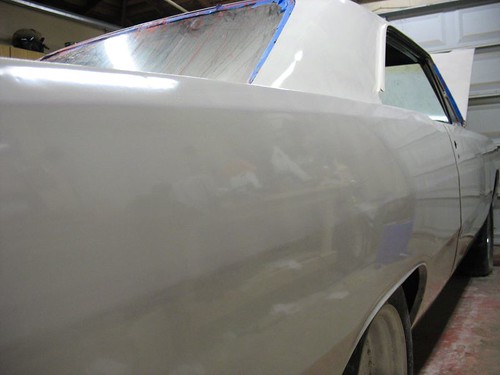
well i just put on the 3rd coat. I took this pic after painting the roof and driver's 1/4 panel, but before painting the driver's door and fender. So there's the difference one coat makes. The white is going on nice and smooth, and it seems to go on fine at higher temps (above 80+) as long as the mixture of mineral spirits and paint is right, which tonight was pretty thin.
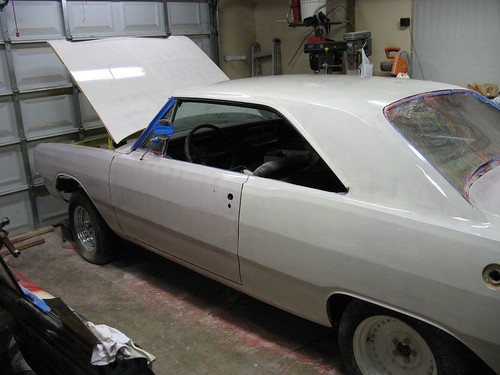
this one makes it look like it's more solid color that it actually is at this point.

|
|
|
 Re: Paint job on a budget!? CONTINUED..page 44........
[Re: Exit1965]
#24900
Re: Paint job on a budget!? CONTINUED..page 44........
[Re: Exit1965]
#24900
07/01/06 07:34 AM
07/01/06 07:34 AM
|
Anonymous
Unregistered
|
Anonymous
Unregistered
|
Sorry, meant Exit  Long day. Yes I did paint it on a horizontal surface instead of vertical as it would normally sit. I think it is better to start this way to get the feel of the roller and fine tune the mixture of the mineral spirits. I also found that I always had to error on the side of more mineral spirits. Color is Safety Red, Rustoleum Professional Series, Duplicolor 100% Mineral Spirits (NOT low oder) that I got from Advance Auto, and I am using a spray can of Safety Red to get into areas that would be too hard with a roller.
|
|
|
Re: Paint job on a budget!? CONTINUED..page 44........
[Re: Exit1965]
#24901
07/01/06 07:35 AM
07/01/06 07:35 AM
|
Anonymous
Unregistered
|
Anonymous
Unregistered
|
Hi again everyone its been a while sinced i painted my trunk lid black. Goods news i am going to paint my whole car gloss white. I am painting the car because I was hit I think a couple of hours ago by a dirt bike in the city streets(i know why would someone ride a dirt bike in the city street dumb
) As i was turning left the guy thought he was superman and decided to run the stop sign going 35 and hits me. Buts it cool tried to hit and I hit him back with my club alls well.
Anyways this is to Exit how many coats are you planning to do with the canvas white?
|
|
|
Re: Paint job on a budget!? CONTINUED..page 44........
#24902
07/01/06 09:36 AM
07/01/06 09:36 AM
|
Joined: May 2006
Posts: 575
Canada
Marq
mopar addict
|
mopar addict
Joined: May 2006
Posts: 575
Canada
|
If it's Saturday... then it must be 'pictures as promised day'. Ok... I drove the McLaren out into the daylight and here are some pictures of TWO COATS of BRIGHTSIDE (by Interlux). This is WITHOUT WETSANDING and after letting the car dry overnight from its 2nd coat of paint. I am sorry if the pics are a bit large... but for some reason if I make the pictures smaller or at a lower resolution my camera distorts things. At least these pics will let you know how things turn out when you paint Brightside over Tremclad     Today I plan on wetsanding this puppy to prepare it to receive its THIRD coat of BRIGHTSIDE. I am very confident at this point that it will ONLY take THREE coats of paint to complete this. Marq .
|
|
|
Re: Paint job on a budget!? CONTINUED..page 44........
[Re: Marq]
#24905
07/01/06 11:24 AM
07/01/06 11:24 AM
|
Joined: Jun 2006
Posts: 30
Ohio
pdqvsix
member
|
member
Joined: Jun 2006
Posts: 30
Ohio
|
Marq, How much paint did it take to do those 2 coats? The car looks great!  Thanks,
|
|
|
Re: Paint job on a budget!? CONTINUED..page 44........
[Re: Marq]
#24908
07/01/06 01:54 PM
07/01/06 01:54 PM
|
Joined: Jun 2006
Posts: 30
Ohio
pdqvsix
member
|
member
Joined: Jun 2006
Posts: 30
Ohio
|
Thanks Marq,for the info. I guess i will continue with the Rustoleum paint project since i've already bought everything to complete it and the cost is very low. The closest place i could find that carries the Brightside paint is 60 miles away and costs $32.99 per quart and since my car is average size and at one quart per coat that would be out of my budget right now. It is good to know there is another paint that can be applied with a roller and brush and have great results with though,maybe next time if i do it again i'll try it.
Last edited by pdqvsix; 07/01/06 01:57 PM.
|
|
|
Re: Paint job on a budget!? CONTINUED..page 44........
[Re: pdqvsix]
#24909
07/01/06 02:59 PM
07/01/06 02:59 PM
|
Anonymous
Unregistered
|
Anonymous
Unregistered
|
New question:
Has anyone tried to use the rattlecans to paint an entire panel? My parking area is extremely dusty, so any paint wiht a long drying time (>4 hours) gets absurd amounts of contaminants.
|
|
|
Re: Paint job on a budget!? CONTINUED..page 44........
#24910
07/01/06 11:35 PM
07/01/06 11:35 PM
|
Anonymous
Unregistered
|
Anonymous
Unregistered
|
Quote:
New question:
Has anyone tried to use the rattlecans to paint an entire panel? My parking area is extremely dusty, so any paint wiht a long drying time (>4 hours) gets absurd amounts of contaminants.
yes, check the honda-tech.com link i posted some guy in their painted his whole hood with the rustoleum/tremclad black...it looks just as glossy and good of a job as u doing it with the roller.
|
|
|
Re: Paint job on a budget!? CONTINUED..page 44........
[Re: Marq]
#24912
07/02/06 12:40 PM
07/02/06 12:40 PM
|
Anonymous
Unregistered
|
Anonymous
Unregistered
|
I think a saw it somewhere, but can't find it now. Can you recomend an order of painting? I'm guessing
1) Door Jams, Inside of Trunk and Hood (Rattle Cans)
But after that I'm unsure....any suggestions?
Also, for a car with good, but old paint...you suggest scuffing with 320 prior to painting or another finer grit?
Thanks for the help
|
|
|
Re: Paint job on a budget!? CONTINUED..page 44........
#24913
07/02/06 12:59 PM
07/02/06 12:59 PM
|
Joined: Jul 2003
Posts: 3,378
Rancho Cordova, CA
Exit1965
master
|
master
Joined: Jul 2003
Posts: 3,378
Rancho Cordova, CA
|
Quote:
I think a saw it somewhere, but can't find it now. Can you recomend an order of painting? I'm guessing
1) Door Jams, Inside of Trunk and Hood (Rattle Cans)
But after that I'm unsure....any suggestions?
Also, for a car with good, but old paint...you suggest scuffing with 320 prior to painting or another finer grit?
Thanks for the help
I asked the same question in the original thread (in the archive now). 69charger gave the order he painted his car, I think it started with the hood and decklid. I tried that the first time, and now I just kind of go in a strange order that I've been using on the, 12+ coats I've done since then:
roof then along the top of both 1/4 panels, then driver's 1/4 panel, then psgr 1/4 panel, then psgr door, then cowl, then hood, then psgr fender, then driver's fender, then driver's door, then the rear window area and deck lid.
Not sure why but that's just the way I've done it.
With all the wetsanding and coats you're going to put on it, 320 will work fine, you could probably do fine with 240 but 320 will be nicer.
As far as painting the door jambs/around the trunk and hood openings etc., you might opt to do that all at once instead of doing it while you're rollering. personally im focusing on teh body first then i'll get to the door jambs after the hard part is done 
|
|
|
Re: Paint job on a budget!? CONTINUED..page 44........
[Re: Exit1965]
#24914
07/02/06 04:40 PM
07/02/06 04:40 PM
|
Anonymous
Unregistered
|
Anonymous
Unregistered
|
I've got to be another person to say that Charger is doing great things for the car community with this. Nothing like painting your own car and being sure of the quality.  Well it's been a long four days of reading but I have successfully read from page 1 to now and I feel like I have an encyclopedia of information in my head. I have everything I to start on my test peice (the fender off a 47 Jeep) except for the mineral spirits. Because of all the debate I have seen, I am going to be using the regular mineral spirits but have only found it at sherwin-williams for 12.99 a gallon. I'm hoping to find it cheaper elsewhere. I know Kelly Moore has it but they don't have any store here in the East. I have gotten nearly all my questions answered by reading this but still have a question about the sun. I know there was a discussion about letting the paint dry for a few hours then pull it out into the sun to harden. Is this a good idea or are most people keeping the car inside the entire job? Also, is everyone agreed that we shoudl wait a few weeks to do the final polish? And if so, do you apply the 6th coat and wait then wetsand and polish weeks later or apply the 6th coat, wetsand and then polish weeks later. So far these are the only details I have left before I start tomorrow night. I'm going to be trying the Hunter green and since no one has posted pictures of it completed, I'm kinda anxious to see how well it will look on my camaro. I'm iffy about it but the original color is turquoise and I don't want to go with too extreme of a change. Heck, at only $25 a gallon, I can redo it if I end up hating it. Forgot one more question, what is the suggested polisher, 6" or 10". I just bought the 10" but am wondering if the 6" will give me more control. Charger, I thought I read that u used the 10". If so, how would you go about doing around the windshield and the tighter areas. I feel like the 10" will be easier to stand for hours holding onto only because of the handles on the sides and there is more weight to keep it under controls.
Last edited by FarFire70; 07/02/06 04:45 PM.
|
|
|
Re: Paint job on a budget!? CONTINUED..page 44........
[Re: Marq]
#24915
07/02/06 07:39 PM
07/02/06 07:39 PM
|
Anonymous
Unregistered
|
Anonymous
Unregistered
|
Quote:
To do one coat on the McLaren with the Brightside it takes about 1/2 to 2/3's of a one liter can ( roughly equal to 1/2 to 2/3rd of a quart can.
I would suspect that on an 'average' size car ( like a Dart ) with a ROOF it would probably take one full can per coat.
In the case of Charger's Charger... it would probably take 1 1/3 can because those cars had a lot of surface area to cover.
.
Im going to use this paint you speak of. im going to get 4 quarts of Steel Gray and paint my car. I was thinkin of maybe getting:
3 quarts of steel gray
1 quart of black
and mixing all 4 cans for a gunmetel colorish paint. what do you think?
|
|
|
Re: Paint job on a budget!? CONTINUED..page 44........
#24916
07/02/06 07:59 PM
07/02/06 07:59 PM
|
Joined: Jul 2003
Posts: 3,378
Rancho Cordova, CA
Exit1965
master
|
master
Joined: Jul 2003
Posts: 3,378
Rancho Cordova, CA
|
Farfire- good question about waiting to wetsand or waiting to polish. The reason to wait is so that the paint is hard enough to polish out the scratches put in by wetsanding. Whether it makes any difference or not, I don't know, but I would wetsand a day or more after the final coat (a few days, or whenever convenient would be more like it), then wait a few more weeks before polishing. The reasoning being that the surface of the paint, which will be polished, will become the hardest. Again, not sure if there is any difference but it stands to reason that the paint on the very surface is going to be the driest/hardest part of the paint, so polishing that part (which has been exposed directly to dying air for a month) should be easier than polishing something that hasn't been directly exposed to the air quite as long (which is the surface slightly under the original surface that would be exposed after wetsanding). Such a minute difference, maybe inconseqential, but there's my  .
|
|
|
Re: Paint job on a budget!? CONTINUED..page 44........
#24917
07/02/06 08:36 PM
07/02/06 08:36 PM
|
Joined: May 2006
Posts: 575
Canada
Marq
mopar addict
|
mopar addict
Joined: May 2006
Posts: 575
Canada
|
Quote:
Im going to use this paint you speak of. im going to get 4 quarts of Steel Gray and paint my car. I was thinkin of maybe getting:
3 quarts of steel gray
1 quart of black
and mixing all 4 cans for a gunmetel colorish paint. what do you think?
One of the grays by Brightside is a lovely color that looks something like Ford Mustang's 'Mineral Gray' ( without the metalflake of course ).
Next to the Fire Red... that darkest color of gray would have been my next choice in colors. It is dark enough to stealth the lines of a car and give it a myseriously deceptive look... while at the same time not being so dark that it shows any imperections in the bodywork etc.
Oh... ONE IMPORTANT thing that I only caught on to tonight regarding the painting of cars or boats with the 'roller and brush method'.
As you know... you apply the Brightside straight out of the can using the high density foam 4" roller... in thin coats.
As you complete a small section you are then suppose to float your 3" or 4" foam brush over the surface and that magically pops any surviving bubbles.
What I ONLY LEARNED TONIGHT was that if you are rolling from north to south.. then you brush wipe from east to west. If you are rolling from side to side.... then you brush wipe from up and down.
I had been following the path of the roller. If I rolled from the left side of a door to the right side of a door... I was mistakenly brush wiping by going from the left side to the right side.
So to anyone who is planning to use the Brightside paint method... just note that you roll your paint in one direction... and then brush it by going across the rollings - not with the rollings.
Hope this info helps. I am planning to use this new found knowledge on my third coat of Brightside.
.
|
|
|
|
|


