|
 Re: Paint job on a budget!? CONTINUED..page 44........
[Re: Marq]
#24678
Re: Paint job on a budget!? CONTINUED..page 44........
[Re: Marq]
#24678
06/15/06 05:11 PM
06/15/06 05:11 PM
|
Joined: Jan 2006
Posts: 1,220
toronto canada
69chargeryeehaa
 OP
OP
pro stock
|
OP
pro stock
Joined: Jan 2006
Posts: 1,220
toronto canada
|
Marq - my thoughts on that are: a ) Rustoleum or Tremclad - SAME STUFF. b ) odorless or regular mineral spirits - ONLY REGULAR MINERAL SPIRITS. c ) environment temperature - NEVER EFFECTED MY WORK, JUST THE MIXTURE RATIO OF SPIRITS TO PAINT, 2 HOURS DIFFERENCE DRYTIME FROM -10*DEG C, TO +25*DEG C. d ) environment humidity - QUITE HONESTLY PLAYED NO ROLE IN DRYTIME OR APPLICATION. e ) even the color you choose seems to require some deviances in the recipe... - ONLY IN THE CASE OF COLOR, SOME COLORS ARE SLIGHTLY MORE TRANSLUCENT THAN OTHERS REQUIRING MORE COVERAGE. Also i've repeated my results, 6yrs apart, same color, new paint (purchased 6yrs apart) perfect color match. (ie: 69 charger and 74 beetle, both orange.) That's based soley on my expirences, others results may be different, no animals were killed to paint my car!!!.    
|
|
|
Re: Paint job on a budget!? CONTINUED..page 44........
[Re: 69chargeryeehaa]
#24679
06/15/06 05:40 PM
06/15/06 05:40 PM
|
Anonymous
Unregistered
|
Anonymous
Unregistered
|
question for u charger, do u have any issue with ur paint(consider it being dried for so long), are there any dust on ur paint, seems like the dust that my car collected from sitting in the driveway has gotten my smoothed surface rough, even after a wash, the surface is somehow ruined by the dust... any advise? thanks
|
|
|
Re: Paint job on a budget!? CONTINUED..page 44........
#24681
06/15/06 07:54 PM
06/15/06 07:54 PM
|
Joined: Jan 2006
Posts: 1,220
toronto canada
69chargeryeehaa
OP
pro stock
|
OP
pro stock
Joined: Jan 2006
Posts: 1,220
toronto canada
|
Quote:
question for u charger, do u have any issue with ur paint(consider it being dried for so long), are there any dust on ur paint, seems like the dust that my car collected from sitting in the driveway has gotten my smoothed surface rough, even after a wash, the surface is somehow ruined by the dust... any advise? thanks
it's super important that your work area is clean, and it really should be done in a garage, pretend your doing open heart surgery. also the first 8 hours or so of drying time should be done in a garage, and only after that you should be ok to pull it outside to wetsand and clean it. those first 8 hours or so is critical, any dust that lands on the car could stick in the paint just as with any other paint including automotive paint, things like when you leave the garage, open and close the door really slowly as to not kick up dust.
|
|
|
Re: Paint job on a budget!? CONTINUED..page 44........
[Re: 69chargeryeehaa]
#24682
06/15/06 09:44 PM
06/15/06 09:44 PM
|
Anonymous
Unregistered
|
Anonymous
Unregistered
|
i see, but all my layers are already done, i finished final wetsand and wax/buff already...surface was super smooth until it started to collect dust..
|
|
|
Re: Paint job on a budget!? CONTINUED..page 44........
#24683
06/15/06 09:52 PM
06/15/06 09:52 PM
|
Anonymous
Unregistered
|
Anonymous
Unregistered
|
Quote:
Chuck,
I agree with your interpertation of the orange peel on Marq's car (look at drivers side front pic). I haven't fully tested this method myself, but am quite worried about your results. Maybee a hardener can be added so the paint could be sanded properly. Seems like most are ignoring or hoping what you have said isn't true for them. Sometimes it also seems like we are getting snowed over by a couple of Tremclad employees/marketers.
I'm a little worried about this method as well because of the orange peel everyone is experiencing and labeling as "Flat as Glass". If it were a spray job, I would demand my money back becuase that much orange peel is unacceptable. The only "Flat as Glass" results I have seen yet are Jeff's and Admactanium's (*sp). It is discouraging when you hear its going on "Flat as glass" and "looks like a mirror" but then you see pics after and its not.
I'm not trying to knock anyone here. I guess what I have realised is that everyone sees something different and everyones expectations are different.
If I have time this weekend, I will try to get some hardener and see if it changes anything. As of right now, the majority of results are too discouraging to apply to a daily driver, maybee a beater.
Ok people, time to prove me wrong here (I want this method to work). Lets see some clear pictures without the orange peel. Take 2 pictures: Picture 1, 1-2 feet away, straight on or slight angle and in the shade. Picture 2, same distance, but on an angle reflecting a straight line in the background (close to the car, 4 feet away or so).
Love it or Hate it; it had to be said!
Smite

What i'm saying and what Smite is seeing and relaying in his post is...the results are just not there. I see alot of people that are close, but it's always something like 'after two more coats', 'after I buff with a different compound', 'maybe I should use a different grit of sandpaper'...there's always one or two more steps left to this elusive paint job.
Believe me, I wanted this to work as much as anyone. I tried the different techniques...I started on a test piece and it looked ok and I thought to myself 'i've learned from my mistakes and the next piece will be better'...I moved to just the trunk lid and yes it was better but it still wasn't without it's problems...the thing is these problems that everyones discovering are never going to cease. Your always going to be just one step from finishing.
It's been well over a month and i'm still having problems getting this paint off my car (and it's 90+ degrees here)...I think as we move ahead in this 'paint experiment', we may be surprised at how many different problems occur. There are so many obvious mistakes being made...has anyone every read a guide for applying auto paint? It's a very timed, meticulous job and you DO NOT add wax for 30+ days - and this is for auto paint that hardens!! And somehow we figure we can paint with $20 hardware store paint and get the results of veteran painters that know what they're doing. Right now, the most enthusiastic people are the ones just getting started and haven't experienced the final stages of the painting process...
|
|
|
Re: Paint job on a budget!? CONTINUED..page 44........
#24684
06/15/06 09:57 PM
06/15/06 09:57 PM
|
Joined: May 2006
Posts: 575
Canada
Marq
mopar addict
|
mopar addict
Joined: May 2006
Posts: 575
Canada
|
It's an interesting question that you raise concerning the problem you are experiencing with dust spoiling your finished and highly polished work.
I was tossing that scenario around in my mind and the first thought that popped into my head was that the dust might be reacting with the sunlight to concentrate pockets of heat on your finish ?
Bear with me. If the surface was 100% dust free - the sun beating down on the paint and wax would be evenly distributed over the paint.
BUT... if there were dust particles on the car and they heated up under the sun to a higher temperature then the paint or wax benath itbelow... I wonder if it might be able to melt into the wax ?
Now the other thought that struck me was a question about the actual structure of this 'dust'. For example, is the dust simply road dust or dirt that has gotten stirred up and landed on your car... or could this dust be pollen from tress in the area... or maybe even dust from some guy down the street mixing his own batch of concrete mix ? Both of those scenarios would probably place dust on your car that are giving off some nasty chemical type reactions ( in the same vain as bird poop could eat away even the best of waxes or professionally applied paint jobs.
The scenario you are describing is kind of odd and so I think you have to think outside of the box for the answer.
Now another scenario might be the wax and the 'still curing' paint beneath it. Let us pretend that the mineral spirits have not yet 100% evaporated from the paint job. Could the 'still evaporating mineral spirits' not possibly have an adverse effect on the wax ? I am imagining a scenario here where the paint job is sort of like some Martian landscape with little geisers lurking just below the Martian surface. Every now and then a little spurt of gas eeks its way to the surface as the sun beats down on it. That could possibly create a scenario where these gases escaping could damage the wax surface above it. In this type of scenario the dust could simply be a red herring and not the direct cause of the damage to the waxed surface ? Or the dust could simply be gravitating to these little geiser pot marks in the waxed finish ?
All I know for sure is that the mineral spirit does have the ability to strip most types of car waxes off a car ( like when you were initially prepping the body for painting ).
If these scenarios sound like they might explain the problem... the answer would be to hold off further waxing for quite a while and let the paint and its constituent of mineral spirit reach the maximum level of curing. Maybe you have to hold off for three months before waxing again... or maybe even six months.
Of course the circumstances by which your car is exposed to the heat of the sun also would be a variable in how long or fast this 'absolute' curing point would be reached.
And I have the strange lurking feeling that the odorless mineral spirits would probably take longer to reach a level of 'absolute' curing then the regular mineral spirits which don't have an inhibitor to slow down its rate of evaporation.
Dunno... I am no scientist but those are the first thoughts that popped into my mind to explain what you might be experiencing.
Maybe you could try a little experiment by ;
a ) slapping your favorite wax on a normal car paint job...
b ) take your the mineral spirit that you are using and soak a clean cloth with it.
c ) now wring out the mineral soaked cloth until it is almost completely dry.
d ) place the cloth over the 'waxed' area and just leave it there for twelve hours. Don't bother rubbing the wax. Just place the cloth over the waxed spot.
e ) then remove the cloth after 12 hours and see if the vapours that would have still been evaporating from the moist rag had any impact on the shiny wax surface ?
This is similar to the old experiment where you take the mercury from an old fashioned thermometer and place it about 5 inches away from something that contains real silver. The gases that evaporate from the mercury has the ability to turn all silver that the airborn vapor comes in contact with to turn into an irreversible BLACK color.
.
Last edited by Marq; 06/15/06 10:04 PM.
|
|
|
Re: Paint job on a budget!? CONTINUED..page 44........
[Re: 69chargeryeehaa]
#24685
06/16/06 12:51 AM
06/16/06 12:51 AM
|
Anonymous
Unregistered
|
Anonymous
Unregistered
|
I thought I would pass on an observation I made.
A couple of months ago I painted a metal railing using Rustoleum gloss black. I took my finger to it a few days ago and found I could still scape it. Now this was during the day with the sun on it. It should have cured as much as it would by now. The other night I was on the deck and tried to scape the same spot and it was rock hard. It dawned on me that the heat of the sun softens the paint. Now I have put parts I have painted with this paint in the oven to cure after painting with good results. What I would suggest is that when one goes to polish the paint do it out of the sun where it is cool. The paint will be harder and you should have better results.
|
|
|
Re: Paint job on a budget!? CONTINUED..page 44........
[Re: Exit1965]
#24686
06/16/06 09:06 AM
06/16/06 09:06 AM
|
Anonymous
Unregistered
|
Anonymous
Unregistered
|
Quote:
[edit: by the way, I see now one of my dogs decided to make a cameo in the picture]
I'm in agreement with your dog... that paint looks delicious.
Exit, I shared your observations several months back with the soft paint results (laying on too thick). It eventually DID harden to a rock solid finish (Sunrise Red - not the professional line). I had done 4 heavy coats and wetsanded coats 2 and 4. I let it sit for a while because of frustration over the softness and have lurked here ever since, seeing guys come up with some pretty good stuff.
A couple of weeks ago I hit the panel with 3M machine glaze on a right angle buffer for just a bit and the stuff really took on a shine. I then hit it with 3M scratch remover and am really impressed with the results. In retrospect I could have taken the finish lower on the final wetsand to be more smooth, but the stuff looks great.
BTW, guys I found the good stinky mineral spirits at Advance Auto Parts. It's from Duplicolor and labeled Paint Thinner, but says 100% Mineral Spirits ( See Here). It's not the "safe" kind found at Wal-Mart.
|
|
|
Re: Paint job on a budget!? CONTINUED..page 44........
#24687
06/16/06 09:18 AM
06/16/06 09:18 AM
|
Joined: Jan 2003
Posts: 3,048
Richmond, Tx. (Houston)
GTSDave
master
|
master
Joined: Jan 2003
Posts: 3,048
Richmond, Tx. (Houston)
|
Quote:
the surface was super smooth until i let the car sit for a few days and it collected dust and it seems like it's making the smooth surface rough again...even after i washed off the dust, i can still feel that it is rough
widebody,
It sounds like you have some solvent pop going on. I don't think you will have dust sticking several days after polishing. I do think that since you put it in the sun, trapped solvents are starting to work their way to the surface. When this happens what you get is very small blisters that work their way to the top then once the solvent evaporates, they harden again. Sorta like little goose pimples that harden.
I have seen it a lot with regular auto body paints that were laid on without sufficient flash time between coats. That is one of the reasons I like to let my primers sit for a few days before applying top coat.
One sure fire way to tell is to smell your paint. Park it in the sun for a little while then smell the paint. If you can still smell it, then it has not fully cured yet and there is a good chance you have solvent trapped in it.
-Dave
|
|
|
Re: Paint job on a budget!? CONTINUED..page 44........
[Re: GTSDave]
#24689
06/16/06 09:49 AM
06/16/06 09:49 AM
|
Joined: Jan 2006
Posts: 1,220
toronto canada
69chargeryeehaa
OP
pro stock
|
OP
pro stock
Joined: Jan 2006
Posts: 1,220
toronto canada
|
I can understand all the concerns about cutting and waxing the paint so soon after it is done, but i can say from my expirence that this paint does not continue to vent/gas for more than the first 4hrs of drying time. If it was, then re-coating after 8-10hours would really cause some problems. Funny thing is that nobody has ever complained that when re-coating that there is a reaction or issues with the relationship between the two layers of paint. With single stage acrylic enamel there are alot of steps and timing is critical as someone mentioned, and they are absoultly right. with single stage, after applying the primer sealer application (depending on the brand; there are slight differences) you have a window of 30 mins to go to color top-coat, or 15 days!!! the reason for this is to allow each layer to gas or "flash", and if you apply another layer outside the window then the two layers interact with eachother and cause bubbles, ect, by making the underlying layer (which has vented off partially) to basically get "wet" again and the two layers dry at different rates, causing a big mess. this is also true of all successive layers of paint, they must be applied within a window, and the correct reducer or ammount of hardener must be used to thin the paint for spraying, and provide the correct rate at which the paint layers flash, too much hardner/reducer for the conditions (relative to temperature and humidity) and the paint can over-dry, and start to crack or seperate from the underlying layers, too little and it could never fully dry. Auto paints should never fully dry in the sence that it is completely dry, otherwise it would loose adhesion from being heated and cooled in the sun, and a certian amount of flexability has to be maintained or any movement of the pannels would cause the paint to crack. What i'm trying to say is that people are trying to compare the process of regular automotive paint (be it single stage or BC/CC) with this method, and i can tell you it's not comparing apples to apples. this "rust" paint is actually formulated to remain "soft"; that is part of it rust inhibiting abilities, but by applying thin coats, and using a much higher concentration of mineral spirits to thin the paint solves that issue. it is the mineral spirits that flashes out of the paint, and to a degree the paint flashes itself too, but the properties of the paint makes it probabally one of the eaisest paints to work with in my opinion hands down. I can honestly say that this paint is not prone to alot of the issues that auto paint is prone too, if it were, then people would have issues like i mentioned earlier with re-coat windows. i've cut and buffed including waxing the paint 2 days after painting the last coat, and i have absoultly no issues with the paint, acheving gloss, or durability, that has to be a testament to reinforce the point i'm trying to get accross, we have to stop comparing the regular auto paint process with this method, because the theories and process steps, and formulations are not the same. the rules that apply to regular auto paint somewhat apply, but the processes vary too greatly to compare them.
|
|
|
Re: Paint job on a budget!? CONTINUED..page 44........
#24690
06/16/06 10:55 AM
06/16/06 10:55 AM
|
Anonymous
Unregistered
|
Anonymous
Unregistered
|
Quote:
i see, but all my layers are already done, i finished final wetsand and wax/buff already...surface was super smooth until it started to collect dust..
shouldn't be any problem doing outdoor. some people have it turned out pretty good even outdoors with dust, tree particles, insects all around, etc.
here's someone's post awhile back, i think it's a good process to follow. looks pretty good being painted outside.
http://cars.500megs.info/forum/viewtopic.php?t=13
even if you are finished with the final buff and all, you can still put more coat on. if it's rough, wetsand it down and repolish or put another coat of paint.
|
|
|
Re: Paint job on a budget!? CONTINUED..page 44........
[Re: Exit1965]
#24691
06/16/06 11:49 AM
06/16/06 11:49 AM
|
Anonymous
Unregistered
|
Anonymous
Unregistered
|
When I wetsanded the panel, I was using 800 or so because I was planning on laying a couple more coats before polishing. There was zero shine in the panel after the wetsand. I'm not sure if this is what you're experiencing as haze? I never made it up to 2000 grit. By haze, do you mean wetsand scratches?
Anyway, with the softness of the paint at the time (after the wetsand), I just put the panel away for a while and forgot about it while I worked on the myriads of other issues on the car. I came back to it because I was tired of working on the car and wanted to try out my buffer (high speed - beware).
Sorry, I don't have any pics of the panel (camera's on the fritz)...
|
|
|
Re: Paint job on a budget!? CONTINUED..page 44........
#24692
06/16/06 02:25 PM
06/16/06 02:25 PM
|
Joined: Jul 2003
Posts: 3,377
Rancho Cordova, CA
Exit1965
master
|
master
Joined: Jul 2003
Posts: 3,377
Rancho Cordova, CA
|
Well, I finally had some luck getting this red to shine after polishing. My earlier problem with haze, I am not sure what to attribute to. But this coat had dried for several days, was wetsanded yesterday, then polished with a cheap 6" buffer today. I used the cheap turtle wax polish, and this area (above the body line) took about 2 minutes. Maybe with more time it would be better than this. 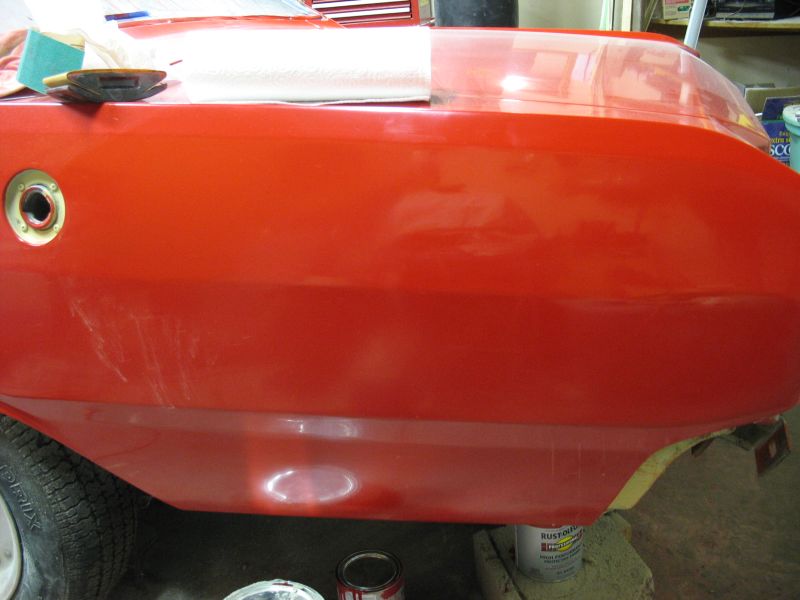 You should be able to see the area that was not sanded and polished (just the paint there) forward of the area that was. This polished area also has some spray bottle Eagle "nanowax" which is a clear carnuaba wax. edit.. opened the garage and let some natural sunlight in on it. Im liking the red now so Ill just finish the d*mn thing before I change my mind again. by the way, this was sanded with 2000 grit, and there is _no_ orange peel. [edit: looked closely, and there is some orange peel deep down. Maybe hitting with a harder grit before 2000 would help it shine better]
Last edited by Exit1965; 06/16/06 02:49 PM.
|
|
|
Re: Paint job on a budget!? CONTINUED..page 44........
#24693
06/16/06 02:26 PM
06/16/06 02:26 PM
|
Anonymous
Unregistered
|
Anonymous
Unregistered
|
So I've been  Is it possible to lay on really really thin coats of the rustoleum clear coat once the top layer has been sanded down to 2000 grit or so? I found it at HD in spray can, and I wonder if you could be really careful and use extremely light coats to get decent results without having to wet sand later. That might add the gloss people are looking for. I might have to give it a go on a test piece... And if wetsanding is required, has anybody successfully tried wetsanding the clear enamel?
Last edited by mooserider; 06/16/06 02:28 PM.
|
|
|
Re: Paint job on a budget!? CONTINUED..page 44........
[Re: Exit1965]
#24694
06/16/06 02:47 PM
06/16/06 02:47 PM
|
Anonymous
Unregistered
|
Anonymous
Unregistered
|
Exit, that polished part looks killer. You can also look at the trunk and see the vertical lines of the stuff in the background. The reflections have no waves. Perhaps the haze you saw was microscratches from the wetsanding...(?)
Question: of those who have used the spray paint for the jambs, does it seem to match pretty well? I have to paint the inside part of the tub of the dune buggy and think it would be much easier to spray the footwell areas than roll.
|
|
|
Re: Paint job on a budget!? CONTINUED..page 44........
[Re: patrick]
#24697
06/16/06 05:10 PM
06/16/06 05:10 PM
|
Joined: Jan 2006
Posts: 1,220
toronto canada
69chargeryeehaa
OP
pro stock
|
OP
pro stock
Joined: Jan 2006
Posts: 1,220
toronto canada
|
Quote:
honestly, exit, it shines about as good as the single stage paint job on my duster. good work!
 finish it and pull it out in the sun, your being too critical, it looks finish it and pull it out in the sun, your being too critical, it looks  , immagine how much better it will look with the bumpers, trim, handles, rubber, ect....also be prepared to polish for at leats 1 solid day, i'd spend 2 hours on that rear quarter, stop, clean with spirits and polish more, it's the polishing that bring the shine and it is permenant, polish, polish, and when your done, polish more. i've had the best luck with the turtle wax polishing coumpound and the white terry bonnets. Also don't forget your looking at a stripped car and once it's all back together you'll be happy as a pig in $h!t!!!!!!!!!!!!! , immagine how much better it will look with the bumpers, trim, handles, rubber, ect....also be prepared to polish for at leats 1 solid day, i'd spend 2 hours on that rear quarter, stop, clean with spirits and polish more, it's the polishing that bring the shine and it is permenant, polish, polish, and when your done, polish more. i've had the best luck with the turtle wax polishing coumpound and the white terry bonnets. Also don't forget your looking at a stripped car and once it's all back together you'll be happy as a pig in $h!t!!!!!!!!!!!!!
|
|
|
|
|


