|
 Re: Paint job on a budget!? CONTINUED..page 44........
[Re: 318Bruiser]
#24619
Re: Paint job on a budget!? CONTINUED..page 44........
[Re: 318Bruiser]
#24619
06/11/06 02:17 PM
06/11/06 02:17 PM
|
Anonymous
Unregistered
|
Anonymous
Unregistered
|
i am repainting my 87 buick grand national and the paint is great it goes on with alot of peel but then is smooth as glass... heres a pic  very glossy!!!!! i wanted to know if i can paint the bumper fillers, seeing that they are urathane and they flex
|
|
|
Re: Paint job on a budget!? CONTINUED..page 44........
#24621
06/11/06 04:12 PM
06/11/06 04:12 PM
|
Anonymous
Unregistered
|
Anonymous
Unregistered
|
Quote:
Samba.com has basically shut down the thread on roller painting. Here's one of the (cleaned up) responses from the "moderators" on that site
(deleted)
That's mostly 'cuz the forum moderator in question is an opinionated ar$e who thinks he knows what's best for everyone. I've seen him try to throw his weight around in forums there where he's *not* a moderator ... and get shot down by the other mods. 
I've been making slow progress on painting parts of my VW Fastback, mostly because of the weather. The big work is still ahead of me -- get the dents&waves out of the roof and paint the body. I've just been doing fenders & trunklids so far. It'd be *much* easier if I could get the car in the garage, or even under the carport. 
|
|
|
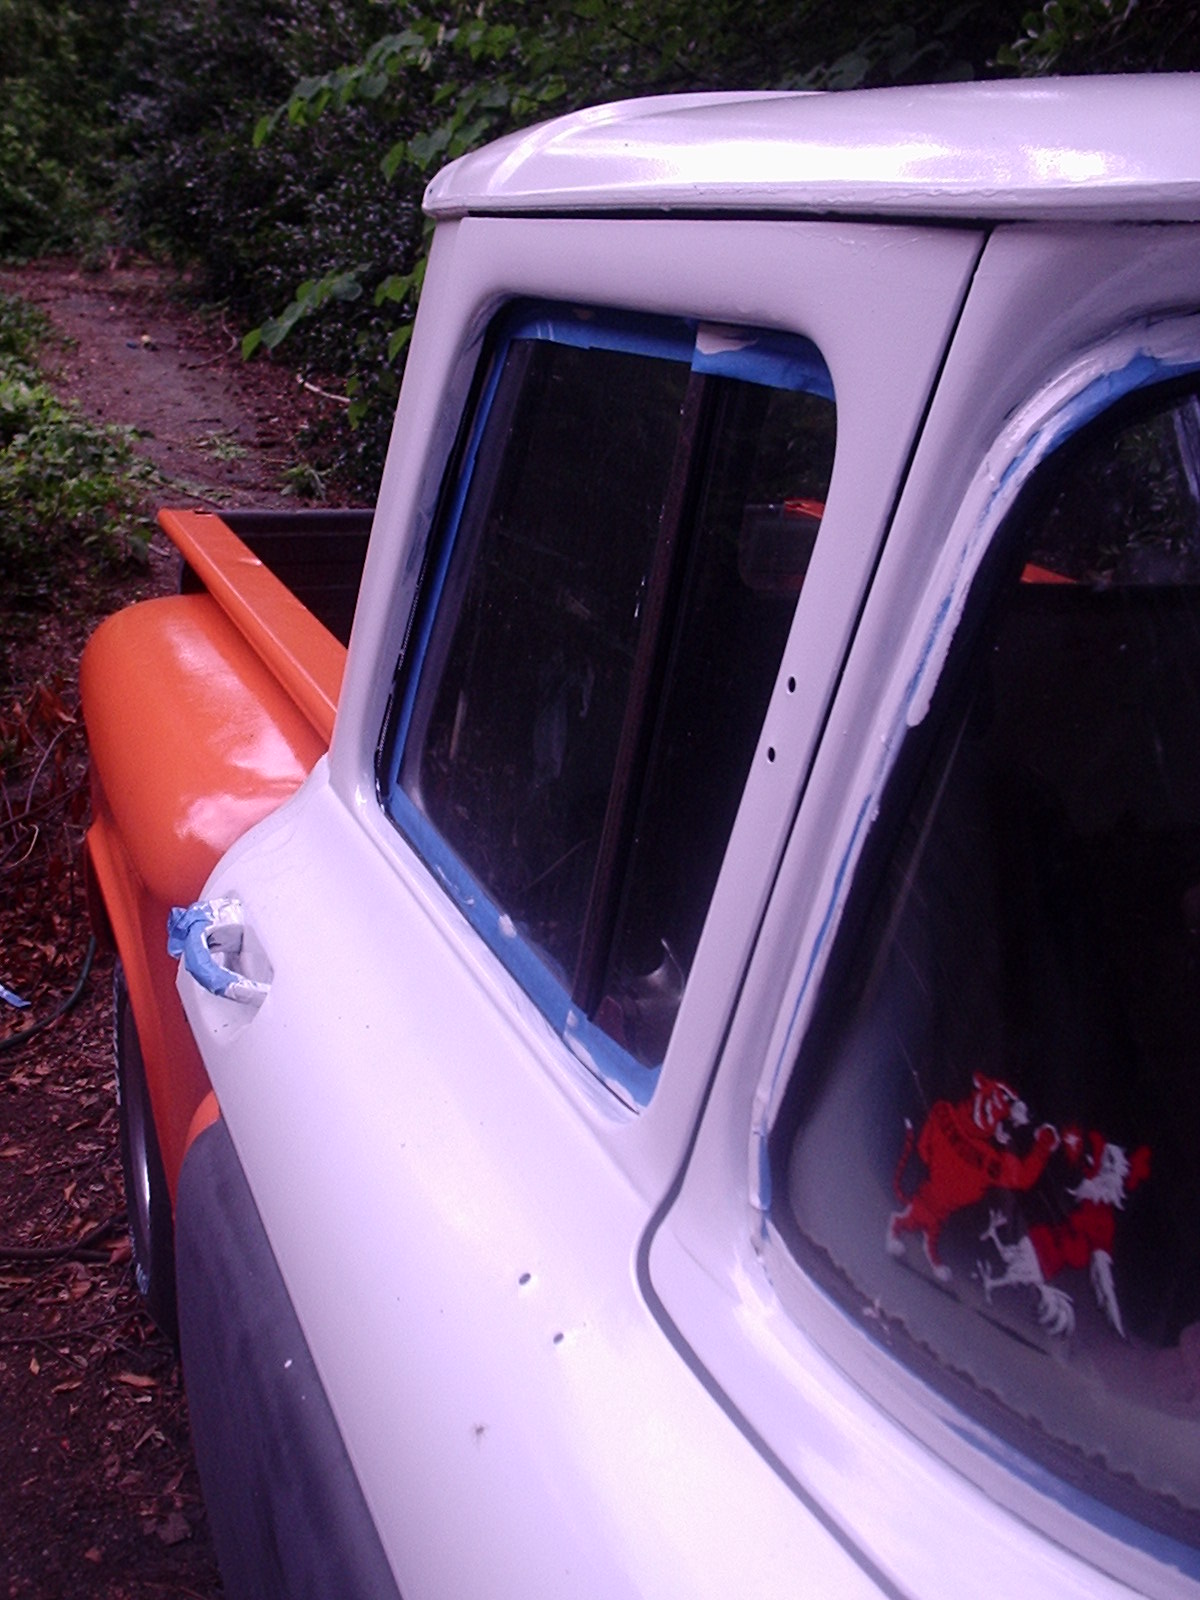
Morning all! Weekend update....
#24622
06/12/06 06:56 AM
06/12/06 06:56 AM
|
Anonymous
Unregistered
|
Anonymous
Unregistered
|
...and a cautionary tale for rookies who choose to paint outside...
Four full coats with paint, spirits and a dash of Penetrol to help with adhesion. I think the Penetrol is also slowing down the drying, since the paint seems to be tacky long than I anticipates. But since it'll be a week before I can get back to it, there's plenty of time to dry.
A couple of things I learned that are probably covered in the 40-plus pages before...
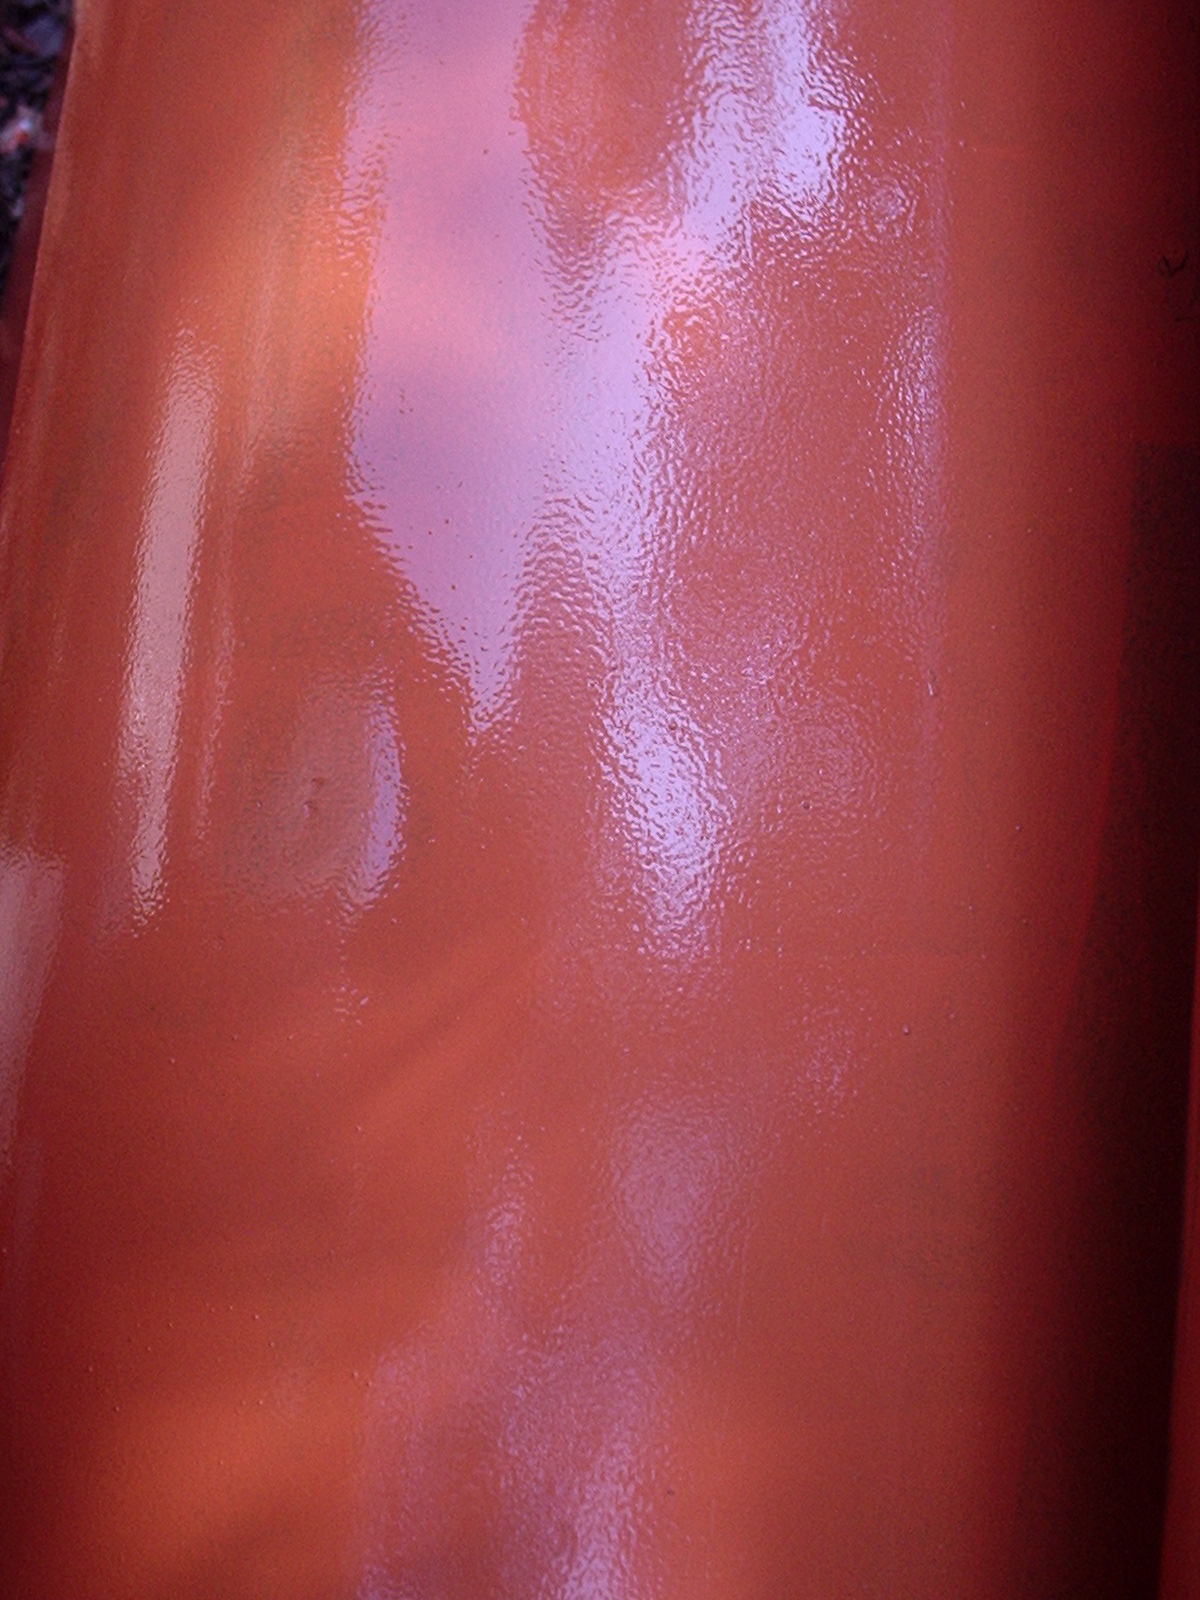
1. Different paints produce different results. I'm going glossy white Rustoleum on the roof and posts, and it's been a dream to work with. Using the same mixture with Coronado anti-rust orange produces a paint that glides on, but is giving me some serious orange (literally) peel. I've provided an example.
Having rain every evening hasn't helped matters either, but since I'll be sanding and re-rolling it's not a big deal.
What IS a big deal is bugs. All sorts of flying critters who decide the orange is just too pretty to pass by. I've has to tweezer two dozen flying things out of the finish, which creates little blotches all over the place.
I hadn't seen this problem addressed, so I'll ask. Anyone know how to keep bugs out of the process while painting outdoors?
Oh, and here's a couple of in-progress pix....
|
|
|
Here's the orange peel....
#24623
06/12/06 06:59 AM
06/12/06 06:59 AM
|
Anonymous
Unregistered
|
Anonymous
Unregistered
|
Obviously, the mixture's too thick...got a weekend of sanding coming up.
|
|
|
Re: Paint job on a budget!? CONTINUED..page 44........
#24624
06/12/06 03:02 PM
06/12/06 03:02 PM
|
Anonymous
Unregistered
|
Anonymous
Unregistered
|
FarFire70,
I've been doing my test peice at my parents which is a couple hours away. I haven't been there in awhile, but its fathers day this weekend so maybee I can get a few more coats and take a couple pics for you. It might not be perfect, but atleast it will give you the idea of what it looks like.
Smite
|
|
|
Re: Paint job on a budget!? CONTINUED..page 44........
#24625
06/12/06 04:50 PM
06/12/06 04:50 PM
|
Anonymous
Unregistered
|
Anonymous
Unregistered
|
Been following this thread with interest. Regarding Chuck's comments about no hardener: Your paint guy doesn't know what he's talking about, I don't think. My paint guy (who could beat up your paint guy,  ) says that when he was spraying enamel regularly that it never had hardener in it, and would off-gas for at least six months. That said, it was sandable in the thick (relative to this process) coats he was putting down in a couple of days, but it shouldn't be waxed for a month or more. If you can wait a few weeks for final polish, I bet it comes up just fine, though it will not be the same look at a urethane bc/cc paint job. Incidentally, this guy is painting one of my cars...$9,000 for a show quality job. $50 sounds REAL good in comparision.
|
|
|
Re: Paint job on a budget!? CONTINUED..page 44........
#24626
06/12/06 05:50 PM
06/12/06 05:50 PM
|
Anonymous
Unregistered
|
Anonymous
Unregistered
|
For the bugs...i would suggest one of those blue lights that zaps the bugs when they fly to it. They might like that better than orange.
Or you could try adding some bug repellant into your paint...
Last edited by RedFive; 06/12/06 05:51 PM.
|
|
|
Re: Paint job on a budget!? CONTINUED..page 44........
#24627
06/12/06 07:05 PM
06/12/06 07:05 PM
|
Anonymous
Unregistered
|
Anonymous
Unregistered
|
Quote:
Been following this thread with interest.
Regarding Chuck's comments about no hardener: Your paint guy doesn't know what he's talking about, I don't think. My paint guy (who could beat up your paint guy, ) says that when he was spraying enamel regularly that it never had hardener in it, and would off-gas for at least six months. That said, it was sandable in the thick (relative to this process) coats he was putting down in a couple of days, but it shouldn't be waxed for a month or more.
If you can wait a few weeks for final polish, I bet it comes up just fine, though it will not be the same look at a urethane bc/cc paint job. Incidentally, this guy is painting one of my cars...$9,000 for a show quality job. $50 sounds REAL good in comparision.
I'm not trying to rain on this parade...sometimes people just wanna believe something (regardless of what common sense tells you).
I have answered a question about why the paint is dull and will not shine after wetsanding and polishing...the reason I answered was I HAD THE SAME PROBLEM...I have personally tried this process and spent the last several weeks trying to fix my mistake! So, I speak from experience...not what someone else has told me. I'm just trying to help the next poor soul who has 'great expectations' about what this paint technique will accomplish.
Don't get me wrong...if you have a rusty, primered beater in your drive, go for it. Just do the research and realize what your getting into. I painted a fairly nice car expecting something that I ultimately didn't get...
Read this web page for some other views...Chuck 
|
|
|
Bugs in paint
#24628
06/12/06 07:08 PM
06/12/06 07:08 PM
|
Anonymous
Unregistered
|
Anonymous
Unregistered
|
Try coming out to the shop to 500 little baby spiders that have hatched above your car and landed on the paint . Oh well they wet sanded out fairly well. I've got some pics of Med Blue that I'll post later this eve. They are 5th coat pics.
|
|
|
Re: Paint job on a budget!? CONTINUED..page 44........
#24629
06/12/06 07:46 PM
06/12/06 07:46 PM
|
Anonymous
Unregistered
|
Anonymous
Unregistered
|
Chuck, I'm not trying to be an jerk, either.
Paint is 93.6% (scientifically measured) prep. The rest, on a non-clearcoat job, is the materials and a willingness to work. Frankly, I bet the "rust stopping" part of the paint's claim is just hot air, but over a nicely prepped body, it's just enamel paint.
Now, I haven't used this rustoleum enamel and it might just be crap paint, but I have some glass smooth and polished bookcases here that I painted with plain-jane house paint which was wet-sanded and then polished, and they look pretty nice.
I think if you could put the car in the oven for an hour at 200 when you were done, you'd find the paint very hard. The single most durable paint I've ever run across was brushed-on oven-baked enamel on an old motorcycle frame. That stuff did NOT come off except in a sandblaster, and then VERY reluctantly. I wonder if a tent of black plastic on a hot summer day would help to really set the paint...
The guys in the thread you point to actually kinda sound like idiots. They heard roller and simply made assumptions that have nothing to do with the way this system actually works. It doesn't really matter how you apply the paint as long as you're willing to work to make it smooth afterwards (this assumes that you don't try to put it on an inch thick, etc.).
The point I was originally trying to make was that the paint will harden eventually, which I thought you had said your paint guy had said would never happen. It just might take a long while.
|
|
|
Re: Paint job on a budget!? CONTINUED..page 44............
[Re: 69chargeryeehaa]
#24630
06/12/06 08:09 PM
06/12/06 08:09 PM
|
Anonymous
Unregistered
|
Anonymous
Unregistered
|
|
|
|
Re: Morning all! Weekend update....
#24631
06/12/06 09:49 PM
06/12/06 09:49 PM
|
Joined: May 2006
Posts: 575
Canada
Marq

mopar addict
|
mopar addict
Joined: May 2006
Posts: 575
Canada
|
Maybe the answer for folks doing outside painting ( and having problems with bugs ) is to invest in one of those propane powered BUG KILLERS - OR - maybe one of those black light electric bug killers. Park it about 20 feet away from where you are working and listen to the sizzle of the little flying bugs as they get their butts smoked or shocked ...  -
Last edited by Marq; 06/12/06 10:01 PM.
|
|
|
Re: Morning all! Weekend update....
[Re: Marq]
#24632
06/12/06 10:39 PM
06/12/06 10:39 PM
|
Joined: Jan 2006
Posts: 1,220
toronto canada
69chargeryeehaa
OP
pro stock
|
OP
pro stock
Joined: Jan 2006
Posts: 1,220
toronto canada
|
I understand why everyone is putting this method down, people who have no paint expirence figure they can try this method and have perfect results. the fact of the matter is that it takes SKILL to do, and that can only be learned. most people don't practice on a test area and go right to their car roller in hand and go crazy, then they are left with a big mess on their hands, get all pissed off and say that the method is crap. the reality is that there is nothing wrong with the paint, it's a good quality durable paint, and if applied correctly with minimal investment you will end up with a great paint job. i've painted 5 cars with this method, 2 i still have, and 1 other died with that paint job  and 2 others that went about 5 yrs and then i had them painted using single stage acrylic enamel regular auto paint and had no issues painting over the tremclad. hardness has never been a issue with the paint for me, a good day in the sun and it's fine. the moral of the story is that it is alot of work, but my time is free, it's not like i'm doing it while i could be making $50/hr, and the ease of work is what i really like. rock on roller buddies   exit1965, if your having seccond thoughts, just polish it up, and pull it out in the sun, i guarentee you that your face will look like this:    in that order!!  
|
|
|
Re: Paint job on a budget!? CONTINUED..page 44........
[Re: 69chargeryeehaa]
#24634
06/12/06 11:26 PM
06/12/06 11:26 PM
|
Anonymous
Unregistered
|
Anonymous
Unregistered
|
alright... i tried polishing my car with the turtle wax compound and got no shine what so ever, also tried waxing after that, no shine. Then tried just waxing it, and also no shine... HOW CAN I GET SHINE!!! someone please give me some advice on how to get some shine into the paint
|
|
|
Re: Paint job on a budget!? CONTINUED..page 44........
[Re: Marq]
#24635
06/12/06 11:56 PM
06/12/06 11:56 PM
|
Anonymous
Unregistered
|
Anonymous
Unregistered
|
OK, I'm going to put my $50 where my mouth is. I have plenty of old body panels laying around. I live out in the sticks, and the local Ace Hardware has their own house brand of the oil acryllic "rust-stopping" paint. When it's all done, I'm going to leave it out in the weather for a year. What color is most likely to fade? Red?
I was going to cover areas and pull the covers off at set intervals so a comparision can be made.
Hell, I should just paint my brush hog, that would be about as harsh a test as any I could come up with.
|
|
|
Re: Paint job on a budget!? CONTINUED..page 44........
#24636
06/13/06 12:02 AM
06/13/06 12:02 AM
|
Anonymous
Unregistered
|
Anonymous
Unregistered
|
I think this was just recently discussed.....do final sand with 1500-2000 grit then hit it with a clear coat. I dont know if anyone has actuall dont this yet but I think this is the cure for the Dull apperance after the final wet sanding. This is the method I'm going to use. first I'm going to let the paint "cure" for a few days while I drive around, this is before I even get to the final wetsand. Then I'm going to finish sanding and do the Tremclad Clear on my final sand.
attached is a pic of the car with the 6th coat.
Last edited by 82Scirocco; 06/13/06 12:05 AM.
|
|
|
Re: Paint job on a budget!? CONTINUED..page 44........
#24637
06/13/06 06:03 AM
06/13/06 06:03 AM
|
Anonymous
Unregistered
|
Anonymous
Unregistered
|
I have just a few last questions before starting my project. I got all my supplies and am ready to start prepping the car tomorrow. I've gotten multiple grits for prep work and just want a suggestion on it. Should I start with my lowest grit (I think it is 80) sand the car down, and once it is fully sanded wash it and then go to the next grit, or maybe just wipe it down to remove the dust and junk?
Also, I know that the paint before applying should be at the consistency of about water, now I remember either Exit or Charger posting a ratio of paint to mineral spirits or something like that, but I cannot find that at all. Anyone have a suggestion, I doubt its 50-50, but if you have any suggestions on a ratio of paint to mineral spirits, please post it. Thanks!
|
|
|
|
|


