|
 Walk me through my wheel and caliper installation
#1459763
Walk me through my wheel and caliper installation
#1459763
06/28/13 10:57 PM
06/28/13 10:57 PM
|
Joined: Jun 2013
Posts: 1,521
Tacoma, Washington USA
Adam71Charger
 OP
OP
pro stock
|
OP
pro stock
Joined: Jun 2013
Posts: 1,521
Tacoma, Washington USA
|
This setup is all new to me, and Im lost. Trying to install my rotor and caliper. I have slider type calipers. Now that my 11.75 rotor wheel bearing races are installed, Im ready to put the bearings in and then onto the spindle. But, I cant figure out which way my oil seal is supposed to be facing, some directions I found say point the lip of the seal inwards, but I dont know which side is the lip or what direction inwards means. here is the back of my rotor:  Now which way does the oil seal go into the rotor? pic 1 or pic 2?? Pic #1  Pic #2 
|
|
|
Re: Walk me through my wheel and caliper installation
[Re: Adam71Charger]
#1459765
06/28/13 11:08 PM
06/28/13 11:08 PM
|
Joined: Jan 2003
Posts: 21,073
Niles , Ohio
therocks
oh wait.but hey.lets see.oh yeah.
|
oh wait.but hey.lets see.oh yeah.
Joined: Jan 2003
Posts: 21,073
Niles , Ohio
|
Pic 2 goes to the outside.Pic one goes to the bearing side.A lot of the new seal dont have the rubber piece.Rocky
Chrysler Firepower
|
|
|
Re: Walk me through my wheel and caliper installation
[Re: Adam71Charger]
#1459771
06/28/13 11:36 PM
06/28/13 11:36 PM
|
Joined: Jan 2003
Posts: 21,073
Niles , Ohio
therocks
oh wait.but hey.lets see.oh yeah.
|
oh wait.but hey.lets see.oh yeah.
Joined: Jan 2003
Posts: 21,073
Niles , Ohio
|
Probally too tight.I alwyas tighten them tight then back off till just loose.Then just snug them down.Ive done them for over 40 years but once you do them a few times you get the feel for it.I dont like tight bearings.As long as the rotor dosent move they are good.Some drag will be felt.Try loosening them.Till loose and turn the rotor.Then start snugging till you fell a bit of drag spinning the rotor.Then install the cotter key.I did them at work for over 30 years and never had a bearing failure.Rocky
Chrysler Firepower
|
|
|
Re: Walk me through my wheel and caliper installation
[Re: Adam71Charger]
#1459777
06/29/13 01:26 AM
06/29/13 01:26 AM
|
Joined: Jan 2005
Posts: 3,344
Central TX
roe
master
|
master
Joined: Jan 2005
Posts: 3,344
Central TX
|
Did mine a while back and instAlled like pic#2. That was based off my Manual and the old ones that I pulled off.
1971 Plymouth Satellite
408/904 8 3/4 3.23 SG
|
|
|
Re: Walk me through my wheel and caliper installation
[Re: dogdays]
#1459779
06/29/13 02:05 AM
06/29/13 02:05 AM
|
Joined: Nov 2003
Posts: 36,040
Lincoln Nebraska
RapidRobert
Circle Track
|
Circle Track
Joined: Nov 2003
Posts: 36,040
Lincoln Nebraska
|
put the 2 small tin pieces on the bolt(s) then the bolt/tin piece goes in/thru the large tin pieces, in other words the bolt goes thru the small tin piece then thru the large flat tin piece. Want the 1 pad to be loose as installed & file the ends if need be. The other pad with the 2 "L" mounting tabs you want to bend them (the L tabs) so you have to hammer tap that pad half in place so the pad is firmly secured to the caliper. Put disc brake quiet on the back side of the pads where there is contact. Clean the rotor/front pad faces with brake kleen. The "L" is referring to the left caliper which are side specific not the parts in the pic. FYI 76 A body calipers & FMJ calipers have a 2.75" bore & 73-75 A body calipers have 2.60" bore & you want the largest bore on the front you can get. Toss the rubber bands.
live every 24 hour block of time like it's your last day on earth
|
|
|
Re: Walk me through my wheel and caliper installation
[Re: Adam71Charger]
#1459780
06/29/13 02:08 AM
06/29/13 02:08 AM
|
Joined: Apr 2007
Posts: 2,918
Calgary, Alberta Canada
a12rag
master
|
master
Joined: Apr 2007
Posts: 2,918
Calgary, Alberta Canada
|
Quote:
so this is one of my caliper sets, it says L so Im assuming it's drivers side. Do I use all of these pieces? or are they just there as a universal setup for multiple applications?
Here's all the pieces.
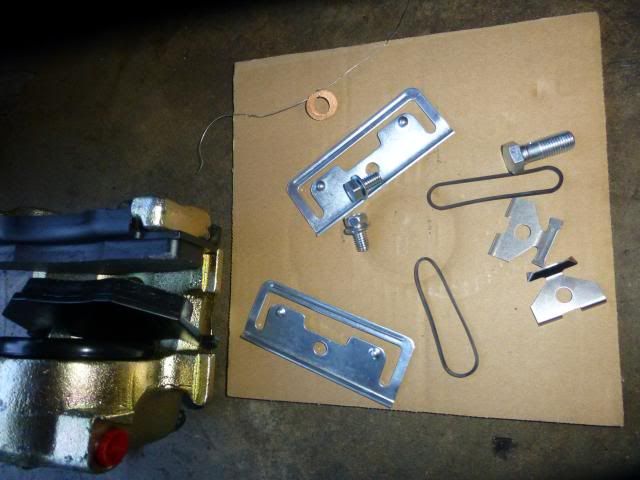
I put 1 pad on first, it hangs itself on the grooves of the caliper adapter, then on goes the other pad and caliper body. The outlet for the brake hose is pointing towards the rear of the car, this seems correct.. or do I have the calipers switched?
  
Then I attached the 2 larger metal plates and bolts, although I dont know which way they are supposed to face
 
Now I have these pieces left over. what are they for?

Those two pieces go under the bolt (top & bottom) of the caliper - where you put the metal pieces. These are the anti rattle pieces that go over the brake pad "ears" . . sorry, don't have a pic . . am sure someone will post a pic . . . oh, and the "elastic" band parts - supposed to go on the caliper adapter, where the pad ears sit, kinda like anti rust/sieze item - but they always get chewed up and are never there, don't worry about NOT putting them on !
Cheers
Mark
|
|
|
Re: Walk me through my wheel and caliper installation
[Re: RapidRobert]
#1459781
06/29/13 03:12 AM
06/29/13 03:12 AM
|
Joined: Jun 2013
Posts: 1,521
Tacoma, Washington USA
Adam71Charger
OP
pro stock
|
OP
pro stock
Joined: Jun 2013
Posts: 1,521
Tacoma, Washington USA
|
Quote:
put the 2 small tin pieces on the bolt(s) then the bolt/tin piece goes in/thru the large tin pieces, in other words the bolt goes thru the small tin piece then thru the large flat tin piece. Want the 1 pad to be loose as installed & file the ends if need be. The other pad with the 2 "L" mounting tabs you want to bend them (the L tabs) so you have to hammer tap that pad half in place so the pad is firmly secured to the caliper. Put disc brake quiet on the back side of the pads where there is contact. Clean the rotor/front pad faces with brake kleen. The "L" is referring to the caliper(s) which are side specific not the parts in the pic. FYI 76 A body calipers & FMJ calipers have a 2.75" bore & 73-75 A body calipers have 2.60" bore & you want the largest bore on the front you can get. Toss the rubber bands.
Ill try this tomorrow.
and I got calipers for a 77 Diplomat so I got the 2.75"
|
|
|
Re: Walk me through my wheel and caliper installation
[Re: Adam71Charger]
#1459783
06/29/13 08:54 AM
06/29/13 08:54 AM
|
Joined: Jan 2003
Posts: 75,020
U.S.S.A.
JohnRR
I Win
|
I Win
Joined: Jan 2003
Posts: 75,020
U.S.S.A.
|
Quote:
yes I packed the bearings. Then i tightened the adjustment nut to 90lbs, and backed off just a little.. the rotor is difficult to turn, doesnt feel right
90ft/lb has to be a typo , not the first time , that is way to tight for a bearing to begin with , I can see 90 inch lbs.
I have never torqued front wheel bearings, always did it by feel. I have to change that , I did torque them once , when working on the mustang that belonged to a friend with a PhD in Physics ...
|
|
|
Re: Walk me through my wheel and caliper installation
[Re: JohnRR]
#1459784
06/29/13 12:03 PM
06/29/13 12:03 PM
|
Joined: Jan 2005
Posts: 3,344
Central TX
roe
master
|
master
Joined: Jan 2005
Posts: 3,344
Central TX
|
I don't remember the number (I'll check when I get home) but mine had me torque to specified # of inch lbs, then loosen and retighten hand tight and secure with cotter pin.
roe
1971 Plymouth Satellite
408/904 8 3/4 3.23 SG
|
|
|
Re: Walk me through my wheel and caliper installation
[Re: buildanother]
#1459786
07/01/13 10:32 PM
07/01/13 10:32 PM
|
Joined: Jun 2013
Posts: 1,521
Tacoma, Washington USA
Adam71Charger
OP
pro stock
|
OP
pro stock
Joined: Jun 2013
Posts: 1,521
Tacoma, Washington USA
|
Got everything put together right. Went on my maiden voyage last night, and didnt get too far, horrible noise. Turns out I put in 1 brake pad backwards, chewed up the backside of the rotor  , but thats what i get for being impatient. Got that turned around and the alignment done today. Drives decent, but there is definitely a vibration, I think its the tranny mount.
|
|
|
|
|