Previous Thread
Next Thread
Print Thread
Page 1 of 3 1 2 3
How-To install a 5.7/6.1 HEMI into your 'ole Mopar! #47370
11/05/07 01:02 AM
11/05/07 01:02 AM
Joined: Jan 2003
Posts: 2,280
808CUDA Offline OP
top fuel
808CUDA  Offline OP
top fuel

Joined: Jan 2003
Posts: 2,280
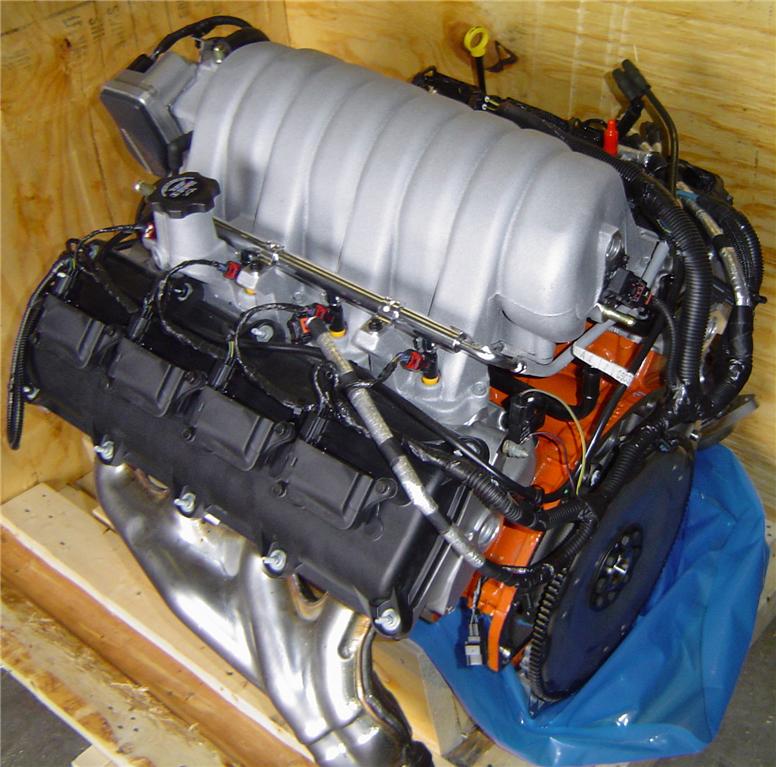
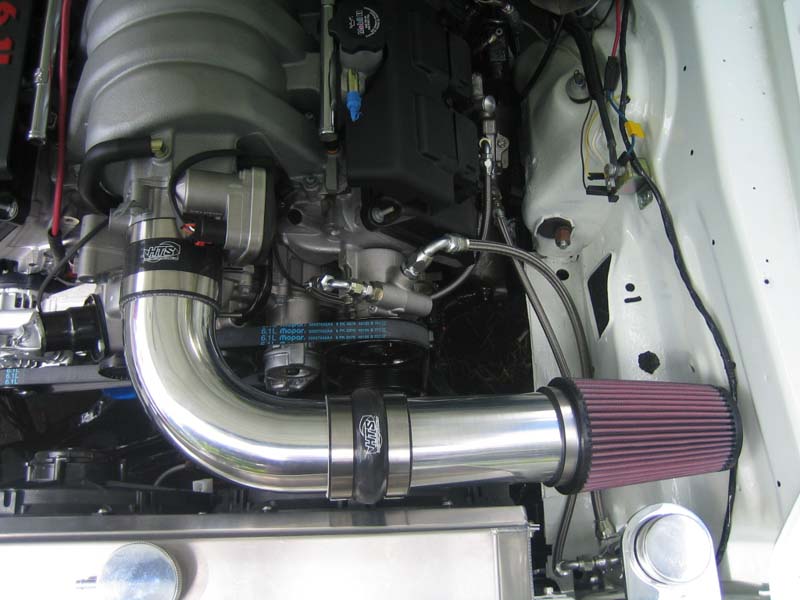
Ok, I see there is quite an interest in the 6.1 / 5.7 Hemi conversions as of lately.
Just happens to be raining a lot today here in Hawaii and I finally had some spare time to be able to give an outline on the swap.
All of the information I have received and learned came my way from Herb McCandless (at Chryler’s @ Carlisle ’07 Hemi Seminar), Dave Weber (Modern Muscle), Arrington Racing Engines, Tony Squier @ Squier Inc., Street & Performance, Pete (Moparts: Autodynamics), Gdemon (Jerry), Rob @ Weldtech and I am suree I am forgetting someone…


What I am going to outline here is what it took to get a 6.1L Hemi complete engine (off the assembly line) installed into a ’71 Cuda 340 with factory A/C.
Just before the swap, the ’71 Cuda had a new 360 Magnum 395hp engine w/ Demon 850 annular carb & Built 727 w/ bolt-in sprag, TF-2 and Dynamic 9.5” converter.

The engine was great, very responsive, nice lope and made great power. But it had many faults the wife wasn’t to crazy about. Cold start pumping the carb, wait for it to warm up a bit, marginal power brakes when coming down a long steep hill and other old technology symptoms.

To make this Cuda more wife friendly (and an excuse to build a new project), I decided a late model 6.1L Hemi would kill ALL birds with one stone. Make more power, easy cold starts, excellent driveability, 140amp generator, small efficient a/c compressor and an abundance of readily available parts.

Many options to acquire a 3rd generation Hemi. Wreckyards or new from the dealer as a complete off-the-line assembly engine with intake, injectors, fuel rails, sensors (minus Intake Air Temp Sensor) or you can buy Direct Connection’s Crate Engine with wiring harness and ECM which is not all that cheap.
I chose the 6.1L Hemi engine off the assembly line pn# 5037400-BA. It lists for $6735 and not available at all dealers. Only select dealers can get them.
My buddy Josh @ Champion Chrysler Jeep in Missouri got me a screaming deal which was a fraction of the list price. He even helped me get it freighted to Hawaii for a very good price. Another bonus, the engine comes in a large crate which Josh stuffs all the extra parts in to save on shipping.

3930520-46994443_o.jpg (3103 downloads)
Re: How-To install a 5.7/6.1 HEMI into your 'ole Mopar! [Re: 808CUDA] #47371
11/05/07 01:03 AM
11/05/07 01:03 AM
Joined: Jan 2003
Posts: 2,280
808CUDA Offline OP
top fuel
808CUDA  Offline OP
top fuel

Joined: Jan 2003
Posts: 2,280
Transmission options. I needed to keep the automatic trans to keep the wife happy (and keep the car original). All 5.7 and 6.1 Hemi’s use the exact same bellhousing bolt pattern as any small block mopar. The only bolt it does not use is the hole at the 12 o’clock position (no biggie).
Lucky for me, the freshly built 727 in the car could be re-used for the same application. Not 100% sure as for the 9.5” converter (Dynamic couldn’t give me a concrete answer for the new Hemi’s) but I’ll find out soon.
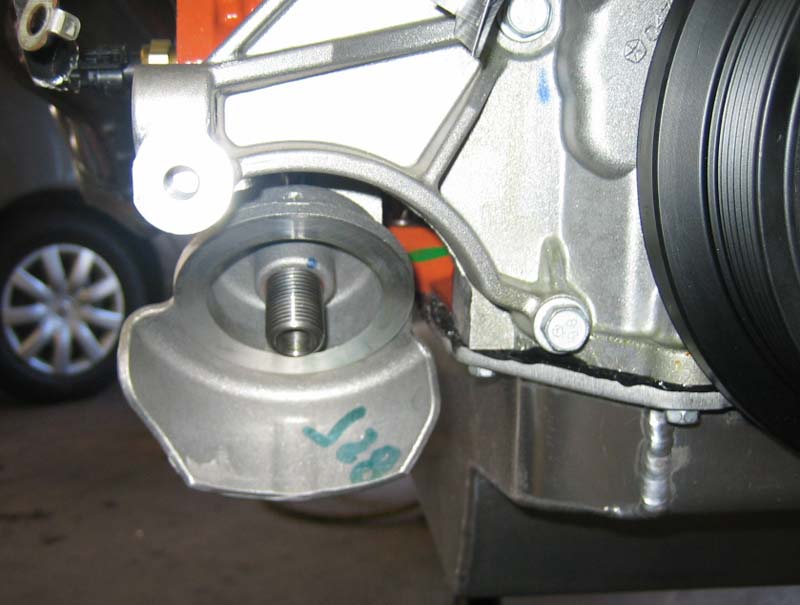
The original starter location on a 5.7/6.1 is on the passenger side but luckily Ma Mopar notched the block so we can mount it on the driver side for our application (they musta’ knew we were going to do these swaps  )
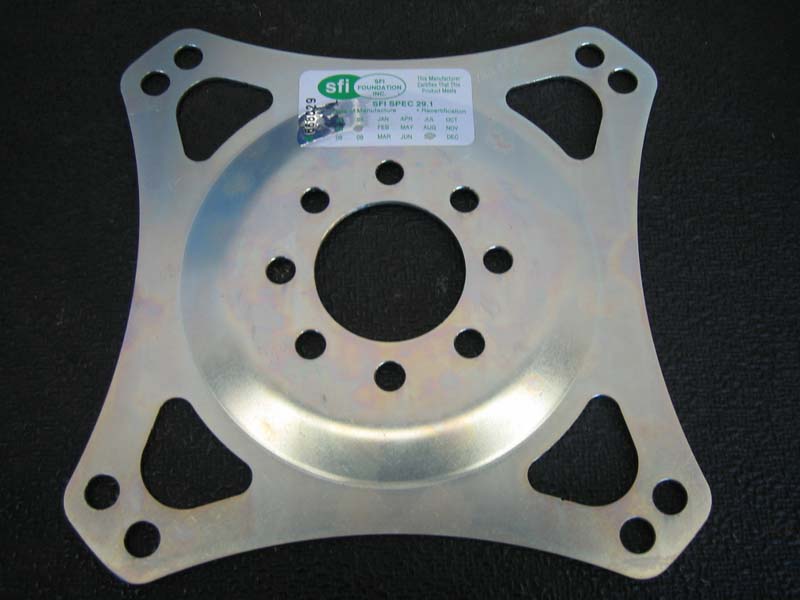
Ok, to get the converter bolted up to the new Hemi I needed a SFI flexplate sold by Direct Connection as part# P5153753 which I purchased from Mancini Racing for $63.95. It includes new hardware to attach the flexplate to the crank. You will need to use the D.C. thin headed torque converter bolts to attach the plate to converter.
This beats the older method of cutting off the ring gear on the Hemi’s original flexplate and re-drilling the holes as needed.
By the way, the new Hemi is internally balanced, so neutral balance converters are a must.
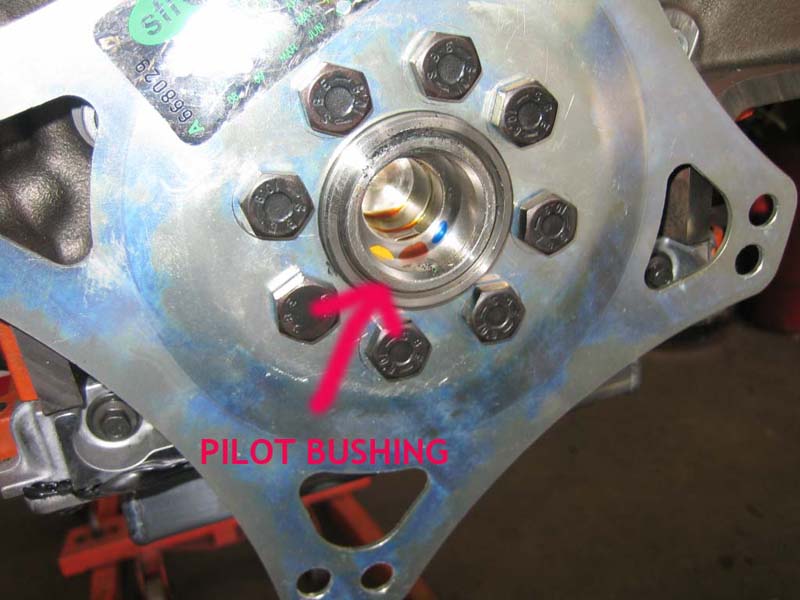
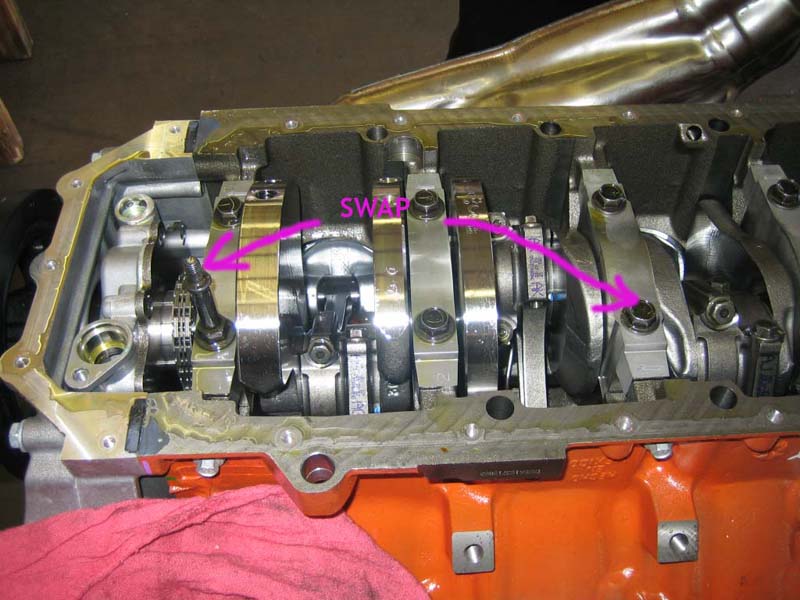
An IMPORTANT note I must state here as I learned the hard way. The 6.1L hemi had a large I.D. pilot bushing at the rear of the crank which needs to be removed to allow the converter hub to properly register into the rear of the crank.
Due to the shape of the bushing it was rather difficult to remove. I could not find a puller which could get a grip to pull it out. The method I used was to use a carbide cutter tip on my die-grinder and cut the ring in 3 spots which allow the bushing to easily removed.

Now, since I am running a fully automatic valve body in the 727, I still need the kick-down/ Detent cable to still be attached to the engine. Problem is the newer Hemi’s have what is called “drive-by-wire” throttle bodies which essentially are electric motor drive throttle blade which is computer controlled by the ECM depending on throttle input from a sensor attached to the gas pedal or a throttle position box.
A throttle position box was used ’03-’04 Hemi Ram’s. It essentially is a box with a throttle position sensor in it. A throttle cable attaches this box to a mechanical gas pedal.
Later year Hemi’s would do away with the box by simply attaching the sensor directly to the pedal.
Tony and Chris Squier design their wire harnesses with both connectors so you can switch from a throttle position box to a electronic gas pedal instead.

Now back to the original dilemma. I needed a way to physically connect the detent cable from the 727 to the engine which has a motorized throttle body. Through the use of two Lokar cables, I was able to connect my original ’71 gas pedal to the throttle box as well as the 727 detent cable. The 727 cable is installed on the opposite end of the box so that it is pulled by the throttle cable on throttle and released on decal. Very ingenius. I learned this set-up from Tony Squier and Street & Performance.
Parts used: Lokar Universal 36” Throttle Cable and 727 Kickdown cable kit.

Had I used a manual valve body 727 or a manual trans, I could have simply used the newer electronic gas pedal for an easier and cleaner install.

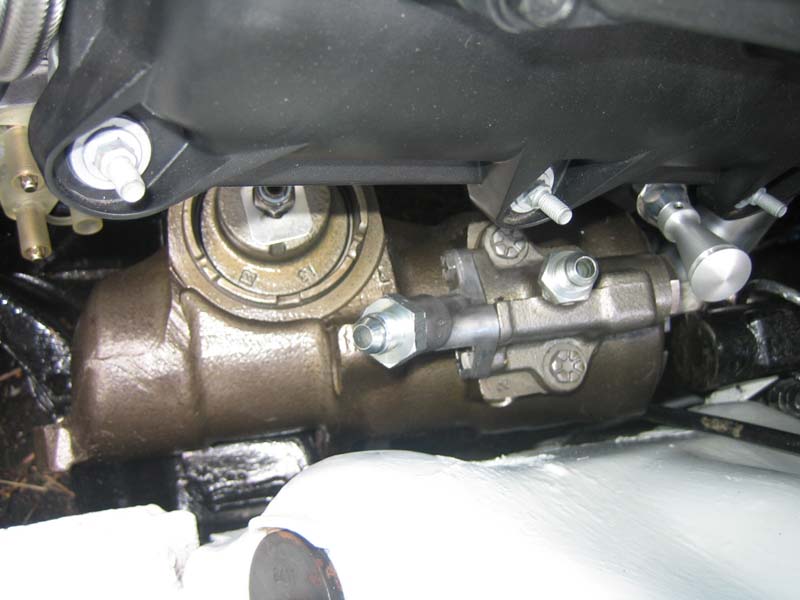
As for the 727 trans dipstick tube, I originally had a newer type tube and locking indicator installed which I purchased from CRT. It faces forward and hits the rear of the right side cylinder head. A little tweaking of the tube to curve it backwards allowed me to re-use the dipstick tube and indicator.

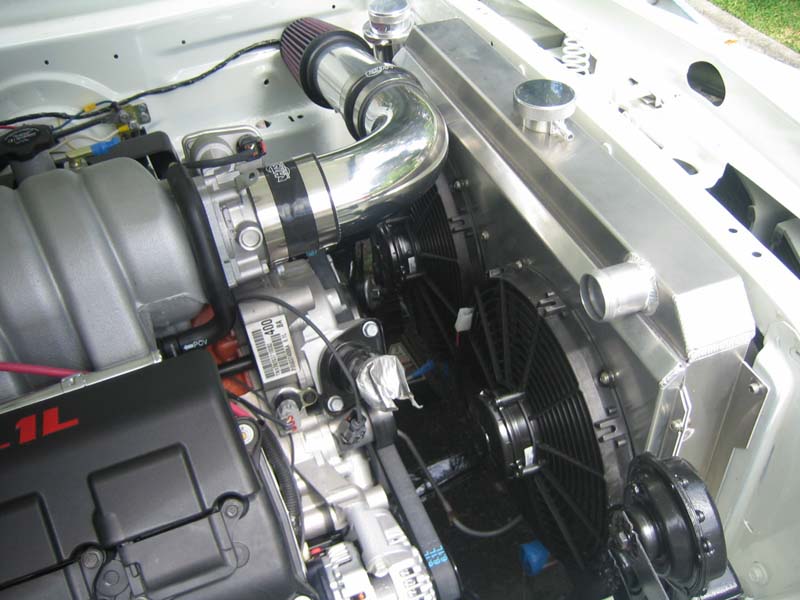
And the last note on using the 3G Hemi with the 727, you can re-use the original trans cooler lines. There are no interferences with the headers or engine mounts and line right up to the new Ron Davis Aluminum Radiator.

3930524-Flexplate.jpg (3052 downloads)
Re: How-To install a 5.7/6.1 HEMI into your 'ole Mopar! [Re: 808CUDA] #47372
11/05/07 01:05 AM
11/05/07 01:05 AM
Joined: Jan 2003
Posts: 2,280
808CUDA Offline OP
top fuel
808CUDA  Offline OP
top fuel

Joined: Jan 2003
Posts: 2,280
A pic of the Throttle box with both throttle and detent cables attached

3930525-ThrottleBox.jpg (4202 downloads)
Re: How-To install a 5.7/6.1 HEMI into your 'ole Mopar! [Re: 808CUDA] #47373
11/05/07 01:06 AM
11/05/07 01:06 AM
Joined: Jan 2003
Posts: 2,280
808CUDA Offline OP
top fuel
808CUDA  Offline OP
top fuel

Joined: Jan 2003
Posts: 2,280
A pic of the large pilot bushing that needs to be removed.

3930528-Pilot_Bushing.jpg (4369 downloads)
Re: How-To install a 5.7/6.1 HEMI into your 'ole Mopar! [Re: 808CUDA] #47374
11/05/07 01:07 AM
11/05/07 01:07 AM
Joined: Jan 2003
Posts: 2,280
808CUDA Offline OP
top fuel
808CUDA  Offline OP
top fuel

Joined: Jan 2003
Posts: 2,280
Now that I covered the trans, we’ll go to the required parts and modifications to fit the engine into the Cuda.

I used TTi engine mount brackets pn# TTIMM57BE and TTi headers pn# TTI6.1HC-C4.
The mounts included the needed hardware.

Using the TTi mounts along with the TTi headers assured me if I had header issues due to engine alignment issues, I would have a ground to stand on. I still had left side header issues and will be addressing it to TTi to se what they can do about it.

Now once you mount the engine brackets to the block you will notice the rubber insulators will need to be slightly modified and clearanced to avoid contacting the block. It only required grinding the corners at an angle.
A couple of other notes on the engine insulators. Install the long ½” pass thru bolts into the driver’s side insulator. With the bolt tightened, cut flush the excess length passed the insulator nut. This will help in clearing the a/c compressor.
On the passenger side insulator, since the oil filter adapter is in the way, it is impossible to install the ½” pass-thru bolt from the front of engine. This will require drilling through the insulator’s existing nut so the bolt can be installed from the rear and using a nut on the other end.

3930530-PassMount_MOD.jpg (2842 downloads)
Re: How-To install a 5.7/6.1 HEMI into your 'ole Mopar! [Re: 808CUDA] #47375
11/05/07 01:08 AM
11/05/07 01:08 AM
Joined: Jan 2003
Posts: 2,280
808CUDA Offline OP
top fuel
808CUDA  Offline OP
top fuel

Joined: Jan 2003
Posts: 2,280
After grinding the interference...

3930531-PassMount_MOD2.jpg (2617 downloads)
Re: How-To install a 5.7/6.1 HEMI into your 'ole Mopar! [Re: 808CUDA] #47376
11/05/07 01:09 AM
11/05/07 01:09 AM
Joined: Jan 2003
Posts: 2,280
808CUDA Offline OP
top fuel
808CUDA  Offline OP
top fuel

Joined: Jan 2003
Posts: 2,280
Driver's side mount went on easily..

3930534-Driver_Mount.jpg (2302 downloads)
Re: How-To install a 5.7/6.1 HEMI into your 'ole Mopar! [Re: 808CUDA] #47377
11/05/07 01:10 AM
11/05/07 01:10 AM
Joined: Jan 2003
Posts: 2,280
808CUDA Offline OP
top fuel
808CUDA  Offline OP
top fuel

Joined: Jan 2003
Posts: 2,280
By the way, make sure you install your 45 degree Engine oil filter adapter to the engine first before securing the right side engine mount to the block. It is a tight fit.

Some folks have used the oil filter block off plate then install a remote oil filter kit.
On an E or B body, that is not necessary. By using part # 53021610-AE and 3 small bolts pn# 6102041-AA, you can reposition the oil filter to clear the K-frame.
All that is required is to remove the oil filter pipe fitting on the block (very tight with loctite), and bolting on the adapter. Then cut the oil catch slide in half so it won’t interfere with the K-frame. Last important note is to use an AC-Delco PF13 oil filter. It is ½” shorter and will allow easy replacement. No worry on the filter, it is the replacement filter for an SRT8 Charger or 300C.
Keep in mind, this adapter can be used on an A-body but will require the K-frame to be notched (Thanks Jerry!)

Just above the oil filter you will see a sensor screwed in. It is the engine oil temperature sensor and not used in our application. You can unscrew that and purchase two brass fittings which will allow us to re-use the OE oil pressure sender. On my application, I needed a 45 deg fitting so the sender would clear the headers and frame.

3930536-45degFilter_1.jpg (5795 downloads)
Re: How-To install a 5.7/6.1 HEMI into your 'ole Mopar! [Re: 808CUDA] #47378
11/05/07 01:11 AM
11/05/07 01:11 AM
Joined: Jan 2003
Posts: 2,280
808CUDA Offline OP
top fuel
808CUDA  Offline OP
top fuel

Joined: Jan 2003
Posts: 2,280
How it looks after the trimming..

3930539-45degFilter_CUT.jpg (4168 downloads)
Re: How-To install a 5.7/6.1 HEMI into your 'ole Mopar! [Re: 808CUDA] #47379
11/05/07 01:12 AM
11/05/07 01:12 AM
Joined: Jan 2003
Posts: 2,280
808CUDA Offline OP
top fuel
808CUDA  Offline OP
top fuel

Joined: Jan 2003
Posts: 2,280
Another needed item is center/mid sump oil pan. There are 4 choices from what I have seen.
-Weldtech makes a custom aluminum pan with modified pick-up tube.
-Charlie’s makes the same custome pan and pick-up tube.
-Milodon makes one you can purchase through Direct Connection.
-Modify an original 3G Hemi pan (very difficult from what I understand)

A couple of items to be aware about on the pan swap.
-The windage tray is the actual pan gasket.
-5.7 oil pan gasket has different drainback holes than the 6.1L hemi.
-Two (2) additional holes need to be drilled at the rear of the oil pan gasket when using a Weldtech or Charlie’s pan. They are using two not used existing drilled/tapped mounting holes.
-Apply a very good black RTV to both sides of the oil pan gasket.
-When swapping pick-up tubes, the #1 main cap stud needs to be swapped with the #3 main cap bolt to properly secure the pick-up tube.
-If you car is a driver like mine, I polished my Weldtech pan by hand with Mother’s Mag wheel polish, washed it then clear coated it with High Temp Engine Clear paint.
-Always a good idea to have on hand a NEW o-ring seal fro the pick-up tube. A cut o-ring seal will aerate your oil and give you much grief, just ask some Chevy LS1 owners.

3930541-GasketHoles.jpg (2634 downloads)
Re: How-To install a 5.7/6.1 HEMI into your 'ole Mopar! [Re: 808CUDA] #47380
11/05/07 01:13 AM
11/05/07 01:13 AM
Joined: Jan 2003
Posts: 2,280
808CUDA Offline OP
top fuel
808CUDA  Offline OP
top fuel

Joined: Jan 2003
Posts: 2,280
Relocated pick-up tube

3930542-PICK_Up1.jpg (2570 downloads)
Re: How-To install a 5.7/6.1 HEMI into your 'ole Mopar! [Re: 808CUDA] #47381
11/05/07 01:13 AM
11/05/07 01:13 AM
Joined: Jan 2003
Posts: 2,280
808CUDA Offline OP
top fuel
808CUDA  Offline OP
top fuel

Joined: Jan 2003
Posts: 2,280
Main cap bolts needed to swap...

3930546-MAIN_bolts.jpg (5198 downloads)
Re: How-To install a 5.7/6.1 HEMI into your 'ole Mopar! [Re: 808CUDA] #47382
11/05/07 01:14 AM
11/05/07 01:14 AM
Joined: Jan 2003
Posts: 2,280
808CUDA Offline OP
top fuel
808CUDA  Offline OP
top fuel

Joined: Jan 2003
Posts: 2,280
Beautiful Weldtech oil pan

3930547-WeldtechPan.jpg (2472 downloads)
Re: How-To install a 5.7/6.1 HEMI into your 'ole Mopar! [Re: 808CUDA] #47383
11/05/07 01:15 AM
11/05/07 01:15 AM
Joined: Jan 2003
Posts: 2,280
808CUDA Offline OP
top fuel
808CUDA  Offline OP
top fuel

Joined: Jan 2003
Posts: 2,280
Ok, We’ve got the pan, flexplate and mounts on. We now need to modify the K-frame to allow the use of the 6.1 Hemi a/c compressor. Note: if you are running an a/c delete pulley you will not need to do this next step.
To clear the a/c compressor on our B/E K-frame, we will need to perform a small notch on the driver’s side. This will allow the a/c compressor to clear.
We will also need to cut the 4th ear off the A/C compressor. It will not be used and will give us the needed clearance.

3930550-KframeNOTCH.jpg (2423 downloads)
Re: How-To install a 5.7/6.1 HEMI into your 'ole Mopar! [Re: 808CUDA] #47384
11/05/07 01:16 AM
11/05/07 01:16 AM
Joined: Jan 2003
Posts: 2,280
808CUDA Offline OP
top fuel
808CUDA  Offline OP
top fuel

Joined: Jan 2003
Posts: 2,280
After performing all the aforementioned changes, the new hemi will easily slip into the K-frame and bolt-up to your existing trans. Just don’t forget to unbolt the original manifolds and save the gaskets. These MLS headers gaskets are better than the gaskets supplied by TTi .
To properly chain the engine for hoisting, unbolt the upper intake manifold and remove from the engine. Get some safe release tape and mask any open intake and oil passages.
Then using two engine chains and FOUR (4) grade 8 or better 8MM bolts, attach the chain to the 4 corners at the front and rear of the cylinder heads. Now you are ready to hoist that bad boy in.

3930554-Engine_Drop.jpg (3004 downloads)
Re: How-To install a 5.7/6.1 HEMI into your 'ole Mopar! [Re: 808CUDA] #47385
11/05/07 01:18 AM
11/05/07 01:18 AM
Joined: Jan 2003
Posts: 2,280
808CUDA Offline OP
top fuel
808CUDA  Offline OP
top fuel

Joined: Jan 2003
Posts: 2,280
Ok engine is in and now we need to attach some accessories.

To install the a/c compressor, we needed to remove the 4th ear off the a/c compressor.
You must cut this ear flush off the rear of the a/c compressor housing. This will barely clear the driver’s side mount on the K-frame.
Next you will need to shorten the lower mounting bolt by approx. ¾”. So it can be installed and tightened to the engine.
The a/c compressor electrical connector can then be flipped on it’s bracket to it can plug into the Squier engine harness.

The Generator is a straight forward bolt-in affair. Just need to purchase the 3 correct mounting bolts and an 8mm nut for the battery cable.
Using the existing battery/generator cable on the original 6.1L Hemi engine harness which has a fusible link, I was able to run the generator cable from the generator to the starter B+ terminal below the intake manifold.
Buttoning up the drive accessories was easy as well. Just ordered a correct belt tensioner, idler pulley (with cover) and drivebelt. Easy as pie.

Installing the TTi headers was not fun. Keep in mind my torsion bars were not in since I was overhauling the front end.
The passenger side was easy and straight forward.
The driver’s side #1 primary pipe interfered with the a/c compressor. It required a half dollar size dent to clear the compressor. ( I am not the only one to have experienced this).
The #1 pipe also interfered with the upper rear corner of the driver’s side mount insulator. Nothing a little grinding didn’t correct.
But the rear problem was installing the mini denso starter. It would not fit properly. It required two half dollar dings on two different pipes to get the starter fitted.
I plan on addressing these issues with TTi soon.
Also, since I have power steering, it was tricky getting the driver’s side in. Header in, the p/s box will not go in. P/s box in and header will not go in.
Required leaving the box in LOOSE , push the box as far left as possible and slipping the header into position. This was WITHOUT the torsion bar which I can imagine would make it much more difficult. Another possibility would have been to jack the engine up but I did not want to lift on the new pan.
One big bonus. The headers immediately bolted righted up to my existing TTi exhaust.

Re: How-To install a 5.7/6.1 HEMI into your 'ole Mopar! [Re: 808CUDA] #47386
11/05/07 01:20 AM
11/05/07 01:20 AM
Joined: Jan 2003
Posts: 2,280
808CUDA Offline OP
top fuel
808CUDA  Offline OP
top fuel

Joined: Jan 2003
Posts: 2,280
Power steering pump. I purchased all my power steering parts from Street & Performance. According to Street & Performance, Our power steering system runs on 950psi. the OE 6.1 pump runs @ 1350 psi and according to S&P our boxes will not handle that. So I decided to purchase their p/s pump which is a GM pump rated @ 950 psi. I also purchased their pre-made to order power steering hoses and remote aluminum reservoir.
Several problems arised from this swap. The S&P hoses are fitted with AN-6 fittings to the gearbox for inlet and outlet.
I installed a fresh Firm Feel Stage 2 box. Firm Feel did not know what the thread size and fittings I can use on the gear box. So I took the original fittings to a hydraulic supply store and the best they could do was match it up to some metric sized an-6 fittings.
I sized my fittings as follows:
Pressure fitting on box: ½” -20 inverted flare
Return fitting: 5/8”- 18 inverted flare
So I took the metric fitting and re-tapped them to the correct sizes. The return fitting also required a 7/16” hole to drilled so the spring can sit in the well.
As for the pulley, amazingly the original 6.1L hemi p/s pulley can be used on the GM pump.
Another note, Pete (autodynamics) brought to my attention his dilemma with his hydroboost brakes. If you are running hydroboost and power steering, you will need the 1350psi pump due to the hydroboost’s demand.
Engine oil dipstick and tube for the new Hemi can be purchased through S&P. It is a Lokar piece which is nice and pretty. Been told an OE 5.7 Hemi dipstick can be used, not 100% sure tho.

3930564-PSboxfittings.jpg (2388 downloads)
Re: How-To install a 5.7/6.1 HEMI into your 'ole Mopar! [Re: 808CUDA] #47387
11/05/07 01:20 AM
11/05/07 01:20 AM
Joined: Jan 2003
Posts: 2,280
808CUDA Offline OP
top fuel
808CUDA  Offline OP
top fuel

Joined: Jan 2003
Posts: 2,280
A pic of the p/s line routing...

3930566-PS_lines.jpg (2498 downloads)
Re: How-To install a 5.7/6.1 HEMI into your 'ole Mopar! [Re: 808CUDA] #47388
11/05/07 01:21 AM
11/05/07 01:21 AM
Joined: Jan 2003
Posts: 2,280
808CUDA Offline OP
top fuel
808CUDA  Offline OP
top fuel

Joined: Jan 2003
Posts: 2,280
For the cooling system you will need to run at least one electric fan if not two.
Thanks to Pete’s suggestion, I called Ron Davis Racing and have them build a custom aluminum radiator with dual electric fans and custom shroud ready to bolt-in and attach to my existing trans cooler lines.
Ran into a couple of problems with Ron Davis, but Bill @ Ron Davis stepped up and helped correct the mistakes.
The unique features of the 3G Hemi radiator requirements are the inlet and outlet locations. They both need to be on the passenger side. If not, you are going to run some really LONG upper and lower hoses 
Upper hose O.D. measures 1.75” and lower measures 1.65’
Preferably due to the fact both inlet/outlet connections are on the same side of the radiator, you will need a downflow radiator with upper and lower tanks.
You can use a crossflow radiator with sidetanks but it will need to be segmented as such that the coolant from the upper hose does not go straight down to the lower hose in the same tank. Keep this in mind when ordering a radiator.
I also purchased a dual fan relay wire harness to wire the fans.
If you are doing the same build as me, you can call Ron Davis, speak to Bill and tell him you want the same exact radiator I had made (26” radiator). I am sure they keep the specs on file. And for hoses, I used Napa hoses pn# 8458 and #7694

3930568-RonDavisRad.jpg (2119 downloads)
Re: How-To install a 5.7/6.1 HEMI into your 'ole Mopar! [Re: 808CUDA] #47389
11/05/07 01:23 AM
11/05/07 01:23 AM
Joined: Jan 2003
Posts: 2,280
808CUDA Offline OP
top fuel
808CUDA  Offline OP
top fuel

Joined: Jan 2003
Posts: 2,280
Engine management and wire harnesses are available from several sources.

You can go with F.A.S.T. which they sell a plug n play harness and uses their ECM which you can tune with a laptop computer. It requires a FAST 90MM throttle body which is mechanical and uses an idle air control valve. It also requires a different coolant temp and intake air temp sensor. Nice set-up for someone who plans on modifying their 3G Hemi. I was tempted to use this set-up but decided not to for several reasons. I do not intend to make the engine radical to keep it comfortable for the wife, besides 450hp is enough for her. I am very well experienced with tuning EFI with a laptop, just do not see us modifying this engine. Another reason is the 6.1L Hemi pistons are very unforgiving if you make a mistake while tuning. Due to the small ring land areas, if you go lean even for a brief moment you will almost instantly burn that piston up.
Another item I did not like is FAST does not look at the knock sensors. So go lean too long or detonate without knowing it is very risky.
On the plus side, since it is a mechanical throttle body, throttle response is faster. You can also connect your detent cable at the throttle body.

You have AEM. Been told by many to stay away. I am not convinced on the AEM .
For the price of an AEM I would go FAST which has a better reputation.
Then you got Direct Connection engine harness with ECM and throttle body. Was not available when I started and seemed very pricey. Again, FAST has a greater reputation.
Supposedly tuneable with a laptop Windows based program.

I decided to go with Squier Auto (Hotwaireauto.com). They make an engine harness to use the existing OE sensors and ECM.
They are the only game in town. If you buy the harness from any place else, you are buying from the middle man. They make a nice wire harness. It includes a fuseblock and relays for the fuel pump, starter and ASD. Those items are mounted inside the car. If you have a specific location you want the ECM mounted, you must measure that location from the firewall hole and tell them.
I am hoping we will one day have what GM LS1 engine owners have, HPtuners and EFI Live tuning software which allows tuning the factory ECM with a laptop computer.

Where Squier Auto fell short in is supplying some sort of info. with the harness.
Information such as the minimum size hole you need in the firewall (1.25”), what exactly the main wires need to be connected to and what inputs they need to see exactly.
They will tell you if you call them but it should be included with the wire harness.
I ran into two issues.
When I was ready to start the car it would only tap the starter when cranking. Tap just like when you are setting points on a distributor.
After going through the service manuals and talking to Pete (autodynamics), the ignition wire is not seeing 12volts during crank BECAUSE our older ignition switches do not supply ignition during crank on the same wire.
I took Pete’s suggestion and wired a relay so it would supply 12volts to ignition during crank.
So ok, now the car cranks and starts but then stalls out. I noticed electric fuel pump prime during cranking but then the fuel pump would quit.
I performed continuity checks between relays and ECM connector to find they installed two wires next to each other backwards. The starter relay control was mixed with the fuel pump relay control. Switched them and now she starts and purrs.
Thankfully I work on these things for a living because it was rather easy to find and correct for me. But for the poor soul who does this on weekends only it would have been hell.
Another item to keep in mind. If you are using an ’07 or newer 6.1 hemi, you will need a crank position sensor from a 2006 or older 5.7 Hemi pn#56028815-AA. The connector on the harness is larger and will not connect. Tony told me they have not been able to acquire the newer 2007 style connector.
Another note, the starter solenoid on the inner fender is no longer used to enable the starter. I use that solenoid as a junction block for power distribution now. The starter cranks from the starter relay in the new engine wire harness.
The Engine Control Module (ECM) can be purchased from Squier Auto but it will have a 5.7 tune which will not take full advantage of the 6.1 power and rev capability. It will have the ant-theft feature disabled so we can operate it in our cars.
I decided to purchase a new ECM and shipped it to B&G Specialists. Dave flashed the ECM to 6.1 specs and spiced up the tune for the headers and a higher rev limiter. They also disabled the anti-theft feature.
I’ve seen there are some hand held tuners being sold which can be used for these enhancements but you will still need to disable the anti-theft feature.
If you purchase a used ECM, you will need the VIN number so the anti-theft feature can be disabled. If you purchase an ECM, make sure it is for a ’04-’06 manual trans Hemi Ram. You will need this for either a manual trans or 727 swap. The Manual trans ECM will not enable the rev limiter.

As for the OE engine harness, it can be re-used with a slight modification.
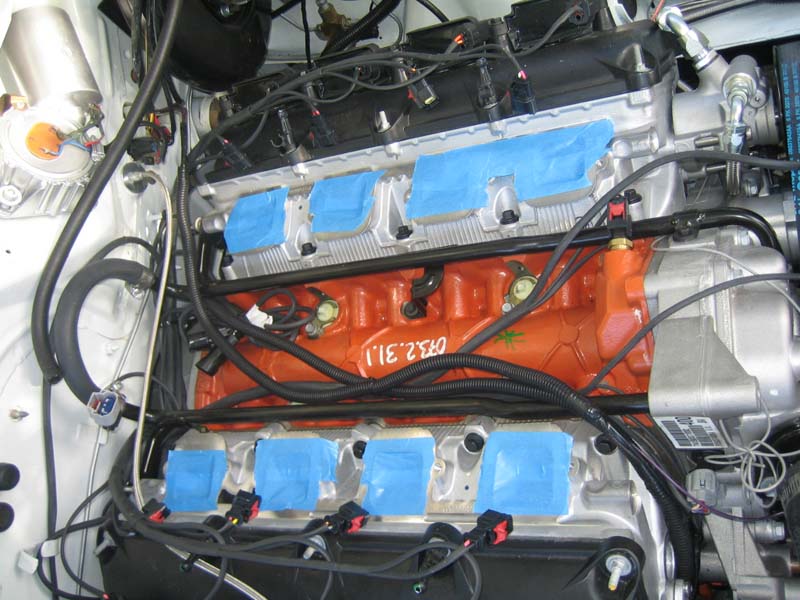
After removing the unnecessary ignition component wiring (i.e. ballast resistor,coil,ECU), I lengthened the oil pressure sender (grey wire) so it can reach the new location by the oil filter. Interestingly the coolant temp sender reached the new location with no modification. The horn and washer wires also did not require modification. I then placed the modified OE harness in a 3/8” convoluted tubing to protect the wires and routed the harness below the intake manifold.
While the intake manifold was off, I connected both heater pipes with 5/8” heater hose. In Hawaii we do not need heat, so I just bypassed it.

3930571-EngineWiring.jpg (2924 downloads)
Page 1 of 3 1 2 3


Powered by UBB.threads™ PHP Forum Software 7.7.1