|
 Re: New Paint job on a budget thread.
#37914
Re: New Paint job on a budget thread.
#37914
01/30/08 10:49 AM
01/30/08 10:49 AM
|
Joined: May 2006
Posts: 575
Canada
Marq

mopar addict
|
mopar addict
Joined: May 2006
Posts: 575
Canada
|
Quote:
Marq:
I'm in the works of getting a set and plan on painting them with rustoleum this spring, so thats why I was asking if you happened to paint a set yourself :P
I think I'm going to use aircraft stripper to get the old clearcoat off, and then just spray bomb the crosslace section... I don't see much point in trying to roll the laces.
I haven't done a rim in years. Last time I did a rim was back in 1970 on a Triumph TR4A set of steel rims.
I know with my TransAm rims, they were looking a little dodgy. But fortunately we had a rim refurbishing company that did hotswaps. They would show up at your house with a fresh spanking and sparkling newly refurbished set of rims and take your money and the old rims. The cost was a measly $50 per rim and well worth it.
I did have one friend by the name of Carl who was a bit of a perfectionist. He use to put his car away every winter. So what he did one winter was remove the rims from the car and brought them to his basement. Over the winter, whenever the mood struck him... he would venture down to his basement and do a little sanding... a little painting....... a little wet sanding... a little more painting etc etc etc... all winter long. In the spring he showed us how his rims had turned out and they were nothing short of amazing. I would dare say that they were actually better then the factory originals.
So I know that the rims can be done successfully and with good long term endurance. BUT my main area of concern with open or spoked style rims is the road contaminant that will land on the paint.
Brake dust is particularly nasty if it is allowed to build up. And because you have a paint type coating on the rim... it sort of limits the type of cleansers that you would normally be able to use on a rim.
The other problem is simply all the road chips that will happened to the paint on the rims. If the paint is somewhat soft... then you will get a cratered moon type pitting which will slowly reduce the gloss and shine of the painted areas. If the paint is fully hardened... there is the risk the road chips may smack out or separate little pieces of the paint from the rim.
That was one of the reasons I opted to pay the bucks for the professionally refinished / refurbished rims. Their cleaning methods and chemicals are far superior to anything most of us could bring to play on the taak. As well, they have the paint, paint application methods and ability to bake on the paint. And even for the finished clearcoat they put on it... I suspect they have a superior product available to them.
If we were to try to duplicate the cost of chemicals for the acid bath, surface prep chemicals, paint and clear coat, I suspect the cost would end up over the $50 per rim that I paid. And that was not taking into consideration the 'experience' they have at working on rims etc.
One hint is to get a quote directly from the rim refurbishing company, with yourself pretending to be a garage ( not a consumer ) and not going through some middleman company.
IF I was going to do my rims... I suspect that I would probably lean towards doing the aerosol bomb method as compared to a foam brush etc.
I do know that one guy did an amazing job on his set of spoked/splined style rims using an airbrush to lay on the paint. The guy was pretty good at airbrushing art work... and so he just figured that it would be a natural for the rims. He used the same type of paint that he would use when painting a mural on the hood of a car or on the side of a van. At least he knew that the paint itself was durable for exposure to the elements.
One other chap I knew... did all the surface preparation work on his rims and got them up to the stage where the paint was ready to be applied. But he chickened out of doing it himself and instead took it to a local professional autobody / paintshop. They sprayed his rims using a polyurathane... and then clear coated them. I think the total cost was about $100 and they looked factory fresh..
.
|
|
|
Re: New Paint job on a budget thread.
#37915
01/30/08 01:05 PM
01/30/08 01:05 PM
|
Anonymous
Unregistered
|
Anonymous
Unregistered
|
Have you ever though of maybe building a cheap little quonset with some tarps and cheap lumber? Doing this outside and letting it get rained on and what not are obviously not going to get the best results...
|
|
|
Re: New Paint job on a budget thread.
#37916
01/30/08 03:53 PM
01/30/08 03:53 PM
|
Anonymous
Unregistered
|
Anonymous
Unregistered
|
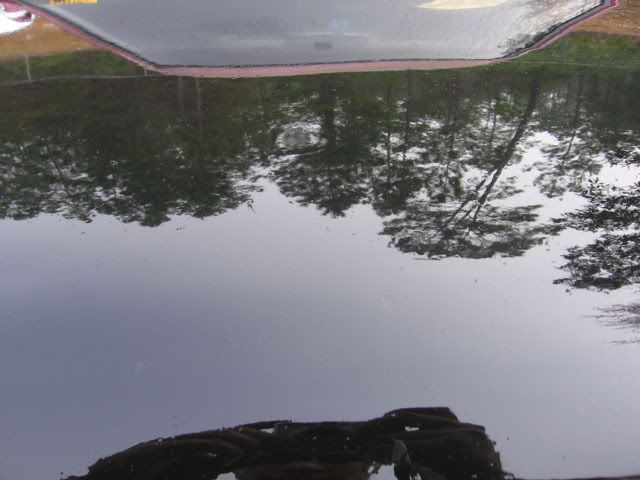
Quote:
No runs, thin but not too thin. I can barely see the original paint.
(Took crappy pics - wrong settings on camera  ) )
As Borat would say, "wow wow wee"
Nice reflections. Hopefully a couple more coats and ill be set to move on!
Looks like you finally got the formula down for your conditions. Congrats, its looking good. 
|
|
|
Re: New Paint job on a budget thread.
#37917
01/31/08 01:26 AM
01/31/08 01:26 AM
|
Anonymous
Unregistered
|
Anonymous
Unregistered
|
For rims, I've thought about getting them powdercoated. I know the powdercoating would probably outlast the car... but it just goes back to initial cost.
So I'm thinking that just in the short run of a few years that if I just rattle-can my rims every couple years to keep them looking good, then that would be allright.
But I hadn't thought about having a professional shop do them... I'll have to look into that. Hmm...
|
|
|
Re: New Paint job on a budget thread.
#37918
02/01/08 03:23 AM
02/01/08 03:23 AM
|
Anonymous
Unregistered
|
Anonymous
Unregistered
|
With regard to the question of powdercoating your rims, if you're going to keep the rims for the long term and you can afford it I'd go the powdercoat route. After all, with the durability you'll get why would you want to go through the time and effort to "renew" them yourself every year or two? That's time lost enhancing the vehicle in some other way!
Regards,
|
|
|
Re: New Paint job on a budget thread.
#37919
02/01/08 09:41 AM
02/01/08 09:41 AM
|
Anonymous
Unregistered
|
Anonymous
Unregistered
|
Well okay. I forgot to change the batteries to the camera so I went to use my cellphone camera but I cant find the cables to connect it to my PC!  I just realized I skipped putting on another coat!!  I just got back from sanding with 1000G and putting on another coat. i think im going crazy  This must mean i should be taking a vacation from my day (night technically) been working overtime for the past couple weeks has been killing me. So now that i skipped 6th coat, im going to put 2 more coats on top of the one i just did now. I have some issues though. The edge of the hood that is parallel to the windshield refuses to hold the paint. This edge is curved upward to meet the angle of the windshield. When I roll over this edge, the paint does not like to sit on this "upward curved" edge. BUT all other 3 edges are fine, even the edge parallel to the bumper, which might I add is curved downward. My paint doesn't run either. Another thing I want to check is my prep. I just want to go over it and make sure im doing this right. From the beginning.. Before 1st coat;(Assuming surface is sanded and paint is mixed) -wipe down with MS -let it dry a bit -wipe with tack cloth - about this tack cloth, how many times can i use a single sheet?-begin rolling 1st coat - About rollers, how many times can I use a roller?-wait 24hrs -wipe down with MS -let it dry a bit -wipe down with tack cloth -apply 2nd coat -wait 24hrs -WET SAND - start off using 600g and gradually move up to 800,1000,1200 after 2 coats - about wet sanding. When I start wet sanding, i notice the paper will glide easily on some parts of the surface and other it will literately get stuck on the surface, as if it was "sucked" to the surface. I'm assuming these are the parts i have to smooth out? Also how much pressure i should apply while wet sanding and how long should a hood take to wet sand? -apply 3rd coat and repeat
|
|
|
Re: New Paint job on a budget thread.
#37920
02/01/08 12:33 PM
02/01/08 12:33 PM
|
Joined: Mar 2007
Posts: 5,660
Flint, MI
Gusteve
I Love the Unicorn Song!!
|
I Love the Unicorn Song!!
Joined: Mar 2007
Posts: 5,660
Flint, MI
|
Quote:
- about this tack cloth, how many times can i use a single sheet?
-begin rolling 1st coat
- About rollers, how many times can I use a roller?
-about wet sanding. When I start wet sanding, i notice the paper will glide easily on some parts of the surface and other it will literately get stuck on the surface, as if it was "sucked" to the surface. I'm assuming these are the parts i have to smooth out? Also how much pressure i should apply while wet sanding and how long should a hood take to wet sand?
Tack cloth - if you have it folded up into a 4" or so square, you can keep flipping/folding and use it over and over. Basically, as long as it is still "tacky", its good. (Tip - wear a neoprene glove so your hand doesn't get all sticky).
Rollers - if you seal the rollers up in plastic bags with twist ties, they will last 24 hours easy. They'll still be wet when you take them back out. I replaced mine every two coats. For $1 each, what the heck.
Wet Sanding - have a hose or spray bottle handy. When the sandpaper starts sticking its because its not wet enough. Also rinse it in a baucket or hose it off often, as it gathers up paint residue real quick. You should not need to use a lot of pressure, but you should be using some kind of sanding block or something firm to wrap the paper around while you are sanding. I used a stiff foam sanding block that I bought from the local hardware store. Its fairly firm, but you can still make it conform to curves in the panel.
|
|
|
Re: New Paint job on a budget thread.
[Re: Gusteve]
#37921
02/01/08 02:25 PM
02/01/08 02:25 PM
|
Anonymous
Unregistered
|
Anonymous
Unregistered
|
I think you're getting way ahead of yourself using 1200 after only 2 coats. 
|
|
|
Re: New Paint job on a budget thread.
#37922
02/01/08 03:31 PM
02/01/08 03:31 PM
|
Joined: Mar 2007
Posts: 5,660
Flint, MI
Gusteve
I Love the Unicorn Song!!
|
I Love the Unicorn Song!!
Joined: Mar 2007
Posts: 5,660
Flint, MI
|
Quote:
I think you're getting way ahead of yourself using 1200 after only 2 coats.
True.
He said "-WET SAND - start off using 600g and gradually move up to 800,1000,1200 after 2 coats"
I hope he meant move up a grade after each two coats, and did not mean doing 600, then 800, then 1000, then 1200 and then do another two coats.
Just to be clear - it should be:
2 coats
600
2 coats
800
2 coats
1000
2 coats
1200
|
|
|
Re: New Paint job on a budget thread.
[Re: Gusteve]
#37923
02/02/08 10:43 AM
02/02/08 10:43 AM
|
Anonymous
Unregistered
|
Anonymous
Unregistered
|
Hi, all. I read every post up to page 35 in this section, and have to put in my About 10 years ago, I painted a travelling van with Home Depot Aluminum Industrial paint (I don't remember what brand). I wanted the highest reflection possible, because I lived in AZ. I rolled it on one night, at about 2 AM, when it was about 78 degrees out. I wasn't concerned about orange peel, or anything. I painted everything but the glass, and lights (I even "smoked" the signals with a very light spray bomb silver). It stuck to the paint, rubber, plastic...etc.. perfectly, and in about a month, I polished it. I felt sorry for the pilots overhead! It was like bright anodized aluminum! It hurt my eyes, and I'm really surprised I didn't get pulled over for it! Here is a testement to it's durability: I went head on with a new Mustang, both of us going about 35. Mustang: Totalled. I had to pull my fender away from the tire. Paint stuck great except where the original paint underneath flaked off. Then, got rear ended by a teenager. I had to make him get out of the car because he was so scared. His Honda went under my bumper, and peeled back his lights, hood, etc. I buffed out the bottom of my bumper. Got sideswiped by a drunk in Cali., on the freeway. He was raging mad, and rammed my driver side. His Trans Am: TOTALLED! Fiberglass everywhere. He went to jail, I buffed out the paint. It had a 1" deep, 3 foot long crease, but NO loss of paint! April 8, 2004. had a 70 mph front collision with another van that almost killed my passenger, and I, and caught the van on fire, warped the roof in waves all the way back, and pushed the engine back almost a foot. Doors were stuck, etc.. The paint was fine (except, again, the original paint that had flaked off). It was even okay after the fire. So, in my experience, silver is great. The van, however was cursed.
|
|
|
Re: New Paint job on a budget thread.
#37924
02/02/08 11:29 AM
02/02/08 11:29 AM
|
Anonymous
Unregistered
|
Anonymous
Unregistered
|
Quote:
So, in my experience, silver is great. The van, however was cursed.
I think you may have neglected to consider one thing here ... the van wasn't cursed, it was camo'd by the polished aluminum paint, which reflected everything and made the vehicle "disappear." No wonder so many other vehicles collided with you ... or maybe they were blinded by the reflection?
Anyway, hope you and your passenger made a full recovery!!!
(sorry for the thread hijack!)
Regards,
|
|
|
Re: New Paint job on a budget thread.
#37925
02/02/08 12:01 PM
02/02/08 12:01 PM
|
Anonymous
Unregistered
|
Anonymous
Unregistered
|
Heheh. Yeah, I guess it was like the birds flying into windows.
By the way, I rolled it with the short nap type, straight out of the can, and didn't have bubbles. I unwittingly "tipped' it with a brush, using a technique I refined as a high end fine furniture builder. I would put almost microscopicly thin layers of stain over sanding sealer, and have to even them out perfectly, by brushing so lighly, that it felt like the brush didn't touch the surface. It should be the same as what has been done here, but my goal is to put it on smooth enough to not have to sand at all.
I have a '93 Mazda mx-3 (similar to the Miata) that I'm going to paint brightside black. I'm going to try with just 2 brushes, using the technique mentioned, and let you know how it works.
And thanks, Steve. My passenger still got headaches once in a while, and I still get random pains... Being a professional acrobat doesn't help any.
Last edited by FowlJesse; 02/02/08 12:06 PM.
|
|
|
Re: New Paint job on a budget thread.
#37926
02/02/08 12:38 PM
02/02/08 12:38 PM
|
Joined: Jul 2006
Posts: 44
USA
_Scott_
member
|
member
Joined: Jul 2006
Posts: 44
USA
|
Quote:
my goal is to put it on smooth enough to not have to sand at all.
It is possible to lay it out smooth enough with just a foam brush that the final sanding and polishing step is optional. I've seen
this car in person, and I had to look really hard to find any brush marks. Black will be less forgiving, but I'm sure you can get good results with a minumum of sanding and polishing.
|
|
|
Re: New Paint job on a budget thread.
[Re: _Scott_]
#37927
02/02/08 01:27 PM
02/02/08 01:27 PM
|
Anonymous
Unregistered
|
Anonymous
Unregistered
|
I would never attempt to use black on my first try anyways...
|
|
|
Re: New Paint job on a budget thread.
#37928
02/02/08 04:13 PM
02/02/08 04:13 PM
|
Anonymous
Unregistered
|
Anonymous
Unregistered
|
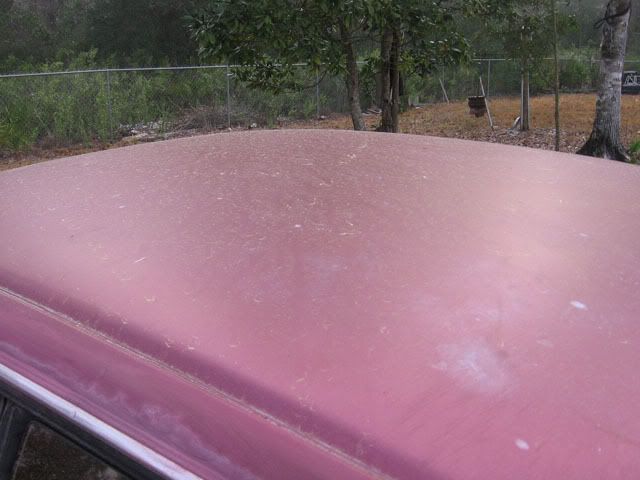
Durability update:
It's been quite a while since I've logged in to this site, but I thought it was an appropriate time for an update. I got hooked up with this thread about 2 years ago and did a little experimenting. My first project was to repaint the rusted garage beer fridge (red with white racing stripes) which I still love. Next up was the riding mower, again with Rustoleum's wonderfull Red (no racing stripes this time). That one was completed in April 2006 I think. Photos of both projects are back on the old expired threads on this site. Since that time, the mower has been sitting outside, uncovered, in the South Florida sun (when not performing it's duties!). Over the last few weeks I noticed just how faded the paint was starting to look on the hood. Keep in mind that from day one after the paint dried it has been outside and has NEVER had any wax applied. And as you might expect, it was starting to look pretty bad, but that was kinda the point - see how durable the paint is. Well, I couldn't take it any longer and broke out an old bottle of NU-FINISH car polish (not a compound, just a polish). 15 minutes later, with only elbow grease and a rag, the old mower looked just as shiny as the day I put the last coat on! I gotta say I am very impressed, enough that any doubts I had about putting it on my daily driver are gone. Now if I could only find the time! LOL
|
|
|
Re: New Paint job on a budget thread.
[Re: Gusteve]
#37929
02/04/08 10:58 AM
02/04/08 10:58 AM
|
Anonymous
Unregistered
|
Anonymous
Unregistered
|
Quote:
Quote:
I think you're getting way ahead of yourself using 1200 after only 2 coats.
True.
I hope he meant move up a grade after each two coats, and did not mean doing 600, then 800, then 1000, then 1200 and then do another two coats.
Just to be clear - it should be:
2 coats
600
2 coats
800
2 coats
1000
2 coats
1200
yep thats what i meant. after 2 coats, step it up a grade.
------------------------------------------------
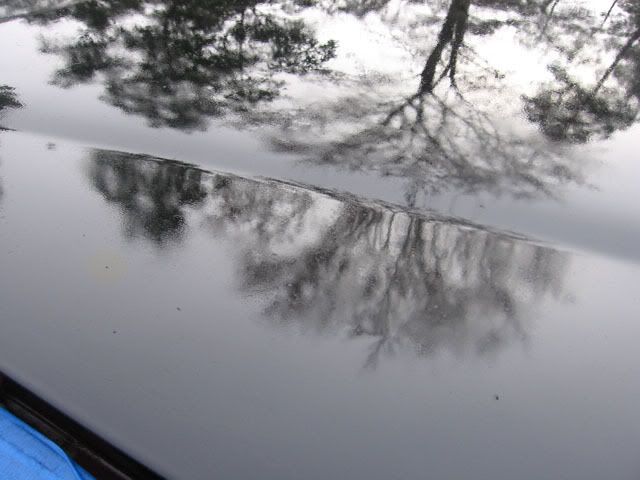
well that 5th coat turned out HORRIBLE after it got rained on. it left unwashable water spots on the surface. so i busted out 800g and sanded the hood off.
So basically I just put on another 5th coat, with more bad results 
Prepped the surface, laid a the 5th coat and this is where it begins. For some reason, there was a swarm of gnats (small annoying flys) hanging over my trunk. They literally waited till i finished painting to dive bomb the hood. im guessing the smell or the shine must of attracted them. so now i have a wet hood with some bugs on it. oh and I tried to pluck them out, but it was a losing war.
Well here are the pics. NEW 5th coat after sanding original water-spot 5th coat.
loving the reflection, but damn bugs, dog hair and grains of dirt ruin it.
----------------------
Spring time comming up. pollen coated vehicles are a common site around here.
----------------------
niiiiice

----------------------
Ok I did some crappy photo editing in photoshop. Heres a shot of some of the bugs that flew into my paint in the green circle.

----------------------
same shot, no editing.
Guess im going to have to live with it. Its not like im painting for a show quality finish.
|
|
|
Re: New Paint job on a budget thread.
#37930
02/04/08 11:52 AM
02/04/08 11:52 AM
|
Joined: May 2006
Posts: 575
Canada
Marq
mopar addict
|
mopar addict
Joined: May 2006
Posts: 575
Canada
|
Quote:
Quote:
Quote:
Damn gnats and bugs. Guess im going to have to live with it. Its not like im painting for a show quality finish.
There might be two things you can try... go to your local hippee store ( or maybe even Walmart ) and buy a 'blacklight'... Put it out in the yard on a lamp that you don't care about. The little gnats, moths, flies, mosquitoes and just about every other flying pest will go 'to the light'. And the fun thing is that blacklights heat up like you wouldn't believe... so any bug that is stupid enough to land on the light will be roasted and toasted before it knows what hit it.
In the meantime they will have been drawn away from your fresh coat of paint...
Now... on the topic of bugs flying on to the fresh paint... I agree with you. It seems there is something in the smell that draws the buggers to it. BUT one thing I learned... is that IF bugs land on the paint DON'T TOUCH THEM.
The odds are that the weight of the bug is not sufficient to penetrate too deeply into the skin of the paint as it is curing. The bug is usually attached on the outermost part of the paint skin.
So you let the paint fully dry... and the bug will fully dry with it... and the odds are that when you take a tack cloth to it after, the dried bug will easily separate from the paint as you are lightly wiping. The only evidence left behind might be a part of their leg hehhehe. The next coat of paint will take care of that tiny glitch. And even if you are moving on to the compounding, polishing and waxing stage, that will also go a long way towards making the gravesite of the bug disappear or become quite a bit less obvious.
I don't know what I would have done if a full size moth had stuck himself into the fresh paint. Fortunately it never happened... although I did have a STUPID cat walk on the hood while it was still curing ( that required a resanding and fresh coat of paint ).
With regards to hair in the fresh paint... it depends if it is human or dog...  When I was doing my initial painting I kept seeing human hair in the fresh paint. Sadly I must admit that it was coming off of me. After all, we humans shed hair all the time ( and especially in the shower and when brushing or combing our hair ). The solution to this problem was rather simple - I wore a baseball cap everytime I painted. No more hair from me. When I was doing my initial painting I kept seeing human hair in the fresh paint. Sadly I must admit that it was coming off of me. After all, we humans shed hair all the time ( and especially in the shower and when brushing or combing our hair ). The solution to this problem was rather simple - I wore a baseball cap everytime I painted. No more hair from me.
The only time I would try to remove hair from fresh paint is if I spotted that evil hair WHILE I was painting. At least at that point, I could get the hair off the wet paint and re-roll quickly over that spot ( feathering around it to blend it in ).
IF the paint was dried and I noticed a hair... I did not bother trying to dig it out of the freshly cured paint. IF I could use the tweezers on an exposed end of the hair, then I would try that to see how cleanly I could get the hair out.
In some cases the layer of paint that it is embedded in is thinner than the thickness of the paint itself. So you could make a greater mess by trying to pluck the hair out. So I just let the next coat of paint cover over it - and it seemed to work out quite well.
One nice thing about the pictures you provided is that it is becoming visibly clear on how much better the car is going to look once it is fully clothed with fresh black paint. A 10 footer is always better then a 50 footer if you know what I mean.
|
|
|
Re: New Paint job on a budget thread.
[Re: Marq]
#37931
02/05/08 08:57 AM
02/05/08 08:57 AM
|
Anonymous
Unregistered
|
Anonymous
Unregistered
|
OK 6th coat and more bad news. I pulled one of those "if it aint broke, dont fix it" type deals here. I went ahead and prepped the hood and did NOT let the MS dry. so i got a new tack cloth and wiped the hood down. MS + tack cloth = garbage. tack cloth become un-tacky. so I applied the 6th coat to a moist hood. moist as in MS, not water. Here are my results  *sigh* I was thinking of wiping it down with a soaked rag with mineral spirits before it dried, but i wasnt sure if was sopposed to look like this or not. 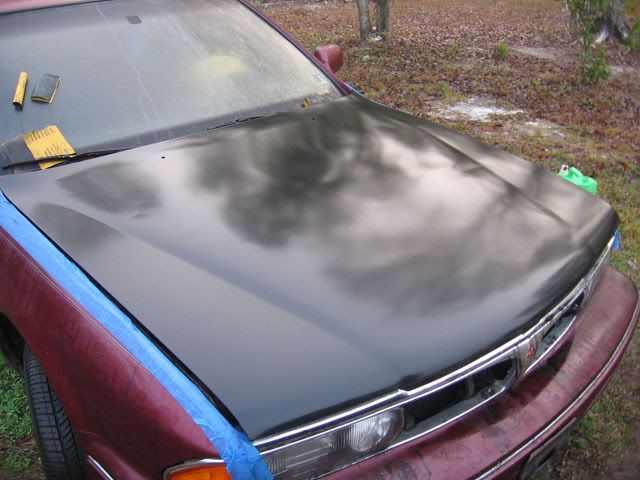 ------------------------- I think the MS prevented the paint from flattening out 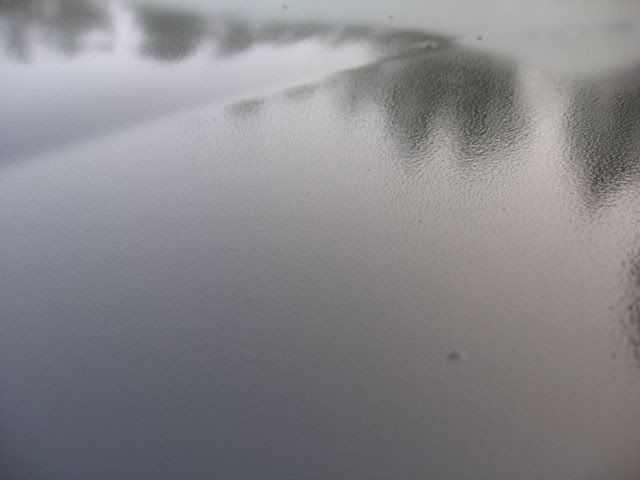 ------------------------- It has begun. first gnats, now mosquitoes. 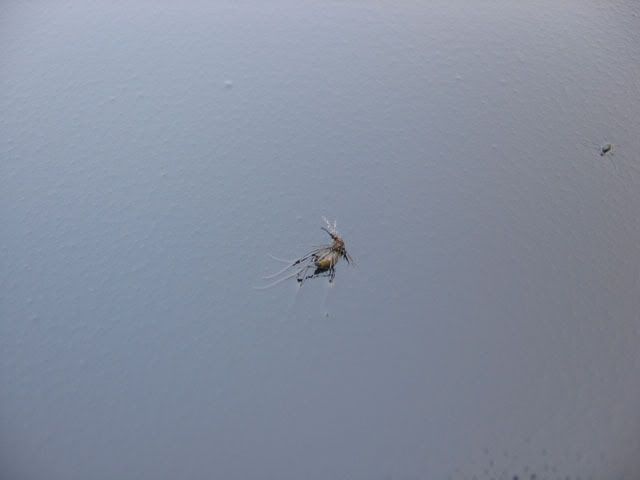 ------------------------- gnats 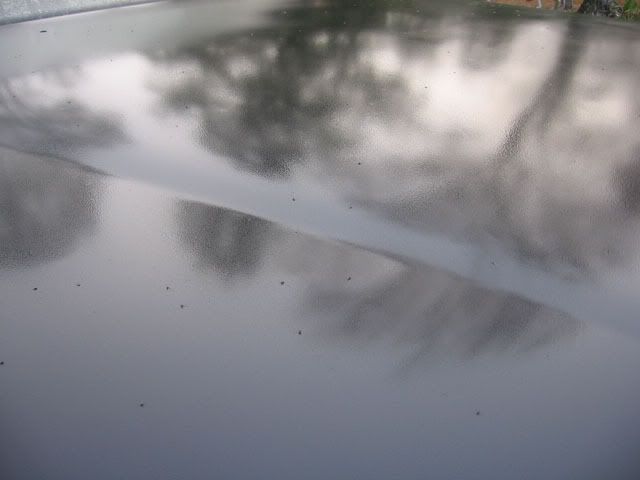 im seriously going to have to invest in a bug zapper or something.
Last edited by M2001; 02/05/08 09:12 AM.
|
|
|
Re: New Paint job on a budget thread.
#37932
02/05/08 12:25 PM
02/05/08 12:25 PM
|
Joined: May 2006
Posts: 575
Canada
Marq
mopar addict
|
mopar addict
Joined: May 2006
Posts: 575
Canada
|
Quote:
OK 6th coat and more bad news. I pulled one of those "if it aint broke, dont fix it" type deals here. I went ahead and prepped the hood and did NOT let the MS dry. so i got a new tack cloth and wiped the hood down. MS + tack cloth = garbage. tack cloth become un-tacky. so I applied the 6th coat to a moist hood. moist as in MS, not water. Here are my results
-------------------------
I think the MS prevented the paint from flattening out
-------------------------
The hood looks like it has orange peeled. You are going to have to do a bit of sanding to get that surface all flush and back to one surface level.
Possibly the wiping down with mineral spirits was a little exhuberant.. ( too much wet ). I would go with a cloth wetted with mineral spirits and then wrung out to get most of the MS out of the cloth before wiping down the car.
Too much MS on a coat of paint causes the outer skin of the paint layer to soften. When you add the next coat of paint on and it begins curing, the lower trapped surface layer gives way and gets pulled at from the forming of the hardening skin on the fresh coat of paint.
So let the hood dry and harden fully and then go at it with the sand paper to knock back the orange peel.
I know it is frustrating to take one step forward and two steps back... but sometimes it is worth the extra effort to get a better finished product.
As for that mosquitoe that attached himself to your hood... that was nasty. Maybe you could burn one of those RAID citronella bug repellant incense things to force the bugs away from your work area.
AND yes... I actually did that one day while working in my garage on the painting The buggers were taking advantage of my concentration on painting to try to feast on me. So I lit up one of those citronella bug repellant incense things and it drove the buggers off.
They work equally well outside. Maybe you could get one of those garden type ones, that are mounted on a bamboo shaft. It would drive away most flying bugs from where you are working.
.
|
|
|
Re: New Paint job on a budget thread.
[Re: Marq]
#37933
02/05/08 12:45 PM
02/05/08 12:45 PM
|
Anonymous
Unregistered
|
Anonymous
Unregistered
|
-------------------------
As for that mosquitoe that attached himself to your hood... that was nasty. Maybe you could burn one of those RAID citronella bug repellant incense things to force the bugs away from your work area.
... I lit up one of those citronella bug repellant incense things and it drove the buggers off.
They work equally well outside. Maybe you could get one of those garden type ones, that are mounted on a bamboo shaft.
.
What a GREAT IDEA Marq! I never thought of that! WOW. Home Depot should change their name to "Home and AUTO PAINTING Depot." We roller guys already get our foam rollers, Penetrol, mineral spirits and paint(Rustoleum) from them. Now add Citronella bug repellent to the list. Thanks again for the tip!
|
|
|
|
|


