|
 Thermoquad guys.....OK where do I start....
#221644
Thermoquad guys.....OK where do I start....
#221644
02/11/09 09:48 PM
02/11/09 09:48 PM
|
Joined: Aug 2003
Posts: 4,384
Madison Wi
NTOLERANCE
 OP
OP
master
|
OP
master
Joined: Aug 2003
Posts: 4,384
Madison Wi
|
Picked this up for a 12 pack of cheap beer. 9118S originally 440 truck, circa 1978. ( i am looking for match to this one as well  ) I have "rebuilt" a number of TQs and never had one come out right. This one is pretty clean inside, looks like the accell. pump hose came off at some point. Otherwise, its looks good. I have read magazine after magazine, and internet article after article. The last one I did was on a 77 motohome, and it never ran right. Made your eyes water, got horrible fuel economy, and every so often, would give me the thermobog. I've got a kit, and some brass float bowls. I think the kit came with the ethanol tolerant parts. Napa couldnt tell me for certain. Honestly, I am not a carb guy. Never have been, but its one of the few things I cant do myself right now, so I need to get over that hurdle. So, sinc eI have a nice clean carb, and the correct parts, where do I being, what do I watch out for, and what tricks can I use? For all the TQ haters, I do have a fresh 3310 waiting in the wings as well. 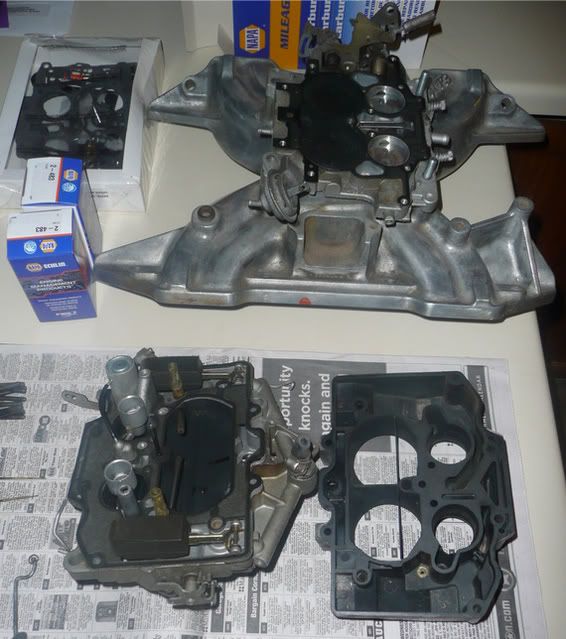 We all rebuilt carbs on the kitchen counter right? Interestingly enough, the TQ fits on the 440 streetmaster intake without an issue, but the secondaries hit on my low deck Holley strip dominator. 
I used to care but....... things have changed
|
|
|
Re: Thermoquad guys.....OK where do I start....
[Re: earlybee]
#221646
02/11/09 11:33 PM
02/11/09 11:33 PM
|
Joined: Apr 2007
Posts: 2,327
Glendale, AZ
69L78Nova
Banned. Forever.
|
Banned. Forever.
Joined: Apr 2007
Posts: 2,327
Glendale, AZ
|
In addition to that, make sure the throttle shaft is tight in the baseplate...meaning no play. Also, the most important thing, double check to see that the o-rings are in place before you assemble carb. If you leave them out, or they are not sitting down all the way correctly, it WILL run rich/dump fuel.
As far as the "bog", it just takes some fine tuning with the secondary air door. And make sure your dashpot is good. Thermoquads are not bad at all once you get a feel for them. Every one I've gone through runs like new.
1969 Nova
454/M21/3.31
Mild mid-11 second weekend cruiser
1994 F150 XLT Super Cab 2WD
5.0/4R70W/3.55
(Daily driver)
|
|
|
Re: Thermoquad guys.....OK where do I start....
[Re: NTOLERANCE]
#221649
02/12/09 09:47 AM
02/12/09 09:47 AM
|
Joined: Jan 2003
Posts: 826
Stone Mt, GA.
DEMONSIZZLER
super gas
|
super gas
Joined: Jan 2003
Posts: 826
Stone Mt, GA.
|
This is a perfect opportunity to build this one so that it runs right: 1)clean all visible sediment from the sump(bottom)of the float bowl areas with glass cleaner and a paper towel, 2)remove the old main jet well o-rings with a scribe or equivalent tool, 3)remove the old needle seat gasket(behind the old seat or may be stuck on the end of the seat on removal), with the pick, 4)place the top on a surface(floor etc)and put a screwdriver handle under the pump well bottom. Remove the 's' link from the end of the accelerator pump. Take a #2 Phillips screwdriver and with the top of the carb steadied, knock the top of the accelerator pump stem straight down using a hammer. You are removing the old accelerator pump and well cover. Clean out the accelerator pump well bore if it is glazed up or shows signs of corrosion. Use a light coating of trans fluid on the bore before re-assembly with the new pump. 5)Place the spring and new pump into the bore and attach the 's' link on the end of the new pump. Be sure that the large end of the spring goes up. 6)keep the top upside down and knock lightly the new well cover on with a small hammer, making sure the 's' link stays in place. 7)install the seat gaskets using one of the long main body screws; slide the gasket 1/2" over the screw and guide it into the seat bore making sure it seats into the bore straight. Put a tad of trans fluid on the threads of the seat, and using a wide blade screwdriver, snug the seats in the bore. 8)Match the new top gasket with the old gasket and with the top of the carb upside down, work the gasket into place. Start it over the driver side and the pipe fitting on the bottom of the accelerator pump pickup and then over the passenger side, seating it correctly. Then lube the ends of the new pump well transfer tube and work the ends onto the small pipe fittings, 9)install the needles into the seats, install the float pins with the button head facing to the inside of the carb. **One good trick is to grind or file the button flat to the pin dia so that it is about a 1/2 circle and will not 'snag' on the gasket when you install the pins, 10)set the float level with the top of the carb inverted and measuring at the front corner of the float, from the gasket surface. My preference is 29/32", 11)check the choke pull-off to be sure it will hold a vacuum and if not replace it or you will have a vacuum leak and 2ndaries that will not work right. 12)Now is a god time to check the jet sizes and metering rod #'s. You should have a 4098 pri jet and a 5025 2ndary jet with a 2110 metering rod. If the engine is cammed-up or has other bolt-on mods, the 2ndary jetting may be lean. So you will have to road-test the engine and report back here for external tuning tips. 13)Onto the bowl; place the lower bowl gasket onto the bottom of the bowl that 'matches' the primary bores. And it would be a good idea to used a gas resistant sealer around the old sealant on the main wells. I prefer a clear sealant called Seal All, avail at most auto parts stores. I use a toothpick to apply it. Also be sure the main well covers are not loose on the bottom of the bowl, 14)if the base of the carb needs no other attention set the bowl back onto the base of the carb, making sure the gasket stays in place and that the metering rod step up lever and pin are in place. 15)Drop the X-style orings into the bowl i nthe proper position using a main body screw. Be sure that the o-ring seat area is perfectly clean. Center the o-ring in the seat area, and install the primary jets with a dab of trans fluid on the threads and snug them. Recheck the o-rings that both are centered in the bowl. 16)Put the rear L shaped linkage back into the rear of the lock out lever and let it lay flat backward, turn the top of the carb upside down with the driver side to the driver side of the bowl. Hold it about 1/4" above the top of the bowl and hook the end of the lock out linkage into the hole in the end of the lock out shaft. Carefully maneuver the top into place, seating it fully against the top of the bowl. Be sure the top gasket stays in place and does not fold anywhere! 17)Put a dab of the trans fluid on the first 4 or so threads of the 10 long screws and put each into the bores. Only screw each of these where first contact is made. Do NOT tighten any screws yet. You will need to tighten in a very specific pattern similar to torquing a head gasket. 17a)Start with one of the screws down in the choke tower and lightly snug it, move to the adjacent screw in the choke tower, lightly snug it, then move to the next closest screw to the rear of the choke tower on the same side, lightly snug it, move to the one on the opposite side, then to the next closest on the same side, to the front of the choke tower and snug it, to the opposite side, then to the rear screw on the same side ect. Repeat this pattern three more times, then you are done. This tightening pattern will eliminate fuel leaks from slightly warped bowl tops. 18)Following the rest of the settings outlined in the instructions, re-install all linkages and small parts. The metering rod assembly needs to be put back into the top before the choke assembly. **You should sight down the length of the metering rods to be sure both are straight and straighten accordingly. Do not forget the check valve under the accelerator pump cluster and the new gasket! TIP: on all 1975-up oem passenger car and all '78-up truck carbs, you will need to fill-in the small two holes down in the choke tower. These are about the size of #2 pencil lead and are to the inside of the front choke tower wall. Seal these two holes with a dab of epoxy or Seal All using a toothpick. This mod is absolutely necessary for correcting smogger lean circuitry and will nearly equal the performance of the pre-smogger carbs.and You can pre-adjust the main idle speed by turning the carb upside down and turning the main idle speed screw so that only a slight rectangle shows at the front of the primary butterfly edge. This is the idle transfer slot. This setting has to be done with the fast idle cam not engaged. That is about it! If you pay attention to detail and set the internal/external settings properly, the T.Q. will be completely on par with you Holley, David. Picture shows where the #2 pencil lead holes are: 
|
|
|
Re: Thermoquad guys.....OK where do I start....
[Re: NTOLERANCE]
#221650
02/12/09 10:08 AM
02/12/09 10:08 AM
|
Joined: Feb 2006
Posts: 1,949
land of 10,000______'s
BDS871Cuda
top fuel
|
top fuel
Joined: Feb 2006
Posts: 1,949
land of 10,000______'s
|
Quote:
For all the TQ haters, I do have a fresh 3310 waiting in the wings as well.
We all rebuilt carbs on the kitchen counter right?
Interestingly enough, the TQ fits on the 440 streetmaster intake without an issue, but the secondaries hit on my low deck Holley strip dominator.
A good reason to use the Holley carb, secondaries.
I don't hate the Thermoquad, I just don't like
all the BS in building one. Sure, if done right,
they will perform almost as good as a Holley.
At least you have a Holley for a back up. I like
the Holley cause they are so easy to rebuild and
tune. I think Peter Griffen or his buddy
Quagmeyer could rebuild a Holley!

Snap your neck, mega G-force launch, is all I want!
|
|
|
Re: Thermoquad guys.....OK where do I start....
[Re: DEMONSIZZLER]
#221652
02/12/09 06:31 PM
02/12/09 06:31 PM
|
Joined: Aug 2003
Posts: 4,384
Madison Wi
NTOLERANCE
OP
master
|
OP
master
Joined: Aug 2003
Posts: 4,384
Madison Wi
|
Quote:
This is a perfect opportunity to build this one so that it runs right:
1)clean all visible sediment from the sump(bottom)of the float bowl areas with glass cleaner and a paper towel,
2)remove the old main jet well o-rings with a scribe or equivalent tool,
3)remove the old needle seat gasket(behind the old seat or may be stuck on the end of the seat on removal), with the pick,
4)place the top on a surface(floor etc)and put a screwdriver handle under the pump well bottom. Remove the 's' link from the end of the accelerator pump. Take a #2 Phillips screwdriver and with the top of the carb steadied, knock the top of the accelerator pump stem straight down using a hammer. You are removing the old accelerator pump and well cover. Clean out the accelerator pump well bore if it is glazed up or shows signs of corrosion. Use a light coating of trans fluid on the bore before re-assembly with the new pump.
5)Place the spring and new pump into the bore and attach the 's' link on the end of the new pump. Be sure that the large end of the spring goes up.
6)keep the top upside down and knock lightly the new well cover on with a small hammer, making sure the 's' link stays in place.
7)install the seat gaskets using one of the long main body screws; slide the gasket 1/2" over the screw and guide it into the seat bore making sure it seats into the bore straight. Put a tad of trans fluid on the threads of the seat, and using a wide blade screwdriver, snug the seats in the bore.
8)Match the new top gasket with the old gasket and with the top of the carb upside down, work the gasket into place. Start it over the driver side and the pipe fitting on the bottom of the accelerator pump pickup and then over the passenger side, seating it correctly. Then lube the ends of the new pump well transfer tube and work the ends onto the small pipe fittings,
9)install the needles into the seats, install the float pins with the button head facing to the inside of the carb. **One good trick is to grind or file the button flat to the pin dia so that it is about a 1/2 circle and will not 'snag' on the gasket when you install the pins,
10)set the float level with the top of the carb inverted and measuring at the front corner of the float, from the gasket surface. My preference is 29/32",
11)check the choke pull-off to be sure it will hold a vacuum and if not replace it or you will have a vacuum leak and 2ndaries that will not work right.
12)Now is a god time to check the jet sizes and metering rod #'s. You should have a 4098 pri jet and a 5025 2ndary jet with a 2110 metering rod.
If the engine is cammed-up or has other bolt-on mods, the 2ndary jetting may be lean. So you will have to road-test the engine and report back here for external tuning tips.
13)Onto the bowl; place the lower bowl gasket onto the bottom of the bowl that 'matches' the primary bores. And it would be a good idea to used a gas resistant sealer around the old sealant on the main wells. I prefer a clear sealant called Seal All, avail at most auto parts stores. I use a toothpick to apply it. Also be sure the main well covers are not loose on the bottom of the bowl,
14)if the base of the carb needs no other attention set the bowl back onto the base of the carb, making sure the gasket stays in place and that the metering rod step up lever and pin are in place.
15)Drop the X-style orings into the bowl i nthe proper position using a main body screw. Be sure that the o-ring seat area is perfectly clean. Center the o-ring in the seat area, and install the primary jets with a dab of trans fluid on the threads and snug them. Recheck the o-rings that both are centered in the bowl.
16)Put the rear L shaped linkage back into the rear of the lock out lever and let it lay flat backward, turn the top of the carb upside down with the driver side to the driver side of the bowl. Hold it about 1/4" above the top of the bowl and hook the end of the lock out linkage into the hole in the end of the lock out shaft. Carefully maneuver the top into place, seating it fully against the top of the bowl. Be sure the top gasket stays in place and does not fold anywhere!
17)Put a dab of the trans fluid on the first 4 or so threads of the 10 long screws and put each into the bores. Only screw each of these where first contact is made. Do NOT tighten any screws yet. You will need to tighten in a very specific pattern similar to torquing a head gasket.
17a)Start with one of the screws down in the choke tower and lightly snug it, move to the adjacent screw in the choke tower, lightly snug it, then move to the next closest screw to the rear of the choke tower on the same side, lightly snug it, move to the one on the opposite side, then to the next closest on the same side, to the front of the choke tower and snug it, to the opposite side, then to the rear screw on the same side ect. Repeat this pattern three more times, then you are done. This tightening pattern will eliminate fuel leaks from slightly warped bowl tops.
18)Following the rest of the settings outlined in the instructions, re-install all linkages and small parts. The metering rod assembly needs to be put back into the top before the choke assembly. **You should sight down the length of the metering rods to be sure both are straight and straighten accordingly. Do not forget the check valve under the accelerator pump cluster and the new gasket!
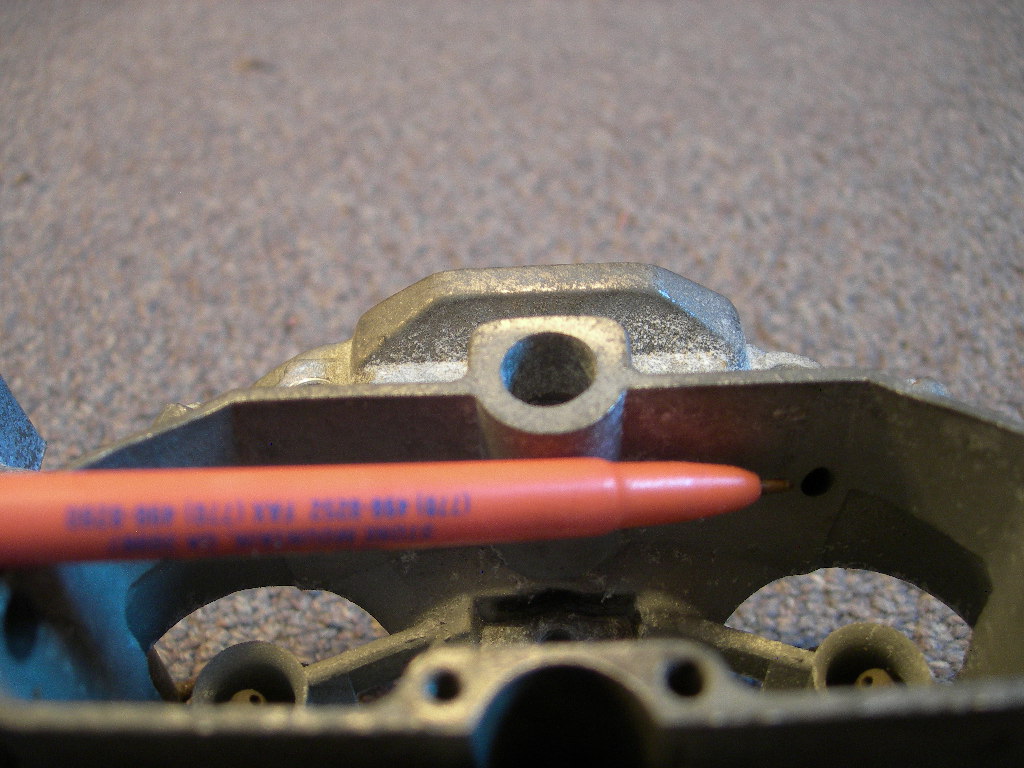
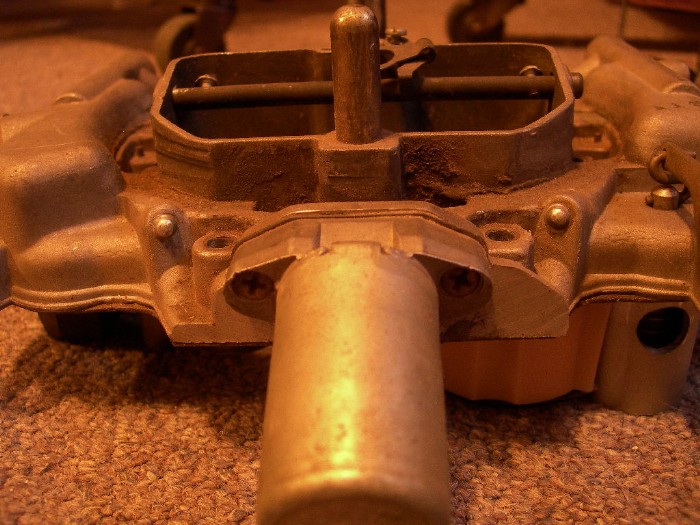
TIP: on all 1975-up oem passenger car and all '78-up truck carbs, you will need to fill-in the small two holes down in the choke tower. These are about the size of #2 pencil lead and are to the inside of the front choke tower wall. Seal these two holes with a dab of epoxy or Seal All using a toothpick. This mod is absolutely necessary for correcting smogger lean circuitry and will nearly equal the performance of the pre-smogger carbs.and
You can pre-adjust the main idle speed by turning the carb upside down and turning the main idle speed screw so that only a slight rectangle shows at the front of the primary butterfly edge. This is the idle transfer slot. This setting has to be done with the fast idle cam not engaged.
That is about it! If you pay attention to detail and set the internal/external settings properly, the T.Q. will be completely on par with you Holley, David.
Picture shows where the #2 pencil lead holes are:

I used to care but....... things have changed
|
|
|
Re: Thermoquad guys.....OK where do I start....
[Re: DEMONSIZZLER]
#221654
02/12/09 07:57 PM
02/12/09 07:57 PM
|
Anonymous
Unregistered
|
Anonymous
Unregistered
|
Those holes you talk about filling in and closing up. Arn't they for for what I'll call the idle air bypass? The earlier tq's had a slot or channel in the bottom casting. This routed idle air into the intk bypassing the butterflies and the idle circuit. The later model brings that passage up to the top casting to where you have shown.
I normally open up the idle jet (idle feed restriction) to richen up the idle. I reasoned that blocking the idle air bypass would mess up the throttle blade to transfer slot position at idle.
If you have more thoughts/info on this, please share. I'll try to post a picture of the earlier model idle air bypass.
|
|
|
Re: Thermoquad guys.....OK where do I start....
#221656
02/12/09 08:33 PM
02/12/09 08:33 PM
|
Joined: Jan 2003
Posts: 14,610
Not2farfromNashville, TN
Rug_Trucker
I Live Here
|
I Live Here
Joined: Jan 2003
Posts: 14,610
Not2farfromNashville, TN
|
I found that round wooden chop sticks available at the local buffet coated in JB Weld is good for plugging those holes.
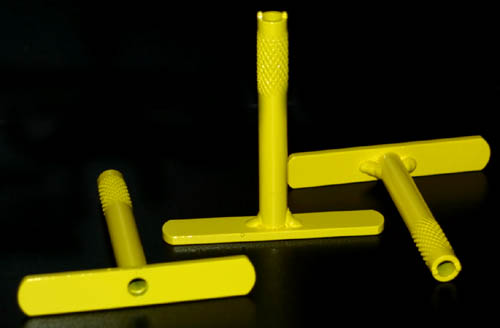
Hey Doc, those ELECTRIC BANANAS for sale?
I have 3 of those in my tool box. I have an original Carter one too.
IIRC David said the 78 truck carbs are the last of the good ones?
"The only thing to do for triumph of evil is for good men to do nothing"
"NUNQUAM NON PARATUS!"
|
|
|
Re: Thermoquad guys.....OK where do I start....
[Re: BDS871Cuda]
#221657
02/12/09 08:38 PM
02/12/09 08:38 PM
|
Joined: Feb 2003
Posts: 21,318
Manitoba, Canada
DaytonaTurbo
Too Many Posts
|
Too Many Posts
Joined: Feb 2003
Posts: 21,318
Manitoba, Canada
|
Quote:
A good reason to use the Holley carb, secondaries.
I don't hate the Thermoquad, I just don't like
all the BS in building one. Sure, if done right,
they will perform almost as good as a Holley.
All while getting better fuel mileage and superior throttle response than the holley...
|
|
|
Re: Thermoquad guys.....OK where do I start....
[Re: NTOLERANCE]
#221658
02/12/09 08:48 PM
02/12/09 08:48 PM
|
Joined: Jan 2003
Posts: 9,982
Ansonia, CT
CJK440
master
|
master
Joined: Jan 2003
Posts: 9,982
Ansonia, CT
|
I never fooled with a TQ until I went FAST racing. While for a race only car I'd rather have a Holley, I wish I had a street car to put a TQ on. Its an awesome street carb.
2017 Contusion Blue Challenger T/A 392 M6 "BLKNBLU"
|
|
|
Re: Thermoquad guys.....OK where do I start....
#221660
02/12/09 08:57 PM
02/12/09 08:57 PM
|
Anonymous
Unregistered
|
Anonymous
Unregistered
|
|
|
|
 Re: Thermoquad guys.....OK where do I start....
#221661
Re: Thermoquad guys.....OK where do I start....
#221661
02/12/09 09:24 PM
02/12/09 09:24 PM
|
Joined: Jan 2003
Posts: 826
Stone Mt, GA.
DEMONSIZZLER
super gas
|
super gas
Joined: Jan 2003
Posts: 826
Stone Mt, GA.
|
Quote:
Those holes you talk about filling in and closing up. Arn't they for for what I'll call the idle air bypass? The earlier tq's had a slot or channel in the bottom casting. This routed idle air into the intk bypassing the butterflies and the idle circuit. The later model brings that passage up to the top casting to where you have shown.
I normally open up the idle jet (idle feed restriction) to richen up the idle. I reasoned that blocking the idle air bypass would mess up the throttle blade to transfer slot position at idle.
If you have more thoughts/info on this, please share. I'll try to post a picture of the earlier model idle air bypass.
The #2 pencil lead holes were used to lean all three circuits; the idle, main and hi speed circuits for emission purposes. That is why sealing both will help the smogger carbs work on non smogger engines, David.
By the way, these are the worst T.Q. carbs to re-calibrate for non smogger use; top pic below:
|
|
|
|
|


