Previous Thread
Next Thread
Print Thread
Page 1 of 2 1 2
DYI Guys "How To" Restore Your Idle Stop Solenoid #567069
12/30/09 04:05 PM
12/30/09 04:05 PM
Joined: Jan 2003
Posts: 42,714
Spokane Washington
ScottSmith_Harms Offline OP
Mr Wizzard
ScottSmith_Harms  Offline OP
Mr Wizzard

Joined: Jan 2003
Posts: 42,714
Spokane Washington
Carburetor Idle Stop Restoration


This is a customer’s Idle Stop Solenoid I recently received with their carburetor for restoration. I do these for free if supplied with a carburetor restoration but I thought I’d show the restoration procedure I use so that any of you DYI guys out there can try it if you’d like.

Re: DYI Guys "How To" Restore Your Idle Stop Solenoid [Re: ScottSmith_Harms] #567070
12/30/09 04:06 PM
12/30/09 04:06 PM
Joined: Jan 2003
Posts: 42,714
Spokane Washington
ScottSmith_Harms Offline OP
Mr Wizzard
ScottSmith_Harms  Offline OP
Mr Wizzard

Joined: Jan 2003
Posts: 42,714
Spokane Washington
After removing it from the clamp

5698369-Step1Before.jpg (978 downloads)
Re: DYI Guys "How To" Restore Your Idle Stop Solenoid [Re: ScottSmith_Harms] #567071
12/30/09 04:07 PM
12/30/09 04:07 PM
Joined: Jan 2003
Posts: 42,714
Spokane Washington
ScottSmith_Harms Offline OP
Mr Wizzard
ScottSmith_Harms  Offline OP
Mr Wizzard

Joined: Jan 2003
Posts: 42,714
Spokane Washington
After removing the rubber boots, that grime on there looks like soft dirt but it's not, that is some hard crusty stuff! You'd think that you'd never get it off without sand paper!

Re: DYI Guys "How To" Restore Your Idle Stop Solenoid [Re: ScottSmith_Harms] #567072
12/30/09 04:08 PM
12/30/09 04:08 PM
Joined: Jan 2003
Posts: 42,714
Spokane Washington
ScottSmith_Harms Offline OP
Mr Wizzard
ScottSmith_Harms  Offline OP
Mr Wizzard

Joined: Jan 2003
Posts: 42,714
Spokane Washington
Unscrewing the plunger can be tough, they are held in place by a small nylon lock tab molded around the threads in a small spot. If you can’t turn it by hand (loosening is counter clockwise) turn it with a small wrench. If it’s a round head try grabbing it with some smooth jawed pliers insulated by rubber/cloth/leather, etc. to avoid gauging the brass. Once the plunger is screwed all the way out, screw it back into place a couple threads and leave it in for now.

*This pic shows the small copper wire you don't want to break.

Re: DYI Guys "How To" Restore Your Idle Stop Solenoid [Re: ScottSmith_Harms] #567073
12/30/09 04:09 PM
12/30/09 04:09 PM
Joined: Jan 2003
Posts: 42,714
Spokane Washington
ScottSmith_Harms Offline OP
Mr Wizzard
ScottSmith_Harms  Offline OP
Mr Wizzard

Joined: Jan 2003
Posts: 42,714
Spokane Washington
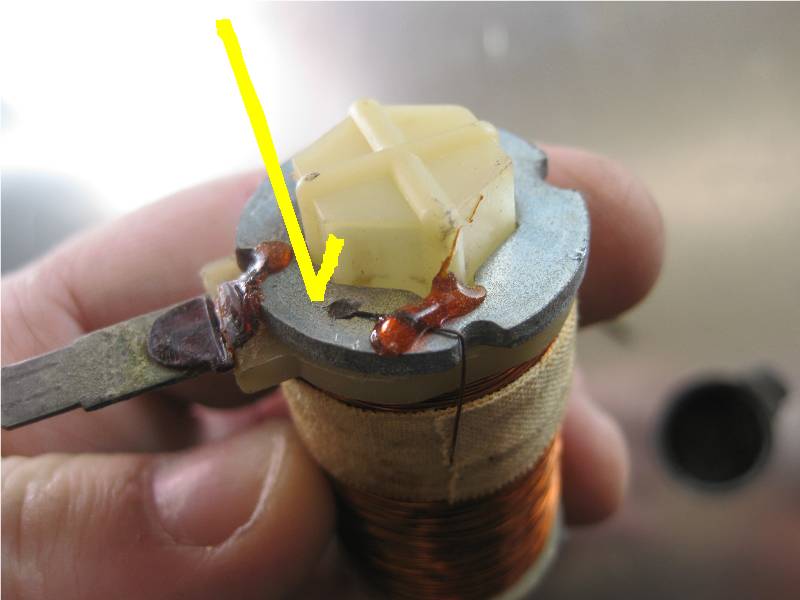
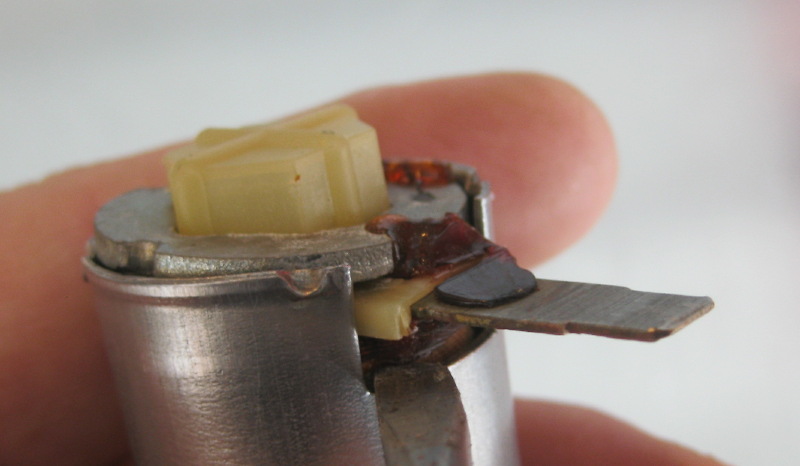
This is the tricky part. The copper wire is welded to the silver washer at the lower end, and to the opposite end at the wire connection tab base. It’s important to NOT break these connections. The housing is crimped at the lower end to retain the washer which is what retains the inner workings from exiting the can when the plunger is activated. There are basically two ways to remove the housing crimps, either pry them away with a stout set of pliers/side cutters, or grind them away completely (I use a dremel with a dime sized abrasive disc and VERY carefully grind away the nubs working around the wire). You may discover other ways to deal with the crimps but these two methods work for me. Also, the severity of the crimping varied; some are very shallow making removal easy while others are severe making grinding an absolute necessity. Once the housing crimps are out of the way the inner workings may still be stuck inside, usually it’s the dielectric potting glue around the housing can opening where the copper wire exits or the wire tab comes out. Carefully pry around these areas with a small screw driver to release the housing from the internals. Now, the washer is just resting around the base of the inner workings, other than the tiny copper wire nothing is holding it in place. Be sure to retain its position while removing the inner workings as a complete unit so you don’t break the wire connection on the washer. Use the still slightly screwed in plunger to push the internals out from the opposite end like a push up popsicle. You may have to pry the crimped areas away from the edges of the washer to free it as you push, it takes a bit of delicate dexterity. Once the unit is free of the housing you can unscrew the plunger and set it aside. Take the internals and put the assembly in a safe place to protect the delicate connections.

Re: DYI Guys "How To" Restore Your Idle Stop Solenoid [Re: ScottSmith_Harms] #567074
12/30/09 04:10 PM
12/30/09 04:10 PM
Joined: Jan 2003
Posts: 42,714
Spokane Washington
ScottSmith_Harms Offline OP
Mr Wizzard
ScottSmith_Harms  Offline OP
Mr Wizzard

Joined: Jan 2003
Posts: 42,714
Spokane Washington
2

Re: DYI Guys "How To" Restore Your Idle Stop Solenoid [Re: ScottSmith_Harms] #567075
12/30/09 04:12 PM
12/30/09 04:12 PM
Joined: Jan 2003
Posts: 42,714
Spokane Washington
ScottSmith_Harms Offline OP
Mr Wizzard
ScottSmith_Harms  Offline OP
Mr Wizzard

Joined: Jan 2003
Posts: 42,714
Spokane Washington
4

Re: DYI Guys "How To" Restore Your Idle Stop Solenoid [Re: ScottSmith_Harms] #567076
12/30/09 04:12 PM
12/30/09 04:12 PM
Joined: Jan 2003
Posts: 42,714
Spokane Washington
ScottSmith_Harms Offline OP
Mr Wizzard
ScottSmith_Harms  Offline OP
Mr Wizzard

Joined: Jan 2003
Posts: 42,714
Spokane Washington
5 After degreaser soak

Re: DYI Guys "How To" Restore Your Idle Stop Solenoid [Re: ScottSmith_Harms] #567077
12/30/09 04:16 PM
12/30/09 04:16 PM
Joined: Jan 2003
Posts: 42,714
Spokane Washington
ScottSmith_Harms Offline OP
Mr Wizzard
ScottSmith_Harms  Offline OP
Mr Wizzard

Joined: Jan 2003
Posts: 42,714
Spokane Washington
Now, cleaning these parts is not difficult, I process them with carburetor parts I restore, the exact method is proprietary, however for this job DYI is easy. First use a good degreaser like Purple Stuff or Simple Green to get the grease and oil off, then a soak in a store bought corrosion remover like Ospho, or a home brewed mix of citric acid, vinegar, and salt (as described by another member matthewnokc) also does a good job. His recipe: 1/2 gallon of white vinegar- 1/3 cup of salt - and the entire contents of 1 of those yellow plastic squeeze lemon juice bottles.

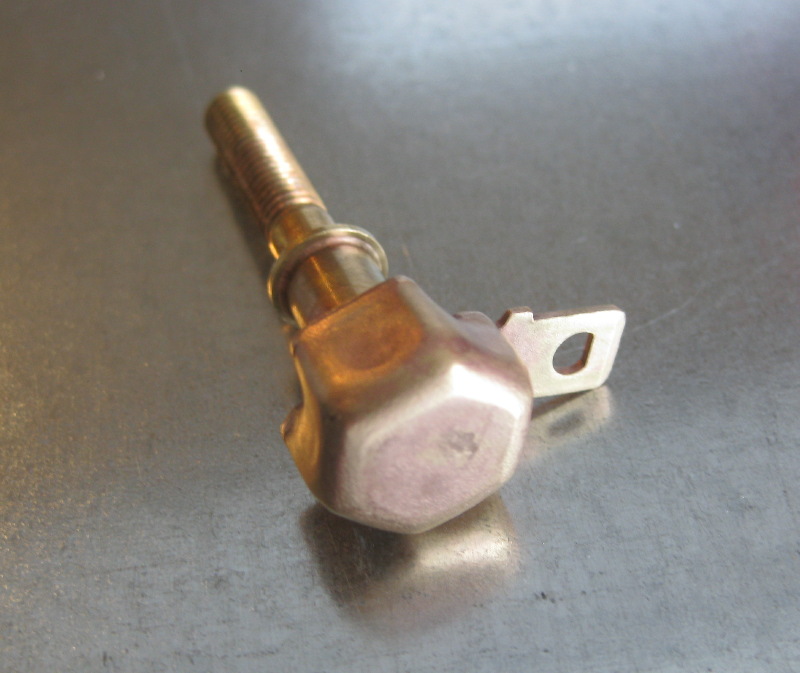
Soak the steel housing and the brass plunger in the solution overnight for the best results, clean off residue with a clean shop rag, use a scotch bright or 000 steel wool if there are stubborn stains. The original plating will be removed if you use the home brew vingar/citric acid mix above so the housing will now be bare steel (my example was also stripped of the plating and is bare steel as shown here).

You can use damp baking soda and a cloth to polish the surfaces, the baking soda works especially well on the brass plunger as a polish and leaves an OE appearance rather than an overly polished high luster that polished brass can have. Use dry baking soda in a cloth to buff it up to a shine.

Once you are happy with the housing finish you can use it as is, give it a light clear coat with something like Eastwoods “Nylac”, or do what I do and send it out for a proper silver/zinc plating job.

The example here is not plated yet, I just assembled it for show and tell, I will be taking it back apart send it out for final plating.

Re: DYI Guys "How To" Restore Your Idle Stop Solenoid [Re: ScottSmith_Harms] #567078
12/30/09 04:17 PM
12/30/09 04:17 PM
Joined: Jan 2003
Posts: 42,714
Spokane Washington
ScottSmith_Harms Offline OP
Mr Wizzard
ScottSmith_Harms  Offline OP
Mr Wizzard

Joined: Jan 2003
Posts: 42,714
Spokane Washington
After you are happy with the parts reassemble them in the reverse order. After the assembly is back together you can use a punch or chisel to crimp the housing back over the washer, this must be done carefully, again, have to protect that soldered wire. You can also use a heat resistant 2 part epoxy to glue it into place, a dime sized blob worked into the edges usually does a good job. After it sits overnight to dry you just add on the rubber boot and test the solenoid function with a 12v source.

Re: DYI Guys "How To" Restore Your Idle Stop Solenoid [Re: ScottSmith_Harms] #567079
12/30/09 04:18 PM
12/30/09 04:18 PM
Joined: Jan 2003
Posts: 42,714
Spokane Washington
ScottSmith_Harms Offline OP
Mr Wizzard
ScottSmith_Harms  Offline OP
Mr Wizzard

Joined: Jan 2003
Posts: 42,714
Spokane Washington
Plunger

Re: DYI Guys "How To" Restore Your Idle Stop Solenoid [Re: ScottSmith_Harms] #567080
12/30/09 04:19 PM
12/30/09 04:19 PM
Joined: Jan 2003
Posts: 42,714
Spokane Washington
ScottSmith_Harms Offline OP
Mr Wizzard
ScottSmith_Harms  Offline OP
Mr Wizzard

Joined: Jan 2003
Posts: 42,714
Spokane Washington
Assembled...Not fully seated as I'm pulling it back appart for plating

5698400-ReassembledA.jpg (656 downloads)
Re: DYI Guys "How To" Restore Your Idle Stop Solenoid [Re: ScottSmith_Harms] #567081
12/30/09 04:20 PM
12/30/09 04:20 PM
Joined: Jan 2003
Posts: 42,714
Spokane Washington
ScottSmith_Harms Offline OP
Mr Wizzard
ScottSmith_Harms  Offline OP
Mr Wizzard

Joined: Jan 2003
Posts: 42,714
Spokane Washington
Here's what it looks like all back together

Re: DYI Guys "How To" Restore Your Idle Stop Solenoid [Re: ScottSmith_Harms] #567082
12/30/09 04:21 PM
12/30/09 04:21 PM
Joined: Jan 2003
Posts: 42,714
Spokane Washington
ScottSmith_Harms Offline OP
Mr Wizzard
ScottSmith_Harms  Offline OP
Mr Wizzard

Joined: Jan 2003
Posts: 42,714
Spokane Washington
Ok, last post

If your internal workings are corroded and nasty it’s pretty likely that they are un repairable. In this case you can either use the correctly numbered re-assembled non functioning unit for shows, or you can transfer the internals from a new reproduction unit with a generic housing, or another old one that’s in better shape. One note on reproductions, as illustrated in this photo, they are not built as well as originals and provide less power to the plunger. Many report that they function “lazy” or not at all because of this.

Re: DYI Guys "How To" Restore Your Idle Stop Solenoid [Re: ScottSmith_Harms] #567083
12/30/09 09:40 PM
12/30/09 09:40 PM
Joined: May 2007
Posts: 545
Massachusetts
LYNCHROAD69.5 Offline
mopar
LYNCHROAD69.5  Offline
mopar

Joined: May 2007
Posts: 545
Massachusetts
Scott...nice detailed post. You are correct about the repo solenoids....not very powerfull and "lazy"....mine is.

Re: DYI Guys "How To" Restore Your Idle Stop Solenoid [Re: ScottSmith_Harms] #567084
12/30/09 10:11 PM
12/30/09 10:11 PM
Joined: Jun 2003
Posts: 21,427
It's a dry heat
gtx6970 Offline
Too Many Posts
gtx6970  Offline
Too Many Posts

Joined: Jun 2003
Posts: 21,427
It's a dry heat
well done, I've never seen one of these apart like this.


Re: DYI Guys "How To" Restore Your Idle Stop Solenoid [Re: ScottSmith_Harms] #567085
12/31/09 12:44 AM
12/31/09 12:44 AM
Joined: Oct 2003
Posts: 2,309
South, FL
cudaized Offline
top fuel
cudaized  Offline
top fuel

Joined: Oct 2003
Posts: 2,309
South, FL
Scott, You do EXCELLENT work. Thank you for saving mine and making it look (probably better then) new!
Ola

5699503-DSC01242.JPG (792 downloads)
Re: DYI Guys "How To" Restore Your Idle Stop Solenoid [Re: ScottSmith_Harms] #567086
01/02/12 01:18 PM
01/02/12 01:18 PM
Joined: Jan 2003
Posts: 42,714
Spokane Washington
ScottSmith_Harms Offline OP
Mr Wizzard
ScottSmith_Harms  Offline OP
Mr Wizzard

Joined: Jan 2003
Posts: 42,714
Spokane Washington
In case this gets put into the archives, here's an application guide chart:


Delco Remy Idle Stop Solenoid Guide

19691/2-1971 Mopar Applications

Stamping# DR1114421
Part# 3514520 Early (Carter AVS)
Part# 3549318 Late (Carter AVS)
1970 440
Carburetor: 4737S, 4739S, 4741S, 4740S
Hex head with cap, no integral bracket

Stamping# DR1114442
Part# 3514892 (Carter AVS)
1970 340
Carburetor: 4936S, 4937S
Round head, no integral bracket

Stamping# DR1114442 or DR1114447 (Evidence of either number being factory original)
Part# 3438303 (Carter AVS)
1970 440 4738S
1971 440 4968S
Hex head with cap, no integral bracket

Stamping# DR1114441
Part# 3438777 (Holley)
1971 383 4667A, 4734A, 4668A, 4735A, 6191A, 6193A
Hex head with cap, no integral bracket, but includes wiring harness

Stamping# DR1114429
Part# 2875975 (and Part# 3438333) (Holley, Carter AFB, Carter Thermoquad)
1970 440+6 4375A, 4734A, 4376A, 4144A
1970 340+6 4791A, 4792A
1970 426 4745S, 4746S
1971 426 4969S, 4970S
1971 340 4972S, 4973S
Round head with integral bracket

Stamping# DR1114443
Part# 3438338 (Holley)
1971 440+6 4669A, 4670A
Hex head with cap

Stamping# DR1114420
Part# 3412059 (Holley)
19691/2 440+6
Hex head with cap

*Some information on this list was contributed by Tony D’Agostino, Bill Rolik, and Frank Badelson

Re: DYI Guys "How To" Restore Your Idle Stop Solenoid [Re: ScottSmith_Harms] #567087
01/02/12 06:41 PM
01/02/12 06:41 PM
Joined: Sep 2003
Posts: 3,426
weymouth,mass.
M
meepmeep70 Offline
master
meepmeep70  Offline
master
M

Joined: Sep 2003
Posts: 3,426
weymouth,mass.
thank you Scott for sharing(saved),i'm actually been looking for one for my 70 440 6pak,so this will come in real handy,sooner or later
Darren

Re: DYI Guys "How To" Restore Your Idle Stop Solenoid [Re: meepmeep70] #567088
01/02/12 06:58 PM
01/02/12 06:58 PM
Joined: Jan 2004
Posts: 2,103
East Coast, NJ
F
fig426 Offline
top fuel
fig426  Offline
top fuel
F

Joined: Jan 2004
Posts: 2,103
East Coast, NJ
Thanks Scott!! Maybe it will make it to Tech Archives???


Chris from New Jersey
Page 1 of 2 1 2


Powered by UBB.threads™ PHP Forum Software 7.7.1