|
 RE: New Paint job on a budget thread Part III
#38294
RE: New Paint job on a budget thread Part III
#38294
06/03/08 11:39 PM
06/03/08 11:39 PM
|
Anonymous
Unregistered
|
Anonymous
Unregistered
|
So im looking to repaint a cavalier thats dark purple into a red. Probably like a brighter red. Where can i see a list of colors of paint. what paint do you recomend? I think im gonna go with brightside. Wheres the link for rustoleums marine paints? And about home much time goes into the whole project?
|
|
|
Re: RE: New Paint job on a budget thread Part III
#38295
06/04/08 01:40 PM
06/04/08 01:40 PM
|
Joined: Jan 2003
Posts: 12,405
Southern, Ca.
69DartGT
 OP
OP
moparts member
|
OP
moparts member
Joined: Jan 2003
Posts: 12,405
Southern, Ca.
|
I got a good but on a six pack of quarts off ebay but that person doesn't sell anymore, I used their frie red but rusto;eums safety red is the same, almost impossible to tell the colors apart.
Took about a week and a half to do the truck the weather was good the whole time. Hindsite being 20-20 I should have primed the whole truck before I started.
Last edited by 69DartGT; 06/04/08 01:44 PM.
|
|
|
Re: RE: New Paint job on a budget thread Part III
[Re: plum500]
#38296
06/06/08 08:39 PM
06/06/08 08:39 PM
|
Anonymous
Unregistered
|
Anonymous
Unregistered
|
So, I have decided to roll out several layers first then spray the last set of coats. One MAJOR problem i'm having is that I can clearly see roller strokes in the paint. Ive tried using thicker and thinner paint and I can still see the strokes ant he layers arnt going on too even at all. How do I fix this?
|
|
|
Re: RE: New Paint job on a budget thread Part III
#38297
06/06/08 08:56 PM
06/06/08 08:56 PM
|
Joined: Jan 2003
Posts: 12,405
Southern, Ca.
69DartGT
OP
moparts member
|
OP
moparts member
Joined: Jan 2003
Posts: 12,405
Southern, Ca.
|
Quote:
So, I have decided to roll out several layers first then spray the last set of coats. One MAJOR problem i'm having is that I can clearly see roller strokes in the paint. Ive tried using thicker and thinner paint and I can still see the strokes ant he layers arnt going on too even at all. How do I fix this?
You needed to wet sand that first. Roller marks are high and low spots.. I have a few also been toying with the idea of spraying on a high build primer and starting another coat..
|
|
|
Re: RE: New Paint job on a budget thread Part III
[Re: Exit1965]
#38299
06/08/08 12:24 PM
06/08/08 12:24 PM
|
Anonymous
Unregistered
|
Anonymous
Unregistered
|
Its soo thin right now that its super bubbly. and a tiny bit runny so i thickend it up a little.
|
|
|
Re: RE: New Paint job on a budget thread Part III
#38300
06/09/08 06:56 AM
06/09/08 06:56 AM
|
Anonymous
Unregistered
|
Anonymous
Unregistered
|
Hey guys, i created a blog on my progress with this project. Tons of pictures on my project are up, if you guys want to check it out.
link in my sig.
|
|
|
Re: RE: New Paint job on a budget thread Part III
#38301
06/09/08 11:03 AM
06/09/08 11:03 AM
|
Joined: Apr 2008
Posts: 28
Molino, Fl.
ace250xr84
member
|
member
Joined: Apr 2008
Posts: 28
Molino, Fl.
|
Well I have been slowly but steadilly working on the Olds it has been kind of rough, time is short and the days are HOT. I have a couple of questions for the ones that have gone before me.  The top surfaces were in sad shape no clear coat left, cracked paint surface rust and what look like scratches with surface rust in them. I sanded with a 1/3 sheet power finish sander with 220 grit my first thought was it probably be too aggressive but it looks silky smooth afterwards, only original primmer left, for the most part excepts where those scratches with surface rust in them were the surface actually is shinnier than before sanding, strange? My first question is how much filling will Rusto rusty metal primmer fill, I do NOT want to take the surface to bare metal and should the primmer be thinned like the paint. My second question is concering the sides. The very top of side that roll to the Horizontal plane are like the top no clear coat left, paint comes off easy now shows original primmer like the top of car but as you go down clear coat is intact and that stuff is Hard 220 grit + power sander just does dull it up. The hart of the question is for adhesion for new primmer and paint How do you know if is scuffed enough so the new stuff will be permanent. One more if you don't mind about  Bondo Surface prep for application what grit and does it need to be bare metal. I have a couple dozen spots that need attention  ranging from dents, a couple rust spots, Holes from bolts that held the side trim and a whole bunch of metal studs that I grinded off that held the same side trim on. Thanks
|
|
|
Re: RE: New Paint job on a budget thread Part III
[Re: 78D150CLUB]
#38305
06/11/08 12:52 AM
06/11/08 12:52 AM
|
Anonymous
Unregistered
|
Anonymous
Unregistered
|
good job, exit. I still remember the times when you were trying out the red color. damn...this thread is ancient. Here my turn to show off. Well, not really. im not even finish and this is a WET shot. (I like wet shots....thats what she said... ok ok) 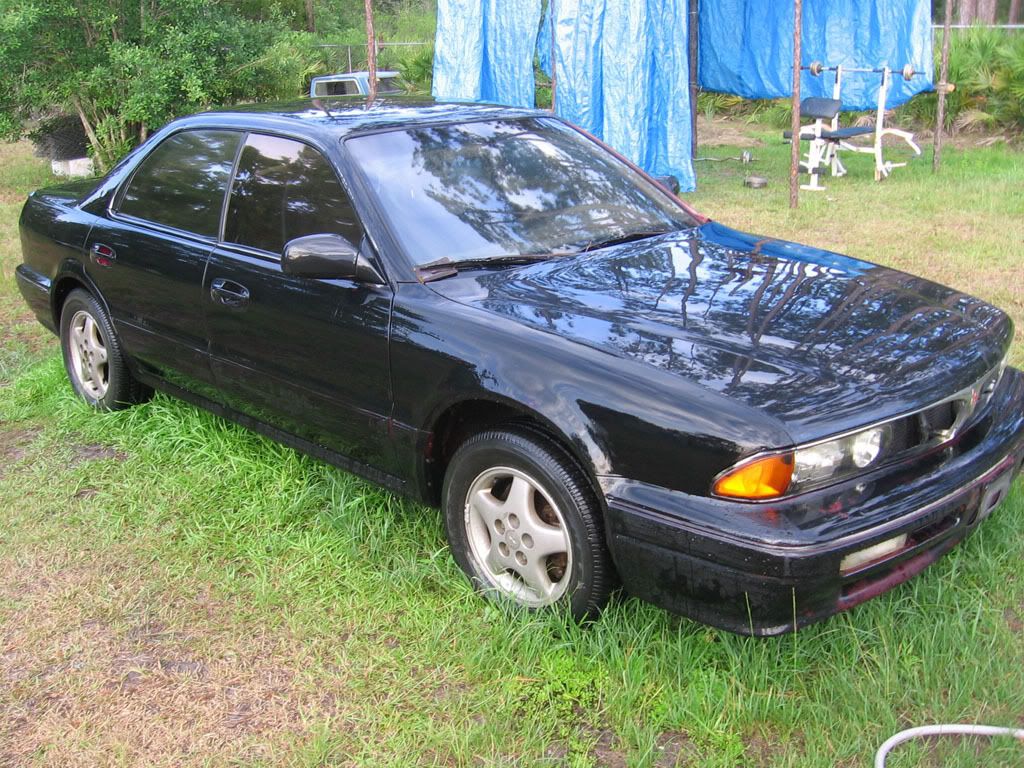 (check out what I turned my make-shift-blue-lagoon-survival-man-canopy into...a hang out spot AND a weight training spot. me ftw.  
|
|
|
Re: RE: New Paint job on a budget thread Part III
[Re: ace250xr84]
#38306
06/11/08 11:25 PM
06/11/08 11:25 PM
|
Joined: Apr 2005
Posts: 42
plum500
member
|
member
Joined: Apr 2005
Posts: 42
|
Quote:
Well I have been slowly but steadilly working on the Olds it has been kind of rough, time is short and the days are HOT. I have a couple of questions for the ones that have gone before me. The top surfaces were in sad shape no clear coat left, cracked paint surface rust and what look like scratches with surface rust in them. I sanded with a 1/3 sheet power finish sander with 220 grit my first thought was it probably be too aggressive but it looks silky smooth afterwards, only original primmer left, for the most part excepts where those scratches with surface rust in them were the surface actually is shinnier than before sanding, strange? My first question is how much filling will Rusto rusty metal primmer fill, I do NOT want to take the surface to bare metal and should the primmer be thinned like the paint. My second question is concering the sides. The very top of side that roll to the Horizontal plane are like the top no clear coat left, paint comes off easy now shows original primmer like the top of car but as you go down clear coat is intact and that stuff is Hard 220 grit + power sander just does dull it up. The hart of the question is for adhesion for new primmer and paint How do you know if is scuffed enough so the new stuff will be permanent. One more if you don't mind about Bondo Surface prep for application what grit and does it need to be bare metal. I have a couple dozen spots that need attention ranging from dents, a couple rust spots, Holes from bolts that held the side trim and a whole bunch of metal studs that I grinded off that held the same side trim on. Thanks
If it were me, to deal with those deep scratches and not strip to bare metal.... I'd make sure all the rust was out of the scratches - sand em', then use some light spot putty to deal with them. Fill them, blend them, then shoot the areas you puttied with a rattle can primer - scratch fill - and go a fair bit outside your repair area. Give a light sand to blend all that to your original primer.
|
|
|
....
[Re: Marq]
#38307
06/12/08 01:21 PM
06/12/08 01:21 PM
|
Anonymous
Unregistered
|
Anonymous
Unregistered
|
Ok, I am sure most of you have realized that the profesional painting community does not agree with this method.
Question, is there a reason (other than cost)that the Rustoleum or Brightside paints are used for this technique? Could a more recognized automotive paint be used sucessfully? If not, why not? If so, what would be recomended?
Craig
|
|
|
Post deleted by Defbob
#38308
06/12/08 06:18 PM
06/12/08 06:18 PM
|
Anonymous
Unregistered
|
Anonymous
Unregistered
|
|
|
|
Re: ....
#38309
06/12/08 06:36 PM
06/12/08 06:36 PM
|
Joined: Nov 2006
Posts: 32
Edgerton WI
Donny O.
member
|
member
Joined: Nov 2006
Posts: 32
Edgerton WI
|
Quote:
It will be interesting to see how long these low buck paint jobs last after a couple years of exposure to the sun and weather. This is what separates the cheap paint from the more expensive automotive paint.
well 69chargerXXXX posted pictures of his charger and bug after years of sun, rain, snow, etc and said they looked as good as the day he did them.
|
|
|
Re: ....
#38310
06/12/08 06:49 PM
06/12/08 06:49 PM
|
Joined: Jan 2003
Posts: 12,405
Southern, Ca.
69DartGT
OP
moparts member
|
OP
moparts member
Joined: Jan 2003
Posts: 12,405
Southern, Ca.
|
Quote:
It will be interesting to see how long these low buck paint jobs last after a couple years of exposure to the sun and weather. This is what separates the cheap paint from the more expensive automotive paint.
The Brightside for one is marine paint, used in some pretty harse climate, mine is two years old and still looks just fine.
|
|
|
Re: ....
#38311
06/12/08 09:07 PM
06/12/08 09:07 PM
|
Joined: May 2006
Posts: 575
Canada
Marq
mopar addict
|
mopar addict
Joined: May 2006
Posts: 575
Canada
|
Quote:
It will be interesting to see how long these low buck paint jobs last after a couple years of exposure to the sun and weather. This is what separates the cheap paint from the more expensive automotive paint.
My Mustang McLaren ( painted in Brightside Red ) is now 2 years old and still as shiny as the day it was finished. So I would say that it has held up 'quite nicely' - and probably is in the same overall state as if I had a professional paint job at that time.
Now... I will admit that I enjoy taking my Porter & Cable out and slapping fresh coats of wax on the car every couple of months... but I would have probably have done that with a 'pro' paint job too.
Now.. if I had a pro-paint job with a clear coat, I probably would not have had to bother waxing this puppy...
But overall I am extremely pleased how this 'cheap' paint job went. The single biggest benefit to date is the fact that I was able to make the car look RESPECTABLE AGAIN. I was able to USE the car for the last two years. You have to remember that previously the poor little car had sat hidden away in my garage FOR FOUR YEARS because I did not have the $3800 that THREE PAINT SHOPS wanted for painting it.
IF ONLY I HAD KNOWN about this SIX years ago... I would have been able to drive the car for six years, instead of hiding it away in a garage.
So yes... I am pleased.... no thrilled on how this whole adventure turned out.
.
|
|
|
Re: ....
#38312
06/12/08 09:51 PM
06/12/08 09:51 PM
|
Anonymous
Unregistered
|
Anonymous
Unregistered
|
Quote:
It will be interesting to see how long these low buck paint jobs last after a couple years of exposure to the sun and weather. This is what separates the cheap paint from the more expensive automotive paint.
You have a crystal ball? Have you seen these rolled projects fail? So far so good. Maybe expensive paints are over priced versions of the cheap paints?
|
|
|
|
|


 but sounds to me like you need to use a thinner mixture and lay it on real light. I dont remember seeing any roller marks when painting, or if I did, they went away on their own when rolling over the area after applying the coat (to even things out). Thicker paint will just stay there and not self level, and too much thin paint would probably run.

 . If I ever get to putting pigment on I hope it goes faster. I still have a little intial sanding to do and body filler to apply. Not sure if I made it clear but the primmer I plan on using is rustoleum rust metal in the quart can.


