|
 Re: New how to paint your car on a budget with a roller
[Re: Gusteve]
#37894
Re: New how to paint your car on a budget with a roller
[Re: Gusteve]
#37894
01/27/08 07:38 PM
01/27/08 07:38 PM
|
Joined: Feb 2003
Posts: 885
south louisiana
lowell66dart

super stock
|
super stock
Joined: Feb 2003
Posts: 885
south louisiana
|
I'll look back and shoot him a pm. If need be I guess I could spray the hood.
2021 Dodge 2500 4WD Cummins
2020 Challenger R/T Scat Widebody
2007 Charger R/T 5.7
|
|
|
Re: New how to paint your car on a budget with a roller
[Re: lowell66dart]
#37895
01/27/08 11:58 PM
01/27/08 11:58 PM
|
Anonymous
Unregistered
|
Anonymous
Unregistered
|
Speaking of spraying the hood... From what I've read through the numerous threads and compilation websites I've found on this method, I've found that there's about 2 ways to go about door jambs and under the hood, as well as other areas that don't need a lot of attention. 69chargeryeehaa said, Quote:
i don't sand/polish the underhood and door jambs, it looks fine just as it is. the wetsanding and buffing is only done for the exterior that you see. it does not look out of place at all, the natural finish looks great, besides those areas such as door jambs are full of curves, ect...and it's hard to even see a difference in finish at all.
Exit1965 said,
Quote:
For door jambs, engine bays, etc., it is easier to use spray cans or spray the paint on if you have a compressor. I used a compressor and gun to paint my door jambs, and used a refillable rechargable spray can from Harbor Frieght to paint my engine bay. Using one of those refillable cans allows you to get the exact same color since you're using the exact same paint you're rolling with (although it doesn't need to be thinned quite as much).
So what I'm wondering is... What have other people done? It would be a lot easier to just spray the bottom of the hood and I plan on spraying inside the engine bay with some sort of satin black spray anyways... But what about the little L shaped lip around the hood, have people been painting the hood and then opening it to paint that lip and under the hood? Removing the hood altogether?
And as for door jambs, what have you guys been doing? I'm thinking of just using a small foam brush and a roller when I can, and just do the jambs, inside of the door, then outside of the door... And then close the door for wet sanding and open it again for the next coat?
Maybe I'm making things more complicated than they should be, and I should just go ahead an roll the whole exterior out, get it completely finished and then go back and mask off everything but the jambs and under the hood and spray it?
Anyways, please share what order and what methods you guys have been doing these not-often seen areas. 
|
|
|
Re: Pics?
[Re: Marq]
#37897
01/28/08 01:13 AM
01/28/08 01:13 AM
|
Joined: May 2006
Posts: 575
Canada
Marq
mopar addict
|
mopar addict
Joined: May 2006
Posts: 575
Canada
|
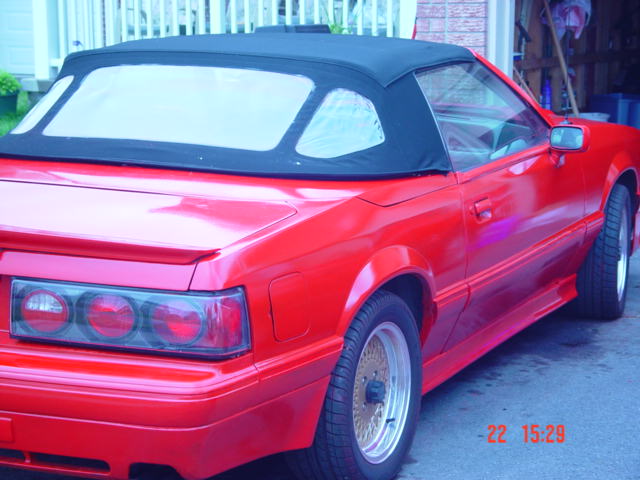
Here's another one....  One of the easiest ways to spot a McLaren Mustang ( compared to your run of the mill Mustang convertible is that the Mercedes style three window rag top tucks completely under that body hatch and can not be seen at all when you are driving with the top down.
Last edited by Marq; 01/28/08 01:28 AM.
|
|
|
Re: Pics?
[Re: Marq]
#37898
01/28/08 01:15 AM
01/28/08 01:15 AM
|
Joined: May 2006
Posts: 575
Canada
Marq
mopar addict
|
mopar addict
Joined: May 2006
Posts: 575
Canada
|
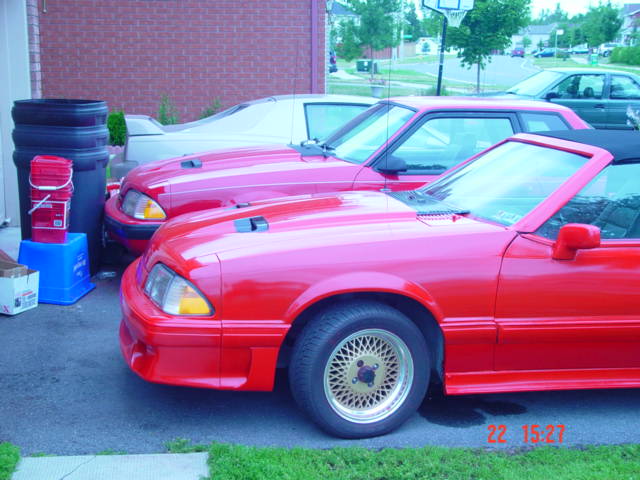
And one more since it is not chewing up my web server's bandwidth This features my McLaren ( front ), Cobra ( middle ) and my Ferrari hatch GTA Trans Am ( back ). I love American Muscle ! You will see a lovely and comfortable blue recycling bin in front of the garage. I used it to sit on while working on the sides of the car. Another feature of the McLaren, compared to the standard issue Mustangs... is that they raked the windshield an additional 15 degrees to make the car look sleeker and aerodynamic. In this picture you can see the difference in the angle of the McLaren windshild compared to its brother behind it. .
Last edited by Marq; 01/28/08 02:18 AM.
|
|
|
Re: Pics?
[Re: Marq]
#37899
01/28/08 01:19 AM
01/28/08 01:19 AM
|
Joined: May 2006
Posts: 575
Canada
Marq
mopar addict
|
mopar addict
Joined: May 2006
Posts: 575
Canada
|
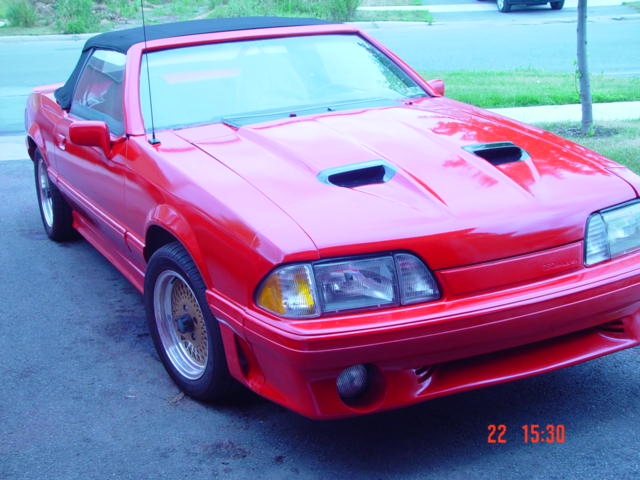
Hmmmmm.. one more After I put the headlights back on to the car... I took a flat black paint and highlighted the openings of the functional dual ram air gun ports to make them stand out.
Last edited by Marq; 01/28/08 01:34 AM.
|
|
|
Re: Pics?
[Re: Marq]
#37900
01/28/08 01:51 AM
01/28/08 01:51 AM
|
Joined: May 2006
Posts: 575
Canada
Marq
mopar addict
|
mopar addict
Joined: May 2006
Posts: 575
Canada
|
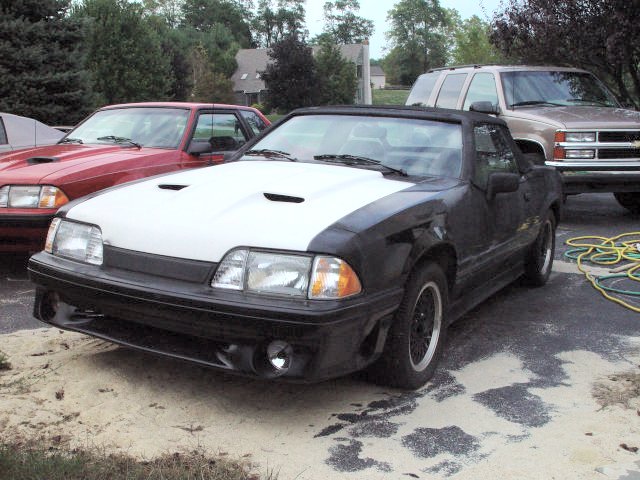
And some folks would like to know how this puppy started before the roller job...
The original hood was hopeless and beyond reasonable repair. So I slapped a fiberglass dual port functional ram air on. They arrive in a white gel coat ( and that is what you see ).
I had taken the car to three body shops to get a quote on painting the poor puppy... and they all came in at $4000... ( so the car sat untouched for two years until I stumbled on this message thread and decided to give it a try ).
I was thrilled by how the car turned out and at the saving of $3750...
Last edited by Marq; 01/28/08 02:32 AM.
|
|
|
Re: Pics?
[Re: Marq]
#37901
01/28/08 01:52 AM
01/28/08 01:52 AM
|
Joined: May 2006
Posts: 575
Canada
Marq
mopar addict
|
mopar addict
Joined: May 2006
Posts: 575
Canada
|
And here is a rear shot... At some point the rear valance on the McLaren had been damaged and the previous owner simply slapped an LX style bumper on to the car. I replaced it with the proper rear valance which you can see in the shiny red pictures of the finished car. I also hated the lame dual exhaust tips on the car... and replaced the exhaust from front to back with a true dual Mac system with dual chrome tips on each of the new dual pipes. Nothing sexier on a sportscan then having four exhaust tips purriiing out their musical rumble at the car behind you .
Last edited by Marq; 01/28/08 02:22 AM.
|
|
|
Re: Pics?
[Re: Marq]
#37902
01/28/08 01:52 AM
01/28/08 01:52 AM
|
Joined: May 2006
Posts: 575
Canada
Marq
mopar addict
|
mopar addict
Joined: May 2006
Posts: 575
Canada
|
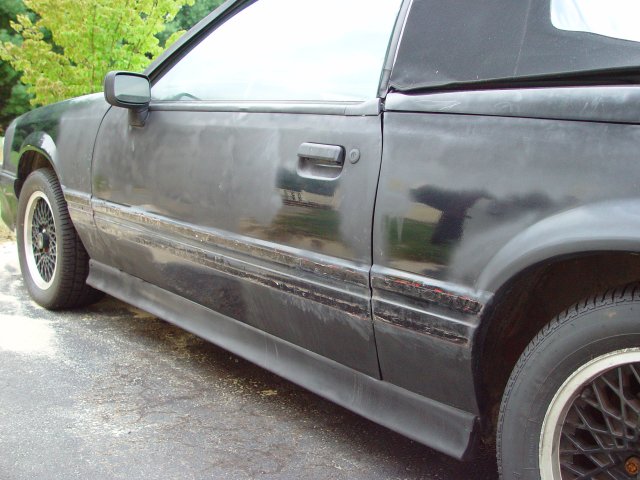
And a side profile...
Yup... that is how I received it... rough, scruffy and not exactly the car you want to be seen cruising in on Friday nights... ( It was embarassingly and poorly cared for by its previous owner ).
Last edited by Marq; 01/28/08 02:00 AM.
|
|
|
Re: New how to paint your car on a budget with a roller
#37903
01/28/08 02:16 AM
01/28/08 02:16 AM
|
Joined: May 2006
Posts: 575
Canada
Marq
mopar addict
|
mopar addict
Joined: May 2006
Posts: 575
Canada
|
Quote:
So what I'm wondering is... What have other people done? It would be a lot easier to just spray the bottom of the hood and I plan on spraying inside the engine bay with some sort of satin black spray anyways... But what about the little L shaped lip around the hood, have people been painting the hood and then opening it to paint that lip and under the hood? Removing the hood altogether?
Because I was painting the car in Fire Red, I was able to buy the aerosol and liquid canned paint in the same color. So for under the hood, I used the spray aerosol. For the inner lip of the fender and the hood I also sprayed with the aerosol bomb. I did all my spraying BEFORE doing the roller job on the more exposed exterior parts.
I think at some point I also touched up the inner ffender part that is attached in the engine compartment with a 1" foam paint brush.
While working in the engine compartment I covered the engine and inner fender walls and inner firewall with a sheet of plastic that I taped into position ( just to cut down on the over spray getting in the engine compartment ).
Quote:
And as for door jambs, what have you guys been doing? I'm thinking of just using a small foam brush and a roller when I can, and just do the jambs, inside of the door, then outside of the door... And then close the door for wet sanding and open it again for the next coat?
I just opened the doors and used the aerosol bomb to spray into those hard to reach places. I also spray bombed the bottom of the door panels. The spray bombing went on pretty smoothy and I ended up putting on three coats over a three day period. No additional finishing or waxing was required. It looks like it has always been there. And that was going from black to red.
Quote:
Maybe I'm making things more complicated than they should be, and I should just go ahead an roll the whole exterior out, get it completely finished and then go back and mask off everything but the jambs and under the hood and spray it?
Nah... I went about things the other way around. Get the piddly detail work done first. This way your roller job will not get runs or oversprays that may happen if you did the body first and the 'hard to reach areas' second.
The other advantage of getting the piddly things done first.. is that any overpray on the body can be easily worked over when you do your body sanding and body paint rolling.
In the end... the exterior body is the most important visually to you and anyone who looks upon your roller paint job. Nothing would make you cry more then to do a beautiful exterior body painting... and then foul it up with overspray or paint runs escaping from the 'hard to reach areas'.
.
|
|
|
Re: New how to paint your car on a budget with a roller
[Re: lowell66dart]
#37904
01/28/08 09:55 AM
01/28/08 09:55 AM
|
Joined: Mar 2007
Posts: 5,660
Flint, MI
Gusteve
I Love the Unicorn Song!!
|
I Love the Unicorn Song!!
Joined: Mar 2007
Posts: 5,660
Flint, MI
|
Quote:
I'll look back and shoot him a pm. If need be I guess I could spray the hood.
Scroll down on this thread and you'll see the satin job on the Mach 1 by gfeighny.
https://board.moparts.org/ubbthreads/show...rue#Post3476310
BTW - you won't want to buff out your final coat of satin, as that will start to make it glossy. You'd end up with some kind of sem-gloss instead of satin.
Even though my attempt at it didn't turn out well, you can still give it a try. gfeighny proved that it can come out good, maybe I just couldn't get the technique down right. You can always change your mind later if it doesn't turn out to your liking
.
|
|
|
Re: New how to paint your car on a budget with a roller
[Re: Gusteve]
#37905
01/28/08 12:20 PM
01/28/08 12:20 PM
|
Joined: Feb 2003
Posts: 885
south louisiana
lowell66dart
super stock
|
super stock
Joined: Feb 2003
Posts: 885
south louisiana
|
That's the cool thing about this paint, I only have $8 to lose.
2021 Dodge 2500 4WD Cummins
2020 Challenger R/T Scat Widebody
2007 Charger R/T 5.7
|
|
|
Re: Pics?
[Re: Marq]
#37906
01/28/08 12:25 PM
01/28/08 12:25 PM
|
Anonymous
Unregistered
|
Anonymous
Unregistered
|
|
|
|
Re: New how to paint your car on a budget with a roller
[Re: Marq]
#37907
01/28/08 07:22 PM
01/28/08 07:22 PM
|
Anonymous
Unregistered
|
Anonymous
Unregistered
|
Marq: Does that mustang have 92-99 Pontiac Bonneville rims on it? 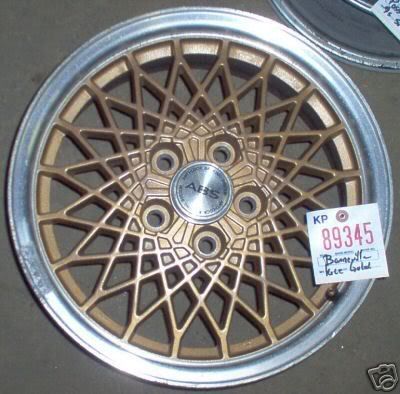 If so, were those painted with Rustoleum as well or how were they done? Or were they on the car when the PO had it?
|
|
|
Re: New how to paint your car on a budget with a roller
[Re: Marq]
#37909
01/29/08 12:04 PM
01/29/08 12:04 PM
|
Joined: Feb 2007
Posts: 42
Oregon
FarDarter
member
|
member
Joined: Feb 2007
Posts: 42
Oregon
|
I just wanted to show a quick project I'm working on in addition to my Dart. The lead seam in the roof of my GTO needed some attention so I stripped the paint off and got busy. Afterwards I decided to try to match the color with Rustoleum. Here are my results. I love this stuff! I even put it on with a foam brush. [image]  [/image]
|
|
|
 Re: New Paint job on a budget thread.
[Re: cyberized]
#37911
Re: New Paint job on a budget thread.
[Re: cyberized]
#37911
01/30/08 02:47 AM
01/30/08 02:47 AM
|
Anonymous
Unregistered
|
Anonymous
Unregistered
|
This is my first post. I've enjoyed all the info that everyone has posted. I joined just to follow this thread. I don't own any Mopar products, but my interests are in Jeep Cherokees. Has anyone thought of using a palm sander or some other vibration device (not your old lady's) to vibtrate the bubbles out or help level the paint? Also, came across this: http://www.bluewatermarinepaint.com/They use to own Interlux Yacht Finishes that makes Brightside. They were the private label for West Marine and several other companies, according to a PDF I downloaded. They also sell gallons of single stage enamel truck paint for reasonable price. No shipping or sale taxes, but they do charge a $19.95 handeling fee on the entire order. Chris AKA: BigBlue
|
|
|
Re: New Paint job on a budget thread.
#37912
01/30/08 03:53 AM
01/30/08 03:53 AM
|
Anonymous
Unregistered
|
Anonymous
Unregistered
|
Marq: Very interesting story on the rims. I noticed the newer gold rims were different than the black ones, but the black ones looked like bonnie rims. The funny part is that they would fit the Mustang hubs just fine too :P Lucky you got them back in 1998 or you would have had a heck of a time getting them now considering how much traffic eBay gets these days. Personally, I would have kept the original McLaren rims in storage just to be able to swap the car back to stock if the need or desire ever arose. The Saleen rims do look better (although I like the black color better) with the wider lip. I'm a fan of modding cars to suit my desires, but I also don't want to hack it up so much that I can't put it back to factory stock for the sake of collectibility. Its funny that you mention the TA rims... that one year of crosslaces happen to look almost identical to Buick GNX rims and people with Grand Nationals use the TA rims to make a GNX clone. Look 'em up on Ebay, they go for quite the pretty penny. The Bonnie crosslace rims are used by later-era Pontiac and Buick guys (after the lug pattern was changed) to hint to GNX rims too. The lug pattern of actual GN/Regal rims is different so we have to use the Bonnie rims for our lug pattern. When painted black, Bonnie crosslace rims actually look pretty darn nice: http://www.cardomain.com/ride/2556893/7Lucky for us, the Bonnie crosslace rims were used from 92-99, were the lightest alloy rims available during that time, and they're easy to find for pretty cheap. Back on topic, I'm in the works of getting a set and plan on painting them with rustoleum this spring, so thats why I was asking if you happened to paint a set yourself :P I think I'm going to use aircraft stripper to get the old clearcoat off, and then just spray bomb the crosslace section... I don't see much point in trying to roll the laces.
|
|
|
Re: New Paint job on a budget thread.
#37913
01/30/08 10:21 AM
01/30/08 10:21 AM
|
Anonymous
Unregistered
|
Anonymous
Unregistered
|
Its been a while. finally got another break in the weather. I work nights and scheduled to leave at 6am. So far for the past couple of days its been a little below freezing. So everytime i got out of work, all cars have a sheet of ice on em'. I wasnt about to go outside and get frost bite on my hands trying to take the ice off   So this morning, it was perfect. nice 60 degrees. I believe this is my 5th coat. After using 800g i almost just almost went back to original paint. I didnt get any pictures right after sanding. I always thought from the beginning I thinned the paint too much. so i added a little more paint to the mix. i laid it out and came out pretty good. No runs, thin but not too thin. I can barely see the original paint. (Took crappy pics - wrong settings on camera  ) As Borat would say, "wow wow wee"  -------------------- almost full coverage (cant see original paint on crappy shot)  -------------------- drying up pretty quick  -------------------- Nice reflections. Hopefully a couple more coats and ill be set to move on!
Last edited by M2001; 01/30/08 10:23 AM.
|
|
|
|
|


