|
 Re: paint stuff
[Re: andyoucankeepit]
#36814
Re: paint stuff
[Re: andyoucankeepit]
#36814
06/19/07 08:06 AM
06/19/07 08:06 AM
|
Anonymous
Unregistered
|
Anonymous
Unregistered
|
Quote:
anyone testing with clears over this paint yet?
the rustoleum clear only comes in spray cans right?
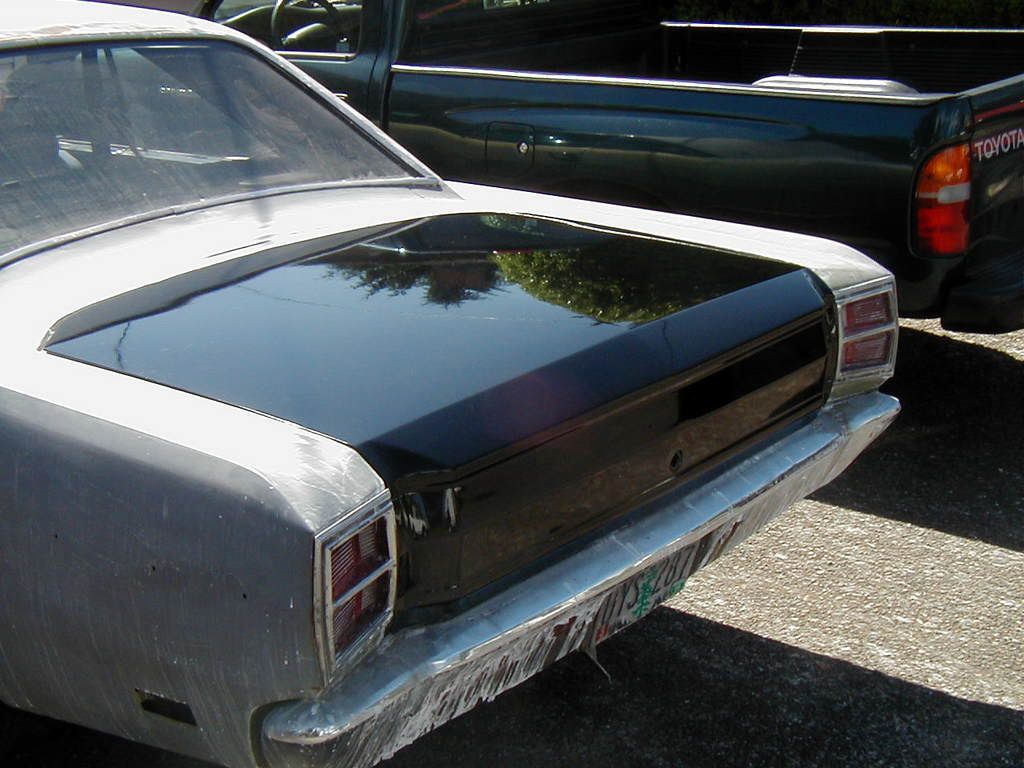
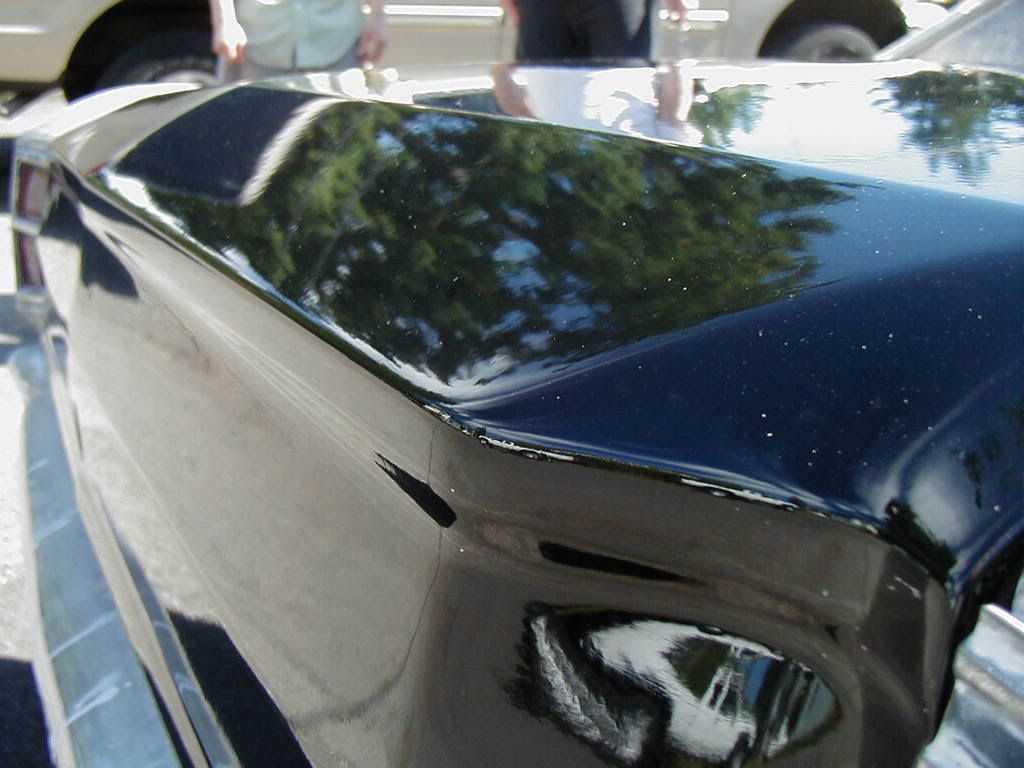
Rustoleum makes an Industrial clear available in gallons only. Some folks here have bought the Industrial clear but haven't reported any results yet, other than how dark it looks in the can.
On the rattle can clear, I tried several different combinations of paint while trying to produce a faux chrome finish for a nose grill I was working on.
Rustoleum rattle can clear will work with Rustoleum "metal" hobby paint - the result is a very bright clearcoat metalic silver. Its not bright enough to simulate chrome, but may be too bright for an entire car. It does lay down nice, though.
Applying the rattlecan clear to rustoleum aluminum and chrome finishes just caused them to darken considerably - gunmetal-ish. In my experience this finish did not last long (I was sanding it off the next day!)
Rustoleum puts "Do not use with Rustoleum Automotive Paints" right on the label of the rattlecan clear.
It also says to apply the clear 10 minutes after the last layer of color, but I had trouble with elephant skin and outgassing bubbles if I didn't let the metal paint properly cure.
It took me three weeks to paint those stupid grills, mostly because of the experimentation and "distance to the paint perfection" effect Marq describes. 
Heaven help me when I paint the car...
|
|
|
Re: paint stuff
#36815
06/19/07 09:46 AM
06/19/07 09:46 AM
|
Joined: Apr 2005
Posts: 42
plum500

member
|
member
Joined: Apr 2005
Posts: 42
|
Quote:
Quote:
anyone testing with clears over this paint yet?
the rustoleum clear only comes in spray cans right?
Rustoleum makes an Industrial clear available in gallons only. Some folks here have bought the Industrial clear but haven't reported any results yet, other than how dark it looks in the can.
On the rattle can clear, I tried several different combinations of paint while trying to produce a faux chrome finish for a nose grill I was working on.
Rustoleum rattle can clear will work with Rustoleum "metal" hobby paint - the result is a very bright clearcoat metalic silver. Its not bright enough to simulate chrome, but may be too bright for an entire car. It does lay down nice, though.
Applying the rattlecan clear to rustoleum aluminum and chrome finishes just caused them to darken considerably - gunmetal-ish. In my experience this finish did not last long (I was sanding it off the next day!)
Rustoleum puts "Do not use with Rustoleum Automotive Paints" right on the label of the rattlecan clear.
It also says to apply the clear 10 minutes after the last layer of color, but I had trouble with elephant skin and outgassing bubbles if I didn't let the metal paint properly cure.
It took me three weeks to paint those stupid grills, mostly because of the experimentation and "distance to the paint perfection" effect Marq describes.
Heaven help me when I paint the car...
I don't think there's a clear that won't do that to any "chrome-like" or silver paint, and if you don't cover it, it will rub off. I would say Alsa Corp stuff is probably the best bet. But, it's pricey, and I've read/heard that the rattle can stuff might require some practice -- you want a continuous wet coat to get that shine.
Rustoleum/Tremclad have an "indoor" metallic finish that supposedly won't rub off...but...it's indoor, and I wouldn't subject anything but maybe some interior trim pieces to it...
The only one I've seen hold up to finger prints and produce a shine so far is Dupli Color's high-heat. The stuff for exhaust manifolds and such, up around 1200� I believe. I've had decent success with that as it is, without clear.
But as far as everything else out there that claims to be "chrome" or metallic, or aluminum - meh, aside from the Alsa Corp stuff (which I haven't tried) ... it's all.... blech...
|
|
|
Re: paint stuff
[Re: andyoucankeepit]
#36816
06/19/07 09:49 AM
06/19/07 09:49 AM
|
Joined: May 2006
Posts: 575
Canada
Marq
mopar addict
|
mopar addict
Joined: May 2006
Posts: 575
Canada
|
Quote:
- so you get the brightside paint at boat places?
- and you cant roll aluminum because you cant wetsand it, but can it be sprayed?
- anyone testing with clears over this paint yet?
the rustoleum clear only comes in spray cans right?
Brightside is mostly available from marine and boat supply type shops. You can find them on the Internet or if you are lucky in your phone book.
The problem with the aluminum paint is that it actually contains aluminum particles. When you go to sand it... the aluminum particles DARKEN and you lose the reflective metalic look. So you can roll it or spray it - but you will get screwed when you go to wetsand it or try to sand any runs or orange peel.
The clear coat concept is not a proven winner at this point. Frankly you don't gain as much with it than without it. Once you put a clear coat on... you can't do simple or quick repairs to scratches. There are concerns about adhesion and whether you really gain anything by attempting to clear coat a Tremclad/Rustoleum or Brightside paint job. Suffice to say with the Brightside it is a polyurathane... and so it already has a built in high level of gloss. And even the Tremclad/Rustoleum can be polished and waxed up to the same level of shine and glossiness.
.
|
|
|
Re: New Paint job on a budget thread.
[Re: 62440]
#36817
06/19/07 10:34 AM
06/19/07 10:34 AM
|
Anonymous
Unregistered
|
Anonymous
Unregistered
|
Someone once told me that if you use more thinner, you get more gloss, so I've mixed up to 50:50 in the past (lacquers). With the Tremclad, I went for a ratio that made it thin enough to spray - 4:1 seemed right!
|
|
|
Re: paint stuff
[Re: Marq]
#36818
06/19/07 10:38 AM
06/19/07 10:38 AM
|
Anonymous
Unregistered
|
Anonymous
Unregistered
|
Quote:
The clear coat concept is not a proven winner at this point. Frankly you don't gain as much with it than without it. Once you put a clear coat on... you can't do simple or quick repairs to scratches. There are concerns about adhesion and whether you really gain anything by attempting to clear coat a Tremclad/Rustoleum or Brightside paint job. Suffice to say with the Brightside it is a polyurathane... and so it already has a built in high level of gloss. And even the Tremclad/Rustoleum can be polished and waxed up to the same level of shine and glossiness.
.
I'm curious what the Rustoleum clear in a gallon can actually is... Most of the cans of clear you see on the shelf are lacquers (well, Testors makes an enamel model paint clear). The Rustoleum enamel spray clear looks like an acrylic enamel by the MSDS sheet. Lacquer clear probably isn't the best choice for a car anyway...it yellows over time, and is a lot more brittle than enamel paint. Unfortunately, if you want a "real" clear coat, you'll have to use catalyzed automotive clear. The reason you can't find a spray can of "real" clear is that once you add the activator, it has a shelf life measured in hours...not months or years like a spray can would need. Marq mentioned adhesion as a problem...talking to people who've sprayed a clear coat on alkyd enamels I've heard "sometimes it works, sometimes not".
I've got a steering wheel I restored for my '60 Oldsmobile, and I'm doing a 2 tone paint job on it with metallic synthetic paint (light grey/shadow grey), and I'm going to give a couple coats of acrylic urethane clear to protect it. I'll let you guys know what happens If it all goes haywire, I'll just be sanding it down for the 50th time and have to get some "real" base coat paint. The steering wheel gets handled enough I want a good hard clear on the metallic paint. I painted the rest of the interior with metallic alkyd synthetic paint, and I'm not worried about the durability...I won't be handling my dash board very often.
I agree with Marq though...I'm not sure it's worth the trouble. These enamel paint jobs are going to look different than a bc/cc job...that's just the nature of the paint. One looks "wet" the other looks "shiny". With everyone going to bc/cc paint, it's actually kind of neat to see car that isn't 
Last edited by toolbox; 06/19/07 01:50 PM.
|
|
|
Re: paint stuff
#36819
06/19/07 02:16 PM
06/19/07 02:16 PM
|
Joined: Feb 2007
Posts: 34
socal
s4dustin
member
|
member
Joined: Feb 2007
Posts: 34
socal
|
|
|
|
Re: New Paint job on a budget thread.
[Re: Marq]
#36820
06/19/07 09:11 PM
06/19/07 09:11 PM
|
Joined: Feb 2006
Posts: 2,590
Piqua, Ohio
dodgeram440
master
|
master
Joined: Feb 2006
Posts: 2,590
Piqua, Ohio
|
Thanks for the suggestions on my situation Marq. Taking into account your advice, what I'm now planning to do is, on my bare fender, do the bondo work that is needed, which really isn't very much. I DA'd 98% of it with 80 grit and it's actually pretty smooth. Not a bunch of deep sanding marks. As I do the body work on the fender and the rest of the truck, I'm going to use the spray can primer for sanding. I know that will work good because I did that with with my motorcycle gas tank and the bodywork was flawless. I even stripped it with a scotchbrite pad on my die grinder, and I've got no scratch marks in it at all. The only problem is I used a rattle can to paint it with and when I put gas in it, the paint ran. So after I get all the body work finished, then I will cover the whole truck with the rusty metal Rustoleum primer, and then paint the truck. Still thinking about spraying the paint. Can the primer be sprayed also? BTW...what's the best way to fill in the holes from the emblems and stuff? Weld them or just bondo over them?
|
|
|
Re: New Paint job on a budget thread.
[Re: dodgeram440]
#36821
06/20/07 07:30 AM
06/20/07 07:30 AM
|
Anonymous
Unregistered
|
Anonymous
Unregistered
|
Quote:
Thanks for the suggestions on my situation Marq. Taking into account your advice, what I'm now planning to do is, on my bare fender, do the bondo work that is needed, which really isn't very much. I DA'd 98% of it with 80 grit and it's actually pretty smooth. Not a bunch of deep sanding marks. As I do the body work on the fender and the rest of the truck, I'm going to use the spray can primer for sanding. I know that will work good because I did that with with my motorcycle gas tank and the bodywork was flawless. I even stripped it with a scotchbrite pad on my die grinder, and I've got no scratch marks in it at all. The only problem is I used a rattle can to paint it with and when I put gas in it, the paint ran. So after I get all the body work finished, then I will cover the whole truck with the rusty metal Rustoleum primer, and then paint the truck. Still thinking about spraying the paint. Can the primer be sprayed also? BTW...what's the best way to fill in the holes from the emblems and stuff? Weld them or just bondo over them?
You might want to go over that fender with your D/A again with some 150 grit...it'll take out the 80 grit scratches, and it'll take less primer to fill them.
If you only have a couple of holes for the emblems and have a MIG welder, just weld them up...it's not a big deal. You can either use a copper backer, or just cut a small scrap of steel and put it behind the hole and weld it in. Grind it and skim it with filler. You can fill them with body filler, but in order to keep it from just falling through you need a pretty thick layer on top of the holes. Then you need to feather that blob into the rest of the panel. It's hard to get a blob thick enough to be strong and yet small enough it doesn't look funny when painted. Since it has to be raised above the surface of the panel, that's hard to do. If you use a really thin coat and just fill the holes, any pressure at all on them will poke them right through the fender...not cool if you just painted it  . Here's my old '73 Chevy 4x4 when I was doing the body work on it...I had just started welding up the trim holes on my replacement fender: . Here's my old '73 Chevy 4x4 when I was doing the body work on it...I had just started welding up the trim holes on my replacement fender:
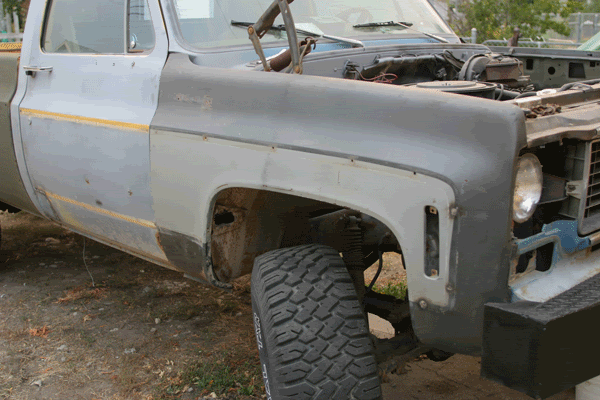
(the fender is hanging on there as a test fit). I didn't bother stripping it until I was done welding . When you have a lot of them, it's kind of time consuming but not that big of a deal. . When you have a lot of them, it's kind of time consuming but not that big of a deal.
Last edited by toolbox; 06/20/07 07:37 AM.
|
|
|
Re: New Paint job on a budget thread.
#36822
06/20/07 07:58 AM
06/20/07 07:58 AM
|
Anonymous
Unregistered
|
Anonymous
Unregistered
|
Words of advice. If you are near your last coat and it looks really good and don't have too much paint left, you may want to stop and not even do another coat. I'm putting on the 8th and final coat and for some reason parts that looked good before looked hazed now. Argh!! I shouldn't have messed around with it already looking nice. Ah well then, I will wait and see what happens. Hopefully buffing can bring a shine back. If not I will get another small quart or pint later on down the road... 
|
|
|
Re: New Paint job on a budget thread.
#36823
06/20/07 10:17 AM
06/20/07 10:17 AM
|
Anonymous
Unregistered
|
Anonymous
Unregistered
|
Hey folks,
Can I use alcohol to wipe my car down before painting? My dad accidently poured down old mineral spirits we used to clean our rollers down the clean jug of mineral spirits. Is it still clean to use?
I don't think so...
any thoughts?
|
|
|
Re: New Paint job on a budget thread.
[Re: dodgeram440]
#36824
06/20/07 11:00 AM
06/20/07 11:00 AM
|
Joined: May 2006
Posts: 575
Canada
Marq
mopar addict
|
mopar addict
Joined: May 2006
Posts: 575
Canada
|
Quote:
BTW...what's the best way to fill in the holes from the emblems and stuff? Weld them or just bondo over them?
The 'best' way to fill the holes... depends on whether the hole is in metal.... fiberglass... or in plastic...
For metal.. the best way would be to sand to metal around the hole... and use solder / lead.. with the appropriate flux to fill it in and feather the repair into the surrounding metal. It doesn't require a high amount of heat and you can probably do it with one of those cheap propane 'do it yourself' tanks with the appropriate head on it. But naturally, with a flame near the body... you have to take caution that you don't ignite anything behind the fender ( like undercoating etc ). Keep a hose handy 
If the holes are in plastic... I would probably rough up the surface around the hole and squeeze some epoxy into the hole and blend it around the sanded outer surface. The trick with this method is to make sure that the epoxy glue you use notes on its packaging that it is designed to work and function in the 'temperature range' that is appropriate for the area you live in. YOu don't want to fill the hole with something that won't expand and contract equally with the surrounding plastic. Otherwise temperature fluctuations will cause the 'epoxy' to separate or crack between the two surfaces. They do make a bondo that is specifically designed for flexible plastic ( like the flexible plastic bumpers etc ).
In fiberglass... you should go with a filler that is designed to work with specifically with fiberglass. Although you could use most normal bondos... I am not sure if it might become an achilles heel when temperature fluctuations occur. At the very least - if you want to go the bondo route... it hopefully would be on of those hybrid bondos that use fiberglass shreds in it. The best way would be to use a fiberglass repair kit with a piece of fiberglass sheet behind the hole ( if you have access to the backside of the hole ).
.
|
|
|
Re: New Paint job on a budget thread.
#36825
06/20/07 11:05 AM
06/20/07 11:05 AM
|
Joined: May 2006
Posts: 575
Canada
Marq
mopar addict
|
mopar addict
Joined: May 2006
Posts: 575
Canada
|
Quote:
Words of advice.
I'm putting on the 8th and final coat and for some reason parts that looked good before looked hazed now. Argh!! I shouldn't have messed around with it already looking nice.
Ah well then, I will wait and see what happens. Hopefully buffing can bring a shine back. If not I will get another small quart or pint later on down the road...
A slight hazing is not necessarily a bad thing. It is on the outer surface. After all... when you do your final wet sanding... the entire surface is going to take on a less than glossy / shiny look. It will then be the job of the rubbing compound, polishing and subsequent waxing that is going to give you your long term shine and gloss.
.
|
|
|
Re: paint stuff
[Re: s4dustin]
#36826
06/20/07 11:20 AM
06/20/07 11:20 AM
|
Anonymous
Unregistered
|
Anonymous
Unregistered
|
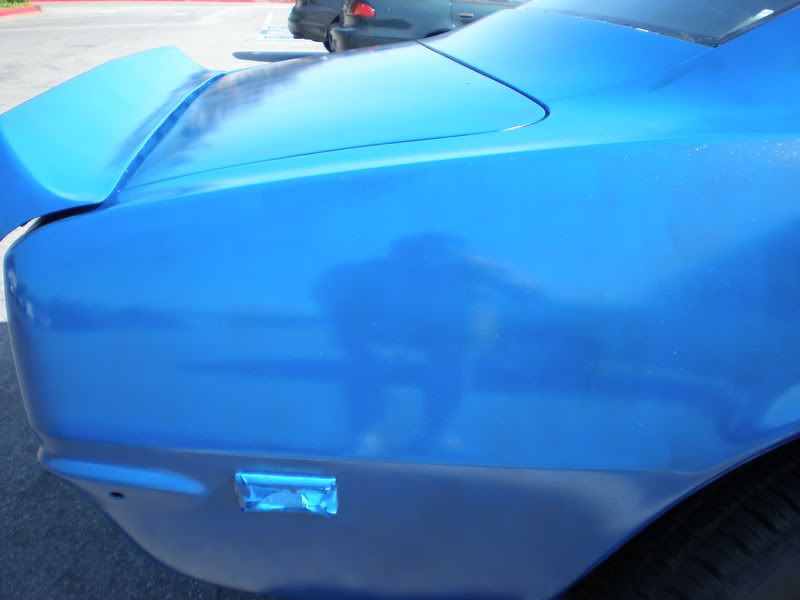
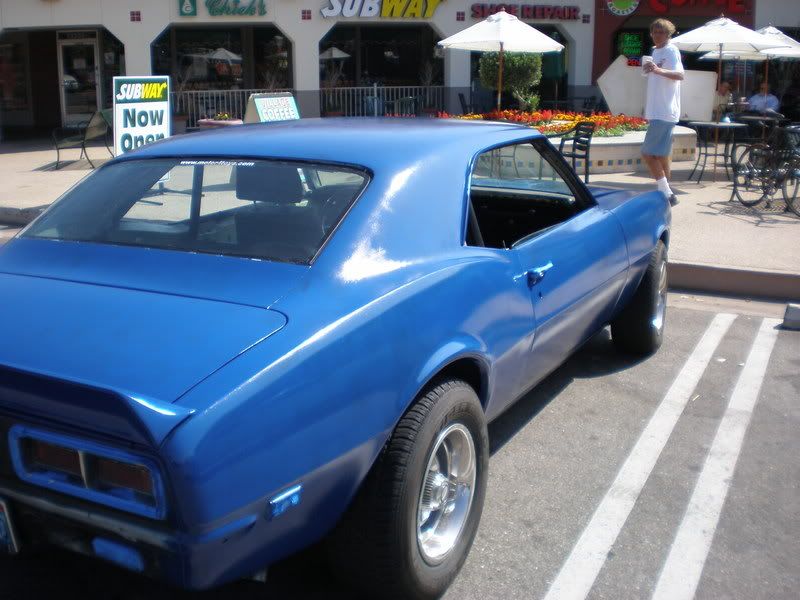
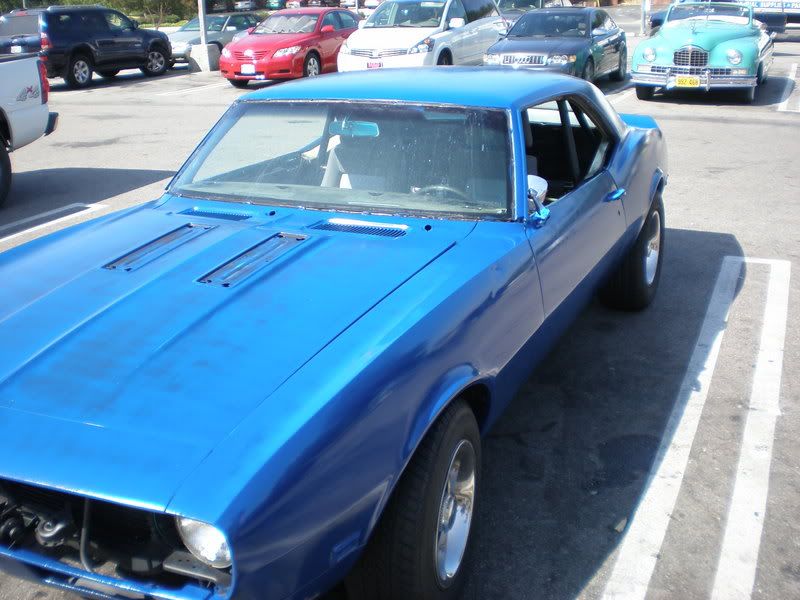
Starting to get there....That's a nice blue you got, and doesn't look too orange peely. It's good to see that even mid-paint job you were able to drive it to Subway!
Interesting to see that Packard in the background too.
|
|
|
Re: New Paint job on a budget thread.
[Re: Marq]
#36828
06/20/07 02:33 PM
06/20/07 02:33 PM
|
Anonymous
Unregistered
|
Anonymous
Unregistered
|
Quote:
Quote:
Words of advice.
I'm putting on the 8th and final coat and for some reason parts that looked good before looked hazed now. Argh!! I shouldn't have messed around with it already looking nice.
Ah well then, I will wait and see what happens. Hopefully buffing can bring a shine back. If not I will get another small quart or pint later on down the road...
A slight hazing is not necessarily a bad thing. It is on the outer surface. After all... when you do your final wet sanding... the entire surface is going to take on a less than glossy / shiny look. It will then be the job of the rubbing compound, polishing and subsequent waxing that is going to give you your long term shine and gloss.
.
Hey Marq thanks for the words of encouragement! Today wasn't our day I suppose. My dad was the one doing to rolling as usual. We woke up @ 6AM to complete this.
Let me explain something. This would be technically the 2nd coat after my planned "final wetsanding stage" where I sanded down from 800 and then 2000 grit.
The 1st coat that went on top after wetsanding was my 7th coat. I should have left it alone, I really should have. The car was nice and even in most spots, AND most importantly it was glossy when dried and had little hazed spots.
The biggest thing after that 1st coat after final sanding was there was less pronounced orange peel. You know the rimply peel effect? It was there but wasn't too bad, it was a very thin layer, 1 layer thats all, it looked good.
After our 2nd coat today, that rimply orange peel look has been magnafied more than last coat. I can tell with my own eyes.
Today my roof was glossy in one half, and the other half was hazed and can see lines.
I told my dad "thats okay we will fix it TOMORROW". I said "lets go inside, don't worry fix it tomorrow". So I went inside our home. Big mistake! I went to grab something to eat and then went back to the garage and saw him still there, he was fixing up one small part. I told him again, "you still there, don't worry lets fix it up tomorrow Dad". I ended telling him the third and final time because he kept on doing something...
I go inside the garage the 3rd time and he tells me he accidently mixed up the old mineral spirits we had in a similar 4L jug and then he poured it into the newer mineral spirit jug we were using...
Darnit! Things are getting worse by the minute.
You know what else I notice? My dad tried to fix up the roof when I told him tomorrow! The roof is soo messed up now. He loaded up the paint for some odd reason. He did the whole roof like that when all we had to do is one portion that was bad. The other half was fine and lovely. He loaded up the paint!! And you can see the straight lines from the end of the roller and some drips!! OMG.
Bah. I will just have to live with it because I don't he wants to wetsand anymore.
Tomorrow we just have to fix up the bumper and the hood. God help us, hopefully nothing else will go wrong.

|
|
|
Re: New Paint job on a budget thread.
[Re: blue195]
#36830
06/20/07 05:35 PM
06/20/07 05:35 PM
|
Anonymous
Unregistered
|
Anonymous
Unregistered
|
Quote:
Take heart; I've sprayed cars that had a hazy look, some "dry spray" and a couple runs. After wet sanding and buffing they came out looking great! My suggestion would be to wait more than one day before buffing to let the paint set up a bit. I've buffed soggy paint, and it ain't pretty! 
Thanks very much. Yes I plan to wait for at least 1-2 months to prevent cutting through any soggy paint....Thats the last thing I need right now.
Plus I have to get a better polisher. My dad has this one here, but I don't think its anywhere near what I need for cutting/polsihing...
URL: http://www.canadiantire.ca/browse/produc...fromSearch=true
You think thats good enough? I don't...
Also I have Alcohol Solution (50% by volume), can I use this to wipe my car clean as substitute to mineral spirits?
|
|
|
Re: New Paint job on a budget thread.
[Re: FarDarter]
#36832
06/21/07 08:41 AM
06/21/07 08:41 AM
|
Anonymous
Unregistered
|
Anonymous
Unregistered
|
Well I finished my car my today. My dad and I were fixing up parts where we screwed up. The hood had white spots. Anyway he loaded up the roller again when I told him not to...Some parts are still hazed but mostly even glossy finish. Except the bottom of the hood is tooo orange peely. But as you guys said, wetsand and polish will fix all our bad work. Thanks guys and I will have pics up maybe later when the whole car gets baked in the sun for a few days. 
|
|
|
Re: New Paint job on a budget thread.
[Re: FarDarter]
#36833
06/21/07 09:00 AM
06/21/07 09:00 AM
|
Joined: Mar 2007
Posts: 5,660
Flint, MI
Gusteve
I Love the Unicorn Song!!
|
I Love the Unicorn Song!!
Joined: Mar 2007
Posts: 5,660
Flint, MI
|
Quote:
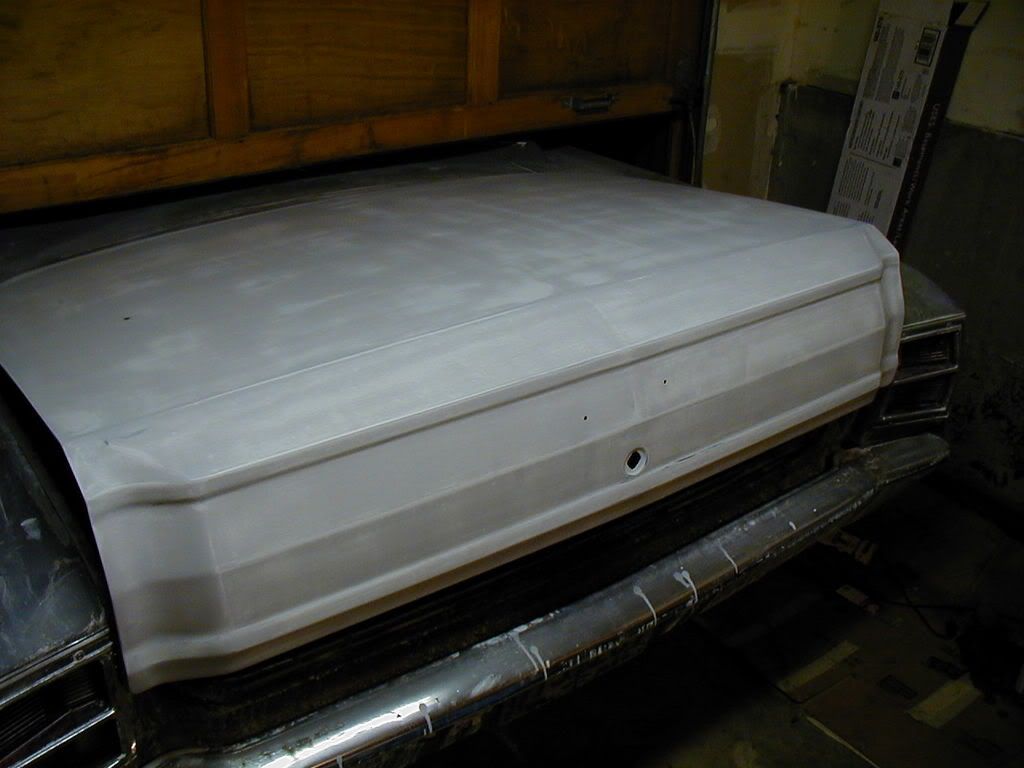
I finally got the first coat on my trunk. After spending forever on the prep work, I rolled on the Rustoleum last night. It turned out that I didn't thin it as much as is prescribed but it still turned out pretty well.
Here's the paint wet:
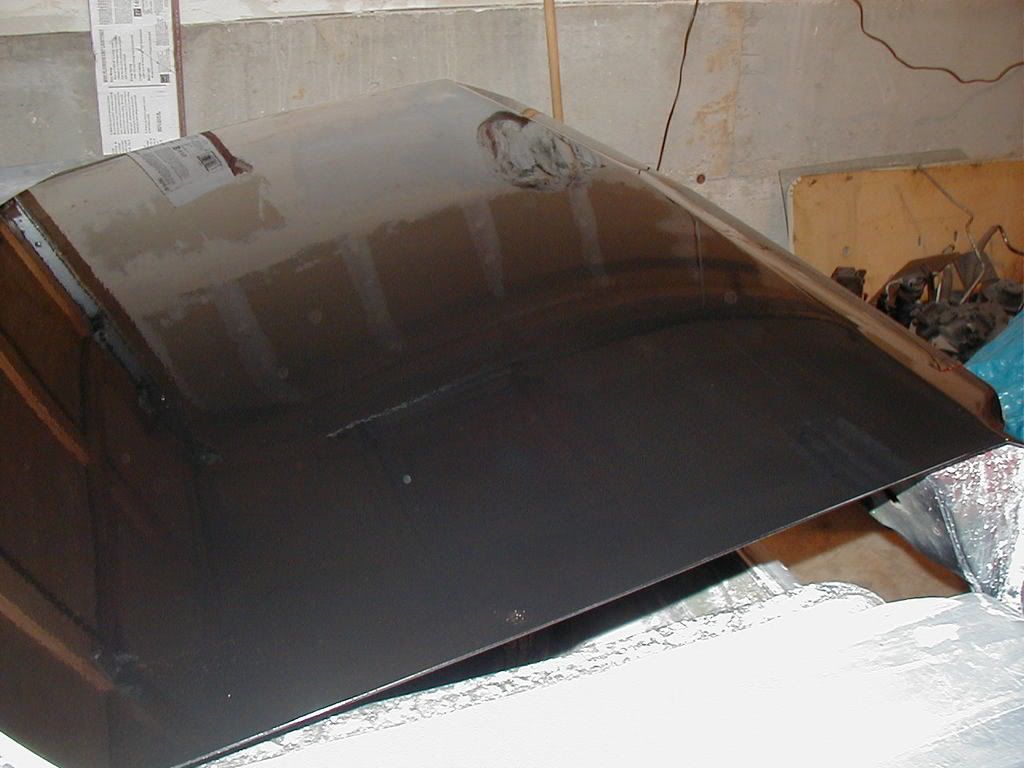
That looks really heavy for a first coat .......I would have expected to still see the primer underneath.
|
|
|
|
|