|
 Re: Paint job on a budget!? CONTINUED
#27278
Re: Paint job on a budget!? CONTINUED
#27278
04/04/07 09:29 PM
04/04/07 09:29 PM
|
Anonymous
Unregistered
|
Anonymous
Unregistered
|
OK, I am obviously doing something wrong. I am using Rustoleum Pro thinned about 20% with 100% mineral spirits. I am applying using the roller, which I load up and then roll out on the tray so that I only put on a thin coat. After about 5 minutes when most of the bubbles have gone I drag a dry foam brush across the surface using only its weight as pressure. The surface looks very good, not a mirror but quite close. I leave it about 2 days, clean the surface with the mineral spirits, let them evaporate and repeat again.
Then I do a wet sand. I use 1500 grit to try and remove the faint brush marks that are left as well as any dust that has settled during drying (not much as I'm doing this in the basement). Every time I seem to go through to the previous paint layer in a few places, which then means that I am stuck with those ridges.
Everyone says to do thin coats, but that's no good if I keep having this problem. What am I doing wrong?
Thanks
|
|
|
Re: Paint job on a budget!? CONTINUED..page 44........
[Re: Radio Joe]
#27280
04/04/07 10:11 PM
04/04/07 10:11 PM
|
Joined: Jul 2006
Posts: 1,475
Ontario, Canada
78D150CLUB

My avatar is a self portrait!!
|
My avatar is a self portrait!!
Joined: Jul 2006
Posts: 1,475
Ontario, Canada
|
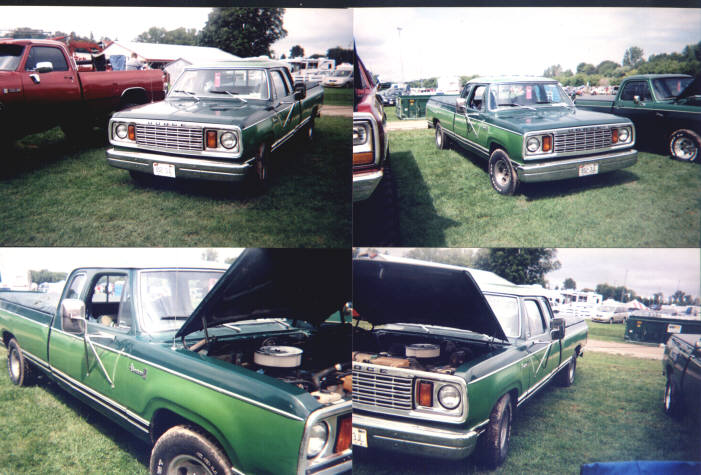
Haven't said much lately, but I have been lurking in the background. Seeing some amazing results. Very good work from a lot of good people. I did my truck in a green/green two tone, and I found out the hard way about over adhesion and paint removal. The cure I found was to pull the tape on a 45* bias while wiping the end with a spirit soaked rag. This softens the adhesive and lets the tape loose. Work slowly and the tape should come off with no trouble. Hope this helps out. It just takes patience, but it's worth it.  This is the end result before trim was installed.
I want to die like my Grampa, peacefully, in his sleep. Not screaming in terror like his passengers.
|
|
|
Re: Paint job on a budget!? CONTINUED..page 44........
[Re: 78D150CLUB]
#27281
04/04/07 10:22 PM
04/04/07 10:22 PM
|
Joined: Jul 2006
Posts: 1,475
Ontario, Canada
78D150CLUB
My avatar is a self portrait!!
|
My avatar is a self portrait!!
Joined: Jul 2006
Posts: 1,475
Ontario, Canada
|
These are from Moparfest 2006 after everything was finished and installed.
I want to die like my Grampa, peacefully, in his sleep. Not screaming in terror like his passengers.
|
|
|
Re: Paint job on a budget!? CONTINUED..page 44........
[Re: 78D150CLUB]
#27282
04/05/07 12:39 AM
04/05/07 12:39 AM
|
Anonymous
Unregistered
|
Anonymous
Unregistered
|
FYI, I found a store selling Rustoleum "Top Side" marine paint. This is NOT a polyurethane paint...it's a modified alkyd. I'm not sure what (if any) difference there is between regular Rustoleum and Top Side, other than the price. Just something to be aware of...it's not a polyurethane like Brightside.
|
|
|
Re: Paint job on a budget!? CONTINUED..page 44........
#27283
04/05/07 12:57 AM
04/05/07 12:57 AM
|
Anonymous
Unregistered
|
Anonymous
Unregistered
|
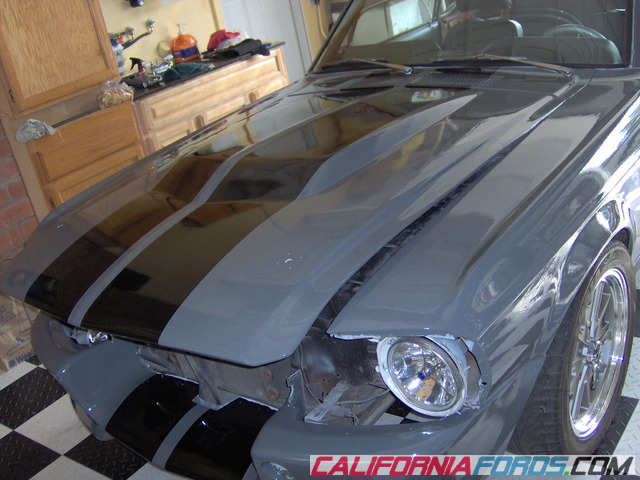
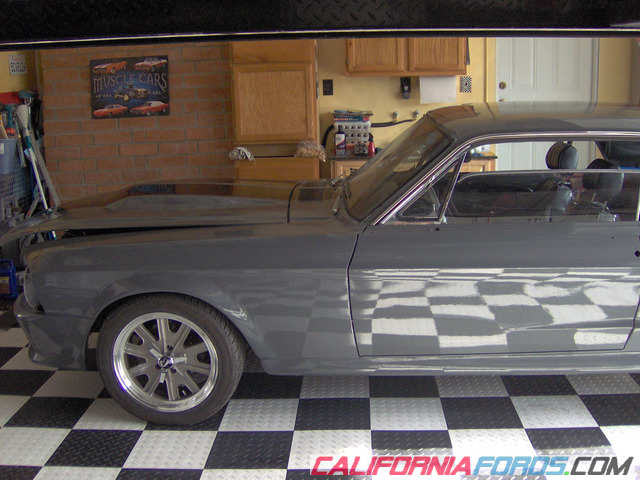
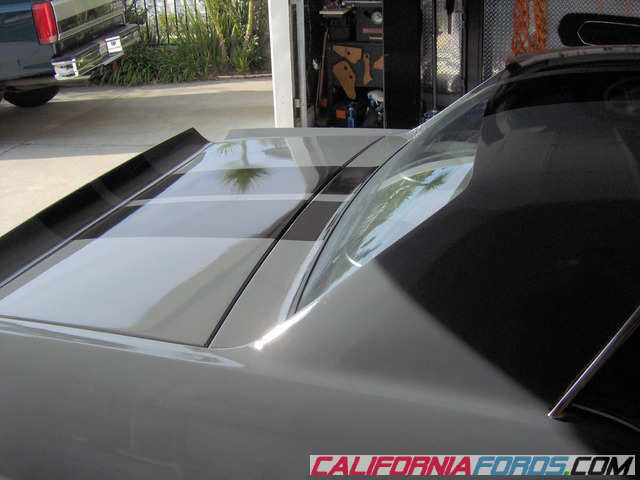
Here are the latest progress pix. The stripes are done, and this is the first coat of Brightside on the rest of the car. Next step, wetsanding and final coat of paint (I'm using 2 coats). Followed by final sand and polish. These pix are ginormous so you can see all the detail, with apologies to any dialup users out there. 1 2 3
Last edited by ZIPPY; 04/05/07 01:09 PM.
|
|
|
Re: Paint job on a budget!? CONTINUED
#27284
04/05/07 01:44 AM
04/05/07 01:44 AM
|
Joined: May 2006
Posts: 575
Canada
Marq
mopar addict
|
mopar addict
Joined: May 2006
Posts: 575
Canada
|
Quote:
Then I do a wet sand. I use 1500 grit to try and remove the faint brush marks that are left as well as any dust that has settled during drying (not much as I'm doing this in the basement). Every time I seem to go through to the previous paint layer in a few places, which then means that I am stuck with those ridges.
Everyone says to do thin coats, but that's no good if I keep having this problem. What am I doing wrong?
It sounds like you are following the recipe correctly. The big variable here is the amount of pressure you are applying while doing the wetsanding.
Wetsanding in the basement is not as much fun as doing it in the garage or out in the driveway.
When I was doing my car, I was outside and I had a hose in one hand and a wetsanding block in the other. I was basically soaking the surface and lightly skimming the sanding block over the wet surface like a hovercraft. I was really not laying much pressure down on the wetsanding pad.
Working out of the basement, I would guess that you are not able to wet the surface enough to cut down on the sanding abrasion.
You may want to try laying down 3 layers of paint prior to wet sanding... to compensate for the more abrasive wetsanding you are experiencing.
.
|
|
|
Re: Paint job on a budget!? CONTINUED
[Re: Marq]
#27286
04/05/07 09:29 AM
04/05/07 09:29 AM
|
Anonymous
Unregistered
|
Anonymous
Unregistered
|
Marq, newbie comment coming here, I thought that the thin coats would bond together to become one thicker layer, but that obviously isn't the case here. Would adding an extra coat between wet sanding do anything for me if I am still going to break down into the previous coat?
I am trying to get a completely matt flat surface each time; do I really need to be that anal about it?
Or, should I apply a thicker coat and wet sand it matt flat, then go with the thin coats?
Exit, I am using hand pressure as I can easily feel when an area (with thicker paint layer) goes smooth. I see where you are going, but if there is an imperfection (orange peel / brush or roller mark) then you have to go as deep as is needed to get rid of it. That said, I will try a foam block; never used one, so any recommendations?
Last edited by Smeg; 04/05/07 10:20 AM.
|
|
|
Re: Paint job on a budget!? CONTINUED
[Re: Marq]
#27289
04/05/07 01:16 PM
04/05/07 01:16 PM
|
Anonymous
Unregistered
|
Anonymous
Unregistered
|
Attension Brightside users!!
Do not use Dupicolor's Filler Primer! Today after, I started polishing and all of a sudden I'm having some serious adhesion issues with areas where I used this primer. Unfortunately, I've since had to repaint a number of spots because brightside just pealed right off from the buffer and it definitely comes off with my finder nail.
and things were going so smooth too. Poorboys + Wolfgang + 7424 = one really nice shine.
|
|
|
Re: Paint job on a budget!? CONTINUED
#27290
04/05/07 01:42 PM
04/05/07 01:42 PM
|
Anonymous
Unregistered
|
Anonymous
Unregistered
|
Quote:
Attension Brightside users!!
Do not use Dupicolor's Filler Primer!
That is the primer I'm using, and I haven't had any issues with it. Hmmm...
I sanded mine seriously with 600 grit before painting.
|
|
|
Re: Paint job on a budget!? CONTINUED
#27291
04/05/07 03:53 PM
04/05/07 03:53 PM
|
Anonymous
Unregistered
|
Anonymous
Unregistered
|
who knows, i did 400 for everything. It's rather disappointing to have to repaint polished areas
|
|
|
Re: Paint job on a budget!? CONTINUED
#27292
04/05/07 04:12 PM
04/05/07 04:12 PM
|
Joined: May 2006
Posts: 575
Canada
Marq
mopar addict
|
mopar addict
Joined: May 2006
Posts: 575
Canada
|
Quote:
Marq, newbie comment coming here, I thought that the thin coats would bond together to become one thicker layer, but that obviously isn't the case here. Would adding an extra coat between wet sanding do anything for me if I am still going to break down into the previous coat?
Polymer paints always try to form 'chemical chains' with the polymers of the sub-layer. So whether you are doing a thin coat or a thick coat, the chemical reaction will be the same for both - they want to form polymer chains.
The variable here is whether the subsurface is matted flat or unsanded. The websanded surface should give an increased adhesion simply because the paint's carrier is able to more quickly penetrate all the roughened pores of the surface to get a grip.
Quote:
I am trying to get a completely matt flat surface each time; do I really need to be that anal about it?
The main reason to be anal about the surface preparation is because the 'more perfected' the subsurface is, the 'more perfect' the paint job will work out in the end. All the meticulous surface work will pay off with a glossier paint job with no imperfections to detract from the look.
Quote:
Or, should I apply a thicker coat and wet sand it matt flat, then go with the thin coats?
The Brightside paint can be used straight out of the can. As noted the thinning of Brightside is mostly to buy yourself extra working time or to slow down the curing process in a hot work environment.
In some cases I would tend to lean towards one or two thick ( straight from the can ) coats to start off. Then use a wetsanding to bring it all level... then continue with thin layers ( cut with mineral spirits ) to build up some glossier layers and slowly fill in any surface imperfections that may occur during the wetsandings.
But that is not to say that you might want to build up your layers slowly ( using a thinned Brightside ). The main benefit of going all the way with just thin layers is that it allows you to develop your paint application skills from one coating to the next ( with the hope that by the final coating you have the application method perfected ). The other advantage of 'thin layers' is that you shouldn't encounter any 'big mistakes'.
By the time you have done one or two layers ( either thinned or straight from the can ) you will know whether you should continue following that mixture for subsequent layers - or if you should try the other paint mixture
.
|
|
|
Re: Paint job on a budget!? CONTINUED
[Re: Marq]
#27293
04/05/07 08:09 PM
04/05/07 08:09 PM
|
Joined: Feb 2003
Posts: 21,318
Manitoba, Canada
DaytonaTurbo
Too Many Posts
|
Too Many Posts
Joined: Feb 2003
Posts: 21,318
Manitoba, Canada
|
Hey marq, I saw a couple pics of your mustang, looks real good.  I read what you wrote about laying down some paint with a roller, then going over it with a different roller or foam brush to get rid of the bubbles, then going over it again with a different brush to smoothen it out. Sounds like a good idea. I have yet to start painting using the rollering method but I have been watching this thread on and off since the beginning. About how large of an area should I paint before stopping and going over it again with the other two brushes? As in like, do a whole door, then go over it again go get rid of the bubbles, or should it be after every swipe of the roller? Or after every time the roller is out of paint??
|
|
|
Re: Paint job on a budget!? CONTINUED
#27294
04/05/07 08:17 PM
04/05/07 08:17 PM
|
Anonymous
Unregistered
|
Anonymous
Unregistered
|
Quote:
Quote:
Attension Brightside users!!
Do not use Dupicolor's Filler Primer!
That is the primer I'm using, and I haven't had any issues with it. Hmmm...
Hey spyhunter, maybe I spoke too soon... When I peeled off my masking tape today for the striping, there were a few areas where the paint came right off with the tape.
D'oh!
Still, I blame my surface prep, which was hasty and reckless. I hate sanding. Perhaps I missed a couple spots.
|
|
|
Re: Paint job on a budget!? CONTINUED
#27297
04/06/07 12:46 AM
04/06/07 12:46 AM
|
Anonymous
Unregistered
|
Anonymous
Unregistered
|
Quote:
Attension Brightside users!!
Do not use Dupicolor's Filler Primer! Today after, I started polishing and all of a sudden I'm having some serious adhesion issues with areas where I used this primer. Unfortunately, I've since had to repaint a number of spots because brightside just pealed right off from the buffer and it definitely comes off with my finder nail.
and things were going so smooth too. Poorboys + Wolfgang + 7424 = one really nice shine.
crap, i think thats what i used
|
|
|
|
|


![3416021-IMG_0173[1].jpg](/ubbthreads/ubbthreads.php/ubb/download/Number/2767/filename/3416021-IMG_0173[1].jpg)