|
 Re: Paint job on a budget!? CONTINUED..page 44........
#25478
Re: Paint job on a budget!? CONTINUED..page 44........
#25478
08/10/06 12:11 AM
08/10/06 12:11 AM
|
Joined: Jul 2003
Posts: 3,378
Rancho Cordova, CA
Exit1965

master
|
master
Joined: Jul 2003
Posts: 3,378
Rancho Cordova, CA
|
Quote:
Cool, thanks exit.
Also, does anyone know of a place to order sandpaper with grits higher than 1000? The highest I have and can find around here is 1000, and I would like to get 1500 and 2000 for the next go round.
Tbrown, try walmart. In the automotive section (near the bondo) is where I get my sandpaper, they have lots of wet/dry paper there, 2000 grit and I think even higher, but I got lots of 800, 1500 and 2000 from there.
|
|
|
Re: Paint job on a budget!? CONTINUED..page 44........
#25479
08/10/06 12:26 AM
08/10/06 12:26 AM
|
Joined: Jul 2006
Posts: 44
USA
_Scott_
member
|
member
Joined: Jul 2006
Posts: 44
USA
|
Quote:
I have a lot of brush marks still visible. the paint is not smooth at all. i also have a lot of scratches that you can see if you look closely at the paint.
You should have been able to feel the ripple while you were wetsanding. That should have been the tip-off that you need to use a sanding block, especially on a large and relatively flat surface like that.
You can smooth that out with a sanding block and I'd probably start with 600 wet to knock the peaks off, then switch to 800 wet to bring the peaks down even with the valleys. Then I'd go back over with 1000 or higher just to remove the 800 grit scratches, and at this point you may get away without the sanding block, or switch to a softer block.
A note about sanding blocks. The hard black rubber ones are usually too hard for anything but bondo. The red ones are more universal, but look for one that is flat on the bottom. Most of them seem to have lumps or are concave or convex or have some other strangeness that makes them junk. I've had to dig through cases of them to find a good one before.
A source for 1000/1500/2000 grit sandpaper is WalMart, strangely enough. You'll find it near the bondo.
|
|
|
Re: Paint job on a budget!? CONTINUED..page 44........
[Re: _Scott_]
#25480
08/10/06 01:07 AM
08/10/06 01:07 AM
|
Anonymous
Unregistered
|
Anonymous
Unregistered
|
Thanks all for the info everyone. I will get to Wal-Mart this weekend. I do have a sanding block (black), but it felt too hard, so i switched to a sponge. But what do I know? I have never done anything like this before. I will try to find a softer block this weekend also.
I really have a hard time feeling the ripples. I know they are there, obviously, but it feels so smooth to me.
Marq, the paint was polished with the turtle stuff (dark reddish brown) and then polished with the sonus sfx-3. That sonus polish made a HUGE difference. I used a yellow no-name pad for the turtle stuff, and a blue one for the polish. took me about an hour and a half. It has no wax on it at all. I figured I would wait on the wax until I get it really smooth.
Also, there are lots of scratches in the paint that I think were left from the 1000 (looks like a car that got a wash with a dirty rag). those should be taken care of by the higher grit sandpaper. the turtle polish helped a lot with lessening the scratches, but they are mostly still there.
Im pleased with the paint, its rock hard, and now I know how to shine it up. I just got to get it smooooth.
|
|
|
Re: Paint job on a budget!? CONTINUED..page 44........
#25481
08/10/06 04:05 AM
08/10/06 04:05 AM
|
Joined: Apr 2006
Posts: 37
venice, ca
admactanium
member
|
member
Joined: Apr 2006
Posts: 37
venice, ca
|
Quote:
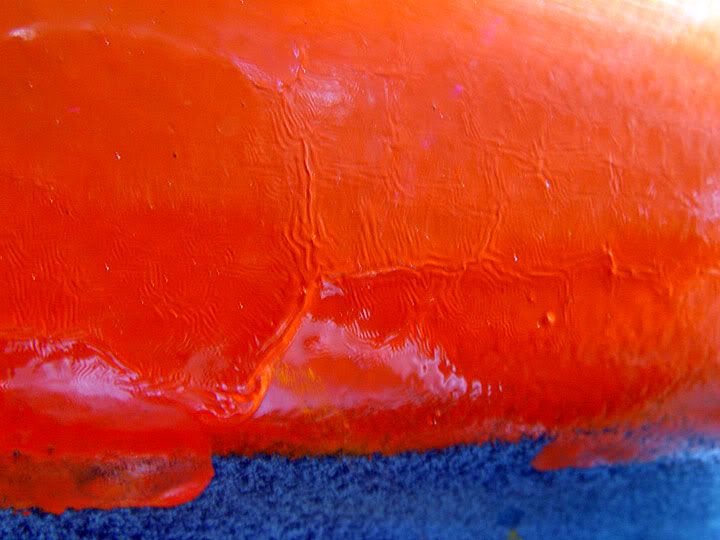
ok, so i broke out the buffer and went at it. I used the turtle polishing compound and some sonus polish. the paint did what i wanted it to, but as you can see by the pic. I have a lot of brush marks still visible. the paint is not smooth at all. i also have a lot of scratches that you can see if you look closely at the paint.
suggestions on what to do now? nock it all down with 600 or 400 and then redo the polishing? will more coats of paint help? I know I rushed the process, but I couldnt wait to see if the brightside would shine up, and it seems to have.
What would yall do to get it flat?
thanks again for all the help.
so what you're seeing that the paint itself is polishing well but you haven't levelled the surface of your paint. go ahead and use a harder rubber sanding block and try to stay off the edges of the block. what you can do while wetsanding is to have a squeegee of some sort and just swipe dry a section every now and then. what you should see with the use of a block is spots of dull (matte) finish and spots of shiny finish. so you're abrading away the bumps and brushmarks and NOT abrading the low spots (valleys) of the bumps.
keep going until you squeegee off a section and it is solidly matte finish. until you get to that stage you will only polish the orange peel or brush marks to a shiny surface rather than really getting that flat finish you like. don't be afraid to start with a lower grit paper to cut down the bumps. you're going to have to remove that paint either way, so using 2000 gt only wastes more of your time. you just have to be careful not to cut through. so use 800 or something until the shiny spots are getting smaller. once the shiny spots are almost done then switch to different less aggresive grades of paper.
go from 800 > 1000/1200 > 1500 > 2000 > even 3000 if you're ambitious. but what you need to do at each stage is make sure you're sanding off the marks from the previous grade of sandpaper. with enough experience you'll start to see what that means.
when you polish, you could use a porter cable but i recently bought a makita ro6040 for detailing which has a forced rotation mode along with it's random orbital action. it cuts faster. you'd want to get at least some decent foam pads from a good detail supply house (properautocare, autogeeks) etc. i'd recommend a yellow cutting pad and then perhaps a medium pad. some manufacturers have them as orange powerpads or whatnot, but each manufacturer uses different color scheme. together with a diminishing abrasive polish like the poorboys, 3m, meguiars or menzerna powergloss/intensive polish and final polish you should get a mirror finish.
i ended up having to delay my motorcycle parts because i got crazy busy with work and then travel. so my parts are just waiting on my kitchen table. 
trust me guys, with just a little bit of knowledge you can get these finishes to be glass smooth and reflective. i once polished out a kryon paintjob on an old motorcycle to a perfectly flat mirror finish using a cheap cordless drill and a lame foam pad. it can be done but you just have to know what you're doing.
the stage where you're at now the most important thing is to flatten the paint. if you cut through the paint then you didn't have sufficient coverage to sand down to begin with and the paint would have been too thin anyway. if that happens, i guess you can just paint some more layers on. but don't lose hope on that paint. you've shown that it WILL shine up if you level the surface properly.
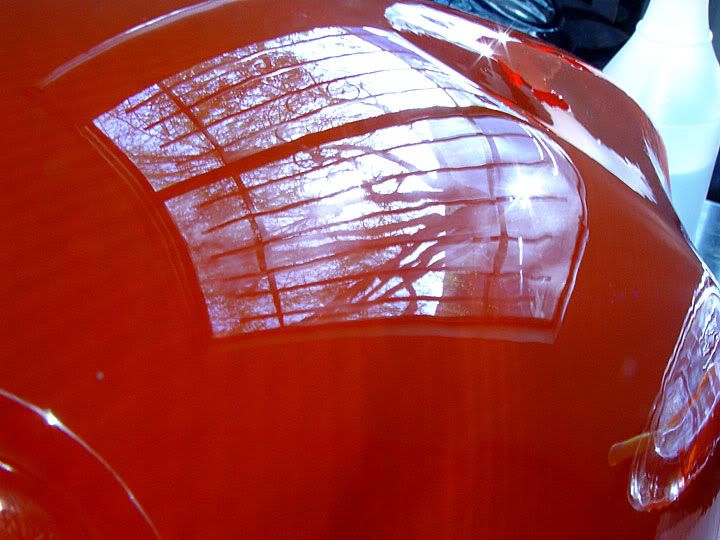
on the previous thread i got this surface:
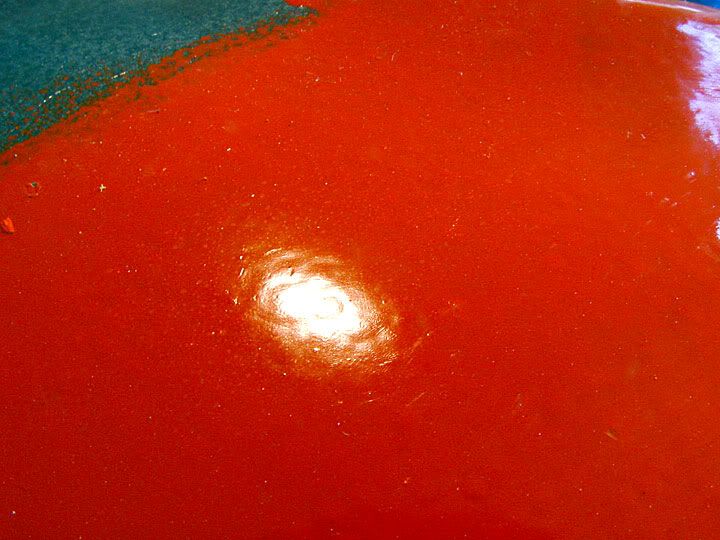
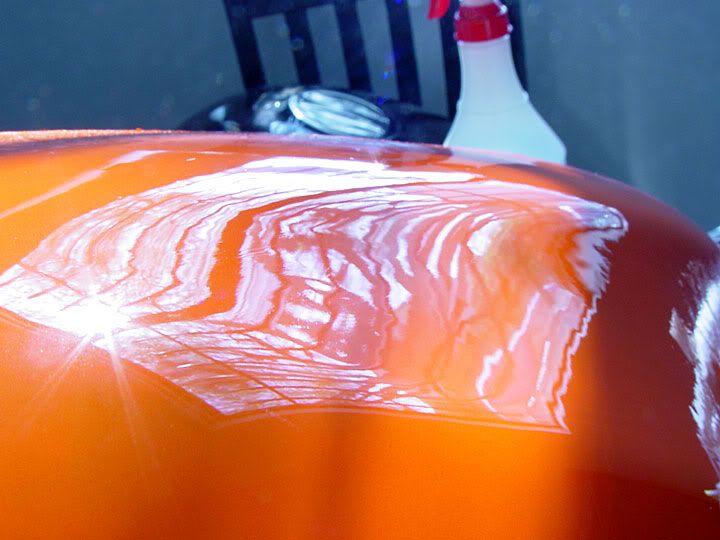
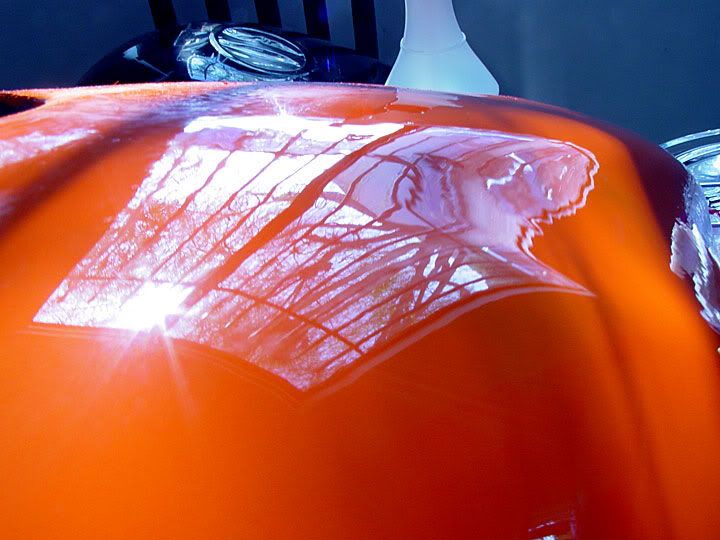
with wetsanding and polishing to look like this:
Last edited by admactanium; 08/10/06 04:12 AM.
|
|
|
Re: Paint job on a budget!? CONTINUED..page 44........
[Re: admactanium]
#25482
08/10/06 04:21 AM
08/10/06 04:21 AM
|
Anonymous
Unregistered
|
Anonymous
Unregistered
|
Quote:
so what you're seeing that the paint itself is polishing well but you haven't levelled the surface of your paint. go ahead and use a harder rubber sanding block and try to stay off the edges of the block. what you can do while wetsanding is to have a squeegee of some sort and just swipe dry a section every now and then. what you should see with the use of a block is spots of dull (matte) finish and spots of shiny finish. so you're abrading away the bumps and brushmarks and NOT abrading the low spots (valleys) of the bumps.
Why is it that DA wetsanding is not possible? If this could be engineered, it'd sure take a lot of the elbow grease out of the equation! A soaked spongy backing pad with a high-grit stick-on abrasive paper "seems" like it could handle anything that isn't peaks or edges.
|
|
|
Re: Paint job on a budget!? CONTINUED..page 44........
#25483
08/10/06 10:45 AM
08/10/06 10:45 AM
|
Anonymous
Unregistered
|
Anonymous
Unregistered
|
Ok,
As far as Brightside goes....it sounds like 3 coats is the way to go. Is this the process?
Step #1
Coat #1 from the can then wetsand(what grit?)
Step #2
Coat #2 from the can then wetsand(what grit?)
Step #3
Coat #3 Thinned 5-10% with #333 then wetsand? (what grit?)
Step #4 Polish (turtle wax polishing compound?)
Step #5 Wax
My questions would be-
How long between painting and wetsanding?
How long between wetsanding and painting?
How long between wetsanding and polishing?
How long between polishing and waxing?
This will be my son's first car and I want to get it right. If I'm off track at all, please chime in. Thanks for all the help.
|
|
|
Re: Paint job on a budget!? CONTINUED..page 44........
#25484
08/10/06 12:53 PM
08/10/06 12:53 PM
|
Joined: Jul 2006
Posts: 44
USA
_Scott_
member
|
member
Joined: Jul 2006
Posts: 44
USA
|
Quote:
Why is it that DA wetsanding is not possible?
It's possible, just not advised.
It is extremely rare to find someone who uses a DA sander correctly. Most people (including "professionals") hold the sander at an angle that causes a gouging action and only uses a narrow ring around the outside edge of the sand paper. This causes ripples in the surface. Also, the backing plate in DA sanding pads is easily bent when the DA is dropped, or even stored incorrectly. This causes the sander to want to jump around which also results in ripples in the surface.
On a stage of the process as critical as the final wetsand, it's advised to do it by hand.
|
|
|
Re: Paint job on a budget!? CONTINUED..page 44........
[Re: admactanium]
#25485
08/10/06 01:05 PM
08/10/06 01:05 PM
|
Anonymous
Unregistered
|
Anonymous
Unregistered
|
thanks admactanium
that orange looks great. that was rustoleum, right?
|
|
|
Re: Paint job on a budget!? CONTINUED..page 44........
#25486
08/10/06 01:34 PM
08/10/06 01:34 PM
|
Joined: May 2006
Posts: 575
Canada
Marq
mopar addict
|
mopar addict
Joined: May 2006
Posts: 575
Canada
|
I have amended your recipe for using the Brightside paint
At this point I believe that it is better to plan on four coats. For boats the manufactuer says that two coats of paint straight from the can will do the job. But what we have learned through trial and testing is that a boat owners quest for a high gloss shine is different than our quest for a super-high-gloss shine on a car.
Since I am suggesting cutting the paint with 10% product 333 Brushing liquid for the first two coats... I look at that as only equaling one coat. The third coat is cut with 5% Brushing liquid... because hopefully you are more comfortable with the rolling technique at this point and we are laying on a little more color solids. By the time you hit the fourth layer you can go with straight paint or cut with 5%.
The extra bit of paint using this four coat system will leave you with enough paint on the car ( after having gone through a number of wet sandings that removed some of the paint ) so that you still have plenty for when you go at the paint with the polisher and the compounding polish.
The following recipe may require some alteration on the fly depending on
a) whether you encounter problems with any of the layers that needs drastic corrections or repainting.. and
b) the choice of color that you have chosen. It would appear that the percentage of solids ( color pigments ) in the various colors varies. One color may provide better coverage then another. I find that red in both Brightside and the Tremclad/Rustoleum is more translucent then say a white or a dark blue.
At this point the bodywork is all done.
Step #1
a) Wash car down thoroughly with cloth and bucket of water with a little bit of liquid detergent ( dish detergent ). Rinse thoroughly. Let sit and thoroughly dry.
b) using a Tack cloth wipe down entire body of car.
c) Coat #1 thinned 10% with #333. No need to wet sand this step.
d) Let paint cure for 24 hours.
Step #2
a) using a Tack cloth wipe down entire body of car to get any dust, bugs, hair or other contaminents that may have fallen on your first layer of paint while it was curing.
b) Coat #2 thinned 10% with #333.
c) Let dry 24 hours.
d) Wet sand with 400 to 600 grit looking to level the surface so that it is level, with no ripples, bubbles, etc.
e) Wash car down thoroughly with cloth and bucket of water with a little bit of liquid detergent ( dish detergent ). Rinse thoroughly. Let sit and thoroughly dry.
Step #3
a) using a Tack cloth wipe down entire body of car to get any dust, bugs, hair or other contaminents off the paint.
b) Coat #3 thinned 5% with #333. No need to wet sand this step unless there are any visual defects that you want to address. If so...wet sand with 400 to 600 grit looking to level the surface so that it is level, with no ripples, bubbles, etc.
e) Wash car down thoroughly with cloth and bucket of water with a little bit of liquid detergent ( dish detergent ). Rinse thoroughly.
f) Let sit for 24 hours .
Step 4
a) using a Tack cloth wipe down entire body of car to get any dust, bugs, hair or other contaminents off the paint.
b) Coat #4 thinned 5% with #333 or straight from the can ( depending on your confidence level at this point ).
c) Let dry 24 hours.
d) Wet sand with 800 or 1000 grit looking to level the surface so that it is level, with no ripples, bubbles, etc.
e) Wash car down thoroughly with cloth and bucket of water with a little bit of liquid detergent ( dish detergent ). Rinse thoroughly. Let sit and thoroughly dry.
You should at this stage be able to do a 1500 wet sanding and then a 2000 wet sanding - with thorough washings and rinsing at the end of each wet sand session.
The body 'should' have a uniform dull shine at this point with no patches of 'shiny' in the otherwise dulled but somewhat shiney surface.
How long between painting and wetsanding? - Always at least 24 hours... the manufacturer recommends 18 hours... but times will vary due to temperatures, humidity, etc.
How long between wetsanding and painting? The body needs to be thoroughly washed down after the wet sanding. So 24 hours is a good rule of thumb to ensure that no moisture is left in the roughened paint.
How long between wetsanding and polishing? When you get to the final step four.. you will be doing a series of wet sandings, increasing the grit with each sanding. Then you will have to again give the car a thorough wash down. So again it is worthwhile to let the car dry for 24 hours if for no other reason than to give yourself a break and so that you can be 'fresh and wide awake' when you begin the polishing stage.
How long between polishing and waxing? Once you complete your polishing to a level of shine and gloss that is acceptable to you... you can proceed to the wax stage almost immediately to seal up all the work you did.
Hope this info helps...
.
Last edited by Marq; 08/10/06 02:11 PM.
|
|
|
Re: Paint job on a budget!? CONTINUED..page 44........
[Re: Dart360sav]
#25489
08/10/06 03:03 PM
08/10/06 03:03 PM
|
Anonymous
Unregistered
|
Anonymous
Unregistered
|
I tried the one on University, only up to 1000, and the one on broadway same thing. I will try the wal mart in oakland.
|
|
|
Re: Paint job on a budget!? CONTINUED..page 44........
#25490
08/10/06 03:17 PM
08/10/06 03:17 PM
|
Joined: Apr 2006
Posts: 37
venice, ca
admactanium
member
|
member
Joined: Apr 2006
Posts: 37
venice, ca
|
Quote:
thanks admactanium
that orange looks great. that was rustoleum, right?
yes it was. it's held up well since then too although it is admittedly not exposed to the elements or used in any way. but regardless of the durability you can definitely shine that paint. the steps for final wetsand are:
1. level the paint
2. get the scratches down to a "polishable" level
3. polish with an aggresive diminishing abrasive with an aggresive pad
4. polish with a milder diminishing abrasive with a light cut pad.
5. protect (wax, sealant, etc).
nearly any paint can shine if finished off properly. my previous rattlecan job shined like the dickens but the paint wasn't durable. but for a week it was so shiny i could read a product label's fine print in the reflection.
|
|
|
Re: Paint job on a budget!? CONTINUED..page 44........
[Re: Marq]
#25491
08/10/06 06:38 PM
08/10/06 06:38 PM
|
Anonymous
Unregistered
|
Anonymous
Unregistered
|
Quote:
I have amended your recipe for using the Brightside paint
Marq, I think you have just authored the "Brightside Bible." Nicely done!
Quote:
At this point I believe that it is better to plan on four coats.
I'll agree here, too... I was about to stop at three coats (the black is very opaque and provide excellent coverage when evenly applied - even when slightly thinned) but my wetsanding has revealed 2 or 3 of the tiniest thin spots. My last coat will be undiluted for just a little bit heavier top layer.
|
|
|
Re: Paint job on a budget!? CONTINUED..page 44........
[Re: 440charger70]
#25494
08/10/06 09:19 PM
08/10/06 09:19 PM
|
Anonymous
Unregistered
|
Anonymous
Unregistered
|
That kit contains the same products and uses the same procedures as what the boys are describing above.
One word of advise though, unless you are an expert with an electric polisher, don't use a sheepskin polishing pad. In inexperienced hands those sheepskin pads have the ability to destroy your paint quicker than just about anything short of sandpapert. Stick with a foam pad instead.
|
|
|
Re: Paint job on a budget!? CONTINUED..page 44........
[Re: admactanium]
#25497
08/11/06 01:09 AM
08/11/06 01:09 AM
|
Joined: Jul 2003
Posts: 3,378
Rancho Cordova, CA
Exit1965
master
|
master
Joined: Jul 2003
Posts: 3,378
Rancho Cordova, CA
|
The engine bay is basically done, just need to grind and repaint one tiny spot. 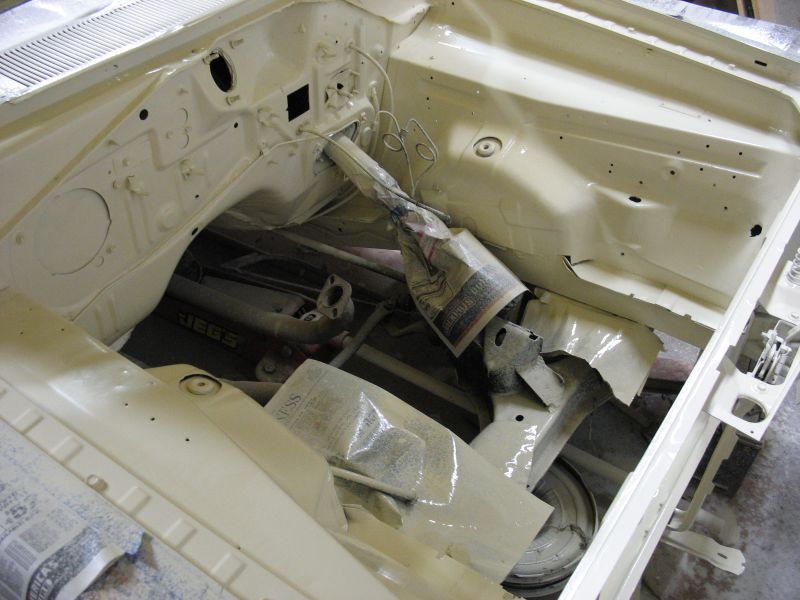 I really dig that pump up spray can. Today, I tried to fit a Krylon nozzle onto it hoping for better atomization, and after filing the Krylon nozzle down a bit, it went on. But it doesn't atomize nearly as well as the nozzle included with the pump up can. (It still does not spray as fine a spray as comes out of a typical rattle can, but maybe that has to do with the mixture as well). Next is the door jambs..
|
|
|
|
|


