|
 Re: Paint job on a budget!? CONTINUED..page 44........
#25458
Re: Paint job on a budget!? CONTINUED..page 44........
#25458
08/08/06 09:43 PM
08/08/06 09:43 PM
|
Anonymous
Unregistered
|
Anonymous
Unregistered
|
|
|
|
Re: Paint job on a budget!? CONTINUED..page 44........
#25460
08/08/06 10:43 PM
08/08/06 10:43 PM
|
Joined: May 2006
Posts: 575
Canada
Marq

mopar addict
|
mopar addict
Joined: May 2006
Posts: 575
Canada
|
 I think you are definitely on track to working up a great shine. The water layer gives a good indication of how the final result 'should' turn out. That wet black pic is the money shot ! From what I read in the furniture restoration forums, when working with the polyurathane the trick really centers around the 2000 grit wet sanding and then the polishing stage. Your polishing stage should get you up to the level where there is a reflection. At that point you in theory have gotten the polyurathane finish to its smoothest appearance. When you add the wax, you will reacquire the mirror finish / gloss and depth to the paint job. It's too bad we can't avoid the polishing stage and go straight to some clear coat of polyurathane. The way polyurathane works, it would be able to blend in and adhere itself to the highly wet sanded paint job. The problem is that the polyurathane clear coat would still end up with the same skin consistency of the last layer of paint prior to it being wet sanded. So that is the reason why you go to the polishing stage to urge a shine out of your last layer of paint. Then the waxing basically provides the seal to all your work and enhances the gloss of the final layer. I got my fingers crossed for you... One product that keeps being mentioned in other forums about polishing polyurathane is a 3M product called Finesse-It buffing compound Generally most of the folks who have discussed this product have had excellent results similar to this snippet of a conversation I'll quote here... Quote:
....the polyurathane paint was wet sanded with 1200 paper to remove all traces of orange peel, pollen, suicidal bugs and other nasties. This was followed by buffing with an electric buffer and 3M Finesse-It buffing compound. The compound quickly restores the gloss of the paint, and as long as enough paint was applied to prevent cutting through to the primer, the finish can be worked until it is mirror smooth.
And here is the car that he was talking about :


.
And just to round off the topic on polishing and buffing up a polyurathane finish, I will include this chap's advice which also tended to reflect a common agreement on getting this type of a finish up to a mirror quality
Quote:
I started the wet sand process. I found a local auto body shop supplier with a good selection of 3M wet/dry papers. Using a stiff foam block purchased from the same store as the papers, I began with 1000-grit, liberally spraying the surface with water containing a little bit of dish soap (I used Dawn and it worked fine).
This first grit is the most critical as it flattens the orange peel and gets out the major imperfections. You have to let it dry completely before you can really see what you've got. You're looking for a uniform dull finish. Any areas that show up still shiny mean you haven't knocked them down enough and the finer grits will never touch them. Once you're sure you've got a good 1000-grit base to work from, proceed through 1200, 1500, 2000, and 2500 grits.
Keep the paper wet at all times - you're looking for a kind of milky "slurry" indicating material is both being removed and being carried out from under the paper. If your paper gums up with little globs of material, toss it and get another sheet. I found rubbing with the grain was fine, no need to make circles or figure eights. After finishing the 2000 grit pass, rinse off and let dry. The final step is to buff out the 2000-grit scratches with polishing compound. I used 3M "Perfect-It" and my Porter-Cable worm drive random orbit sander.
Both the rubbing compound and the foam pad that velcro�s to my sander came from the auto body supply store. Dribble some compound onto the surface and start up the sander. It's messy, so count on compound slinging around the area. Polish until the compound dries up, then wipe off any excess. You should see a near-mirror finish. Mine came out better than anything I've ever finished before in fifteen years of what I'll call serious hobbyist woodworking. It was much better than any sprayed or brushed finish. The only thing that might be better is a good French polish, but I personally don't have the time or patience for that. Good luck and one last piece of advice: practice on a test piece to get a feel for the papers - 1000-grit doesn't sound very aggressive, but it will eat your lunch if you don't know when to stop.
Now... the last bit of info I will toss into this topic is a further blurb about this 3M Finesse-It II Machine Polish
Quote:
Smoothes tough swirls, scratches, and imperfections to restore old, neglected paint.
Orbital buffers are the best way to restore dull, damaged paint finishes, but they�re only as good as the product you apply to them. 3M Finesse-It II Machine Polish is an easy, effective, affordable solution to your minor paint imperfections.
3M Finesse-It II Machine Polish is formulated to give the best results when used with a buffer. It�s abrasive enough to smooth the edges of swirls and scratches but gentle enough buff your vehicle to a deep, flawless shine. It�s also effective on light oxidation and water spots. 3M Finesse-It II Machine Polish will restore the smooth, perfect finish your vehicle had when it was new.
For the best results, pour a small amount onto your polishing pad. On a speed you are comfortable with, apply the polish with light to medium pressure. Allow it to dry to a haze and then buff away with a clean buffing pad or microfiber towel if buffing by hand.
Though 3M Finesse-It II Machine Polish will leave a deep shine, it offers no protection. Apply a quality wax or paint sealant to preserve your restored finish. We recommend Pinnacle Souveran Wax or Pinnacle Signature Series II Wax for a warm carnauba finish. If you prefer a paint sealant, try Wolfgang Deep Gloss Paint Sealant for a dramatic gloss.
Your vehicle will look as perfect as the day you bought it after using 3M Finesse-It II Machine Polish followed by a great wax.
Hope this info helps
.
Last edited by Marq; 08/09/06 01:33 AM.
|
|
|
Re: Paint job on a budget!? CONTINUED..page 44........
#25461
08/09/06 01:33 AM
08/09/06 01:33 AM
|
Joined: Jul 2006
Posts: 44
USA
_Scott_
member
|
member
Joined: Jul 2006
Posts: 44
USA
|
Quote:
I think Marq had considered skipping final wetsand and going straight to polish
I strongly discourage people from skipping the final wetsanding step.
It's important to think of every sanding step as a shaping step. When sanding bondo, you are recreating the shape you desire for the body panel. When sanding the old paint, you are not only scuffing it up, you are also removing imperfections like chips/scratches/runs (from a previous paint job) and any other crap you don't want to show up in your finished paint. And, when doing the final sanding, you are still shaping the surface in preparation for buffing. Any dirt specs, hair or bugs that may have ended up in your last coat of paint or any orange peel or roller/brush marks will need to be smoothed out with sand paper, preferably on a sanding block, to create a smooth ripple-free surface. The only texture you want remaining after your final wetsand step is the texture the 1000/1500/2000 grit sandpaper leaves behind.
The sanding creates the shape, the buffing only brings the shine back.
|
|
|
Re: Paint job on a budget!? CONTINUED..page 44........
[Re: Marq]
#25462
08/09/06 02:53 AM
08/09/06 02:53 AM
|
Anonymous
Unregistered
|
Anonymous
Unregistered
|
Thanks for all the sanding info, Marq. That helps a ton.
|
|
|
Re: Paint job on a budget!? CONTINUED..page 44........
#25463
08/09/06 06:06 AM
08/09/06 06:06 AM
|
Anonymous
Unregistered
|
Anonymous
Unregistered
|
I've been doing a lot of research on a number of detailing forums. The polisher that every US forum recommends is the Porter Cable 7424. There are a number of places that sell the PC online and there are also some video tutorials available here PC web videos . To achieve a mirror reflection from polishing, we first need to use a meduim cut swirl remover such as the Poorboys SSR2.5, then follow it up with a finer cut swirl remover (such as Poorboys SSR1). After the paint is free of all marks we then need to polish the paint to maximize the shine and only then should the paint be sealed with either a carnauba wax or a synthetic polymer sealant. While many people use the 3M range of swirl removers/polishes, apparently the 3M products contain fillers which will 'hide' problems (such as swirl marks) rather than removing them. The Poorboys range of swirl removers/polishes are very well regarded and so is the Menzerna range. I have purchased the Poorboys SSR2.5, SSR1 and Pro-Polish for my polishing and I'm going to use Zaino Z5 and Z3 for paint sealants. I will have to re-paint my miata as the 'Aussie' version of the Rustoleum (called Tremco Metal Armour) Gloss Black has turned into a Matt Black due to frost damage, so I will be re-doing the whole car with Brightside in a few weeks. Ironacally my 'polishing' will cost almost twice as much as my 'painting', even with the two different paint applications..... But my theory is to paint it really well, get it looking immaculate and then keep it looking that way. So for me at least, all of the polish will be worth it.
Last edited by Aussie Driver; 08/09/06 06:10 AM.
|
|
|
Re: Paint job on a budget!? CONTINUED..page 44........
[Re: Marq]
#25464
08/09/06 08:20 AM
08/09/06 08:20 AM
|
Anonymous
Unregistered
|
Anonymous
Unregistered
|
Quote:
Hey that dude is practically a neighbor, 44 tags are Athens, AL about 8 miles from here. He rolled or sprayed this paint? I'd really like to see that car in person to give it a close up look, if I can get the finish on my truck looking like that I'm liable to literally shake with joy 
|
|
|
Re: Paint job on a budget!? CONTINUED..page 44........
#25465
08/09/06 08:50 AM
08/09/06 08:50 AM
|
Joined: May 2006
Posts: 575
Canada
Marq
mopar addict
|
mopar addict
Joined: May 2006
Posts: 575
Canada
|
Quote:
Hey that dude is practically a neighbor, 44 tags are Athens, AL about 8 miles from here. He rolled or sprayed this paint? I'd really like to see that car in person to give it a close up look, if I can get the finish on my truck looking like that I'm liable to literally shake with joy
That little car is a 'kit car' and basically all the body pieces come off it in a matter of minutes. So what he did was take the body panels and fenders off the car and sprayed them in his garage using a polyurathane. So he cheated a little by not rolling.. but he still encountered many of the same 'surface glitches' that a roll on job would have.
So for our purposes we pick up on his story where he was attempting to resolve the 'suicidal bugs, orange peel and other mysterious things' that had landed on his freshly paint body parts. So we match up to the stage where he does the wet sanding and subsequent polishing to get a mirror finish onto his little Lotus Super Seven look-a-like.
And I guess the finish must be quite acceptable as the car has come 1rst place in a number of car shows.
I think most of us would kill to be able to get the paint on our cars up to a level where we would fearlously enter them in car shows 
.
|
|
|
Re: Paint job on a budget!? CONTINUED..page 44........
[Re: Marq]
#25466
08/09/06 10:41 AM
08/09/06 10:41 AM
|
Anonymous
Unregistered
|
Anonymous
Unregistered
|
Quote:
I think most of us would kill to be able to get the paint on our cars up to a level where we would fearlously enter them in car shows
Car show? Heck I'll be happy if I can park it at Wal Mart with pride
|
|
|
Re: Paint job on a budget!? CONTINUED..page 44........
#25467
08/09/06 11:39 AM
08/09/06 11:39 AM
|
Anonymous
Unregistered
|
Anonymous
Unregistered
|
Quote:
The polisher that every US forum recommends is the Porter Cable 7424. There are a number of places that sell the PC online and there are also some video tutorials available
I did a quick search on the PC 7424, and I came up with a great article here
I should also point out that I had previously described paint removal on my car with a "Porter-Cable DA sander", but in fact it would appear to be an "orbital" (bzzzzzzzzz!!!) sander that I have.
|
|
|
Re: Paint job on a budget!? CONTINUED..page 44........
[Re: Marq]
#25470
08/09/06 09:05 PM
08/09/06 09:05 PM
|
Joined: Feb 2006
Posts: 59
St Andrews ,Manitoba ,Canada
C38coupe
member
|
member
Joined: Feb 2006
Posts: 59
St Andrews ,Manitoba ,Canada
|
Hi all, good to see this thread continuing on, I have been watching on the sidelines, some of you guys are making [Edited by Moparts - Keep it clean] good progress, "keep on rollin brothers".Another car nut, who is a chemist by profession, did tell me that Tremclad paint and the almighty expensive POR-15, are quite similar in there chemical recipe and there smell, as well as the workability of the paint to some extent. Both paints are based with Alphatic Naptha, POR 15 uses Isocyanates, while Tremclad uses Isobutane. This I found very interesting, The Price between the 2 products, is quite different. Just thought some of you guys might find this interesting, I am not saying Tremclad is better, just that it's a similar product, designed to do the same thing at a fraction of the price..........C38 Coupe sorry I meant "DARN GOOD PRODUCT"
Last edited by C38coupe; 08/09/06 09:07 PM.
|
|
|
Re: Paint job on a budget!? CONTINUED..page 44........
#25471
08/09/06 09:45 PM
08/09/06 09:45 PM
|
Anonymous
Unregistered
|
Anonymous
Unregistered
|
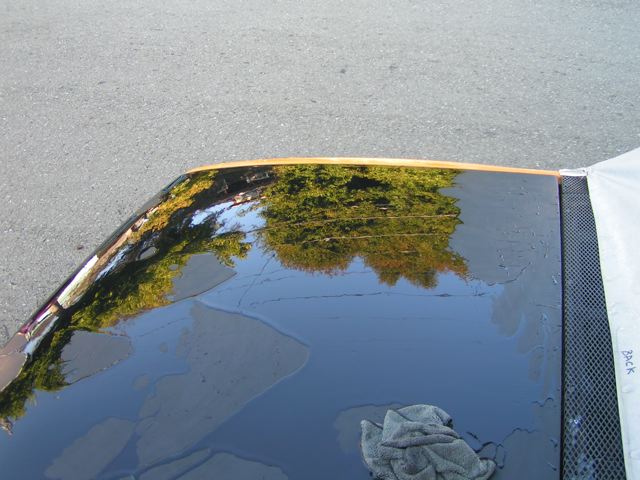
ok, so i broke out the buffer and went at it. I used the turtle polishing compound and some sonus polish. the paint did what i wanted it to, but as you can see by the pic. I have a lot of brush marks still visible. the paint is not smooth at all. i also have a lot of scratches that you can see if you look closely at the paint.
suggestions on what to do now? nock it all down with 600 or 400 and then redo the polishing? will more coats of paint help? I know I rushed the process, but I couldnt wait to see if the brightside would shine up, and it seems to have.
What would yall do to get it flat?
thanks again for all the help.
|
|
|
Re: Paint job on a budget!? CONTINUED..page 44........
#25472
08/09/06 09:46 PM
08/09/06 09:46 PM
|
Anonymous
Unregistered
|
Anonymous
Unregistered
|
|
|
|
Re: Paint job on a budget!? CONTINUED..page 44........
[Re: Exit1965]
#25474
08/09/06 10:03 PM
08/09/06 10:03 PM
|
Anonymous
Unregistered
|
Anonymous
Unregistered
|
Cool, thanks exit.
Also, does anyone know of a place to order sandpaper with grits higher than 1000? The highest I have and can find around here is 1000, and I would like to get 1500 and 2000 for the next go round.
|
|
|
Re: Paint job on a budget!? CONTINUED..page 44........
#25475
08/09/06 10:37 PM
08/09/06 10:37 PM
|
Anonymous
Unregistered
|
Anonymous
Unregistered
|
I found 1500 at O'Reilly's Auto Parts but so far no 2000 anywhere, haven't checked the other car places or the name brand paint shops (Sherwin Williams/etc).
|
|
|
Re: Paint job on a budget!? CONTINUED..page 44........
#25476
08/09/06 10:55 PM
08/09/06 10:55 PM
|
Anonymous
Unregistered
|
Anonymous
Unregistered
|
try going to a body shop supply store. around here i have a place called "terrace auto supply". they sell to all the local body shops, and the public can buy from them too... they sell in large quantites though... i got the masking paper but i had to buy 3 rools so i can do about 100 cars with this paper but it costs 20.00 for the 3 rolls, and i asked for a sticky wet sand paper and they have a 100 count for 65.00..
|
|
|
Re: Paint job on a budget!? CONTINUED..page 44........
#25477
08/09/06 11:36 PM
08/09/06 11:36 PM
|
Joined: May 2006
Posts: 575
Canada
Marq
mopar addict
|
mopar addict
Joined: May 2006
Posts: 575
Canada
|
Yeah it looks like it polished up quite nicely.
Now you should knock it level as suggested by Exit and lay another coat on to it.
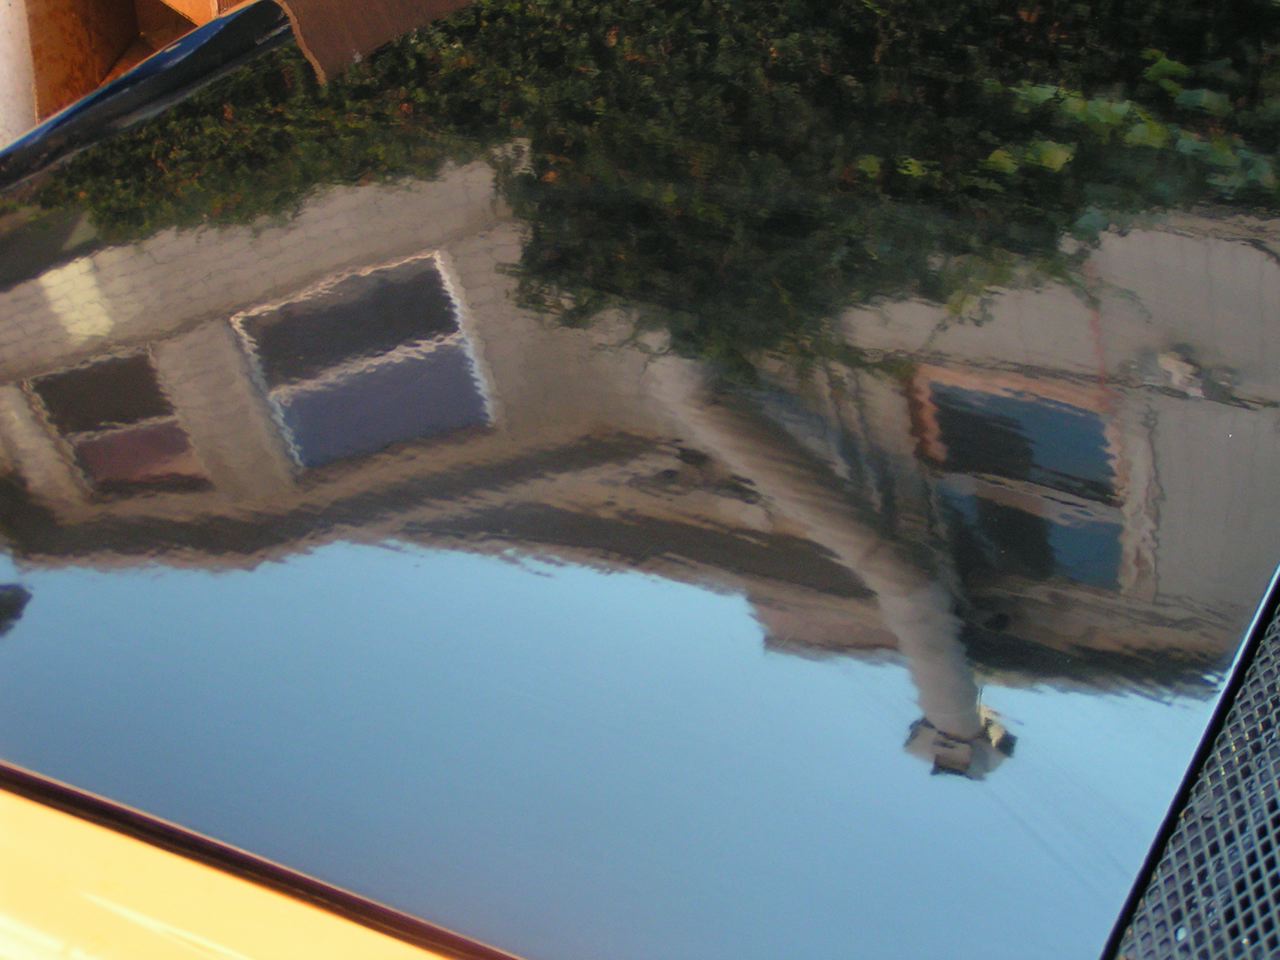
What I have seen with Brightside is that when we lay it on with a roller it stays fairly translucent. So when you get the gloss up you can see a few layers down ( and this gives it the depth ).
This is where we get caught making choices... if we thin the paint out with too much ketone the layers are more translucent then if we laid a layer straight out of the can.
Although I initially cut the paint with the brushing fluid for the initial layers... I moved to laying two layers of straight paint once I had acquired the knack of rolling Brightside.
The straight from the can layers contain more pigment or color solids and help block the view of the depth from revealing any flaws on the lower layers.
But I am impressed by the shine you were able to get out of the Brightside.
You mentioned using the finishing compound and polish. Is this the shine you were able to achieve without going to the wax ? Or is your polish a combined polish/wax ?
.
.
Last edited by Marq; 08/09/06 11:38 PM.
|
|
|
|
|


