|
 Re: Paint job on a budget!? CONTINUED..page 44........
[Re: Marq]
#25438
Re: Paint job on a budget!? CONTINUED..page 44........
[Re: Marq]
#25438
08/07/06 05:30 PM
08/07/06 05:30 PM
|
Joined: Jul 2003
Posts: 3,378
Rancho Cordova, CA
Exit1965

master
|
master
Joined: Jul 2003
Posts: 3,378
Rancho Cordova, CA
|
Quote:
Quote:
Funny thing I've noticed is that when I've used rustoleum in spray cans, and even when I mixed some spray together in my refillable spray can, the paint has dried VERY hard in a matter of days or a week. I can't leave indentations in it with my fingernails like I can with the rolled on stuff.
The carrier in the spray paint is much more evaporative then the carrier in the paints which we use. So that and the thickness of the layers we 'roll on' go a long way towards the longer curing time needed as compared to the spray bombs.
.
The strange thing is that I am spraying on THICK layers, and they seem to dry hard much faster than the rolled stuff.
I have used actual rattle can material (safety red in a rustoleum rattlecan), sprayed it on so it colored completely in one coat, and in a few weeks it was as tough as nails.
And the mix that I'm using for the engine bay is simply mineral spirits and rustoleum. That also dries rock hard much faster than the rolled stuff (e.g. 2 or 3 days) does for me. This is with a single thick coat that covers nearly 100% except for the darkest spots.
Spraying my engine bay was easy enough with the pump can. I think if I can't get sufficient hardness out of the rolled kind, I'll just shoot the whole car with a HVLP gun.
Last edited by Exit1965; 08/07/06 05:31 PM.
|
|
|
Re: Paint job on a budget!? CONTINUED..page 44........
#25439
08/07/06 05:58 PM
08/07/06 05:58 PM
|
Joined: Jul 2006
Posts: 1,475
Ontario, Canada
78D150CLUB
My avatar is a self portrait!!
|
My avatar is a self portrait!!
Joined: Jul 2006
Posts: 1,475
Ontario, Canada
|
On the topic of things not to do, when you reach the buffing stage, Do Not make the mistake of leaving the buffer sitting on any part of the car overnight. I forgot about leaving mine on the unbuffed half of the hood last night, and found a huge lightened circle on the hood where the wet pad had sat.  Fortunately, mineral spirits seemed to clear the blotch up, and it has since returned to its darker color. Makes me wonder if the white haze after polishing might be water forced into the paint by the buffer. Just for kicks, I'm getting some new terry cloths and I'm going to try buffing using spirits. One kind for the buffer and one kind for the operator  I'll post my results at a later date.
I want to die like my Grampa, peacefully, in his sleep. Not screaming in terror like his passengers.
|
|
|
Re: Paint job on a budget!? CONTINUED..page 44........
[Re: 78D150CLUB]
#25441
08/07/06 07:20 PM
08/07/06 07:20 PM
|
Joined: May 2006
Posts: 575
Canada
Marq
mopar addict
|
mopar addict
Joined: May 2006
Posts: 575
Canada
|
|
|
|
Re: Paint job on a budget!? CONTINUED..page 44........
[Re: Marq]
#25442
08/07/06 09:10 PM
08/07/06 09:10 PM
|
Anonymous
Unregistered
|
Anonymous
Unregistered
|
Quote:
But like the roller process, the key to the more successful spray bomb jobs is to begin with an excellent surface, take your time spraying layers and be fanatical and exercise great patience in the multiple wet sandings.
I "fanatically" wetsanded my hood today, I spent several hours hard at work. It was layer 2 of black Brightside, and the coverage was near-complete at the start of the sanding process. 2 days ago I wetsanded the first coat with 3M 800 grit. Out of curiosity, I wanted to see what the 2000 grit would do, so off I went! I did the entire hood with 2000 except for one section which had some heavy brush marks from one of my screwups; I used 1200 here, followed by the 2000.
Everything now is a dark satiny grey. A few small thin spots are revealing old primer from underneath now, but it is much less so than coat #1. I hope that after coat 3 I have full coverage, but am a little concerned about wetsand getting me thin again.
Marq, do you know what polish product/method you'll be using to shine everything up? I don't think I'll be able to skip wetsand on final coat. I get too many goobers in my paint, despite painstaking measures to keep paint, surface, applicators, floor and air clean.
Last edited by CamronCamera; 08/07/06 09:11 PM.
|
|
|
Re: Paint job on a budget!? CONTINUED..page 44........
[Re: Marq]
#25443
08/07/06 10:28 PM
08/07/06 10:28 PM
|
Joined: Jul 2006
Posts: 1,475
Ontario, Canada
78D150CLUB
My avatar is a self portrait!!
|
My avatar is a self portrait!!
Joined: Jul 2006
Posts: 1,475
Ontario, Canada
|
Quote:
Just remember that if you put lipstick on a pig... it is still just a pig.
HMmmmm... Have you been sneaking out and looking at my truck? LOL
I had the very same thought re: the vapor flash point, and I don't plan to use thinners to wet the buffer, as such. I'll mix the compound with a small amount and apply the paste to the cloth pad.
that should keep things a little less explosive, and I'm going to be working outdoors in an open industrial yard, so any fireworks should be for display purposes only 
Thanks for the caution, though, it's something for us all to keep in mind when using the flammable mixtures involved in this process. Sometimes the strangest items can become an ignition source and all paints, thinners, etc. create vapors that can and do explode without any warning.
I wonder if I have time to learn smoke signals? 
I want to die like my Grampa, peacefully, in his sleep. Not screaming in terror like his passengers.
|
|
|
Re: Paint job on a budget!? CONTINUED..page 44........
[Re: Marq]
#25444
08/07/06 11:11 PM
08/07/06 11:11 PM
|
Anonymous
Unregistered
|
Anonymous
Unregistered
|
|
|
|
Re: Paint job on a budget!? CONTINUED..page 44........
#25445
08/08/06 02:26 AM
08/08/06 02:26 AM
|
Anonymous
Unregistered
|
Anonymous
Unregistered
|
Just finished rolling coat #3 and it's looking gooood! No big boo boos this time. Still getting linty goobers as I tip, I think it could be the foam brushes as I "tip" the paint. The one-two roller technique didn't seem to work for me; with the lightest pressure (weight of roller only) the second "clean" roller would generate bubbles, not flatten them. But tonight I only used up one foam roller instead of two... cool beans
|
|
|
Re: Paint job on a budget!? CONTINUED..page 44........
#25446
08/08/06 09:17 AM
08/08/06 09:17 AM
|
Joined: May 2006
Posts: 575
Canada
Marq
mopar addict
|
mopar addict
Joined: May 2006
Posts: 575
Canada
|
Quote:
Marq, do you know what polish product/method you'll be using to shine everything up? I don't think I'll be able to skip wetsand on final coat. I get too many goobers in my paint, despite painstaking measures to keep paint, surface, applicators, floor and air clean.
I still have not made a firm decision on how I will go about the polish and waxing. I have never done it before and I am looking at three alternatives...
a) it turns out that one of my nephews use to work in a detailing shop that serviced a limousine company. He has the tools and the knowledge... But if I let him do it and he screws up I would probably kick myself in the butt
b)I even thought about sending the car over to an excellent detailing shop that is just a few blocks away from here. But the problem with that idea is that unlike a 'normal' car coming in for a polishing and waxing ( which might only take two hours ), this job might take five or six hours. They may charge me up the ying yang...
c) the leading contender at the moment is to buy my own polishing machine and do it myself. From everything that I have read elsewhere regarding the polishing of polyurathane.. the process is the very same as the one being used to polish and wax the Tremclad/Rustoleum paint job. The benefit to doing it myself is that I would be able to keep the polisher and then use it on the Cobra and the Roadmaster after 
.
|
|
|
Re: Paint job on a budget!? CONTINUED..page 44........
#25447
08/08/06 05:18 PM
08/08/06 05:18 PM
|
Anonymous
Unregistered
|
Anonymous
Unregistered
|
Camron,
I am in the same boat you are.
I am using brightside black (after an attempt with some orange paint I didnt like the color of). I, too, am working outside and there is no way a final coat will look good by itself. Way too much dust and bugs in the air. I have also sanded it, mostly with 1000, down to a pretty uniform dark satiny grey color. I will try polishing it next to see what I can come up with.
When I rinse off the trunk with water after wetsanding, it looks absolutely sick! super shiny and reflective, as good as any factory paint job, a few small ripples but no orange peel. Im just hoping i can get that effect by polishing enough. That is what I should expect if I can polish it absolutely smooth, correct?
Actually, doesnt a clear coat essentially act the same as a layer of water? If I used a clear, should I expect to see what I saw when the trunk was wet?
|
|
|
Re: Paint job on a budget!? CONTINUED..page 44........
#25448
08/08/06 06:46 PM
08/08/06 06:46 PM
|
Anonymous
Unregistered
|
Anonymous
Unregistered
|
Quote:
Camron,
I am in the same boat you are.
I am using brightside black (after an attempt with some orange paint I didnt like the color of). I, too, am working outside and there is no way a final coat will look good by itself. Way too much dust and bugs in the air. I have also sanded it, mostly with 1000, down to a pretty uniform dark satiny grey color. I will try polishing it next to see what I can come up with.
I'm actually painting in my garage, I have a household HEPA filter running contantly on high, but I'm pretty sure the goobers are from foam. I start with fresh rollers and foam brushes at each paint application, I even roll them lightly on wide masking tape to pick up any linties, but it's not helping.
Quote:
When I rinse off the trunk with water after wetsanding, it looks absolutely sick! super shiny and reflective, as good as any factory paint job, a few small ripples but no orange peel. Im just hoping i can get that effect by polishing enough.
Yeah, it looks good, huh?! So that I can see best what I'm doing, I'm colorsanding outside in the sun with constantly running water. Even when wet, though, the black is not as deep as right off the rollers...
Quote:
That is what I should expect if I can polish it absolutely smooth, correct?
I hope so! That's what I'm depending on! I've been scoping out autobody101.com for colorsanding/polishing tips, but I may try 69Charger's Turtle Polish method first... I picked up the polish while shopping for project supplies, and I already have a random-orbit el-cheapo buffer (need to get fresh terry bonnets, tho). I'm just not sure how long I should wait for paint to cure before polishing.
I think Marq had considered skipping final wetsand and going straight to polish, but I believe I still have too many faint brush marks to pull this off. I'd like to be able to skip as much wetsanding as possible, but I'm just not going to cut corners with my elbow grease!
Last edited by CamronCamera; 08/08/06 08:01 PM.
|
|
|
Re: Paint job on a budget!? CONTINUED..page 44........
#25449
08/08/06 07:05 PM
08/08/06 07:05 PM
|
Joined: Jul 2006
Posts: 1,475
Ontario, Canada
78D150CLUB
My avatar is a self portrait!!
|
My avatar is a self portrait!!
Joined: Jul 2006
Posts: 1,475
Ontario, Canada
|
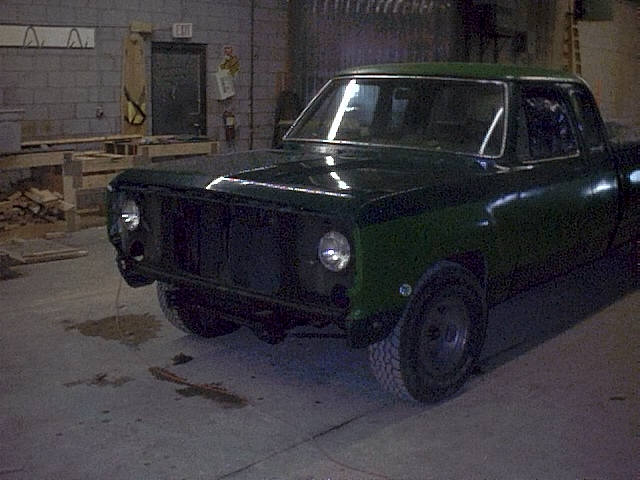
This may be a bit of encourgement for those approaching the buffing stage. This was polished with Turtle Wax compound and an El-Cheapo Turtle Wax random orbit 10" polisher. I left half the hood unpolished to show the difference between the polished and unpolished sections. Even with my less than perfect body and prep work, things are looking good.  Sorry about the dark pic, but my camera bites indoors. 
I want to die like my Grampa, peacefully, in his sleep. Not screaming in terror like his passengers.
|
|
|
Re: Paint job on a budget!? CONTINUED..page 44........
[Re: 78D150CLUB]
#25451
08/08/06 07:09 PM
08/08/06 07:09 PM
|
Joined: Jul 2006
Posts: 1,475
Ontario, Canada
78D150CLUB
My avatar is a self portrait!!
|
My avatar is a self portrait!!
Joined: Jul 2006
Posts: 1,475
Ontario, Canada
|
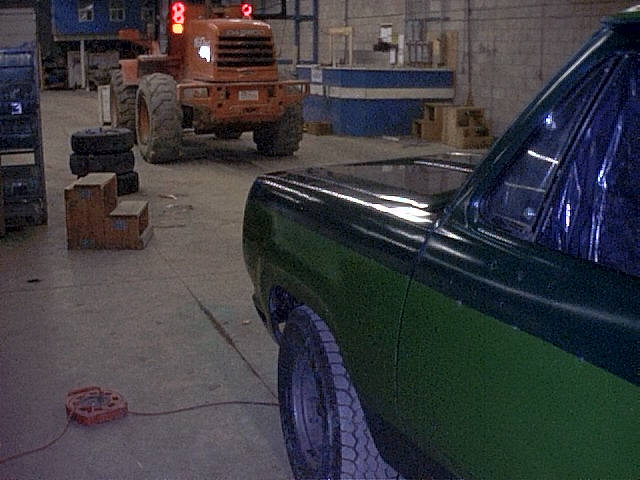
Last for now. Oh, Marq, the spirits didn't help at all, so that idea was a bust. I'm still here and unsinged, though. 
I want to die like my Grampa, peacefully, in his sleep. Not screaming in terror like his passengers.
|
|
|
Re: Paint job on a budget!? CONTINUED..page 44........
[Re: 78D150CLUB]
#25453
08/08/06 07:45 PM
08/08/06 07:45 PM
|
Joined: Jan 2006
Posts: 1,220
toronto canada
69chargeryeehaa
OP
pro stock
|
OP
pro stock
Joined: Jan 2006
Posts: 1,220
toronto canada
|
Quote:
This may be a bit of encourgement for those approaching the buffing stage.
This was polished with Turtle Wax compound and an El-Cheapo Turtle Wax random orbit 10" polisher.
I left half the hood unpolished to show the difference between the polished and unpolished sections.
Even with my less than perfect body and prep work, things are looking good.
Sorry about the dark pic, but my camera bites indoors.
that's looking good there  shows what a differnece polishing does. polishing with spirits will do squat, there are no abrasives in spirits, in the turtle wax polishing compound is about the equivilent of a 3000+ grit sand paper, and the tutrle wax rubbing coumpound is about a 1000grit, and way too harsh. but you could use the rubbing coumpound first, then go to the polishing coumpound, i just found wetsanding eaiser. shows what a differnece polishing does. polishing with spirits will do squat, there are no abrasives in spirits, in the turtle wax polishing compound is about the equivilent of a 3000+ grit sand paper, and the tutrle wax rubbing coumpound is about a 1000grit, and way too harsh. but you could use the rubbing coumpound first, then go to the polishing coumpound, i just found wetsanding eaiser. 
|
|
|
Re: Paint job on a budget!? CONTINUED..page 44........
#25454
08/08/06 08:08 PM
08/08/06 08:08 PM
|
Anonymous
Unregistered
|
Anonymous
Unregistered
|
Camron,
I totally agree that the paint doesnt look quite as dark when wet with water as it does straight from the can if not sanded at all. But even still, I like the color, its kind of a really super dark gray, just a shade or two from jet black.
Ive got the turtle polish, and some other expensive stuff too. I also have an orbital sander with a couple of foam pads, so all I need to do now is find some time to go at it. We shall see how it turns out...
|
|
|
Re: Paint job on a budget!? CONTINUED..page 44........
[Re: 69chargeryeehaa]
#25455
08/08/06 08:25 PM
08/08/06 08:25 PM
|
Joined: Jul 2006
Posts: 1,475
Ontario, Canada
78D150CLUB
My avatar is a self portrait!!
|
My avatar is a self portrait!!
Joined: Jul 2006
Posts: 1,475
Ontario, Canada
|
Quote:
polishing with spirits will do squat
It really depends on how much you consume 
Actually, I was blending the paste compound with mineral spirits to try to alleviate the white haze as mentioned by Exit1965. I had thought that water being forced into the open wetsanded surface might be the cause, because I got the same haze in spots. Didn't make any difference, though.
I did find that polishing in stages seemed to help, buff the entire section, then wash, chamois dry and repeat.
I also found applying water to the surface rather than to the bonnet during polishing easier and faster.
The haze did disappear as polishing progressed, and for the last polish, I let the buffer run almost dry and then rubbed the residue off with paper towel. No haze afterward.
I love this process, even if it is a bit of work. My labor is free, and I can go back over the body and smooth things out in the future, then just blend in new paint or recoat an entire panel as I go.
I'm impressed, especially by anything Free!
I want to die like my Grampa, peacefully, in his sleep. Not screaming in terror like his passengers.
|
|
|
Re: Paint job on a budget!? CONTINUED..page 44........
#25456
08/08/06 09:41 PM
08/08/06 09:41 PM
|
Anonymous
Unregistered
|
Anonymous
Unregistered
|
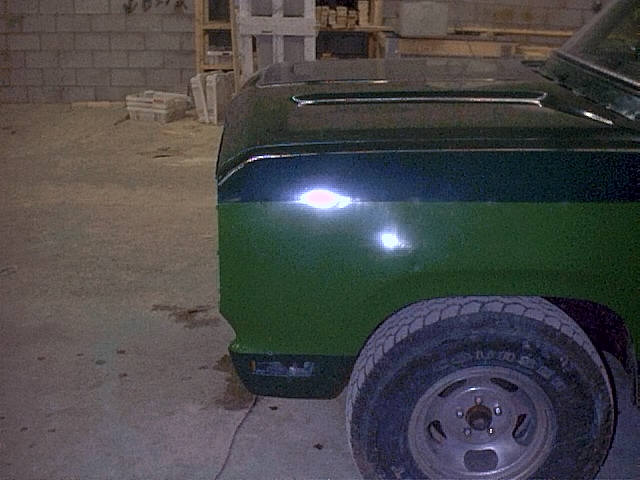
Here are a few pics to show how the brightside looks sanded, and then when its wet. I just hope I can somehow get this reflection with polishing.
Dry
|
|
|
Re: Paint job on a budget!? CONTINUED..page 44........
#25457
08/08/06 09:42 PM
08/08/06 09:42 PM
|
Anonymous
Unregistered
|
Anonymous
Unregistered
|
|
|
|
|
|


