|
 Re: Paint job on a budget!? CONTINUED..page 44........
#24978
Re: Paint job on a budget!? CONTINUED..page 44........
#24978
07/07/06 09:37 AM
07/07/06 09:37 AM
|
Joined: Jul 2003
Posts: 3,378
Rancho Cordova, CA
Exit1965

master
|
master
Joined: Jul 2003
Posts: 3,378
Rancho Cordova, CA
|
As far as I know, bondo doesn't need to cure over several days. Look at the production body shops, I do not think they wait several days and that bondo changes shape over those days.
Plus I think it's not curing, it's hardening chemically. After a couple of hours that's as hard as it gets and as long as you use a block or a board to sand with, you should get pleasant results and not see any surprises once you start putting paint on it. I have used the cheap bondo and have not had this problem, and a guy who works at a body shop came over to help me fix a dent on a fender, and he had the whole thing done and primed (with one coat of bondo, and one skim coat) in about an hour. I've done other small dents only a couple of hours before painting, like when I found things I hadn't seen before painting. No issues as long as the bondo is mixed right.
For the final pass of bondo once you have the shape right, mix bondo with fiberglass resin, then the bondo hardener. This will fill in scratches and will not have any pinholes. But it takes a bit longer to dry.
Last edited by Exit1965; 07/07/06 09:40 AM.
|
|
|
Re: Paint job on a budget!? CONTINUED..page 44........
[Re: Exit1965]
#24979
07/07/06 04:47 PM
07/07/06 04:47 PM
|
Anonymous
Unregistered
|
Anonymous
Unregistered
|
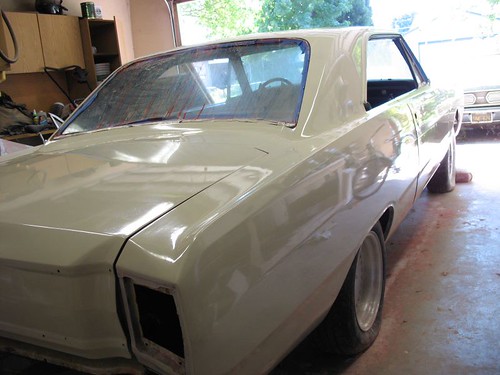
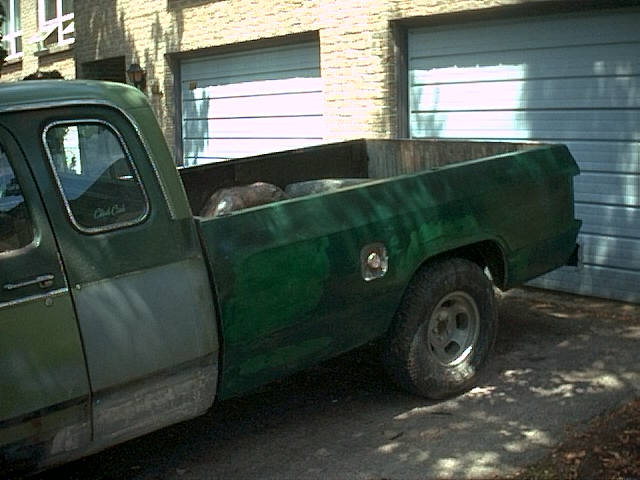
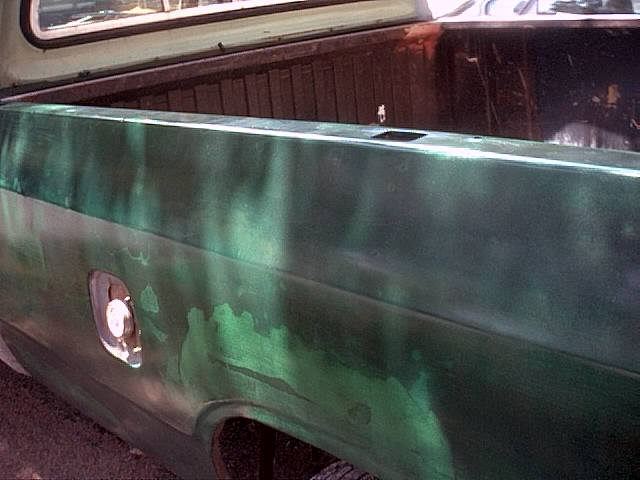
Well today I did my first wetsand and applied my 3rd coat. Charger is totally right when you apply that third coat and everything suddenyl looks like one color. It's still a little light in areas but it's looking good. When I first did the coat I was worried that it was too think because of how well the color came through and it had a fair amount of orange peel. However once I went over it about a minute later with the roller, it was much less orange peely and self-leveled nicely. There's a definate learning curve for the painting but I found the wetsanding to be even harder. I had the piece out in my driveway and was using the hose to spray while I was sanding. I have a 600 grit piece around a sponge and it seemed to work pretty well. Can anyone provide any tips for wetsanding, expecially those wetsanding in a garage because my method I used today got me and the surrounding area very wet. There was a lot of orange peel to take down on the areas that had original paint but I figured a lot of that was texture coming through from the paint being poorly preped, after all my prep on this panel didn't last much more than 5 minutes. Since I figure I'll be grinding down to bare metal, I decided to strip a large section on the fender to improve my sanding technique since today the bare sections were where I focused and got the best results. I posted more pictures and included a shot of the fender next to my car to compare the color. It's definately a change but I think with a really nice shine it'll look good. I've seen older pickup from the 50s era in this color but they are typically a flat or semigloss so I can't compare. I think that right now people considering this color can have a good idea on how the Hunter Green will turn out. Webshots
|
|
|
Re: Paint job on a budget!? CONTINUED..page 44........
[Re: Exit1965]
#24980
07/07/06 04:49 PM
07/07/06 04:49 PM
|
Anonymous
Unregistered
|
Anonymous
Unregistered
|
Quote:
As far as I know, bondo doesn't need to cure over several days. Look at the production body shops, I do not think they wait several days and that bondo changes shape over those days.
Plus I think it's not curing, it's hardening chemically. After a couple of hours that's as hard as it gets and as long as you use a block or a board to sand with, you should get pleasant results and not see any surprises once you start putting paint on it. I have used the cheap bondo and have not had this problem, and a guy who works at a body shop came over to help me fix a dent on a fender, and he had the whole thing done and primed (with one coat of bondo, and one skim coat) in about an hour. I've done other small dents only a couple of hours before painting, like when I found things I hadn't seen before painting. No issues as long as the bondo is mixed right.
For the final pass of bondo once you have the shape right, mix bondo with fiberglass resin, then the bondo hardener. This will fill in scratches and will not have any pinholes. But it takes a bit longer to dry.
Thats pretty much what my friend did to our test car, we had one wheelwell that was rusted a ton and had a few holes, he fiberglasses it once, then a second time to make sure it was fully covered, then did a coat of the bondo, and once it was dry (only a few hours of work), he shaped it all with I believe 80 grit sandpaper. It came out pretty decent, we did let the car sit for a few days so I can't vouch for saying how long you should wait, but I wouldn't imagine waiting more then a day since it dries so fast.
|
|
|
Re: Paint job on a budget!? CONTINUED..page 44........
#24981
07/07/06 05:51 PM
07/07/06 05:51 PM
|
Joined: Jul 2003
Posts: 3,378
Rancho Cordova, CA
Exit1965
master
|
master
Joined: Jul 2003
Posts: 3,378
Rancho Cordova, CA
|
I'm wetsanding in the garage.. what I use is a soft sanding sponge (320 grit, but it doesn't matter since I just wrap the paper around it), a bowl of water, a lint free cloth for cleaning the car (bought a 6 pack at walmart), and a spray bottle.
I start by spraying down the entire surface to be sanded. The water usually stays there in beads. Then I'll dunk the paper and sanding sponge into the water, and start sanding while spraying. I do the whole panel (the whole hood, whole fender etc.) before wiping it down. First wipe it dry with the cloth, then rinse out the cloth a few times and go over it a few times with the cloth still moise, until the residue is gone.
Also, as Charger suggested way back when, it works well to use your hand to hold the sandpaper, especially on tight spaces. Also on tight, contoured spaces I will bunch up the cloth and put the sandpaper around that, so it takes the shape of whatever I'm pushing it down and sanding on.
If anyone out there knows where to get a quality spray bottle, let me know. All of mine eventually start working badly, leaking or the lever thing starts sticking..
|
|
|
Re: Paint job on a budget!? CONTINUED..page 44........
[Re: Exit1965]
#24982
07/07/06 08:21 PM
07/07/06 08:21 PM
|
Anonymous
Unregistered
|
Anonymous
Unregistered
|
Quote:
I'm wetsanding in the garage.. what I use is a soft sanding sponge (320 grit, but it doesn't matter since I just wrap the paper around it), a bowl of water, a lint free cloth for cleaning the car (bought a 6 pack at walmart), and a spray bottle.
I start by spraying down the entire surface to be sanded. The water usually stays there in beads. Then I'll dunk the paper and sanding sponge into the water, and start sanding while spraying. I do the whole panel (the whole hood, whole fender etc.) before wiping it down. First wipe it dry with the cloth, then rinse out the cloth a few times and go over it a few times with the cloth still moise, until the residue is gone.
Also, as Charger suggested way back when, it works well to use your hand to hold the sandpaper, especially on tight spaces. Also on tight, contoured spaces I will bunch up the cloth and put the sandpaper around that, so it takes the shape of whatever I'm pushing it down and sanding on.
If anyone out there knows where to get a quality spray bottle, let me know. All of mine eventually start working badly, leaking or the lever thing starts sticking..
From what you described it sounds similar to my technique except I was using the hose since I still need to pick up a bottle. I'm doing short quick linear motions which seems to work well. I started sanding through on a few spots but am pretty sure that it was because they were high spots from the original prep. I just looked over the piece a few minutes ago and saw it was laying down very nicely. The two original bare metal spots have no orange peel to speak of so I'm VERY happy with the results. I just found a crack in my front bumper's ground effects so I'll need to replace that but I figure I'll paint the current ones then paint new ones once I get them with the same amount of coats. The way Charger described it, the colors will still match which is perfect for me.
Charger, since you've been doing this for a while I figure you may know how this paint will handle snow. I know your beetles and charger are living in a garage but have you ever had ice buildup on this paint? My car lives out in the elements so I'm curious how this will handle ice and snow. I know it's for mowers and tractors but we're applying it slightly different so I figured I'd ask. 
|
|
|
Re: Paint job on a budget!? CONTINUED..page 44........
#24983
07/07/06 10:20 PM
07/07/06 10:20 PM
|
Joined: Jan 2006
Posts: 1,220
toronto canada
69chargeryeehaa
OP
pro stock
|
OP
pro stock
Joined: Jan 2006
Posts: 1,220
toronto canada
|
Quote:
Charger, since you've been doing this for a while I figure you may know how this paint will handle snow. I know your beetles and charger are living in a garage but have you ever had ice buildup on this paint? My car lives out in the elements so I'm curious how this will handle ice and snow. I know it's for mowers and tractors but we're applying it slightly different so I figured I'd ask.
no issues, my crx drove thru 3 hard canadian winters in North Bay Ontario, where it really, really snows, paint survived great, every spring and fall i would wax it.
when wetsanding i would only do small 3' x 3' areas, and have a spray bottle in one hand and hand sand the car, first spraying the area with the spray bottle, and i'd also have 2 buckets full of water and a shammy in one, the other bucket i rinse the sand paper in. after i'm finished sanding a area, i use the shammy to clean the area before it dries, it's alot eaiser to do it that way, then rinse the paper,and move onto another area. every so often i'd change the water in the buckets, about every 1/2 a car's worth. then when i'm all done, put new water in the bucket, and shammy down the car rinsing the shammy often, and repeat, then whipe down the whole car with spirits, and then clean with a tack cloth (regular auto body tack cloth) and then go to paint. i cannot stress how much the tack cloth helps, it probabally cuts down 90% of the dirt/dust/dog's a$$ hairs!!!. and they only cost about $1 each, plus i got these really nice shammys from the dollar store, you know the ones you allways see a guy at a show with the booth spilling coke on the carpet and showing that the shammy holds like 2 gal of water....same stuff at the dollar store - the orange ones, about 3' x 3'. also if you need a spray bottle follow these steps: 1. go to the wifes cleaning closet, 2. remove any spray bottle, 3. empty contents into a sutibale container (you will need it later), 4. use spray bottle, windex ones work best:), 5. when finished using the bottle, return stored contents back into spray bottle, place back into cleaning closet, and deny any involvement in it's use when confronted by wife/girl friend/mistress/boyfriend(to be politically correct)!!!!  
|
|
|
 Re: Paint job on a budget!? CONTINUED..page 44........
[Re: 69chargeryeehaa]
#24984
Re: Paint job on a budget!? CONTINUED..page 44........
[Re: 69chargeryeehaa]
#24984
07/07/06 11:37 PM
07/07/06 11:37 PM
|
Joined: Jul 2006
Posts: 1,475
Ontario, Canada
78D150CLUB
My avatar is a self portrait!!
|
My avatar is a self portrait!!
Joined: Jul 2006
Posts: 1,475
Ontario, Canada
|
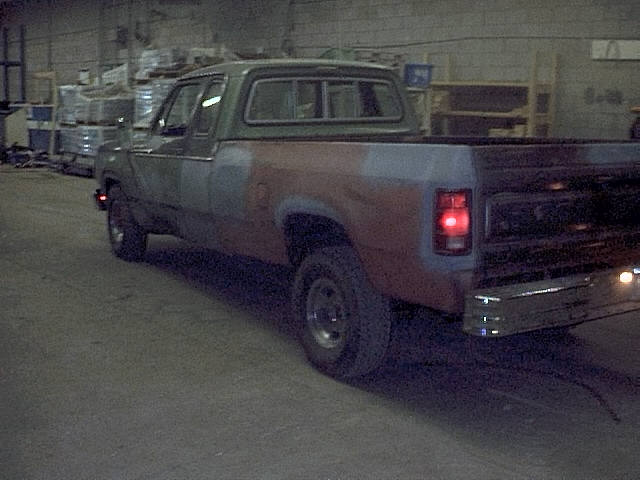
Just started using this method on my 78 Adventurer SE. Too dark for a good pic atm, but I will try to get one tomorrow. Followed your method all the way, and so far it looks great. It will be a treat to drive something that doesn't look like a chameleon hiding in a box of crayons. Hat's off to you, charger. I wouldn't have painted until I got a correct pre-81 longbox for Godzilla, but this is the best of both worlds. P.S.: Pic is early this spring after much work to get it back on the road.
Last edited by 78D150CLUB; 07/07/06 11:49 PM.
|
|
|
Re: Paint job on a budget!? CONTINUED..page 44........
[Re: 78D150CLUB]
#24985
07/08/06 03:54 AM
07/08/06 03:54 AM
|
Anonymous
Unregistered
|
Anonymous
Unregistered
|
I felt that some of this threads information would be easer served up on a wiki. for those out of the know a wiki is an editable web page that anyone can edit. The address is: http://carpainting.wetpaint.com/I'm affraid I haven't added much more than Morwan's pdf and a few headers and links to kinda direct the basic layout. (though I'm sure that will evolve soon enough). I plan on going through the thread page by page and adding information. It's just getting late tonight. Oh and yea I tried to make the site very general to allow for it to expand into other areas of car painting. I noticed some over lap on this thread. ie prep work and rattle caning it. One will have to create a user account to edit the pages but it's quick and if most of us use the same user id's we'll be able to tell who's who. Later, Aaron
|
|
|
Re: Paint job on a budget!? CONTINUED..page 44........
#24986
07/08/06 11:53 AM
07/08/06 11:53 AM
|
Anonymous
Unregistered
|
Anonymous
Unregistered
|
Excellent idea, I joined up and made a few small comments. Gotta admit, it's my first go round with a wiki, and it feels a bit odd editing someone elses words! LOL I suppose it's not uncommon for these things to get a little heated? Anyway, it's a great idea. I've had asperations of creating a website dedicated to this method of painting for some time now - interviewing some of the more active testers/painters, creating links, having a step-by-step "how to" gallery, etc. Unfortunately, my workload has been such that I just don't seem to have any free time, but I suppose that's a good thing too!
|
|
|
Re: Paint job on a budget!? CONTINUED..page 44........
#24990
07/08/06 02:20 PM
07/08/06 02:20 PM
|
Anonymous
Unregistered
|
Anonymous
Unregistered
|
Quote:
I felt that some of this threads information would be easer served up on a wiki. for those out of the know a wiki is an editable web page that anyone can edit. The address is: http://carpainting.wetpaint.com/
I'm affraid I haven't added much more than Morwan's pdf and a few headers and links to kinda direct the basic layout. (though I'm sure that will evolve soon enough). I plan on going through the thread page by page and adding information. It's just getting late tonight. Oh and yea I tried to make the site very general to allow for it to expand into other areas of car painting. I noticed some over lap on this thread. ie prep work and rattle caning it. One will have to create a user account to edit the pages but it's quick and if most of us use the same user id's we'll be able to tell who's who.
Later,
Aaron
I thought a lot of the text looked familiar. 
My original guide was pretty inaccurate since I wrote it up with no actual painting experience... But now that I do have some experience, hopefully my contributions will be more useful.
|
|
|
Re: Paint job on a budget!? CONTINUED..page 44........
[Re: Marq]
#24992
07/08/06 09:20 PM
07/08/06 09:20 PM
|
Anonymous
Unregistered
|
Anonymous
Unregistered
|
I have finished my painting and I am currently up to polishing. I have found an Australian website that has a heap of tips and has lots of examples of professional detailers work on cars including what products they have used. I have found it to be an excellent source of information. Detail Paradise The Detailing Tips towards the bottom of the first page are well worth a read and the Forums button on the top of the page leads towards the main forum. I have found the Detail Paradise forums underneath the Sponsore forums to hold bucketloads of useful info. So if you want to know how to turn this  into this  then have a look at the link above. PLEASE NOTE THESE PICS ARE FROM THE WEBSITE MENTIONED ABOVE. They are not my work, they are the reults obtained by a professional detailer. I listed them bacause the detailer who did them described what products and equipment he used to obtain these results. Hopefully they han help us to achieve similar results ourselves.
Last edited by Aussie Driver; 07/08/06 10:24 PM.
|
|
|
Re: Paint job on a budget!? CONTINUED..page 44........
[Re: Exit1965]
#24994
07/08/06 10:55 PM
07/08/06 10:55 PM
|
Anonymous
Unregistered
|
Anonymous
Unregistered
|
Looking good Exit. Can't wait to see you get that out in the sun. I just finished my 4th coat on my test piece and things seem to be going well. Thursday I'll be tearing down my car to start prep work so I'm going to continue playing with my test piece till then.
|
|
|
Re: Paint job on a budget!? CONTINUED..page 44........
[Re: Exit1965]
#24996
07/09/06 03:24 PM
07/09/06 03:24 PM
|
Anonymous
Unregistered
|
Anonymous
Unregistered
|
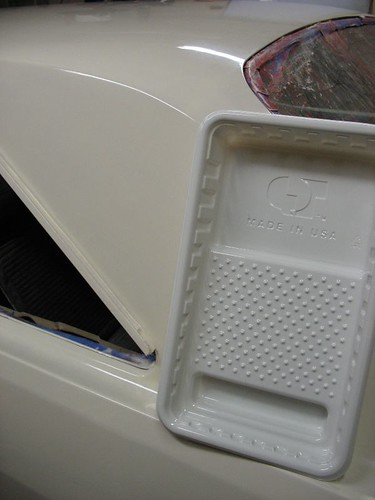
Looking good. You have an amazing shine going there. I really need to work on my technique. I'm getting orange peel really bad. Take a look at my pictures from my 5th coat: 5th coat Orange Peel I'm confused on where the solutions lies for this. I'm using the same exact roller pan as you are shown above and when I fill up the roller, i move it to the bumpy section and roll with a lot of pressure and watch the paint seap out. I think put the paint over the edge into the flatter part and do this a few times. So I know my layers are thin. Also, I have no bubbles to speak of so I think that my mixtures it pretty good. I mixed it up initially for the first coat then add a little mineral spirits for each coat. Any suggestions would be great cause I'm getting a little iffy about starting on the car since I'm having this trouble now. Also, look at my wetsanding shot, I'm really only focusing on the initially bare metal sections since the other painted areas were poorly prepped. When I wetsand, I work the area then wash it off, wipe with a cloth then let it draw and see out the color is. If the color is a solid hazy green then I continue. If there are dark and light spots, I continue. Is this a good practice? Hope you all can help me because I'm excited about this paint and would love to see it working smoothly for me.
Last edited by FarFire70; 07/09/06 03:25 PM.
|
|
|
Re: Paint job on a budget!? CONTINUED..page 44........
#24997
07/09/06 03:34 PM
07/09/06 03:34 PM
|
Anonymous
Unregistered
|
Anonymous
Unregistered
|
Ok, those pictures were immediately after the paint was applied about a half hour ago and I just went down and the orange peel is fading a little so the self-leveling it working good. Maybe I'm worried about nothing but is that how everyone else's looks right after you initially apply a coat?
|
|
|
|
|


 Dry roller well in tray, and apply paint so thin it only has one side.
 I will be there soon, just put the 5th coat on last night and the 6th will go on tonight.
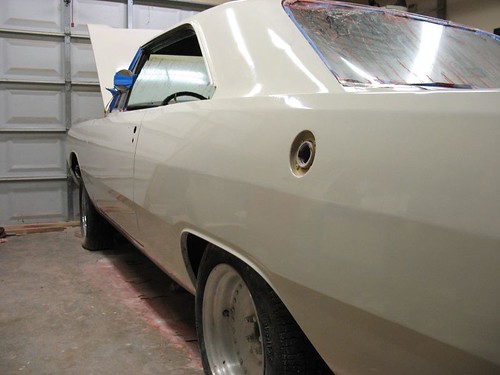