|
 Re: Paint job on a budget!? CONTINUED..page 44........
[Re: 69chargeryeehaa]
#24658
Re: Paint job on a budget!? CONTINUED..page 44........
[Re: 69chargeryeehaa]
#24658
06/14/06 06:41 PM
06/14/06 06:41 PM
|
Anonymous
Unregistered
|
Anonymous
Unregistered
|
Hi there. I'm here from nissanforums... I got a 95 200sx that im working on. It seems that this thread has a great following. And I cannot help to be one of them. I have read all the pages and pages.
I must thank all those who are working on this method and spending time to answer questions and show their results. especially 69 charger for bringing this idea to light.
I am in the process of preping my car for this paint method. My car is orininally teal green. And I am looking to paint it 'Sail Blue'. I just came back from both Loews and Home Depot with no luck but the spray bomb. I was going to go for the Royal Blue but it was so dark.
Where else can I find this paint? It seems that the stores I have tried are very limited on their rustoleum products. One thing I did notice is that home depot had the regular and loews had the pro grade. Both had rollers and such.
Question for Exit. I was looking for the sponge sander you were refering to. but there were quite a frew to choose from. Is there a way you can take a photo of it so I may see what to get. I am very excited to see the reults of your car. It seems so nice.
One of the few that doubt this method is that chuck fellow. Seeing others come out with amazing finishes on their test peices mock his remarks, yet I will also test this paint on a few junk mirrors to see. I know that if you use the right polisher and wetsanding methods this paint will shine very well. He had mentioned that the paint never hardens which would make no sense in the results of charger and the others.
With that out of the way I am anticipating great results and will post all the steps I have taken to achieve this.
Aside from the 2 questions I had asked I have a few others. What is the suggestion on polishers? 10" or 6"? And as far as the engine compartment goes I was going to spray a flat high heat sail blue but I wonder if I should just spray the rustoleum gloss version. Would that be bad for heat?
One of my maot obsticles is that I have no access to a garage and my car is a daily driver. So this will surely be a weekend gig. I know the rule of thumb is to paint in the shade, let it dry and then let the sun cure it. I was hoping someone in my position, Serpent or anyone else can enlighten me further on preperations for doing this in the hell that is outside...
|
|
|
Re: Paint job on a budget!? CONTINUED..page 44........
[Re: Exit1965]
#24660
06/14/06 07:48 PM
06/14/06 07:48 PM
|
Anonymous
Unregistered
|
Anonymous
Unregistered
|
Cool. Thanks much. Hows everything coming along?
|
|
|
Re: Paint job on a budget!? CONTINUED..page 44........
#24661
06/14/06 08:27 PM
06/14/06 08:27 PM
|
Anonymous
Unregistered
|
Anonymous
Unregistered
|
Quote:
One of the few that doubt this method is that chuck fellow. Seeing others come out with amazing finishes on their test peices mock his remarks, yet I will also test this paint on a few junk mirrors to see. I know that if you use the right polisher and wetsanding methods this paint will shine very well. He had mentioned that the paint never hardens which would make no sense in the results of charger and the others...
You hear alot of good things and alot of bad things about this unique method of auto painting, but the truth is there are only a few who are actually seriously trying this technique. Let the facts speak for themselves:
About half-way up the previous page, posted by 'PsYcHo-DoUgHbOy'...can't get a shine after wetsanding...
Also from the previous page, 'widebody mr2' says his car 'was super smooth until i let the car sit for a few days and it collected dust and it seems like it's making the smooth surface rough again'...
'Exit1965' is having the same problem trying to get a decent shine after wetsanding...
Look closely at the pics of Marqs mustang (forth post from the bottom of the previous page)...there is considerable 'orange peel' on this car...
I personally painted my whole car with this method after doing several test pieces and tried various tips including Penetrol and spraying with a paint gun...looked good until the end when I tried to wetsand and polish...
I'm not trying to change anyones mind...i'm just reporting the results as I see them. If you want to try this method, give it a shot...
|
|
|
Re: Paint job on a budget!? CONTINUED..page 44........
#24662
06/14/06 09:36 PM
06/14/06 09:36 PM
|
Joined: May 2006
Posts: 575
Canada
Marq

mopar addict
|
mopar addict
Joined: May 2006
Posts: 575
Canada
|
Hi Chuck... Actually... after four coats there was NO orange peel EXCEPT on the rear passenger quarter where the fuel door is. And the reason for that specific spot having the orange peel is that I added some extra paint to that spot after bumping into it with my leg. The fresh paint on the non-cured paint caused that spot to do the orange peel. As for the rest of the body... it is smooth and no orange peel at all. The illusion you might see is possibly a fault of my camera. It is an 8 megapixel camera and the pictures were taken with the highest setting. Each picture was originally about 8 megs in size. So I loaded the pictures into Corel and reduced the size down to a more manageable and downloadable size. During this process Corel does wonderous mathematical calculations to reduce the pixels. In the course of the downsizing of the picture you get what are known as jpeg artifacts... and pixelations... imperfections in the picture. I suppose this may be what gave you the impression of orange peel city. For the best way of confirming this... look at the picture at : http://www.snpx.com/mclaren/mclaren/mclarenrear.jpgNow... note the Mustang coupe sitting next the McLaren. Note the white pinstripe that runs laterally along the side of the Mustang coupe. That is a 100% solid and unbroken pin stripe. And yet the picture when downsized distorts the stripe and makes it appear to be interupted and not contiguous. The other problem I faced with the pictures is that the McLaren's finish is indeed smooth and shiny as h*ll and giving off one heck of a mirror of its surroundings. It was difficult to get a clear picture of the car that wasn't echoing in the mirror finish all the things surrounding the car and being reflected. I should also note that those pictures were taken with the 4th coat and no wet sanding. Even I was surprised by how mirror smooth AND LACK OF IMPERFECTIONS it was. I was almost hesitant about going to the wet sanding at this stage because there were no imperfections or orange peel ( except at the fuel door ) to smooth out. I think Chuck that this discussion is going to boil down to two camps... those using Tremclad ( as per the original recipe or using the US "almost equivalent brother product' Rustoleum. It's quite possible that the Rustoleum dudes may not be able to get the same results as the Tremclad folks. And when folks start using odorless mineral spirits that might also slow down the curing process and affect the end results. I know at our Home Depot, Canadian Tire and even Walmart offer both the Rustoleum and Tremclad products... and I figured that it was safer to stick to the 'original' recipe that called for Tremclad. So I can see where you might have good reason to play the devils advocate in this discussion. You may be 100% correct for the chaps that are in the States and only have access to the Rustoleum product. As for me... I am still properly impressed at this point. And with the discussions so far about how to handle the final stage... well I am still formulating how I will handle that stage when I get there. At this moment I am undecided between two camps on how to finalize the project where I arrive at that point. a ) on one hand I am thinking that the final coat will be left on the car for one or two months to let it achieve whatever maximum curing the paint may require. Once it has achieve maxium hardness I would then go with the final 2000 grit wet sanding... followed by the polishing. or b ) I am intrigued by the chatter about the Tremclad UV clearcoat. I might be tempted to avoid the polishing stage and take a shot at the clearcoat method. But again this wouldn't occur until at least 2 months after the final layer was painted and the body had ample time to fully cure. Oh well... this whole exercise has been a great hoot and for my cost of investment in time and money I am having fun. And at least my little project car now has a skin on it rather than the black primer that it had to wear while parked in my garage over the last three years. I too may sour on the process in the end. But at least I am having fun and my sweet little car is getting some long overdue attention. .
Last edited by Marq; 06/14/06 09:48 PM.
|
|
|
Re: Paint job on a budget!? CONTINUED..page 44........
#24663
06/14/06 10:21 PM
06/14/06 10:21 PM
|
Anonymous
Unregistered
|
Anonymous
Unregistered
|
There is a great chance that the tremclad is far more suseptable and shines better, but we are all trying that. I hope through my own tests that this "shine" can be reached.
I do think that Marq is right about the curing period. And the fact that there is no clear coat used as such with bc/cc or single stage. The shine matching that will be hard to reach. Time will only tell in Exit or Marq's case if this paint can be close or equal to a SS job.
That being said I am going into this with very little money and a fair paint job at the moment. If all else fails and my paint does not cure or does not shine after curing. Then it's live and learn. =)
But atleast I'll have that experience under my belt. Over the course of this thread I have learned a lot about painting, preping, techniques of other paint applications. Hell, your experiences are also an attribute to what I now know. And I thank all who participate in this thread.
If my outcome is bad or good, i wont stress. =)
|
|
|
Re: Paint job on a budget!? CONTINUED..page 44........
#24664
06/14/06 10:33 PM
06/14/06 10:33 PM
|
Anonymous
Unregistered
|
Anonymous
Unregistered
|
also there were a few:
JeffS and admactanium that had a lot of sucess as far as getting this paint to shine. "so i was just curious to see if regular ole rustoleum (or xo rust or whatever) could be polished to a nice shine. i'm convinced that i can be and if the surface prep and the color sanding steps are done properly a paint job using this method would be virtually indistinguishable from a pro-shot paintjob. and in many cases, if you do those steps effectively, it could look much better than 95% of the professionally shot paintjob out there. it just seemed like there were people dismissing this technique wholesale because they couldn't get enough shine out of the paintjob in the end when in all likelihood it was their colorsanding and buffing technique that caused the problem. they would likely have just about as flat a paintjob from a professional gun with 2k paints as they would with rustoleum because they were not finishing the job correctly.
of course, this doesn't answer any of the questions of durability in regards to the elements, sun, gasoline, grit and other crap that cars get put through, but at least this is encouraging enough to let me know that the paint can look awesome given that the proper care is taken that you would use for ANY paint job."
Takin' from page 28.
|
|
|
Re: Paint job on a budget!? CONTINUED..page 44........
#24665
06/14/06 11:07 PM
06/14/06 11:07 PM
|
Anonymous
Unregistered
|
Anonymous
Unregistered
|
Maybe I missed it, but has anybody done the clear coat thing yet? Any pictures?
|
|
|
Re: Paint job on a budget!? CONTINUED..page 44........
#24666
06/14/06 11:28 PM
06/14/06 11:28 PM
|
Joined: May 2006
Posts: 575
Canada
Marq
mopar addict
|
mopar addict
Joined: May 2006
Posts: 575
Canada
|
One thing I am curious about for the chaps that have been polishing their Tremclad paint jobs...
From what I gather the original recipe for this process called for using the cheapest type of Turtlewax. The key being that it was to produce a shine but not contain much in the way of abrasives.
Now I know that most polishes contain varying amounts of abrasives in order to micro-grind the oxidized layers of paint to reach a paint layer that is free of oxidation etc.
Now... since we are talking about brand new paint that has been wet sanded with 2000 grit paper, I would tend to think that no abrasives whatsoever would be better than one that contains any abrasives ?
Would a straight carnuba wax with no abrasives not be better at creating a shine without adding further abrasion to the paint surface ?
My other thought is that a clear wax as compared to the white and pasty wax might give a better shot at not having a foggy haze appear after waxing. I would have to think that some of these white pasty waxes are leaving remnants behind in the paint. And although they may be relatively clear when initially done, they would tend to whiten as they dry out ?
If that is correct then the more clear the wax... then possibly the better for reducing the chances of a fog appearing later.
Another wax that might be good is the colored wax that is available in the primary colors. I know there is a black, red, brown, gray, yellow and green. Possibly this wax might have a better chance at cutting down on the whitish fog.
I guess when the time comes I will spend a little more time researching the zillion types of waxes that are available at the store.
But for some reason I am thinking that the more expensive carnuba wax ( with no abrasives ) would probably be the best for this particular surface.
Dunno... some of you polishing pros might have a better insight in this...
And I guess we really have to look at the quality of the polishing and buffering pads used on the polisher. There are some polishing pads that probably are harsh enough to create micro-abrasions in the Tremclad paint ( especially if the paint hasn't fully cured ).
For example, I would definitely not use a used or washed buffer or polishing pad on my polisher. I would tend to think that a virgin pad ( of higher quality ) might be the ticket for reducing the chances that the pads might do any harm to the Tremclad paint...
All these thoughts about waxing and polishing are making me more tempted to consider the Clearcoat method ( if we can get some feedback that it works and is compatible with the layers of Tremclad paint that it goes on...
I did take a look at Home Depot and Canadian Tire today and unfortunately neither of them were stocking the clear coat except in the aerosol spray bombs...
.
.
.
Last edited by Marq; 06/14/06 11:45 PM.
|
|
|
Re: Paint job on a budget!? CONTINUED..page 44........
[Re: Marq]
#24667
06/15/06 12:54 AM
06/15/06 12:54 AM
|
Joined: Jul 2003
Posts: 3,378
Rancho Cordova, CA
Exit1965
master
|
master
Joined: Jul 2003
Posts: 3,378
Rancho Cordova, CA
|
I'm planning to use something like turtle wax "ice" or another of those clear waxes. They are supposed to fill in swirl marks somewhat also.
What's left to do on my car is first, smooth out the roof with some bondo, then do a good strong wetsand with 800 and put 2 more coats over the whole body. Those coats could be the final coats for the body, except for the spot painting I have to do of the rest of the car (both doors, one fender, the roof, the decklid and the passenger 1/4).
As far as cure time, I dont expect it to be fast. I took my nail to the lower 1/4 panel and was able to scrape the paint all the way off, but I only did a very small amount and it will be easy to touch up. However the test areas I painted a few months ago are all much harder, and I cannot scratch that paint off but I can still put a nice slice in it with my nail if I run my nail sideways across it, pushing down hard. Part of the problem there is I was using odorless spirits and not letting enough cure time between coats.
I am hoping though that leaving at least 24 hours between thin coats with this red paint will lead to some good hardness after a few months. Its not likely that something will deliberately slice to make a scratch on the paint anyways so it's not a big concern.
The pro. safety red I got in a spray can and sprayed my door to check the color - that was rock hard after a few weeks. I can probably get away with one thick coat on my engine bay and door jambs, because I put that test coat on real thick and it's very hard.
Im still a bit tempted to switch colors to canvas white, but I know I need to finish this red paint job and look at it in the sun before I make any decision like that. The other benefit to a plainer off white is that people will not scrutinize it or notice it as much as they will when the car is red. If there are imperfections in it, which there will be if I dont wetsand, that may or may not bother me. But I'm not far off finishing this red paint job so I'll go head and do it. Now that the body continues to get straighter, if I do decide to change colors I could probably do the whole job in a week or so.
|
|
|
Re: Paint job on a budget!? CONTINUED..page 44........
#24668
06/15/06 01:20 PM
06/15/06 01:20 PM
|
Anonymous
Unregistered
|
Anonymous
Unregistered
|
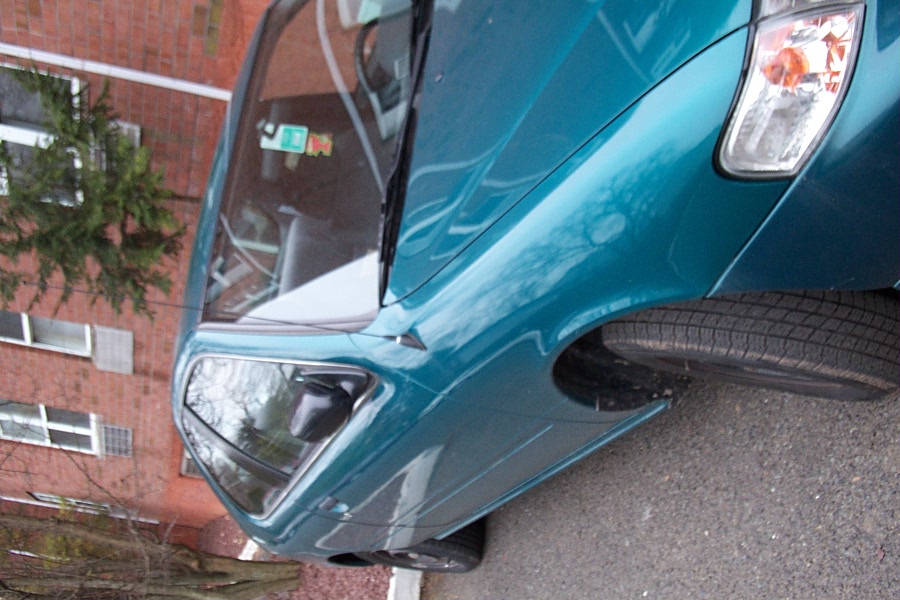
Chuck, I agree with your interpertation of the orange peel on Marq's car (look at drivers side front pic). I haven't fully tested this method myself, but am quite worried about your results. Maybee a hardener can be added so the paint could be sanded properly. Seems like most are ignoring or hoping what you have said isn't true for them. Sometimes it also seems like we are getting snowed over by a couple of Tremclad employees/marketers. I'm a little worried about this method as well because of the orange peel everyone is experiencing and labeling as "Flat as Glass". If it were a spray job, I would demand my money back becuase that much orange peel is unacceptable. The only "Flat as Glass" results I have seen yet are Jeff's and Admactanium's (*sp). It is discouraging when you hear its going on "Flat as glass" and "looks like a mirror" but then you see pics after and its not. I'm not trying to knock anyone here. I guess what I have realised is that everyone sees something different and everyones expectations are different. If I have time this weekend, I will try to get some hardener and see if it changes anything. As of right now, the majority of results are too discouraging to apply to a daily driver, maybee a beater. Ok people, time to prove me wrong here (I want this method to work). Lets see some clear pictures without the orange peel. Take 2 pictures: Picture 1, 1-2 feet away, straight on or slight angle and in the shade. Picture 2, same distance, but on an angle reflecting a straight line in the background (close to the car, 4 feet away or so). Love it or Hate it; it had to be said! Smite 
Last edited by Smite; 06/15/06 01:23 PM.
|
|
|
Re: Paint job on a budget!? CONTINUED..page 44........
#24669
06/15/06 01:54 PM
06/15/06 01:54 PM
|
Joined: Jan 2006
Posts: 1,220
toronto canada
69chargeryeehaa
OP
pro stock
|
OP
pro stock
Joined: Jan 2006
Posts: 1,220
toronto canada
|
i would just like to comment on my expirences with the paint issue, shine, peel ect. before i do, exit, that turtle wax "ice" clear synthetic wax is the best wax i used hands down, i bought some 2 months ago, after using it and seeing the results, i gave all my mothers/mequires wax to my mom, and only use the ice wax. the stuff goes on super easy like whiping your car, it's clear and you can do it in the sun, which i did. i waxed my 2002 mustang gt, and my wifes 2001 vw new beetle sport in 30 mins start to finish. the thing i love about this wax is that you can get it on black plastic, glass, ect...and it leaves no residue, like when you use a liquid or paste wax that stains black plastic white that's there for life, or a really really long time. after 2 months since i've waxed the cars which sit outside all the time, the water still beads, and i've washed the cars once since, they are still clean, and seem to stay clean just as well when compared to a high end wax like mothers, ect.... not to mention the stuff almost just wipes off without buffing, you gotta love that. i used about 3% of the bottle contents to wax 2 cars. geez, looking back i almost feel like i should work for turtle wax!!!! but trust me i don't, but if they're reading i'll take some royalities. the wax rocks, it is the BEST wax i've ever used, and seems to last long, just as a comparable mothers/mequires wax, with less effort, and ease of application. Now lets get back to the paint. basically i painted my charger in 5 days, start to finish not including body work and prep. keep in mind i've done it alot, i could whip on a coat in 1 hour or less. while i'm waiting for the exterior for the next coat i'd do the door jambs, and trunk area. my process was 2 coats, wetsand, 2 coats wetsand, 2 coats wetsand and polish. now my car was painted the same color, it was previously orange, if i was changing colors i'd do 2 more coats. my first 2 coats were medium coats, that helped get coverage fast, and fill all prep sanding marks/scratches. then i did a good wetsand and the following coats were thin coats with wetsand every 2 coats with 1000, and finished with 1500, then polish. the reason why i use the turtle wax polishing compound is that it is the equivelant of i'd say 3000+ grit, meaning the process is slow, but works great, does'nt harm the paint from over polishing, and it's cheap!!! after the last coat, i waited overnight, and let the car sit in the sun for a day, the next day i wetsanded and started buffing. i wetsanded from about 7 am to 12pm, then buffed until about 10pm, and the next day from 8am to 10pm. so the buffing took a day and a half to do the whole car exterior only. basically get a beer, buffer, bonnets, compound, chair, more beer, and let the buffer do the work. you could use a more aggressive compound, and cut it alot faster, but this is fresh paint, and the turtle wax stuff is impossible to over buff and burn the paint. it's easy work. mind you i did rush it to get the car on the road and    , but it has excellent shine. right after buffing, i waxed it no issues. then followed by alot of . the paint does remain "soft" for about a month, after that it's rock hard, espically if you it. you could let it cure for 2 months, then cut it in 5 hours with a aggressive compound, of not do a final wetsand and just wax it, drive it for 2 months, and then wetsand/polish but then you cut corners, because it's alot eaiser to do when the car is stripped. for 5 days, when you know what your doing, not including body work i painted my car, body work took me 3 solid days to prep, not including stripping the bumpers, handles, rubber, trim, ect...if you have the time then wait, let it cure, then buff later, but if your like me and are like  damm i gotta this thing then use the turtle wax polishing compound and a buffer, or if you cut paint for a living, and really know your stuff cut with whatever you want. if i polished for another 2 days combined with more wetsanding, there's no doubt in my mind that i could pull off a pro looking job. but i really don't care since i drive my car alot, go sideways on dirt roads, ect...plus it's really only me that sees the flaws, nobody that's looked at the car has seen where i sanded a bit too much and went thru in a 2" area on a body line, i'd have to show you it for you too see it. the problem is when your painting your car, you're evaluating it under a microscope in artifical light, where flaws are most visible. to 99% of other poeple out there, your paint looks perfect. you are your worst enemy when it comes to painting, because you are hyper aware of all flaws, the 71 beetle i sprayed single stage auto paint on for my dad has 2 flaws, one microscopic run, and 1 fish eye, i see it from a mile away because i know it's there, but nobody else could spot it. that's where exit, i would reccommend you get a few buddies to come check out your car, and give you their honest opinion, you'll be plesantly supprised with their comments, it will change your mind completely, and allow you to be less critical on yourself, trust me, plus at a 120mph it's just a blur!!!! again marq, excellent advise.    
|
|
|
Re: Paint job on a budget!? CONTINUED..page 44........
#24670
06/15/06 02:09 PM
06/15/06 02:09 PM
|
Joined: Jul 2003
Posts: 3,378
Rancho Cordova, CA
Exit1965
master
|
master
Joined: Jul 2003
Posts: 3,378
Rancho Cordova, CA
|
Quote:
Chuck,
I agree with your interpertation of the orange peel on Marq's car (look at drivers side front pic). I haven't fully tested this method myself, but am quite worried about your results. Maybee a hardener can be added so the paint could be sanded properly. Seems like most are ignoring or hoping what you have said isn't true for them. Sometimes it also seems like we are getting snowed over by a couple of Tremclad employees/marketers.
I'm a little worried about this method as well because of the orange peel everyone is experiencing and labeling as "Flat as Glass". If it were a spray job, I would demand my money back becuase that much orange peel is unacceptable. The only "Flat as Glass" results I have seen yet are Jeff's and Admactanium's (*sp). It is discouraging when you hear its going on "Flat as glass" and "looks like a mirror" but then you see pics after and its not.
I'm not trying to knock anyone here. I guess what I have realised is that everyone sees something different and everyones expectations are different.
If I have time this weekend, I will try to get some hardener and see if it changes anything. As of right now, the majority of results are too discouraging to apply to a daily driver, maybee a beater.
Ok people, time to prove me wrong here (I want this method to work). Lets see some clear pictures without the orange peel. Take 2 pictures: Picture 1, 1-2 feet away, straight on or slight angle and in the shade. Picture 2, same distance, but on an angle reflecting a straight line in the background (close to the car, 4 feet away or so).
Love it or Hate it; it had to be said!
Smite
Smite, I don't think orange peel is the problem here. Several people have refined their technique and are avoiding orange peel altogether since they are now putting on thin coats. If orange peel is your problem, reread the posts and see how people have put on thinner coats. Here's a pic. There is probably SOME orange peel here, but it's certainly not enough to notice or to care about. [edit: by the way, I see now one of my dogs decided to make a cameo in the picture]
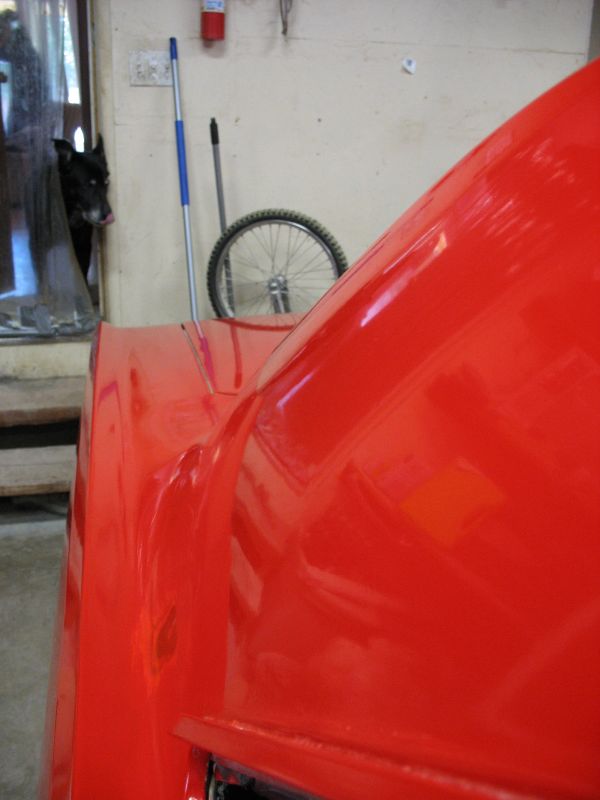
The problem in my eyes is that it seems easy to scratch, perhaps until it has a long time to cure. And maybe it's not a problem after all if it does end up being rock hard eventually.
Last edited by Exit1965; 06/15/06 02:13 PM.
|
|
|
Re: Paint job on a budget!? CONTINUED..page 44........
[Re: Exit1965]
#24671
06/15/06 02:33 PM
06/15/06 02:33 PM
|
Anonymous
Unregistered
|
Anonymous
Unregistered
|
Exit,
Orange peel isn't an issue with me. I know I can refine the process to get it out, or possibly sand it out. Thats not the problem. My problem is that 85% or more of the results I have seen, I hear only good things about the paint and result. Like, no orange peel, flat as glass and mirror finish. When you see the pictures afterwards the pictures aren't what they are said to be (or too far away to tell). How can I beleive how good this paint/paint process is when the pictures aren't showing what they are saying. So that right there makes me doubt any of the claims of the poster.
Also, I didn't want to say anything yet, because I may not being doing it quite right yet, but I can sort of relate to what Chuck was saying. After 12 hours, I sanded the paint down dry and I noticed it was gumming up the sand paper (600 grit). This makes me wonder about what Chuck said. It makes sense what was said if it doesn't harden enough, and also makes sense that it might stay a little soft since it is rust paint.
I know I'm just going to have to finish this myself, but my problem is I live in the city, and my paint is a 2 hour drive away. I'm only able to paint a little once every month or every other month. I would like to see some good results. You are doing well keeping the orange peel down, and I can't wait to see it buffed. You may be the changing factor in my mind; I know how much work you have been putting into this, unlike others I have a feeling is a pretty quick jobby.
I hope I'm not being over critical here and expecting too much.
Smite
Last edited by Smite; 06/15/06 02:35 PM.
|
|
|
Re: Paint job on a budget!? CONTINUED..page 44........
[Re: Exit1965]
#24672
06/15/06 02:43 PM
06/15/06 02:43 PM
|
Anonymous
Unregistered
|
Anonymous
Unregistered
|
Looking good exit. My car has its problems. I got hit in the rear and quarter panel and am fixing and sanding the whole car as we speak. I am going to be painting the front and rear bumpers first, but before that I am testing the paint on an old set of mirrors. I recall serpent had an issue with the paint matching when he had to deal with the fuel door. I wonder if the same problem would happen in my case with the mirrors and the rest of the body if painted seperatly.
I am only doing that so I can reach all the crevises and such.
As far as spray bombing the doors jams and engine bay- would the same prep be applied or it doesn't matter being it isn't seen nearly as often?
|
|
|
Re: Paint job on a budget!? CONTINUED..page 44........
#24673
06/15/06 03:00 PM
06/15/06 03:00 PM
|
Anonymous
Unregistered
|
Anonymous
Unregistered
|
When I sprayed out my jams I just hit it with a 400 grit, just to scuff it up a bit after I cleaned it. Hit it with one coat. Let it sit for a bit less then an hour (as can says) hit it with another. Waited 48 hours wiped with mineral spirits to clean off dust and hand grease, then hit it once more. The spray takes a while to dry but it's very hard when it does. It seemed to self smooth in all but one place. I'm not sure why but I knocked down the bumps there and hit that jam part with another quick coat. It looks great.
I just painted my bicycle this way (roll and a bit of spray). Pictures later maybe.. It matches my car (the parts thar are finished almost perfect) Really crappy prep job though... It shows :/
|
|
|
Re: Paint job on a budget!? CONTINUED..page 44........
[Re: 69chargeryeehaa]
#24675
06/15/06 04:40 PM
06/15/06 04:40 PM
|
Anonymous
Unregistered
|
Anonymous
Unregistered
|
HAHA, Nice close up of the turtle wax!
|
|
|
Re: Paint job on a budget!? CONTINUED..page 44........
#24676
06/15/06 04:46 PM
06/15/06 04:46 PM
|
Joined: Jan 2006
Posts: 1,220
toronto canada
69chargeryeehaa
OP
pro stock
|
OP
pro stock
Joined: Jan 2006
Posts: 1,220
toronto canada
|
Quote:
HAHA, Nice close up of the turtle wax!
lol, i have some more recent pics, high res of the charger, close up shots, just trying to find a place to host them, they're huge.
|
|
|
Re: Paint job on a budget!? CONTINUED..page 44........
#24677
06/15/06 04:54 PM
06/15/06 04:54 PM
|
Joined: May 2006
Posts: 575
Canada
Marq
mopar addict
|
mopar addict
Joined: May 2006
Posts: 575
Canada
|
Quote:
Smite said.... "
Also, I didn't want to say anything yet, because I may not being doing it quite right yet, but I can sort of relate to what Chuck was saying. After 12 hours, I sanded the paint down dry and I noticed it was gumming up the sand paper (600 grit). This makes me wonder about what Chuck said. It makes sense what was said if it doesn't harden enough, and also makes sense that it might stay a little soft since it is rust paint. "
.. My thought on this was previously explained and I guess you didn't read my post. Chuck is 100% right that Tremclad and even Rustoleum have a natural tendency to be soft even after a week or a month etc... IF YOU ARE APPLYING STRAIGHT paint.
But my theory is that by cutting the paint to a more watery point changes the way this paint performs. That is why I think the evaporation rate of the mineral spirit the thiness of the layers applied is very important to the end results.
If you don't put the right mix of mineral spirit to paint... then you are either going to end up with something that may not have the ideal combination to result in a quick hardening.
Too much paint and the curing process for each layer is going to be longer...
Too much thinner and the excess mineral spirit may have some impact on the layer that you are painting over ( probably leading to orangepeel ).
But please let me also re-clarify something that I had to explain to Chuck... I know what orange peel is. I know how to spot it and I know how to remove it. When I say that the ONLY spot on my car that had orange peel WAS THE REAR QUARTER near the fuel door... I have absolutely no reason to to glorify the results that I am obtaining. I am just reporting things as they stand at four coats...
I think the only thing that anyone should be afraid of in this Tremclad paint project is the number of VARIABLES that we have seen and how it is a tiny bit of voodoo science to land on the exact recipe that will work on a given car..
a ) Rustoleum or Tremclad
b ) odorless or regular mineral spirits
c ) environment temperature
d ) environment humidity
e ) even the color you choose seems to require some deviances in the recipe...
And these variables are what can ultimately trip up a user that is trying this... So maybe the odds are stacked against someone because you have to go through eight or ten layerings to get to the end of the project.
Heck.. I could get tripped up on the fifth or sixth layering... or maybe my fate is awaiting me at the nineth or tenth layering. It's a real gauntlet and I suppose that patience is the last variable that has to be thrown into the mix.
So I am not a Tremclad cheerleader yet. All I can do is report on how things are proceeding and to explain what measures I have taken to try make this job repeatable with consistent results.
.
|
|
|
|
|


