Previous Thread
Next Thread
Print Thread
68 rr dash reassembly questions. #225643
02/15/09 01:38 PM
02/15/09 01:38 PM
Joined: Feb 2005
Posts: 363
Missouri
P
petty43 Offline OP
enthusiast
petty43  Offline OP
enthusiast
P

Joined: Feb 2005
Posts: 363
Missouri
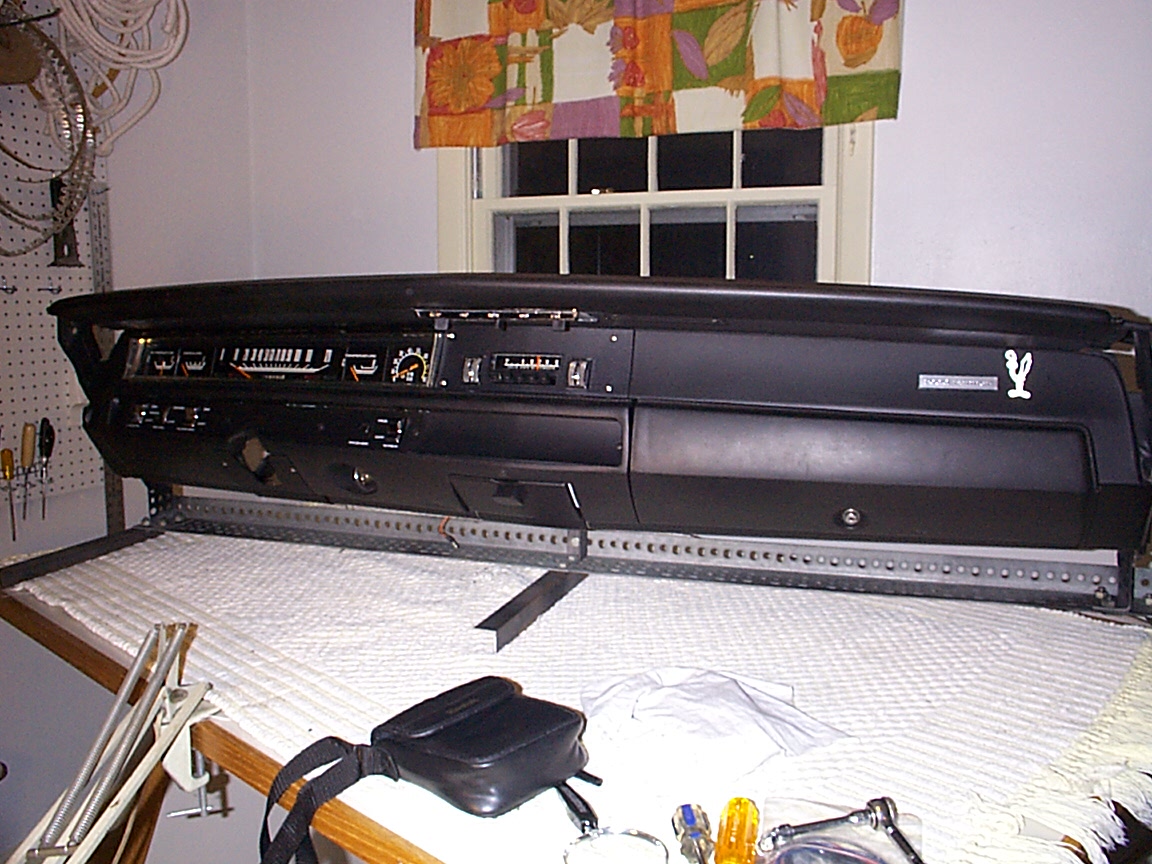
Does anyone have tips on dash reassembly for a bare dash going into a 68 B Body?

I had the dash sandblasted and painted and am going back with all green stuff like original.

Is the dash pad the last to go on or does the switch panel go in last?

Any tips on screw sizes? I know you can buy a kit but it would be easier if I could go to the store and get particular sizes rather than dig through my hardware stash.

My car was in pieces when I got it and I am putting in a nice dash I got as opposed to the one I got with the car that was hacked up for speakers and stereo.

Thanks for any advice.

Tim


1968 Satellite RR Copy Cat My Fleet
Re: 68 rr dash reassembly questions. [Re: petty43] #225644
02/15/09 02:22 PM
02/15/09 02:22 PM
Joined: Nov 2003
Posts: 1,029
Southeast Virginia
68jim Offline
super stock
68jim  Offline
super stock

Joined: Nov 2003
Posts: 1,029
Southeast Virginia
Tim,
It sounds like the dash frame is not installed back in the car yet since you had it painted. Easiest way to go is to assemble the dash while it is still out. Find a large table and either support the frame with metal/wood or just use a soft blanket or two to roll it around. I found it much easier than contorting myself around the frame in the car to get access to all the hard to reach hardware. I even installed all the wiring. When it came time to put it in the car I had my wife help me move it into the car and had the two side bolts already started. Once you get the "forks" over those bolts then use a short length of wire to hold the dash away from the windshield base and do all the wire hook-ups. Then just push it up and do the 5-6 bolts at the base of the windshield.
Good Luck,
PM me if you want some pictures.

Jim
68 Hemi Road Runner

Re: 68 rr dash reassembly questions. [Re: 68jim] #225645
02/15/09 04:09 PM
02/15/09 04:09 PM
Joined: Jan 2003
Posts: 20,757
A collage of whims
topside Offline
Too Many Posts
topside  Offline
Too Many Posts

Joined: Jan 2003
Posts: 20,757
A collage of whims
Jim's right; the more assembly you can do where you have easy access to the backside of the dash, the better. Upper pad & lower pad go on before heater control and switch panel. Wiring the switch panel is easier when you don't have to be a human pretzel fishing the harness into position blindly. Heater control cables are easier to get to at the heater box but that's no big deal. Switch panel's easier to get intot he lower pad without the dimmer switch & its big cage attached. There are a couple of wires that can go to the wrong switch, IIRC, especially the wiper switch, so a wiring diagram is real handy. Pull the A-pillar trim and the upper roof trim before you install the dash. The speedo cable's a PITA too, easier if you have it out and install it at the speedo end 1st, then fish it through to the trans.

Re: 68 rr dash reassembly questions. [Re: topside] #225646
02/15/09 06:16 PM
02/15/09 06:16 PM
Joined: Feb 2005
Posts: 363
Missouri
P
petty43 Offline OP
enthusiast
petty43  Offline OP
enthusiast
P

Joined: Feb 2005
Posts: 363
Missouri
Thanks for the responses. Yes I have the dash out of the car.

I think for hardware I'll get a few packages of different size sheet metal screws and just use what fits.

One thing I'm concerned with is the dash pad. I have original 68 door panels, glove box, and front dash pad.

I bought the after market dark green top dash pad from MegaParts they said just came out and the green is a lighter shade than all of the other pieces. Not a big deal but it would be nice if I've gone this far that the new top dash pad would match the originals.

I can post pictures of all of the different pieces.

It would help to have an exploded diagram from a shop manual if anyone has one.

Tim


1968 Satellite RR Copy Cat My Fleet
Re: 68 rr dash reassembly questions. [Re: petty43] #225647
02/15/09 08:27 PM
02/15/09 08:27 PM
Joined: Jan 2003
Posts: 20,757
A collage of whims
topside Offline
Too Many Posts
topside  Offline
Too Many Posts

Joined: Jan 2003
Posts: 20,757
A collage of whims
Screws for the dash trim are #8, chrome, domed countersunk heads mostly, except heater control used flat countersunk heads. Some of the head sizes used in Mopars were smaller, like a #6 head on a #8 thread. Glove box screws were a silver cad or zinc, button head, and I think 10/32 thread or something on the glovebox latch. All the other screws are sheetmetal thread.
Your dash pad should be the same color & shade as the other dark green interior pieces, especially the A-pillar trim.

Re: 68 rr dash reassembly questions. [Re: topside] #225648
02/15/09 09:59 PM
02/15/09 09:59 PM
Joined: Nov 2003
Posts: 1,029
Southeast Virginia
68jim Offline
super stock
68jim  Offline
super stock

Joined: Nov 2003
Posts: 1,029
Southeast Virginia
Tim,
Here is a shot of my dash assembly.

Jim
68 Hemi Road Runner

5028181-Dashassem5.JPG (106 downloads)
Re: 68 rr dash reassembly questions. [Re: petty43] #225649
02/16/09 10:03 AM
02/16/09 10:03 AM
Joined: Nov 2005
Posts: 836
lancaster, new york
macmic87 Offline
super stock
macmic87  Offline
super stock

Joined: Nov 2005
Posts: 836
lancaster, new york
IIRC, the lower dash pad goes on first and then the switch panel. i have heard of people using silcone spray, tape and even plastic bags to ease the process of inserting the switch panel back into the lower dash pad. a tight fit!! you will want to put the top dash pad on first. and the last thing is getting the right order of dashframe, glove box liner, and glove box hinge. i seem to remember doing that at least twice.

Re: 68 rr dash reassembly questions. [Re: 68jim] #225650
02/16/09 10:34 AM
02/16/09 10:34 AM
Joined: Feb 2005
Posts: 363
Missouri
P
petty43 Offline OP
enthusiast
petty43  Offline OP
enthusiast
P

Joined: Feb 2005
Posts: 363
Missouri
Quote:

Tim,
Here is a shot of my dash assembly.

Jim
68 Hemi Road Runner


Nice dash Jim. Thanks for the tips.

I will post pics today of the color differences.

Also on the speedo needles model master flourescent red works great.


1968 Satellite RR Copy Cat My Fleet


Powered by UBB.threads™ PHP Forum Software 7.7.1