|
 Re: Off the stand!
[Re: 19cuda73]
#165811
Re: Off the stand!
[Re: 19cuda73]
#165811
10/24/11 04:38 PM
10/24/11 04:38 PM
|
Joined: Oct 2006
Posts: 7,369
Iowa
burdar
 OP
OP
Owen's Dad
|
OP
Owen's Dad
Joined: Oct 2006
Posts: 7,369
Iowa
|
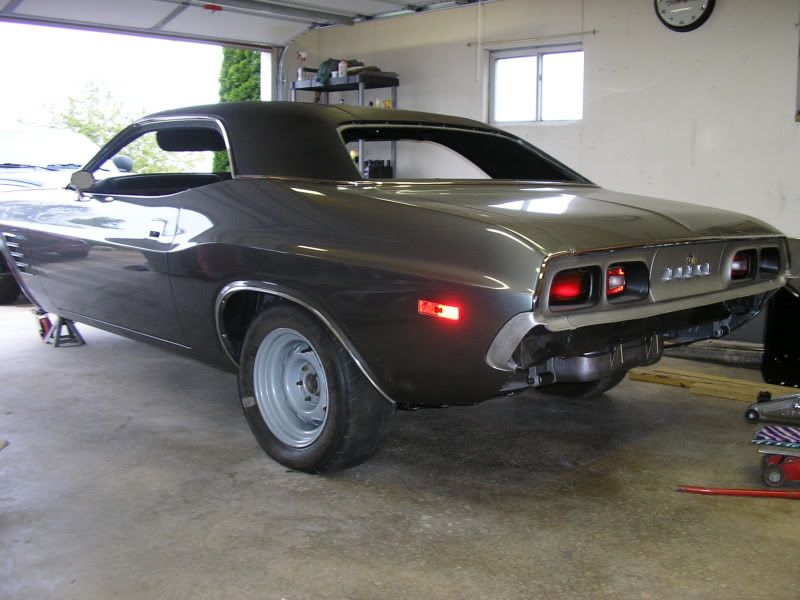
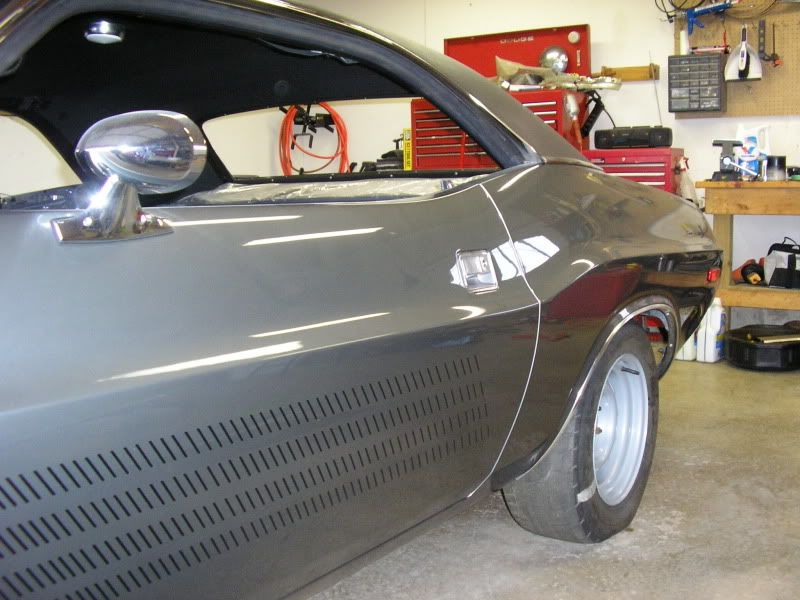
About a week and a half ago I was in the garage trying to decide what I wanted to work on next. I saw the driveshaft sitting there so I decided to work on it. Probably seven years ago I wire wheeled the shaft and brushed on some POR-15. Then I sprayed it with Detail Gray spray paint.  Since then I've seen some awsome looking driveshafts restored and left bare metal. I wanted to see how nice I could get the driveshaft to look without using any paint. Well, it didn't turn out as nice as I had hoped since it was extremely pitted but I'll show what I ended up with anyway. I started by brushing on some paint stripper to remove the Detail Gray paint. It came off easily. Here you can see the POR-15 underneith. 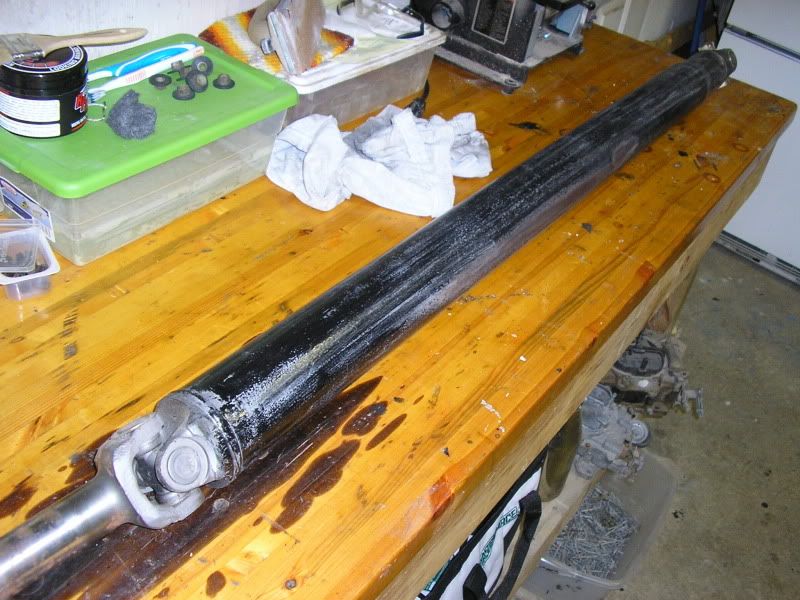 Next, I sanded off most of the POR-15 with 80 grit sand paper and removed the U-joints. 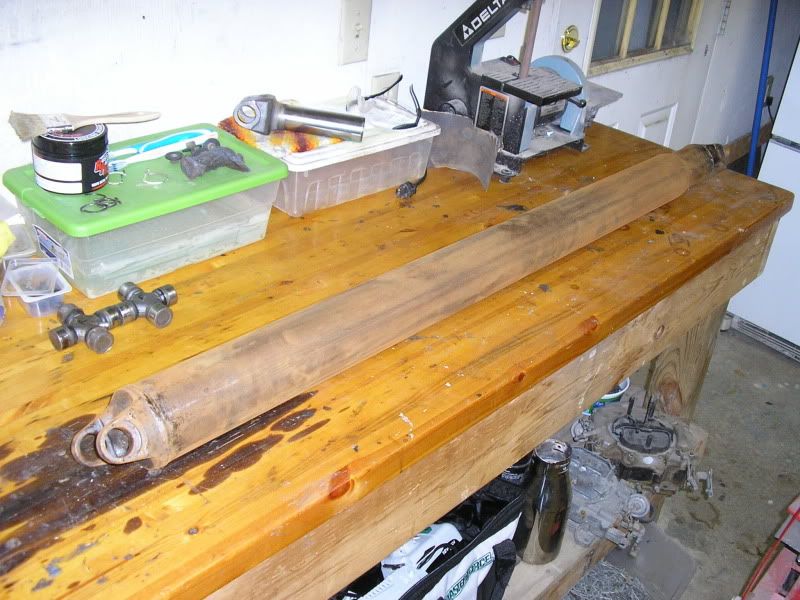 I went to the hardware store and bought some 4" PVC pipe and a cap. I poured EvapoRust in the pipe and inserted the driveshaft.  After a day of soaking, the shaft came out rust free. I still had paint and POR-15 on the ends which required a little sandblasting to clean up. 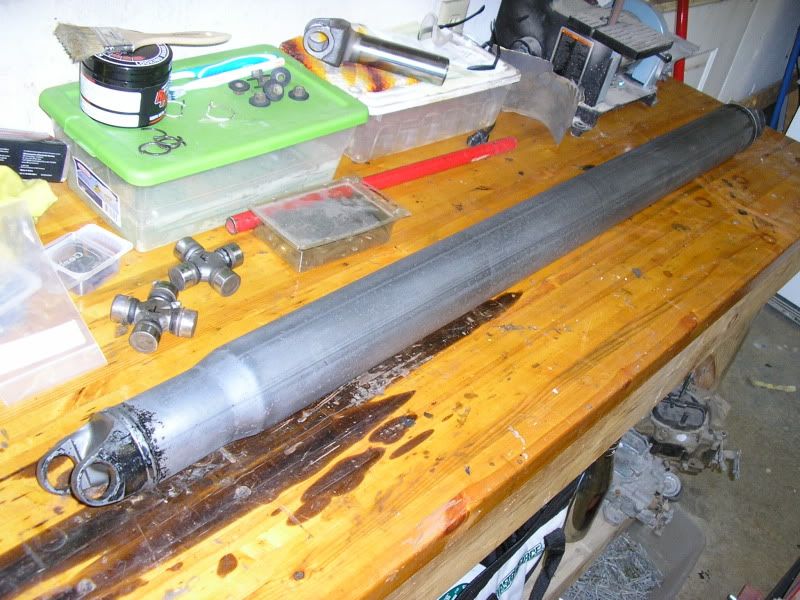 I was shocked to find a nice looking part number still on the driveshaft.  I sanded on the shaft a little but the pits weren't coming out. I got online and found out that driveshafts are only about a 1/16" thick so I decided to just leave it. I lightly bead blasted the shaft to remove some of the sanding marks. Finally, I rubbed it down with steel wool to get rid of the blasted finish. Once the ends were cleaned up I dipped them in my black oxide solution for 30 seconds to darken them. I rubbed them with steel wool to remove some of the darkness on the high spots. I took the driveshaft to my father-in-laws house and he helped me reapply the heat markings from the end caps being welded to the tube. Over the weekend I heated the driveshaft and applied RPM to it so it won't rust again. I also applied some RPM to the new U-joints. While I had the new joints appart I noticed that one of the caps was missing two of the needles. :22yikes: I returned that one today and got a replacement. The only other thing I need to do is have it ballanced. Here's the finished product. I took this picture without the flash to hide some of the pitting. Hopefully it will look OK under the car. 
|
|
|
Re: Off the stand!
[Re: 19cuda73]
#165813
10/24/11 10:42 PM
10/24/11 10:42 PM
|
Joined: Jan 2008
Posts: 1,300
Washington
19cuda73
pro stock
|
pro stock
Joined: Jan 2008
Posts: 1,300
Washington
|
Darren Quite the improvement, Driveshaft looks great. keep up the good work!
Dennis
1966 Charger 383 4 speed (Black with Red interior)
1973 Cuda 340 4 speed (Lemontwist)
1972 Corvette
|
|
|
Re: Off the stand!
[Re: UCUDANT]
#165815
11/29/11 04:43 AM
11/29/11 04:43 AM
|
Joined: Aug 2003
Posts: 637
NM
74fish
mopar
|
mopar
Joined: Aug 2003
Posts: 637
NM
|
|
|
|
Re: Off the stand!
[Re: 74fish]
#165816
11/29/11 10:50 AM
11/29/11 10:50 AM
|
Joined: Oct 2006
Posts: 7,369
Iowa
burdar
OP
Owen's Dad
|
OP
Owen's Dad
Joined: Oct 2006
Posts: 7,369
Iowa
|
Quote:
I want to see that picture in front of the house when it's done.
The original salesman that sold the car is now the owner of the dealership. It's still in buisness but is located in another town. I thought it would be cool to get a picture with him and my dad next to the car infront of the dealership. I'm getting ahead of myself though...I need to get the car done first. 
|
|
|
Re: Off the stand!
[Re: burdar]
#165817
02/01/12 03:27 PM
02/01/12 03:27 PM
|
Joined: Oct 2006
Posts: 7,369
Iowa
burdar
OP
Owen's Dad
|
OP
Owen's Dad
Joined: Oct 2006
Posts: 7,369
Iowa
|
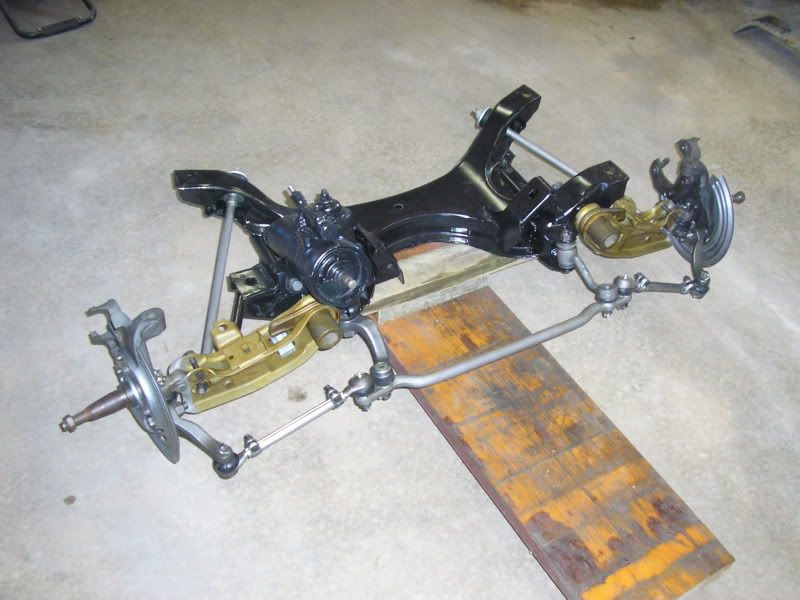
I've been busy working on front suspension parts. Probably 9 years ago I wire wheeled the suspension components and covered them in POR-15. Then I painted them with Eastwood paints to try and replicate bare metal. I wasn't very happy with the way the parts looked but, at the time, I didn't know what else to do with them. This winter I've been stripping off all the paint and POR-15, hoping to achieve a more correct appearance. Regular paint stripper won't touch POR-15 so I started looking for something that would easily remove it. I found that POR makes a product called POR-Strip that will remove cured POR-15. If anyone has applied POR-15 to something and now need to remove it, I highly recommend POR-Strip. It wrinkles the POR-15 almost instantly and makes removal pretty easy. I started with the spindles and caliper brackets. After stripping the POR-15, I sand blasted them. I darkened them by brushing on some black oxide solution. Before I assembled the pieces I coated everything with RPM. The finished product turned out a little too dark but they still look a lot better then the previously did. 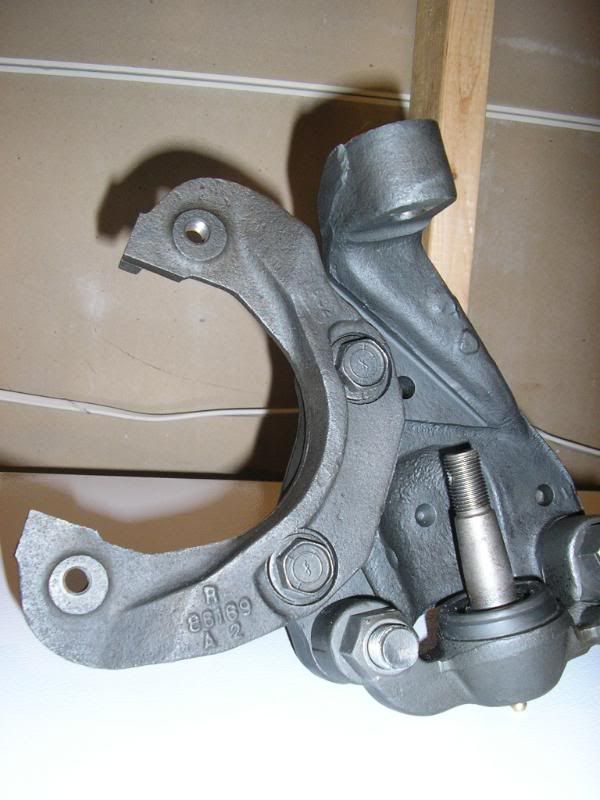
|
|
|
Re: Off the stand!
[Re: burdar]
#165818
02/01/12 03:37 PM
02/01/12 03:37 PM
|
Joined: Oct 2006
Posts: 7,369
Iowa
burdar
OP
Owen's Dad
|
OP
Owen's Dad
Joined: Oct 2006
Posts: 7,369
Iowa
|
Next, I turned my attention to the center link, strut rods, tie rod ends and adjusters. Everything in this next pic was covered in POR-15 except the tie rods. I just clear coated those piece however they had started to rust underneith the clear. After the POR-15 was removed I bought a smaller section of PVC and put the center link and strut rods inside. I filled the PVC with a 1 to 1 ratio of muriatic acid and water. Once they were rust free, I dumped out the acid and poured in baking soda and water. I let the parts sit over night. In the morning I rinsed them off and RPM'd them. I also soaked the tie rod adjusters in acid. Before RPMing those pieces(as well as the clamps)I lightly wire wheeled them. The tie rods I just stripped the clear coat, rubbed them with steel wool until they were clean and RPM'd them. 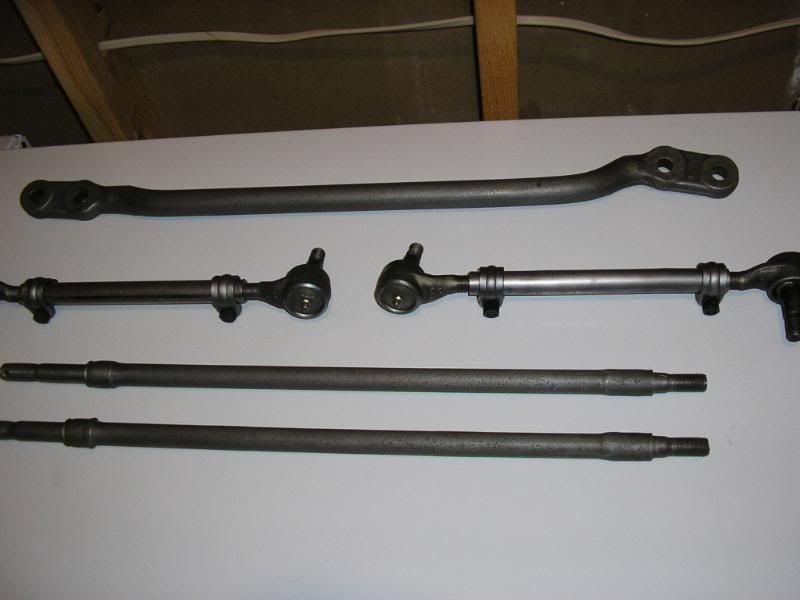
|
|
|
Re: Off the stand!
[Re: burdar]
#165820
02/01/12 04:01 PM
02/01/12 04:01 PM
|
Joined: Oct 2006
Posts: 7,369
Iowa
burdar
OP
Owen's Dad
|
OP
Owen's Dad
Joined: Oct 2006
Posts: 7,369
Iowa
|
The LCA's looked pretty bad. There was a lot of rust scale under the POR-15. I didn't even want to try an strip the paint so I just had them sand blasted. I was surprised how nice they came out. The date codes were still visable on the rivit heads. I rubbed the LCA's down with steel wool, darkened the cast lower ball joint piece, the rivit heads and the torsion bar socket. I masked off a dip line and sprayed 3 coats of Krylon battery protectant followed by a matte clear. I let them dry for a day before I heated them up and RPM'd them. I went right over the paint with the RPM for some more protection. I think they turned out pretty decent. This pic was taken before the RPM was applied. 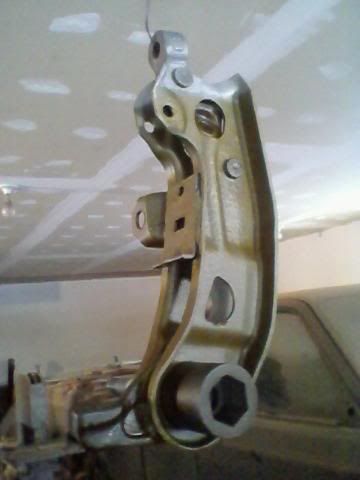 Last night the engine/trans were removed from the K-member. The engine was put back on a stand so I can change a few things. I need to remove the cork valve cover gaskets and install rubber ones...all the brackets have been removed and will be redone with a more correct looking black. The trans is going to get stripped of the AlumBlast paint I used on it earlier and all the fasteners and brackets will be redone without paint. The K-member will be sent out to get powder coated and the steering box will get some new seals and a coat of black paint instead of the incorrect cast blast paint that's on it now. The original carb is going out to Scott Smith this week. I'll be sending the alt out to Dixie soon too.
|
|
|
Re: more progress...
[Re: burdar]
#165823
03/24/12 09:07 PM
03/24/12 09:07 PM
|
Joined: Oct 2006
Posts: 7,369
Iowa
burdar
OP
Owen's Dad
|
OP
Owen's Dad
Joined: Oct 2006
Posts: 7,369
Iowa
|
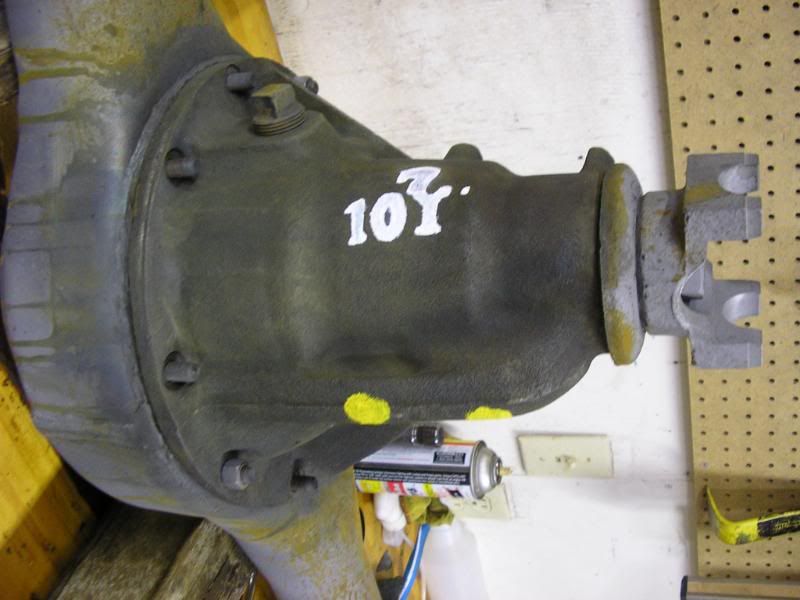
Here's a picture of the rear axle assembly that I posted at the begining of this thread. At the time I thought it looked good but I've wanted to redo if for awhile now. Previously, everything was painted with POR-15 and cast blast paint.  The first thing I did was have a look at the original center section. The car originaly had 2.76 gears but I had a working 3.23 sure-grip so I decided to use it. The 3.23 sure-grip was a factory option for a 318 Challenger in 73 so at least it's correct for the year.  After cleaning off the caked on grease, not much was visable. I did find an orange mark...  ...and a little white mark on the side.  I had some used up EvapoRust and decided to soak the center section to see if anything else would show up. After soaking, two yellow dots showed up on the bottom. Two yellow dots stands for 2.76 gears.  The white mark on the side really became visable... 
|
|
|
Re: more progress...
[Re: burdar]
#165825
03/24/12 10:09 PM
03/24/12 10:09 PM
|
Joined: Oct 2006
Posts: 7,369
Iowa
burdar
OP
Owen's Dad
|
OP
Owen's Dad
Joined: Oct 2006
Posts: 7,369
Iowa
|
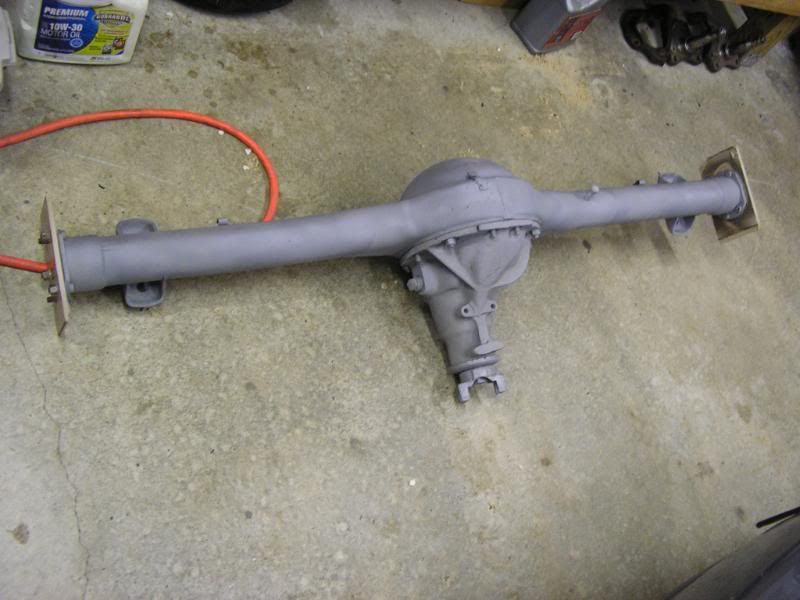
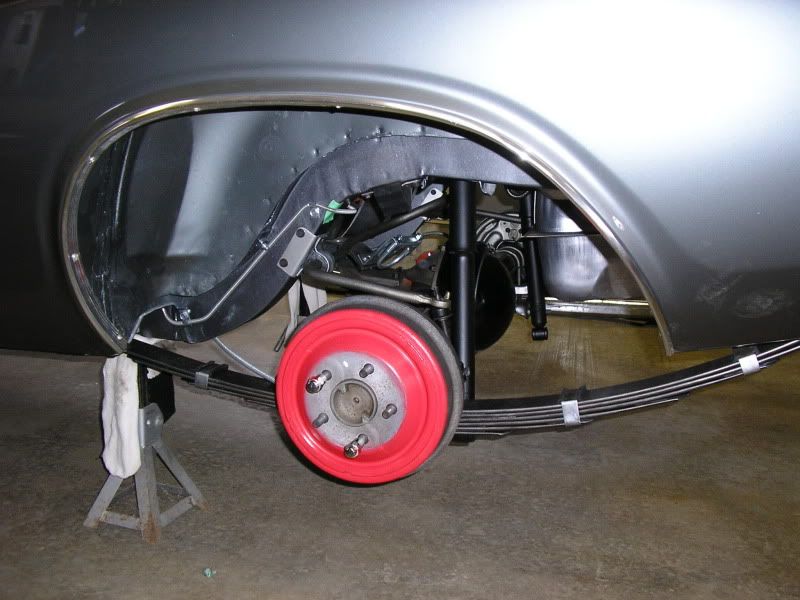
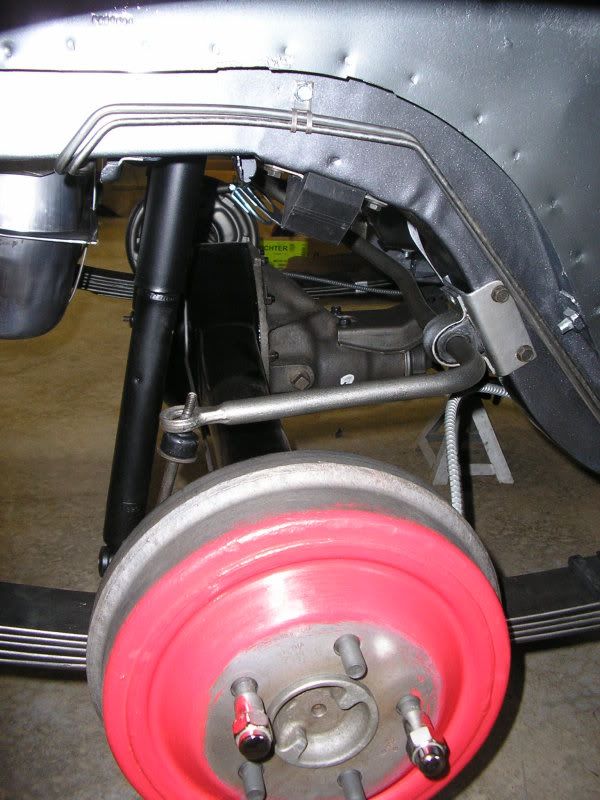
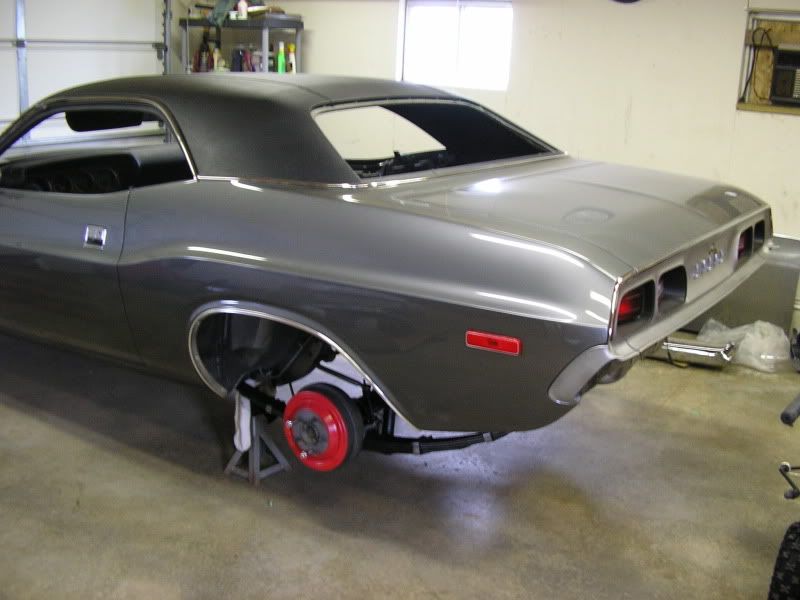
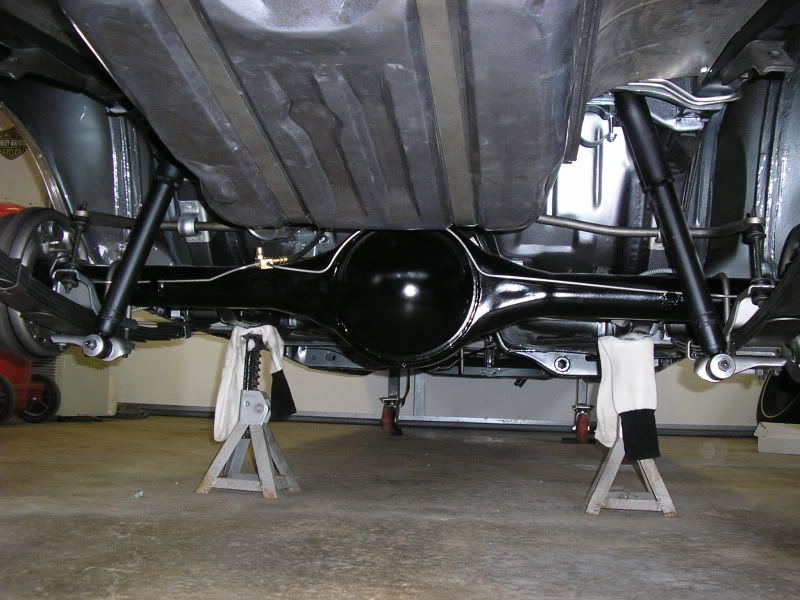
I had the housing powder coated but I wasn't happy with how it looked. I thought the powder would have hidden the pitting in the tubes but it didn't. I ended up taking the housing to the guy that painted the car. He scuffed the housing...sprayed it with a high build primer and sanded most of the pitting out. Finally he sprayed it with a sem-gloss black. It looks a lot better then it did. I looked at new brake drums at a few part stores and didn't like what I saw. One of the drums had "CHINA" cast into the face of it. It would have been visable through the spokes in the Road Wheels. I decided to just use the originals. I blasted them, painted the faces an orangish red and RPMed them. I don't know how close to correct the red color is...I could have boughten RestoRicks paint but I need to save money where I can. If it ends up being way different, I can repaint it down the road. The only other thing I'm considering is painting a yellow or white "J" on the center of the housing. It looks like the "J" stood for 1973. The housing was way too rusty to see any original markings. I don't want to add marks that the car didn't have but the "J" looks to be a pretty safe bet. I havn't decided yet. Here's the finished rear axle assembly... 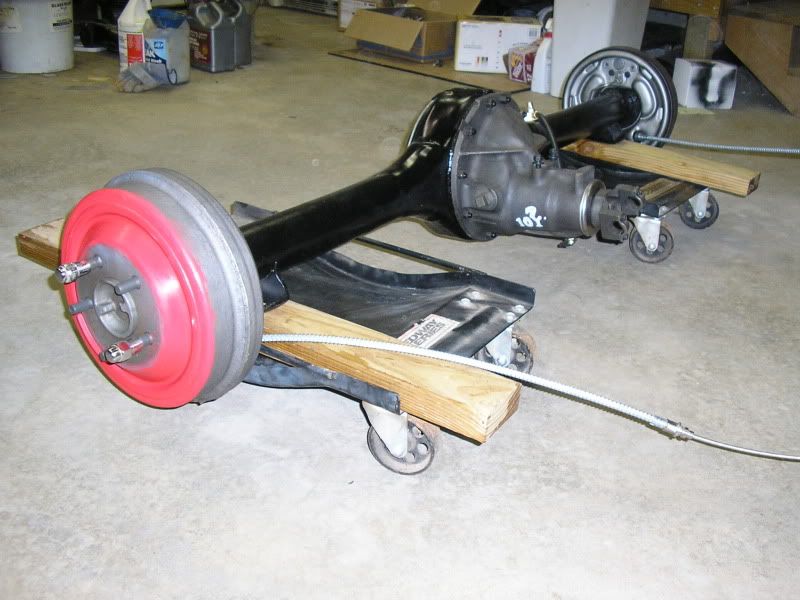 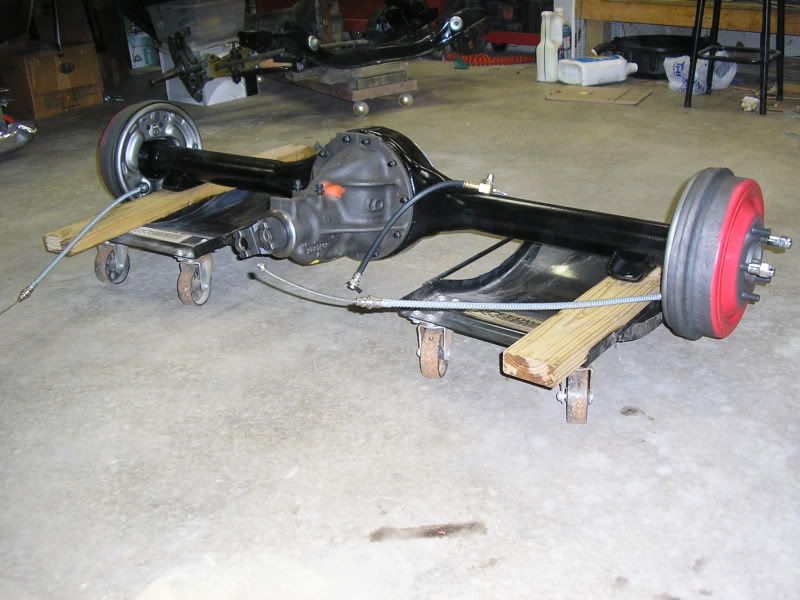
|
|
|
Re: more progress...
[Re: redmay]
#165827
03/25/12 11:41 PM
03/25/12 11:41 PM
|
Joined: Jan 2008
Posts: 1,300
Washington
19cuda73
pro stock
|
pro stock
Joined: Jan 2008
Posts: 1,300
Washington
|
Darren I agree always first class work. Keep the pictures coming. Dennis 
1966 Charger 383 4 speed (Black with Red interior)
1973 Cuda 340 4 speed (Lemontwist)
1972 Corvette
|
|
|
Re: more progress...
[Re: burdar]
#165829
04/21/12 08:23 PM
04/21/12 08:23 PM
|
Joined: Oct 2006
Posts: 7,369
Iowa
burdar
OP
Owen's Dad
|
OP
Owen's Dad
Joined: Oct 2006
Posts: 7,369
Iowa
|
|
|
|
Re: more progress...
[Re: burdar]
#165830
04/21/12 08:26 PM
04/21/12 08:26 PM
|
Joined: Oct 2006
Posts: 7,369
Iowa
burdar
OP
Owen's Dad
|
OP
Owen's Dad
Joined: Oct 2006
Posts: 7,369
Iowa
|
|
|
|
|
|


 Driveshaft turned out great Darren. Wish I had done similar to mine now. Getting closer buddy!