Moparts
origonal owner 73 Challenger build
Posted By: burdar
origonal owner 73 Challenger build - 12/11/08 01:22 AM
My dad is the origonal owner of this 1973 Challenger Rallye. The title is still in his name even though I have, more or less, taken it over from him. Some of my first memories as a child are riding with my dad in this car. He used to steer the car with only one finger in the holes in the steering wheel. I remember thinking that was the coolest thing in the world. It has been a dream of mine to restore this car for as long as I can remember. It's been a part of my family for a long time and I'd just like to thank my dad for never getting rid of it.
This picture was taken outside my grandmothers house when the car was new. When the car is done, I'd like to take another picture of it in the exact same spot...just 40 years later.

Posted By: burdar
Re: origonal owner 73 Challenger build - 12/11/08 01:23 AM
This is the only other old picture I have been able to find so far. It was taken in July of 1975. This is my uncle Al washing the car for my dad. As it turns out, Al washed the car right before my parents got married. My dad said that later that night, Al snuck into the garage and "decorated" the car for the wedding. I'm still trying to find out if a picture of that exists.

Posted By: burdar
Re: origonal owner 73 Challenger build - 12/11/08 01:40 AM
The car was bought new at Thein Motors in Clarence Iowa. The build date of the car is September 27, 1972 and my dad probably took delivery in October.
He said that when the car arrived, there were a couple problems. One of the turn signal light lenses was broken and my dad didn't order the car with the side stripes. He liked the look of them but didn't want to pay extra for them. The dealership changed out the broken lense and took some money off the top for the stripes.
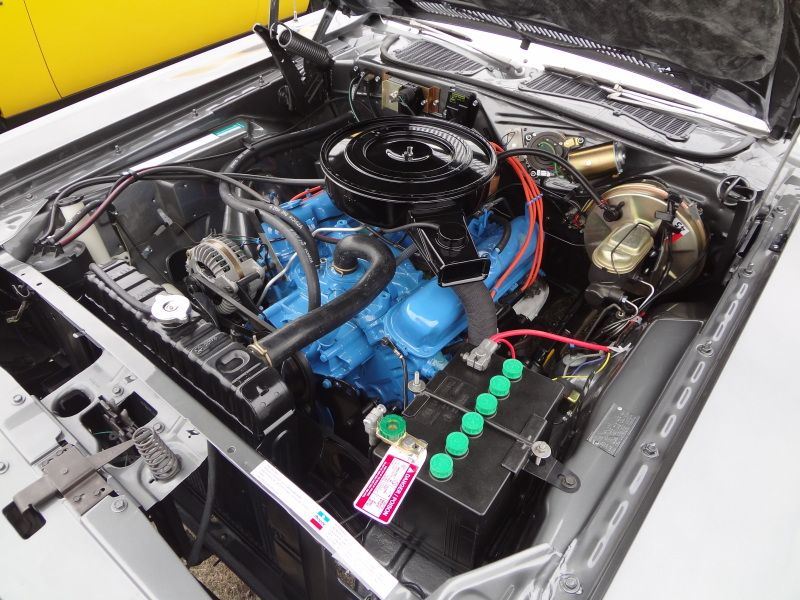
The car has all the heavy duty components of the Rallye pakage including 8 3/4 rear with rear swaybar, rallye hood, and rallye dash. Dad bought the car for daily transportation so fuel milliage was an issue. That's why he went with the 318/904 instead of the 340. Hindsite is 20/20 however. Dad said that he put over 30,000 miles on the car within the first year. The car was parked sometime in the mid 80's and spent the next ten years in one corner of the garage with the hood open. Right now the car shows 96,000 miles.
Posted By: burdar
Re: origonal owner 73 Challenger build - 12/11/08 01:52 AM
In the mid 90's the car was worked on a little just to get it running again. The starter was rebuilt, new brakes were installed, the exhaust was replaced and new tires were mounted. The leaf springs were very tired so a local mechanic added a leaf on each side to get the back end up. He also rebuilt the carb and found a hole in the float. Dad always said that he had to put the shifter in neutral at stop lights or the car would die. I drove the car for a short time and put about 3000 miles on it before it's first trip to the body shop.
I still have the owners manual and found a build sheet under the back seat during disasembly. I also found an "electrical" card as well. I'm not exactly sure what that is for. Maybe someone here knows. It wasn't until years later that I discovered that the build sheet was the wrong one. The sheet I have is for a 340 Cuda. Same color with black stripes and 4-speed.

Posted By: burdar
Re: origonal owner 73 Challenger build - 12/11/08 02:04 AM
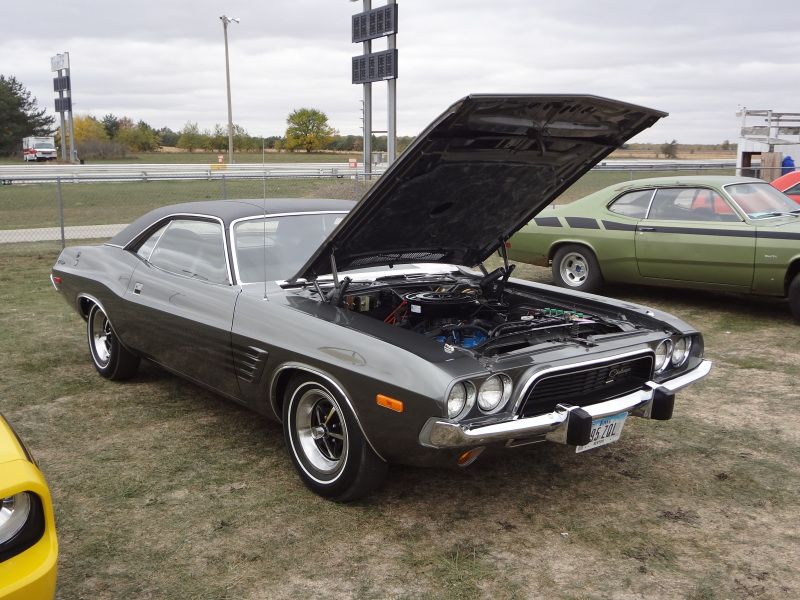
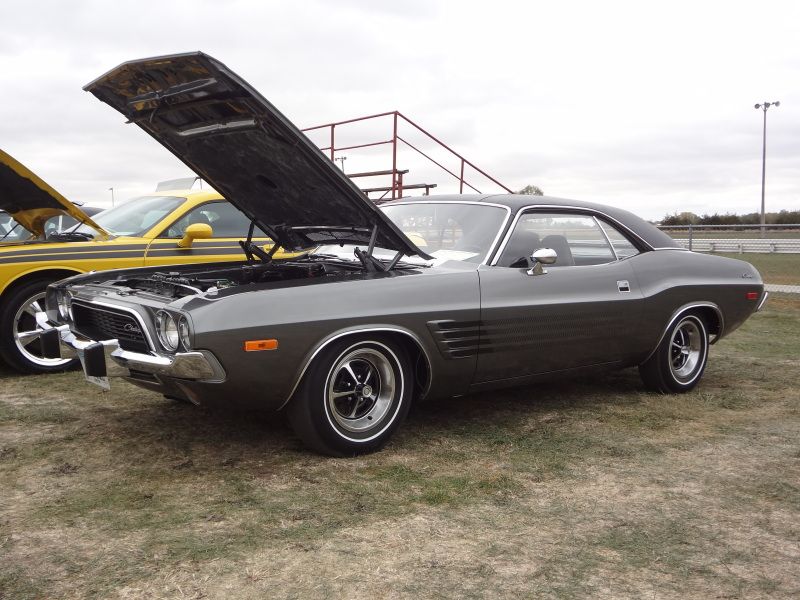
Once it was on the road again, I wanted to take some pictures of it. My dad and I drove the car to the lumber yard that my dad managed and took a few pics.

Posted By: burdar
Re: origonal owner 73 Challenger build - 12/11/08 02:05 AM
One more

Posted By: burdar
Re: origonal owner 73 Challenger build - 12/11/08 02:55 AM
In 1996 I was a senior in High School. I wanted to get some estimates on getting the car worked on. I went to some local body shops expecting them to be exited and willing to work on the car. That just tells you how young and nieve I really was. I was basically laughed at and told that the car was junk at one shop. The others were nicer about it but the answer was still the same. It would take a lot more work than they wanted to get involved in.
That led me to an autobody shop I had driven past for years. I stopped in and talked to the owner. (I won't mention his name) He was interested in the work and came to look at the car. We agreed to have him install quarter panels and trunk extensions. He was also supposed to fix some rust in the trunk and in the frame by the shackels.
He thought he might have the car for three months or so but it turned out to be close to two years. Part way throught the work I found out that he was a hack. He wouldn't let me even see the car. He told me that it was in storage in another town. It took my father calling the county Sherrif to get him to let us see the car. When we finally picked up the car my dad and I didn't even look the car over. We just paid what we owed and hauled the car home.
This is what I saw when I got home.

Posted By: burdar
Re: origonal owner 73 Challenger build - 12/11/08 03:09 AM
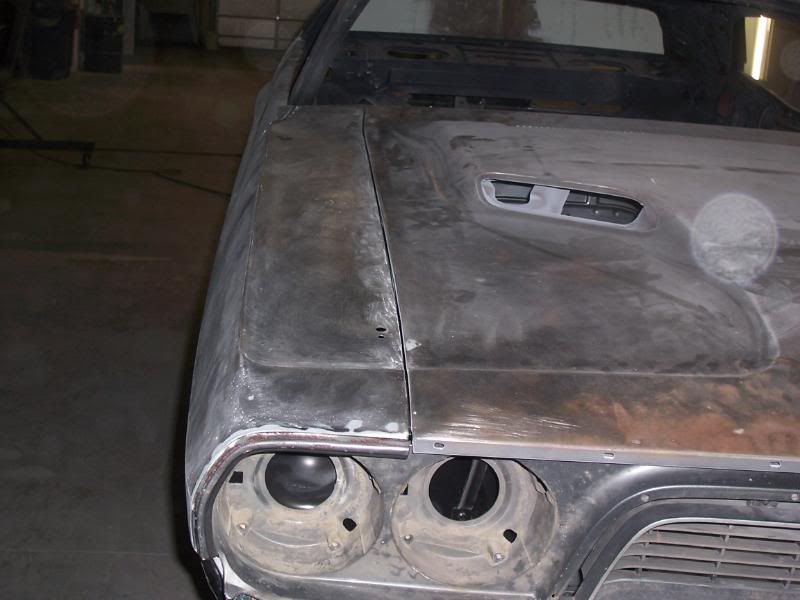
It looked good from a distance but when you got closer you could see what he had done.
The old quarters were cut off a couple inches from the top and the new skins were slapped on the side of the old ones. There were places were the bondo was an inch thick. Rust holes were just bondoed over and he didn't even fix the rusted rocker panels before he put the quarter skins on. Pieces of metal were slapped onto the side of the frame by the rear shackel and tacked on as well as over the rust holes in the trunk.
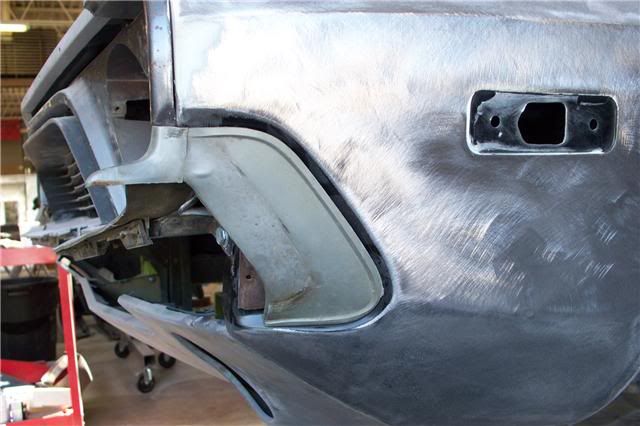
I purchased a used rear valence that had the dual exhaust cut outs on it. It had been in an accident and was bent but I got it for like $75 and thought it could be fixed. When I looked at the car, the valence hadn't been fixed at all. It had been welded onto the quarter skins and the seams had been filled with bondo. It would all have to be re-done.
Here is what the rear valence looked like.

Posted By: burdar
Re: origonal owner 73 Challenger build - 12/11/08 03:15 AM
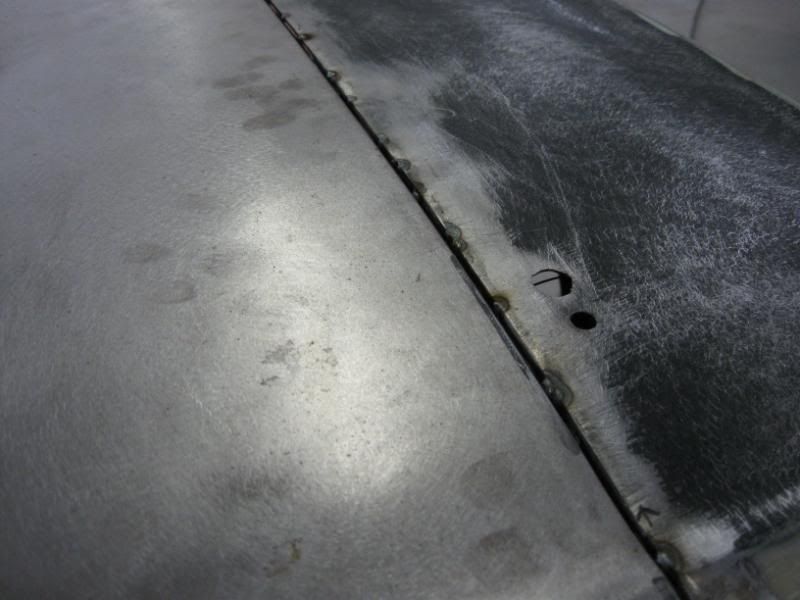
Here is how the quarter skin was installed. There was a good 1/4" of bondo over this seam.

Posted By: burdar
Re: origonal owner 73 Challenger build - 12/11/08 03:17 AM
Here is the piece of metal that was slapped over the hole in the trunk. You can see grinder marks that are all the way through the trunk floor. That was also bondoed over. He didn't even weld the spare tire jack brackets back on the floor.

Posted By: burdar
Re: origonal owner 73 Challenger build - 12/11/08 04:28 AM
Here are some more pics of the bad patch panels and the rust that was bondoed over.
This is the drivers side. These rust holes were just filled with bondo.

Posted By: burdar
Re: origonal owner 73 Challenger build - 12/11/08 04:29 AM
This is the metal that was welded onto the frame by the shackels.

Posted By: burdar
Re: origonal owner 73 Challenger build - 12/11/08 04:30 AM
This is the passengers side. You can see how bad the quarter skin was installed. This was also full of bondo.

Posted By: burdar
Re: origonal owner 73 Challenger build - 12/11/08 04:35 AM
It's too bad he messed up the trunk floor by putting those patches in. The only rust was right above the shackles and could have been fixed by someone that knew what they were doing. Now the whole floor needs to be replaced.
This is how nice the trunk looks except for the bad patch work.

Posted By: jrwoodjoe
Re: origonal owner 73 Challenger build - 12/11/08 05:18 AM
Sorry you had so much trouble with the initial repairs. I'm sure it will be nice when it is done this time around. What a great piece of family history you have. Cars usually don't stay in the same family as long as yours has so I know it's special to you. Can't wait to see the progress you make on it.
Best of luck. Joe
Posted By: VITC_GTX
Re: origonal owner 73 Challenger build - 12/11/08 05:33 AM
Wow, all the re-work you have to do is a shame.
The car does have a great history though

I really like the idea of the "before and after" picture in front of your grandmas house.
Posted By: burdar
Re: origonal owner 73 Challenger build - 12/11/08 06:41 PM
The main reason I wanted to show those pictures was so other people can learn from my mistakes.
I was all exited about getting the car worked on that I didn't do any homework about the shop. If I would have checked around, I would have found out what he was really like and would have kept my car as far away from him as possible.
None of the parts stores in town would sell to him because he owed them a lot of money. Shortly after getting the car back I heard that he was in jail on Federal gun charges.
I could tell some good stories about that guy but I don't want to dwell on that situation too long.
Posted By: burdar
Re: origonal owner 73 Challenger build - 12/11/08 06:58 PM
I got the car back in early 1998. Shortly after that I pulled the engine/trans and started the disassembly process.

Posted By: burdar
Re: origonal owner 73 Challenger build - 12/11/08 07:03 PM
The engine compartment was pretty rough looking. The inner fenders were rusted through underneith the battery and the origonal battery tray was long gone.
I have some good pictures of all the rusted areas after the car was sand blasted that I'll share later. This is what the engine compartment looked like with the engine out.
.jpg "4872443-comp001(2).jpg")
Posted By: Scott Carl
Re: origonal owner 73 Challenger build - 12/11/08 07:09 PM
WOW! Thanks for sharing, Darren! How long ago was this guy arrested. I think he may be loose and doing biz in Omaha

I feel your pain tho. Partly why I'm doing my bodywork myself. The other reason is that I'm broke and cheap LOL. Mines a '74 but similar condition minus the shoddy attempt at repairs. Also 318/904. All original except the aftermarket AC. (Just Another Challenger thread). Are you keeping your power train stock? Well, Good luck on your project. I'll be watching
Posted By: burdar
Re: origonal owner 73 Challenger build - 12/11/08 07:26 PM
Right now my plan is leaving it mostly stock. I have another 318 that is going to go in the car that has a different cam and heads on it but it will still have a 2-barrel for now. The only exterior change is going to be dual exhaust with the factory chrome tips.
Posted By: burdar
Re: origonal owner 73 Challenger build - 12/11/08 11:42 PM
Here is another pic of the engine compartment with the engine out. In this picture you can see that the front fenders are in sorry shape.
.jpg "4872955-front001(2).jpg")
Posted By: burdar
Re: origonal owner 73 Challenger build - 12/11/08 11:52 PM
The fenders came off next. I knew there was extensive rust in the lower areas behind the tires. After I got them off it was clear that they wouldn't be re-used.
I found two rust free fenders for pretty decent money. The replacements didn't have any holes in them for the side louvers or the fender mounted turn signals. I had a guy measure the holes off of the origonal set before they got tossed.
The front valance was also pretty crusty. I found a great used one at the Mopar Nationals back when it was in Indy. I think I only paid $40 for it.
.jpg "4872973-front002(2).jpg")
Posted By: burdar
Re: origonal owner 73 Challenger build - 12/12/08 12:01 AM
I wasn't happy with what I found once the fenders were off. The rockers were junk. I've been going to the Mopar Nationals every year since 95 and have always kept an eye open for a pair of "FULL" rocker panels. In 2006 I finally found a pair. I didn't have any money with me but I was able to borrow what I needed from a friend. Another friend hauled them home for me.

Posted By: HemiChallenger
Re: origonal owner 73 Challenger build - 12/12/08 02:48 AM
You got some good friends man. I dont know too many people that would lend out cash unless is was end of the day sunday

Posted By: burdar
Re: origonal owner 73 Challenger build - 12/12/08 03:09 PM
Yes I do have some good friends. The guy that lent me money was looking for parts for his 68 or 69 Super Bee. I've only seen the car once but it looks like it is going to be quite a prodject as well.
I had my 2002 Stratus R/T in the show field so I didn't have any way to get the rockers home. Another friend had room so it all worked out.
If any of you get Mopar Muscle magazine you have probablly seen me and my Stratus. It was in the 2003 Mopar Nats program.
Accually, a group of my friends was in the magazine a few months before I was. There was a picture of about four guys looking through the swap meet with there shirts off. The caption said something like..."No this isn't an Ambercrombi and Fitch add, this is the Mopar Nationals"...or something like that.
Posted By: burdar
Re: origonal owner 73 Challenger build - 12/13/08 03:06 AM
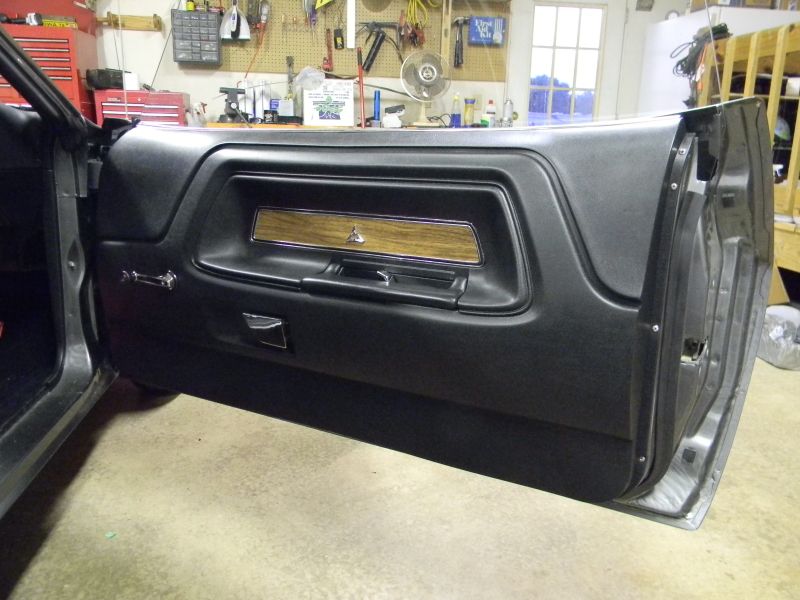
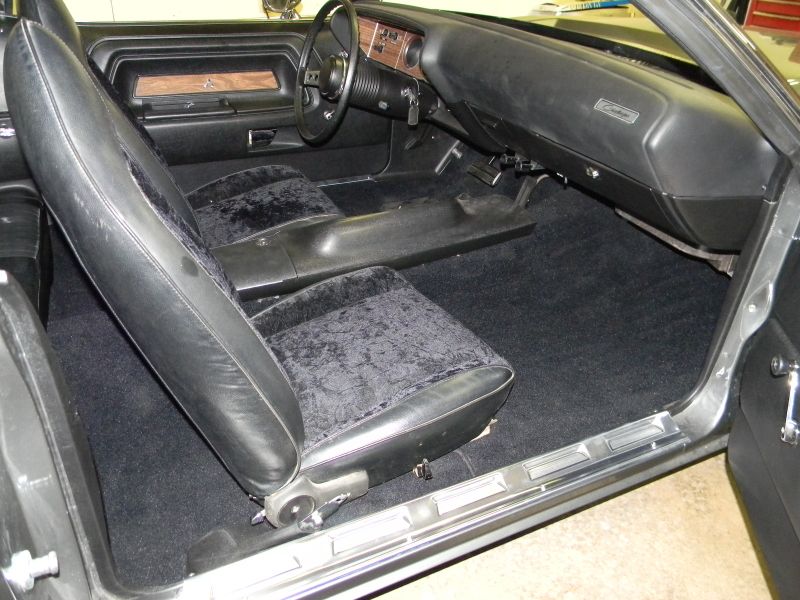
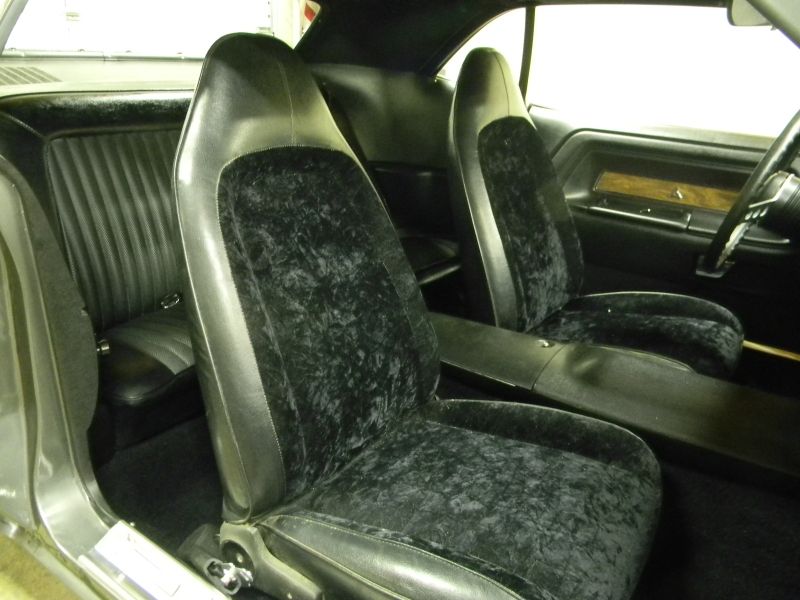
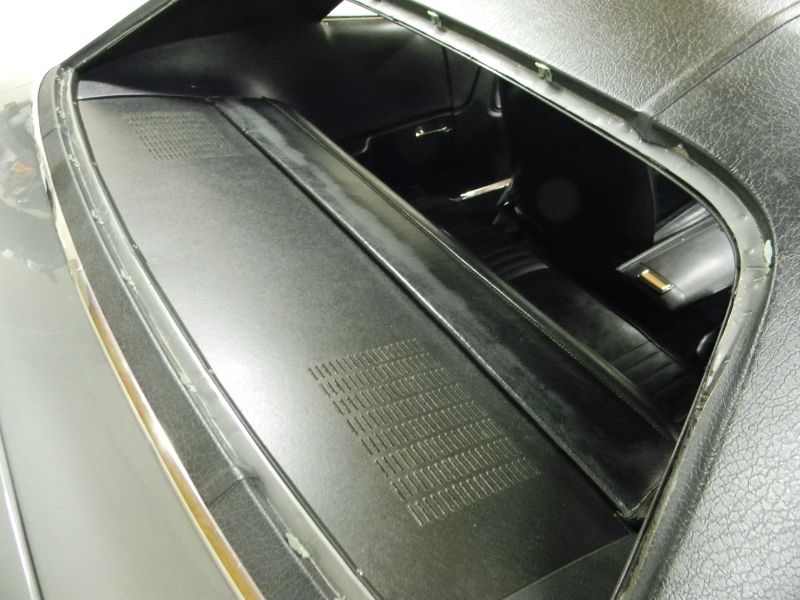
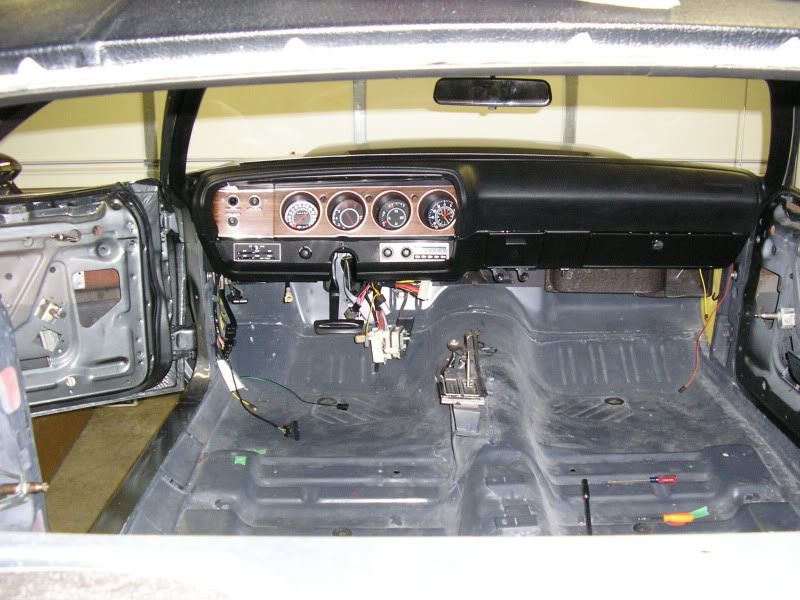
Once the front end was apart, I removed the interior. The rear seat is in great shape. The only problem with it is right on top of the back rest under the glass. The sun took its tole on the vynal. It could probably be re-dyed but I think I'll replace everything so it looks the best. The front seats were re-covered in black crushed velvit a long time ago. Dad says that was the "in" thing back in the day. He also had two small pillows made out of the same material. He kept them in the back seat for when us kids got tired. The pillows will most likely be put in the back seat again when the car is done. That's where I always remember them.
The interior didn't give me any troubles though I did find a present while removing the headliner. As I was cleaning up the mess on the floor I found three small baby mice that had made the headliner their home. I didn't find their mom or dad though.
The dash was in pretty good shape. There was only one small crack in the face of it were the gauges end. However, a few years ago while moving the dash assembly, my dad dropped his end and shattered the top left corner. THat's OK...I was going to replace it anyway.
The gauge cluster needs some work. The clock hasn't worked in years. I understand that they had a lot of problems with them. The clock was draining the battery at one time before it was disconnected. The MAP LIGHT switch also was disconnected because of a battery drain.
Posted By: burdar
Re: origonal owner 73 Challenger build - 12/13/08 03:12 AM
The rest of the car came apart pretty fast. I'm sorry to say that I wasn't very organised in my disassembly. I'm going to be needing everyones help and pictures to get everything put back together just right.
This is how the car sat from 1998 until the begining of 2001 when my family moved. The car would spend another couple years in a storage shed while my dad got a shop built at his new house.
.jpg "4875751-front003(2).jpg")
Posted By: burdar
Re: origonal owner 73 Challenger build - 12/14/08 01:45 AM
As I stated earlier, I've been going to the Mopar Nationals since 1995. It's hard to imagine but that is almost half my life. Anyway...I've tried to buy at least one part each year for the last five or so years. In 05 I bought inner fenders...06 I found rocker panels, 07 I got new rear frame sections as well as the filler panel that the rear bumper bolts to.
Every year after I get home I have the erge to work on the car. That lasts for a few weeks until the shear size of the project realy sets in and I loose interest until the next year.
I do however try to get at least one project done each year. One year it was the K member and steering box...the next year was the engine and trans...then came the rear end and finally last year was the front suspension.
Posted By: burdar
Re: origonal owner 73 Challenger build - 12/14/08 01:56 AM
For some reason I didn't take a "before" picture of the K-member and steering box but here's an "After" pic.

Posted By: burdar
Re: origonal owner 73 Challenger build - 12/16/08 12:33 AM
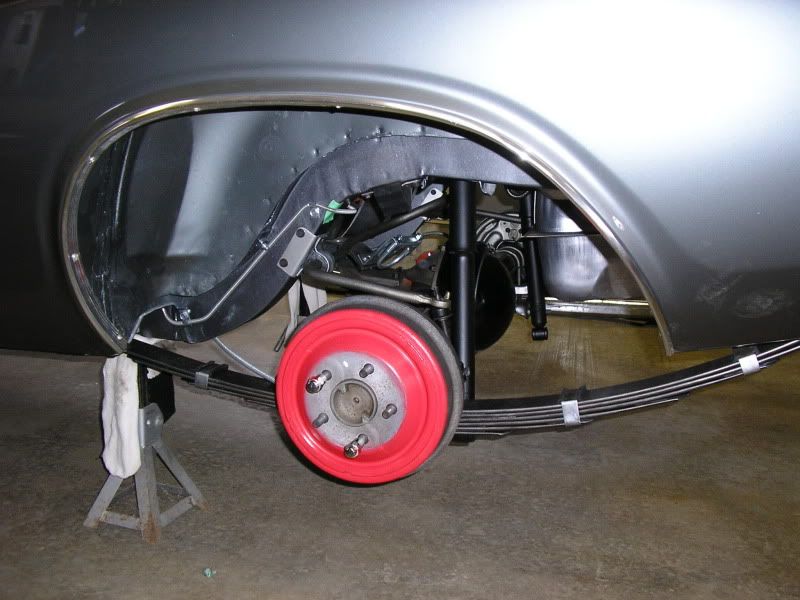
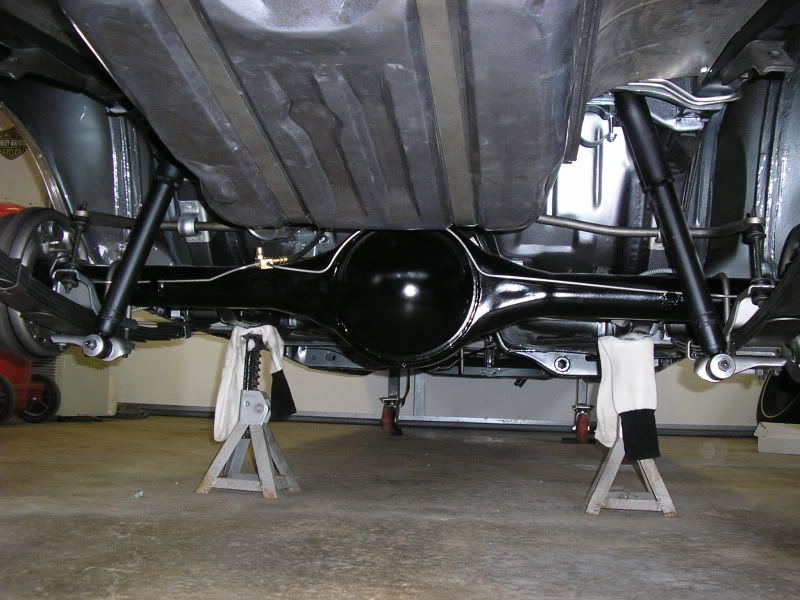
Even though the car came with a 318, it has all the Rallye equipment so it has the 8 3/4 rear end.
The stock gears were a peg leg 2.76. I had a good 3.23 sure grip center section just sitting around so I cleaned it up and installed a new pinion seal. I also re-used the 2.76 gear ratio tag.
Here is a "before" picture. I had the housing sand blasted but didn't get it finished right away so it rusted again.
The springs will be replaced.
.jpg "4881462-front004(2).jpg")
Posted By: burdar
Re: origonal owner 73 Challenger build - 12/16/08 12:34 AM
Here is the after picture. I used POR-15 on everything but the drums. The brake lines are from Year One and the brake hose is from a local parts store.

Posted By: burdar
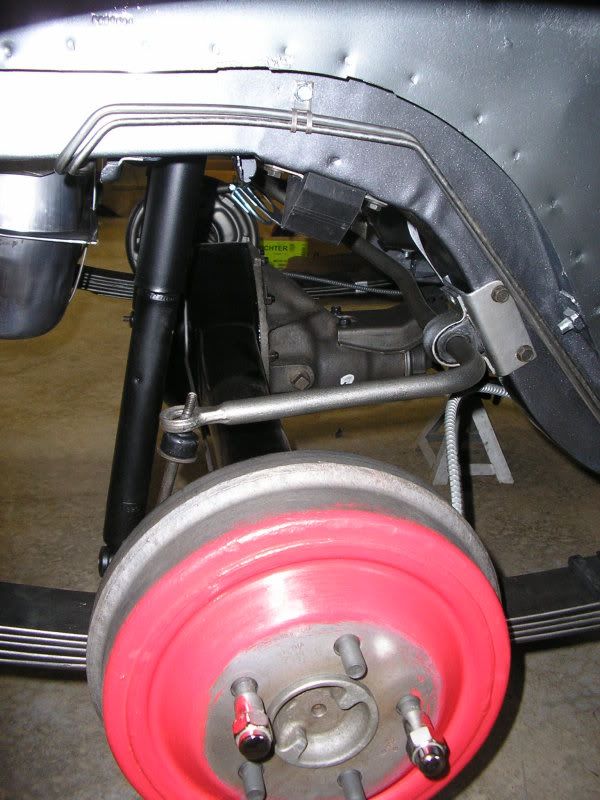
Re: origonal owner 73 Challenger build - 12/16/08 05:47 PM
another

Posted By: burdar
Re: origonal owner 73 Challenger build - 12/18/08 01:26 AM
I bought another Challenger in 95 for $700. I had seen it for years sitting behind a fence on the way to my grandparents house. When my dad and I were coming back from my first year at the Mopar Nationals, we left a note on the car. Later that week I got a call saying it was for sale.
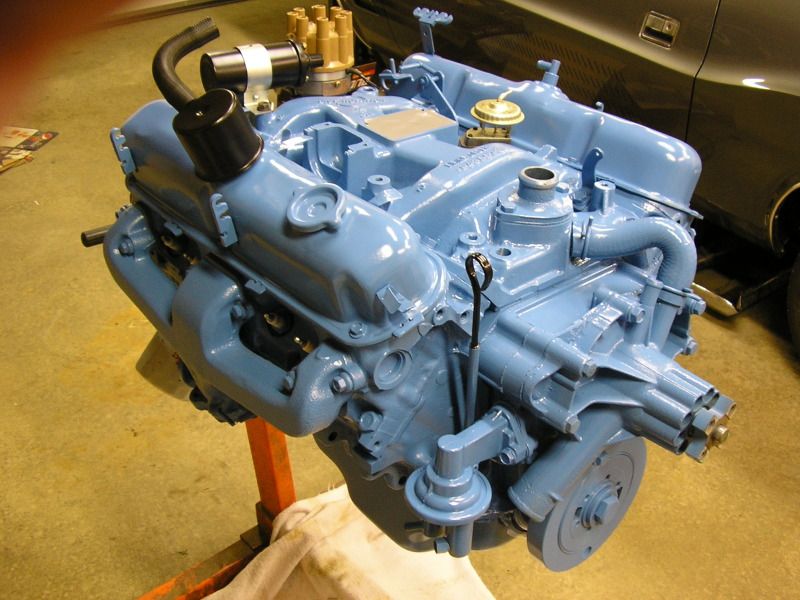
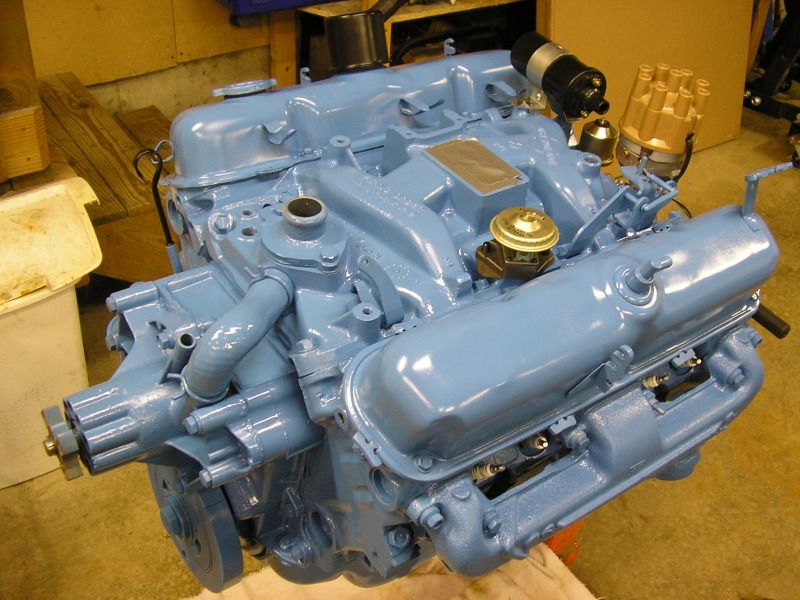
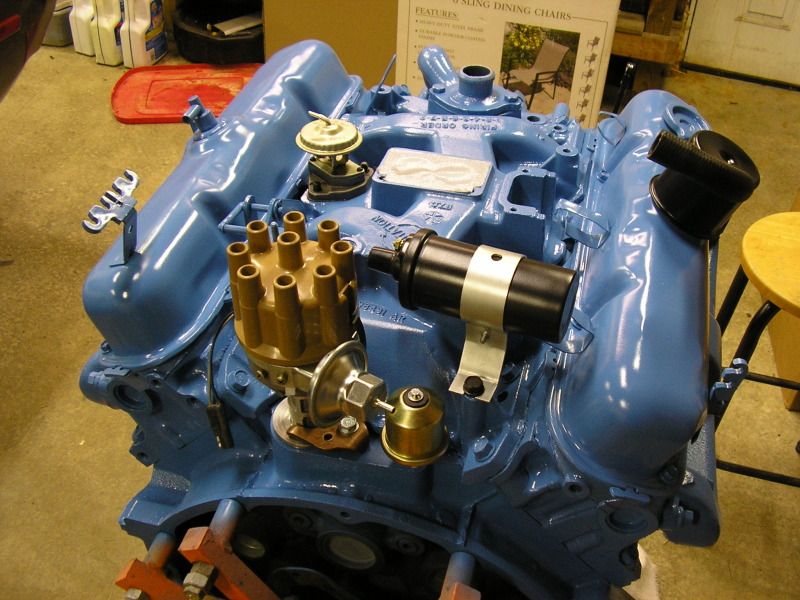
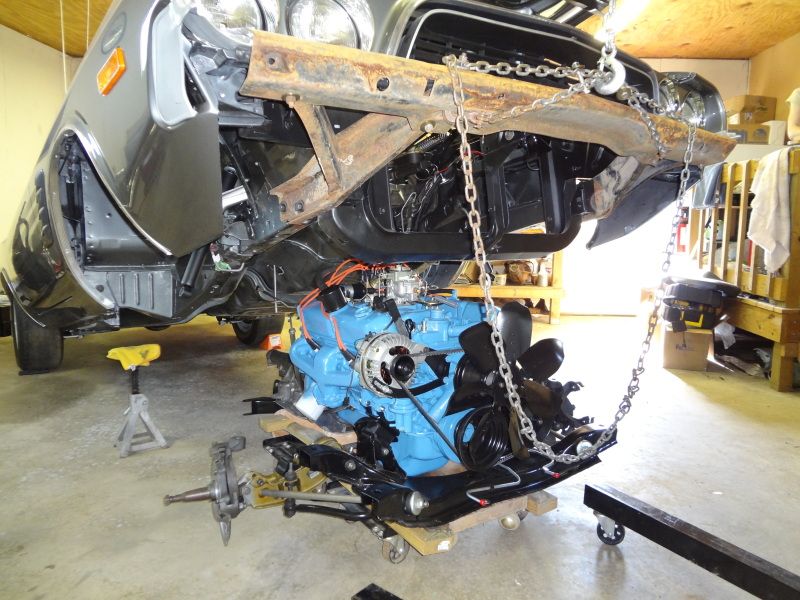
Why I sold it in 98 I'll never know. I kept the engine out of that car because I already had the short block finished. That is the engine that will be put in the car. I can't see spending more money on rebuilding the origonal engine when I have this one ready to go. Some day down the road the origonal one will find its way back between the fenders but not right away.
This engine is also a 73 but it has a much later production date. The balance pads have been ground off the rods and the crank has been turned. The block also got a .030 bore. I used a MP Purpleshaft cam in it. It's the stock 340 cam. No heads came with the engine so I bought a set from Aerohead. They were cheaper than having the stock heads rebuilt. Aerohead is the stock division of Indy Cylinderhead. THe heads came surfaced and had bigger valves in them. Stock 318 valves are 1.75in and 1.50ex. These heads have the 360 sized valves in them.(1.88in and 1.60ex) The only things that are being reused from the origonal engine are the valve covers and the intake manifold. The exhaust manifolds are also being re-used.
.jpg "4885827-engine003(2).jpg")
Posted By: burdar
Re: origonal owner 73 Challenger build - 12/18/08 01:33 AM
Here's a picture of the origonal trans when I pulled it out of the car more than 10 years ago.
.jpg "4885852-engine001(2).jpg")
Posted By: HemiChallenger
Re: origonal owner 73 Challenger build - 12/18/08 01:42 AM
That rear looks good man! Keep up the progress!
Posted By: burdar
Re: origonal owner 73 Challenger build - 12/18/08 02:00 AM
Here is what the trans looks like now. I used Eastwood's "alumablast" paint and then I sprayed clear over it. We'll see how it holds up.
I had it re-built at Georand Brothers Transmision in St Lucas, Iowa. They were featured in Mopar Muscle a few years ago for there bullit proof torque convertors for Cummins diecels.
The owner gave me a one year warrenty on the trans. I told him that it would be years before the car was on the road again but he didn't care. He said that he would warrenty it anyway because he was more concerned with the miles driven than the accual time.
.jpg "4885920-engine002(2).jpg")
Posted By: burdar
Re: origonal owner 73 Challenger build - 12/19/08 04:55 PM
Over the years I have talked to a few different shops about getting the bodywork done. All of these shops came back with around the same price tag. To replace all the rusted panals, fabricate any panels that aren't reproduced and paint the car, would be around $25,000.
At the time, that was more than I made in an entire year. So, the body just sat. Years went by and I have been getting more and more frustrated that the car is just sitting, collecting dust.
In August of 2007 I really wanted to get something started. I contacted a media blasting company in the area and they said that it would cost right around $800 to get an entire car cleaned up.
I also got in contact with a guy that does sand blasting who's shop is only a few miles away. He said that it would cost about $200 to blast the car. Since I knew the car was in rough shape, and that I didn't know if I would even have a car left after blasting, I went with sand. He blasted the engine comp, the door jams, the underside and lightly hit the interior. He didn't spray anything that could get warped like the outside of the doors or the roof. I was pretty happy with what I saw when I got it back. There really weren't any surprises.
Posted By: burdar
Re: origonal owner 73 Challenger build - 12/19/08 05:07 PM
The engine compartment cleaned up pretty good. If you compare the before pictures above, it looks a lot better. You can see in this picture that the inner fenders need to be replaced and there is a little rust around the brake booster. The shock towers looked pretty rough before hand but they came out very well.

Posted By: burdar
Re: origonal owner 73 Challenger build - 12/19/08 05:14 PM
These next few picture will just show the rusted areas of the car. Long Iowa winters have taken there tole. My dad did have the car undercoated after he bought it. I think that really saved the car. Except for a few pin holes in the drivers side floor and a few others in different area, the floors are great.

Posted By: burdar
Re: origonal owner 73 Challenger build - 12/19/08 05:14 PM
#2

Posted By: burdar
Re: origonal owner 73 Challenger build - 12/19/08 05:15 PM
#3

Posted By: burdar
Re: origonal owner 73 Challenger build - 12/19/08 05:16 PM
#4

Posted By: burdar
Re: origonal owner 73 Challenger build - 12/19/08 05:17 PM
#5
You can see an old repair on the front of the door. Dad had the car repainted atleast once in the late 70's or early 80's.

Posted By: burdar
Re: origonal owner 73 Challenger build - 12/19/08 05:20 PM
#6

Posted By: burdar
Re: origonal owner 73 Challenger build - 12/19/08 05:24 PM
#7
This is the torsion bar mount.

Posted By: burdar
Re: origonal owner 73 Challenger build - 12/19/08 05:26 PM
#8
Here you can see that the filler panel that the rear bumper bolts to is rusted out at the corners.

Posted By: burdar
Re: origonal owner 73 Challenger build - 12/19/08 08:19 PM
#9

Posted By: burdar
Re: origonal owner 73 Challenger build - 12/19/08 08:20 PM
#10

Posted By: burdar
Re: origonal owner 73 Challenger build - 12/21/08 06:07 PM
As you can tell by the pictures, we sand blasted just enough to reveal the problem areas. THere was no point in hitting the top or the doors at that time.
The guy that blasted the car(Tom's Auto Restoration in Vinton, Iowa) said that if you didn't touch it a lot, it should be OK for a year without having to spray a sealer on it. Any longer and the car would start to rust again. That was October of 2007 so I had a little time to try and find someone to do the bodywork. Tom wasn't really interested in working on the car at that time. He was short staffed and had enough work in his shop for a while. He was nice about it and wished me luck with the project.
So now it was time to really look hard and try to find someone to work on the car. I had gone to school from 96 to 98 for Automotive technology and was an auto mechanic until 2001 so I am able to do all the mechanical aspects of a restoration but don't have a clue when it comes to bodywork. I really wasn't interested in learning bodywork on the Challenger either. I have read many articles on cars were the owner has learned to weld and do bodywork on a car that turned out great, but that's not for me.
Posted By: burdar
Re: origonal owner 73 Challenger build - 12/21/08 06:22 PM
In early 2008 I started a post on Moparts entitled "Who Can Restore My Car." I thought that people on this site might know some good shops in my area. The few shops that I had found up to that point didn't really impress me that much. One guy seemed to do good work but when I told him the car was a metalic gray color, he said "Oh, man I hate shooting metallics. I can never get them right." I didn't think that was the best thing to tell a prospective client.
Through this website I found a shop called Classic Revival. They were located in Dyarsville, Iowa witch was only about an hour away from me. I called the owner (Tim) and told him that I had a Challenger that needed a lot of work. Tim said that he was accually working on a Challenger at that time and to come by the shop and check it out.
Posted By: burdar
Re: origonal owner 73 Challenger build - 12/21/08 07:12 PM
One Saturday morning in February, my dad and I drove to Dyarsville to see the shop and talk to Tim.
When we got there we saw that Tim was in deed working on a Challenger. It was a black 70 R/T with factory red stripes. The interior, engine compartment, undercarriage and trunk were painted but the main body was still being sanded before the color coat. Tim showed us pictures of the car all the way through the restoration process. As it turns out, the cars owner is from my home town. I knew he had a Challenger, but I never thought he would get around to working on it.
Tim seemed like a nice guy and I could tell right away that he had a passion for restoring cars. It looked like he did great work. The best thing was that he had an old 50's Buick or Olds in the shop that he had painted the exact same color as dad's Challenger. It looked awsome.
Before we left the shop that day, I gave Tim a CD of pictures that I had taken of the Challenger. I tried to get a picture of all the problem areas. Tim said that he would get some information together as far as past E-bodies that he had done. He said that was the best way to get a fairly close estimate on the cost of restoring this car. He went on to say that the rust repair would differ from previous projects but the paint process should be very similar time wise.
Posted By: burdar
Re: origonal owner 73 Challenger build - 12/21/08 07:33 PM
A few weeks later I got a call from Tim and he gave me his estimate. Although I don't really want to go into the exact amount he quoted me, I though it was reasonable. It was more than I had been quoted before, but a few years had passed since then and he seemed to be the best qualified person that I had talked to. I want to have it done right the first time....accually the second time if you consider the previous work back in the 90's.
Tim said he was very interested in working on the car and that he would give me a call when the Challenger he was working on was done.
A few months passed and I hadn't heard anything from Tim. I sent him an e-mail asking how the other Challenger was going. He said that some changes were going on with the shop and that the 70 Challenger was still a ways from being done. As you may know, it's hard for a small restoration company to charge enough money to make a profit when it comes to all the work nessesary to built one of these cars. Tim was feeling the stresses of this fact and decided to take a great opportunity that was presented to him.
He had done a lot of work for a company in Ohio called "Best of Show Automotive." The owner of that company had just offered Tim a job running the restoration shop there. So, Tim sold his company and took over the shop at "Best of Show Automotive."
Tim was still interested in working on my car but I wasn't sure I wanted it half way across the country. I mean, part of the fun of doing a restoration is being able to see the car during the whole process. I wasn't sure what I was going to do so I decided to wait and talk to Tim at the Mopar Nationals.
Posted By: burdar
Re: origonal owner 73 Challenger build - 12/21/08 07:38 PM
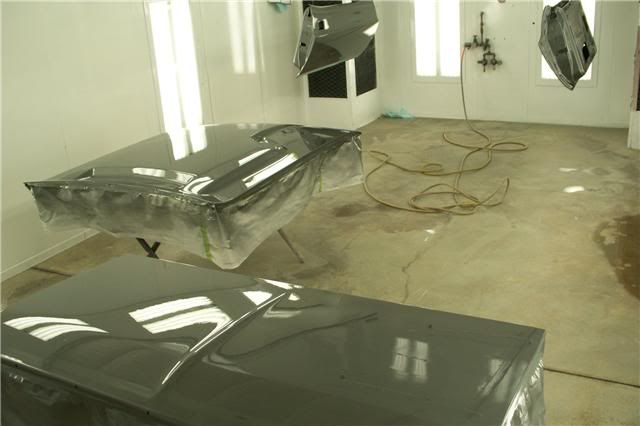
"Best of Show Automotive" has a tent at the Mopar Nats every year. It is a yellow and white striped tent right by the tower. Tim had taken the 70 R/T to Ohio to finish and had it almost done. He took it to the Nats anyway and I got my first look at it since it had been in primer. These pics arn't that good because they were taken inside the tent, but you can see how good the black looks on this car. I thought that if he can spray black this good, that he would be able to do a great job on dads car.
.jpg "4893070-nats2008012(2).jpg")
Posted By: burdar
Re: origonal owner 73 Challenger build - 12/21/08 07:41 PM
Here's another.
.jpg "4893077-nats2008014(2).jpg")
Posted By: burdar
Re: origonal owner 73 Challenger build - 12/21/08 08:08 PM
I had a long conversation with Tim on Friday morning at the Nationals. He said that he was sorry about the whole situation but I understood that he has to look out for his own family first. I came to the conclusion that even though I wouldn't be able to drop by and look at the car whenever I wanted, Tim was the best person to do the job.
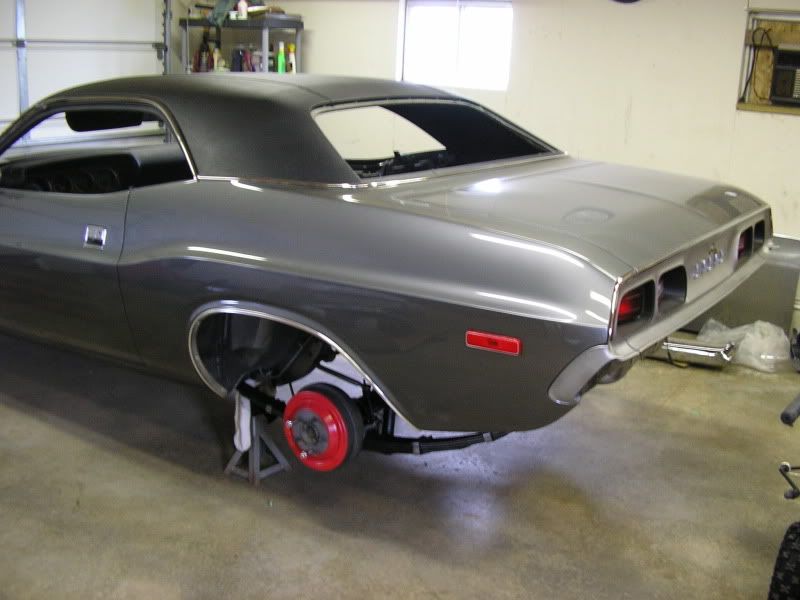
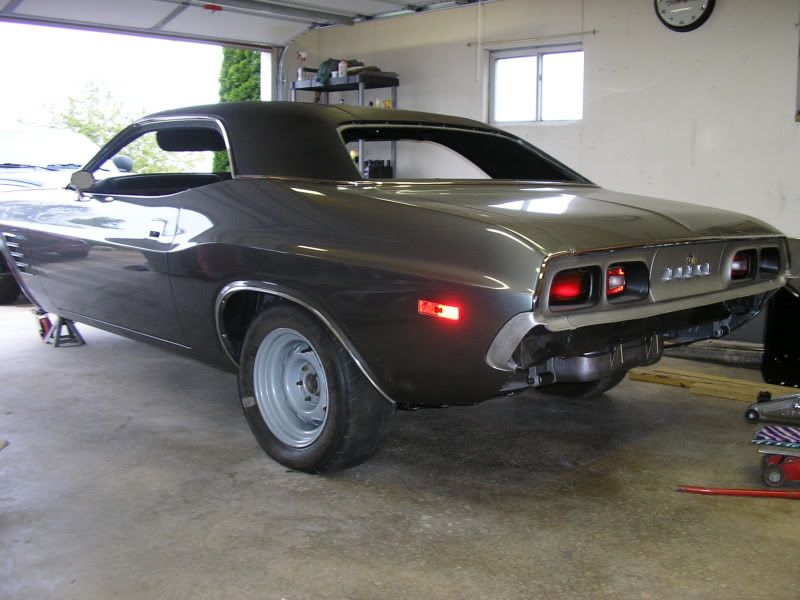
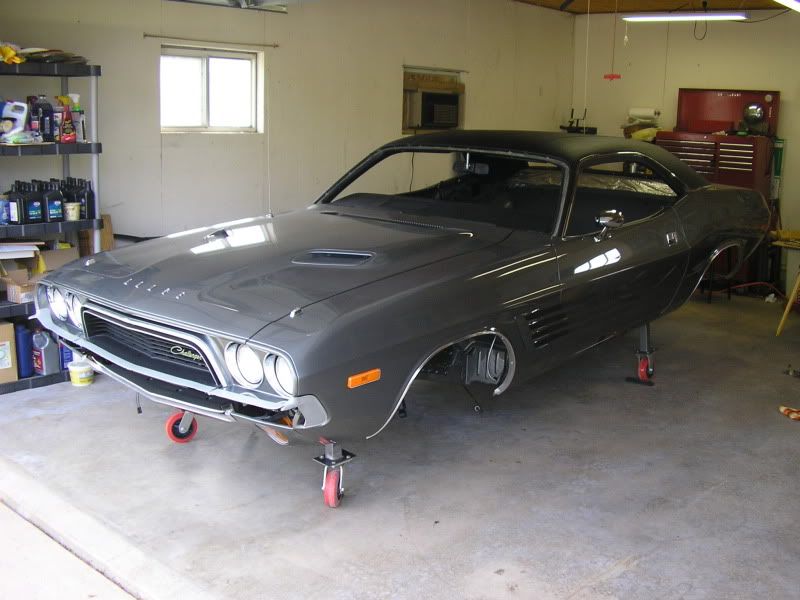
I spent the next few months gathering everything together and waiting until Best of Show had a transport in the area. One Saturday my best friend and I worked on removing as much seam sealer as we could to try and save a little money. We reinstalled the hood, trunk lid and front fenders so they wouldn't be damaged on the way out to Ohio. This is how the car looked right before it left.

Posted By: burdar
Re: origonal owner 73 Challenger build - 12/21/08 08:28 PM
Best of Show delivered a car to Wisconsin on October 13th and the transport picked up dads Challenger on the 14th. They are going to start hitting it hard in January. I should be recieving a picture CD every month with updates and will share them with everyone as soon as can. When the car comes back,it will be in paint with the fenders, hood, trunk lid and grill installed. That's when the fun will start.
I know some people look down on others who pay to have someone else work on there cars but I believe in knowing what you ARE and ARE NOT capable of doing yourself. Bodywork is NOT something I'm interested in learning on this car. Believe me..I'm not made of money and there is a budget on this car. I hope everyone can understand that. I got married in 06 and my wife and I are expecting our first child in late February so money is going to be tight.
Check out pictures of the 73 at
http://www.bestofshowautomotive.com

Posted By: burdar
Re: origonal owner 73 Challenger build - 12/28/08 03:32 AM
These next few pictures really don't have much to do with the cars restoration but I thought they were cool.
I have seen other posts on "Dip Lines" and thought I'd post some of my own.

Posted By: burdar
Re: origonal owner 73 Challenger build - 12/28/08 03:34 AM
This picture also shows a grease pensil marking on the passengers door. It was too faint to make out though.

Posted By: burdar
Re: origonal owner 73 Challenger build - 12/28/08 03:37 AM
This picture shows "869" written on the floor of the car.

Posted By: 69Cuda340S
Re: origonal owner 73 Challenger build - 12/29/08 03:19 PM
I bet that car comes back looking better then new.
Posted By: dangina
Re: origonal owner 73 Challenger build - 12/31/08 02:45 AM
sweet! can't wait to see the updated pics!!! i'm sure its in good hands...
Posted By: burdar
Re: origonal owner 73 Challenger build - 12/31/08 03:51 AM
Quote:
I bet that car comes back looking better then new.
Quote:
i'm sure its in good hands...
I hope it comes back looking as good as I am picturing in my head. I know it's in good hands but I'm still a little worried about it being so far away. I think I'll take a trip out to Ohio in the spring to check it out. Part of the fun is seeing it during the whole process.
Posted By: Dave Watt
Re: origonal owner 73 Challenger build - 12/31/08 02:50 PM
Darren, it looks like you are doing a great job on the parts you're restored so far. The restoration process can make for more stories than the car had it's whole life. Great history your dad has had with the car. He'll be proud when he turns the key the next time.
Posted By: burdar
Re: origonal owner 73 Challenger build - 12/31/08 07:23 PM
Thanks Dave...I can't wait until dad turns the key either. I'll be in the passengers seat re-living my early years.
Posted By: etek
Re: origonal owner 73 Challenger build - 01/05/09 05:17 AM
Just read the entire thread - GREAT story!! It's too bad it costs so much to restore cars....so many have great stories like this with memories and more, especially for sons and Dads.
The other thing I thought was: DAMN - I gotta start doing cars for other people instead of for myself. Instead of spending 6 grand for parts to restore a car, I could make 25 grand a year restoring someone elses in my spare time!!!!
Best of luck and looking forward to seeing the work done!
Posted By: bennydodge
Re: origonal owner 73 Challenger build - 01/30/09 02:31 AM
burdar, is the color A5 silver metallic? I ask because my '73 Rallye 340 was originally A5(now blue). I can't wait to see the finished product. Good luck the rest of the way.
Benny
Posted By: burdar
Re: origonal owner 73 Challenger build - 01/30/09 06:01 PM
Quote:
burdar, is the color A5 silver metallic? I ask because my '73 Rallye 340 was originally A5(now blue). I can't wait to see the finished product. Good luck the rest of the way.
Yes the car is A5 silver. I love that color but of coarse I'm biased. I have really only seen a handful of cars that color. I don't know how popular of a color it really was.
My dad bought a new Dakota in 03. He bought one that was painted metalic gray just like his old car. The trucks color is a little darker than the Challenger but they are close.
I just got an e-mail from Tim at "Best of Show." He said they are now working hard on the car!!!  He is just waiting for me to send him the jack brackets for the trunk and a few fender bolts. Hopefully I'll have more pictures to share soon.
Posted By: burdar
Re: origonal owner 73 Challenger build - 01/31/09 01:17 AM
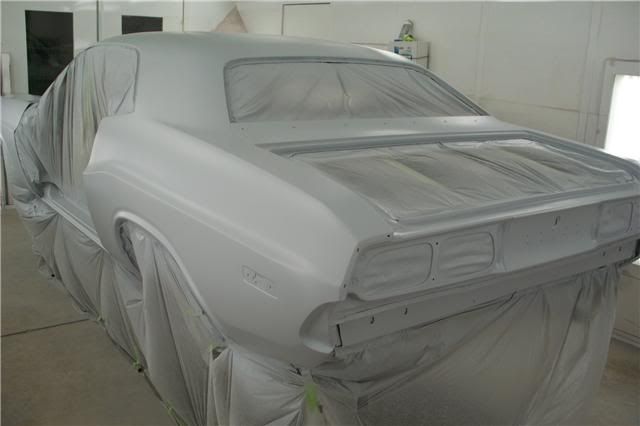
Well, Tim sent me a few pictures this afternoon. They have gotten more work done than I thought.

Posted By: burdar
Re: origonal owner 73 Challenger build - 01/31/09 01:18 AM
another one

Posted By: burdar
Re: origonal owner 73 Challenger build - 01/31/09 01:20 AM
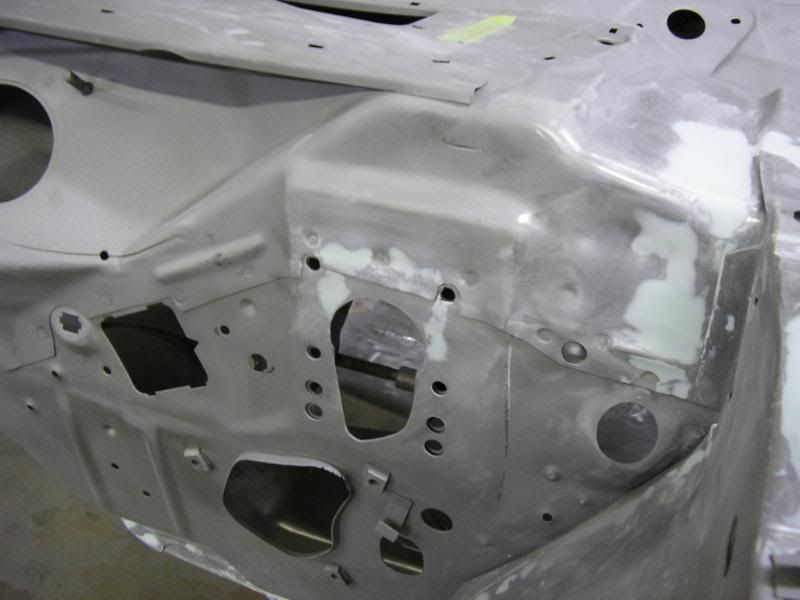
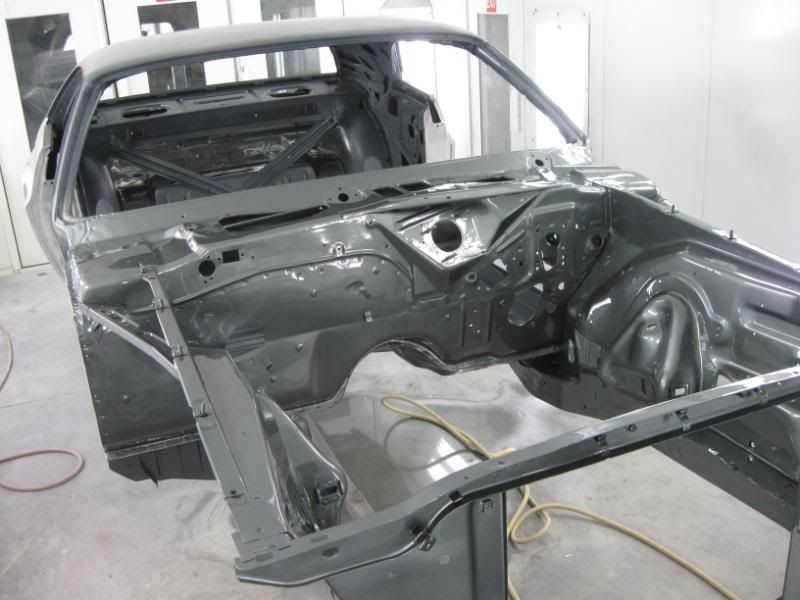
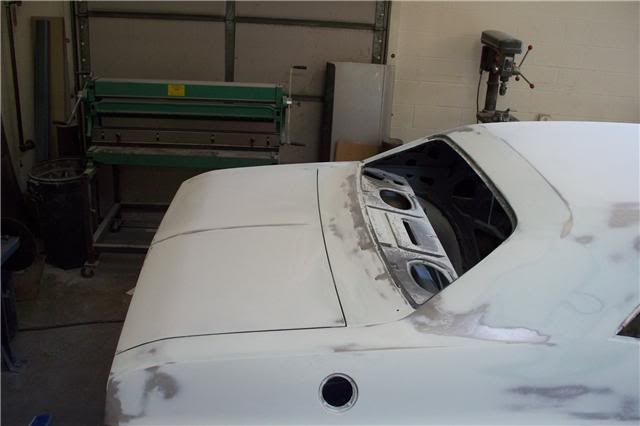
If you look at the places where there is primer, you can see what other work they must have gotten done.
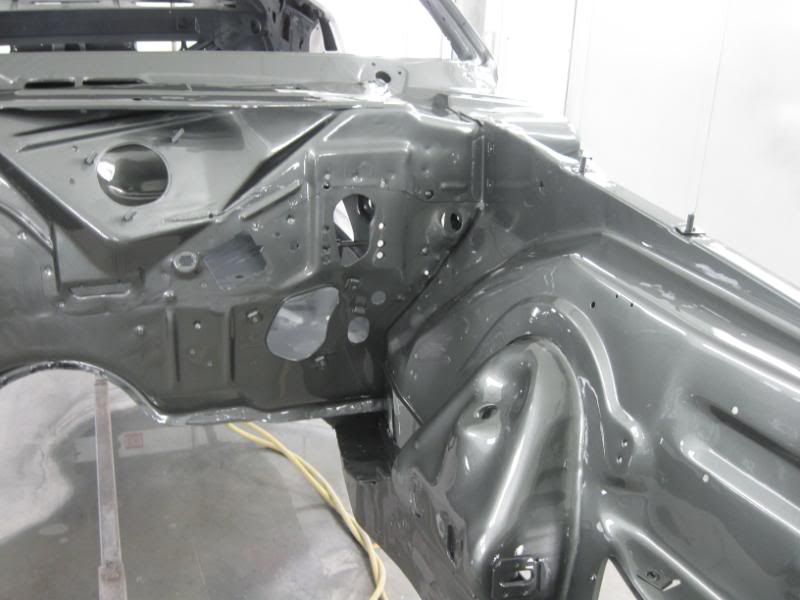
There was some rust on the firewall on the passengers side where the inner fender brace meets it. There was also a little rust around the brake booster opening. The sides of the radiator support look to be fixed as well.

Posted By: burdar
Re: origonal owner 73 Challenger build - 01/31/09 02:45 AM
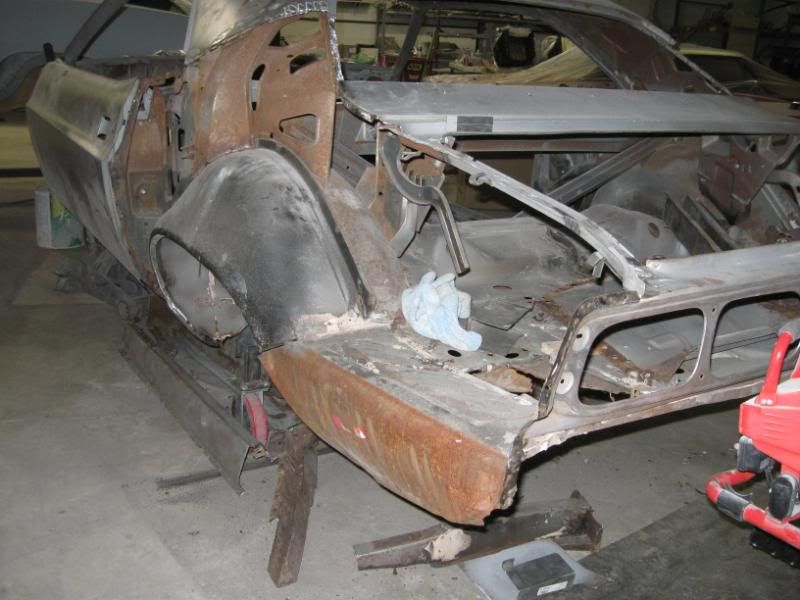
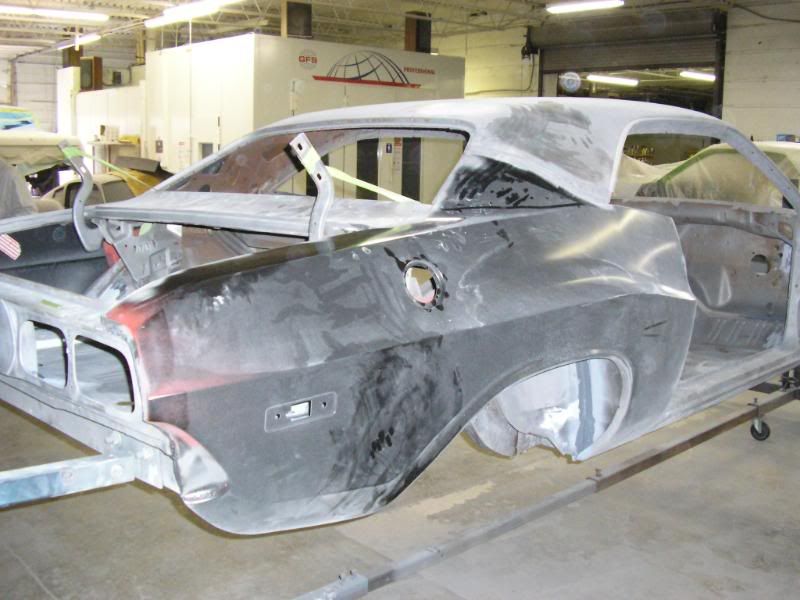
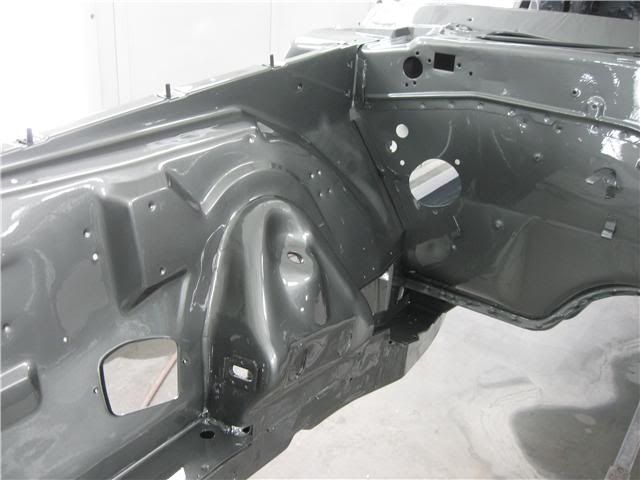
This is the last pic I have right now. They are waiting for me to send the jack brakets so they can hang the quarters.
Looking at the picture You can see that the rear framerail sections are cut out as well as the rear filler panel and are laying under the car. You can also see the rusty rocker panel underneith the quarter. New quarters were installed over the top of this rust during a previous restoration attempt by another shop.

Posted By: burdar
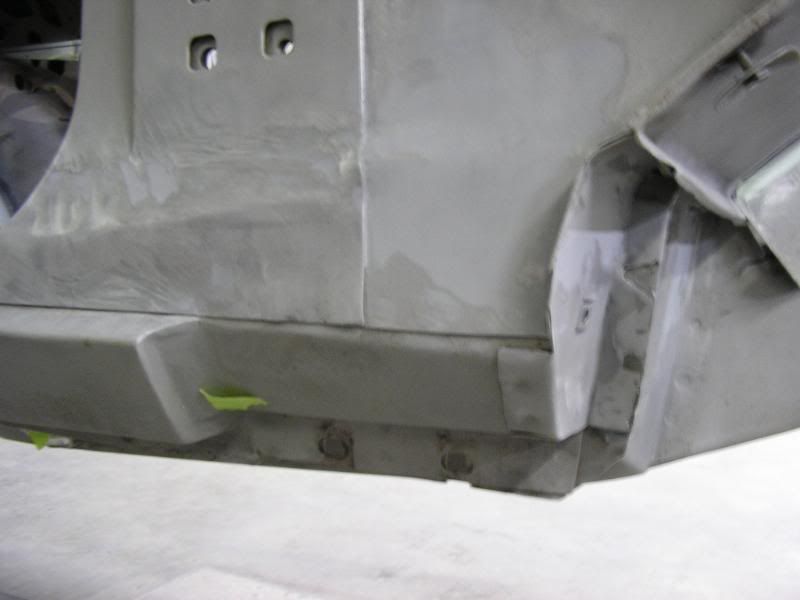
Re: origonal owner 73 Challenger build - 01/31/09 02:49 AM
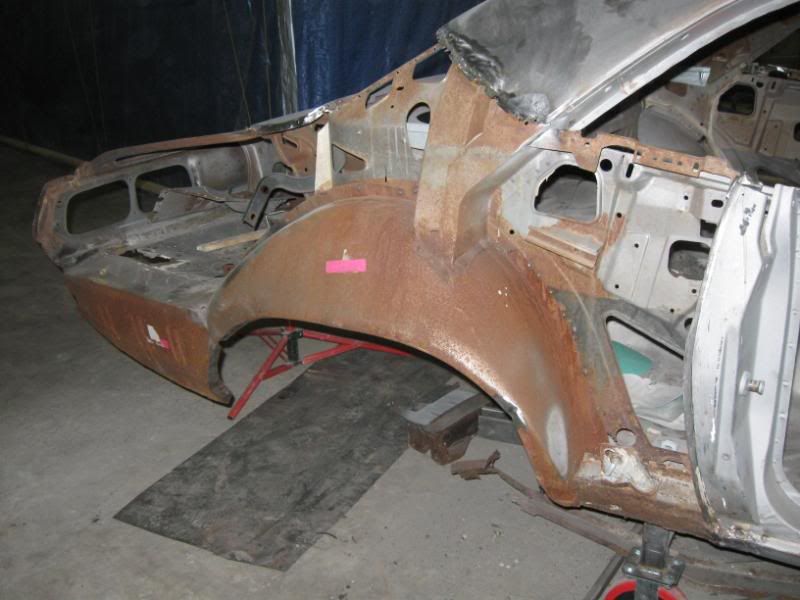
Here is a close-up of the rust in the rocker area. This will obviously be taken care of (this time) before the new "FULL" quarters go on.

Posted By: 3eighty3
Re: origonal owner 73 Challenger build - 01/31/09 01:36 PM
Great progress! Looks like a really complete approach!
thomas
___________________________________________
cuda blog
Posted By: 69Cuda340S
Re: origonal owner 73 Challenger build - 01/31/09 06:19 PM
Looks like that car is in good hands this time around. That is some nice looking work they are doing.
Posted By: burdar
Re: origonal owner 73 Challenger build - 01/31/09 06:41 PM
I went and picked up the fender bolts/studs and trunk bolts I needed this morning. I'll get them cleaned up in the blast cabinet tomorrow so I can send them off on Monday.
The guy I get my parts from here in Iowa has a lot of really nice stuff at his place. I pulled up and he has a 68 Charger R/T and a 70 Barracuda sitting outside the shop. Inside is a red 70 Hemi Cuda with red shacker. In front of that is a 71 Barracuda convertible.(Plum Crazy) It was a /6 car but now has a Hemi in it. In the back is a 70 RR (B5) and another 70 Hemi Cuda (plum Crazy) He once owned Ramo Stott's #7 NASCAR 70 Superbird too. I just thought it was funny seeing all those cars...and there I was getting fender bolts for a 73 318 Challenger. Kind of both ends of the spectrum.
Posted By: burdar
Re: origonal owner 73 Challenger build - 01/31/09 10:31 PM
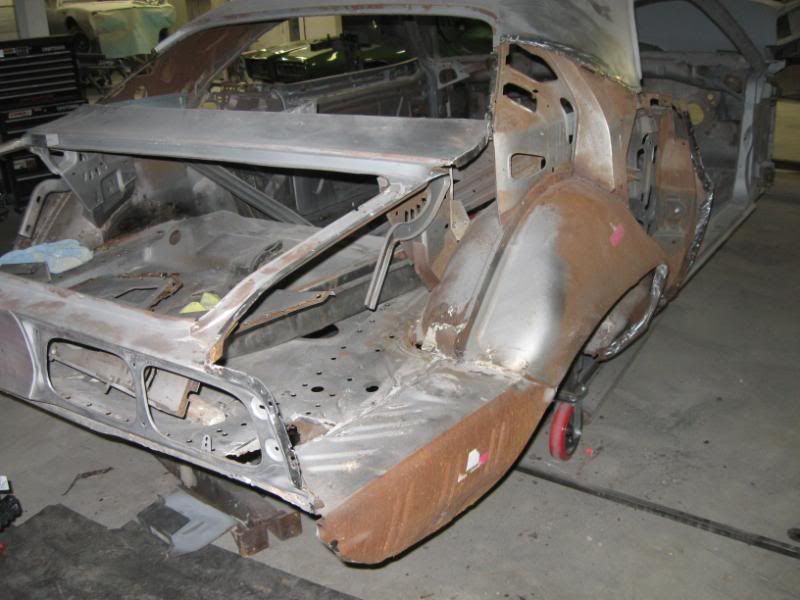
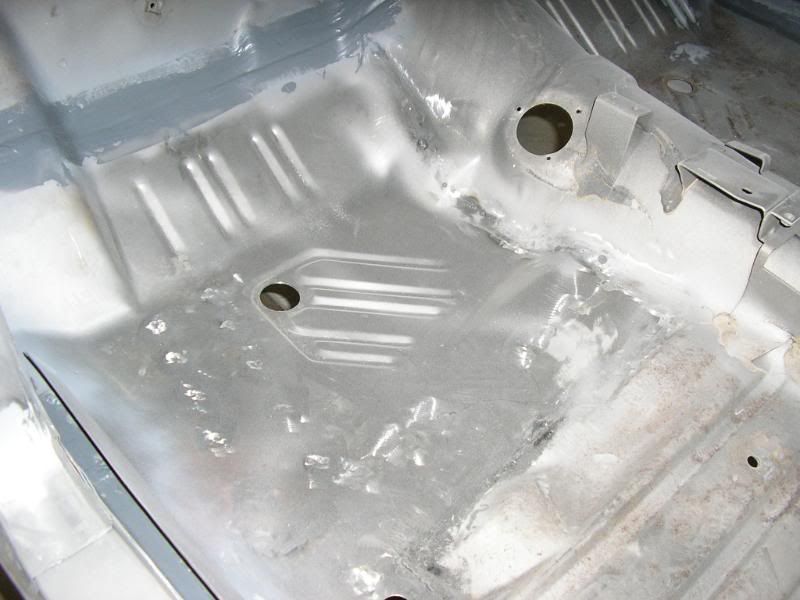
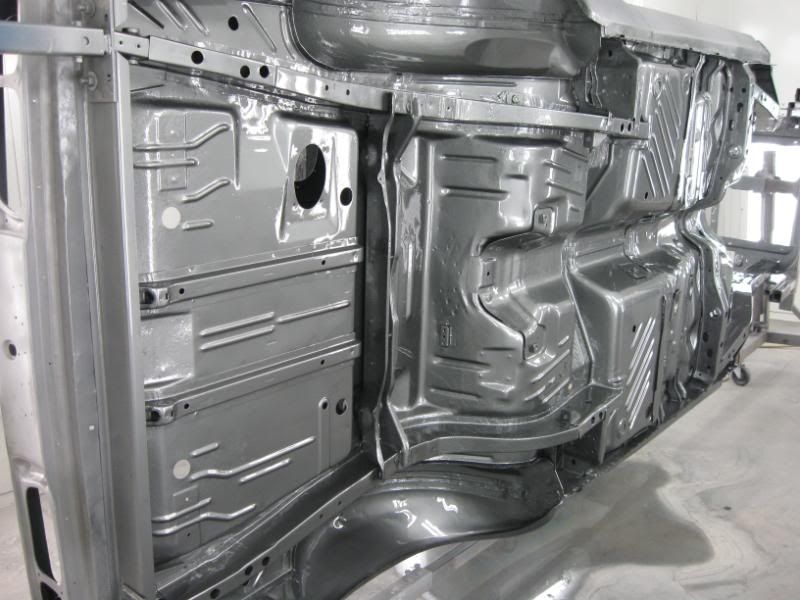
If you look at the picture, you can see that the trunk is still in the car. The bad patch panels that were just placed over the rust(right above the shackles) have been taken out and the rust has been cut away.
I just found out that they are going to save the origonal trunk floor. The owner of the black Challenger R/T that they just finished, has an old 2-piece trunk floor that he is sending out for dad's car. They are going to cut what they need off of those pieces to weld into the origonal floor.

Posted By: ixelerate
Re: origonal owner 73 Challenger build - 02/01/09 09:20 AM
First off...awesome car!! I really wish I could find my dad's old dart to restore! Now Best of Show is a really great place to have your car at! I live approximately 10 min from the place and it is impressive! I think that your car is actually at another restoration shop that is about 15 min from their showroom. Now if you do come in the summer you have to check out the local cruise-in which is about 2 min from their showroom. It is an old diner that has a live-band and great food! I know a bunch of other moparters go there. If you see a pea green charger...that would be mine
Posted By: burdar
Re: origonal owner 73 Challenger build - 02/01/09 04:18 PM
Quote:
First off...awesome car!! I really wish I could find my dad's old dart to restore! Now Best of Show is a really great place to have your car at! I live approximately 10 min from the place and it is impressive! I think that your car is actually at another restoration shop that is about 15 min from their showroom. Now if you do come in the summer you have to check out the local cruise-in which is about 2 min from their showroom. It is an old diner that has a live-band and great food! I know a bunch of other moparters go there. If you see a pea green charger...that would be mine
Yes, I think you are correct. The body shop is at a different location than the showroom. It looks like they are making some good progress so I'm not sure when they plan on having it done. If it works out for me to take a trip out there, I'll be sure to check out the local cruise-in. Thanks
Posted By: burdar
I guess we will start over then........... - 08/31/10 04:44 PM
Well, six pages of my thread have vanished. Just wanted to say thanks to the mods for trying to figure out what happened. Just one of those things I guess.
It looks like I have some work to do. For those of you who still want to see the pictures that were lost, I'll repost them over the next few days. Thanks for the kind words and encouragement up to this point. It really meant alot.
I wish who ever deleted my thread would have deleted the rear end and trans pics on the first page

Those will be redone before finding their way back onto the car.
Posted By: Challenger 1
Re: I guess we will start over then........... - 08/31/10 06:47 PM
Quote:
Well, six pages of my thread have vanished. Just wanted to say thanks to the mods for trying to figure out what happened. Just one of those things I guess.
It looks like I have some work to do. For those of you who still want to see the pictures that were lost, I'll repost them over the next few days. Thanks for the kind words and encouragement up to this point. It really meant alot.
I wish who ever deleted my thread would have deleted the rear end and trans pics on the first page Those will be redone before finding their way back onto the car.
Wow sorry for the mixup on your thread. Also sorry I wasn't any help with the heater box or exhaust heat shields.
So how is your car coming? Do you have it home yet?
Posted By: burdar
Re: I guess we will start over then........... - 08/31/10 07:10 PM
The car is home. I got it back on Fathers Day weekend. I'm just slowly putting it back together. I bought a lot of parts at the Nat's so I have plenty of work that can be done.
Quote:
Also sorry I wasn't any help with the heater box or exhaust heat shields.
Not a problem Gary. You've helped out alot already. Whenever I've had a question you've been willing to answer it...not to mension the rear bumper guards you sent my way. Thanks again.
I'll start adding the pics back soon.......
Posted By: burdar
Re: I guess we will start over then........... - 08/31/10 07:39 PM
Posted By: burdar
Re: I guess we will start over then........... - 08/31/10 08:14 PM
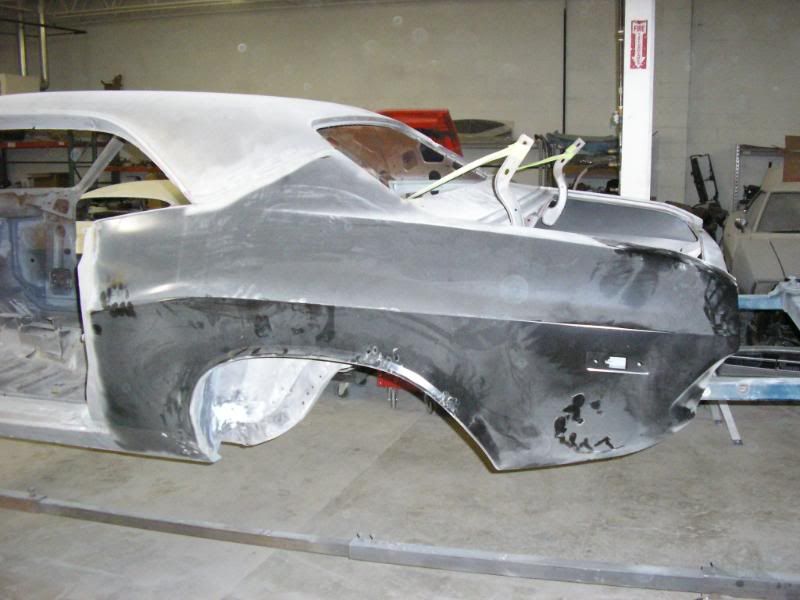
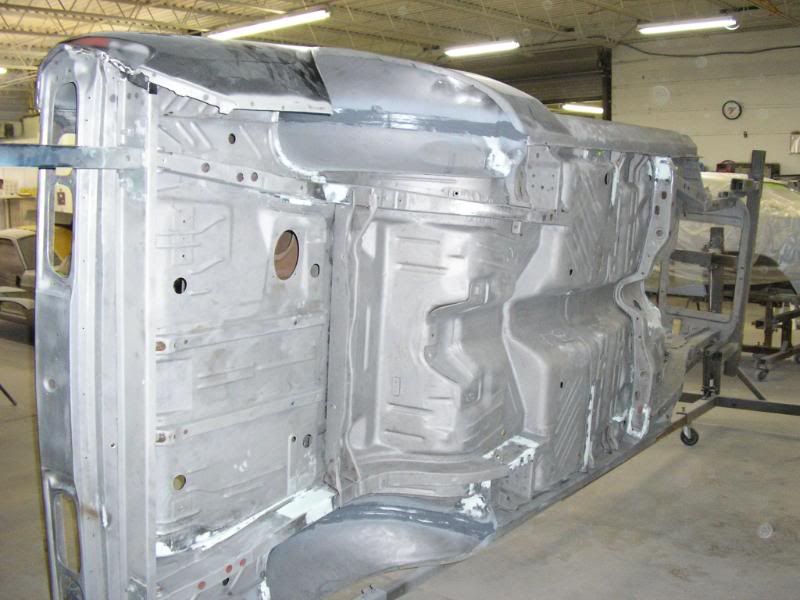
The drivers side rocker was replaced and the front of the passengers side rocker was patched. The rear section of the framerails were also replaced. Once the car was stronge enough, it was bolted onto a roticerie.
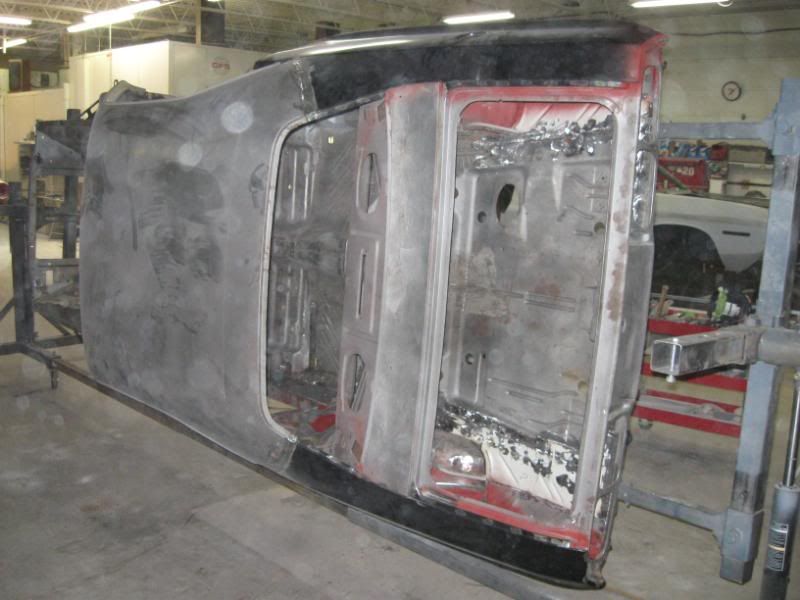
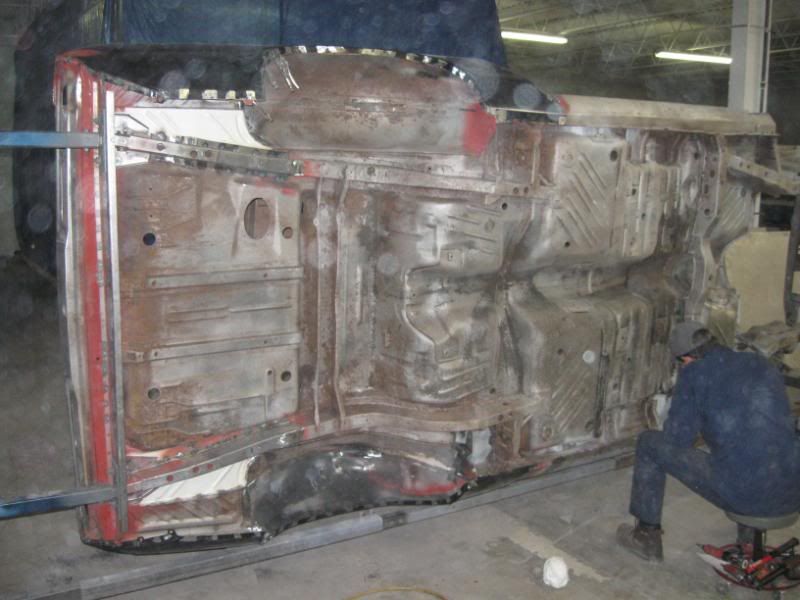
Once all the metal replacement was done, the bottom was media blasted to get ready for paint.
Posted By: burdar
Re: I guess we will start over then........... - 08/31/10 08:23 PM
Posted By: burdar
Re: I guess we will start over then........... - 08/31/10 08:32 PM
Posted By: 71383beep
Re: I guess we will start over then........... - 09/01/10 04:20 AM
Awesome post man!
i would have no regrets for sending her out...that's a first class job there!
I have one thing to add...throw a 340 intake and a TQ on that badboy 318! I am sure you're dad won't mind!
Keep up the pics!
Man do I want a chally project to work on...
Posted By: burdar
Re: I guess we will start over then........... - 09/01/10 03:13 PM
Thanks Chris. All these pics were posted before but were deleted somehow. I'll get the rest of them up shortly. Hopefully soon, I'll have some new pics to post of the assembly.
Posted By: burdar
Re: I guess we will start over then........... - 09/01/10 03:22 PM
Posted By: burdar
Re: I guess we will start over then........... - 09/01/10 03:25 PM
Posted By: burdar
Re: I guess we will start over then........... - 09/01/10 03:32 PM
Posted By: burdar
Re: I guess we will start over then........... - 09/01/10 03:40 PM
Posted By: burdar
Re: I guess we will start over then........... - 09/01/10 07:33 PM
Posted By: burdar
Re: I guess we will start over then........... - 09/01/10 07:43 PM
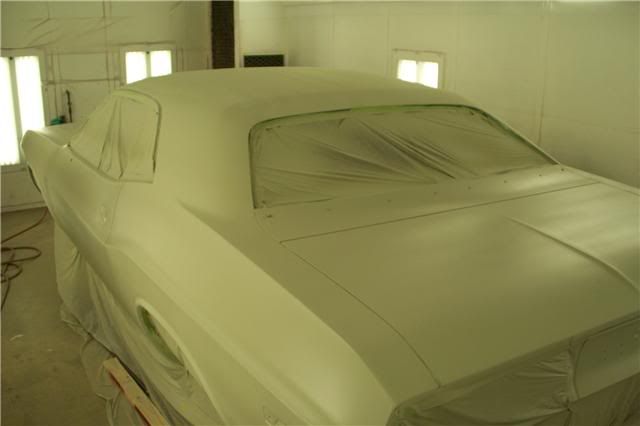
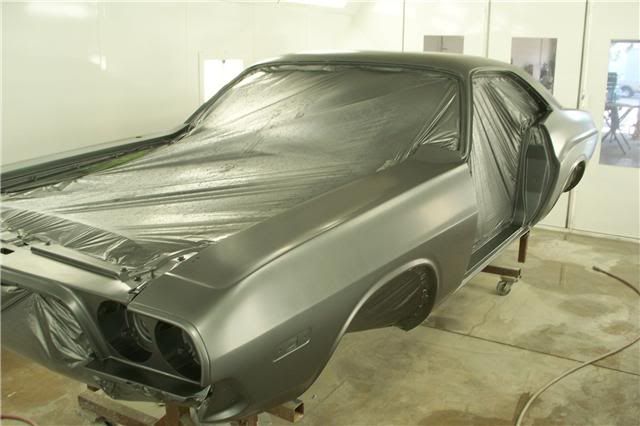
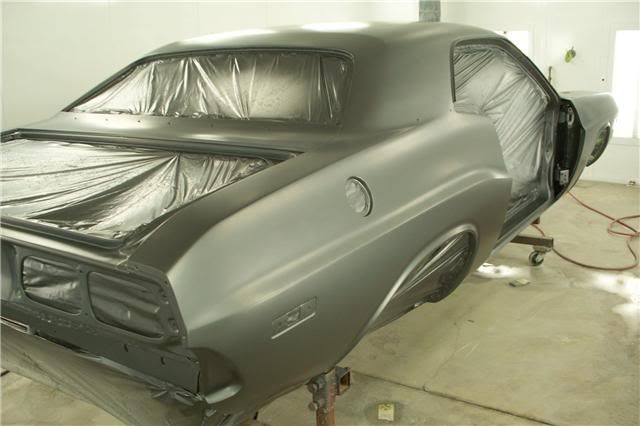
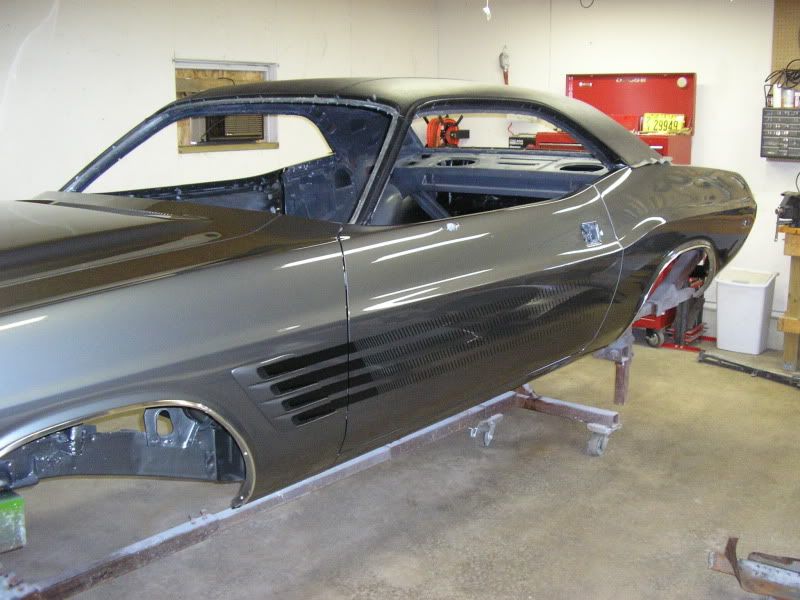
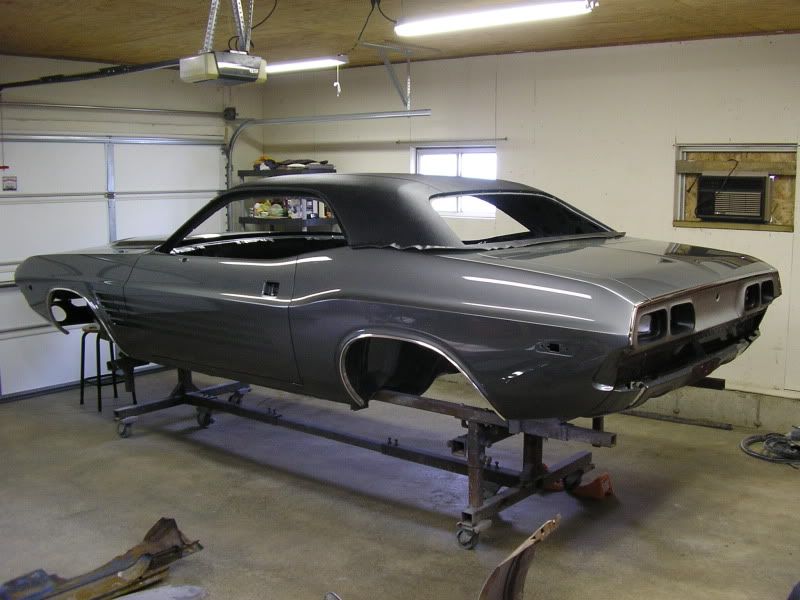
Vinyl top installed and argent sprayed on the tail panel.
The argent looks like silver paint in these pics but it looks good in person. It closely matches a set of NOS tail light housings I have pictures of.


Posted By: burdar
Re: I guess we will start over then........... - 09/01/10 07:55 PM
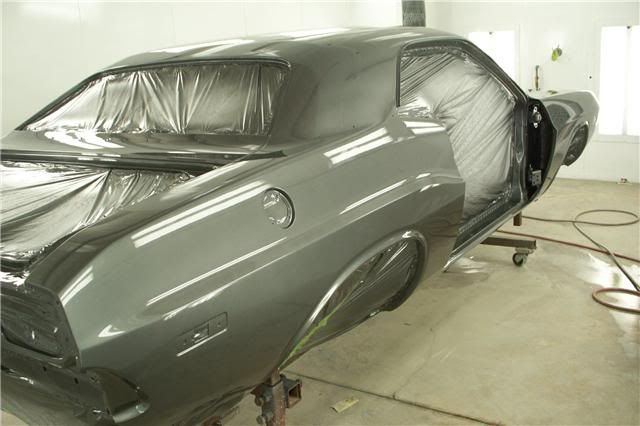
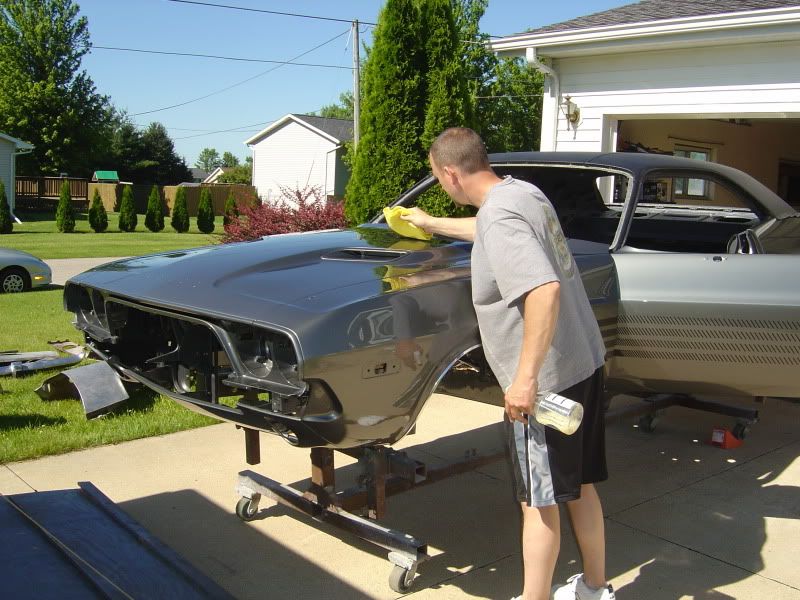
Stripes are on and it's finally home.
Tim, cleaning it up a bit after the long drive.
Posted By: burdar
Re: I guess we will start over then........... - 09/01/10 08:09 PM
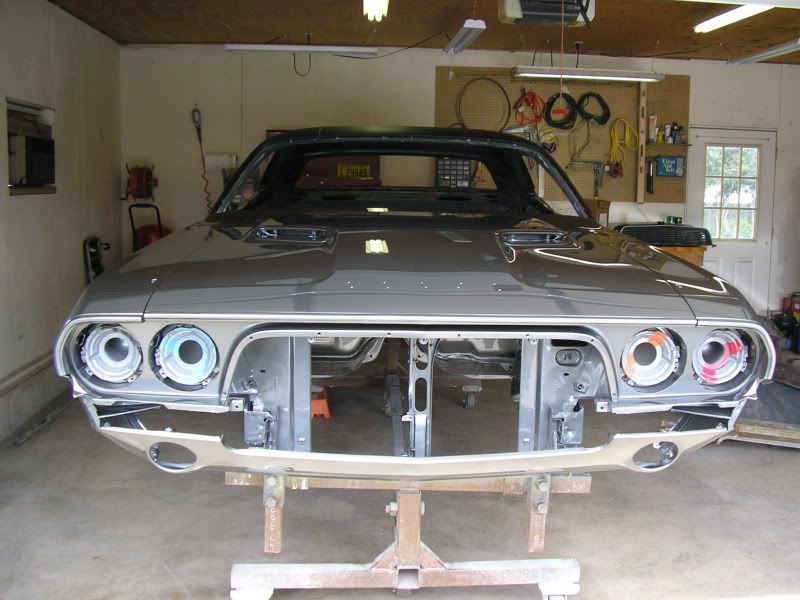
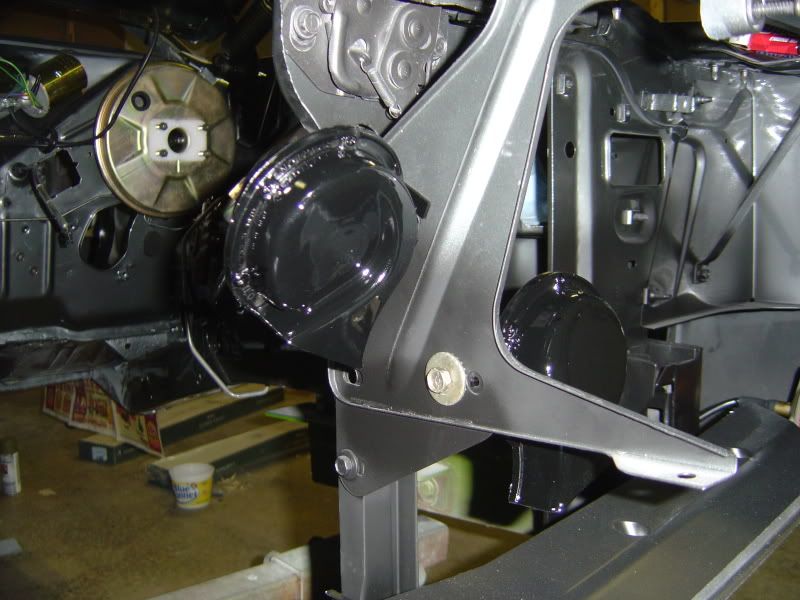
Before picture of the headlight buckets.

I cleaned them up with steel wool and soapy water. I'm very happy with the way they turned out. I re-applied the paint markings I found when cleaned them.
The marks really looked like they were applied with a brush and blotted on. By looking at Resto Ricks website and reading Dave Waldens posts, it looks like I should have sprayed the paint on the buckets. The dirt was caked on them so bad that it was impossible to make out a spray pattern. Oh well, now I know what to do next time. I'm still happy that they cleaned up as nice as they did.
After...

Installed...
Posted By: burdar
Re: I guess we will start over then........... - 09/01/10 08:51 PM
OK, here's something new...
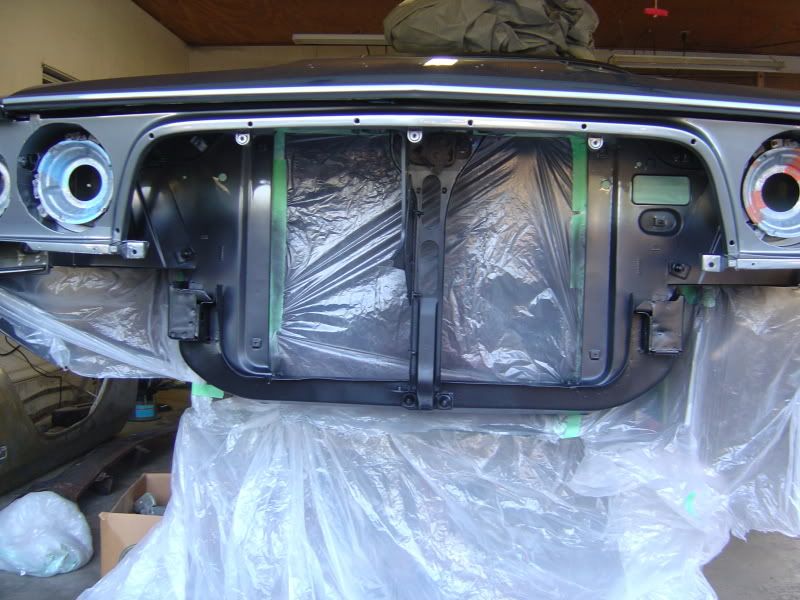
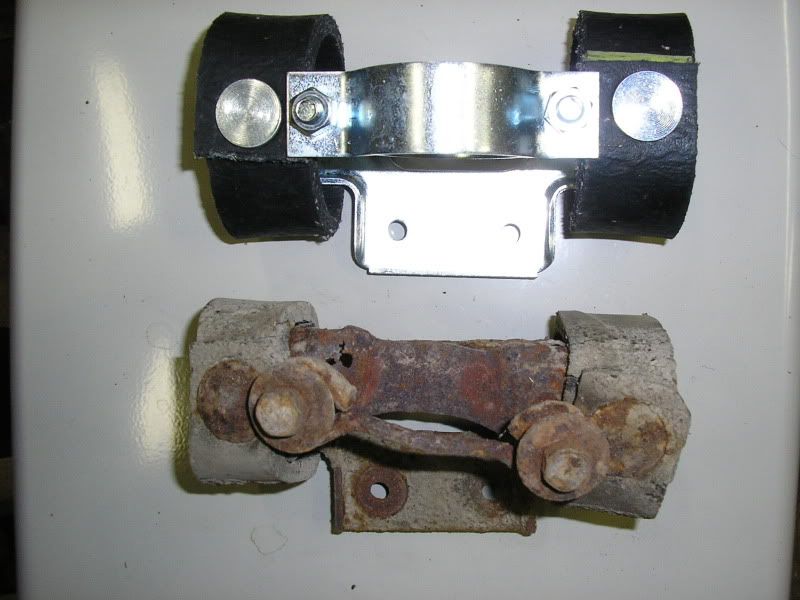
I didn't document the rad blackout spray pattern when I took the car apart. That was a long time ago and didn't know any better. The horn/latch bracket didn't get stripped before the car went to the bodyshop so I did take a picture of that.

The only other picture I had of the front end was this one...

I decided to try and lighten up the picture and see if anything would become visable. This is what I ended up with...

The pattern on the passengers side is what I ended up trying to copy. I don't know how accuarate that is though. I might end up spraying the black up higher before the front end is all back together.
Posted By: jrwoodjoe
Re: I guess we will start over then........... - 09/01/10 09:10 PM
That thing looks SWEEEEET Darren!!

Posted By: burdar
Re: I guess we will start over then........... - 01/20/11 05:27 PM
I havn't worked on the car since it got cold. My garage isn't heated and I had to push the car against the wall so my wife could get her car inside. Here are some pics of what I was working on before winter.
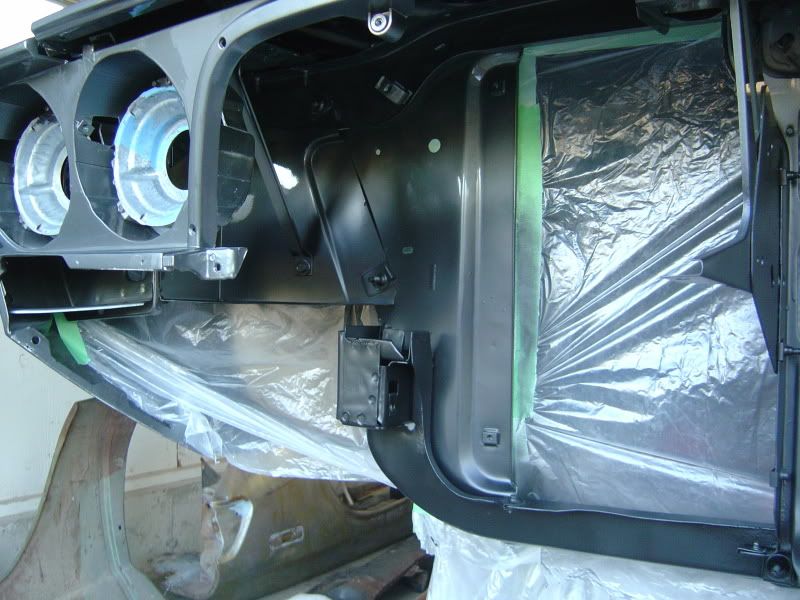
The heater box was in decent shape...just very dirty. It was stored for more than 10 years in a hot attic and I think the cover warped somewhat. I had a very hard time getting it back on. It's still not perfect but I think it will work just fine. The cover did have the typical crack by the fresh air opening. I just used a rotary tool and smoothed the edge so it didn't look broken.
Heater box before...
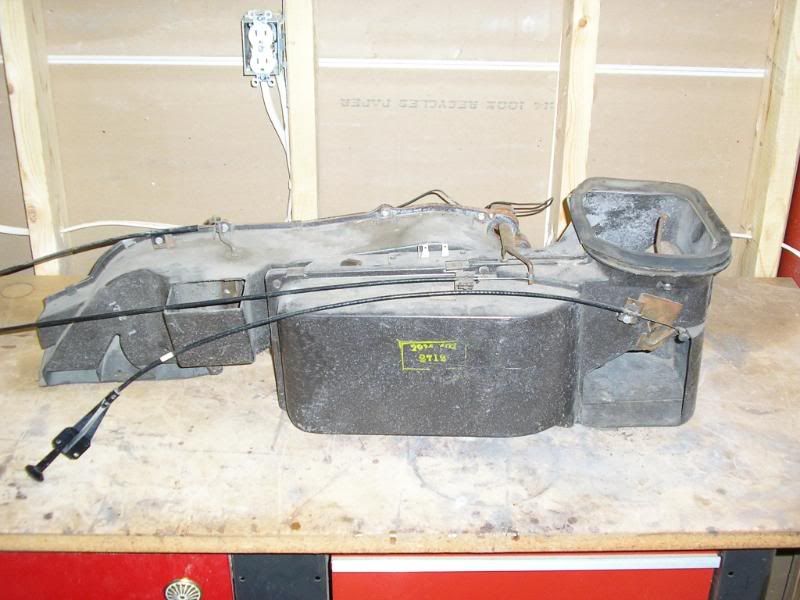

After a lot of cleaning and a DMT gasket kit.


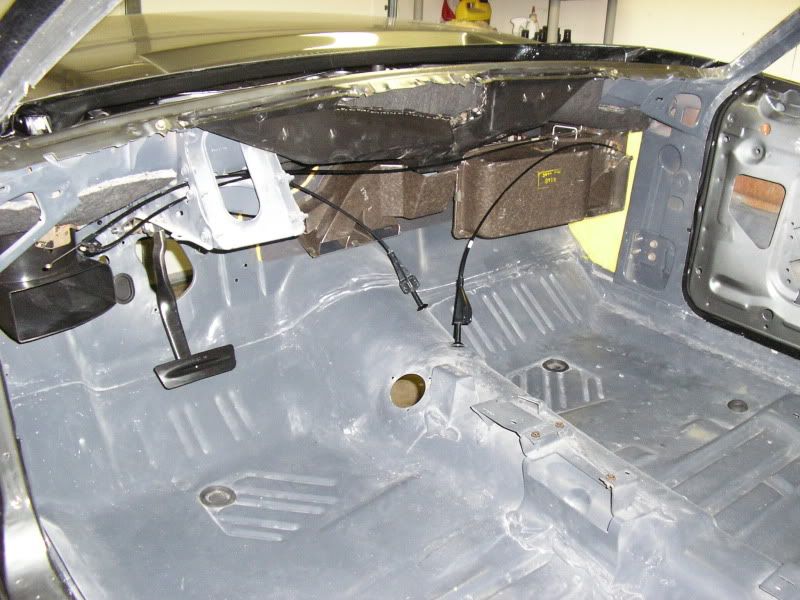
Here's a pic of it installed. It was a major PITA but it's in. The brake pedal assembly, drivers side fresh air door and dash vent were all cleaned up and reinstalled.
Posted By: burdar
73 Challenger Rallye - 01/20/11 05:51 PM
Horns blasted, painted and installed. At first glance, the attaching bolts looked like they'd need to be replated but it was just years of road grime. They looked basically new once cleaned.
There was some miscommunication with the bodyshop when it came to some of the smaller parts on the car. Some parts were painted that I didn't want painted. The hood reliece and latch were sprayed with a phosphate looking paint. I ended up blasting the hood reliece lever, latch and safetly hook, then refinished them myself but still need to take a good picture of them. The tail light housings were also spray painted even though they were in great shape. I got lucky and the paint came off pretty easy. Here, one housing is done and the other is still painted.

Posted By: burdar
Re: 73 Challenger Rallye - 01/20/11 06:16 PM
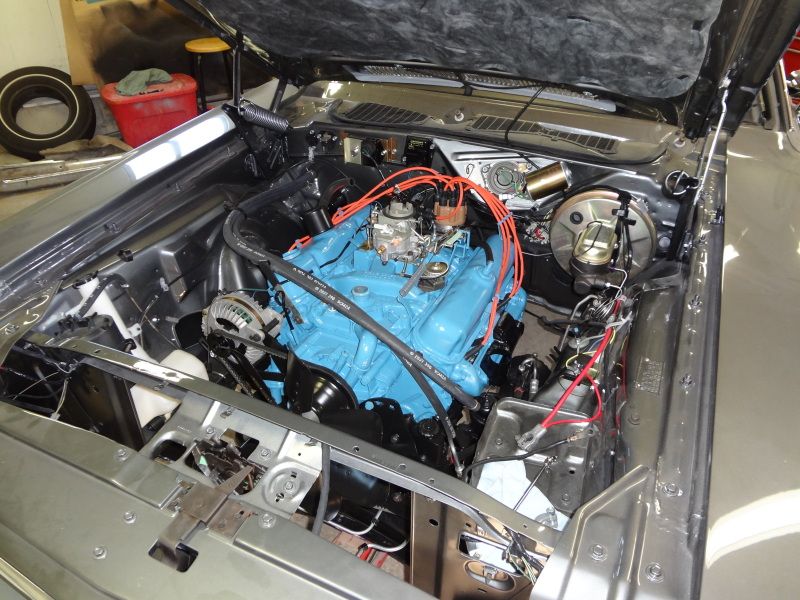
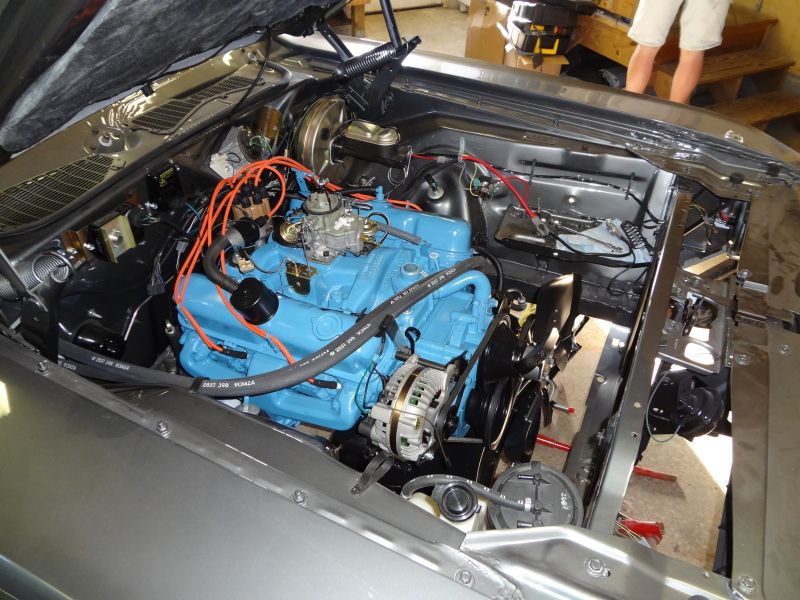
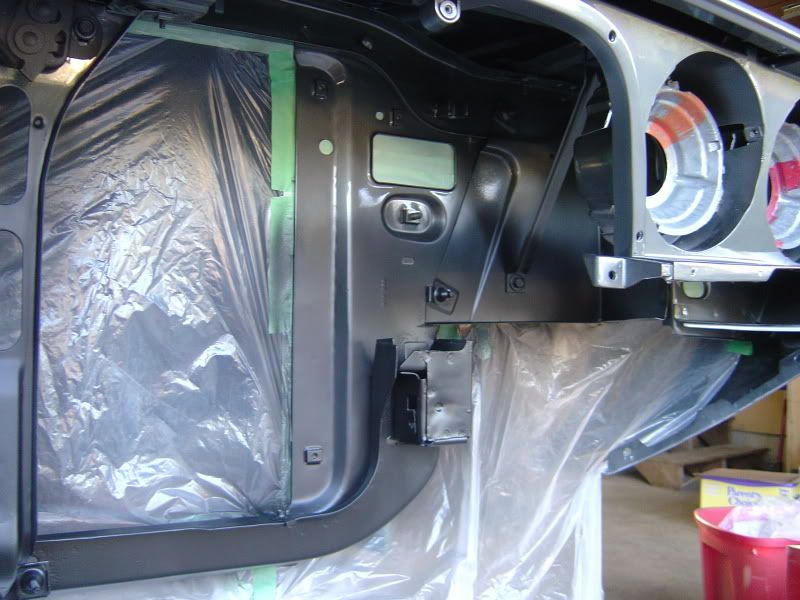
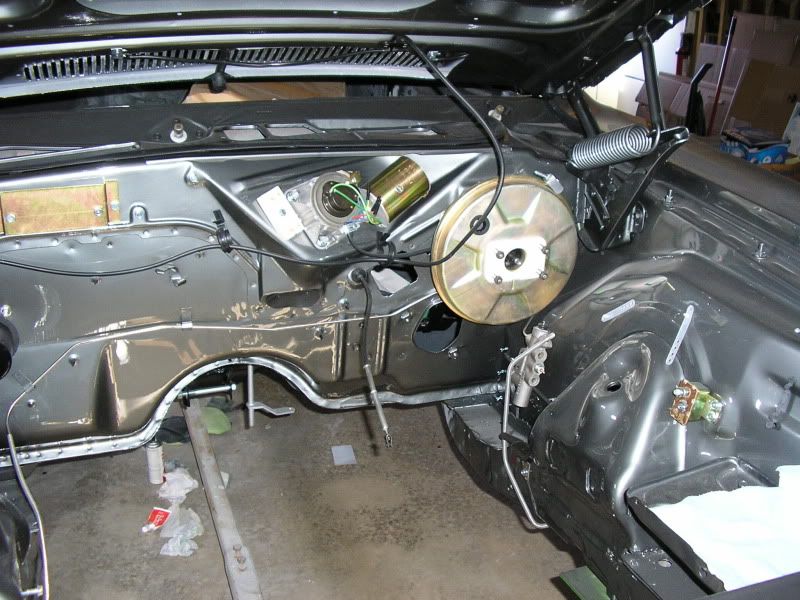
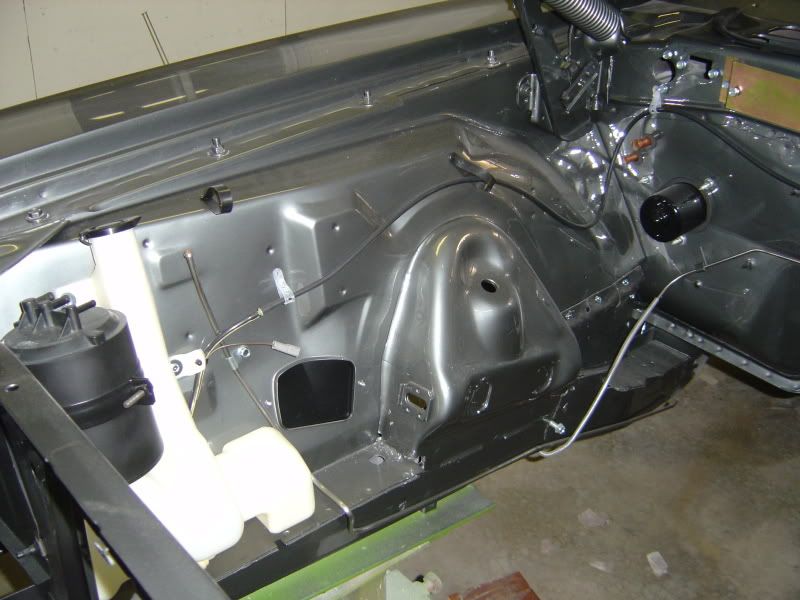
Here are a couple engine compartment pics. The booster was rebuilt by Booster Dewey. The wiper motor and ECU stand off bracket were restored by Jules. The clear plastic straps that are pictured are accually too short. I bought another strap kit from Dante that has the correct length straps.
The charcole canister is the orginal one to the car and still has its date code stamp on it. The top was in good shape.(just dusty) The side of the canister had a lot of deep scratches and dings on it from sitting in a box with other parts. I wet sanded the entire side, masked off the top portion and sprayed it with Trim Black. It looks pretty good. I probably could have used Landau Black for a little more gloss though.
The washer bottle is new but the lid doesn't have any part numbers on it like the origonal one. I'll probably try to use the origonal lid. The washer hose is origonal and cleaned up really well. The pictures I have of the car before I took it appart, don't show the hose running through the hole in the cowl. I suppose it could have been rerouted at some point. I'll have to see if there is enough length to route it that way. The squirters attached to the hood were replated.
Blower motors were painted black from the factory in 73. This is the origonal motor with correct date code. I took it appart...it looked new inside...painted the case and put it back together.
Posted By: 19cuda73
Re: 73 Challenger Rallye - 01/20/11 10:07 PM
Great Pictures. You and I are real close to the same spot on our builds. The 73's have lots of common parts. Good job its tough not damaging the paint as you put it together too.
Posted By: burdar
Re: 73 Challenger Rallye - 01/21/11 01:30 AM
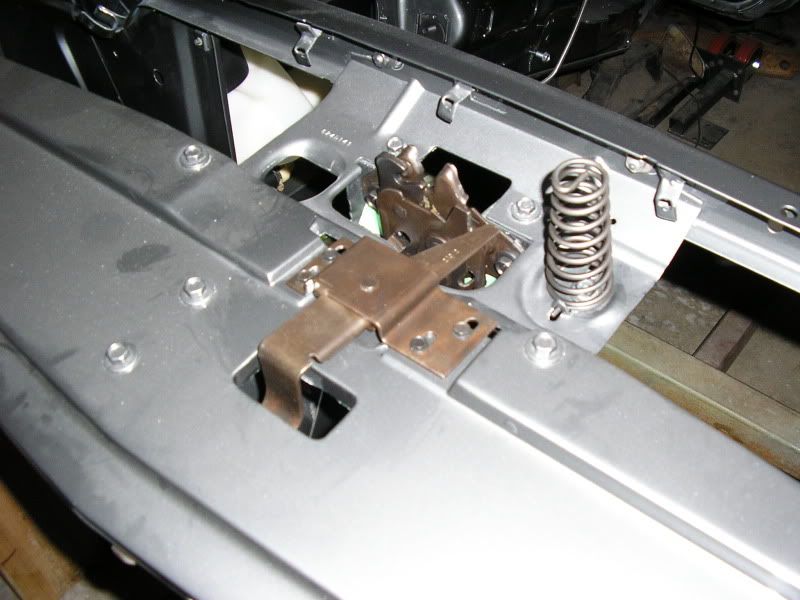
I just went out and took a few pics of the hood reliece, hood latch and safety hook. I ended up redoing them myself to try and save some money. I think they turned out pretty good. I can always send them out to Jules down the road if money allows.
The areas under the mounting bolts were still brown so I knew that was the origonal finish. Don't ask me how I got them to turn brown...it was a happy accident. I also refinished the pop-up spring.

Posted By: jrwoodjoe
Re: 73 Challenger Rallye - 01/21/11 01:44 AM
I think you did a nice job on the latches Darren. I noticed that you had the hood on in the photos above and had put in the wiper motor and arm shafts. How hard was that to do with the hood in place? I'm considering bolting on my hood before I start assembly but thought it might be sort of hard to do those things at the firewall with the hood on. I removed all my stuff with the hood off which was sort of nice.
Car looks sweet. Just love it.
Joe
Posted By: dmoore
Re: 73 Challenger Rallye - 01/21/11 04:13 AM
Awsum results here! Keep posting
Posted By: burdar
Re: 73 Challenger Rallye - 01/21/11 03:40 PM
Thanks Dave...that means alot.
Joe, it wasn't that hard working around the hood but you do have to be extra careful. I accually worked from inside the car to install the wiper mechanisms since the dash isn't installed. With no windsheild in place, everything is right there infront of you. That was a lot easier than working from the engine compartment. Since your hood is going to be black, it might be easier to have the hood off. I don't want to have to worry about touching up painted bolts so the hood is staying on. Your hood bolts are probably just going to be phosphated, so you won't have to wory about messing up any paint.
Right before it got cold, I was working on filling some pitted areas on the underside. Since the bodyshop did this job for a set price, the underside wasn't given the same attension as the top. There was some pretty major pitting on the inside of the rear frame rails among other places. I just couldn't leave it looking like that. I got the rear rails done but it got too cold to continue. In the spring, I'll finish up the underside and can install the brake/fuel lines, gas tank exc...
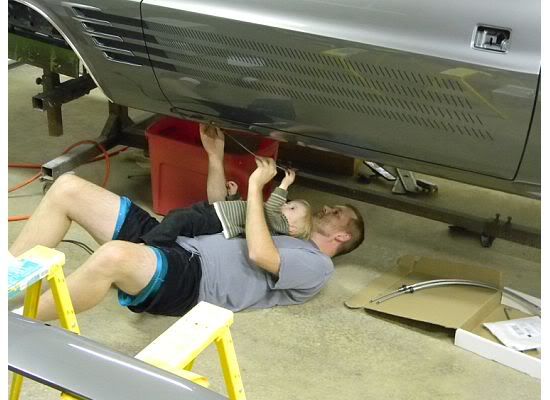
Since I don't know what I'm doing when it comes to bodywork, I called a local Wheelers(autobody supply store) and asked them how I should proceed with filling the pitted areas. They were real nice and explained everything to me. After purchasing supplies, my best friend from High School and I worked on the rear frame rails on a Saturday afternoon. The car is still on the body stand it was painted on. The painter said I could use it for as long as I need it. It's nice because the car sits up fairly high...higher then the stands I have. Once the brake/fuel lines are on and the wheelwells are undercoated, I'll put the car on my stands.
Here's my friend Paul working while I stay clean taking pictures.
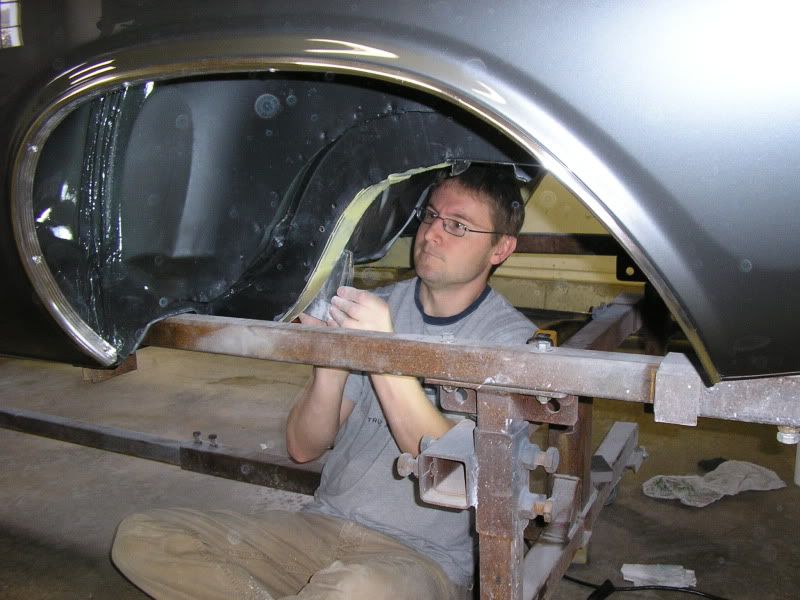
Here's the end result. It looks way better than it did.
Posted By: denfireguy
Re: I guess we will start over then........... - 01/31/11 04:21 AM
Quote:
I havn't worked on the car since it got cold. My garage isn't heated and I had to push the car against the wall so my wife could get her car inside.
I hear you. There is a Cabrio occupying half of the garage. My Durango sleeps outside and the Cuda is against the wall. I turned it around this last weekend so I can get to the passenger door to assemble it and get the weather stripping on it. I am leaving the mirror off since she kept hooking the other one with her coat. It is just taking too long.
You are doing a great job, Darren. Take your time and you will be happy.
Craig
Posted By: burdar
updates... - 07/06/11 03:32 PM
Time for some more updates. These first few pictures are old but I forgot to post them.
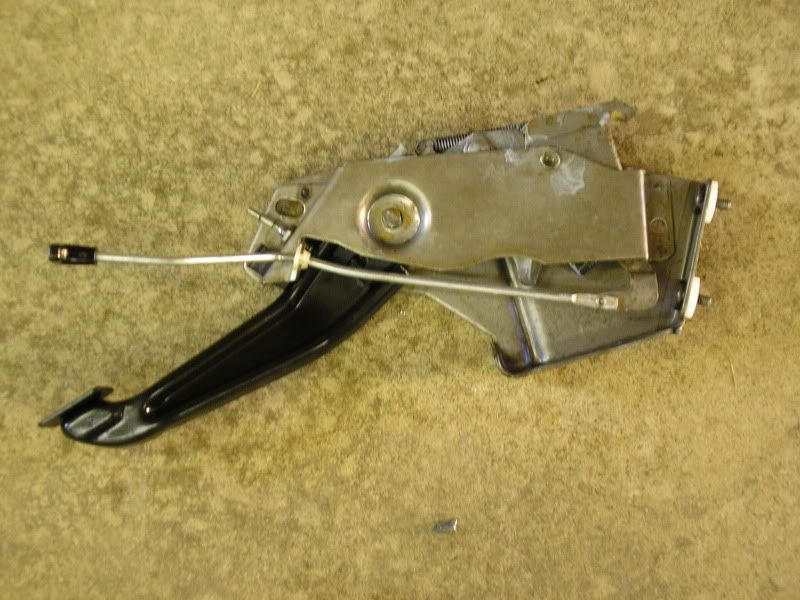
The E-brake mechanism was in good shape but was covered with surface rust. I soaked it in EvapoRust and rubbed it down with some steel wool.
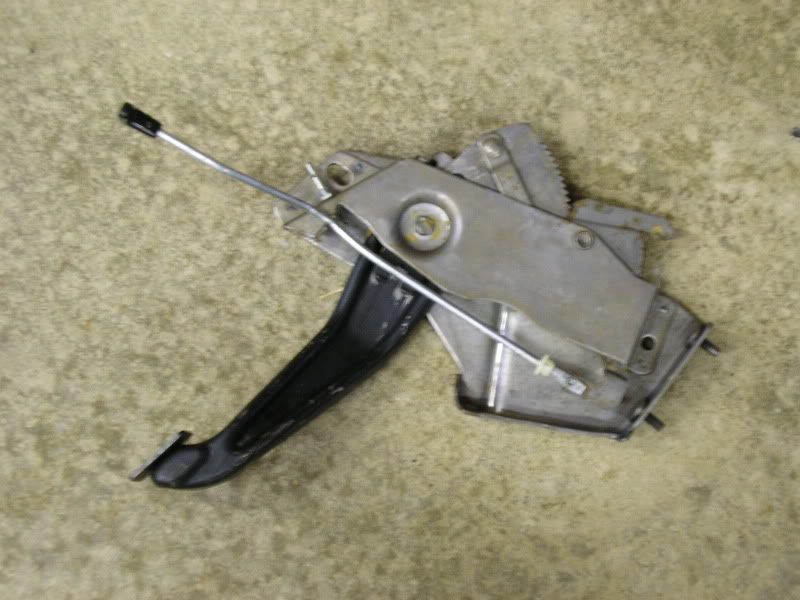
The black paint on the arm was a little worn so I resprayed it. The arm was painted all the way up into the mechanism. I've seen some that have a dip line but this one wasn't like that. I redid the white lettering on the handle using Testors model paint. I just applied it with a brush...when the paint was dry, I wiped the excess off with mineral spirits.
Then my son who was 1 at the time wanted to help me install the front E-brake cable.
Posted By: burdar
updates... - 07/06/11 03:54 PM
In May, the guy that did the bodywork/paint on the car came over to help me with a few things.
The fenders had been drilled for the 72 style turn signal lights by mistake.(the ones ontop of the fenders that came with the A01 light package) The 72 style lights used a stud/nut to attach them to the fender. The 73+ lights just used a philips head screw. So, one hole in the fender was too small and the other one was too big. We enlarged one of the holes from 1/2" to 5/8" so the rubber light socket would fit down into the fender. Luckily we didn't damage the paint.
I went to the hardware store and found a small stainless bolt that had the same philips head as the original screw. Now the light is held on with a bolt/nut but still looks factory from the outside. The headlight splash shield will hide the nut so it will still look factory on the underside too. It does make changing the bulb a little difficult though.
Next we worked on the vinyl top. I didn't send the trim to the bodyshop so the vinyl was left long. We trimmed the vinyl and installed the trim. The new plastic trim clips are junk. They don't hold the trim tight to the body. I'm going to have to drill some holes and use the bolt-on style clips.


Posted By: burdar
updates... - 07/06/11 04:26 PM
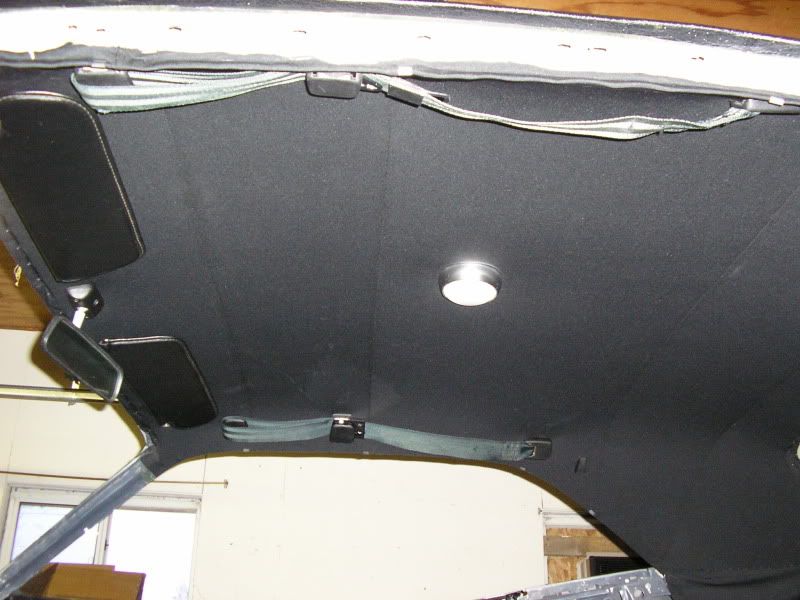
Then we worked on installing the headliner. The domb light wiring was installed and the insulation was glued to the roof.
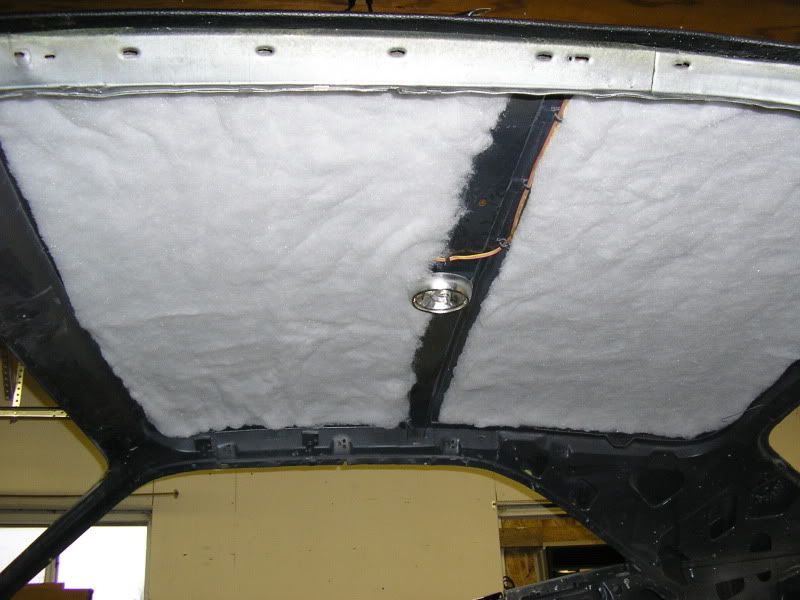
Resto Rick's instructions were a big help. The headliner I ordered was from Dante's Parts. It is made from Yorkshire material and looks pretty close to what came from the factory on the 73-74 Challengers.(Cudas ?) This material doesn't wrinkle at all. It was sitting in a box all crumpled up for a few months before it was installed. The installation couldn't have gone easier.
I have a lot of small clamps so I put them to good use.

I took apart the rear view mirror and repainted the base with SEM Trim Black. I painted the mast with Tank Tone paint. It looks close to the original finish. The mirror was just cleaned up with soap/water. The sun visors were also just cleaned up and reistalled.
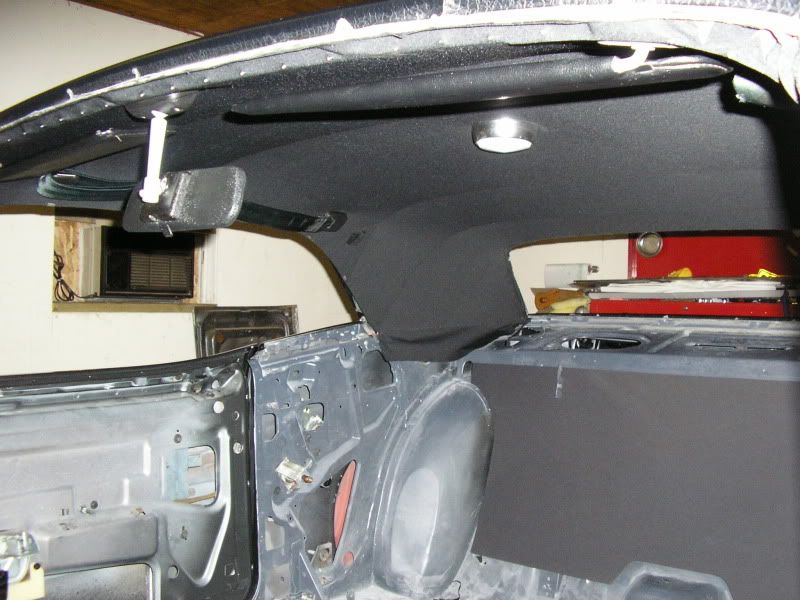
The shoulder belts were in decent shape but had been sitting in an open box for the past 13 years. They were very dirty. I put them in an old pillow case and threw them in the washing machine. They came out looking great. They look green in the picture but that's due to the flash. They look good in person.
Posted By: burdar
updates... - 07/06/11 04:38 PM
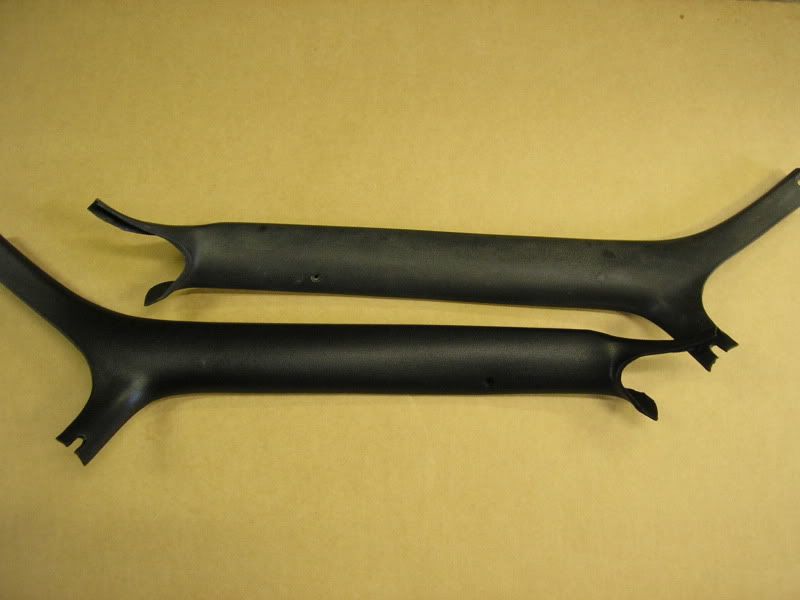
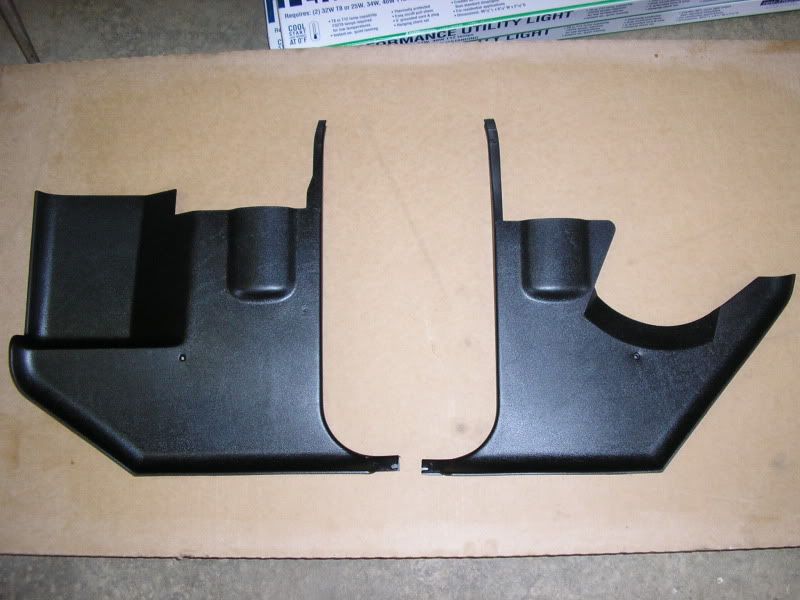
I cleaned the A-pillar and kick panel trim four times to get them ready for refinishing. Once they were clean I sprayed them with SEM Adhesion Promoter and SEM Landau Black. I'm very happy with how the pieces turned out. The gloss level is very close to the original gloss of the plastic.
Here is a refinished A-pillar trim piece next to an unfinished one.
Before picture of the kick panels...they turned gray over the years.
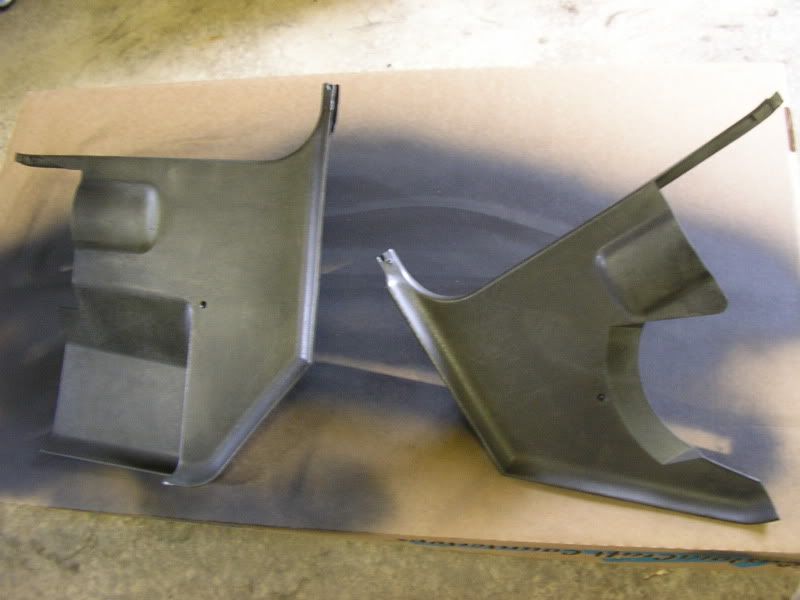
Finished
Posted By: burdar
updates... - 07/06/11 05:04 PM
I also worked on restoring the grill and "Challenger" emblem. I had three emblems to choose from. I picked the nicest one and cleaned it up. Then I took a Q-tip and applied a thin layer of petrolium jelly to the face of the emblem. I sprayed the entire emblem with SEM Trim black paint. Once the paint was dry, I just wiped off the petrolium jelly which left the face of them emblem free of any paint.
Next, I turned my attension to the grill. It was in decent shape. It wasn't cracked but the plastic was discolored and looked old.

I cleaned it a few times and then sprayed it with the SEM paint. I previously test sprayed a small section and matched it against the area of the grill that was covered by the bumper filler strip. The Trim Black paint matched the color of the plastic perfectly.
The night I sprayed the grill it was very hot and humid. The paint didn't spray very well and left the grill very blotchy. I didn't think I could screw it up any further so I tried very lightly sanding the grill with steel wool. It accually worked very well. It evened out the paint and got rid of the very small orange peel look. It doesn't even look painted now which is good because the original finish was just the black of the plastic.
I masked off the front lip of the grill and sprayed it with Mopar Rallye Wheel paint. It closely matches the original silver color. I used the same paint on the front valance insert.
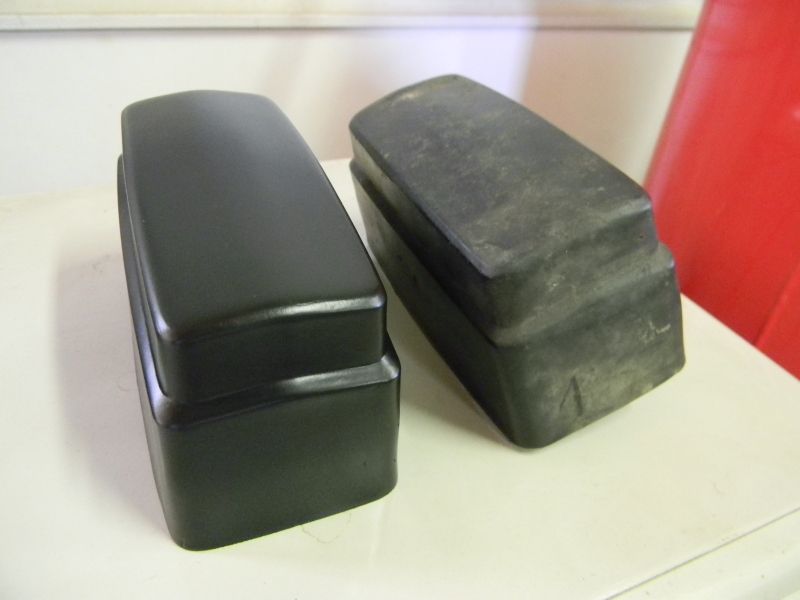
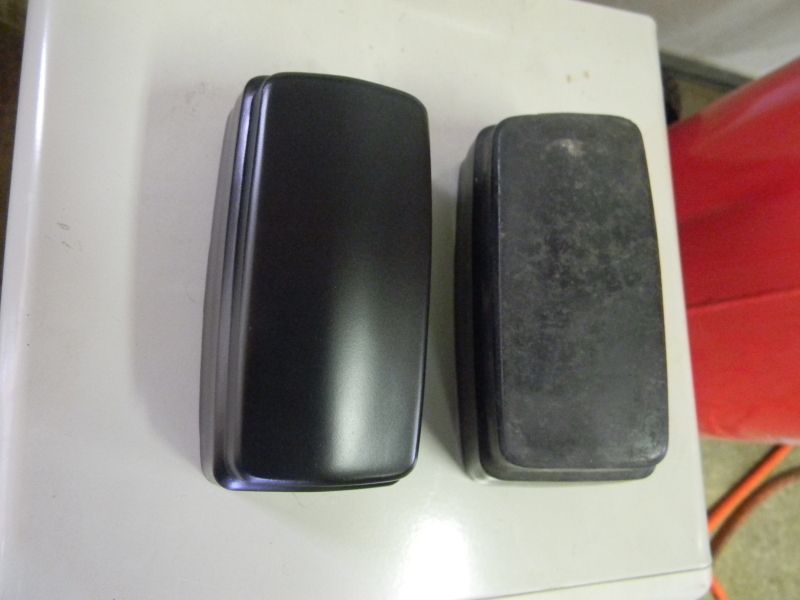
The front bumper filler pieces cleaned up with a very light wet sanding. They didn't need any paint at all. They are still just the natural gray of the rubber.
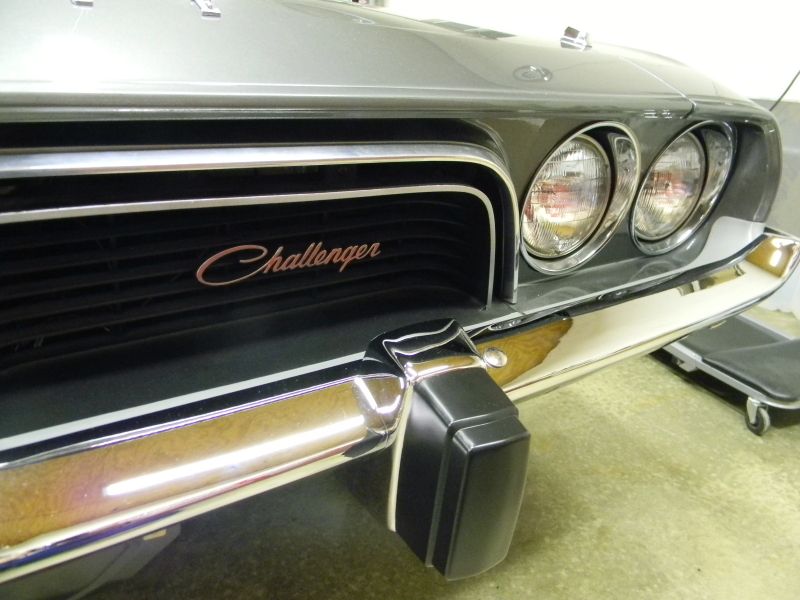
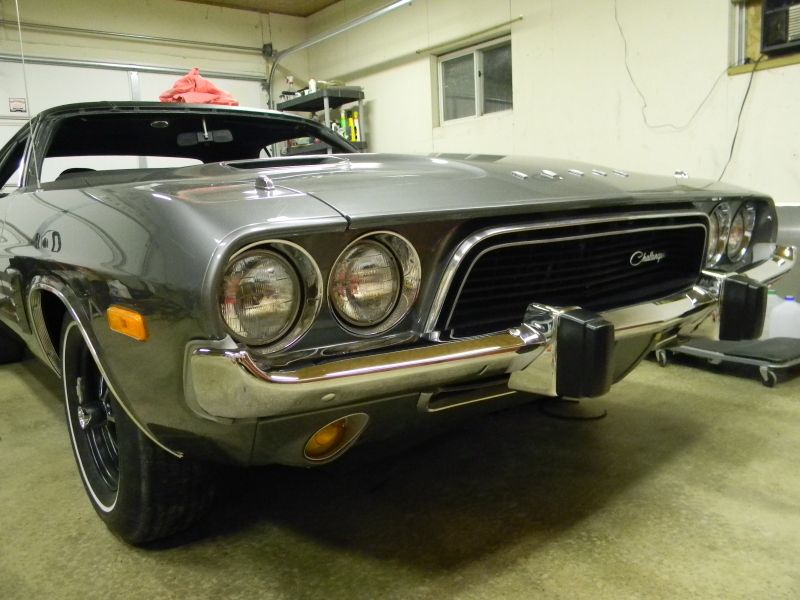
Finished grill/emblem
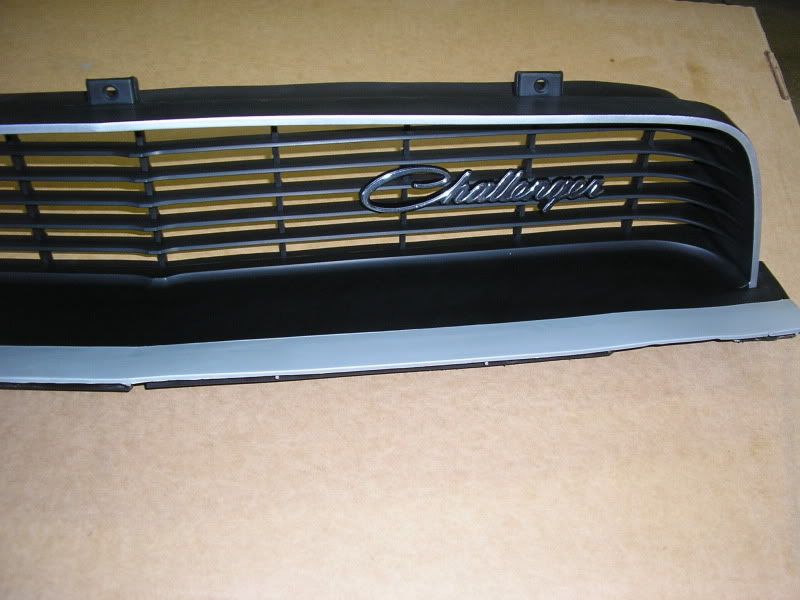
Finally, here are a couple pics of it installed on the car.


Posted By: CDN72SE
Re: updates... - 07/06/11 05:59 PM
Beautiful car and great work!
Posted By: 19cuda73
Re: updates... - 07/07/11 01:12 AM
Darren your car is looking great!!!. Excellent job on the headliner install and the engine compartment really is shaping up nicely. Keep up the good work.. I appreciate your help too on the photo support and emails on my key build issues.
Dennis
Posted By: denfireguy
Re: updates... - 07/07/11 03:16 AM
Headliner looks great. I tried to save money on mine by re-installing the one I got from Legendary. Even if it was wrong.
Found out that all the stretching I did to put it in the first time made it impossible to make a good looking installation. Now I have to order a new one from Dantes.
Did you get your sail panels from Dantes as well?
It looks great. Keep up the good work.
Craig
Posted By: burdar
Re: updates... - 07/07/11 03:48 AM
Thanks guys! I've got the dash assembly all together except for the gauges. I'm still waiting on those to come back from GCAR. Once I have them back, the dash is going in. Then I'll have some cool pictures to share.
Craig...Challengers didn't use sail boards like the Cudas did. Earlier Challengers used a piece of cardboard underneith the headliner but by 73 the factory had done away with that. I found that out after purchasing new ones. Dante does sell the Cuda sail boards.
Isn't your headliner blue? Did blue interior cars come with blue headliners? I've never seen the Yorkshire headliner in blue. Maybe the perforated headliner was used if the interior color was something other then black? That's something you'll have to look into.
Posted By: denfireguy
Re: updates... - 07/07/11 04:19 AM
I still have remnants of the original liner. It was perforated blue with a corrugated texture. The one I have now is totally wrong. So are the sailboards but at least they were new and went in easily. I just looked at their web site. The prices are not terrible for set so I will order them tomorrow.
Meanwhile, I have to drop the transmission pan and figure out why the transmission is shiftless. I am sure I put something together wrong.
Craig
Posted By: burdar
Re: updates... - 07/08/11 03:08 PM
I received a call from GCAR late yesterday and the gauges are done. I'll have them back next week. The dash assembly should be in the car by the weekend.
The carpet also showed up yesterday. I have it laying out in the basement.
I ordered a new VIN sticker from ECS. I also bought a can of RPM. A few of the bolts I redid with Caswell Platings black oxide kit have some surface rust on them. The bolts were sitting in a tub on the damp concrete. The few bolts that have been installed on the car still look good. The sealer that I bought with the black oxide kit isn't going to be good enough. I'll apply the RPM to the bolts instead of the penetrating sealer.
Posted By: jrwoodjoe
Re: updates... - 07/08/11 11:07 PM
That thing is looking SO GREAT Darren! I hope I can get my headliner and interior panels to look as nice as yours. Just BEAUTIFUL!!

Posted By: burdar
Re: updates... - 07/08/11 11:33 PM
Thanks Joe.
There was a small package at the door when I got home just now. It was my antenna bezel. I sent the original one out to AIH chrome in Dubuque because the new repop didn't fit the contour of the fender. This one fits and looks awsome.
Very nice job, great attention to detail!
Super nice project.Will follow all the way!!
Posted By: rayztoy
Re: updates... - 07/17/11 01:16 AM
Very nice... Keep up the good work and keep the pics coming!
Posted By: burdar
Dash Restoration is done....finally - 07/22/11 03:05 PM
I disassembled the dash back in February. I just finished it up on Wednesday and installed it last night. It was a big project and I'm happy that it's behind me. I wasn't looking forward to this part of the build but it was accually easier then I thought it would be. I just took a lot of pictures and made a few notes for the reassembly.
The dash assembly had been sitting upside down on a bench for the last 7 or 8 years so it was very dirty.


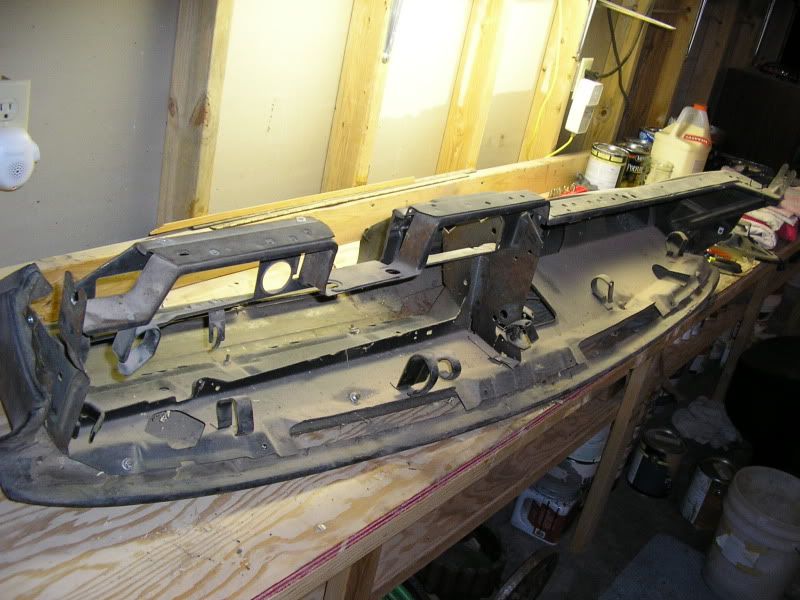
The original pad was is great shape up until it was removed from the car. Dad tripped on something in the garage and dropped his end of the assembly which shattered the passengers side of the dash pad.
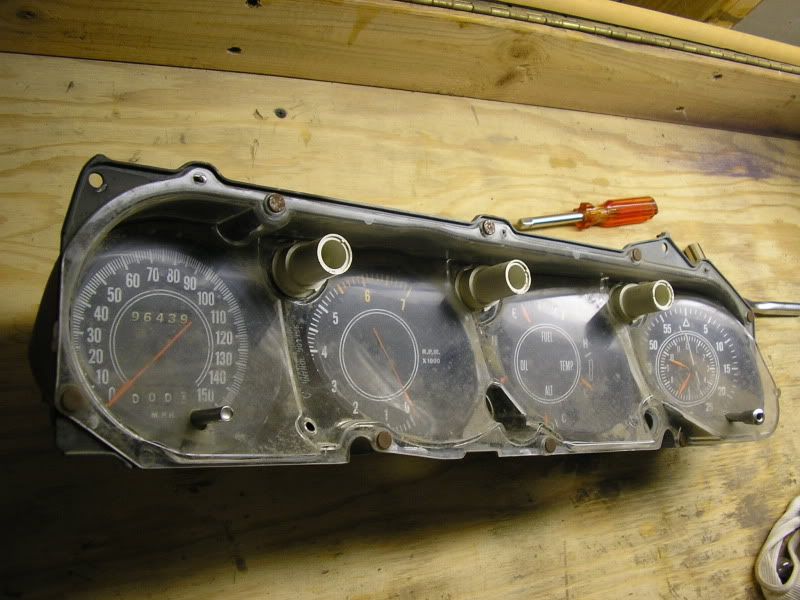
Dave from Rosevillemoparts.com was having a dash pad sale so I decided to go ahead and send my pad off to be redone. We worked it out so I would get my original core back to minimize any fitment issues.
While the dash pad was being redone, I sent the gauges out to Glen at GCAR. The gauges were in pretty good shape over all. Glen rebuilt the speedometer and relettered the odometer. I didn't want the mileage turned back to 0 so he left the mileage at 96439.(a car is only original once anyway right?) The tach was surprisingly pretty accurate but was recalibrated and cleaned up. The fuel level, temp, oil pressure and alt gauges were still in great shape. The clock was converted to a quartz mechanism.
Posted By: burdar
Re: Dash Restoration is done....finally - 07/22/11 03:40 PM
I got the dash pad back within 3 weeks. There was a lot of extra foam that needed to be removed but that's to be expected with an Ultimate Rides pad. I trimmed a lot of foam out of the light bar area and was able to get that to fit. The drivers side lower dash trim didn't initially fit. I was able to get it fitting pretty good with just a little sectioning of the foam in a couple areas. I wasn't impressed with the fit of the right hand lower dash trim though. The pad was way too thick in that area and didn't line up with the trim.(where the trim and pad come together by the gauges) I should have just heated up the trim with a heat gun and moulded it to fit the contour of the pad...but I didn't. Like an idiot I tried to cut some foam out of the pad and ended up ruining it. I called Dave and told him what happened. I was fully expecting having to buy a new pad again. He got in touch with me a few days later and said UR would fix it for me as long as I paid the shipping both ways. So...the brand new messed up pad went back to UR.
I waited about six weeks and still didn't have the pad back. A couple calls to UR didn't seem to make a difference. Finally, I called Dave. Even though it was no longer his problem, he was nice enough to give UR a call for me to see what was going on. The next day I got a call saying the pad was shipping.
As soon as I opened the box, I knew that I hadn't been sent my original core back. I had engraved my initials in the core so I'd know if I got mine back. I think UR sold my core to someone else...that's why it took so long to get one back. The first pad was accually nicer then this one but I wasn't going to press the issue. I'd had enough messing around and just wanted to start the assembly. It's definatly nicer to be working with the original core because I had to redrill the speaker grill holes as well as the VIN plate holes in order to get those parts to fit.
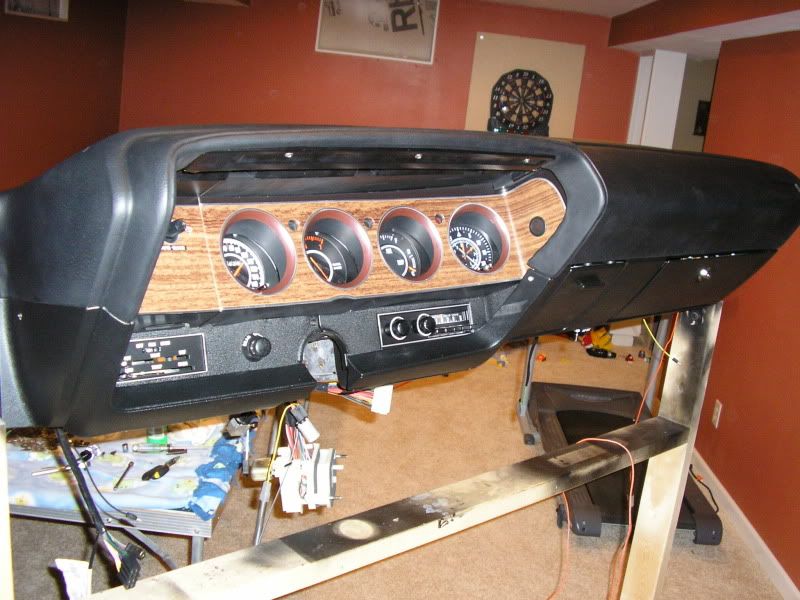
I mounted the pad on the frame and installed it. I wanted to make sure it fit before I had it completely assembled.

There were a few issues but was able to work those out after talking with a few people and seeing some pictures of original dashes.
Posted By: burdar
Re: Dash Restoration is done....finally - 07/22/11 04:23 PM
Here's a pic of the original heater control bezel.

This was my first time trying to refinish a part like this. It was accually pretty fun to do. It took four different paint steps to get it done. I think it turned out nice for being my first time doing it.
After cleaning off all the original paint, I sprayed the inner rectangle area with SEM Trim Black paint. Once that was dry, I masked off the inner section and sprayed the bezel with VHT Wrinkle Paint. Before spraying that paint, I sprayed a test sample because I'd never used the wrinkle paint before. The test turned out good so I went ahead with spraying the bezel. I sprayed it on a hot and sunny day and left the part in the sun for a couple hours. The heat made the wrinkles tighter and it matches what was originally there very closely. I let that paint dry for two weeks before continuing. The next step was to mask off the entire bezel except for the raised rectangle around the controls. I sprayed two light coats of chrome paint onto the rectangle. The chrome paint isn't very chromey(is that a word?) but it looks a little better then a silver paint pen I think. Finally, I used a white paint pen to redo the letters. After going over them once, they still looked dirty. It took another going over to get the white looking crisp.
The finish looks very rough in the picture but it is accually very fine in reality.

Here is a pic of the entire part. It's a little blotchy but you have to spray the wrinkle paint very heavily to get it to wrinkle. It looks better without the flash. The speaker fader knob and bezel are NOS parts my dad bought 20 years ago.

I redid the AM radio face plate the same way. I sprayed it with SEM Trim Black and sprayed the chrome paint on the raised rectangle area.
Posted By: burdar
Re: Dash Restoration is done....finally - 07/22/11 05:03 PM
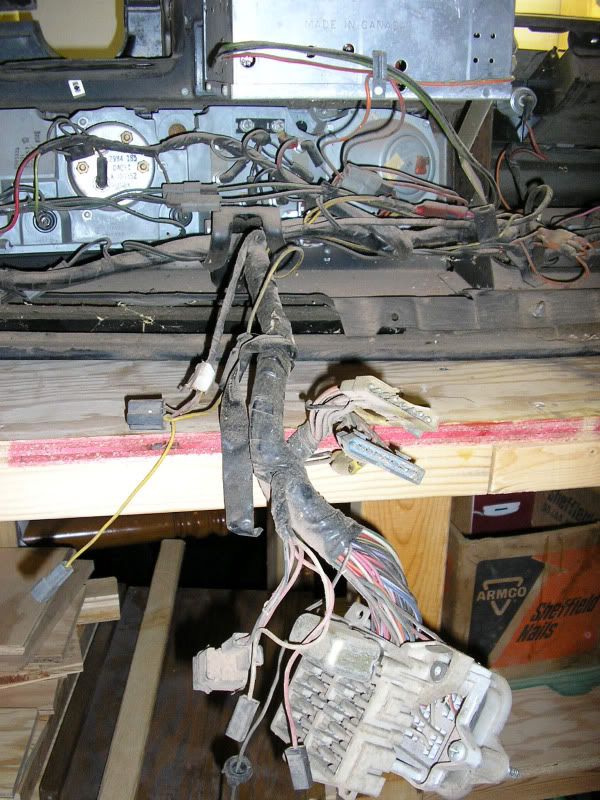
I bought a new M&H dash harness even though the original one was in good shape. The only problem area was the white connector at the steering column. The large blue wire melted the connector and had been bypassed a long time ago. I laid the old harness next to the new one and transfered all the secondary harnesses over.
The map light switch had major problems. The toggle lever didn't move anymore without a lot of force. I believe it was also causing a battery drain. I sent the switch out to Jim at JS Restorations. He rebuilt the switch and even kept the factory date codes intact. The plastic MAP LIGHT bezel was broken and I didn't want to try gluing the pieces back together. I found a metal one from a 70 Cuda that I cleaned up and painted black. I used Testors white paint for the recessed letters.
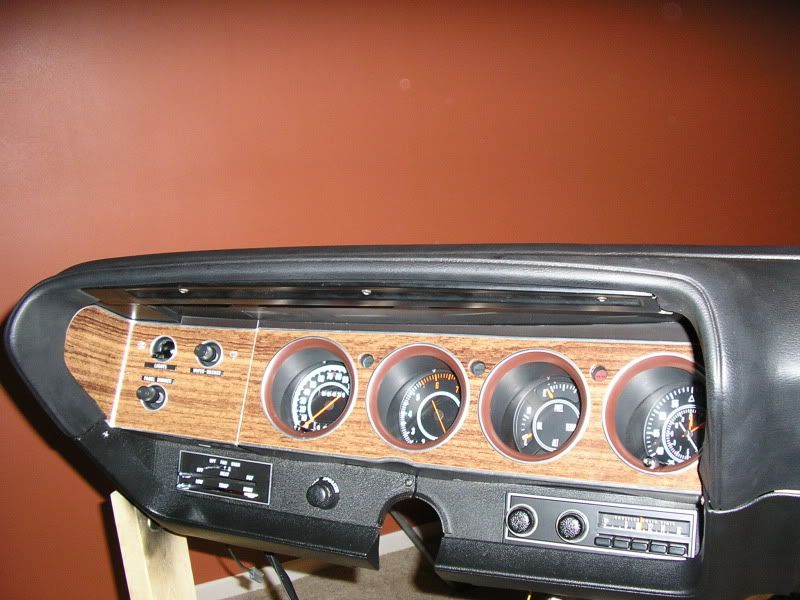
The factory woodgrain was in OK shape. The main woodgrain piece around the gauges had separated from the metal backing though. I was going to reuse the woodgrain but it just didn't look good enough. I lucked out and found someone online who had new pieces that they weren't going to use. Otherwise I wouldn't have been able to afford them. They came flat and I had to bend them to fit the plastic bezel. I had dad give me a hand with that. We used a piece of pipe to push against to make the bends.
The new pieces look good but there are some differences between them and the original woodgrain piece. The new switch panel piece says "lights" where the original said "head lamps". The new part also has little pictures of wipers and lights next to the switches. The original didn't have those either. The main woodgrain section is a little different too. The brown around the gauges is a little different color and that section is a little too big. I had to put dimples in the metal so the trip odometer and clock handles would clear. Finally, the seat belt light hole on the right side wasn't in the correct spot. I had to grind some plastic out of the bezel to match the hole in the woodgrain piece.
The glove box liner is just a new REM part. The screws that held it together were different then what was on the original liner. I tranfered all of the original screws over to the new liner.


Posted By: CDN72SE
Re: Dash Restoration is done....finally - 07/22/11 09:45 PM
Very, very nice work you are continuing to do.
Posted By: 19cuda73
Re: Dash Restoration is done....finally - 07/23/11 05:16 AM
Darren that car is looking sweet. Keep the pictures coming.
Posted By: 71rm23
Re: Dash Restoration is done....finally - 07/23/11 04:20 PM
Quote:
Darren that car is looking sweet. Keep the pictures coming.

Posted By: denfireguy
Re: Dash Restoration is done....finally - 07/23/11 09:55 PM
You will be caught up with me in no time. Looking great.
Craig
Posted By: rayztoy
Re: Dash Restoration is done....finally - 07/28/11 01:40 AM
Darren,
Nice work! Keep the pics coming. You inspire me...
Ray
Posted By: burdar
Re: Dash Restoration is done....finally - 07/28/11 02:28 AM
Thanks everyone for nice comments. It gives me the motivation to continue trying to do my best instead of just throwing it together quickly.
Last weekend my friend Paul came back over and we worked on the underside some more. The car was rusted pretty bad so there are a lot of pits on the underside. I'm trying to fix the most visable ones but there are a lot that I just can't reach. The car was originally fully undercoated so I can always spray it if it doesn't turn out. I've got one more area that I need to fix and then it's done...the best that I know how anyway.
I realized on Saturday that there is no way to install the brake and fuel lines while the car is on the body stand. It looks like I'll be putting it back on my smaller stands sooner then I thought. I had hoped to undercoat the wheelwells while it was still up higher.
I talked to my boss the other day about using a forklift from work to lift the car off the stand. That's the only safe way I can think of to do it.(without hauling the car to a shop and using a hoist) Maybe right after the Mopar Nat's I can get that done.
Posted By: jrwoodjoe
Re: Dash Restoration is done....finally - 07/28/11 03:07 AM
The dash turned out great Darren.
Looks awesome! Funny, the dash stand you built looks very similar to mine. It worked out good for me and looks like yours worked out good too.

Joe
Posted By: burdar
Off the stand! - 09/28/11 03:59 PM
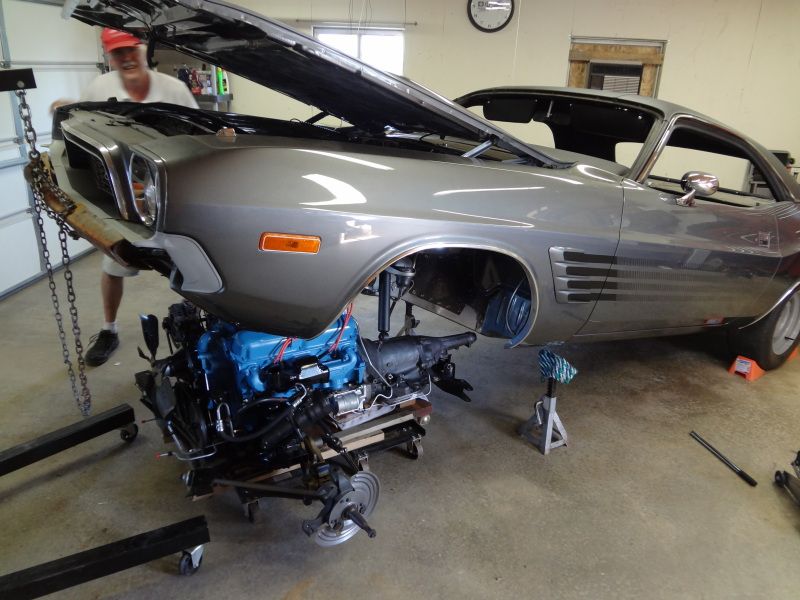
The car came off the body stand yesterday. A guy from work came over with the "donkey" and lifted the car off the stand. I've been waiting for about 3 weeks for them to have a delivery close to my house. Now that the car is back on my stands, I can get the brake/fuel lines and gas tank installed before winter.
My new Accurate Exhaust system should be here today. Once the gas tank is in, I'll install the muffler heat shields. I might even hang the mufflers and over axle pipes.


Posted By: UCUDANT
Re: Off the stand! - 09/29/11 12:15 PM
Wow it looks sweet. Thanks for including the procedure and paints you used on the heater control panel BTW
Posted By: denfireguy
Re: Dash Restoration is done....finally - 09/30/11 01:54 AM
Quote:
I bought a new M&H dash harness even though the original one was in good shape. The only problem area was the white connector at the steering column. The large blue wire melted the connector and had been bypassed a long time ago. I laid the old harness next to the new one and transfered all the secondary harnesses over.
Does this look familiar? Mine was the Red wire that burned.

Posted By: burdar
Re: Dash Restoration is done....finally - 10/03/11 04:45 PM
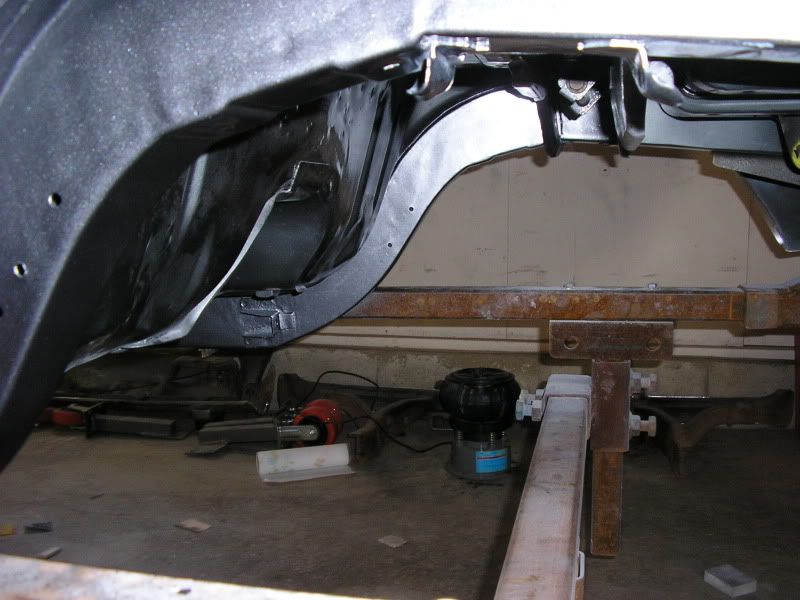
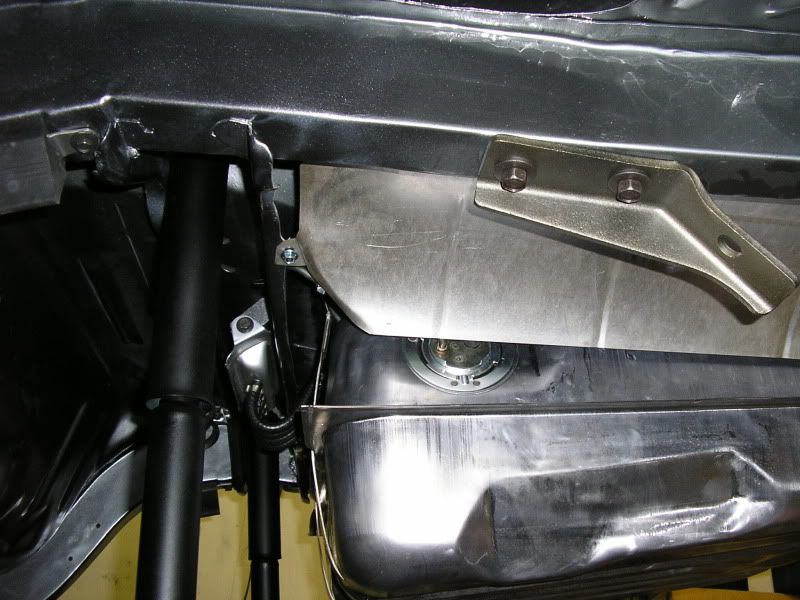
Over the last week I installed the brake and fuel lines. I also installed the fuel tank yesterday. The lines are stainless and are from Fine Lines. They fit fairly well but needed some tweeking here and there. The tanks straps and J-bolts needed to be modified a little bit to fit in their mounts. Before the tank went in I bolted the shocks to their upper mounts and installed the passengers side over axle pipe hanger.
The exhaust hanger(Accurate) isn't 100% stock looking but it's close enough for me. The differences don't affect the function of the hanger. You can see that the original part used bolts to clamp onto the pipe where the new part uses carriage bolts and nuts. The lower strap is also different.
I preinstalled the vapor separator onto the new tank and made a new tank pad.
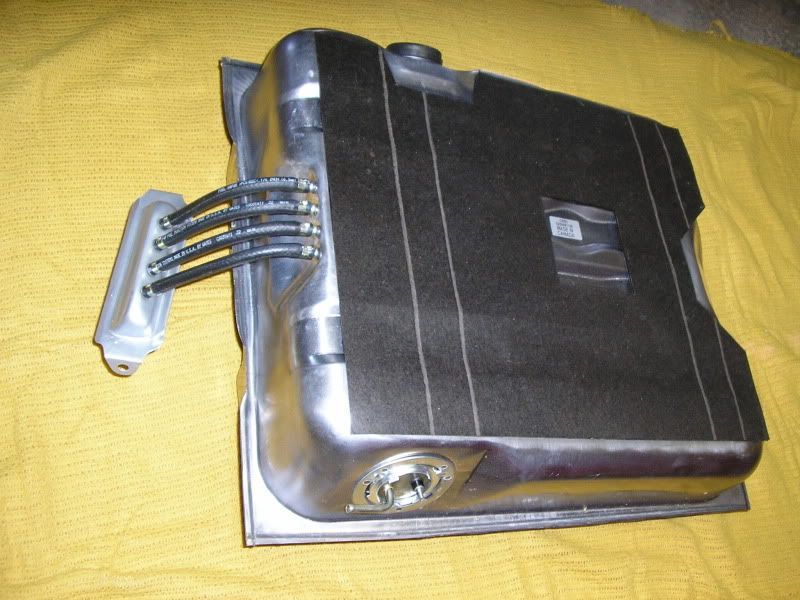
fuel tank and vapor separator installed

Once the fuel line connection was hooked up I installed the new muffler heat sheilds from Dales Cuda shop.
Posted By: CDN72SE
Re: Dash Restoration is done....finally - 10/03/11 05:04 PM
Looking good and nice job with the tank pad.
Posted By: 19cuda73
Re: Off the stand! - 10/03/11 09:30 PM
Darren your car is really looking Sweeeet!!!. First class job. You are building a car that is turning heads already. Keep up the good work.. I appreciate your help trying to work out the tough issues as well.
Posted By: burdar
Re: Off the stand! - 10/24/11 08:38 PM
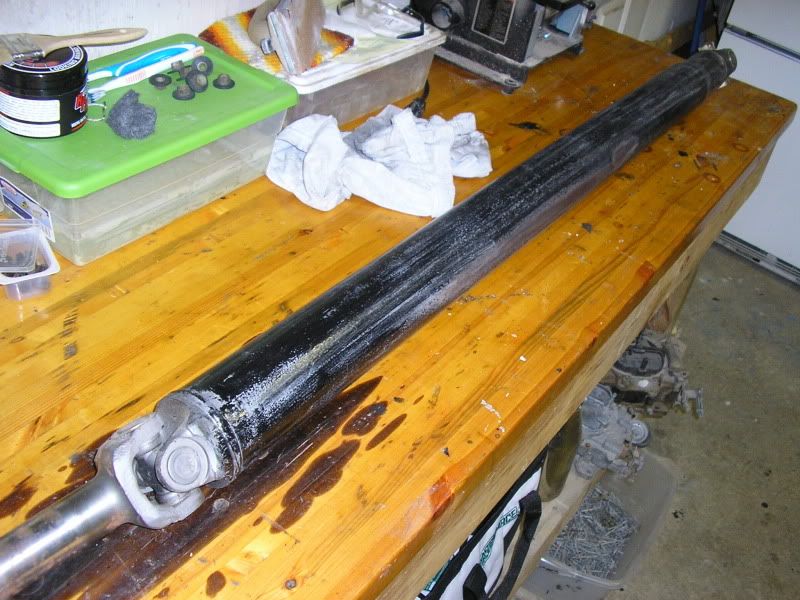
About a week and a half ago I was in the garage trying to decide what I wanted to work on next. I saw the driveshaft sitting there so I decided to work on it. Probably seven years ago I wire wheeled the shaft and brushed on some POR-15. Then I sprayed it with Detail Gray spray paint.

Since then I've seen some awsome looking driveshafts restored and left bare metal. I wanted to see how nice I could get the driveshaft to look without using any paint. Well, it didn't turn out as nice as I had hoped since it was extremely pitted but I'll show what I ended up with anyway.
I started by brushing on some paint stripper to remove the Detail Gray paint. It came off easily. Here you can see the POR-15 underneith.
Next, I sanded off most of the POR-15 with 80 grit sand paper and removed the U-joints.
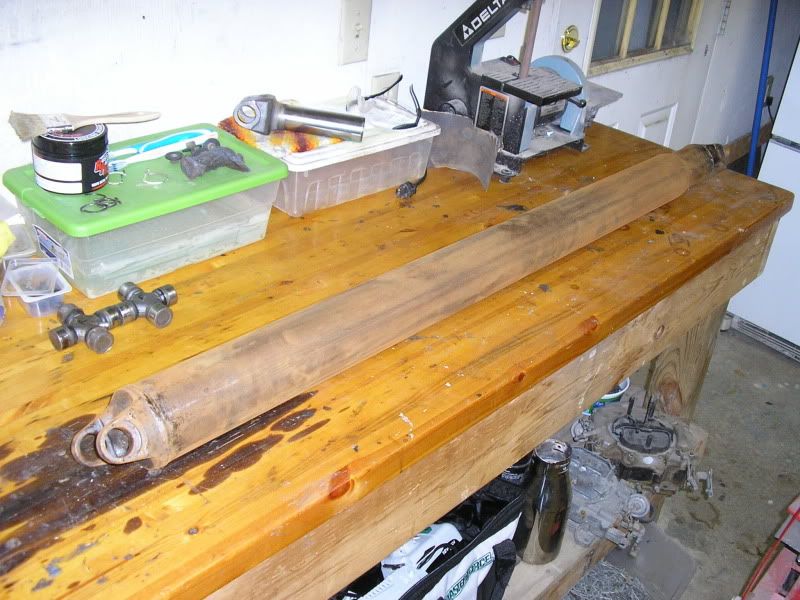
I went to the hardware store and bought some 4" PVC pipe and a cap. I poured EvapoRust in the pipe and inserted the driveshaft.

After a day of soaking, the shaft came out rust free. I still had paint and POR-15 on the ends which required a little sandblasting to clean up.
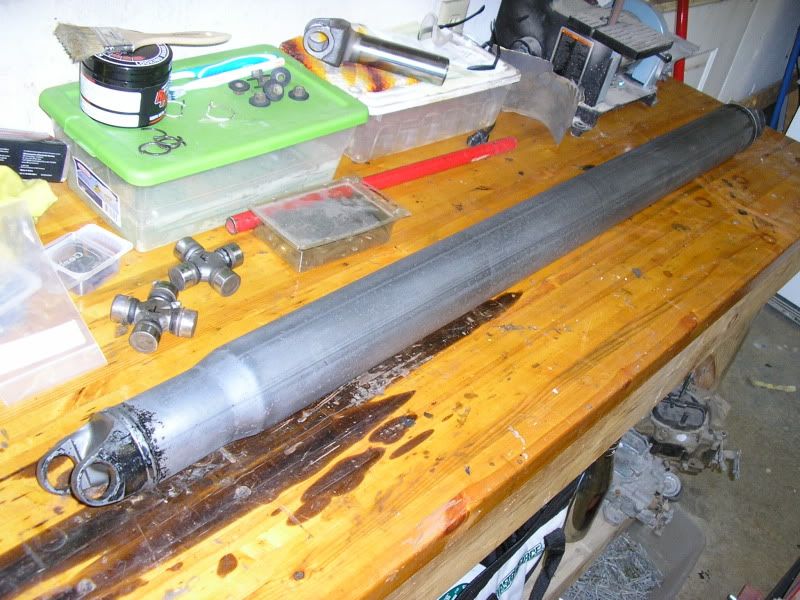
I was shocked to find a nice looking part number still on the driveshaft.

I sanded on the shaft a little but the pits weren't coming out. I got online and found out that driveshafts are only about a 1/16" thick so I decided to just leave it. I lightly bead blasted the shaft to remove some of the sanding marks. Finally, I rubbed it down with steel wool to get rid of the blasted finish. Once the ends were cleaned up I dipped them in my black oxide solution for 30 seconds to darken them. I rubbed them with steel wool to remove some of the darkness on the high spots.
I took the driveshaft to my father-in-laws house and he helped me reapply the heat markings from the end caps being welded to the tube. Over the weekend I heated the driveshaft and applied RPM to it so it won't rust again. I also applied some RPM to the new U-joints. While I had the new joints appart I noticed that one of the caps was missing two of the needles. :22yikes: I returned that one today and got a replacement. The only other thing I need to do is have it ballanced.
Here's the finished product. I took this picture without the flash to hide some of the pitting. Hopefully it will look OK under the car.

Posted By: jrwoodjoe
Re: Off the stand! - 10/24/11 08:42 PM

Driveshaft turned out great Darren. Wish I had done similar to mine now. Getting closer buddy!
Joe
Posted By: 19cuda73
Re: Off the stand! - 10/25/11 02:42 AM
Darren Quite the improvement, Driveshaft looks great. keep up the good work!
Dennis
Posted By: UCUDANT
Re: Off the stand! - 10/27/11 01:23 AM
This car is going to be sweet, great work.
Dennis looking forward to more of your Cuda too
Posted By: 74fish
Re: Off the stand! - 11/29/11 08:43 AM
Posted By: burdar
Re: Off the stand! - 11/29/11 02:50 PM
Quote:
I want to see that picture in front of the house when it's done.
The original salesman that sold the car is now the owner of the dealership. It's still in buisness but is located in another town. I thought it would be cool to get a picture with him and my dad next to the car infront of the dealership. I'm getting ahead of myself though...I need to get the car done first.
Posted By: burdar
Re: Off the stand! - 02/01/12 07:27 PM
I've been busy working on front suspension parts. Probably 9 years ago I wire wheeled the suspension components and covered them in POR-15. Then I painted them with Eastwood paints to try and replicate bare metal. I wasn't very happy with the way the parts looked but, at the time, I didn't know what else to do with them.
This winter I've been stripping off all the paint and POR-15, hoping to achieve a more correct appearance. Regular paint stripper won't touch POR-15 so I started looking for something that would easily remove it. I found that POR makes a product called POR-Strip that will remove cured POR-15. If anyone has applied POR-15 to something and now need to remove it, I highly recommend POR-Strip. It wrinkles the POR-15 almost instantly and makes removal pretty easy.
I started with the spindles and caliper brackets. After stripping the POR-15, I sand blasted them. I darkened them by brushing on some black oxide solution. Before I assembled the pieces I coated everything with RPM. The finished product turned out a little too dark but they still look a lot better then the previously did.
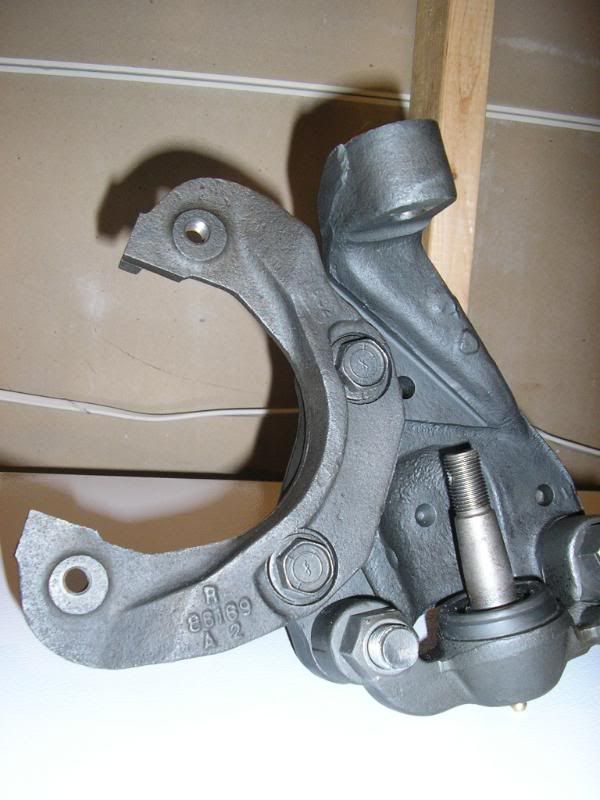
Posted By: burdar
Re: Off the stand! - 02/01/12 07:37 PM
Next, I turned my attention to the center link, strut rods, tie rod ends and adjusters. Everything in this next pic was covered in POR-15 except the tie rods. I just clear coated those piece however they had started to rust underneith the clear.
After the POR-15 was removed I bought a smaller section of PVC and put the center link and strut rods inside. I filled the PVC with a 1 to 1 ratio of muriatic acid and water. Once they were rust free, I dumped out the acid and poured in baking soda and water. I let the parts sit over night. In the morning I rinsed them off and RPM'd them.
I also soaked the tie rod adjusters in acid. Before RPMing those pieces(as well as the clamps)I lightly wire wheeled them.
The tie rods I just stripped the clear coat, rubbed them with steel wool until they were clean and RPM'd them.
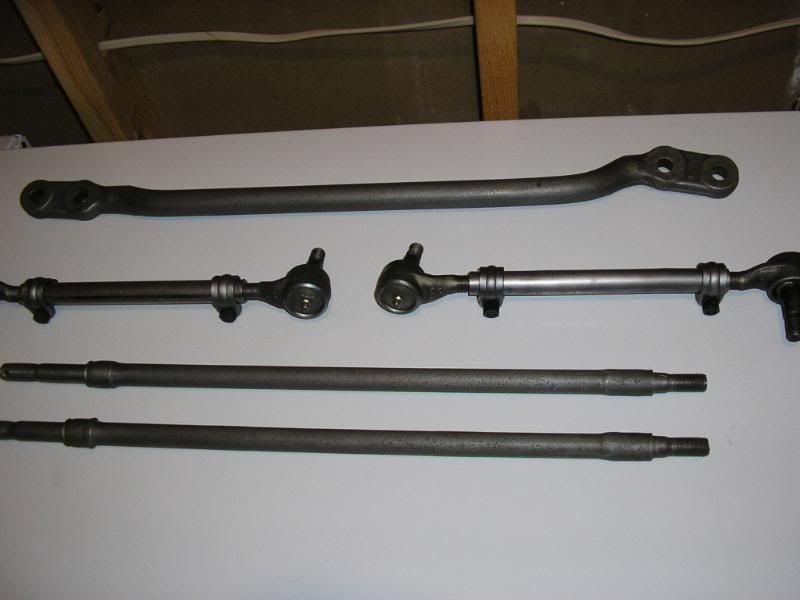
Posted By: burdar
Re: Off the stand! - 02/01/12 07:45 PM
I had planned on buying a new idler arm but it turned out to be in perfect shape. I stripped the paint off of it and soaked it in EvapoRust since I didn't want to get any acid down inside of it.

The calipers I'm using are reman pieces I bought a long time ago. They had some slight surface rust from sitting for so long. I removed the pistons and all the seals. I cleaned off the surface rust with steel wool and RPM'd them. I reassembled them and installed new hoses.

Posted By: burdar
Re: Off the stand! - 02/01/12 08:01 PM
The LCA's looked pretty bad. There was a lot of rust scale under the POR-15. I didn't even want to try an strip the paint so I just had them sand blasted. I was surprised how nice they came out. The date codes were still visable on the rivit heads.
I rubbed the LCA's down with steel wool, darkened the cast lower ball joint piece, the rivit heads and the torsion bar socket. I masked off a dip line and sprayed 3 coats of Krylon battery protectant followed by a matte clear. I let them dry for a day before I heated them up and RPM'd them. I went right over the paint with the RPM for some more protection. I think they turned out pretty decent. This pic was taken before the RPM was applied.
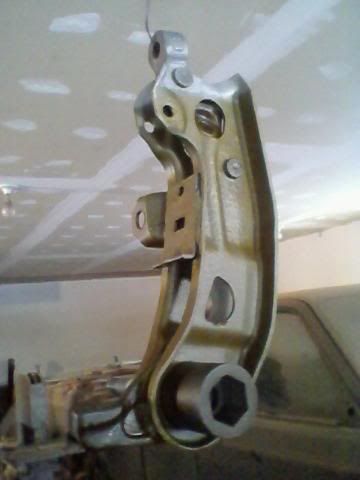
Last night the engine/trans were removed from the K-member. The engine was put back on a stand so I can change a few things. I need to remove the cork valve cover gaskets and install rubber ones...all the brackets have been removed and will be redone with a more correct looking black.
The trans is going to get stripped of the AlumBlast paint I used on it earlier and all the fasteners and brackets will be redone without paint. The K-member will be sent out to get powder coated and the steering box will get some new seals and a coat of black paint instead of the incorrect cast blast paint that's on it now.
The original carb is going out to Scott Smith this week. I'll be sending the alt out to Dixie soon too.
Posted By: burdar
Re: Off the stand! - 02/17/12 08:17 PM
I made some good progress on the K-member assembly this week. I had the K-member and swaybar brackets powder coated an 80% gloss. The powder coater was only supposed to blast the swaybar so I could darken it and leave it gray. He ended up powder coating it by mistake.
I put a pitman arm seal kit in the steering box and painted it with Eastwoods Extreme Chassis Black. It has a little less gloss then the K-member which I believe is correct. The rest of the suspension componants are bare metal.(except for the LCA) The dust shields are supposed to be galvanised but I bead blasted them years ago thinking they were supposed to be black. I stripped off the black paint I had put on them and lightly wire wheeled them. I still have to redo the end links and find some new pins for the strut rods but basically the K is done.

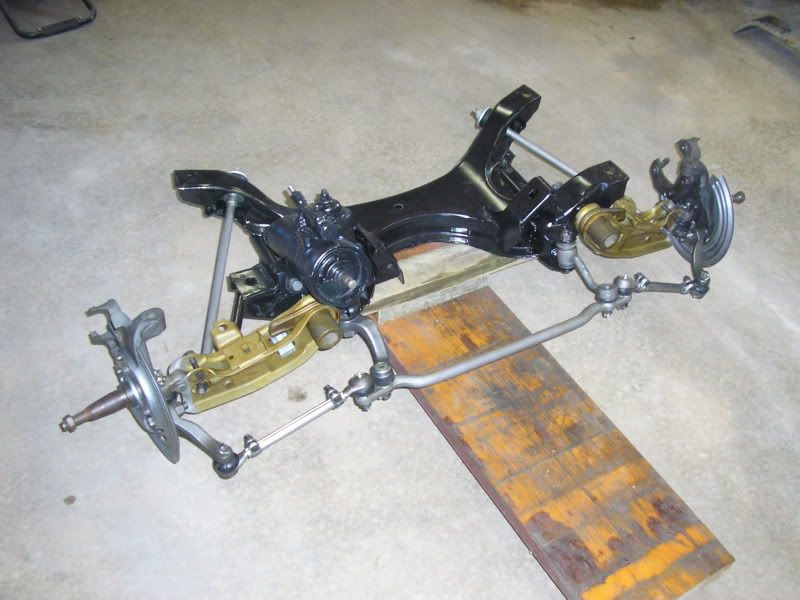
Posted By: burdar
more progress... - 02/19/12 03:03 PM
The guy that did the bodywork and paint on the car lives about an hour away from me now. A couple weeks ago I gave him my air cleaner, spare steel wheel and 4 Road Wheels to paint. He is going to work on them in his spare time. The air cleaner and spare wheel will be painted about an 80% gloss. I'm not sure what paint we are going to use yet. He said that he can add a flattening agent to the gloss paint BUT, if you clean/polish the parts often, you will bring back the gloss. He might look for a paint that is accually designed with less of a gloss. I don't know how this paint stuff works...I'm just going by what he tells me.
The Road Wheels will be sprayed a semi gloss...a little less gloss then the spare wheel. The spokes are being masked off so as not to destroy the original matte chrome finish. He sent me a couple pictures of some of the blasted parts.


Posted By: burdar
Re: more progress... - 03/25/12 01:07 AM
Here's a picture of the rear axle assembly that I posted at the begining of this thread. At the time I thought it looked good but I've wanted to redo if for awhile now.
Previously, everything was painted with POR-15 and cast blast paint.

The first thing I did was have a look at the original center section. The car originaly had 2.76 gears but I had a working 3.23 sure-grip so I decided to use it. The 3.23 sure-grip was a factory option for a 318 Challenger in 73 so at least it's correct for the year.

After cleaning off the caked on grease, not much was visable. I did find an orange mark...

...and a little white mark on the side.

I had some used up EvapoRust and decided to soak the center section to see if anything else would show up. After soaking, two yellow dots showed up on the bottom. Two yellow dots stands for 2.76 gears.

The white mark on the side really became visable...

Posted By: burdar
Re: more progress... - 03/25/12 01:13 AM
Next, I removed the axles, backing plates and lines. I bolted on some wood pieces to the ends of the housing to seal it up and had the entire thing sand blasted.
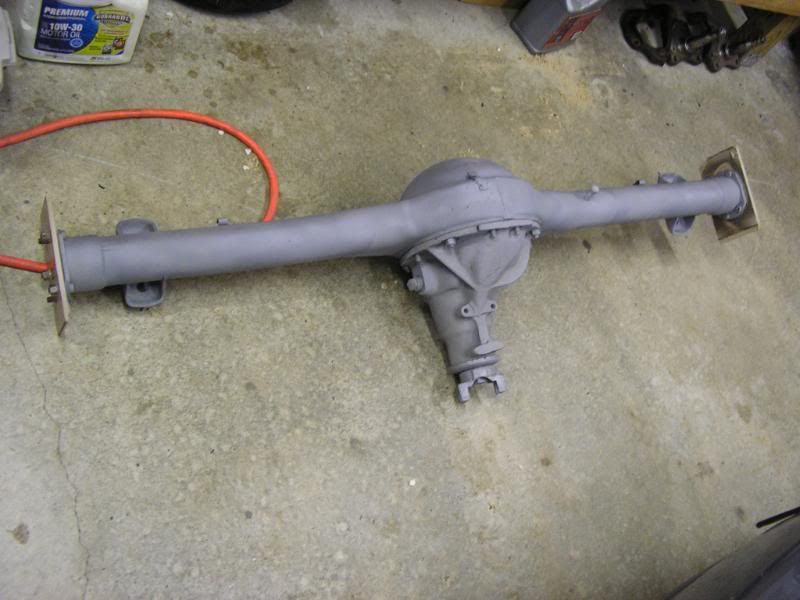
I darkened the center section to get rid of the blasted look. I traced the white stencil from the side of the original center section onto a piece of transparent paper. Then I used some transfer paper and copied it to the other center section. I should have had a stencil made so it would look better but it is what it is. I also put back the two yellow marks on the bottom and the orange mark on the top.
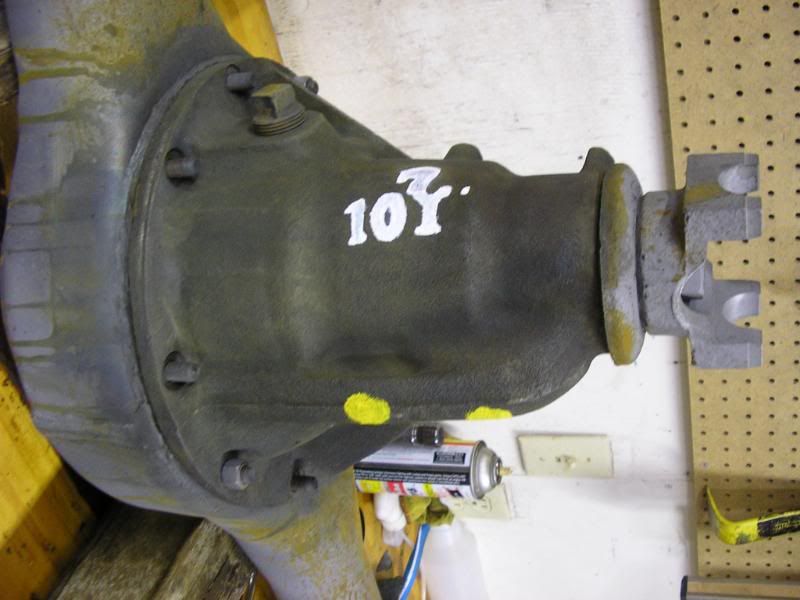
After RPMing the center section and installing a new seal and metal dust cover, I think the center turned out pretty good.

Posted By: burdar
Re: more progress... - 03/25/12 02:09 AM
I had the housing powder coated but I wasn't happy with how it looked. I thought the powder would have hidden the pitting in the tubes but it didn't. I ended up taking the housing to the guy that painted the car. He scuffed the housing...sprayed it with a high build primer and sanded most of the pitting out. Finally he sprayed it with a sem-gloss black. It looks a lot better then it did.
I looked at new brake drums at a few part stores and didn't like what I saw. One of the drums had "CHINA" cast into the face of it. It would have been visable through the spokes in the Road Wheels. I decided to just use the originals. I blasted them, painted the faces an orangish red and RPMed them. I don't know how close to correct the red color is...I could have boughten RestoRicks paint but I need to save money where I can. If it ends up being way different, I can repaint it down the road.
The only other thing I'm considering is painting a yellow or white "J" on the center of the housing. It looks like the "J" stood for 1973. The housing was way too rusty to see any original markings. I don't want to add marks that the car didn't have but the "J" looks to be a pretty safe bet. I havn't decided yet.
Here's the finished rear axle assembly...
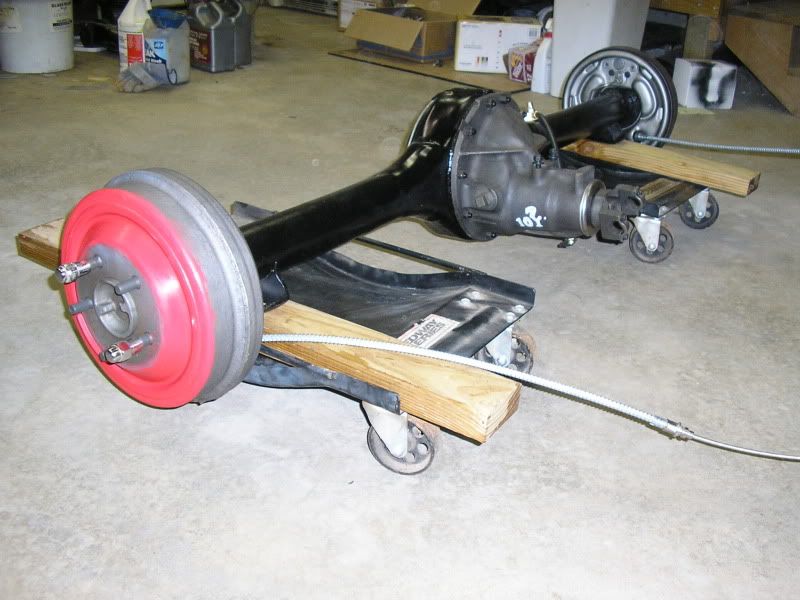
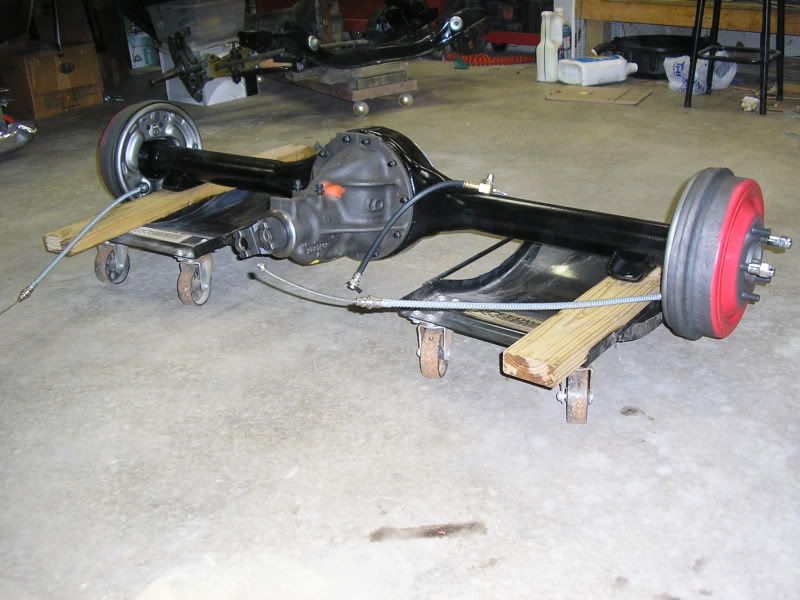
Posted By: redmay
Re: more progress... - 03/25/12 04:47 PM
Your doing a great job and i love the pictures , I have a 73 with same colors and I haven't seen many with this color combo . Keep up the great work
Posted By: 19cuda73
Re: more progress... - 03/26/12 03:41 AM
Darren I agree always first class work. Keep the pictures coming.
Dennis
Posted By: burdar
Re: more progress... - 03/29/12 04:37 PM
I should be picking up my new MP leaf springs this weekend. I'm not looking forward to disassembling a brand new pair of springs to strip off the black paint though. Hopefully they are assembled first...then sprayed black so I don't have a lot of paint to strip.
I have a batch of fasteners getting zinc plated. When those come back I can reassemble and repaint the engine. It shouldn't be long before the car is back on its wheels.
Posted By: burdar
Re: more progress... - 04/22/12 12:23 AM
Posted By: burdar
Re: more progress... - 04/22/12 12:26 AM
Posted By: jrwoodjoe
Re: more progress... - 04/22/12 01:40 AM
Hey Darren,
Rear axle and suspension stuff look AWESOME man.
Posted By: UCUDANT
Re: more progress... - 04/22/12 02:44 AM
What an amazing car Sir.
Posted By: 19cuda73
Re: more progress... - 04/22/12 06:15 AM
Darren Its looking great!. Good Job getting that thing on the rubber thats a major milestone!!!. You are doing a fantastic job keep up the good work.
Posted By: NV69B7RR
Re: more progress... - 04/22/12 07:57 PM
Awesome progress Darren! Keep up the great work.
Did you use gun bluing on the 8 3/4 pumpkin after sandblasting?
Posted By: burdar
Re: more progress... - 04/22/12 08:20 PM
I used my black oxide solution to darken it. It looks about the same as your springs I think doesn't it?
I didn't have to do anything to the new springs after removing the paint. I just put some paint stripper on each of the leaves and lightly wire wheeled them. They had already started rusting between the leaves. They were already dark so I just RPM'd them.
Posted By: burdar
Re: more progress... - 05/08/12 05:37 PM
Posted By: 19cuda73
Re: more progress... - 05/09/12 12:19 AM
Looks Swweeeeet!!! That thing will be on the road in no time.....
Posted By: burdar
Re: more progress... - 05/11/12 02:22 PM
I got the steering column done last night. The rebuild went well. It's not very complicated. I just disassembled everything and bead blasted the upper parts. I hand sanded the tube since it wouldn't fit in the blast cabinet. I painted most of the pieces with SEM Trim BLack. The ignition key light, upper and lower mounts and the lower steering shaft got painted with gloss black Rustoleum. The turn signal switch was still in good shape so I reused it. The ignition switch had a burned wire on the connector so I replaced it.
Before...

After...
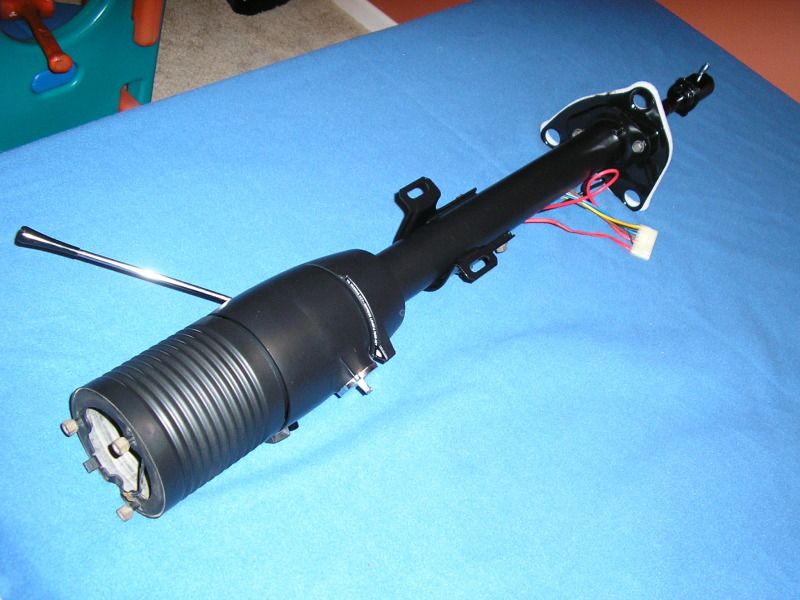
Steering coupler and shaft before...
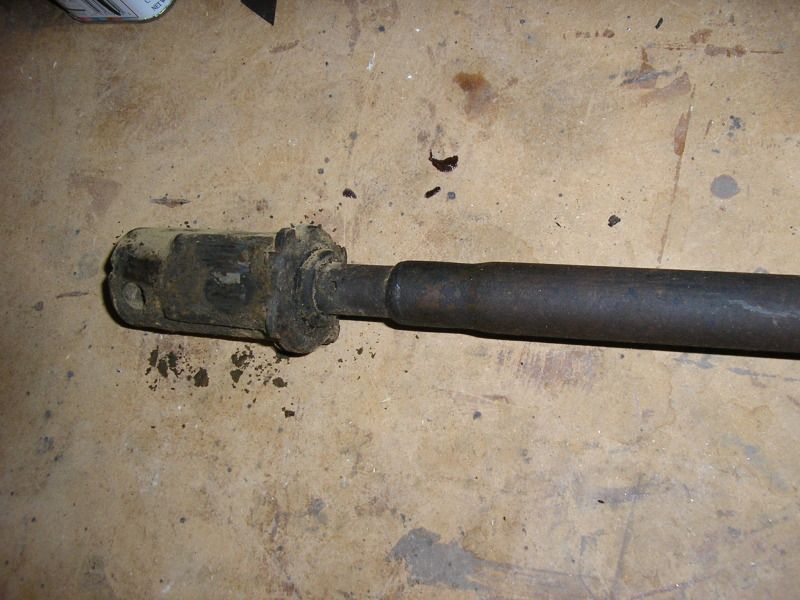
Steering coupler and shaft after...
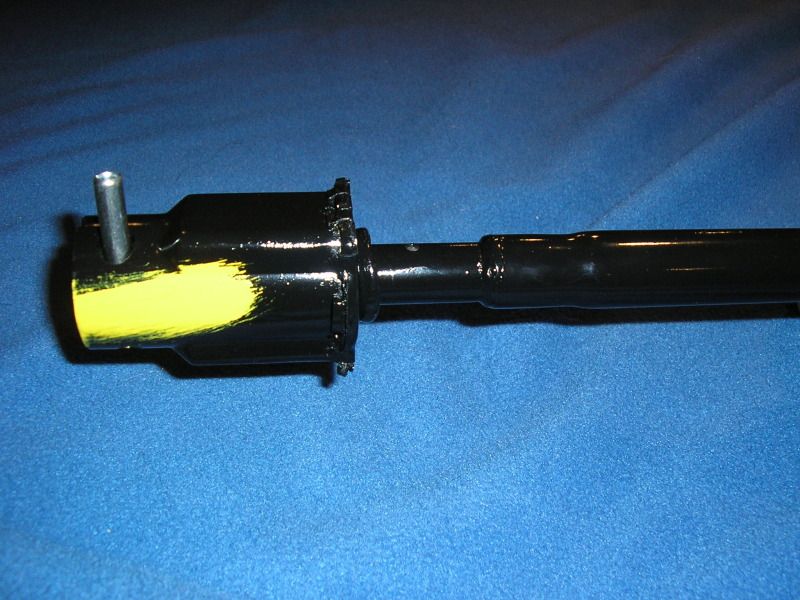
Posted By: burdar
Re: more progress... - 05/19/12 05:03 AM
Posted By: burdar
Re: more progress... - 05/29/12 02:50 PM
Posted By: 19cuda73
Re: more progress... - 05/30/12 12:15 AM
Darren Great Shots!!! That car is looking Sweet!!!
It makes you a little nervous having that thing in the air so high doesn't it!!. This is a major accomplishment though. It definately is going to be a day you and your dad will both remember. You'll be ready soon to fire that motor up.. Congrats
Posted By: jrwoodjoe
Re: more progress... - 06/01/12 04:47 AM
Darren, you have me cleaning my shirt right now because I've drooled all over it.
Your car is sooooo nice. Just Fantastic!
Joe
Posted By: burdar
Re: more progress... - 06/01/12 05:16 AM
Thanks Joe! Things are moving a little faster now. I got the steering column and steering wheel installed tonight along with the heater hoses. Yesterday I got the new fuel pump-to-carb lines back from Fine Lines and got that all hooked up. All I have left to do in the engine compartment is install the radiator and hook up some vacuum lines.
Posted By: 19cuda73
Re: more progress... - 06/01/12 05:49 AM
Looking sharp !! Darren Do you have a date in mind for firing that baby up?
Dennis
Posted By: burdar
Re: more progress... - 06/01/12 02:18 PM
It depends on what I can get done next week. I'm not looking forward to installing the exhaust on my back. That's probably going to take awhile. The radiator isn't done yet. I'm hoping I'll get a call today so I can go pick it up. If everything goes smoothly...maybe I'll break it in on the 9th.
Posted By: DusterKrazy
Re: more progress... - 06/03/12 03:18 AM
It is really nice to see a '73 getting love. Looks nice!!
Posted By: NV69B7RR
Re: more progress... - 06/03/12 05:48 PM
Posted By: burdar
Re: more progress... - 06/03/12 11:48 PM
Yes, things are moving quicker now. Yesterday morning I slid the torsion bars in and hooked up the upper ball joints. I got the rotors and calipers installed too. Later on in the afternoon I installed the driveshaft and dad came over to help me install the exhaust.
Things were not going smoothly trying to install the exhaust from the back to the front. We ended up starting over from the front. It went together much nicer that way. By the time we got the passengers side hooked up it was getting late and our arms were both hurting quite a bit. We'll work on the driver side in a few days.
Posted By: 19cuda73
Re: more progress... - 06/04/12 08:55 AM
Exhaust is fun.
Its the joy of doing all of this while your laying on your back that makes it a fun few days. On your brakes Did you go with Dot 5? or Dot 3 Fluid?
Posted By: burdar
Re: more progress... - 06/04/12 01:59 PM
I'm going with DOT5. I need to find some of those plastic fittings so I can bench bleed the master. I've thrown away a lot of those fittings. I never thought to toss a pair in the tool box.
Posted By: burdar
Re: more progress... - 06/07/12 08:16 PM
I got the master cylinder bled and reinstalled. I opened all the bleaders and within 10 minutes had fluid at all four wheels. The system bled out easily.
The exhaust was finished last night. The rear valance was reinstalled and the tips were adjusted. The radiator is done too so I'll pick it up on Saturday.
Posted By: burdar
Re: more progress... - 07/07/12 02:08 PM
Time for a small update on what I worked on this week. Like a lot of times, I was just bored so I grabbed something and started working on it.
The door panel woodgrain was in OK shape but the corners were starting to curl. I've had new woodgrain for years but never got around to installing it. The new woodgrain was from Year One.
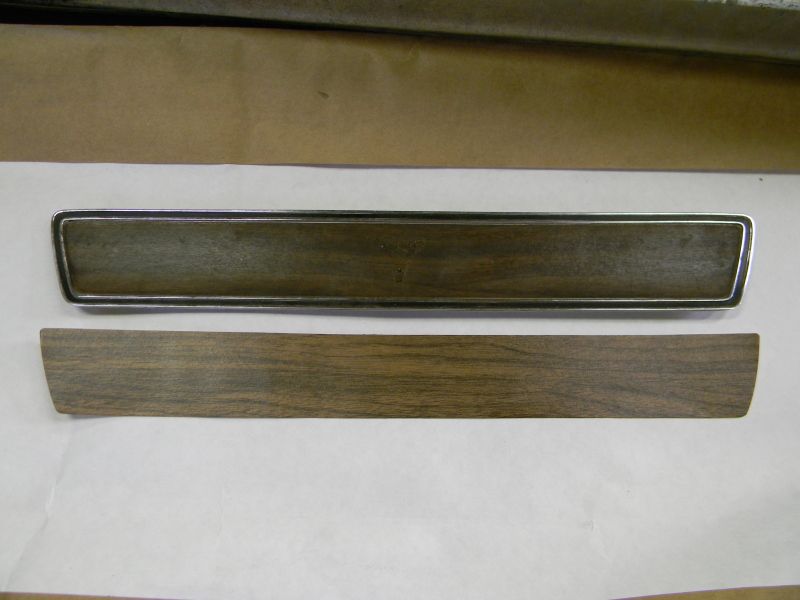
The original woodgrain was darker but it could have darkened up over the years. The new woodgrain matches the color of the dash so I'm happy with it.
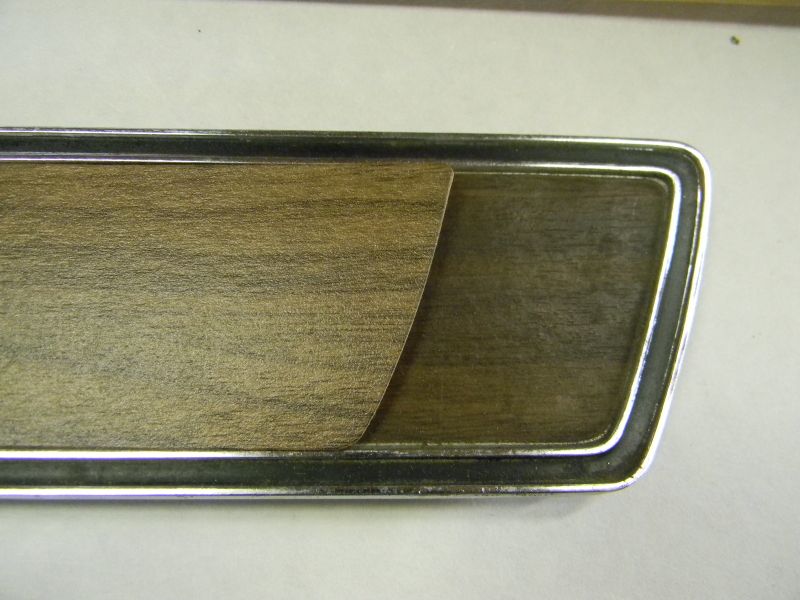
I read online that WD-40 works good at removing the old woodgrain so I saturated one piece with it. I checked it after about 15 minutes and nothing was happening. I got online and did another search. I read where someone used paint stripper with good results. So, I got out the paint stripper and after about 15 minutes, had a look at the decal. It had started to loosen up but it wasn't working very fast. That's when I had an idea.
I bought the wife one of those Shark hand held steem cleaners. I dug it out of the closet, added water and plugged it in. The woodgrain decals peeled right off with very little glue left behind. I couldn't believe how great it worked. For the small spots of glue left on the bezels, I used Un-Du.(Scrapper's Solution) It's for removing stickers and tape from scrapbooking projects. It took the glue right off.
The bezels were in pretty good shape. One of them didn't need any work. The black paint around the edge was still like new. The other side had a few little areas where the paint was scratched. On that bezel, I just misted some SEM Trim Black onto it and wiped the access off the chrome sections. After attaching the new woodgrain decals I turned my attention to the Fratzog emblems. To remove them from the bezels I just used my angle grinder with a flap disc to grind down the pins in the back. I still had a good amount of the pins left for reattachment. I ended up used a very small amount of clear silicone to reattach the emblems. I just put a small amount on a screwdriver and put a daub around each pin. Once the emblems were pushed into place, some silicone pushed out the sides which I figured would happen. I let the silicone dry completely...it would have just smeared if I had tried to clean it up while it was wet. Once it was dry I took a new razor blade and trimmed the excess off the edges. It worked perfectly.
Posted By: burdar
Re: more progress... - 07/07/12 02:10 PM
Then it was time to work on the door panels and rear interior panels. The original panels were a little rough. The drivers door panel and passengers rear panel were in the worst shape. Although they will never look perfect, painting them with SEM paints really makes them look a lot better. Since they end up being a uniform color, your eye isn't drawn to any lighter colored scratches. New panels are on my list but that won't happen until the car is on the road.
I cleaned everything four times, used the SEM Adhesion Promotor per the instructions and finally sprayed them with SEM Landau Black.
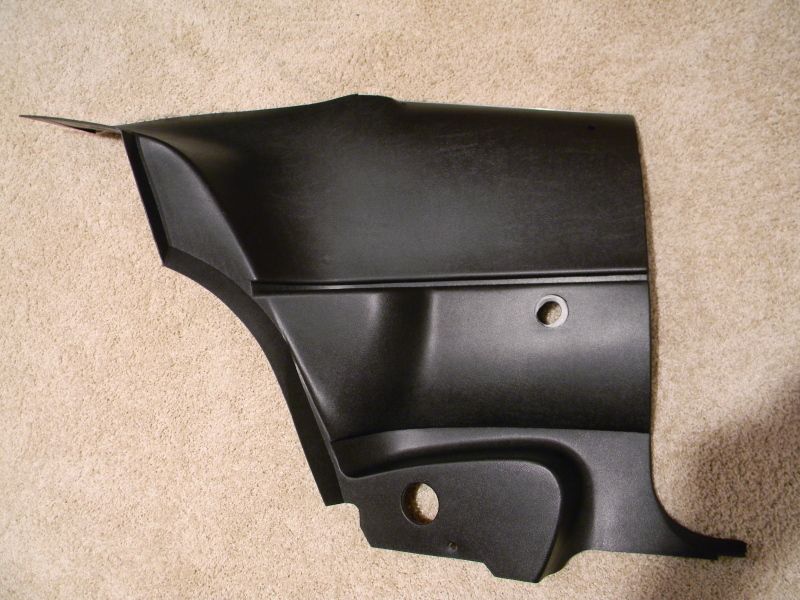
The referbished door panel woodgrain looks great in the panels but the new arm rest pads look awful. The new pads are from Legendary. I can't remember the brand though. There were two options...one was from Palco. I bought the other brand. They are just a block of wood wrapped in vynal. The original ones use a metal core. The vynal isn't close to being the correct grain and the contour of the pad is not right. I'll definately be cleaning up the original ones in the future. One of the original ones is in great shape. The other one is all torn underneith the inner lip. I think I can glue it back together and it won't be seen once installed.
The new window fuzzies don't stay on the panels either. I squeezed the "U" channel together a little more and that helped. I'll probably have to use some weatherstrip adhesive to hold them tight though.
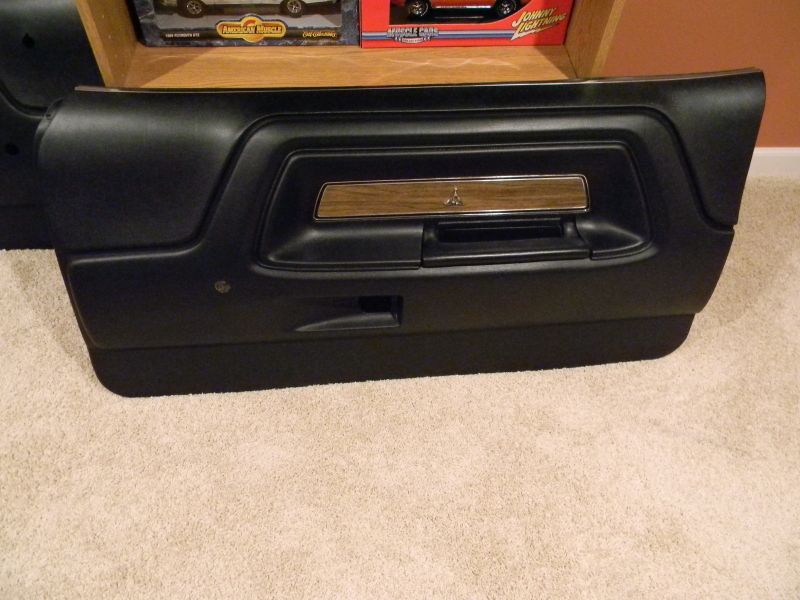
Posted By: burdar
bad two months... - 08/05/12 08:14 PM
The past two months have not gone well. I didn't want to post any updates until I got things sorted out. For those of you that saw my posts in the Question/Answer forum, this won't be anything new.
Back on June 9th I picked up the radiator from being re-cored. I spent the rest of the day installing it and adding fluids. I also put an initial adjustment on the torsion bars and set the wheels on the ground. The car was now on all four tires for the first time in years.
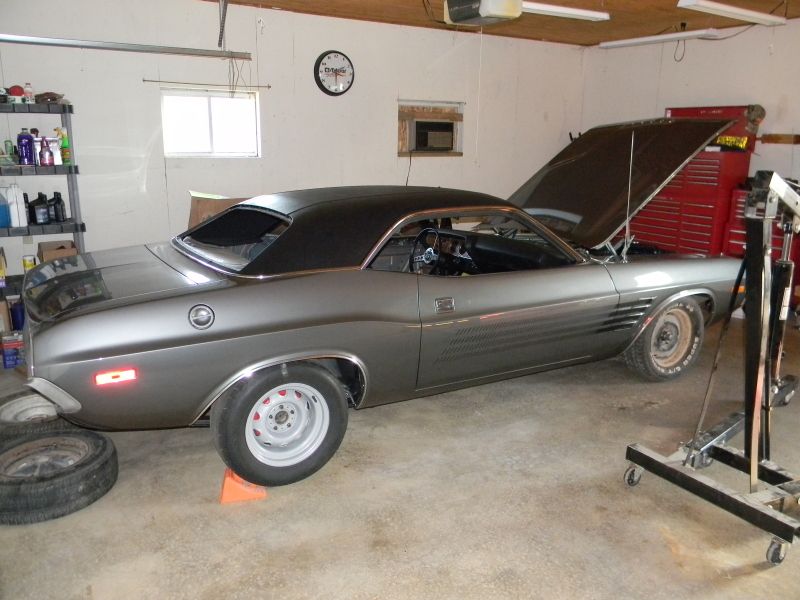
I pulled the battery out of my Durango and set it in the Challenger since I didn't have a battery for it at the time. Everything checked out good. I've got a couple bad bulbs but everything else works like it should. All the harnesses are M&H.
At this point the engine compartment was basically done. I just had to start the engine and break it in. A member over on CC.com posted the vacuume diagram from the FSM. It showed that the EGR lines were color coded originally. I went to a craft store and bought some paint pens. I layed the hoses out on my work bench and nailed the ends down so they wouldn't move. Using my finger as a guide, I put the colored stripes back on the hoses. In this picture you can see the red, green, white and yellow hoses.
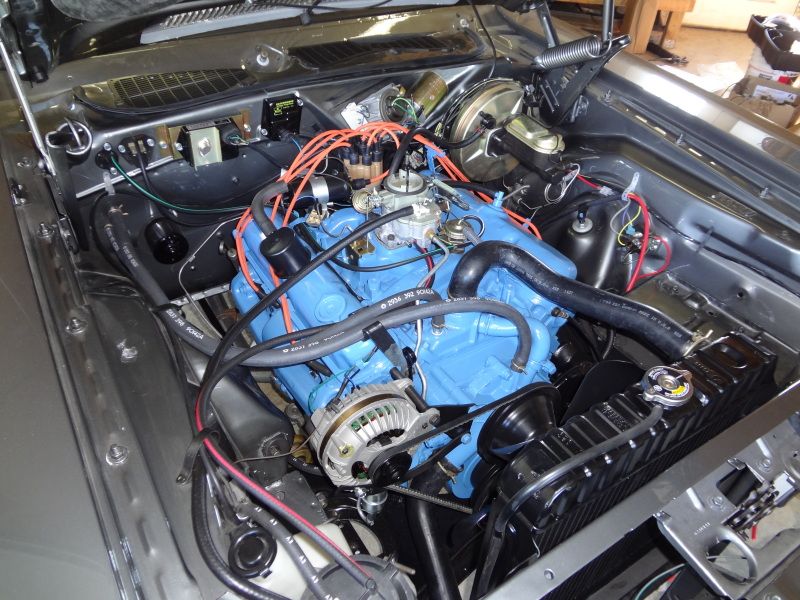
Posted By: burdar
Re: bad two months... - 08/05/12 08:29 PM
This is where things started going wrong. Dad came over that night to help me get the engine running. We had a hard time getting the fuel pump to prime. I had to take the fuel line loose at the carb and squirt fuel into the line using an oil can. I filled the line up with as much gas as it would take. I also squirted some into the bowl vent. Once it finally took off and stayed running, I brought it up to 2500 RPM to break in the cam. The cam was a used MP purpleshaft 340 cam. I had it in a 360 for a couple hundred miles before putting a 484 cam in it. I still wanted to do a break-in to be on the safe side.
As soon as the engine fired I knew something wasn't right. It was missing badly and shaking the entire car. Since the oil pressure was very good and since I didn't hear any strange noises, I went ahead with the break-in. After 20 min I let off the gas. The engine backfired through the carb and died. I started it up again. As soon as I let off the gas, it popped and died.
I called a friend of mine who had a compression tester and he came over the next weekend. We took some readings and cylinders 3 and 7 had 0 compression.
The engine was going to have to come back out.

Of coarse this is when the weather turned very hot. I couldn't work out in the garage very long before having to come back inside. I think I worked in the garage a little each night for three days getting the engine ready to pull. The engine went to the machine shop towards the end of June. They were busy so they wouldn't be able to look at it for 3 or 4 weeks.
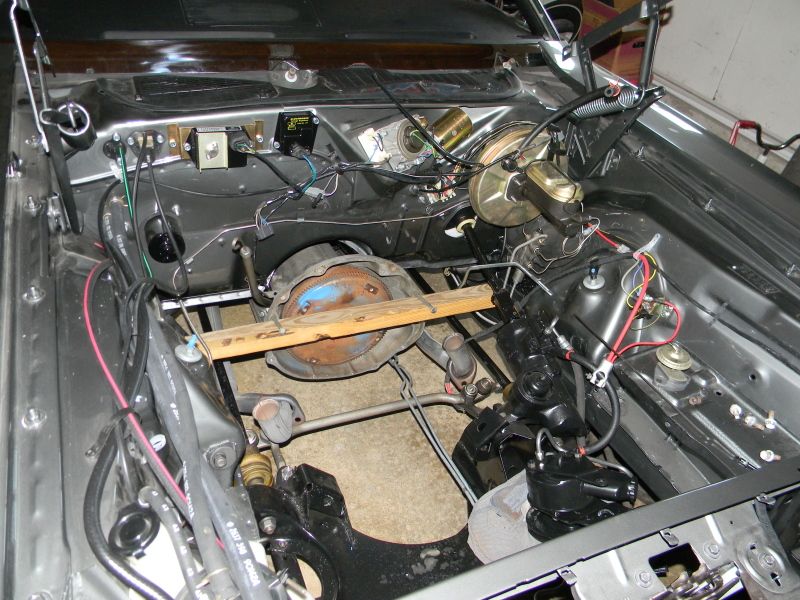
Posted By: burdar
Re: bad two months... - 08/05/12 08:50 PM
The machine shop finally got to the engine after about 5 weeks. They called and told me to come in so they could show me what was found. The cylinder head on that side was the one I had issues with before. Aerohead didn't drill out the oil feed hole for the rockers. It turns out the rest of the head was junk too.
They did a leakdown test and found cylinders 3 and 7 were leaking 90%. There were two sticking exhaust valves and all the seats were cut excessively.(1.88in-1.60ex valves in the 318 heads) That head needed a couple valves, all new seats and all new guides. The other head was working OK at the time but would have had the same work done to it. I ended up bringing in the original heads to have them gone through.
A couple days went by and I went back in to see what the original heads looked like. That's when I was told the original intake manifold was cracked. The crack extended all the way from the choke thermostat to the EGR opening. The manager said, "Now is the time to put a 4-barrel on it."
I had a spare 2-barrel intake that I brought in. The casting is a little different then the original one but I doubt anyone will notice. The original intake had the casting date in the front. This intake has it in the back so you won't see it anyway.
I picked up the engine on Tuesday.
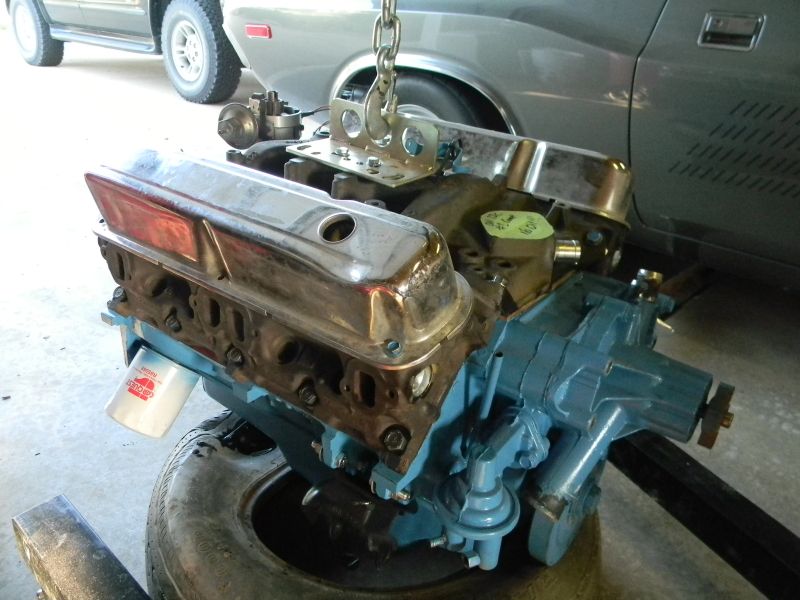
Cleaned and painted it on Wedesday.
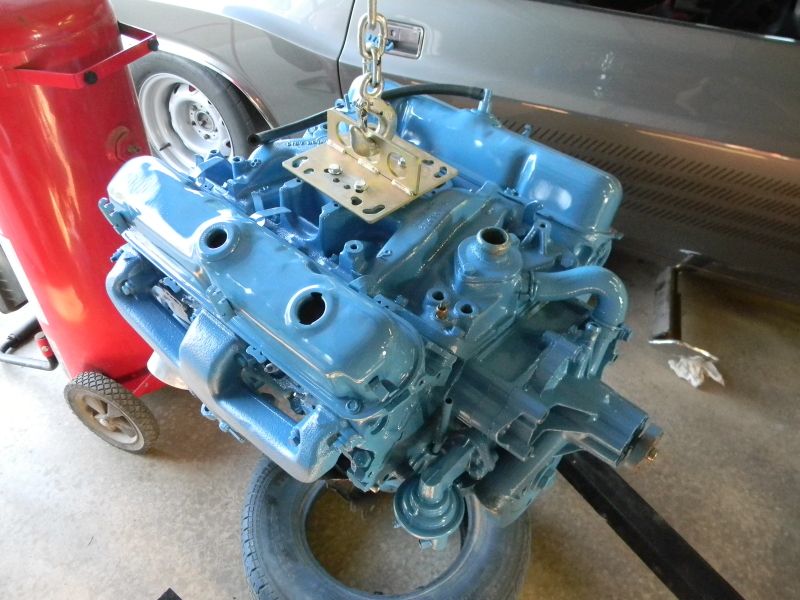
Installed it on Thursday.
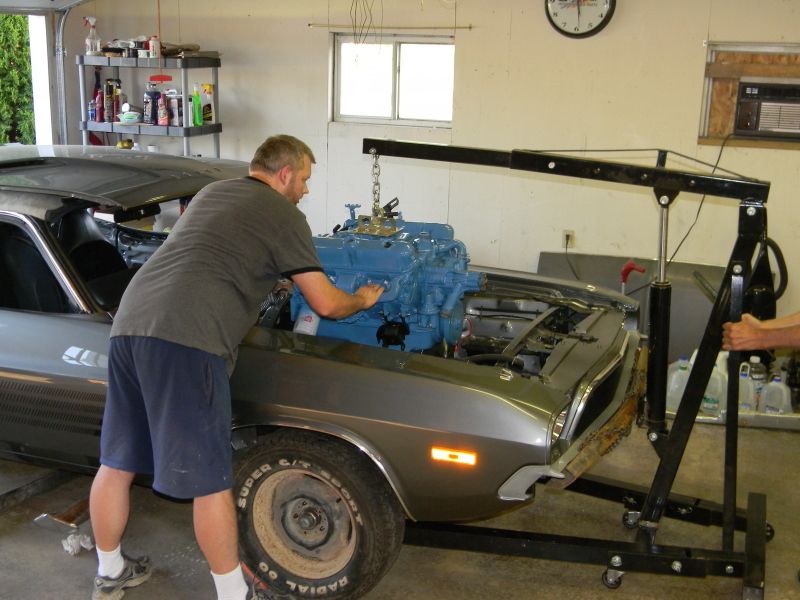
I worked on it Friday night and all day yesterday. I installed the new reproduction battery I got from Fred Gilmore and filled up the fuel line again with gas. It fired right off and sound decent. I was tired so I havn't thrown a light on it yet but at least it runs. Here's a short video I took of it. My wife did a little editing today and added a little production value.
http://www.youtube.com/watch?v=tGKhYa6QDfc
Posted By: JDMopar
Re: bad two months... - 08/06/12 03:05 AM
I'm sorry you've had so much trouble with the motor. Don't let it get you too discouraged this close to the end of all the nice work you've done to the car. It sounds really good now!

Note to self- "Never use heads from Aerohead for anything other than a wheel chock!"

Posted By: 19cuda73
Re: bad two months... - 08/06/12 03:41 AM
Darren, Great job that baby sounds sweet!. You still got lots of summer left wrap up the small stuff and get it on the road. You did a great job on that car. Another fine mopar brought back to life. Now its time to enjoy it!!
Posted By: burdar
progress - 08/20/12 02:33 AM
I ordered tires a couple weeks ago. They showed up on Thrusday.
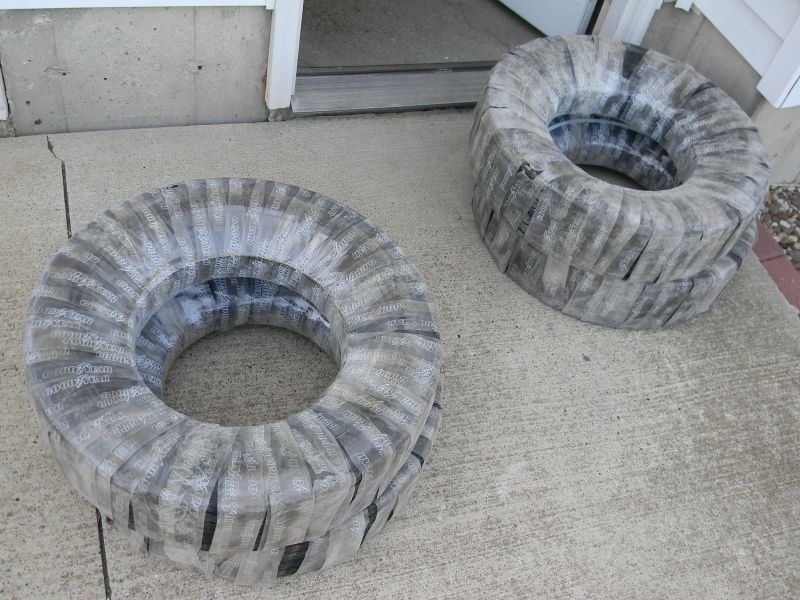
I was worried that I would make the wrong choice. RWL's look great and have a sporty look to them. The WSW are rarely ever put back on and have more of a formal look. I went with the WSW's since it's a 318 car and that's what it originally had. After mounting them up I got worried. They really looked bad. After putting one of the trim rings up onto the wheel though they looked good. The entire wheel being black just looks weird. The trim rings really change the look. The rings will be left off until after the alignment is done. Once they are on, they aren't coming back off without a fight most likely.
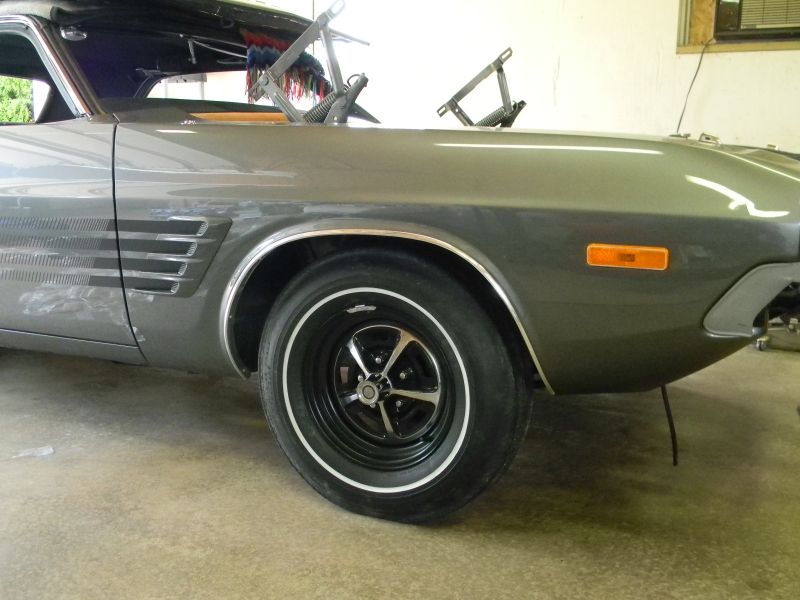
I also got the rear bumper assembly installed. Gary(Challenger_1) sent me some really nice bumper guards that he had in storage for years. I still need to figure out what to do with the fronts since the two pairs I have are all pitted.
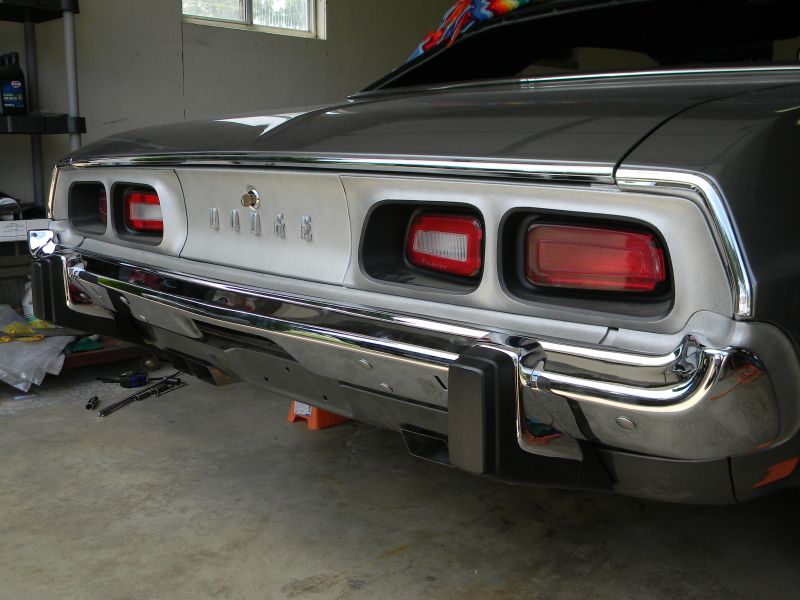
Posted By: burdar
progress - 08/20/12 02:37 AM
I worked on the timing and idle a little yesterday. I don't have a dial back timing light so I'm limited until I can get my hands on one. I set the initial timing at about 12*. The marks on the timing cover only go to 10*. I need to find out how much mechanical advance the older MP distributors have in them. I was told the engine probably will need around 15* of initial timing and then to limit the mechanical advance to a max of 35*. Right now the idle is set at 850 in neutral. It idles nice and fires right up when restarting warm. I havn't tried a cold start since the timing and idle have been adjusted.
I noticed that with the engine running, the brakes were awful. There was about an inch of travel and then the pedal was rock hard. I pushed down very hard and heard a loud POP. The pedal went down lower and then felt perfect. Something in the prop valve must have been stuck. I wanted to move the car a little bit to see how the brakes worked. I put it in gear but it wouldn't move. It wanted to but something was keeping it from moving. I jacked up the front wheels and they were locked tight. I pressed down on the pin that sticks out of the top of the prop valve. The pin went down and the car lurched forward a bit. The front brakes were now relieced. It looks like that valve up top is sticking once the brake pedal is pushed. I have to physically press down on the pin to get the brakes to reliece. I'm not sure what I need to do to fix it. I wonder if some EvapoRust dried inside that valve. When that stuff dries, it gets sticky.
Posted By: Motoman172
Re: progress - 08/20/12 03:25 AM
Your in the home stretch... I enjoyed paging through your progress and it gives me hope... Although I see all the time it takes and Im just starting my 73... Im just going to try to enjoy the process.... No rush...
Thanks for the support and congrats on a great project in wrap up mode
Posted By: 70plymA34
Re: progress - 08/24/12 02:07 AM
either way. great job. every resto is a headache. it takes a while to work all the quirks out these cars after restoration. then the sad reality sets in that it still drives like an old car. (clunks and all.) LOL...... dont give up, you have gone way too far. just step back and take a break, the car will be out in the garage. i hope one day to see this challenger at the nats.
Posted By: burdar
Re: progress - 09/10/12 04:39 AM
I feel like I've made some good progress over the last couple weekends. Nothing major but a lot of little things that needed to be done.
Last weekend the guy that painted the car came over and helped me install and align the side glass. He also helped me reinstall the hood since I had to removed it when I pulled the engine. We used RestoRick's alignment procedure to get the back of the hood lined up with the fenders and it looks perfect. I installed the door panels later on in the week.
Since I don't have a nice big shop to work in, I got paint overspray all over the car while spraying some small parts. I bought a clay bar and on Friday night, cleaned the overspray off the fenders and the hood. Then I installed the hood DODGE letters. I still need to clean the top of the doors/quarters and trunk lid.
One of my original road wheels has some deep scratches on one of the spokes so Saturday I picked up a different wheel to replace it. I also picked up a different combination valve since I broke the valve assembly inside mine while trying to remove it.(it was rusted solid inside the bore...that's why the front brakes were sticking)Accually, I brought home 4 valves to try because we weren't sure what they would look like inside. The valve on the first 3 I tried wouldn't come apart easily so I put them back together. The fourth valve came right out and almost looked new. After cleaning up the bore in my original combination valve, I installed the new valve assembly.
Today I installed the combination valve and master cylinder. Dad came over and helped me bleed the brakes. I need to take the car around the block to be 100% sure on the brakes but I think they are fixed. We also removed the old bumper assembly we used to lift the car for the engine install. After that we threw a couple bolts in the front valance and hooked up the parking lights to check everything out. Both parking light bulbs were dead with the lights on and only one worked with the turn signal. It turned out to just be the bulbs.
The passengers side fender mount turn signal wasn't working either. It turned out to be a ground issue. The chrome housing is supposed to touch a brass contact on the rubber light socket. The assembly is grounded when the housing gets screwed to the fender. The new housing on that side wasn't making contact with the brass section of the light socket. I ended up placing tiny strands of wire on the brass contacts to take up the gap. Now the chrome light housing makes contact and the ground is completed.
Finally, I put the rear fender splash shields on and adjusted the toe so I can drive the car around the block. Maybe I'll do that this week.
Posted By: burdar
Re: progress - 09/20/12 05:19 PM
Posted By: UCUDANT
Re: more progress... - 09/20/12 08:24 PM
Quote:
The new window fuzzies don't stay on the panels either. I squeezed the "U" channel together a little more and that helped. I'll probably have to use some weatherstrip adhesive to hold them tight though.
Well that figures.. what brand are you using? I think mine are "top cat"
I'm just about to open mine and if their crap their going back
Your car looks amazing
Posted By: burdar
Re: more progress... - 09/20/12 08:45 PM
I'm having trouble remembering what brand they are. They aren't Top Cats though. They aren't the PUI ones either. I bought them at the Nat's. There's a guy that makes and sells them there.
So far they are staying on. I did squeeze the U channel some.
Posted By: burdar
Re: more progress... - 09/23/12 02:07 AM
Today I set the ride height and tightened the LCA pivot nuts. I started it up and backed it down the driveway. The brakes seemed to work well so I just kept going. I backed it onto the road and drove it around the block. That's as far as I went since there aren't any plates on it...or a windshield. The trans shifted through the gears nicely and it seemed to drive smoothly. I know it was just around the block but this has been a long time coming. I'm pretty excited.
Posted By: JDMopar
Re: more progress... - 09/23/12 02:36 AM
Good for you! That first drive is both thrilling, and nerve wracking at the same time....lol. After a while, you'll stop listening for noises.
Posted By: 69Cuda340S
Re: more progress... - 09/23/12 03:29 AM
Congrats on that first drive. Car looks spectacular!!
Posted By: 19cuda73
Re: more progress... - 09/23/12 05:13 AM
Darren Car looks sweet congrats you got it on the road... keep it going your rides ready for the show soon.....
Posted By: rhamson
Re: bad two months... - 09/23/12 02:15 PM
There is nothing else in the world that sounds like a Mopar. Good work!
Posted By: burdar
No longer an original owner car - 09/28/12 03:59 AM
It's the end of an era. As of 6:00 tonight, the Challenger no longer belongs to its original owner. I've been calling it mine for years but it was still in dads name. The original title was "lost" so dad got a duplicate and transfered it to me. In Iowa you can "gift" a vehicle so there were no taxes...just a title transfer fee and tag fees. It looks like we forgot to put the car in storage back in 96 but luckily we didn't have to pay the back license fees. Dad just had to sign a paper stating that the car was out of service during the past 16 years.
Posted By: MuuMuu101
Re: No longer an original owner car - 09/28/12 04:08 AM
Initially reading that I was thinking...

"There's no way he could have sold it after all the work he put into it." Luckily it's just going to you and at least it's a 1 family car.
Posted By: burdar
new pics - 10/07/12 01:04 AM
Posted By: UCUDANT
Re: new pics - 10/07/12 08:12 AM
Congratulations on completing an outstanding resto.
Thank you for many of the techniques and details you've shared along the way
Posted By: CDN72SE
Re: new pics - 10/07/12 03:00 PM
Beautiful, excellent work and I really like the tires!
Posted By: jrwoodjoe
Re: new pics - 10/09/12 03:13 AM
WOW Darren! That's outstanding. I'm sorry I didn't get back to you on the windshield. Glad you got it in. Your car looks so good. I wish you were doing mine. I would love to see it person sometime.
Joe
Posted By: burdar
Re: new pics - 10/09/12 03:24 AM
Thanks Joe. I ended up loosening the four small bolts on top of the dash. I pushed the dash down while retightening. It seemed to do the trick. I think I might accually loosen them up again now that the glass is in. It looks a little low on the passengers side.
I'm still planning on having the car at the Mopar Nat's next year. I just have to find a way to get it there. There's no way I'm going to drive it that far in heavy traffic.
Posted By: 19cuda73
Re: new pics - 10/11/12 06:59 AM
Great Job man. Enjoy the moment its only new once or maybe twice now.
Lots of work but its worth it..Good Job you should be proud !!!
Posted By: burdar
Re: new pics - 10/12/12 02:22 PM
The MDH code on the VIN sticker says 101218. It looks like the car was built 40 years ago today.
Posted By: burdar
Re: new pics - 10/23/12 05:30 PM
I had the car back in the shop on Friday to have the toe reset because the steering wheel was off center. Everything is good now.
I've had a small exhaust leak since starting the car and it seems to be getting worse. I thought it would be the manifold to head connection since I'm not using any gaskets. It looks like that's not the case though. The PS manifold is cracked down where the head pipe attaches. I have a spare manifold for it.
The jack assembly is almost done. I removed the mechanism and repainted it. The mast was put in some PVC and filled with acid to cleaned it up. It's going to the platers early next week.
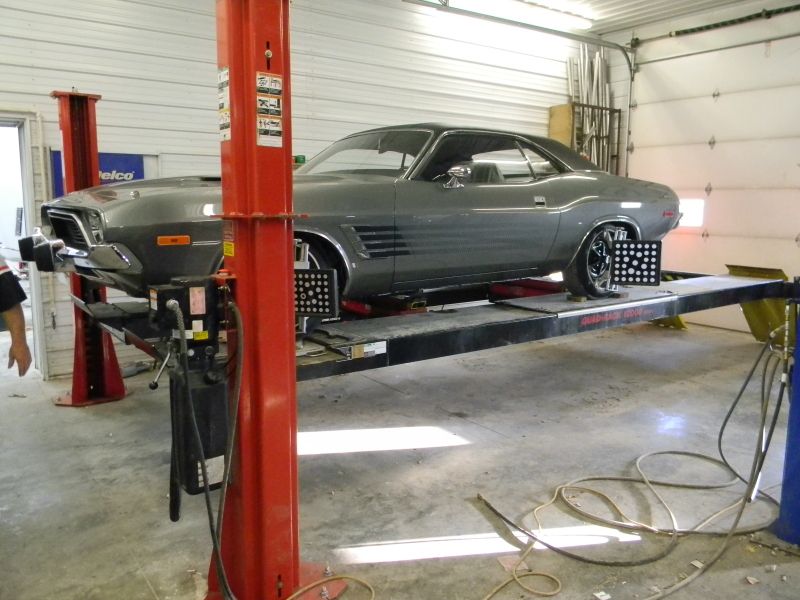
Posted By: scatpacktom
Re: new pics - 10/24/12 12:39 AM
Very Very Nice
I have a 72 Challenger Rallye 340 4sp that I hope to get to one of these days. It is a duplicate to the car I had when I was a kid.
I like the white stripe tires on your car, they make it look just right. Nice Job
Posted By: burdar
Re: new pics - 10/24/12 01:19 AM
Thanks! Post some pics of the 72 when you start to work on it. There isn't much love for the 72-74's.
Posted By: burdar
Re: new pics - 11/06/12 05:02 AM
This is probably the last update until the spring. The car is tucked away in the garage for the winter.
Last week I put some 1/4" aluminum blocks in between the trunk floor and the rear muffler hangers. The tips were very close to the rear valance. Under certain conditions, the PS tip accually hit the valance. The 1/4" blocks took care of the problem and make the tips look like they are sticking out a little further.
The trunk area is just about done. All I have to do yet is clean up some of the weatherstripping adhesive around the trunk seal and replace the trunk latch.(which was damaged at the bodyshop back in the 90's)
I just finished up the jack assembly and installed it. It didn't need much work. I spread the mechanism open enough to pull it off the mast. I soaked it in EvapoRust which cleaned up the minor rust that was on it. Then I resprayed it gray. The rubber bumper and the internal parts had gray paint on them so I didn't have to disassemble it any further. The mast was put in some PVC filled with acid. The acid took the original zinc dichromate plating off and derusted the ends. I took it in to a local plating company and had it replated.
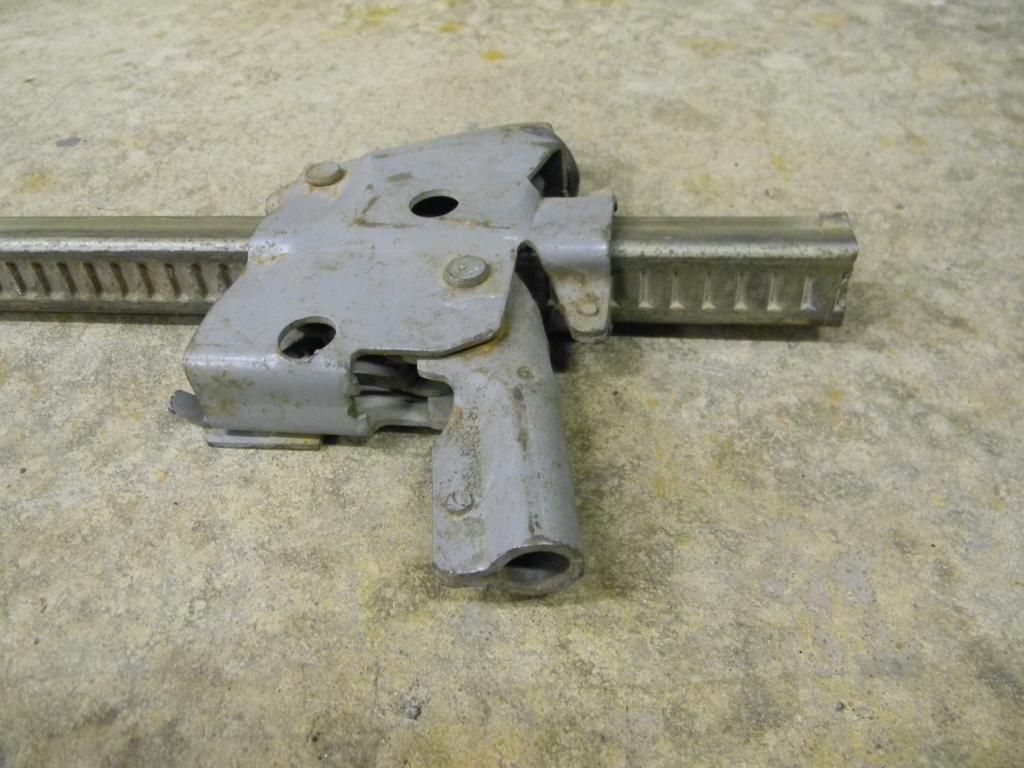

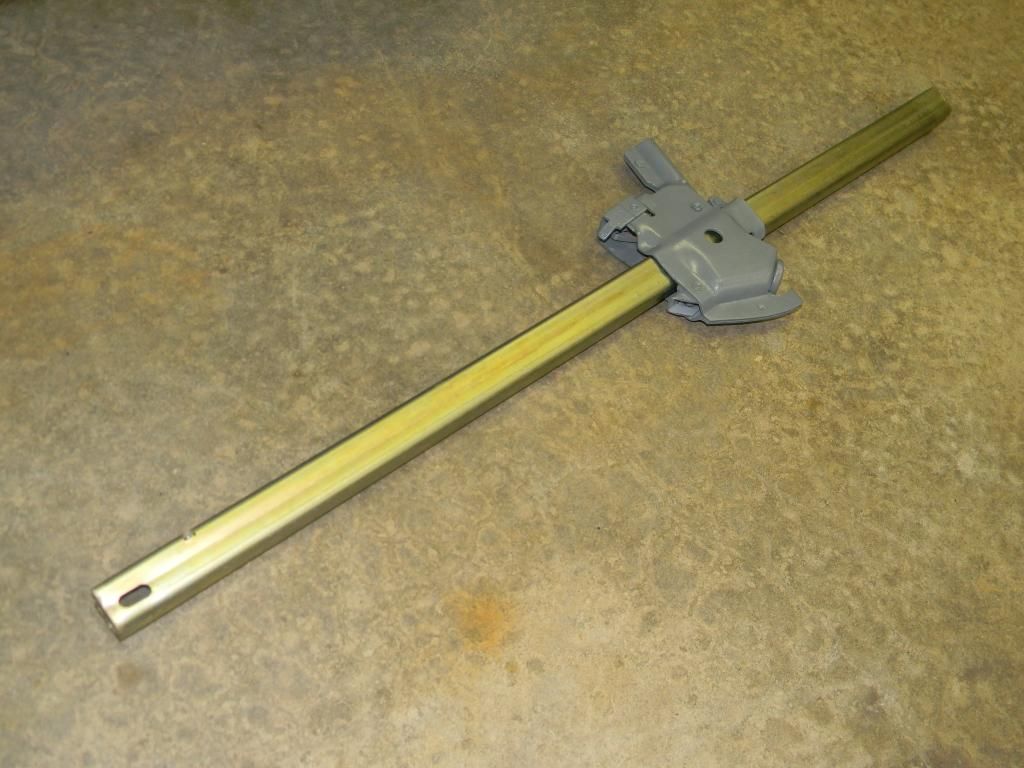
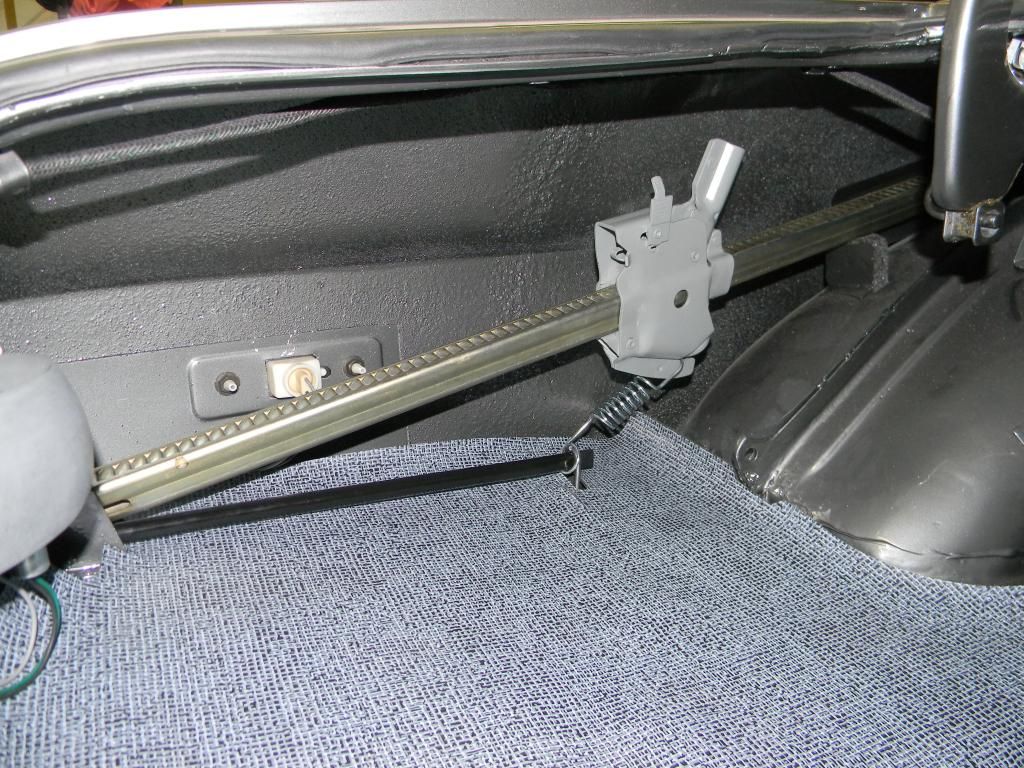
original spare tire...
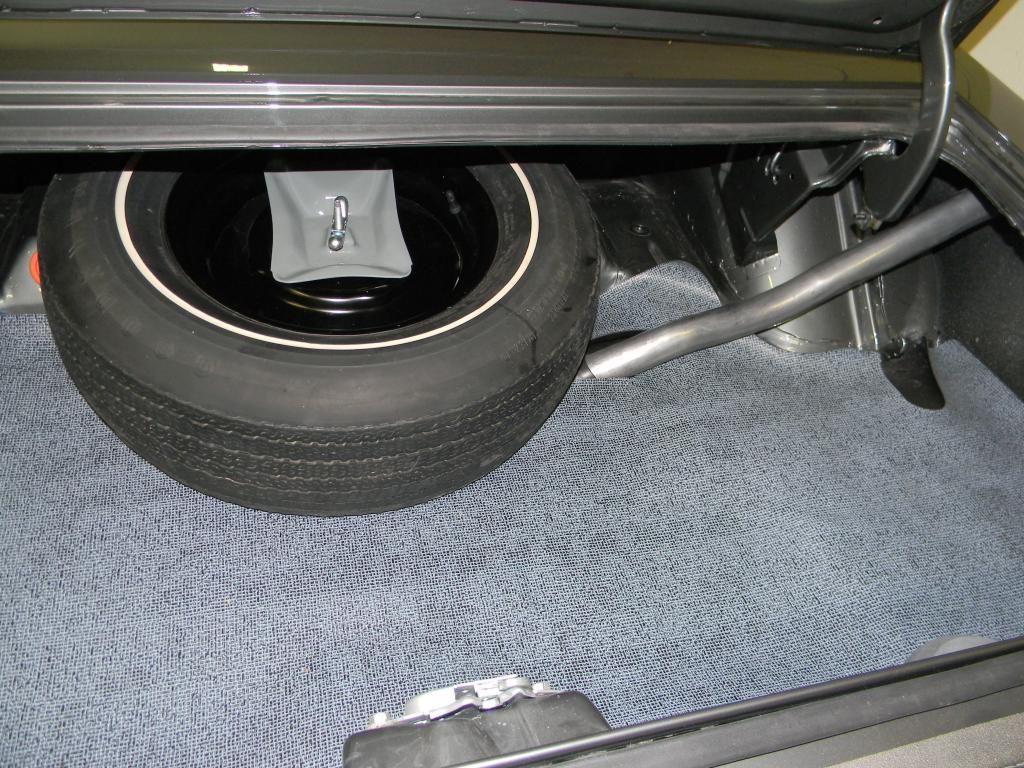
Posted By: NV69B7RR
Re: new pics - 11/06/12 05:15 AM
Great to see it finished! Jack looks perfect. Its all in the details, great job!
...and don't forget that picture next to grandma's house
Posted By: burdar
Re: Nice Job! - 11/10/12 03:22 AM
Oh, I havn't forgotten. Once it's nice enough in the spring, dad and I will be going for a little road trip.
Posted By: burdar
Re: Nice Job! - 11/26/12 02:57 AM
I had the car put away for the winter but didn't have much gas in the tank. Since it was a nice day, I decided to drive up to the gas station, fill it up, and put in some fuel stabilizer.
After I got home, I let it idle for awhile while I took a couple pics. Then I backed it in the garage and hooked up a battery maintainer.
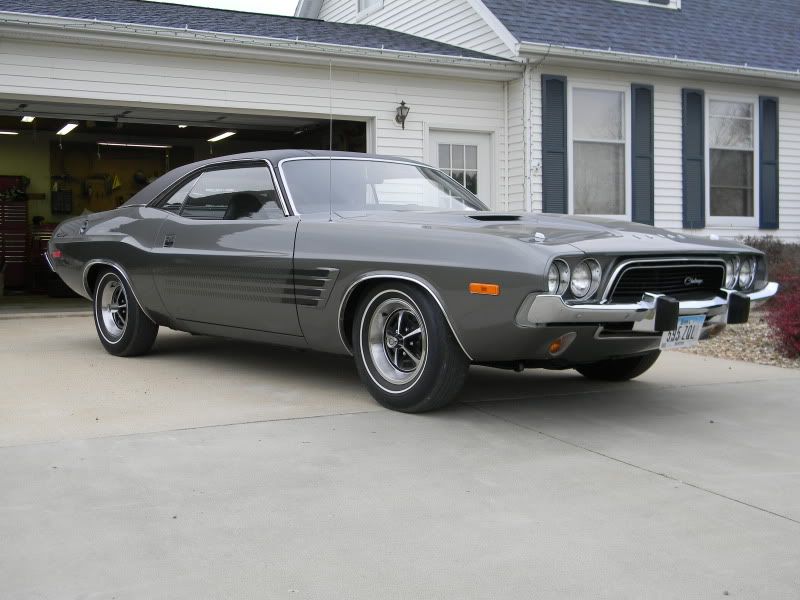
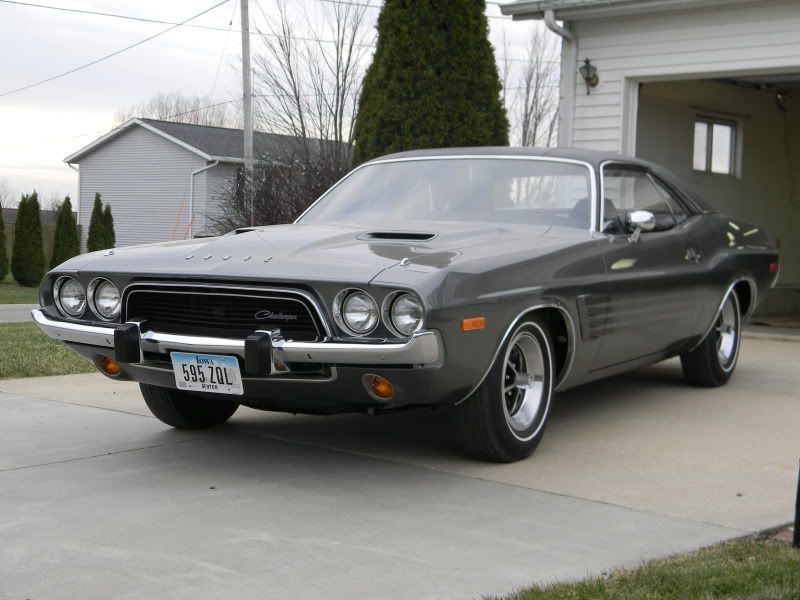
I have been quietly lurking watching you restore a historically significant car from your youth. I have to say that you have done an amazing job and the car is stunning. You should be very proud to have that in your garage. Congrats.
Posted By: 69Cuda340S
Re: Nice Job! - 11/29/12 04:54 AM
Congrats on getting that car done. Car is stunning!
Posted By: burdar
Re: Nice Job! - 12/04/12 04:01 AM
My new plates showed up over the weekend. I found two sets of 72-74 Iowa plates at my grandparents estate sale. I thought one might be the original set to the car but that wasn't the case. I found the correct numbers on the original title though. I had some repro tags made with the same numbers the car originally had.
There are a few differences but overall I like it. The color should really pop against the body color.
Iowa allows you to run a year of manufacture plate as long as you keep the state issued tags in the car somewhere. I e-mailed the Iowa DOT about this because I couldn't find anything in writing. They sent me the Iowa code section that says this is legal. I printed it off and will keep it in the car just incase I need it.
Original 72-74 Iowa plate on top...
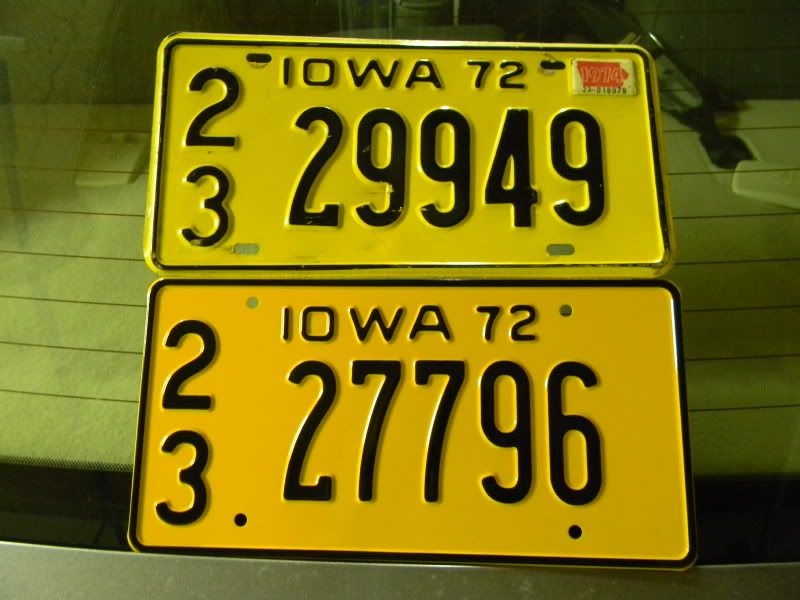
Beautiful car!
Scott
Posted By: burdar
Re: Nice Job! - 05/21/13 03:55 AM
Took the car out for a little drive tonight. I've got some issues to work through but that's to be expected. It's nice to look at peoples faces when you drive by. I got quite a few looks and thumbs up.
If I can get a few things sorted out, I'm going to try and make a cruise this Saturday.
Posted By: NV69B7RR
Re: Nice Job! - 05/22/13 12:47 PM
Glad to see you're getting some wheel time Darren.

BTW, did you ever get a poster for your garage that shows the 73 brochure car thats identical to yours? Your walls looked a little bare..

Posted By: burdar
Re: Nice Job! - 05/22/13 01:16 PM
That would be cool. The walls definately need something. Accually I really need a thrid garage stall. That would let me park everything inside and have a space for some automotive wall art.
Posted By: a12superbee
Re: Nice Job! - 05/23/13 08:54 AM
Very nice and the white stripe tires look just right.
Posted By: burdar
Re: Nice Job! - 06/02/13 08:03 PM
Posted By: dmoore
Re: Nice Job! - 06/02/13 09:37 PM
Car looks fabulous Darren
Great team effort! Enjoy it!
Posted By: burdar
Re: Nice Job! - 06/13/13 02:41 AM
I pulled the seats out last night. They went to the upholstery shop today. I heard a few people talking about the crushed velvet seat covers last weekend so I thought it was time to have them recovered.
The rear end was making some noise so I pulled the center section out tonight. A friend is going to go through it for me. I'm going to pull the rear e-brake cables off tomorrow and compare them to the originals. I'm pretty sure they are why the intermediate cable seems too short. We will see.
Posted By: burdar
Re: Nice Job! - 07/28/13 07:47 PM
The seats are back in. They feel a lot more firm now. They weren't very comfortable before. Looking at the back of the old seat covers, they are stamped 6-72 and 7-72. The outer vinyl was original...the inserts were just replaced with crushed velvet in the late 70's.
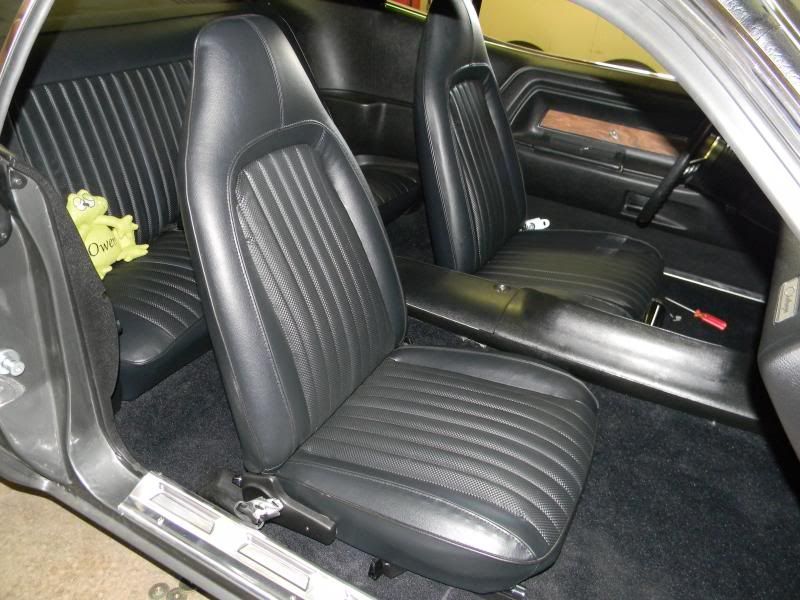
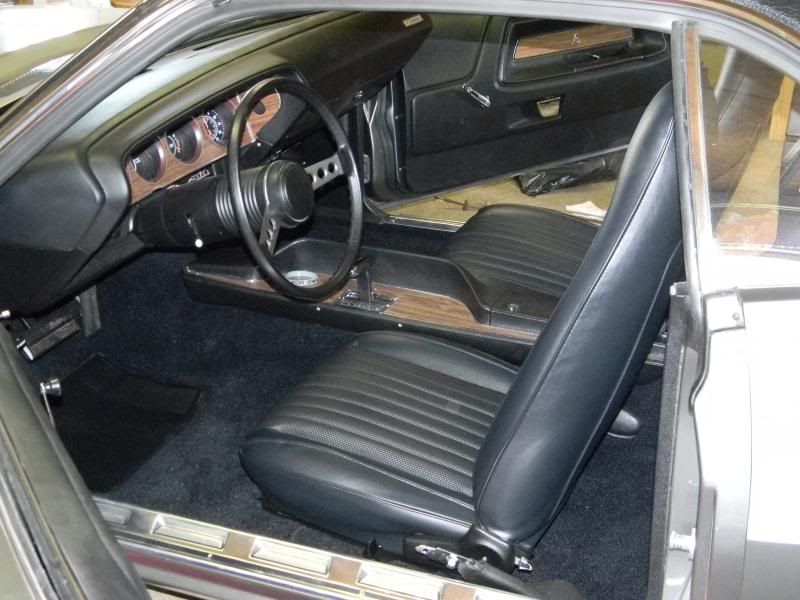
The rear end center section is back in after getting all new bearings. I ordered a longer e-brake intermediate cable so hopefully I can get that hooked up in a day or two.
Interior is looking great Darren!
I can't wait until my car is at that stage.
Scott
Posted By: UCUDANT
Re: Nice Job! - 07/30/13 01:20 AM
Nice seats
Posted By: burdar
Re: Nice Job! - 08/01/13 02:21 PM
Finally got the e-brake hooked up last night. What a nightmare! I ended up using Fine Lines front and rear cables, Inline Tubes intermediate cable and the original S-hook. At least that job is done.
The only thing I have left to do is undercoat the wheel wells.
Posted By: burdar
Re: Nice Job! - 11/08/13 04:15 PM
Posted By: burdar
Re: Nice Job! - 11/08/13 04:23 PM
Quote:
This picture was taken outside my grandmothers house when the car was new. When the car is done, I'd like to take another picture of it in the exact same spot...just 40 years later.
That quote was from the first post on this thread. I finally got to take that picture a few weeks ago. The new owners of the house had a vehicle in the way so I couldn't get the angle just right but it still looks pretty cool.
1973
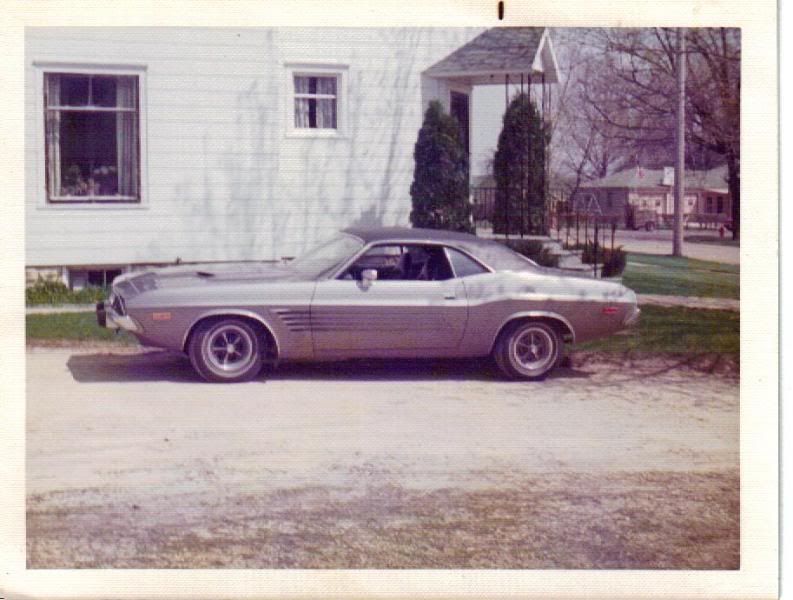
2013
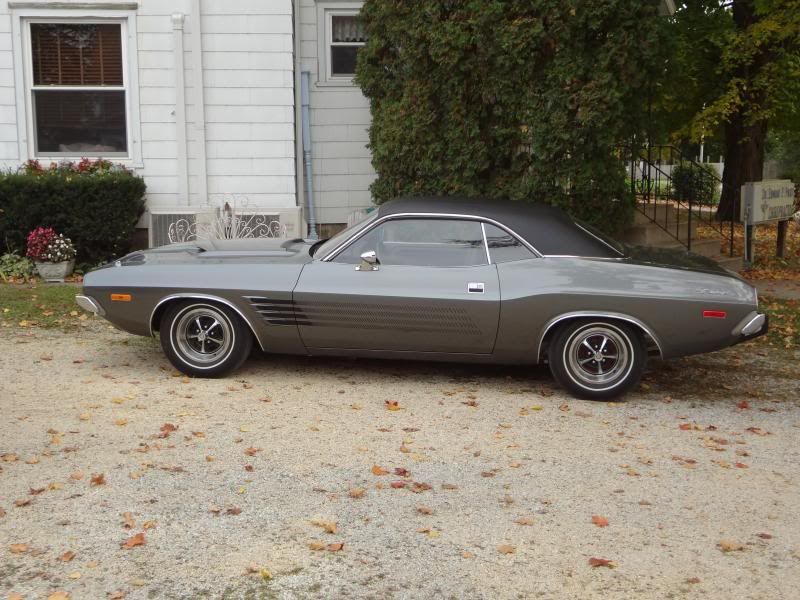
Here are a couple other pictures I took that day as well.
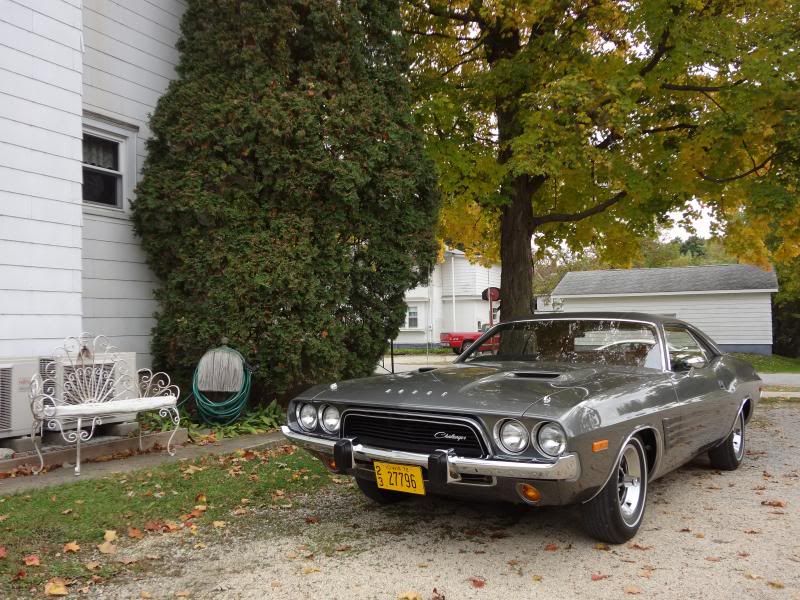
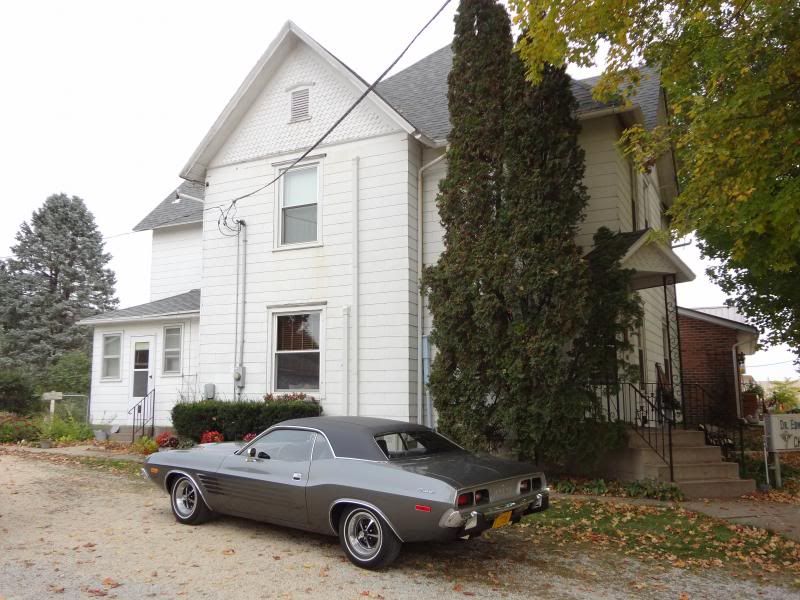
Posted By: 69Cuda340S
Re: Nice Job! - 11/09/13 06:47 PM
Very nice!
Posted By: RUNCHARGER
Re: Nice Job! - 11/09/13 09:40 PM
A lot of restos look great but there's the odd one that takes you back to a Mopar dealer in 1970 or 1974, this is one of those cars. Well done indeed.
Sheldon
Posted By: Anonymous
Re: Nice Job! - 11/10/13 01:04 AM
Posted By: burdar
Re: Nice Job! - 04/20/15 05:50 PM
I decided to bring this thread back from the dead. The last time the Challenger saw the light of day was in October 2013. For the last year and a half it's been under a car cover in a heated shop. After getting it running in the fall of 2012, life got in the way of fixing some bugs and enjoying it. I needed a break, so it was parked. Now it's time to fix the bugs and make it a reliable car. For some reason, storage was not kind to the car. The engine compartment looks awful and some suspension parts have a light coating of surface rust on them. It will need a lot of work. I'll post pictures of the problem areas in the coming weeks.
Here it is with the cover off after sleeping for and year and a half.
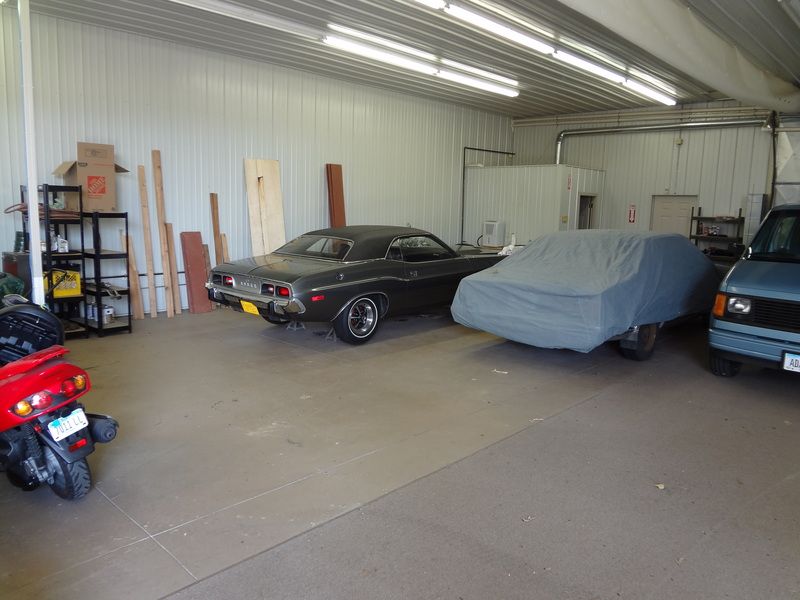
It's dusty but the paint still looks good.
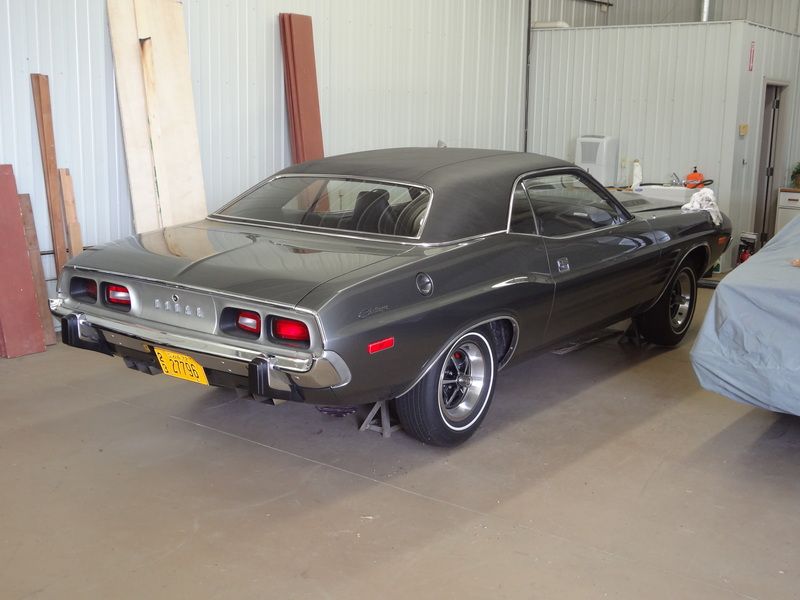
I've had the resto battery sitting in the corner of my garage this entire time with a $10 Harbor Freight "tender" on it. I didn't know if it would still be usable or not. After setting the battery in place the engine cranked over strong. Those "tenders" must do their job. After a couple squirts of gas down the carb, the engine fired right off. While the engine was warming up I installed the battery hold down hardware. After the car was off the jack stands, I spent the next 1/2 hour/45 minutes maneuvering the car out of the shop. I had to squeeze it between the shop door and my cousin's camper. I don't think I had 2" clearance per side. Eventually, I got it out without scratching anything. I don't want to do that again though.
Rain showers were supposed to develop in the afternoon so I wanted to get home before the weather got bad. All was good until I got about a 1/2 hour from home when the rain hit. On the bright side, I got a chance to test out the wipers. Also, no water found its way into the interior or into the trunk so that's good. The car is very dirty now though. It will need its first hand washing very shortly. So, while it needs a lot of work, it's safely at home in the garage...with some company.
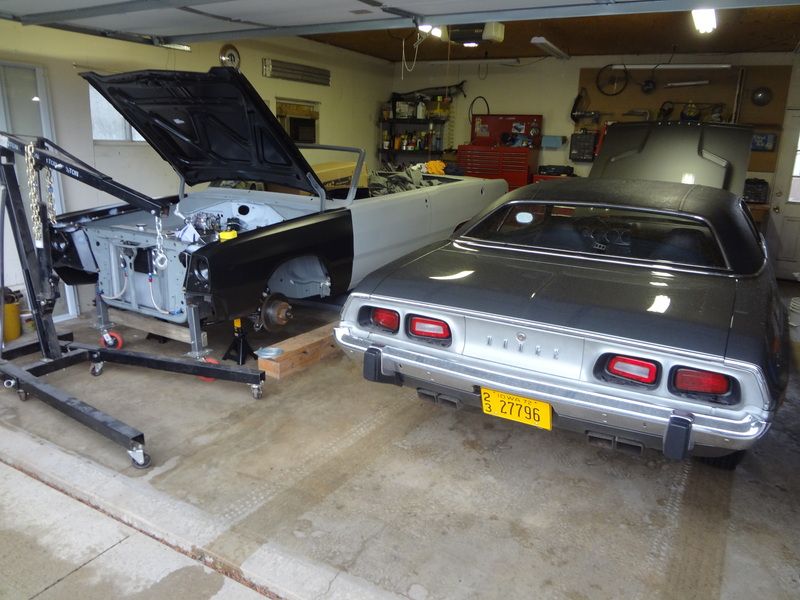
Posted By: rocksmopar
Re: Nice Job! - 04/20/15 08:11 PM
Take her on a roadtrip before you clean her up.