Moparts
Starting mockups for a 572 build... ugly pictures
Posted By: ZIPPY
Starting mockups for a 572 build... ugly pictures - 12/10/18 11:56 PM
I wasn't quite patient enough to dig up this thread every time I wanted to post something to it so it is spread out, somewhat.
Here is a consolidated thread list:
lower end assembly notesCross bolts=cross studsDamper, FEAD, Plug wires, intake manifold and related comments Cylinder head and valvetrain comments Godzilla Lives: Excitement That said: On with the ancient history
------------------------------------------------------------------------------------------
Everyone loves pics, right? lol...Mine aren't the best, but it's just for fun and I have nothing to prove....just trying to keep some content happening in a world seemingly filled with distractions.
Won't bore everyone with the story of how this came to be, but I've been very slowly collecting parts for a long time. The project stopped and started several times but the basic concept lived on (the concept is nothing detailed: a Great big dumb hemi, pump gas, not much more) it's close enough now to give it a push.
Right now I'm trying to figure out some of the parts combo but most decisions have been made.
Installed a couple mains to check crank runout + mocked it up without rings to get a visual of internal clearances (rods to cam, rods to block/bottom of cylinders and so on), no issues found.
This is 4.500 and I can definitely see where the next steps up in stroke and/or larger journal rods would start to cause interference...
The Milodon stroker windage tray seems to me kind of...exaggerated...
I know it's supposed to work fine and all just not sure I care for it being quite that far from the crank/just the way it's made. Looking at other options, full length is appealing. Screens and scrapers are appealing. There's definitely no big rush to slam it together.
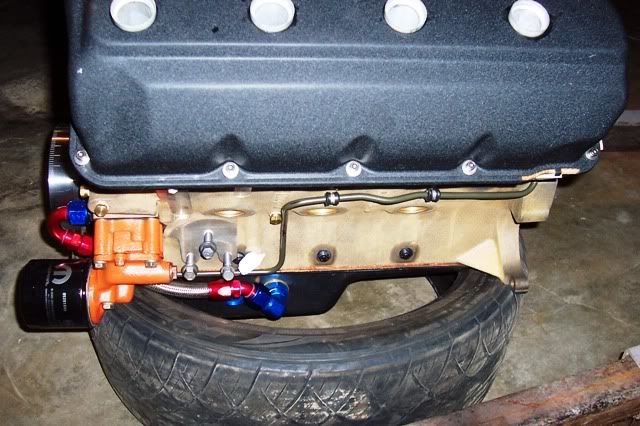
Planning a tried and true m63hv pump but undecided on oil pickup. If I go external I'm thinking single line static should be all right. I am thinking about using the -12 external port in the block but it seems that runs the fitting pretty close to the lower rad hose.
Few more unanswered questions and decisions to make here and there, it's all part of the fun. But it seems ready to send out for balancing now.
These blocks kept changing all the time. This is one of the earlier blocks before they started tapping the mains for slide hammer...
I gotta remember to drill and tap this one just to make it easier to service. The caps have a slight interference fit to the crossbolt bosses and fit really tight, and you really can't wiggle them around very much to get them out without messing up a dowel.
all for now...


Posted By: AndyF
Re: Tired of gratuitous mockup pics yet? - 12/11/18 12:44 AM
You need to buy or borrow a couple of different windage trays to see what works. The Milodon stroker one is super deep and I've never run into a combination that actually needed it. I use the standard Milodon windage tray with 4.25 stroke and 2.20 rod journals. There are a couple of other windage trays on the market so you can mix and match until you find one that fits.
You'll need to decide on oil pickup before you figure out the windage tray though since those things rarely play well with each other on a stroker.
I'd highly recommend staying with an internal pickup. Do you know what pan you're going to use? For a street car I'd stay with the factory Hemi pan. For heavy duty street use and some track time I'd use a Milodon road race pan if it fits for you. It is expensive but it should fit in your car and it will work really well without hanging down low. The external systems are expensive and a hassle.
Posted By: tubtar
Re: Tired of gratuitous mockup pics yet? - 12/11/18 12:47 AM
never tire of pics.
I have never tried these guys , but I like what I see..........
https://crank-scrapers.com/Chrysler_B_RB.html
Posted By: BSB67
Re: Tired of gratuitous mockup pics yet? - 12/11/18 12:51 AM
I use the standard Milodon windage tray with 4.25 stroke and 2.20 rod journals.
Same here. Std stroke Milodon tray with a 4.25 arm and 2.20 rods. I'm using a "small" girdle too, which moves the tray away from the rotating assy too.
Posted By: Porter67
Re: Tired of gratuitous mockup pics yet? - 12/11/18 01:02 AM
No upper thrust bearing in your mock up?
Posted By: ZIPPY
Re: Tired of gratuitous mockup pics yet? - 12/11/18 01:13 AM
No upper thrust bearing in your mock up?
No number 2,3,or 4 bearings or caps, deliberately, at this point.
Following training from the late 80s, I guess it's probably not what anyone does anymore(?). I don't have v blocks and have always done it this way.
Don't know on the pan or pickup yet, will probably not be anything too fancy. Agreed I need more stuff to just check out and see how I like....
Internal pickup looks like no problem, might try it.
Posted By: madscientist
Re: Tired of gratuitous mockup pics yet? - 12/11/18 02:08 AM
That's the crank scraper I use.
Posted By: BSB67
Re: Tired of gratuitous mockup pics yet? - 12/11/18 02:31 AM
You can send Kevin a template and he'll cut you one from that. Then you can hand tweak it for a precision fit. I pinned my girdle and scrapper to the block.
Posted By: CSK
Re: Tired of gratuitous mockup pics yet? - 12/11/18 02:31 AM
The bottom of the bore edge looks sharp, I like to chamfer them.
Posted By: AndyF
Re: Tired of gratuitous mockup pics yet? - 12/11/18 03:00 AM
I wouldn't bother with a scraper for this project. It is a bunch of work for a small gain. With a 4.5 stroke Hemi in a B body car you don't really care about that last 1/10 of a hp. Put it together as simple as possible. You'll enjoy it more in the long run and you'll never miss the tiny bit of power that you leave on the table.
Posted By: tubtar
Re: Tired of gratuitous mockup pics yet? - 12/11/18 04:08 AM
I wouldn't bother with a scraper for this project. It is a bunch of work for a small gain. With a 4.5 stroke Hemi in a B body car you don't really care about that last 1/10 of a hp. Put it together as simple as possible. You'll enjoy it more in the long run and you'll never miss the tiny bit of power that you leave on the table.
I would think that this scraper set up would control windage better than a tray......they also show a baffle for the back of the pan to help keep oil off the crank under acceleration.
Horsepower gains are a result of oil control , but the priority is to control oil........yes ?
Is there enough oil control with a tray that it mitigates any benefit of the scraper ?
Posted By: ZIPPY
Re: Tired of gratuitous mockup pics yet? - 12/11/18 02:07 PM
Therin lies my conundrum, I've heard about some 4.5 stroke combos with street pans having high rpm oil pressure issues. Windage/air? Then there's also the group who says 2 quarts of oil are in each valve cover at high rpm....
I do prefer simple as possible, for sure. Always have.
Posted By: AndyF
Re: Tired of gratuitous mockup pics yet? - 12/11/18 06:17 PM
A big stroke engine will have a lot of windage at high RPM, no doubt about that. But you're building a street engine so 98% of the time you won't have any issue. When you take it to the track you'll just have to make sure that you have a couple of really good breathers in the valve covers. For street use you should be fine with a PCV on one side and a good breather on the other side.
My point is that if it is a street engine then don't spend a bunch of time and money trying to fix the 2% problem. You need a big pan to control the windage and/or a vacuum pump but neither of those are good solutions for a street car so you're just kind of stuck.
The Milodon road race pan is probably the best compromise. It has a fair amount of internal volume but it doesn't hang down very low. If you buy some good valve covers which have proper baffling for a PCV as well as a place to mount some high volume breathers then you should be okay. I don't know if such an animal exists or not but you can get sheet metal valve covers and then weld #12 AN bungs on them for screw in breathers or use AN lines over to the core support for a Moroso 3 qt remote breather tank.
Posted By: dvw
Re: Tired of gratuitous mockup pics yet? - 12/11/18 06:35 PM
My 572 is not a street engine. Runs a screen w/o scraper. The oil level is aprox 2" below the factory full level. 6.5 qts in the sump is enough to keep the pickup covered with a good pan up to 7300. This is with a thicker rotor (+.100"? rotor thickness) Melling pump with a single line feed Indy cover.
Doug
Posted By: ZIPPY
Re: Tired of gratuitous mockup pics yet? - 12/11/18 07:13 PM
Thanks Doug. I like the idea of a screen, or a full length tray that fits tighter.
Posted By: TonyS451
Re: Tired of gratuitous mockup pics yet? - 12/11/18 07:45 PM
You know we love the pics (so keep them coming)! Sorry if I'm late to the party, but what is the build for? Projected power and purpose?
Posted By: ZIPPY
Re: Tired of gratuitous mockup pics yet? - 12/11/18 07:46 PM
it'd probably be fine with a 6 pack pan. I have a Milodon repro on hand to check. I want to take a minute and see where the oil level is relative to the rotating assy sticking out the bottom to get an idea if I'll like it.
I'd like to drop the nose of the car a little and make the front end work better/get more upward travel out of it. Admitting a past error, my current best passes were with literally zero upward travel because the shocks were topped out. I fixed that long ago but haven't got around to running it again yet.
Posted By: 451Mopar
Re: Tired of gratuitous mockup pics yet? - 12/11/18 08:10 PM
The deep windage tray is too deep to fit a reproduction 6-pack / hemi type oil pan. If you have a main stud girdle it will space a shallower windage tray away from the crank.
Posted By: ZIPPY
Re: Tired of gratuitous mockup pics yet? - 12/11/18 08:23 PM
Hi Tony, taking baby steps towards a 572ci Street Hemi, eventual upgrade for the old Plymouth. More accurate to say street/strip but I will just stop there knowing you're very familiar with that whole deal (if you're not careful...next thing you know, it's a race car).
The deep windage tray is too deep to fit a reproduction 6-pack / hemi type oil pan. If you have a main stud girdle it will space a shallower windage tray away from the crank.
Good info, thanks.
If I go with a 7" deep pan then that tray will work.
Being cross bolted, I was thinking nobody made a girdle.
Posted By: SNK-EYZ
Re: Tired of gratuitous mockup pics yet? - 12/11/18 09:24 PM
Your build looks similar to the one I did a few years ago.
Looks like a Mopar Performance/World block.
Being able to run an internal oil pick up depends on if you are running a 2.375 rod size rod journal or a 2.20.
I was running a 2.375 size rod journal.
With that size the bolt in oil pick up adapter won't clear.
There are threads here on Moparts about it.
I was using a 70-71 Street Hemi oil pan.
I ended up using a static/fixed oil pickup and feeding in to the AN boss on the front of the block.
The engine had a Keith Black 4.5 stroke billet crank.
I used a 440 Source windage tray for stroker engines.
They have 2 available now.
http://store.440source.com/Windage-Tray-Stroker-New/productinfo/127%2D1002/ 
The other one is curved to follow the crank.
http://store.440source.com/Windage-Tray-Competition-Style/productinfo/127%2D1021/ 
Posted By: ZIPPY
Re: Tired of gratuitous mockup pics yet? - 12/11/18 09:41 PM
Hey SNK, I was looking at the curved tray.
Which tray are you using in the reproduction hemi pan?
You have 4.500 stroke I presume?
What's your total fill and max rpm?
Pls feel free to PM if that is preferable.
The one I am doing has 2.200 journals.
Thx, Rich
Posted By: Iowan
Re: Tired of gratuitous mockup pics yet? - 12/11/18 10:45 PM
Posted By: CSK
Re: Tired of gratuitous mockup pics yet? - 12/11/18 10:55 PM
The curved one from 440 source will not work with the hemi,440 six pack pan.
Posted By: ZIPPY
Re: Tired of gratuitous mockup pics yet? - 12/12/18 12:08 AM
The curved one from 440 source will not work with the hemi,440 six pack pan.
Thanks, good info.
Of course part of me wants to see how far off it is/whether I could work with it.
Posted By: TonyS451
Re: Tired of gratuitous mockup pics yet? - 12/12/18 12:21 AM
Hi Tony, taking baby steps towards a 572ci Street Hemi, eventual upgrade for the old Plymouth. More accurate to say street/strip but I will just stop there knowing you're very familiar with that whole deal (if you're not careful...next thing you know, it's a race car).
Nice! No adding 509 cam and 1.8 rockers for you. Going right for the jugular with the monster hemi, I like it! Looking forward to hearing how it turns out
Posted By: BSB67
Re: Tired of gratuitous mockup pics yet? - 12/12/18 01:18 AM
I have a girdle and std stroke Milodon full length tray hanging on the wall if you want to mock stuff up.
Posted By: AndyF
Re: Tired of gratuitous mockup pics yet? - 12/12/18 02:50 AM
Being cross bolted, I was thinking nobody made a girdle.
That World block doesn't need a girdle. Should be good for a couple thousand HP as is.
Posted By: ZIPPY
Re: Tired of gratuitous mockup pics yet? - 12/12/18 03:25 AM
Hey thanks. I put a production type MP tray in the mule 440 (I call it that because it's still kicking) and a milodon in the 451, but other than the deep milodon one....no extras. I might accept the tray loan even though the girdle won't be used. Will keep looking
at it and develop a plan. Of course, plans are always subject to change (This started as a low compression 528).
Posted By: cdwmotorsports
Re: Tired of gratuitous mockup pics yet? - 12/12/18 04:44 AM
I don't know if such an animal exists or not but you can get sheet metal valve covers and then weld #12 AN bungs on them for screw in breathers or use AN lines over to the core support for a Moroso 3 qt remote breather tank.
AndyF,
Thank you for this info, I bought the 440source welded aluminum valve covers and was wondering how exactly to handle this problem. I appreciate your knowledge and willingness to help people, i wish everyone on this board would follow your example. Sorry to the OP for the hijack
Posted By: BSB67
Re: Tired of gratuitous mockup pics yet? - 12/12/18 02:14 PM
Hey thanks. I put a production type MP tray in the mule 440 (I call it that because it's still kicking) and a milodon in the 451, but other than the deep milodon one....no extras. I might accept the tray loan even though the girdle won't be used. Will keep looking
at it and develop a plan. Of course, plans are always subject to change (This started as a low compression 528).
Just let me know.
Of course you don't need a girdle, just a possible means to an end. It would simply be for mock up, clearance check and maybe some ideas. I think the thickness of the girdle will give you everything your trying to accomplish. Full length tray, up tight to the rotating assy, hemi oil pan, and a nice fit in the car.
Just an idea.
Posted By: ZIPPY
Re: Tired of gratuitous mockup pics yet? - 12/12/18 07:33 PM
collecting info.
Biggest detail is 1 and 3/16 stick out.
I'd like to create a little bit more space between the oil and the rods sticking out. With this pan and a 6qt fill, the oil seems a little too close to the rods for a windage tray/screen to even have much effect.
confirmed, the extra deep tray is no good with that pan.
I think what I'd like more is a 1"+ deeper repro pan, like 6".
I always believed that is what some of the f.a.s.t. cars appear to have...or used to...years ago I noticed some of them hang down below the K member but only slightly. Or alternately, I could shorten a 7" pan which would be easier because the sump is more squared off on most of them.
It has light interference at the pickup tube adapter, I think I can fix that. Although external is so easy with this block because of the hole in front, it's tempting to try that instead.
Will brainstorm awhile longer. I know I don't want a super stock pan with the center link poking through it.


Posted By: ZIPPY
Re: Tired of gratuitous mockup pics yet? - 12/12/18 07:46 PM
I don't know if such an animal exists or not but you can get sheet metal valve covers and then weld #12 AN bungs on them for screw in breathers or use AN lines over to the core support for a Moroso 3 qt remote breather tank.
AndyF,
Thank you for this info, I bought the 440source welded aluminum valve covers and was wondering how exactly to handle this problem. I appreciate your knowledge and willingness to help people, i wish everyone on this board would follow your example. Sorry to the OP for the hijack
Hey no need to apologize, pick up any ideas you possibly can from any source, it's all good.
I ran AN lines to a breather tank on my Wedge engine back in 2001
Over a period of time, though, I got tired of the clutter underhood and found it was not needed on that engine, tested up to 7000. Instead I went to OEM replacement 1970 era grommets and matching OE style breathers. Those paired up with baffles inside the valve covers is all it seems to need. But...that was a 3.75 stroke engine.....
Posted By: ZIPPY
Re: Tired of gratuitous mockup pics yet? - 12/12/18 07:47 PM
Posted By: SNK-EYZ
Re: Tired of gratuitous mockup pics yet? - 12/12/18 08:49 PM
Here's a link to a previous post about oil pickup clearance.
There are links in the posts and some pics.
https://board.moparts.org/ubbthreads/ubbt...tml#Post1266967
Posted By: ZIPPY
Re: Tired of gratuitous mockup pics yet? - 12/12/18 09:03 PM
Being cross bolted, I was thinking nobody made a girdle.
That World block doesn't need a girdle. Should be good for a couple thousand HP as is.
LOL, yes I know. And c'mon now...you know that I know

Just being diplomatic for a second.
Posted By: ZIPPY
Re: Tired of gratuitous mockup pics yet? - 12/12/18 09:04 PM
Posted By: 383man
Re: Tired of gratuitous mockup pics yet? - 12/13/18 12:31 AM
It looks like you want to go very fast Zippy !! Good luck with the build. Ron
Posted By: BSB67
Re: Tired of gratuitous mockup pics yet? - 12/13/18 01:31 AM
Nice info in your oil pan pic. Thanks.
For oil to rotating assy clearance, the 4.50 stroke is probably only 5/16" lower (closer) than a std stroke 440 if you're using the 2.20 rod journal.
Posted By: davenc
Re: Tired of gratuitous mockup pics yet? - 12/13/18 04:36 AM
collecting info.
Biggest detail is 1 and 3/16 stick out.
I'd like to create a little bit more space between the oil and the rods sticking out. With this pan and a 6qt fill, the oil seems a little too close to the rods for a windage tray/screen to even have much effect.
Zippy,
I had commented on someone else's build that from their pics the windage tray itself was going to be sitting at the oil level....then some other poster pointed out that the oil will not be at that level while the motor is running. I understand deep pans help, but it is worth considering that you may have more separation than you are thinking.
Dave
Posted By: BSB67
Re: Tired of gratuitous mockup pics yet? - 12/13/18 05:12 AM
collecting info.
Biggest detail is 1 and 3/16 stick out.
I'd like to create a little bit more space between the oil and the rods sticking out. With this pan and a 6qt fill, the oil seems a little too close to the rods for a windage tray/screen to even have much effect.
Zippy,
I had commented on someone else's build that from their pics the windage tray itself was going to be sitting at the oil level....then some other poster pointed out that the oil will not be at that level while the motor is running. I understand deep pans help, but it is worth considering that you may have more separation than you are thinking.
Dave
FWIW, I like to consider that too (i.e. the level will be lower when the motor is running), and that it is not sitting level either. I figure that if the oil is at the crank at the back of the motor when stationary and not running, and if the tray is up close to the crank, it'll all be good. No proof though.
I will say that with full time unrestricted oiling to the valve gear, loose bearing clearances and 0W-30W oil, I've never had a problem with oil pressure up to 6800 rpm.
Posted By: ZIPPY
Re: Tired of gratuitous mockup pics yet? - 12/13/18 08:21 PM
collecting info.
Biggest detail is 1 and 3/16 stick out.
I'd like to create a little bit more space between the oil and the rods sticking out. With this pan and a 6qt fill, the oil seems a little too close to the rods for a windage tray/screen to even have much effect.
Zippy,
I had commented on someone else's build that from their pics the windage tray itself was going to be sitting at the oil level....then some other poster pointed out that the oil will not be at that level while the motor is running. I understand deep pans help, but it is worth considering that you may have more separation than you are thinking.
Dave
FWIW, I like to consider that too (i.e. the level will be lower when the motor is running), and that it is not sitting level either. I figure that if the oil is at the crank at the back of the motor when stationary and not running, and if the tray is up close to the crank, it'll all be good. No proof though.
I will say that with full time unrestricted oiling to the valve gear, loose bearing clearances and 0W-30W oil, I've never had a problem with oil pressure up to 6800 rpm.
Yes to all, agree with the thought process and was headed down that road. It's pretty well known folks have overfilled for many years with no adverse effects. I do like to know where I'm starting from.
Since I probably won't engine dyno it, the logical thing to do is put a sight tube on it and put a camera under the car on chassis dyno to really know where the oil level is.
I admit the hardest thing for me to consider is the vehicle moving/dynamic environment. It's easier to imagine it sitting static.
Will play around with a few ideas and figure something out, I have an idea which combination(s) to look at next.
Thanks for the encouraging comments!
Posted By: cdwmotorsports
Re: Tired of gratuitous mockup pics yet? - 12/14/18 12:22 AM
I don't know if such an animal exists or not but you can get sheet metal valve covers and then weld #12 AN bungs on them for screw in breathers or use AN lines over to the core support for a Moroso 3 qt remote breather tank.
AndyF,
Thank you for this info, I bought the 440source welded aluminum valve covers and was wondering how exactly to handle this problem. I appreciate your knowledge and willingness to help people, i wish everyone on this board would follow your example. Sorry to the OP for the hijack
Hey no need to apologize, pick up any ideas you possibly can from any source, it's all good.
I ran AN lines to a breather tank on my Wedge engine back in 2001
Over a period of time, though, I got tired of the clutter underhood and found it was not needed on that engine, tested up to 7000. Instead I went to OEM replacement 1970 era grommets and matching OE style breathers. Those paired up with baffles inside the valve covers is all it seems to need. But...that was a 3.75 stroke engine.....
Thanks for this info zippy, I have a 451 which IIRC was what you had too. The valve covers I’m using don’t have baffles in them and if I have to weld on them I may as well weld in the bungs now. At some point the 451 will become a spare and the valve covers will move to the new engine.
Posted By: ZIPPY
Re: Tired of gratuitous mockup pics yet? - 12/14/18 01:09 AM
Anytime. I actually still really like my 451 and want to keep running it for awhile. In this day of aftermarket parts I think it ran pretty well considering it was built on a broke musician's budget (et and mph in signature, alot more left).
Posted By: firefighter3931
Re: Tired of gratuitous mockup pics yet? - 12/14/18 07:15 AM
Therin lies my conundrum, I've heard about some 4.5 stroke combos with street pans having high rpm oil pressure issues. Windage/air?
That was the case with my 572 wedge that Dwayne built a few years back. Tried the street hemi pan/windage tray/internal pickup. On the dyno it was losing oil pressure as the rpms climbed. Dwayne wasn't happy and we went with a Charlies pan with dual pickups....one line to the pump and the other to the port on the front of the block. Dwayne surmised that the long arm was creating (excessive) windage which was wreaking havoc with the oil control. Going off memory the problem began to appear just past 5000rpm on the dyno and oil pressure continued to drop all the way to the 6200rpm redline.

Worked like a charm with the new oiling system....rock solid oil pressure on the dyno and in the car running down the track.

No windage tray....just a screen that is built-in to the Charlie's pan.
Cool project Zippy !!

Ron
[img]http://www.dodgecharger.com/forum/index.php?action=dlattach;topic=64059.0;attach=117478;image[/img]
[img]http://www.dodgecharger.com/forum/index.php?action=dlattach;topic=64059.0;attach=117649;image[/img]
Posted By: ZIPPY
Re: Tired of gratuitous mockup pics yet? - 12/14/18 01:28 PM
Ron I remember that, and our short conversation on the phone back then about the mp block deal.
I've been asking around and have excellent input from both deep pan and shallow pan users, all long time moparts members.
Posted By: 6PKRTSE
Re: Starting mockups for a 572 build... ugly pictures - 12/14/18 05:36 PM
No issues with mine up to 7900 on the dyno. I didn't want the big & low typical Mopar sump oil pan on the street & wheel stands crushing it. I went with the flat bottom dragster pan & dual external lines & I run a tubular K frame to clear it.

Posted By: ZIPPY
Re: Starting mockups for a 572 build... ugly pictures - 12/14/18 06:38 PM
I've watched all your posts 6pk, thanks for the input.
It will have a stock or near stock/reinforced K frame for the time being.
If somebody gave me another K frame to modify I would be OK with the old familiar cutting and boxing for a little more clearance, but I am not going to deliberately chase that.
Posted By: Hemi_Joel
Re: Tired of gratuitous mockup pics yet? - 12/14/18 07:43 PM
collecting info.
Biggest detail is 1 and 3/16 stick out.
I'd like to create a little bit more space between the oil and the rods sticking out. With this pan and a 6qt fill, the oil seems a little too close to the rods for a windage tray/screen to even have much effect.
confirmed, the extra deep tray is no good with that pan.
I think what I'd like more is a 1"+ deeper repro pan, like 6".
I always believed that is what some of the f.a.s.t. cars appear to have...or used to...years ago I noticed some of them hang down below the K member but only slightly...
Zippy It's been a while, but if I remember right, there is a stock hemi pan that holds 6 quarts. You can overfill it by a quart or 2, because the hemi holds a lot of oil upstairs when it is running. I modifyed a stock pan by extending the front of the sump forward about an inch, and lowered the bottom of it about 1.5". I was trying to keep stock proportions and a stock look. It added about a quart, maybe 2, to the capacity. I like to use a crank scraper from Ishihara-Johnson. Another thing you can do is mount tubes in the crankcase, where the top of the tube covers the drainback hole from the head, and the bottom of the tube hangs into the pan. This keeps the drainback oil from the heads off the crankshaft.
https://imgur.com/a/m1Ppjkd
Posted By: ZIPPY
Re: Tired of gratuitous mockup pics yet? - 12/14/18 08:20 PM
collecting info.
Biggest detail is 1 and 3/16 stick out.
I'd like to create a little bit more space between the oil and the rods sticking out. With this pan and a 6qt fill, the oil seems a little too close to the rods for a windage tray/screen to even have much effect.
confirmed, the extra deep tray is no good with that pan.
I think what I'd like more is a 1"+ deeper repro pan, like 6".
I always believed that is what some of the f.a.s.t. cars appear to have...or used to...years ago I noticed some of them hang down below the K member but only slightly...
Zippy It's been a while, but if I remember right, there is a stock hemi pan that holds 6 quarts. You can overfill it by a quart or 2, because the hemi holds a lot of oil upstairs when it is running. I modifyed a stock pan by extending the front of the sump forward about an inch, and lowered the bottom of it about 1.5". I was trying to keep stock proportions and a stock look. It added about a quart, maybe 2, to the capacity. I like to use a crank scraper from Ishihara-Johnson. Another thing you can do is mount tubes in the crankcase, where the top of the tube covers the drainback hole from the head, and the bottom of the tube hangs into the pan. This keeps the drainback oil from the heads off the crankshaft.
https://imgur.com/a/m1Ppjkd Thanks for repeating the info here Joel, it helps the whole community.
Also thanks again for confirming f.a.s.t. setup, the pans on similar vehicles always looked just slightly bigger as they usually hang down below the K member just slightly.
Will be ordering a couple pieces to play with which should help me decide.
Posted By: krautrock
Re: Tired of gratuitous mockup pics yet? - 12/14/18 08:47 PM
I modifyed a stock pan by extending the front of the sump forward about an inch, and lowered the bottom of it about 1.5". I was trying to keep stock proportions and a stock look. It added about a quart, maybe 2, to the capacity.
do you modify the stock oil pickup when doing this?
Posted By: Tig
Re: Starting mockups for a 572 build... ugly pictures - 12/14/18 10:10 PM
No issues with mine up to 7900 on the dyno. I didn't want the big & low typical Mopar sump oil pan on the street & wheel stands crushing it. I went with the flat bottom dragster pan & dual external lines & I run a tubular K frame to clear it.
Even with a modified sump you can squish them

Posted By: Hemi_Joel
Re: Tired of gratuitous mockup pics yet? - 12/14/18 10:36 PM
I modifyed a stock pan by extending the front of the sump forward about an inch, and lowered the bottom of it about 1.5". I was trying to keep stock proportions and a stock look. It added about a quart, maybe 2, to the capacity.
do you modify the stock oil pickup when doing this?
I used a milodon pickup for an 8 quart pan, but I cut itt shorter and re-threaded it.
Posted By: firefighter3931
Re: Tired of gratuitous mockup pics yet? - 12/15/18 12:06 AM
Ron I remember that, and our short conversation on the phone back then about the mp block deal.
I've been asking around and have excellent input from both deep pan and shallow pan users, all long time moparts members.
Hey Rich,
I tried to attach a few pics but the link didn't work. Send me your e-mail if you want me to send a few pics.
The Charlies pan is a 10qt and I run 9 qts as per Dwayne's recommendations. The fabbed aluminum pan is not a deep sump....hangs a few inches below the K-frame. I have a 2in skid plate that I've been meaning to weld on.....will get to it this season. The pan is long and the center link passes through the pan so it takes a bit more effort to remove the engine. I had to do some minor clearancing on the steering box mount to clear the -12 90* fitting on the back of the oilpump cover. Other than that it went in pretty easy.
That Charlies pan is very nice with lots of baffles/trap doors and built in screen. I wouldn't hesitate to go this route again if I was building a 4.5in stroke deal.
Ron
Posted By: ZIPPY
Re: Tired of gratuitous mockup pics yet? - 12/15/18 05:14 PM
thanks Ron, I'd love to check it out, all info is appreciated and could come in handy later.
rhwang3 @ yahoo dot com
To start with I'm going to try a traditional deep sump without the centerlink hole, (have an idea for changes to the shape of the pan) and will see how that works. I have an idea for windage tray/screen that I want to try out also.
I've had a Moroso deep pan on the car since 2001 and never smashed it, however that may be only because I haven't tried hard enough
Great input from all, many of them only in PM....many thanks.
Posted By: astjp2
Re: Starting mockups for a 572 build... ugly pictures - 12/16/18 08:20 AM
Ok, here is my junk, no hoses for the suction line, its a -12 solid line
the first pics were the interference with a Hemi mount and oil pump suction lines...


Posted By: astjp2
Re: Starting mockups for a 572 build... ugly pictures - 12/16/18 08:25 AM
Posted By: astjp2
Re: Starting mockups for a 572 build... ugly pictures - 12/16/18 08:43 AM
Here is what I started out with rockers, factory wide pads, Dvorak Stands and standard height valve, comp 959 spring, Titanium retainers, .080 tall lash caps.


Posted By: astjp2
Re: Starting mockups for a 572 build... ugly pictures - 12/16/18 08:44 AM
Here are some more but I cant seem to attach them


Posted By: ZIPPY
Re: Starting mockups for a 572 build... ugly pictures - 12/16/18 03:02 PM
Aha...thank you.
The shot with the radiator hose is the one I wanted to see. It's tight but looks like it works. I am going to try internal for openers but if it doesn't work out, using that hole in the front of the block is the fall back plan.
Sure, internal pickup or the hole in the front of the block is slightly more restrictive than an external line right to the pump cover but it seems windage is the bigger problem rather than oil delivery. I'm hoping one of these will be the right comprimise for a street/strip app.
Valvetrain looks like a future source of entertainment!
Posted By: dvw
Re: Starting mockups for a 572 build... ugly pictures - 12/16/18 03:15 PM
Fill the pan and mark the stick for the amount in the pan itself. You may start with 9 quarts in the motor and only see 7-7 1/2 in the pan after you run it once when new. This way you always know the true pan level. Then you can experiment. With my Charlies pan the stock dipstick hits the bottom of the pan where there is no oil, sump is further rearward and deep. Dragster pans can actually allow a lot of oil to climb up the back of the block on accell unless there is a significant amount of baffling.
Doug
Posted By: ZIPPY
Re: Starting mockups for a 572 build... ugly pictures - 12/16/18 04:05 PM
Hi Doug, Yes sir I have encountered that before after first start up with others. They hold quite a bit that can't be easily drained.
May not need to mark the stick as the style I decided on traditionally reads 1 qt overfilled with 7 quarts in it...but will test and find out. Marking the stick and all is part of the plan if needed + I'm going to make provisions for a sight tube so I can get a visual of the oil level at higher rpm.
Posted By: Cab_Burge
Re: Starting mockups for a 572 build... ugly pictures - 12/16/18 07:11 PM
Here are some more but I cant seem to attach them
I'm assuming these pictures are with the valve fully closed, correct? If so are you concerned on the contact of the rocker arm pad on the inner edge of the lash caps?
I am

Hemiroid motors

Posted By: ZIPPY
Re: Starting mockups for a 572 build... ugly pictures - 12/17/18 06:24 PM
Pics seem hard to post for so many. From email and for info purposes, here's a shot of Ron's 572 showing the pan that was swapped on, right after the high rpm oil pressure issues were found with the reproduction street hemi pan. I really like the shallow depth/ground clearance of this one.
For the time being I'm going to try to avoid centerlink pass-through and external lines, but it's good to know what works and it's all there if I need it later.

Posted By: 6PKRTSE
Re: Starting mockups for a 572 build... ugly pictures - 12/18/18 08:43 PM
I like the hard line made idea from the pump to the pan. I should have done something like that on mine. Between the -12 180 degree fitting I used & the -20 An fittings I used on my water pump & radiator it made for some tight clearances.

Posted By: dvw
Re: Starting mockups for a 572 build... ugly pictures - 12/18/18 10:41 PM
My pan: Trap door hanging from the rear lower face of the tie rod hole blocks oil to front on shut down. Baffle at the top of the oil pan rail to keep oil from climbing up the rear of the pan. Single line swinging pickup. The oil level with 6.5 qts in the pan is at the bottom of the tie rod hole (4.5" below the pan rail).
Doug

Posted By: ZIPPY
Re: Starting mockups for a 572 build... ugly pictures - 12/18/18 11:32 PM
Great info on this thread. Reminds me of the old days here! Thanks

Posted By: DoubleD
Re: Starting mockups for a 572 build... ugly pictures - 12/18/18 11:47 PM
Doug - I am guessing based on the drawing your engine is moved back about 1.5 inches??
Posted By: tboomer
Re: Starting mockups for a 572 build... ugly pictures - 12/19/18 12:05 AM
Great info on this thread. Reminds me of the old days here! Thanks
Amen Rich!!

Posted By: dvw
Re: Starting mockups for a 572 build... ugly pictures - 12/19/18 01:57 AM
Doug - I am guessing based on the drawing your engine is moved back about 1.5 inches??
Motor placement was years ago. As I remember it is up about 3/4" and back about 1".
Doug
Posted By: Wax
Re: Starting mockups for a 572 build... ugly pictures - 12/19/18 03:11 AM
6PKRTSE: I don't mean to hijack this thread but I do have a couple of questions. I assume that the Hemi in the picture is your engine. Could you tell how much horsepower and torque you made on the dyno? I have a friend looking at an advertised Hemi that they are claiming makes 1349hp and 850tq. Have no real info on the engine.
Thank you
Posted By: ZIPPY
Re: Starting mockups for a 572 build... ugly pictures - 12/19/18 03:30 AM
Thread hijacks are encouraged
Posted By: ZIPPY
Re: Starting mockups for a 572 build... ugly pictures - 12/24/18 08:40 PM
Posted By: ZIPPY
Re: Starting mockups for a 572 build... ugly pictures - 12/24/18 08:43 PM
Being header-equipped I didn't see the point in a fancy stick, so
I made do. Research brings up numerous threads here how this simple part seems to frustrate folks.


Posted By: ZIPPY
Re: Starting mockups for a 572 build... ugly pictures - 12/24/18 08:57 PM
An early present showed up, the Crane 420 circle track roller I was asking about on another thread. It's from B@rton's stash sold through a 3rd party. It checked out perfectly.
Don't make fun of my little degree wheel lol. I had a larger one but I loaned it out, and it never came back (thanks alot, Roy). Smaller wheel is harder to read. It works fine but it's best to triple check. Crane lifter (sitting on top) won't work...tie bars hits the block on the base circle. Comp 829 fits fine and will probably get the nod.
Intake centerline came out to 110, Crane calls for 107 on this grind With 572ci I'm not sure I need to worry about advancing the cam. Considering trying it as is. Any input?


Posted By: Cab_Burge
Re: Starting mockups for a 572 build... ugly pictures - 12/24/18 09:47 PM
Intake centerline came out to 110, Crane calls for 107 on this grind With 572ci I'm not sure I need to worry about advancing the cam. Considering trying it as is. Any input?
do you want to be able to spin the hind tires anytime you want?
If so advance that rascal to 105 ILC


if not put it in at 111 to 113 to kill the bottom end and trade that for top RPM pulling increases
Posted By: AndyF
Re: Starting mockups for a 572 build... ugly pictures - 12/24/18 09:58 PM
You're making progress. I try to keep one of everything on hand so I can check fit and function when building a new combination. Looks like you're doing the same thing. Some parts work with some parts but not with others so you just have to try them. I'm not surprised at all by the oil pickup and windage tray mods. Stroker engines always require some dinking around in that area.
Posted By: ZIPPY
Re: Starting mockups for a 572 build... ugly pictures - 12/31/18 05:52 AM
The pictures are still ugly so this should fit right in.
CC'd piston tops for 1" down.
You know, it's not just measuring dome volume because there's more going on than that. These pistons have a 73cc dome but with 13cc of dead space around the edges (below the deck) + the valve reliefs, they're effectively the same as a flat at zero + 60cc dome...that's how I like to figure it anyway but my mind is pretty warped.
Dont have any finished heads ready to go but checked a beat/repairable one to ballpark it. Looks like it'll be 10.25:1 with a .040 gasket. Need to Clay piston-to-head to confirm no hemi problems.
ML are the same as CC's....For anyone wanting to do this, you need a drill, a chunk of plexiglass, a 100ml syringe from eBay, some grease and some water. It's not lab quality but will get you within 2 CC's which is plenty accurate enough for anything I'll ever do.


Posted By: ZIPPY
Re: Starting mockups for a 572 build... ugly pictures - 12/31/18 06:11 AM
Cam is degreed in and corrected. I misspoke earlier, Crane calls for 107 intake centerline and that's what I went with. It's 112 straight up on both intake and exhaust, so it's confirmed 112 LSA and installed
5 degrees advanced. I've never run 112 LSA in anything "hot", but it's getting up there at .050 so maybe that will make it slightly more street friendly.
Change of heart on the oil pickup. I'm going to run single line static in this deep pan, so I took this pic to stare at and imagine the line routing. After all the dinking around with the internal pickup I just didn't like how thin I had to make it,to clear the rod.
"What if it cracks and sucks air?". It also had very little purchase into the adapter threads as well, maybe 3 threads at the most....just didn't like it.
Now with the deep pan more or less locked in, the "stroker" windage tray actually makes sense, so I'll give it a try.
Chip's considerable influence had me looking closely at the 440 source aluminum pan, but I only have steel welding capability right now and will need to change the pan somewhat, so I went with steel.

Posted By: AndyF
Re: Starting mockups for a 572 build... ugly pictures - 12/31/18 07:45 AM
Have you decided on where the line will run yet? At some point you're going to need to get the engine in the car so you can verify clearance for the line. It has to sneak around the K frame, steering box, motor mount, headers, steering shaft, etc.
If you have a spare K frame you might be able to mock it up on the floor. That is what I do if I have the parts. Are you changing your K frame over to a Hemi style or using conversion mounts?
I'm doing the same thing right now with my Duster. I just keep adding parts and double checking to see if everything still fits and clears. It is a slow process but it is the only way to get everything packaged into the space. We don't have the luxury of having a full CAD model of all the parts like the OEM guys do.
Posted By: fast68plymouth
Re: Starting mockups for a 572 build... ugly pictures - 12/31/18 05:42 PM
Cam looks to be of the vintage when they(Crane) were still manufacturing billet cores.
My experience has been that the Crane cores were fairly friendly with regards to wearing out the bronze distributor gears.
Posted By: ccdave
Re: Starting mockups for a 572 build... ugly pictures - 12/31/18 05:53 PM
I no longer use those metal windage trays. The plastic trays with a few added slots for oil drainage work great in that they have a dual lined rubber gasket built into the tray. I would love to send a pic but Moparts is does not like Apple devices
Posted By: ZIPPY
Re: Starting mockups for a 572 build... ugly pictures - 12/31/18 06:41 PM
Have you decided on where the line will run yet? At some point you're going to need to get the engine in the car so you can verify clearance for the line. It has to sneak around the K frame, steering box, motor mount, headers, steering shaft, etc.
If you have a spare K frame you might be able to mock it up on the floor. That is what I do if I have the parts. Are you changing your K frame over to a Hemi style or using conversion mounts?
I'm doing the same thing right now with my Duster. I just keep adding parts and double checking to see if everything still fits and clears. It is a slow process but it is the only way to get everything packaged into the space. We don't have the luxury of having a full CAD model of all the parts like the OEM guys do.
Yeah I noticed how you're mocking it up for the duster. It's funny you mention that, nowadays to do my day job...needing full CAD access to the entire vehicle for another manufacturer, I do sometimes think...how cool it would be to have the same thing for an old B body.
Sure wish I had a spare K member, but no. However I do have the car with the 451 B engine right there to look at and imagine, which helps alot. I have 2-3 ideas for where the line could be routed...decided if I don't like the routing into the hole in the front of the block, will swap to one of the black Milodon covers instead to simplify it. One of them will definitely work...A std type pump + cover would help keep the cost down.
I might regret it later, but am planning to try an AR engineering motor plate which should free up some space for the pickup hose. If I can't live with it I have a backup plan to weld tubing into the plate and use rubber bushings to soften it up a little. That would be adding some complexity that I'd rather not if I don't have to.
Posted By: ZIPPY
Re: Starting mockups for a 572 build... ugly pictures - 12/31/18 06:45 PM
Cam looks to be of the vintage when they(Crane) were still manufacturing billet cores.
My experience has been that the Crane cores were fairly friendly with regards to wearing out the bronze distributor gears.
Thank you. Sure hope it turns out to be a good one.
Posted By: ZIPPY
Re: Starting mockups for a 572 build... ugly pictures - 12/31/18 07:23 PM
I no longer use those metal windage trays. The plastic trays with a few added slots for oil drainage work great in that they have a dual lined rubber gasket built into the tray. I would love to send a pic but Moparts is does not like Apple devices
Dave it's a funny thing, awhile after the 5.7 Hemi came out I was pretty fortunate to get to tear into a few of them. One detail that stood out was the composite windage tray having o-ring material built in.
I thought, how cool. somebody should make that for B engine.
Then, awhile later, someone did!
But...I don't think any of them will work with 4.500, and I sure can't cut and weld a piece of nylon into whatever I need.
Posted By: hemi-itis
Re: Starting mockups for a 572 build... ugly pictures - 12/31/18 11:52 PM
Posted By: ZIPPY
Re: Starting mockups for a 572 build... ugly pictures - 01/01/19 12:10 AM
Hey thanks Al. My condition is normally aspirated
Research shows some folks go upward with the lines right before the pump to hold some oil (mostly due to concerns about losing prime), and others like yours go more directly from pickup to pump. Makes it hard to figure what the determining factor is...some lose prime and some don't.
I have seen those purple rocker shaft stands on Arruzza's site as well as on ebay, they are reasonably priced. How do you like them?
I collected a potpourri mixture of MP rockers, stock wide pads, and narrow pads. But lately I've had my eye on roller rockers for this engine. The OEM ones will still work for another application I have in mind, for later.
Posted By: hemi-itis
Re: Starting mockups for a 572 build... ugly pictures - 01/01/19 01:56 AM
I shed 200 lbs last year and aluminum heads and rocker stands were most likely half if not more of my Jenny Craig diet.That's a whole "nuther" thread

Bought the stands from Todd.
Another tidbit,when I went to the MOPAR Performance roller tip rockers they almost NEVER need an adjustment
Posted By: rowin4
Re: Starting mockups for a 572 build... ugly pictures - 01/01/19 06:09 AM
I found the windage tray had to be modified like cut all the way across when using a pan with a drag link tube.
Posted By: DUSTER_340
Re: Starting mockups for a 572 build... ugly pictures - 01/01/19 02:16 PM
Hi Rich, I am also building my first Hemi. It is for a 68 barracuda super stock clone. I am using the Vic Jr. Edelbrock heads with StageV rockers, I purchased my aluminum rocker stands from Angelucci in Macomb township
https://www.ebay.com/itm/MOPAR-426-HEMI-ROCKER-STANDS-COMPLETE-WITH-ARP-INTEGRAL-WASHERS-BOLTS-SHIMS/192741725920?hash=item2ce04d56e0:g:EtkAAOSwAwFattEz:rk:19:pf:0


Posted By: ZIPPY
Re: Starting mockups for a 572 build... ugly pictures - 01/01/19 06:19 PM
Happy New year!
Hey thanks for the pics Bob, really great looking stuff.
I've had my eye on Angelucci for awhile as theirs seem closest to
the MP pieces with the pressed-in washer and all.
I have a set of the MP stands but am exploring options. May want to save them for another build later, not sure.
Rowin, good info...thx
Posted By: ccdave
Re: Starting mockups for a 572 build... ugly pictures - 01/02/19 06:07 PM
They make a windage tray for a 4.500 stroke.. You are good to go.
Posted By: ZIPPY
Re: Starting mockups for a 572 build... ugly pictures - 01/02/19 07:00 PM
One of 1,000 things I found at my past job (as you can probably tell by the 2008 packaging date) is this little gem.
Mopar (OE) PN 06035417 is a really nice 1/2-20 drain plug that has a built-in, thick rubber gasket and an thick 5/8" SAE hex. I have no idea what the orginal application was, maybe someone reading this who is at a dealership can look it up.
Contrast with the typical thin/easily rounded off aftermarket garbage which in this case has a 21mm or similar oddball hex size...I'd only use it in an emergency.

Posted By: ZIPPY
Re: Starting mockups for a 572 build... ugly pictures - 01/02/19 07:15 PM
I can't remember what I was looking at, so this is gratuitous.
I see my caliper laying in the valley but have no idea what was happening. Oh well.
This head can't be used as is, so it's relegated to knock around/mockup duty.

Posted By: Moparteacher
Re: Starting mockups for a 572 build... ugly pictures - 01/02/19 07:34 PM
The drain plug looks identical to what I found in my 92' 5.2 magnum. I put one in my 383.
Posted By: 6PKRTSE
Re: Starting mockups for a 572 build... ugly pictures - 01/02/19 07:47 PM
Looking good. It takes a lot of time a patience with mocking everything up, taking it all back apart again then putting it all back together again. I don't even want to know the hours I had into mine....
Posted By: coronetville
Re: Starting mockups for a 572 build... ugly pictures - 01/02/19 10:12 PM
their is 5 ots of oil in upper top end of a 426 hemi at 7000 rpm
Posted By: ZIPPY
Re: Starting mockups for a 572 build... ugly pictures - 01/02/19 10:41 PM
their is 5 ots of oil in upper top end of a 426 hemi at 7000 rpm
I love it...That's a more alarming variation on the time honored "each valve cover holds 2 quarts of oil" statement that's been posted many times over the years

It's come up before in research.
I'm going to find out if it's true by being able to see, and record on video exactly how much oil is in the pan at 7000 rpm.
If drainback is really as horrible as the legend says, then I will repair it.
Something tells me, though, finding the correct total fill is the key.
That's why all the marks on the pan + I don't want the oil level above the windage tray except maybe when it's shut off.
Posted By: HardcoreB
Re: Starting mockups for a 572 build... ugly pictures - 01/03/19 02:40 PM
NICE! build Rich...look forward to seeing it.
Posted By: an8sec70cuda
Re: Starting mockups for a 572 build... ugly pictures - 01/03/19 04:26 PM
Zippy...the oil pickup line's inlet to the pump will be the biggest factor in your line routing. I found the best clearance is using the Milodon pump that has the pickup inlet facing the front of the car. I used a 45° fitting on the pump facing down and a 90° hose end to tuck the line close to the pan and go b/t the engine and the K frame. No need to remove it to take the engine out, doesn't wrap around anything.
Your World block has that inlet port built-in in basically the same place, just higher up. Get some different fittings and play w/ it.
Posted By: ZIPPY
Re: Starting mockups for a 572 build... ugly pictures - 01/03/19 06:59 PM
NICE! build Rich...look forward to seeing it.
Thanks Sean (hope I remembered the correct spelling!). It's been a long time coming.
Posted By: ZIPPY
Re: Starting mockups for a 572 build... ugly pictures - 01/03/19 07:01 PM
Zippy...the oil pickup line's inlet to the pump will be the biggest factor in your line routing. I found the best clearance is using the Milodon pump that has the pickup inlet facing the front of the car. I used a 45° fitting on the pump facing down and a 90° hose end to tuck the line close to the pan and go b/t the engine and the K frame. No need to remove it to take the engine out, doesn't wrap around anything.
Your World block has that inlet port built-in in basically the same place, just higher up. Get some different fittings and play w/ it.
Thanks again Chip. That's the plan.
Posted By: an8sec70cuda
Re: Starting mockups for a 572 build... ugly pictures - 01/03/19 07:11 PM
On my road runner w/ the 440 in it I used a normal Melling pump w/ a Milodon cover. The rear facing pickup inlet will not work w/ stock style mount brackets on the K frame.
I used the inlet off the "top" of the cover, faces to the ground at about a 45° angle if looking from the front of the car. The line had to wrap around the K frame to get to the pan.
I'll try to get some pics of this and post them.
Posted By: ZIPPY
Re: Starting mockups for a 572 build... ugly pictures - 01/03/19 08:09 PM
It dawned on me last night that I never checked rod-to-cam clearance... don't recall anyone mentioning this is a problem with the 2.200 rods...but, there's an awful lot people don't mention, and since this was my first 572 and all I went ahead and did it.
Checked the 'net and good grief, there is all kinds of advice out there on how to do it, probably the most interesting was from a guy who puts tie wraps around the cam lobes an measures the dents in the plastic...
Ended up using clay, nice and simple. No issue found.
There is well over 1/4" there, that's all I needed to know.
While I had the clay out, I also quickly looked at piston to head clearance in one hole. No issue found, it will be something over .060 in the tightest spot when done...if I remember right that's what the old direct connection book said to run LOL.
With most clearances now checked and known, might as well drop the rotator off for balancing next time I get a chance. Maybe I can get the oil pickup sorted out by the time that's done.
I really understand now why the 4.5/4.5/2.200 rod is (or was) a popular crate engine before block availability went down the toilet. Crank and rods both showed up at my door in a day and a half. Pistons, next day.
No clearance grinding needed in the block whatsoever. (I knocked some off the oil pickup adapter, but in the end just decided not to use it) It's like the path of least resistance to relatively big CI.
As dragged out as this thread probably seems, it's mostly just me being cautious, not taking anything for granted, and trying to get oiling correct on the first attempt if at all possible.
Posted By: ZIPPY
Re: Starting mockups for a 572 build... ugly pictures - 01/03/19 08:10 PM
On my road runner w/ the 440 in it I used a normal Melling pump w/ a Milodon cover. The rear facing pickup inlet will not work w/ stock style mount brackets on the K frame.
I used the inlet off the "top" of the cover, faces to the ground at about a 45° angle if looking from the front of the car. The line had to wrap around the K frame to get to the pan.
I'll try to get some pics of this and post them.
The more pics, the better. And, they don't have to be pretty!
Posted By: DUSTER_340
Re: Starting mockups for a 572 build... ugly pictures - 01/04/19 05:05 AM
Rich I fully appreciate you taking the time to document your adventure as I am definitely taking notes, and getting this right on the first attempt is definitely the goal. Keep the info coming
Posted By: 6PKRTSE
Re: Starting mockups for a 572 build... ugly pictures - 01/04/19 06:15 PM
Rich I fully appreciate you taking the time to document your adventure as I am definitely taking notes, and getting this right on the first attempt is definitely the goal. Keep the info coming
I agree. it is cool when someone does this. I could have probably written a book while machining & assembling my Hemi & all of the ups & downs while doing so. A lot of custom made parts even outside of the short block. In the end I was happy enough with the results.
Posted By: second 70
Re: Starting mockups for a 572 build... ugly pictures - 01/04/19 06:28 PM
Rich I couldn’t really see in your picture but do these look like the crane lifters you couldn’t use?
Thanks, Mike


Posted By: mcmopar1
Re: Starting mockups for a 572 build... ugly pictures - 01/04/19 06:58 PM
This is great info, I’ve enjoyed reading all of it. I’ve always built 440 based engines. I recently purchased two hemi’s. One is a 528 and one is a 572. Lots to learn, this is good info for me, thank you all!
Posted By: ZIPPY
Re: Starting mockups for a 572 build... ugly pictures - 01/04/19 08:29 PM
Rich I couldn’t really see in your picture but do these look like the crane lifters you couldn’t use?
Thanks, Mike
Hi Mike,
They sort of do. The tie bar is "captive" and can't be disassembled, similar to that. The lifters have a oil/lightening band (can't see it). I can get the Crane part number and/or specs later if it'll help?
It might be an illusion, but your block appears to have thicker lifter bore bosses...Not 100% sure what you have there but Yours appears made more like the past generation Megablock which was noticeably thicker in that area. They chopped that down a little shorter on the World stuff. Back then, the common fix was either a taller lifter (Comp 892 comes to mind) or sometimes guys would just cut the lifter bores down shorter.
Rich
Posted By: ZIPPY
Re: Starting mockups for a 572 build... ugly pictures - 01/04/19 09:17 PM
This is great info, I’ve enjoyed reading all of it. I’ve always built 440 based engines. I recently purchased two hemi’s. One is a 528 and one is a 572. Lots to learn, this is good info for me, thank you all!
Rich I fully appreciate you taking the time to document your adventure as I am definitely taking notes, and getting this right on the first attempt is definitely the goal. Keep the info coming
You're both very welcome, and I sure appreciate you saying something.
I have received a whole lot of help over the years, and I figure the least I can do is put some of the info back out there where someone can grab it and do their own thing with it. Gearhead version of pay it forward...
Posted By: second 70
Re: Starting mockups for a 572 build... ugly pictures - 01/04/19 11:22 PM
Good eye Rich. Yes it's a Mega block. These have been ran over 7,000 rpm without any problems. I just didn't know for sure if they're crane or not. These are black on top then bare then a black stripe and back to bare. Sorry no plans to open engine anytime soon to get a picture. Part number might help.
Posted By: ZIPPY
Re: Starting mockups for a 572 build... ugly pictures - 01/04/19 11:55 PM
At 7000, they couldn't possibly be hitting but it sure looks close.
On mine, there's like a 3/16 to 1/4" gap between the wheel and the cam, when it's on the base circle. Lifter just hangs in the breeze. Definite no-workie.
I was going to use those lifters for a future project but most likely will just sell them now. Could use the cash. Expensive hobby, etc

Posted By: ZIPPY
Re: Starting mockups for a 572 build... ugly pictures - 01/05/19 12:42 AM
I could have probably written a book while machining & assembling my Hemi & all of the ups & downs while doing so. A lot of custom made parts even outside of the short block.
Yours looks like a work of art to me! I'm trying to avoid writing a book and hope to keep it all off the shelf, as much as possible.
Posted By: second 70
Re: Starting mockups for a 572 build... ugly pictures - 01/05/19 06:40 PM
Rich if I'm honest they probably been over 8,000 by mistake. No tach or rev limiter at the time. These things rev fast and as they say never quit until they do. Lol
I'm pretty sure these are the lifters. The newer ones look a lot different and I believe these are discontinued. Mine look like the ones in the second picture.
https://www.summitracing.com/parts/crn-66515-16/reviews
Posted By: ZIPPY
Re: Starting mockups for a 572 build... ugly pictures - 01/06/19 06:30 PM
Yep, those are the ones. Guess I'll put them up for sale.

Posted By: ZIPPY
Re: Starting mockups for a 572 build... ugly pictures - 01/06/19 11:03 PM
Tore it back down and packed it up for balancing, while I await oil system parts arrival it's time to get rid of what didn't work out. These 528 pistons were purchased right after I got the block but when it came down to it, I decided to do the 572 instead, so these are up for grabs super cheap.


Posted By: hemi-itis
Re: Starting mockups for a 572 build... ugly pictures - 01/07/19 05:53 AM
Posted By: an8sec70cuda
Re: Starting mockups for a 572 build... ugly pictures - 01/07/19 05:03 PM
Here's a top view looking straight down on top the oil pickup line from the front of the car. 45° fitting on the front of the Milodon pump turned slightly towards the passenger's side. 90° hose end on the pickup line allows it to tuck up b/t the pan and the crossmember.

Posted By: an8sec70cuda
Re: Starting mockups for a 572 build... ugly pictures - 01/07/19 05:04 PM
From the front of the car...

Posted By: hemi-itis
Re: Starting mockups for a 572 build... ugly pictures - 01/07/19 05:14 PM
These are the Comp 845 AMC lifter with pressurized oil to the lifter body.

Posted By: ZIPPY
Re: Starting mockups for a 572 build... ugly pictures - 01/07/19 05:32 PM
Thanks so much for the input guys. Chip your pickup hose routing is real close to one of the ideas I was going to explore.
It was either something like that, or maybe snake it through the motor mount bracket on the K frame (I'll be using a motor plate, but would rather not chop the mounts off the k frame if I can help it).
Al thanks for the part number and pic, the old 829 lifters look like they are going to work, but yours are good alternatives. A little oil through the pushrods might be a smart addition before I start smoking pushrods and adjusters (rather than waiting until after).
Posted By: ZIPPY
Re: Starting mockups for a 572 build... ugly pictures - 01/23/19 06:47 AM
Went and bought more oiling related stuff to check out. Had one of those nice looking newer black milodon pump covers for awhile and talked myself out of it. Didn't like the looks of any of my ideas. I wanted 135 degree hose end and couldn't come up with one, and worked myself into a corner. Then I was looking at Chip's setup and realized he had 135 degrees in front, but he used two pieces to get there instead of one. I tried that with my Fragola stuff and it worked out. Clearance is tight.
Here's my current situation. On other threads I've been told I should have a higher output oil pump but I want to give the old m63hv a try. They are all I've used since 1988 on big blocks.
I experimented with lighting and a diffuser here, in hopes of slightly less ugly pics.


Posted By: AndyF
Re: Starting mockups for a 572 build... ugly pictures - 01/23/19 07:11 AM
If you are shooting with a digital camera go buy a tripod and then shoot on manual mode.
Posted By: n20mstr
Re: Starting mockups for a 572 build... ugly pictures - 01/23/19 02:43 PM
If that's a 440 source pan your using, I welded my baffle in all the way around. The spot weld holding it look pretty small, and also it holds the oil when welded all the way around
Posted By: DUSTER_340
Re: Starting mockups for a 572 build... ugly pictures - 01/23/19 03:47 PM
Rich who are you using for balancing?
Posted By: ZIPPY
Re: Starting mockups for a 572 build... ugly pictures - 01/23/19 09:18 PM
Andy, I probably do need to bust out the camera again soon.
I haven't seriously used it for posting since the shop build/circa 2011/2012. This stuff was all done with a phone... out of convenience. I actually have two tripods also, same situation. Might make a change.
N20, yes it's a 440 source pan. That's a good idea. I want to do other welding to it so will add that to the list.
Bob, probably go with LSM or Best.
Posted By: AndyF
Re: Starting mockups for a 572 build... ugly pictures - 01/23/19 10:26 PM
Shooting good pictures with a phone is super hard. I do all of my pictures with an old digital SLR. A SLR on a tripod allows you to get everything in focus even in low light without a flash.
Posted By: ZIPPY
Re: Starting mockups for a 572 build... ugly pictures - 01/25/19 07:58 PM
These are the Comp 845 AMC lifter with pressurized oil to the lifter body.
Looks like they don't sell the 848 anymore, it's 861 now.
I am not sure what 845 was but I can't find it.
https://www.summitracing.com/parts/cca-848-16
Posted By: AndyF
Re: Starting mockups for a 572 build... ugly pictures - 01/25/19 09:53 PM
Yes the 861 is what I've been using lately. Less expensive than the 829 but a much better lifter. I've suggested to Comp marketing a few times that they just stop selling the 829 and replace it with the 861 but they do not listen to me. I don't think the 829 even has oiling to the roller so it is really outdated. The 861 has roller oiling as well as pushrod oiling. If you don't need the pushrod oiling you just block it off with a solid end on the pushrod.
Posted By: ZIPPY
Re: Starting mockups for a 572 build... ugly pictures - 01/25/19 10:01 PM
Ah, I should have bought that set of 861 from you when I had the chance.
Might order a set to see if I like them more than the 829, and save my spare 829s for something else.
Posted By: ZIPPY
Re: Starting mockups for a 572 build... ugly pictures - 01/26/19 06:38 AM
I fit the cam button the other night and cleaned the exterior of the block with some DX579 + rinsed and silicone sprayed it so it wouldn't rust... and got out the old camera, tripod and the new budget lighting.
This camera has noticeably lower resolution than the phone, I am kind of shocked I can see the difference between 6 megapixels and 8, but even with that it still seems overall pic quality just improved a little bit. I have another camera to try later that will probably really do the trick. Maybe I will do a "STAGE II" post later with pictures that aren't so ugly.
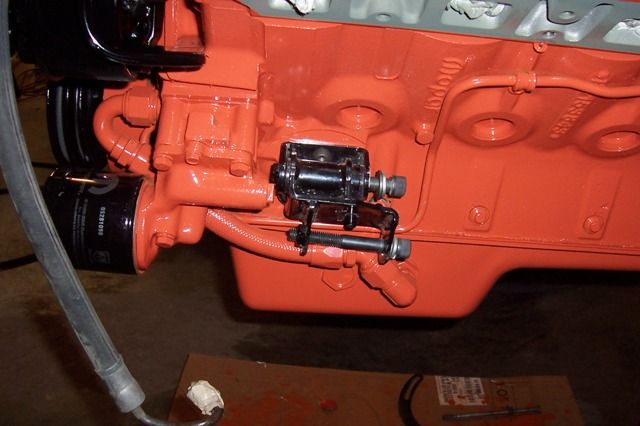
Having painted my last two engines (a 440 and a 5.7) with Mopar Performance Turquoise, then the one before that with PPG3116 orange/spray gun all with nice results, I decided I want to try
VHT SP120 Orange on this one and will also be using primer for the first time as well. The dx579 lightly etches the surface(it's phosphoric acid based)so that should help quality.
After all these years, cam buttons still aren't really standardized. I tried a Lunati and a Comp this time. The Lunati roller's center ring fit in the cam gear perfectly, but the button needed to be cut down and it's steel...Or the timing cover needed to be dented outward...I wasn't willing. The Comp nylon was super easy to cut down (and needed it), but the center ring was too big to fit into a Comp timing gear by .050 or so. Ended up making the nylon one work. I've also used the diamond roller button earlier on the 451, it's pretty good but like so many other performance parts it doesn't really just 'fit' either without a little effort.


Posted By: AndyF
Re: Starting mockups for a 572 build... ugly pictures - 01/26/19 07:44 AM
Yep, those pictures are much better than the phone. Using the tripod allows you to slow the lens way down which allows it to get more light.
The cam button thing always bugged me which is why I started to make my own. Of course, that didn't really solve the whole problem since Cloyes stopped making the timing set that I designed my cam button to fit. But for a few years I had a solution that fit and worked right out of the box.
Posted By: AndyF
Re: Starting mockups for a 572 build... ugly pictures - 01/26/19 07:46 AM
Ah, I should have bought that set of 861 from you when I had the chance.
Might order a set to see if I like them more than the 829, and save my spare 829s for something else.
I have a set of 861 lifters that I'm planning to sell since I've switched all of my stuff over to hyd roller. This set is used but was just refurbished by Comp so they look new and are ready to drop in. Shoot me PM if you want them.
Posted By: hemi-itis
Re: Starting mockups for a 572 build... ugly pictures - 01/26/19 05:06 PM
Ah, I should have bought that set of 861 from you when I had the chance.
Might order a set to see if I like them more than the 829, and save my spare 829s for something else.
I have a set of 861 lifters that I'm planning to sell since I've switched all of my stuff over to hyd roller. This set is used but was just refurbished by Comp so they look new and are ready to drop in. Shoot me PM if you want them.
Jump on these and if you use PR oiling don't forget to restrict the orifice in the PR.
Posted By: ZIPPY
Re: Starting mockups for a 572 build... ugly pictures - 01/26/19 05:45 PM
Ah, I should have bought that set of 861 from you when I had the chance.
Might order a set to see if I like them more than the 829, and save my spare 829s for something else.
I have a set of 861 lifters that I'm planning to sell since I've switched all of my stuff over to hyd roller. This set is used but was just refurbished by Comp so they look new and are ready to drop in. Shoot me PM if you want them.
Jump on these and if you use PR oiling don't forget to restrict the orifice i the PR.
Yep, done!
Andy mentioned it months ago and it went right over my head at the time, thought they would be gone by now so it's pretty cool to see they are still available.
Posted By: fast68plymouth
Re: Starting mockups for a 572 build... ugly pictures - 01/26/19 05:56 PM
Not a fan of the nylon button for anything but a flat tappet cam.
I just dent the cover and use the Comp 204 button.
The Indy cover clears this button as well.
Current pricing in Summit shows the 829’s are $515.99.
The 861’s are $585.99, and then you need to buy the 829-L link bars for $47.92........ $633.91 total.
Posted By: ZIPPY
Re: Starting mockups for a 572 build... ugly pictures - 01/26/19 06:12 PM
Thanks for the info Dwayne, I like the idea and price of the Indy timing cover so that sounds like a good option.
Posted By: AndyF
Re: Starting mockups for a 572 build... ugly pictures - 01/26/19 07:01 PM
The Indy cover doesn't fit under a stock water pump housing and it doesn't have a timing pointer....
Posted By: TonyS451
Re: Starting mockups for a 572 build... ugly pictures - 01/26/19 07:20 PM
Having painted my last two engines (a 440 and a 5.7) with Mopar Performance Turquoise, then the one before that with PPG3116 orange/spray gun all with nice results, I decided I want to try
VHT SP120 Orange on this one and will also be using primer for the first time as well. The dx579 lightly etches the surface(it's phosphoric acid based)so that should help quality.
So, how did the new paint work out? I've always had good luck with several light coats of mopar paint, although still never as deep as painting with a gun.
Andy definitely sets the bar high on the project-progress photography.
Posted By: ZIPPY
Re: Starting mockups for a 572 build... ugly pictures - 01/26/19 08:32 PM
The Indy cover doesn't fit under a stock water pump housing and it doesn't have a timing pointer....
Yep but The AR engineering motor plate will act as a spacer, and timing pointer can just be a 5 dollar sheet metal thing, I'd be happy to with that.
I don't have a hub for my damper yet so the longer version would be needed if I went down that road.
Posted By: ZIPPY
Re: Starting mockups for a 572 build... ugly pictures - 01/26/19 08:49 PM
So, how did the new paint work out? I've always had good luck with several light coats of mopar paint, although still never as deep as painting with a gun.
.
I decided not to paint everything ahead of time, and will wait until a little later. I did paint a test panel + the front of one mockup head and I like the color.
I probably spent $150 on PPG stuff painting the 451, 18 years ago. The pro quality spray gun material produces a super thick, glossy, deep finish that looks really nice but sometimes bugs me. In a way it looks like the engine has been "dipped in plastic". It's a good way to go but decided to swing the other way on this one and see how it goes.
Posted By: AndyF
Re: Starting mockups for a 572 build... ugly pictures - 01/26/19 09:14 PM
The Indy cover doesn't fit under a stock water pump housing and it doesn't have a timing pointer....
Yep but The AR engineering motor plate will act as a spacer, and timing pointer can just be a 5 dollar sheet metal thing, I'd be happy to with that.
I don't have a hub for my damper yet so the longer version would be needed if I went down that road.
Correct, the Indy cover requires a longer hub which moves the pulley spacing. Lots of ripples to the pool. But if you know them all up front then you can work thru them..
Posted By: fast68plymouth
Re: Starting mockups for a 572 build... ugly pictures - 01/26/19 09:44 PM
Or, you can just put the dent in the stock cover.
Actually, the “early” covers with the double step raised area usually don’t need the dent.
Posted By: ZIPPY
Re: Starting mockups for a 572 build... ugly pictures - 01/26/19 11:54 PM
It's still pretty cheap to change my mind at this point so I will keep messing with it and thinking about it.
Here's a shot with the other camera + tripod + cheap light experiment.
I think this camera is the best one I've got.
Now that the resolution is way up there it seems the lighting needs another upgrade.

Posted By: AndyF
Re: Starting mockups for a 572 build... ugly pictures - 01/27/19 12:36 AM
Depends on the camera. I have a Nikon SLR camera which is really old, but it has the knobs on it that allow me to adjust white balance and to run in manual mode. I use fluorescent lights in my shop so I just adjust the white balance in the camera for fluorescent. I use the tripod to hold the camera steady and then I slow the lens way down so it gets the light from the time rather than the aperture. That way you don't need bright lights or a flash. A flash doesn't work with car parts since they tend to be shiny. Natural light doesn't work very well with car parts either. Fluorescent lights work okay if you can adjust the white balance in the camera.
The other trick is to go to a craft store and buy a large sheet of white foam core. Then you just put the foam core board behind the block and you'll have a nice white background.
Posted By: AndyF
Re: Starting mockups for a 572 build... ugly pictures - 01/27/19 12:37 AM
Here is an engine shot. White foam core in the background and fluorescent lights above. No tricky light setup, just regular old shop lights.
.JPG "DSC_3301 (Large).JPG")
Posted By: ZIPPY
Re: Starting mockups for a 572 build... ugly pictures - 01/27/19 08:14 PM
I'll shop for the background material. Thanks for sharing that my friend.
I've been using a piece of white high pressure laminate shelving as a background for auction pictures for awhile now, it's really helped. Need something larger and not too hard to store for bigger pics. Foam board will be perfect.
It looks cool with the diffused light aimed at the areas not in direct light, it makes those spots pop a little.
Fun to mess with while I wait for the balance job to be finished.
Posted By: AndyF
Re: Starting mockups for a 572 build... ugly pictures - 01/27/19 10:31 PM
I tried a bunch of different background materials when I first start shooting pictures for magazine articles. I eventually found out that foam core worked the best. It is super lightweight and has a white matte finish that works excellent as a background. It also reflects light onto the backside of the object you are shooting. Office Depot has 40" x 60" white foam board for $13. A couple of those sheets will provide a good backdrop for engines or other large parts and they are easy to store up against a wall or behind a door.
Posted By: ZIPPY
Re: Starting mockups for a 572 build... ugly pictures - 01/28/19 05:19 AM
Need a little more self-instruction on how to use the 100 settings on the camera or time to mess with them...I am clueless on aperature, shutter speed, and so on...these are in automatic mode, but regardless this seems like a big leap forward.
It looks a little artificial to light up specific areas but really pops and shows quite alot of detail in those spots (if that's what you want to do). You can see how the bottom areas are a little more shiny in the second picture. The first one looks much more natural.


Posted By: AndyF
Re: Starting mockups for a 572 build... ugly pictures - 01/28/19 06:09 AM
On my Nikon I usually shoot in aperture mode. On a Nikon when you are aperture mode the camera will automatically adjust the shutter speed to provide the correct light. So I just adjust the aperture depending on what depth of focus I want. Typically for car parts you just want to focus on a specific area and you don't really want the background in focus. So you can use a lower F number. Usually something in the range of F8 to F4 will give you the best results for car parts. In your pictures above you could reduce the F number by one or two settings to see what it does. For example, you don't really want the engine stand to be in focus. If it is blurry it helps focus the eye on the engine block. When stuff in the background is in focus it distracts the eye.
Posted By: AndyF
Re: Starting mockups for a 572 build... ugly pictures - 01/28/19 06:13 AM
In your shot above you could take a piece of white paper and wrap it around the red engine stand. Then lower the F stop a notch or two and reshoot the picture. When you lower the F number (increase the aperture size) the background loses focus. The white paper doesn't have to perfectly match the white background since it won't be in focus anyway. Everything will just blur together in the picture and it will appear that the engine block is floating.
Posted By: hemi-itis
Re: Starting mockups for a 572 build... ugly pictures - 01/28/19 08:17 PM
It's still pretty cheap to change my mind at this point so I will keep messing with it and thinking about it.
Here's a shot with the other camera + tripod + cheap light experiment.
I think this camera is the best one I've got.
Now that the resolution is way up there it seems the lighting needs another upgrade.
I still have my craftsman tool box like yours,was ale to buy it in 1974 as a special buy through my participation in the Plymouth Troubleshooting contest.Cost of box with tools.......$400

I'm OLD!

Posted By: madscientist
Re: Starting mockups for a 572 build... ugly pictures - 01/28/19 09:43 PM
It's still pretty cheap to change my mind at this point so I will keep messing with it and thinking about it.
Here's a shot with the other camera + tripod + cheap light experiment.
I think this camera is the best one I've got.
Now that the resolution is way up there it seems the lighting needs another upgrade.
I still have my craftsman tool box like yours,was ale to buy it in 1974 as a special buy through my participation in the Plymouth Troubleshooting contest.Cost of box with tools.......$400
I'm OLD!
That GLOBE!!! That thing is sweet.
Posted By: ZIPPY
Re: Starting mockups for a 572 build... ugly pictures - 01/28/19 10:37 PM
I'm partial to the blue pegboard 😎
Posted By: ZIPPY
Re: Starting mockups for a 572 build... ugly pictures - 04/04/19 04:15 PM
Ended up going with Best for balancing and got a crash course in potential oiling issues/things to look for at no extra charge. Enough information was passed from Master to Customer/Student, it's probably going to take me about a week to digest it all and check it all out first hand to make sure I really get it. Thanks Chuck.

Posted By: DUSTER_340
Re: Starting mockups for a 572 build... ugly pictures - 04/04/19 04:25 PM
Rich please share.
Posted By: ZIPPY
Re: Starting mockups for a 572 build... ugly pictures - 04/04/19 04:50 PM
How is your build going?
I wouldn't feel right doing that because of the way it was presented to me. It was a huge favor, and probably too complex to get into here anyway. It mostly revolved around characteristics of different parts combinations, and things to watch for with my specific combination.
Posted By: an8sec70cuda
Re: Starting mockups for a 572 build... ugly pictures - 04/04/19 07:03 PM
Looked at my notes and my hemi's bobweight is 2650 grams, not 2450 like I told you yesterday. It's heavy! I'm using a 7.0" rod and some pretty thick pins...nitrous abuse.
Posted By: DUSTER_340
Re: Starting mockups for a 572 build... ugly pictures - 04/05/19 01:35 AM
No where fast, I only need to purchase pistons/rings and push rods, for the balance of parts collecting, but I need to check the block out and decide what machining if any I want done. It is currently stock bore , with what i think maybe too course of a deck finish, and I also need to have my rotating assembly balanced upon completion.
Posted By: ZIPPY
Re: Starting mockups for a 572 build... ugly pictures - 04/05/19 01:51 AM
Looked at my notes and my hemi's bobweight is 2650 grams, not 2450 like I told you yesterday. It's heavy! I'm using a 7.0" rod and some pretty thick pins...nitrous abuse.
Yeah, it wouldn't surprise me if your pistons we're close to 1/8" thicker than mine right where its needed.
My pistons are, I think, Indy's shelf piston they use in their crate engine, so not designed for
Any power adders. I say "I think" because I didn't get them directly from Indy so it's just a guess.
Posted By: ZIPPY
Re: Starting mockups for a 572 build... ugly pictures - 04/05/19 01:59 AM
No where fast, I only need to purchase pistons/rings and push rods, for the balance of parts collecting, but I need to check the block out and decide what machining if any I want done. It is currently stock bore , with what i think maybe too course of a deck finish, and I also need to have my rotating assembly balanced upon completion.
If you wanted to keep compression down, I have a couple sets of Wiseco MP crate engine pistons I'd sell for dirt cheap.
One set std 426, the other 528 4.500x4.150. Just throwing that out there.
I came very close to doing a 528 with this block and had bought the above pistons + rods to go with, but then later came upon a
Once in a lifetime deal on what I believe to be Indy 572 crate engine pistons. I got pretty excited about the larger CI so I went that way and dove into it. I'm not rushing, though, because I know what can happen + I still want to keep running my wedge engine awhile.
Posted By: DUSTER_340
Re: Starting mockups for a 572 build... ugly pictures - 04/06/19 11:27 AM
Thanks for the offer Rich, but I hope to keep the standard bore, and I already have my stroker crank and chevy 7.1 rods
Posted By: ZIPPY
Re: Starting mockups for a 572 build... ugly pictures - 04/08/19 12:23 AM
Bob, it's all good.
Posted By: ZIPPY
Re: Starting mockups for a 572 build... ugly pictures - 04/28/20 11:48 AM
Thought I'd wrap this up since it was the OG thread.
Godzilla lives!
I fired it two days ago (the date was 4/26) and got it running long enough to see how it's going to go.
It didn't fit my usual test dolly (the external oil line interfered, I fixed that and then the headers interfered)
so I improvised with plan C.
It was admittedly rather sketchy, I just grabbed whatever known working ignition and fuel I could find and did it.
Will come up with a better system for the future.
2 days later: I'm still geeked.......
In keeping with the spirit of ugly pictures, here are the last saved shots of the world's trashiest looking test rig,
and the eventual recipient.

Posted By: ZIPPY
Re: Starting mockups for a 572 build... ugly pictures - 04/28/20 11:54 AM
Rusted MP chrome box from the '90s (black heat sink, "Made in USA") , spare TFI coil:
Add that to the long list of "never tried that before".
Actually not a bad looking spark.
12 dollar ebay emergency electric fuel pump.
I had to hear it run pretty badly. Mission accomplished.

Posted By: tboomer
Re: Starting mockups for a 572 build... ugly pictures - 04/28/20 12:21 PM
Well done Rich!
Posted By: ZIPPY
Re: Starting mockups for a 572 build... ugly pictures - 04/28/20 12:26 PM
Back on the stand now for cleaning and painting.
Changed my tune on paint, decided to spend extra and go the extra mile
for PPG instead of spray cans. PPG has held up so well on my 451
(it looks literally like new after 19 years), I feel it's the best choice for
a major (for me anyway) build like this one.
Spray cans have been fine for the few casual builds in between,
but anything (like this) that takes a year or more definitely ain't casual!
In the background....the eventual recipient, slowly rotting away, in dire need of some resto work.
I've started on some metal work while waiting for engine parts
to arrive etc, and I want the engine swap to drive a few other changes to the car.
All for now. Thanks for reading and congrats on having a long attention span!

Posted By: DynoDave
Re: Starting mockups for a 572 build... ugly pictures - 04/28/20 07:47 PM
I thought I heard something on Sunday. Congrats!
Posted By: AndyF
Re: Starting mockups for a 572 build... ugly pictures - 04/28/20 07:59 PM
When do you think you'll be able to drop the Hemi into the GTX?
Posted By: Cab_Burge
Re: Starting mockups for a 572 build... ugly pictures - 04/28/20 11:28 PM
Back on the stand now for cleaning and painting.
Changed my tune on paint, decided to spend extra and go the extra mile
for PPG instead of spray cans. PPG has held up so well on my 451
(it looks literally like new after 19 years), I feel it's the best choice for
a major (for me anyway) build like this one.
Spray cans have been fine for the few casual builds in between,
but anything (like this) that takes a year or more definitely ain't casual!
In the background....the eventual recipient, slowly rotting away, in dire need of some resto work.
I've started on some metal work while waiting for engine parts
to arrive etc, and I want the engine swap to drive a few other changes to the car.
All for now. Thanks for reading and congrats on having a long attention span!
That dang hemi don't look right without dual quads on it
Posted By: n20mstr
Re: Starting mockups for a 572 build... ugly pictures - 04/28/20 11:44 PM
Back on the stand now for cleaning and painting.
Changed my tune on paint, decided to spend extra and go the extra mile
for PPG instead of spray cans. PPG has held up so well on my 451
(it looks literally like new after 19 years), I feel it's the best choice for
a major (for me anyway) build like this one.
Spray cans have been fine for the few casual builds in between,
but anything (like this) that takes a year or more definitely ain't casual!
In the background....the eventual recipient, slowly rotting away, in dire need of some resto work.
I've started on some metal work while waiting for engine parts
to arrive etc, and I want the engine swap to drive a few other changes to the car.
All for now. Thanks for reading and congrats on having a long attention span!
I dont know if the Jobbers in your area do it, but we sell epoxy primer in a spray can that has an actual hardener on the bottom, also we put DCC in spray cans, again they have the hardener on the bottom so you can activate them , then spray within 24-48 hours. Works really good but no spray gun needed !
Just an option , ask your local paint jobber.
Posted By: ZIPPY
Re: Starting mockups for a 572 build... ugly pictures - 04/29/20 12:10 PM
I had some Matrix epoxy primer on hand and shot it last night.
Busted out a touch up/detail gun that I had never used...."brand new in the package from at least 10 years ago" Devilbiss Starting Line kit (two-gun package), bought from Eastwood at a show but I can't even remember if it was at the Mopar Nats or Carlisle.
For a small job like an engine, the detail/touch up gun is a huge improvement over the full size Harbor Freight gun I used on the 451 (which worked well but threw way too much paint, way too quickly/hard to control).
On the detail gun, the fan can be shrunk to the size of a 50 cent piece and you can really control it.
Overspray seems almost non-existent.
Of course I want to throw the engine in the car right away.....but the car could really use some attention.
I think I'll get the Hemi painted, get a couple pieces powder coated, and figure out the dolly situation a little better.
After that I will mothball it, and switch to replacing some metal on the car.
Preliminary plan is replace all bad metal from the windshield forward during the Hemi install,
repair all the holes drilled in the engine bay over the years, and stuff like that.
I would like to have it ready to be primered from the windshield forward before starting to fit the Hemi.

Posted By: ZIPPY
Re: Starting mockups for a 572 build... ugly pictures - 04/29/20 12:20 PM
That dang hemi don't look right without dual quads on it
Shouldn't be super difficult to take care of that later. A whole lot later.
In fact, let's go back to the beginning......here is where it all began.
It started with a mockup rolled in front of the car.
I intended it as kind of a joke at first, but it helped me decide if I was just going to dump
all this stuff or use it.
Emailed the pics to several long time friends and influences once I decided what I was going to attempt.
Nobody tried to talk any sense into me! Not one word of discouragement.

Posted By: ZIPPY
Re: Starting mockups for a 572 build... ugly pictures - 04/29/20 12:30 PM
That dang hemi don't look right without dual quads on it
I do intend to try the tunnel ram later. The OEM style intake is not a good fit for the build although it looks nice.
I can either throw two freshened Edelbrock 600s on it and straight/simple linkage, or I can buy another 950 QFT Brawler to match the one I already have and do the whole sideways Enderle linkage deal.
I'm leaning towards getting a second QFT, and leaving the edelbrock carbs for the OE manifold (or maybe an edelbrock).

Posted By: ZIPPY
Re: Starting mockups for a 572 build... ugly pictures - 04/29/20 12:37 PM
Thanks for the replies and comments. I do appreciate 'em.
Posted By: CSK
Re: Starting mockups for a 572 build... ugly pictures - 04/29/20 12:46 PM
I like the Tram
I know I am repeating myself
Posted By: Just-a-dart
Re: Starting mockups for a 572 build... ugly pictures - 04/29/20 07:01 PM
Very nice Rich thanks for sharing the build. I totally understand getting the car ready before the transplant, that is smart.
Looking forward to dragstrip results
Posted By: ZIPPY
Re: Starting mockups for a 572 build... ugly pictures - 04/30/20 01:31 AM
I did the thing.
Only used 8 ounces of paint, one tack coat and
2 full wet coats. The Devilbiss really worked nice.
The shade is PPG AMC/Chrysler Mandarin Orange 3116.
I first learned about it from a Steve Dulcich article and used
It on the 451. Then years later when I went to work at the big blue
M, guess what Cummins was using on crate engines? Same code!
So These days I usually just call it “crate motor orange“.

Posted By: ZIPPY
Re: Starting mockups for a 572 build... ugly pictures - 04/30/20 01:36 AM
I think I like it. Hopefully it holds up.


Posted By: ZIPPY
Re: Starting mockups for a 572 build... ugly pictures - 04/30/20 01:42 AM
I only mixed 8 ounces of paint (+ hardener and reducer),
But after one tack coat and two full wet coats I was done with the engine.
Still had about 2 tablespoons of mixed paint in the cup. What to do?
Rather than throw it out, I fogged most of the wix/carquest oil filter stash real quick to
Use it up on something.
This thing has sure come a long way.
My hat is off to the experts who do this successfully for a living.

Posted By: n20mstr
Re: Starting mockups for a 572 build... ugly pictures - 04/30/20 02:02 AM
NICE JOB ! ! !
Posted By: CSK
Re: Starting mockups for a 572 build... ugly pictures - 04/30/20 03:44 AM
I only mixed 8 ounces of paint (+ hardener and reducer),
But after one tack coat and two full wet coats I was done with the engine.
Still had about 2 tablespoons of mixed paint in the cup. What to do?
Rather than throw it out, I fogged most of the wix/carquest oil filter stash real quick to
Use it up on something.
This thing has sure come a long way.
My hat is off to the experts who do this successfully for a living.
That oil pan MIGHT get hit by the center link, it looks deep in that area, I had one like it & it hit on my B wedge.
Posted By: ZIPPY
Re: Starting mockups for a 572 build... ugly pictures - 04/30/20 11:48 AM
That oil pan MIGHT get hit by the center link, it looks deep in that area, I had one like it & it hit on my B wedge.
Hope not, but guess it could happen and it wouldn't hurt to be prepared.
It looked to be a copy of the 971/Moroso deep sump currently in the car, eyeballing it
it seemed pretty close but I'll check it again with a measuring tape.
If it's not going to work I'll try one with a passenger side kickout.
Posted By: ZIPPY
Re: Starting mockups for a 572 build... ugly pictures - 04/30/20 11:49 AM
Posted By: DynoDave
Re: Starting mockups for a 572 build... ugly pictures - 04/30/20 02:52 PM
Looks good Rich!
Posted By: ZIPPY
Re: Starting mockups for a 572 build... ugly pictures - 04/30/20 04:20 PM
thanks Dave, don't be a stranger!
Posted By: AndyF
Re: Starting mockups for a 572 build... ugly pictures - 04/30/20 05:52 PM
I'm thinking you should just go ahead and drop that Hemi into the GTX. Or lift it in from below if that works better. Life is short, summer is around the corner so you might as well get it bolted in and start driving it. You can deal with the patina later, or just not deal with it at all. These days I think it is perfect to have a muscle car with some patina and a 572 in Hemi thumping away. That car will get a lot of attention once you start driving it. You do want to make sure it is safe but other than that I'd say go for it.
Posted By: ZIPPY
Re: Starting mockups for a 572 build... ugly pictures - 04/30/20 06:31 PM
As an influence for a long time, I do like your enthusiasm Andy and totally agree on timing/public taste at the moment.
Folks were literally taking close ups of the rust last year at the track, and I got a ton of positive remarks.
Just want to take care of the front end of the car right now. It'll have both primer and patina going on for awhile
when the engine is fit in there and driven a bit.
Seems like it should be a pretty mild beast with an exhaust on it, compared to the 451.
Posted By: DynoDave
Re: Starting mockups for a 572 build... ugly pictures - 05/01/20 02:34 PM
thanks Dave, don't be a stranger!
I'd offer to come by and help you drop that thing in place, but that would be hard to do from 6 feet away!

I'm sure you have plenty of help, but if you need an extra pair of hands, don't be afraid to ask.
Posted By: ZIPPY
Re: Starting mockups for a 572 build... ugly pictures - 05/02/20 03:26 PM
Thanks Dave.
Managed to get the pulley alignment within 1/32nd".
Thanks to the poster who suggested to use tubing in the V grooves on one of my 800 other threads.
Between the tubing and having the motor plate/creating a nice flat measuring point,
that really worked out great.
Alternator is from a 1991 D150 318, 120 amp Denso.
It wasn't designed to work with Andy's bracket but is really easy to set up.
If anyone wants the "recipe" you drill the bracket out to 3/8, push the alt
sleeve out the back flush with the inside of the ear, make a 1.040" spacer
for the front, and use a 4.5" long 3/8" bolt with a nut on the back.
March WP pulley, Andy's crank pulley spacer, Moroso crank pulley with .120" cut off in a lathe.
So many have told me the Moroso pulley doesn't work...I've used it since 2001
Hopefully it works on this deal.


Posted By: ZIPPY
Re: Starting mockups for a 572 build (trying better pics) - 05/09/20 03:06 PM
Pictures trying to be less ugly, and partially succeeding.
Covid-572: Pandhemi, born on 4/26/20.
That's a wrap for now.


Posted By: DUSTER_340
Re: Starting mockups for a 572 build (trying better pics) - 05/09/20 03:58 PM
Looks awesome Rich, cant wait to have mine to that state.
Posted By: ZIPPY
Re: Starting mockups for a 572 build (trying better pics) - 05/09/20 04:12 PM
Looks awesome Rich, cant wait to have mine to that state.
Thank you Bob! Please let me know if I can somehow be of any help.
Posted By: ZIPPY
Re: Starting mockups for a 572 build (trying better pics) - 09/14/20 05:51 PM
I'm going to follow up with links to the other threads, to consolidate all my slop into one bucket.
I admit I only started those other threads b/c I didn't want to scrounge this one up every time it got buried.
lower end assembly notesCross bolts=cross studsDamper, FEAD, Plug wires, intake manifold and related comments Cylinder head and valvetrain comments Godzilla Lives: Excitement
Posted By: an8sec70cuda
Re: Starting mockups for a 572 build (trying better pics) - 09/14/20 06:10 PM
Looks awesome Rich! One of your threads I completely missed out on while I was on shut down leave...but we kept up via FB.
How's the car coming?
Posted By: ZIPPY
Re: Starting mockups for a 572 build (trying better pics) - 09/14/20 06:37 PM
What might be more important that "what is"......What is NOT.
In other words: What DIDN'T work?
Nobody ever talks about that! It isn't exactly a Glamorous topic.
Quite a bit did not work out like I originally planned or hoped.
I had to try a few things and really look at them/think about them to decide I didn't want to go that way.
-The 572 actually started as a 528. I had bought a new set of Wiseco/MP pistons for $250, and a new set of Scat Rods for
$400. Later on the Diamond 572/Indy crate piston set came up for sale for an incredible price, and that sealed the deal.
MP pistons sold off for a song. (I'll use the Scat rods in a near-stock type of engine later on). I was thankful for this
as I was close to buying a 4.150 crank, and ended up with 4.500.
-The older design 110-M MP aluminum heads. I had hoarded several, almost all of them needed rework, and in the end I decided
I'd be better off with new heads from an airflow and cost perspective. I recently sold almost all of them off.
There is nothing wrong with them, they can definitely run great.
But, I would have had to repair mine, drop alot of money into them for prep,
and probably wait at least another year for that one CNC shop to pull the big numbers.....
-My first choice of 272 @ .050 endurance roller cams. Didn't have enough piston to valve clearance, locked it up. Wasn't about to mess with the pistons any further.
I was a little disappointed, but considering the Diamond pistons I'm using cost 75% less than customs, and this is a street engine first....no big deal.
One local guru I have the utmost respect for told me I needed to take about 16 degrees @ .050 out of it. I compromised at 12. The second smaller cam
took care of that problem.
-The little brass tube pressed into Victor heads for exhaust pushrod clearance/so they can hog out the intake port is OK with stock rocker arms, but would not work with Indy exhaust rollers.
Another thing that had a negative effect on exhaust pushrod clearance was the use of lifters that were near standard height (I mocked up flat tappets for visual aid purposes) with the
same rocker combination. You can't just grind for more PR clearance because there's only a thin brass tube there, there's nothing to grind on.
Of the pieces I worked with, Comp 861 lifters were the best fit overall with the two rocker combos I had.
I have to imagine Comp 892 would probably have also worked (I believe they are taller than stock which is needed) but did not have any to mock up.
-If you follow the story, the oiling system was a conundrum. I was set on staying with internal pickup and had to take the time to mock up a stock style pickup + attempt to clearance it for my
combination of parts before deciding I didn't like it, and it would be better to use the World/MP block external pickup provision instead.
Remember this is a 4.500x4.500. If you use a shorter stroke, you'll have less of an issue or maybe none.
-The oil pan. A shallow pan is nice for street use so I looked into that, close enough to map out the oil level and mark the pan.
Eventually had to admit to myself I hadn't run less than 8 quarts even with my Wedge engine, since 2001 and that it would probably be smart to use
AT LEAST that with the Hemi.
-Having never used race connecting rod bearings before, I got totally lost with those before I was straightened out (right here, and also by the rod manufacturer)
On the upper/lower markings + arranging them to have the chamfers facing the right way. Before looking into that and admitting my lack of experience, I had
no idea about that. Prior to this I only used stock replacement style bearings (clevite P, sealed power, stuff like that), which do not have an upper and lower.
This wasn't a parts thing, it was a learning opportunity. I'm also not accustomed to having quite so many choices for bearings which only happens when you use
Chevy journal dimensions.
-I had pushrod length 100% dialed in where I wanted it, and then decided to upgrade the rocker adjusters.......and that meant I had to do that job twice.
It cost me time, but was another learning opportunity. A street application probably doesn't need the adjusters I installed but it seemed like a good idea anyway.
There is more but I have to stop for now.
Really this build was a great learning experience overall.
I also hope to do some different Gen 2 Hemis later on and have made tentative plans.
A friend suggested I start a youtube series "a hemi for regular gearheads" or something like that. I'm not sure anyone would care enough to watch it.
Posted By: ZIPPY
Re: Starting mockups for a 572 build (trying better pics) - 09/14/20 06:47 PM
Looks awesome Rich! One of your threads I completely missed out on while I was on shut down leave...but we kept up via FB.
How's the car coming?
Hi Chip, thank you.
Not a whole lot has changed lately, but I have had the front sheetmetal off the car for awhile now have welded in a new right inner fender, have done a little rust repair besides.
The backside of the fenders/underside of the inner fenders/rails are painted and I almost have the class A side of the fenders ready for primer.
Been getting alot of practice repairing sheetmetal, since I can't strip the whole car and put it on a rotisserie I'm going to work front to back in sections.
Sold my truck and got sidetracked by new/used truck purchase + and a few other projects and am almost back to working on the car.
The 572 sits under a plastic sheet, on the engine stand.
I'm thinking of making an engine dolly for it just to make it smaller and more compact/a little easier to roll around.


