Previous Thread
Next Thread
Print Thread
A tip on installing aftermarket wheel opening moldings #656414
03/30/10 09:34 PM
03/30/10 09:34 PM
Joined: Mar 2003
Posts: 1,039
INDIANA
P
Paul Jacobs Offline OP
super stock
Paul Jacobs  Offline OP
super stock
P

Joined: Mar 2003
Posts: 1,039
INDIANA
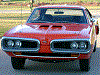
Hey fellow Mopar addicts,
I always see a lot of comments & questions about which brand of wheel opening moldings fit better than others. Truth is, none of them are going to fit perfectly due to so many variables. Yes, some are better than others, but it takes patience & work to make any of them great. So, having said that, I thought I would offer you guys some tips that I have learned in the last 20 years of messing with the junk we call Mopars.
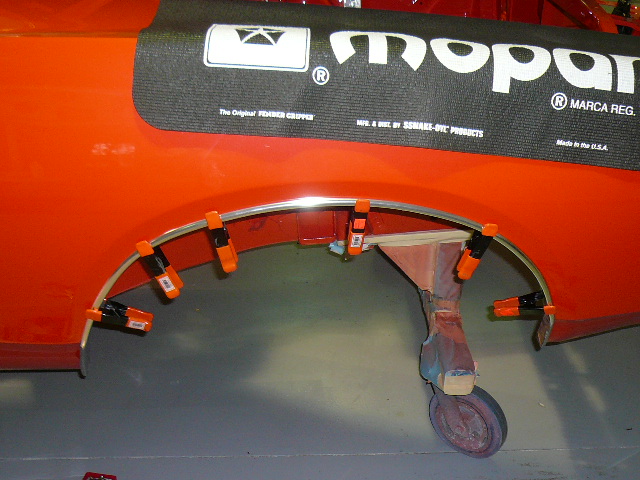
First thing to do is go to your local Harbor Freight, or similar store, and pick up some heavy duty rubber coated spring clips. These are cheap-like $1.00 each. Buy about 12 of them. Then mock up your molding where it fits the best-this is a good 2 person job to prevent scratches. You may find the front or rear doesn’t match the body perfectly. In this case you may have to split the middle or decide which is the least noticeable.
Take your 1st spring clip and place it at the top center of the molding, then take the others and work your way out. When placing the clips on the molding, do so in such a way, that pressure is being exerted against the side of the fender-this keeps it seated against the body for a flush look. Then with an 1/8” drill bit drill the center top hole and place a screw there. Then work the hole to the left, then the right, alternating back and forth. You may find, that to get the molding to sit perfectly flush with the body, the wide band that the screws go through might have to be bent slightly. If you look at some original moldings this is where they are sometimes “wrinkled” and this works well to help the fitting. I have included a picture for reference that I hope helps. I know this may sound a bit confusing and it is without a demonstration, but every little bit helps right? Also, take you time. This usually takes me several hours and I have done them dozens of times.
Paul

5897565-wheelmoldings.jpg (195 downloads)
Re: A tip on installing aftermarket wheel opening moldings [Re: Paul Jacobs] #656415
03/31/10 12:29 AM
03/31/10 12:29 AM
Joined: Jan 2003
Posts: 5,135
Kingsburg Calif.
Quikshft Offline
master
Quikshft  Offline
master

Joined: Jan 2003
Posts: 5,135
Kingsburg Calif.
Paul, I've done a couple sets myself and can comment that you are spot on with your recommendations. I still have to install a set on my 70 Bee project, but BEFORE I painted it I welded up the existing mounting holes in the fender lips, and installed all four moldings. With the car in primer I was not concerned with scratching so I was able to really 'mold' the trim to the fender and I recall exerting quite an amount of pressure to get them to form nicely to the fender. The only way I could see to do this on a car that is already painted would be to perhaps cover the whole fender lip with masking tape to prevent damage. Of course welding up the holes is probably not a good choice on a car that is painted but I have always known a repro set of moldings don't fit perfectly without some massaging so I took the time to install before paint, now they should mount very easily.
Nice post, maybe there are others with tips too. My recommendation is to install first, paint later.

Re: A tip on installing aftermarket wheel opening moldi [Re: Quikshft] #656416
03/31/10 12:34 PM
03/31/10 12:34 PM
Joined: Apr 2006
Posts: 894
uk
TiMopar Offline
super stock
TiMopar  Offline
super stock

Joined: Apr 2006
Posts: 894
uk
Thanks for the tips. When I put NOS ones on my GTX I naively thought they would just go straight on, but they put up such a fight I became convinced they were Oldsmobile trims in the wrong wrappers.

5898652-70X.JPG (127 downloads)
Re: A tip on installing aftermarket wheel opening moldi [Re: TiMopar] #656417
03/31/10 12:43 PM
03/31/10 12:43 PM
Joined: Sep 2003
Posts: 6,111
Detroit
Kidsixpack Offline
master
Kidsixpack  Offline
master

Joined: Sep 2003
Posts: 6,111
Detroit
Paul Great advise! When I redid the Bee I purchased repop moldings and did the prefit as suggested before the car was painted. Glad I did because of all the holes that were slightly off and the tweeking that was needed. Just last week I had my original wheel lip moldings refinished and I put them back on the car. I was surprised and the amount oof tweeking that the originals took to get them to fit properly. Really surprised me that they didn't just fall right in place. Now I see what all the fuss has been about for all this time.
KID

Re: A tip on installing aftermarket wheel opening moldings [Re: Paul Jacobs] #656418
03/31/10 01:30 PM
03/31/10 01:30 PM
Joined: Sep 2004
Posts: 408
Manhattan, IL
SixPackRT Offline
mopar
SixPackRT  Offline
mopar

Joined: Sep 2004
Posts: 408
Manhattan, IL
Quote:

Also, take you time. This usually takes me several hours and I have done them dozens of times.
Paul


Thanks Paul, you made my day, I thought I was the only one that could take a whole afternoon putting on wheel lip mouldings.

Scott


70 Coronet RT 440+6
64 Dodge 330 - Future Hemi Clone
17 Challenger Hellcat - Green Go Driver
86 Buick T-Type Turbo V-6
Re: A tip on installing aftermarket wheel opening moldings [Re: SixPackRT] #656419
03/31/10 05:40 PM
03/31/10 05:40 PM
Joined: Jan 2003
Posts: 4,999
North Pole,New York
F
formula_s Offline
master
formula_s  Offline
master
F

Joined: Jan 2003
Posts: 4,999
North Pole,New York
Maybe this belongs in the other thread but why can't the screw holes be in the same place as originals??? Bought a set from Dales in YO wrappers and after much grunt work they look pretty good but not great. Of course only I know were they don't fit the best but to the casual observer they're good.

Re: A tip on installing aftermarket wheel opening moldings [Re: Paul Jacobs] #656420
03/31/10 11:04 PM
03/31/10 11:04 PM

A
Anonymous
Unregistered
Anonymous
Unregistered
A


Hi Paul,
Okay now.....so I looked in the Manual and couldn't find anything like this mentioned so I used a ball peen hammer instead of the clamps. Oh my goodness what a mess!! The moldings are completely ruined! The quarter panels are dented every four inches and I think we might have to actually cut them off to replace them. This is all your fault! Nowhere in your instructions did you say that I could not substitute those clamps with a tool of my choice! The next time you decide to play Mr. NICE GUY and give advice, you might want to consider referencing EVERY tool that SHOULD NOT be used for the process. That way you won't have to worry about messing up people's projects like you did mine. I hope you are satisfied! Thanks anyway!

On a final note I am looking forward to seeing you next week!!! Be ready for a great Steak Dinner and a fun day.

PS....I hope everyone knows I was being completely ridiculous (as usual) with this post. Thanks for the tip Master Paul....very smart!!

Re: A tip on installing aftermarket wheel opening moldings #656421
03/31/10 11:13 PM
03/31/10 11:13 PM
Joined: Mar 2003
Posts: 1,039
INDIANA
P
Paul Jacobs Offline OP
super stock
Paul Jacobs  Offline OP
super stock
P

Joined: Mar 2003
Posts: 1,039
INDIANA
As stated, it would be a good idea to do this before the car is painted-a point I forgot to make!

Dave, your so funny. I suppose I could just build a manufacturing die & press to build new moldings for my car-I know thats what YOU would do!!! I too look forward to seeing you next week to pick up some sub-par parts.

Re: A tip on installing aftermarket wheel opening moldings [Re: Paul Jacobs] #656422
03/31/10 11:17 PM
03/31/10 11:17 PM

A
Anonymous
Unregistered
Anonymous
Unregistered
A


Quote:

I too look forward to seeing you next week to pick up some sub-par parts.


Re: A tip on installing aftermarket wheel opening moldings #656423
03/31/10 11:25 PM
03/31/10 11:25 PM
Joined: Mar 2003
Posts: 1,039
INDIANA
P
Paul Jacobs Offline OP
super stock
Paul Jacobs  Offline OP
super stock
P

Joined: Mar 2003
Posts: 1,039
INDIANA
Quote:

Quote:

I too look forward to seeing you next week to pick up some sub-par parts.


And looking at your sub par by THE BOOK restoration
COuldn't resist


Powered by UBB.threads™ PHP Forum Software 7.7.1