|
 Re: rear quarter resto question?
[Re: dvw]
#639939
Re: rear quarter resto question?
[Re: dvw]
#639939
03/15/10 10:19 PM
03/15/10 10:19 PM
|
Joined: Mar 2006
Posts: 9,883
MI, usa
dvw

master
|
master
Joined: Mar 2006
Posts: 9,883
MI, usa
|
|
|
|
Re: rear quarter resto question?
[Re: dvw]
#639940
03/15/10 10:21 PM
03/15/10 10:21 PM
|
Joined: Mar 2006
Posts: 9,883
MI, usa
dvw
master
|
master
Joined: Mar 2006
Posts: 9,883
MI, usa
|
|
|
|
Re: rear quarter resto question?
[Re: Stanton]
#639943
03/15/10 11:09 PM
03/15/10 11:09 PM
|
Joined: Jan 2003
Posts: 18,632
jersey shore
flypaper
I hate Texas
|
I hate Texas
Joined: Jan 2003
Posts: 18,632
jersey shore
|
Quote:
Hell I've even repaired frames this way !!!

|
|
|
Re: rear quarter resto question?
[Re: Stanton]
#639944
03/15/10 11:14 PM
03/15/10 11:14 PM
|
Joined: Jan 2004
Posts: 5,476
340dart4spd
Parts Problem
|
Parts Problem
Joined: Jan 2004
Posts: 5,476
|
Quote:
All that sounds like too much work. Since the holes are really big, tape the outside with masking tape and from the inside blow in a batch of spray-foam insulation (low expanding). Let it set up then remove the tape and sand it smooth. Fill with bondo as necessary, sand prime and paint. Hell I've even repaired frames this way !!!
And by the way ... filling your framerails with sprayfoam will keep water and crap out and that means no more rusting from the inside out !! Doesn't weigh squat either !!!
heck why buy foam..use Newspaper......LOL
|
|
|
Re: rear quarter resto question?
[Re: Flatblack]
#639945
03/16/10 09:20 AM
03/16/10 09:20 AM
|
Joined: Sep 2004
Posts: 15,996
RI Deep in the rust belt
chargervert
I Live Here
|
I Live Here
Joined: Sep 2004
Posts: 15,996
RI Deep in the rust belt
|
Quote:
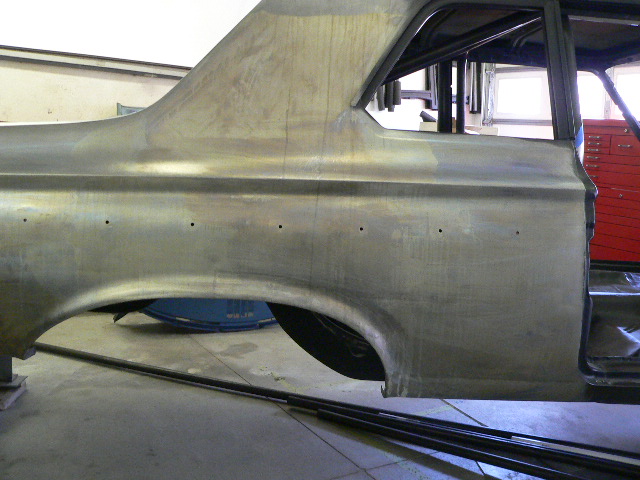
As far as I have learned bondo is only used when making a surface level true. This is only after you have attempted to do as much autobody/metal work to bring the metal to a true surface, covering rust is not a good idea, it's a temporary fix, although I was thinking if they didn't sell panel patches that I would try and fiber glass the tiny pitted holes to save the true body form.
Whenever I install a lower patch panel,like what you are going to be doing,I figure out how much of the patch panel I need to use to make sure it will completely repair the rotted area. I cut the patch panel to the desired size. Like I said before make sure you will be well beyond the rotted area,or the rot will return around the area you replace. I then lay the patch panel over the part of the car that it will replace. Clamp the panel over the car make sure it's up tight on all edges,and postioned exactly where it will be going when installed. I use a pointed sharpie pen,and trace the panel onto the car. Keep the sharpie as close to the panel as possible. Then I use a cutoff wheel and cut inside the lines. Always cut inside,because you can always trim it more,but once it's cut to much,it's a lot of work to put it back. Since this is your first time doing this,I would cut it about 1/4 inch inside the lines,even if you have to recut it again to finess the fit of the patch panel. After removing the old rotted section,then the new panel,and the car can be trimmed to attain the best possible butt weld as possible. After the panel is clamped into place,you can start to weld the two peices together. Do not weld more than a quarter of an inch at a time in any one spot,or you will cause the panel to distort. Move around with the welder giving the last area time to cool before returning to that spot. Keep welding in quarter inch spots,moving back and forth,until you have welded the entire seam. A body hammer can be used to tap down high spots while the area is still hot from the welder. For welding the lower edge of the panel to the trunk extention,and wheelwell,you can predrill holes in the trunk extention,using the original factory spot welds on the peice you cut off,to guage the spacing. This is called plug welding,basically you have the patch panel clamped over the pre drilled trunk extention,and you weld up the holes you drilled. Do not drill through both peices. Drill either the extention,or the patch panel. I like to drill the extention,that way it almost replicates the factory spot welds on the part that will be seen. After you have the seem butt welded,and the edges plug welded,you can use a flapwheel on a grinder to clean up the seam,and plug welds. Be careful to not create too much heat with the grinder,it can distort the panel as much as the welder can. Move the grinder around,and let the peice cool if necesary. It's better to take your time while grinding,than to have to use a lot of bondo to straighten out a distorted panel that you warped by overheating it. I like to use All Metal,or Metal to Metal body filler as the inital filler to blend the weld seams. This stuff is stronger than regular bondo,and will not crack later on. Make sure you use a grader file on the Metal to Metal,and knock off the excess before it hardens completely,because this stuff is differcult to sand after it hardens completely. Don't slap some on,and come back the next day to sand it,or you'll be sanding for a long time! I blended the whole top of the rear quarters on my Charger convertible with it,and since 1999 there are no cracks where it was blended,and convertibles flex alot more than hardtops do. Then you can use a good quality body filler,high build primer,and polyester finishing putty,to block the panel straight. Good luck with the patch job. I hope this will help you out with it.
Last edited by chargervert; 03/16/10 09:37 AM.
70 Charger R/T SE 472 Hemi
70 Charger R/T convertible
70 Charger R/T V Code Sixpack
69 Charger R/T SE Sunroofcar
68 Charger 383
68 Charger 318
71 Charger R/T
70 Challenger convertible
71 Challenger convertible
71 Cuda 340
09 Challenger R/T Classic
|
|
|
|
|


