|
 Rustoleum hardness
[Re: Marq]
#26018
Rustoleum hardness
[Re: Marq]
#26018
10/08/06 11:49 AM
10/08/06 11:49 AM
|
Anonymous
Unregistered
|
Anonymous
Unregistered
|
I used Rustoleum Professional and mineral spirits. I tried the nail test and it would indent the paint as others have reported. The car sat outside for 3 weeks with no activity. The weather has been mostly mild and sunny. San Jose, Ca. The paint is much harder now. I am doing some final sanding and it just barely is giving off a faint ms odor when in the sun. None when cool. I am confident this paint will harden just fine. My previous test pieces were done over the heat wave we had this summer. They baked in the sun and the paint is very hard. Passes the nail test easily. I am sanding it in preparation for one last coat and then polish. 
|
|
|
Re: Paint job on a budget!? CONTINUED..page 44........
#26019
10/08/06 04:16 PM
10/08/06 04:16 PM
|
Anonymous
Unregistered
|
Anonymous
Unregistered
|
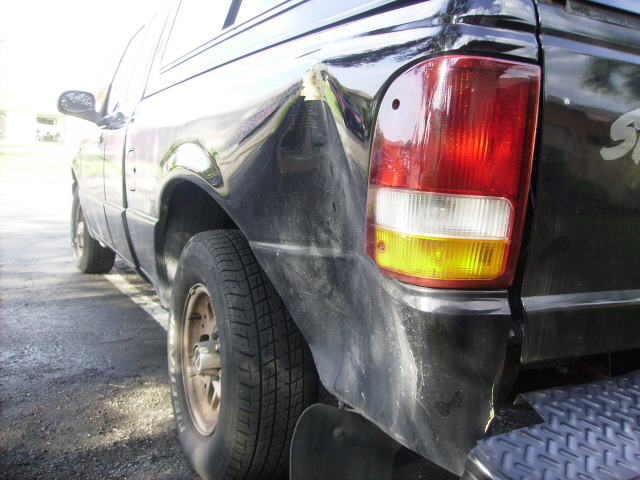
I'm just looking for some advice on how to get started . I've never done any painting or body work. All I want to do is fix this dent on my Ranger Truck and paint the area I don't care if its perfect anything looks better then that ? Should i try and pull the dent out then bondo it ? whats the best way to pull it ? and how can i make the grove in the body ? any advice 
|
|
|
Re: Paint job on a budget!? CONTINUED..page 44........
#26020
10/08/06 04:48 PM
10/08/06 04:48 PM
|
Anonymous
Unregistered
|
Anonymous
Unregistered
|
I'm taking a night class in autobody at the local tech school, for that dent, I'd start off on Ebay or other source to see if i could just find a replacement panel cheap.
On my own truck I had lotsa rust thru (1972 GMC) on the bed bottom and sides here and there, and lotsa bad bondo repair on at least one of the front fenders, I found a very nice bed and pair of fenders for $300 online, so I bought them instead of wasting a lotta time fixing on the ones I had. The new bed is about ready to paint and already primed (it has a couple storage dinks I'll have to smooth but that's it) same for the fenders, I'll spend a few hours fixing the ones I bought rather than a few days and many man hours fixing the originals.
If you can't find a replacement panel or it proves too expensive, use either a stud welder and weld a line of studs about 1 inch apart right down the deepest creases of the dent and pull it out, or drill holes and use an old school dent puller (stud welder is better, leaves no holes behind).
Then hammer/dolly if possible the dent further back onto the path to straightness, or do what you can with the dent puller, then sand(60-80 grit)/bondo/sand(120-180 grit)/primer/sand(220-320 grit) then spray or roll the new paint on, perhaps repeating the primer/sand portion if the panel isn't quite perfect yet also perhaps having to bondo multiple times too, in order to get it back smooth.
|
|
|
Re: Paint job on a budget!? CONTINUED..page 44........
#26021
10/08/06 06:54 PM
10/08/06 06:54 PM
|
Anonymous
Unregistered
|
Anonymous
Unregistered
|
ok im having a problem, i just polished a section of my hood (test piece) and its nice and glossy, minimal orange peel, about the same as a oem paint job, but if i look really close at the paint, there are all these spots. it looks like your windows do after you wash your car and dont dry your windows, with water spots, but its in the paint. im using black rustoleum stop rust, and im not sure what it is. im thinking maybe i sanded through to the lower paint which was also a black, but oem black. =\ not sure. any ideas?
|
|
|
Re: Paint job on a budget!? CONTINUED..page 44........
#26022
10/08/06 07:52 PM
10/08/06 07:52 PM
|
Anonymous
Unregistered
|
Anonymous
Unregistered
|
Quote:
ok im having a problem, i just polished a section of my hood (test piece) and its nice and glossy, minimal orange peel, about the same as a oem paint job, but if i look really close at the paint, there are all these spots. it looks like your windows do after you wash your car and dont dry your windows, with water spots, but its in the paint. im using black rustoleum stop rust, and im not sure what it is. im thinking maybe i sanded through to the lower paint which was also a black, but oem black. =\ not sure. any ideas?
i believe what your seeing is not a complete wet sand to make sure all of the orange peel is gone.
Steve
|
|
|
Re: Paint job on a budget!? CONTINUED..page 44........
#26023
10/08/06 10:12 PM
10/08/06 10:12 PM
|
Anonymous
Unregistered
|
Anonymous
Unregistered
|
r u guys wetsanding with a block or using bare hand?
|
|
|
Re: Rustoleum hardness
#26025
10/09/06 12:46 AM
10/09/06 12:46 AM
|
Joined: Jul 2003
Posts: 3,379
Rancho Cordova, CA
Exit1965

master
|
master
Joined: Jul 2003
Posts: 3,379
Rancho Cordova, CA
|
Here is good info on how to setup the Harbor Freight HVLP guns if anyone is interested. http://purplesagetradingpost.com/sumner/techinfo/HVLPspraygun.htmlThe next page shows a guy's comments about spraying thinned rustoleum through the #43430 gun (which I have also), and he's bananas over it. I wetsanded the whole car, the bondoed area is done and primered, and tomorrow I'll mask, clean with mineral spirits, let dry, and shoot..
|
|
|
Re: Rustoleum hardness
[Re: Exit1965]
#26026
10/09/06 01:41 AM
10/09/06 01:41 AM
|
Joined: Jul 2006
Posts: 40
Bakersfield, CA
kenzo42
member
|
member
Joined: Jul 2006
Posts: 40
Bakersfield, CA
|
Exit, what compressor are you running for this gun? Is it 220v? I can't find a 110v compressor that has enough cfm to run this gun. Btw, I've also heard great things about this gun on thesamba and autobody101. Quote:
Here is good info on how to setup the Harbor Freight HVLP guns if anyone is interested.
http://purplesagetradingpost.com/sumner/techinfo/HVLPspraygun.html
The next page shows a guy's comments about spraying thinned rustoleum through the #43430 gun (which I have also), and he's bananas over it.
I wetsanded the whole car, the bondoed area is done and primered, and tomorrow I'll mask, clean with mineral spirits, let dry, and shoot..
|
|
|
Re: Rustoleum hardness
[Re: Exit1965]
#26027
10/09/06 01:48 AM
10/09/06 01:48 AM
|
Joined: Jul 2006
Posts: 40
Bakersfield, CA
kenzo42
member
|
member
Joined: Jul 2006
Posts: 40
Bakersfield, CA
|
Exit, how do you think the rattle can primer will hold up? I understand bondo is very porous and requires primer, but I've heard quite a few adhesion problems w/ the rattle type primer. I wonder if the industrial type is different? I've had personal experience w/ it chipping, as well, but it was on a front bumper. Whereas I believe yours is on a less stressful area. Quote:
Here is good info on how to setup the Harbor Freight HVLP guns if anyone is interested.
http://purplesagetradingpost.com/sumner/techinfo/HVLPspraygun.html
The next page shows a guy's comments about spraying thinned rustoleum through the #43430 gun (which I have also), and he's bananas over it.
I wetsanded the whole car, the bondoed area is done and primered, and tomorrow I'll mask, clean with mineral spirits, let dry, and shoot..
|
|
|
Re: Rustoleum hardness
[Re: kenzo42]
#26028
10/09/06 11:24 AM
10/09/06 11:24 AM
|
Joined: Jul 2003
Posts: 3,379
Rancho Cordova, CA
Exit1965
master
|
master
Joined: Jul 2003
Posts: 3,379
Rancho Cordova, CA
|
Quote:
Exit, how do you think the rattle can primer will hold up? I understand bondo is very porous and requires primer, but I've heard quite a few adhesion problems w/ the rattle type primer. I wonder if the industrial type is different?
I've had personal experience w/ it chipping, as well, but it was on a front bumper. Whereas I believe yours is on a less stressful area.
Before I started my first coat of rustoleum, I had rattle can primer here and there. I don't know how this industrial rattlecan stuff is different except it says "high solids" and, for what it's worth, a guy who does bodywork for a living gave it to me after helping me fix a dent that he then primered with it. Though I don't know for sure, I don't think he would have used it if it would have to be removed to paint the car.
The issues people have with rattlecan primers are probably from using two part catalyzed paint which can be rough on the undercoating. The rustoleum seemed to work fine over rattlecan primer, in fact I think I used cheap gray plastikote primer in places as well, and there's no problems so far. I wouldn't worry about the primer adhesion as long as it has some dry time, and you're using a non catalyzed paint like rustoleum or brightside.
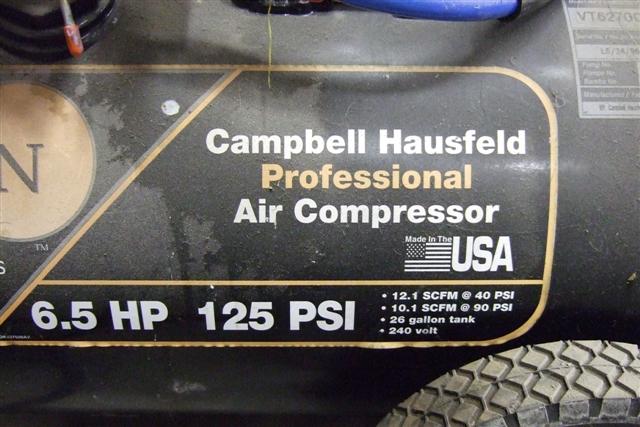
Here's a pic of my compressor, on loan from my dad. It was about $430 maybe 8 years ago at Home Depot, and it's still working great.
|
|
|
Re: Profesional Results?
[Re: admactanium]
#26030
10/09/06 11:54 AM
10/09/06 11:54 AM
|
Anonymous
Unregistered
|
Anonymous
Unregistered
|
Quote:
Quote:
admactanium: Seems like you **really** know your stuff when it comes to paint finishes.
Would you mind posting a recipe for a new person rubbing and polishing their first paint job? I want a long-lasting, beautiful job.
- What buffer do you recommend?
- What rubbing compound?
- What polishing compound?
- Which wax?
It would be great if you could give us a step-by-step breakdown on how to get a finish like you got on your motorcycle tank. That was truly amazing.
yeah. let me try to write something up tomorrow night.
Plz Admactanium, I am at this stage also and would really appreciate your input on this. I am trying the Turtle Wax Rubbing then Polishing compound, and I am getting a hazy, but flat dull look. Not sure if Turtle Wax can give me back the shine that the paint has after it is laid down or not.
|
|
|
Re: Profesional Results?
#26031
10/09/06 02:47 PM
10/09/06 02:47 PM
|
Joined: Apr 2006
Posts: 37
venice, ca
admactanium
member
|
member
Joined: Apr 2006
Posts: 37
venice, ca
|
Quote:
Quote:
Quote:
admactanium: Seems like you **really** know your stuff when it comes to paint finishes.
Would you mind posting a recipe for a new person rubbing and polishing their first paint job? I want a long-lasting, beautiful job.
- What buffer do you recommend?
- What rubbing compound?
- What polishing compound?
- Which wax?
It would be great if you could give us a step-by-step breakdown on how to get a finish like you got on your motorcycle tank. That was truly amazing.
yeah. let me try to write something up tomorrow night.
Plz Admactanium, I am at this stage also and would really appreciate your input on this. I am trying the Turtle Wax Rubbing then Polishing compound, and I am getting a hazy, but flat dull look. Not sure if Turtle Wax can give me back the shine that the paint has after it is laid down or not.
well, the first place to start reading information is here:
http://autopia.org/forum/forumdisplay.php?f=105
great stuff. but i'll give you a basic rundown of how i did it.
materials
this is just what i use. all this stuff adds up so it's not exactly in-keeping with the cheapness of the paint job. but here it is:
porter cable 7424
makita bo6040
lake county polishing pads: yellow cutting, orange power pad, white polishing.
menzera polishes: intensive polish, final polish II.
3m wetsanding paper. grits: 800, 1000, 1500, 2000 (although i hear that meguiars unigrit papers are better).
sanding
� prep your wetsand papers by soaking them in a bucket of water with some dish soap in it for lubrication. an hour or so. you want to soften up the backing paper so you don't get any stiff corners that can lead to deeper scratches.
� start with a fairly high (low number) grit wetsanding paper. 1000 or 800 if you have a lot of orangepeel and imperfections.
� use a sanding block of some sort on the flats. you can use some flexible backer for sanding any curvy spots. like a brillo pad or something of that nature. be VERY careful around edges because the paint naturally is thinner in that area so you can easily sand through.
� get a cheap plastic squeegee from the hardware store. you can use this to clear off the water in sections to check your progress. what you'll start to see is a matte surface with shiny spots. what you're doing is levelling the high spots (peaks) down to the level of the valleys.
� when the shiny spots start to get smaller and are nearly gone. move to lower grit papers (higher numbers). 1200 or 1500. the goal when progressing through the papers is to completely eliminate the sanding marks from the previous grit. you'll learn to see that happen.
- you can sand in a perpendicular direction and it'll help you see when you're finishing up on one level.
� by now the shiny spots should be disappearing and you should be left with only a matte surface. you can�t really finish it up properly until you�ve completely leveled the peaks to the same level as the valleys.
� i usually go to about 2000 grit since it makes polishing that much easier. you can go up to 3000 grit i think but i haven�t usually done that.
on to the polishing
� there are a few different types of machines you can use. or you can go by hand if you don�t mind doing a lot of hard work on it. polishers usually have foam pads that attach to a backing plate by velcro. there are other attachment methods but velcro is the most common.
the three common types of polishing machines are these:
- random orbital: the most commonly used one of these is the porter cable 7424. basically these machines just jiggle the pad very quickly in a random fashion. the benefit of these is that they are very safe when it comes to burning through the paint. they don�t generate much heat. the downside is that it takes longer to polish out imperfections and there are limits to what it can do.
- a dual action forced rotation: these aren�t very common. i have one model from makita, the bo6040. the other popular model of this is the festool rotex. these machines have dual mode. one that works the same way as the PC. in another mode, they work both like a PC and a Rotary. it forces the pad to rotate while also jiggling. this is a nice machine. i like mine. they can be used in ultimate safety mode like a random orbital but it also cuts more strongly with the rotary action.
- rotary: this is the fastest cutting machine but also the most dangerous. they�re also a bit more difficult to control. these machines only spin the pads. as you can imagine, the outer edges of the pads can get moving pretty quickly and they have a lot of cut and power. however, it�s much easier to cut through with one of these and they also tend to leave buffer trails in most users hands. you see this commonly on cars detailed by bad detailers. they look like holograms. circular swirling holograms.
the pads:
� there are a lot of different brands of pads to use with these machines. for the most part the same pads can be used on all the different types of polishers. the pads will be color coded based on their cut or aggressiveness. it�s hard to say definitively which pads do what because different manufacturers use different color codes. most often though yellow will be a �cutting� pad and white will be a �polishing� pad. cutting being more aggressive than polishing.
the polishes:
again, there are plenty of different brands of polishes. i personally use menzerna polishes. and again, there are different levels of aggressiveness in each product line. menzerna has 3 main products (in order of INCREASING aggressiveness):
final polish II, intensive polish, and power gloss.
there�s another line called poorboys that gets good reviews and of course there�s meguiars stuff that�s available at most locations. all of them are good. it usually just comes down to personal preference.
all of these modern polishes (not the tin can stuff you get at the auto parts store) use diminishing abrasives. what that means is that the grit of the polishes break down over time the longer they�re worked. the benefit of this is that it basically does the �step down� grit process we were doing with the sandpapers on its own. that�s why it�s important to make sure you�re breaking down the polishes well and letting them fully work otherwise you�ll have a hazy surface.
the process:
i only have the first two. so i�ll start with the yellow pad on my dual action and use some intensive polish. you should spritz the pad with some water to moisten it to begin.
� i use the yellow pad and apply some intensive polish directly to the pad in an x pattern. then, with the machine off, i dab the pad against the surface to spread the polish around evenly. i�ll even smear the area with the machine off.
� then i start the machine on a low speed. use that slow speed to distribute the product over a small area: maybe 2� x 2�. when the machine is slow really take your time moving it around and apply a bit of pressure.
� you�ll start to notice the polish working in and the surface should be changing a bit already. keep going while increasing the machine�s speed. that will help the polish break down further. with the menzerna polishes you keep going until they�re nearly completely transparent.
� then change the pads on the machine and use a lower grit polish. so in my case it would be a white pad with menzerna final polish II. go through the same process with the white pad and lower grit polish. until it�s nearly all hazed out and gone.
� i�d personally finish with the pc or the random orbit mode and the lighter polish just to make sure i�ve taken out all the previous polishing marks.
you have to check your progress on this as you go. if you�re still seeing sanding marks, it�s not likely that you�ll get them out with polishing. you need to get those out in sanding. that�s why it�s important to constantly check in the sanding process to see that you�ve removed the previous level�s sanding marks.
that's basically it. from there i use a cleaner wax and then a sealant to finish it up. but i wouldn't use a sealant on a newly painted surface for at least a couple months. it has to have time to completely dry and outgas.
i'd say the most important step in the whole process from these types of paintjobs is the sanding process. you need to get all the orange peel and waves/brushmarks out of the paint before you polish. and you REALLY need to step down in grit on the papers. most polishes will not polish out much more than 1500 grit sanding marks. if you don't step down you can get a shiny surface but you'll have shiny looking sanding marks. most of the polishing attempts i've seen on this thread so far fail from not enough time and care taken in wetsanding and getting a perfectly flat surface with a low enough grit.
|
|
|
Re: Profesional Results?
[Re: admactanium]
#26033
10/09/06 05:17 PM
10/09/06 05:17 PM
|
Anonymous
Unregistered
|
Anonymous
Unregistered
|
What happens if you don't do the final sanding and polish? What will happen if I leave the paint as it comes out of its final application?
I am doing my fiberglass dune buggy body. Using Rustoleum Professional. I have 4 coats on it at this time. Been applying the paint for over a month now.
The orange peel does not bother me on the buggy as long as it has a glossy finish and comes out hard and doesn't mar when something rubs the paint.
Right now, the paint appears to be hard but if I rub a fingernail across the paint, it mars the glossy finish.
Is the final sanding and polishing needed to keep the glossy finish from marring?
I was hoping I could eliminate the final step in this process but it seems I have an issue with it right now as it stands.
Any suggestions/thoughts?
|
|
|
 Re: Profesional Results?
#26034
Re: Profesional Results?
#26034
10/09/06 05:25 PM
10/09/06 05:25 PM
|
Anonymous
Unregistered
|
Anonymous
Unregistered
|
|
|
|
Re: Profesional Results?
#26035
10/09/06 05:33 PM
10/09/06 05:33 PM
|
Joined: Apr 2006
Posts: 37
venice, ca
admactanium
member
|
member
Joined: Apr 2006
Posts: 37
venice, ca
|
Quote:
What happens if you don't do the final sanding and polish? What will happen if I leave the paint as it comes out of its final application?
I am doing my fiberglass dune buggy body. Using Rustoleum Professional. I have 4 coats on it at this time. Been applying the paint for over a month now.
The orange peel does not bother me on the buggy as long as it has a glossy finish and comes out hard and doesn't mar when something rubs the paint.
Right now, the paint appears to be hard but if I rub a fingernail across the paint, it mars the glossy finish.
Is the final sanding and polishing needed to keep the glossy finish from marring?
I was hoping I could eliminate the final step in this process but it seems I have an issue with it right now as it stands.
Any suggestions/thoughts?
you don't have to color sand it out. it'll just stay as it is. it won't lose any more gloss left alone than if you were to sand it.
|
|
|
sprayed
[Re: admactanium]
#26036
10/09/06 06:51 PM
10/09/06 06:51 PM
|
Joined: Jul 2003
Posts: 3,379
Rancho Cordova, CA
Exit1965
master
|
master
Joined: Jul 2003
Posts: 3,379
Rancho Cordova, CA
|
I just sprayed the brightside. summary: next time i'll roll. I think in retrospect I had the fan turned almost all the way up, which I discovered when cleaning the gun. After I took off my respirator I see my nose hairs are hatteras white and I feel slightly lightheaded  The coat went on too thin in places. It'll serve as a base coat for the next coat or two which I'll do with a roller. Spraying sucks compared to rolling because when crap falls into the paint, you don't really have anything to run over the paint to take the fingerprint away, so you can just watch. It was my first spraying of an entire car, and I bet with the gun setup correct, a better respirator, and something to keep junk from falling in the paint, it would be OK. But it's back to the roller for me. Pics as soon as the smoke clears..
|
|
|
|
|


