|
 Re: Paint job on a budget!? CONTINUED..page 44........
#25678
Re: Paint job on a budget!? CONTINUED..page 44........
#25678
08/31/06 01:13 AM
08/31/06 01:13 AM
|
Joined: Jul 2003
Posts: 3,378
Rancho Cordova, CA
Exit1965

master
|
master
Joined: Jul 2003
Posts: 3,378
Rancho Cordova, CA
|
Welcome Jason. Way to lay the smack down  Current status is it's done, just awaiting polishing. My dog ate my cheap ($12) 6" buffer on Monday, so I'll need to get another. I am considering skipping wetsanding and going right to polish, unless I find a hair or something that sticks out, then I'll wetsand that area. I have very little orange peel so the wetsanding wouldn't help make the surface much flatter, but it would take out specks and hairs. I'll try a fender straight to polish and see how that goes. I did manage to get a good shine out of the safety red on the one spot where I wetsanded with 2000, then the next day hit with the polisher. Then I painted the car white. I'll try to polish at least part of it this weekend and will post pics.
|
|
|
Re: Paint job on a budget!? CONTINUED..page 44........
[Re: Exit1965]
#25679
08/31/06 03:36 AM
08/31/06 03:36 AM
|
Anonymous
Unregistered
|
Anonymous
Unregistered
|
Quote:
Welcome Jason. Way to lay the smack down
Whatever dude...i'm not hear to argue, but I do have a right to include my experience.
To clarify, I didn't say my paint is soft. I actually cut a piece off my old test panel with a razor blade...the piece was about the size of a half-dollar and I could stretch it!!
In the beginning this was presented as a quick and easy alternative to 'over-priced' paint jobs (8 hours between each of three coats, buff with an orgital sander and you have this wonderful paint job in a weekend)...it didn't happen for me. Sorry if I ruffled some feathers...you guys are going to believe what you want anyway...give it a shot.
...people should see both sides, but they should not be 'PERsuaded' to try it based on ONE PERSON's opinion/experience (Charger's)...'cause noone else has really got that kind of finish for some reason...Chuck
|
|
|
Re: Paint job on a budget!? CONTINUED..page 44........
#25680
08/31/06 09:11 AM
08/31/06 09:11 AM
|
Joined: Jul 2003
Posts: 3,378
Rancho Cordova, CA
Exit1965
master
|
master
Joined: Jul 2003
Posts: 3,378
Rancho Cordova, CA
|
Chuck, I know you had a bad experience but please consider that your experience was unique to you, your car surface, your technique, perhaps your batch of paint, etc. And to say that no one has come up with a great finish (other than charger) is ridiculous. Here's only one personal example where you can see a very shiny surface in a photo taken straight on. You can see where the polishing was done, and where it wasn't. The examples of other people's good work can be found on other pages of the thread. 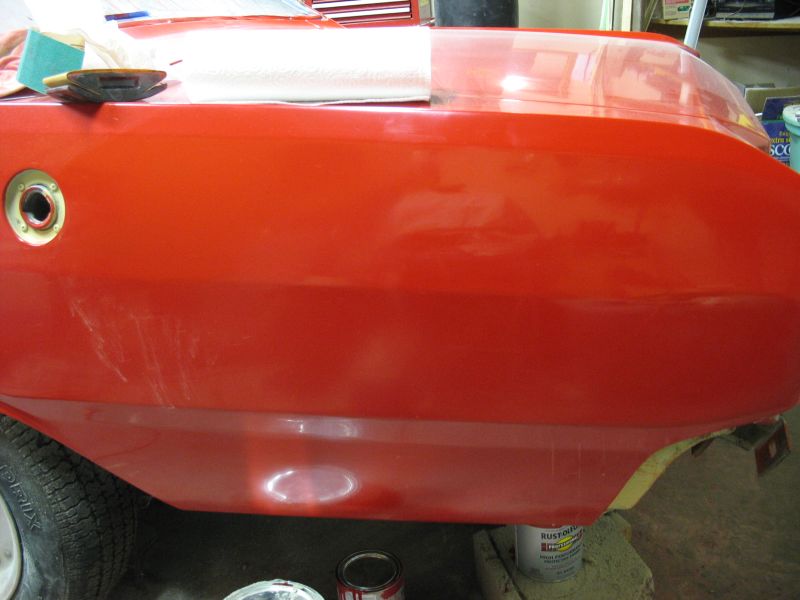 Unless you have some new input, you wont be getting any more "arguing" from me on the points that have been explained or refuted by myself and others, it really seems to be pointless since you are steadfast in your opinion that the paint is junk.
|
|
|
Re: Paint job on a budget!? CONTINUED..page 44........
#25681
08/31/06 10:40 AM
08/31/06 10:40 AM
|
Anonymous
Unregistered
|
Anonymous
Unregistered
|
it is quick and super easy... Once you master it. You have to learn the craft and get your technique down pretty tight to pull it off in a weekend but once you've done a couple cars it starts to come togeather smooth. Don't get all bent out of shape and try to speak out cause you weren't willing to take the time to learn and seek advice. We are all here to help one another and many of us have achieved a nice showroom finish on our pieces. This may sound silly but the reason you didn't master the paint job, wasn't the paint but your attitude and quick willingness to write it off as bunk. Remember, you catch more flys with honey not vinegar even from yourself.  
|
|
|
Re: Paint job on a budget!? CONTINUED..page 44........
[Re: Exit1965]
#25682
08/31/06 10:46 AM
08/31/06 10:46 AM
|
Anonymous
Unregistered
|
Anonymous
Unregistered
|
When you do your final wet sand, you have to sand through all the gloss. This gives you visable target, and lets you know when you are through the orange peel. Another thing that helps is to have a hand held fluorescent shop light to check your progress. Pay close attention to the reflection of the bulb itself, you will see your progress very well. If I recall correctly, I did all my wet sanding with 2000 then 3000 paper. A few drops of soap does help, as does a ketchup type squirt bottle or a standard spray bottle. That is in addition to your bucket of water to rinse your paper. When you sand anything out of your paint (dust, dirt, bug, hair) be very carefull when it comes out of your paint. It is very easy to scratch you paint with whatever you just sanded out. Use lots and lots of water, if you get to the point where the paper starts to grap, its not wet enough. The water serves two purposes, it keeps the paper clean and is a lubricant. Your paper is harshest when it is clean and dry, don't let it get dry (lots and lots of water!). I like the idea the someone had brought up earlier, of sanding in different directions with different grits. It will give you a good idea of when you have sanded through the previous grits marks. I have not used that technique personally, but it sounds reasonable. If your underlying body work is even (flat, smooth) I don't use a block. If you watch your orange peel with the light and sand very very lightly, you shouldn't put and waves into the paint. If your orange peel is uneven, you may want to use a block for your first final wetsand. If you have deep orange peel, with this paint method, you will want to sand it all out, than recoat with a layer or two of paint. After that, if you still have deep orange peel, you are putting it on too thick. If you end up with deep orange peel in the cc of a bc/cc job, your are SOL my friend. Rough it up and re-clear the area.
I have to go, will post more on buffing later.
Jason
|
|
|
Re: Paint job on a budget!? CONTINUED..page 44........
#25683
08/31/06 01:10 PM
08/31/06 01:10 PM
|
Anonymous
Unregistered
|
Anonymous
Unregistered
|
This is my first post on this subject, but I've been reading along and experimenting with Brightside for about 4 months. The bodywork on my vehicles are not yet done, so actual paint work on them is a few months away. I do have a good bit of paint experience. Mostly amatuer experience, other than some painter's assistant experience years ago, but I have been restoring cars for 30 years.
As to Charles' results...sounds like he used latex based Rustoleum. His results/problems all have the characteristics of latex and are definitely not the results I've ever seen or heard of with "regular" Rustoleum. On two occassions I've picked up the wrong can of Rustoleum off the shelf at the store and had picked up the latex Rustoleum instead of the "regular". Charles, check your can. If the can is labeled as the "regular", then it must have had the wrong paint put in it at the factory. That just has to be a latex paint.
As to Brightside...I love the stuff! Incredible hardness, shine, and flow-out...even using a cheap brush! I've discovered that the Fire Red can be mixed with the Rustic Red (discontinued) to get some fantasic colors. I've been able to mix Ford's Rangoon Red and Ford's Candyapple Red to an exact match (the colors of two of my cars). Out of the can, the Fire Red is actually true vermillion. Vermillion is a base color so it can be easily mixed to get other colors. The bad news is that it is tough to find any of the Rustic Red, though. The good news is that it is usually marked down 50% off the regular price when you do find it. I think that it has been discontinued for over two years, which takes it beyond the recommended shelf life, but I haven't found a can that is not OK, yet.
|
|
|
Re: Paint job on a budget!? CONTINUED..page 44........
#25684
08/31/06 03:25 PM
08/31/06 03:25 PM
|
Anonymous
Unregistered
|
Anonymous
Unregistered
|
Been follwoing this thead, and bought enough materials to paint the old white truck cap for my dodge truck over the next weekend. It's a brown truck, and the leather brown paint that Rustoleum has is a pretty close match, so it will at least have a matching color truck cap until I do the rest of the truck, (instead of the usual grandpa jones white!) Cap is a good test case to perfect my technique, at least I think so. And actually, Chuck didn't even use a rustoleum paint, this is a quote from back in march that someone else found, and I am reposting for for reference: Quote:
Ok, now a few insights:
1.) The paint suggested very early in these postings was called "acrylic/enamel paint"...this is not exactly what you're looking for. The proper paint type is "aklyd enamel". The "acrylic/enamel" is water based, and that isn't what you want (read about "acrylic/enamel" on this web page). As a matter of fact, you do not necessarily have to buy "rustoleum". I bought mine from the local "Do-It-Center" and it is the house brand made by Sherwin Williams...worked fine. The easiest way to tell if you have the right thing is to look at the directions and see what "clean-up" instructions are...if it says "clean with Mineral Spirits", than you have the right stuff. Many people make compatible brands.
2.) It may also say in the instructions that you do not have to thin...in this case, you have to thin. My ratio was 10:1, worked great. It will bubble and look "orange peely" at first, but relax, the paint self-levels as it drys.
3.) At first, I understood that we could use a $20 orbital buffer/polisher like you buy a Wal-Mart, etc...Although it seems to have worked for others, it did NOT work for me. It would not eliminate the scratches from the final 1500 grit wetsanding. Luckily, I had a 7" ELECTRONIC POLISHER/SANDER just like the one on this web page. It worked wonders!!
Will write more later if I think of anything. If you have questions about my procedure, I will do my best to help...thanks guys
With that in mind, for Chuck to state that Rustoleum can't do the job when applied the way Charger has, is totally innapropriate. Charger used a much different mixture, along with Tremclad/Rustoleum.
I've never messed with Sherwin Williams paint, nor the Do-It-Center house brand etc... but I know from using Rustoleum to paint many tractors, and mowers as a kid, and in high school, the stuff is darn near indestructable. Does fade if you don't take care of it, (IE ya gotta wax the car now and then to keep that good shine, even on the new cars.)
|
|
|
Re: Paint job on a budget!? CONTINUED..page 44........
#25685
08/31/06 05:04 PM
08/31/06 05:04 PM
|
Joined: Jan 2006
Posts: 1,220
toronto canada
69chargeryeehaa
OP
pro stock
|
OP
pro stock
Joined: Jan 2006
Posts: 1,220
toronto canada
|
well i just did something so stupid last night parking my beetle in my garage, there is a step about 3-4" where the driveway meets the garage floor, and i was reversing really fast into the garage and the wheel just yanked out of my hands and the car hit the garage HARD, put a huge dent in the fender (about 1" deep x 6" long)     . i never do things like this, smash my own car into my own garage, great....so 15 mins later the fender was off the car and i spent about an hour tapping out the dent with a set of autobody dollys and hammers, and then i prepped the fender with 200grit using a small palm sander, and off to paint. cracked a can of paint 6yrs old, and aside for a 1/2" skin that dried on the top the paint was fine. i put on 1 coat last night at about 10pm, then put another coat at 9am this morning, and just did another coat now (about 4pm) and the repair is almost gone, down to metal for where the dent was (which i had to repair) and straight to paint. the paint dried to a touch in about 2-3hr, and i painted about 8-10hrs apart, i might be able to do 1 more coat tonite, and wetsand tommorrow and go and do 2 more coats and final wetsand. here are the results so far:   that's 3 coats of paint, i did'nt bother thinning it down at all just to do a small fender, i used paint straight out of the can. i'm more concerned about coverage, and i'll sand the peel out, but there is practically none after 3 coats. the 2nd coat starts to hide the scratches from prep with the 200, and after the 3rd coat all is gone. i should have the fender back on the car by friday night.   funny thing was that the paint was intact except for some scratching, which was quite deep, but not thru, but the only way to fix it perfect was to tap it out, that way i use no body filler, which is like the whole car. so long story short, don't crash your car into the garage!!!! i hit it about idle with the clutch out in reverse, about 3-5 mi/hr, i feel so stupid.   as for chucks expirence with the paint, i can only say that most of the people trying this method have not ever painted a car, and when things go wrong they blame the process. once you master the tequnique and learn the paint, it's really easy and quick, it takes me all of 2 mins to paint the fender in the pic. at least i can repaint the whole fender for free, and not have to take it to a body shop and get rapped. my paint has served me very well, if someone is to try this method, alot of practice and strict directions followed as to the proceedure is taken, the result is going to be great. also resist the urge to rush the process, it's fast, but is still alot of work, most people trying this method get all gung-ho and just go out to their car roller in hand and then realize it turned out like crap, the reality is it is alot of work, but the $ and bragging rights make it all worth the work, plus you can say "ya, i painted it with tremclad/rustoleum and a roller"....how often do you get to do that?   
Last edited by dbdartman; 08/31/06 08:27 PM.
|
|
|
Re: Paint job on a budget!? CONTINUED..page 44........
[Re: 69chargeryeehaa]
#25686
09/01/06 12:51 PM
09/01/06 12:51 PM
|
Anonymous
Unregistered
|
Anonymous
Unregistered
|
Hey, I just joined this forum because of this thread. I read all of the original and all of this one. I have been contemplating what to do on my 1978 F-150 for some time and I am 90% sure this is the route I will go. I can't find any place here that will color-match Rustoleum paint, but Ace Hardware does color-match THEIR rust paint which they claim is the same as Rustoleum. I wanted to see if any of you knew if Ace's rust paint is worth a shot and if anyone had any experience with it. I really want to keep my truck the original color, 'Ford Medium Copper' (a dark orange), but my second choice would be Safety Red. I also wanted to say great job to all of you who are taking the time to do this right, your paint jobs really show the hard work and effort you put into it. I'm willing to take the time to do it right, so I hope I will be able to join the ranks of the elite paint rollers here :-P Here's my baby: http://www.thetechlounge.com/forum/showpost.php?p=19033&postcount=82EDIT: Also, I think my original paint is laquer but I'm not 100% sure. Will Rustoleum be fine going over that if any is left after sanding?
Last edited by BrianK; 09/01/06 12:55 PM.
|
|
|
Re: Paint job on a budget!? CONTINUED..page 44........
[Re: Exit1965]
#25687
09/01/06 01:16 PM
09/01/06 01:16 PM
|
Anonymous
Unregistered
|
Anonymous
Unregistered
|
Exit, buffing with an agressive enough compound can do all the work wet sanding would. If you have only a little very even orange peel, buffing may very well be the way to go. I once had an insurance company have one of my cars fixed, one that I had bc/cc'd sanded and buffed. The first time they tried to give it back to me "fixed", the orange peel looked terrible (compared to a near perfect paint job, probably was on par with a stock paint job). I told them to fix it right and don't call me again until it was really fixed. When I finally picked it up, they had done a nice job with the finish. They told me that they didn't send it back to the paint shop, they just had it buffed out. I wouldn't use the turtle was buffing compound that charger69 had been talking about. There is nothing wrong with that stuff, but it is intended to be the final buff before wax. Like I said, I have had great experience with 3M compounds from NAPA. It's going to put the paint job over the $50 figure though.
There is one thing I want to clear up, because I'm not sure everyone knows the difference. Generally there are 3 types of pastes we use to finish a paint job. 1st is a rubbing compound, 2nd is a polishing compound, and 3rd is a wax. Rubbing and polishing compounds don't contain any wax, their purpose is to remove material from your finish. The work at different rates, based on how agressive thier abrasives are. Rubbing compound is for removing material quickly (scratches, light orange peel), it has harsh abrasives in it. Polishing compound is for bringing a shine to dull paint, it contains mild abrasives. The rubbing compound (harsh) will leave your paint dull, but not scratched. The polishing compound (mild) will take that dull finish and turn it into a shine. If you skip the rubbing compound after you wet sand, you will spend a very long time buffing (very safe, slow method), otherwise (if you stop early) you will end up with a foggy, scratched, and mildly shiny finish. In the later case you would have a better shine if you didn't wet sand, but your finish would have some orange peel.
Wax is entirely different then rubbing and polishing compounds. Wax leaves a shiny protective film on top of your paint. Although I believe charger69 when he says waxing his paint immediately after finishing didn't hurt the paint, I don't believe it is the BEST way to do it. The best way to do it (my opinion) would be to wait the month or so until the paint is completely hard before you sand and buff. I don't think this is the only way to get an excellent finish (obviously by charger69 and Exits buffed red), but I think it may be the way to get the best possible finish.
There are many different 'grits' of rubbing and polishing compounds. If you stay with a line of products, you can be relatively sure you are going with the right progression. One thing to watch our for, if you seem to be getting a poor results with one step of buffing, it is probably because you stopped the prevoius step too early. You can continue with the current grit for a long time to make up for that, or you can go back and finish the previous step.
Got to run, good luck.
Jason
|
|
|
Re: Paint job on a budget!? CONTINUED..page 44........
#25688
09/01/06 01:32 PM
09/01/06 01:32 PM
|
Joined: Jan 2006
Posts: 1,220
toronto canada
69chargeryeehaa
OP
pro stock
|
OP
pro stock
Joined: Jan 2006
Posts: 1,220
toronto canada
|
Quote:
Although I believe charger69 when he says waxing his paint immediately after finishing didn't hurt the paint, I don't believe it is the BEST way to do it. The best way to do it (my opinion) would be to wait the month or so until the paint is completely hard before you sand and buff.
the only reason why i reccommend the turtle wax polishing coumpound is because it yeilds a awesome shine without any chance of burning thru the paint, let's face it, most of these people trying this method are painting virgins, and to throw in buffing, it's a bit too much. buffing is a art in itself, and takes years of practice. if someone wants to do a paintjob themselves, and have little expirience, then if they follow my steps they will most likely be able to pull off a nice job. i have alot expirence in buffing, wetsanding and cutting new paint, for the tremclad/rustoleum process, waiting a month does nothing, the paint flashes in 1 day, after that it just gets harder but from my expirence does not "vent" after 1 day. i wax immedieatly after buffing, wait about 1 day for dry time, in the sun preferably, and then straight to wetsand and buff.
However i completely agree with all your statments, you obviously have alot of expirence in the buffing field, but i'm just trying to suggest the best, eaisiest, cheapest, most realiable way to buff tremclad/rustoleum; although your advise is dead on regarding auto paints be it single stage, or BC/CC. It's twice as eaiser to cut the paint after 1 day, if you wait more it would just take alot more time to buff, and i mean alot. Of course this is just advice from my expirence, but rubbing coumpound combined with a ele buffer would just burn the paint really quick, even after a month of drying time, i found waxing the paint right after buffing almost makes the shine permenant, and i do have the longterm results to prove it!!!! otherwise excellent advice on buffing for the more "advanced" users. 
|
|
|
Re: Paint job on a budget!? CONTINUED..page 44........
#25690
09/02/06 12:47 AM
09/02/06 12:47 AM
|
Anonymous
Unregistered
|
Anonymous
Unregistered
|
Quote:
Exit, buffing with an agressive enough compound can do all the work wet sanding would. If you have only a little very even orange peel, buffing may very well be the way to go.
This may be music to my ears. It's been a few weeks since my last post. My test piece has been a hood, and I'm painting with black Brightside. I've been having a hard time with the wetsanding.... inevitably I end up sanding through to metal on high edges. Another frustration is my sandpaper suctioning down to the panel, inhibiting the sanding motion, or paper sticking to the wet panel instead of the sanding block. It also seems like I'm using up the sandpaper so fast that I spend more time changing paper and loading up the block than I do wetsanding. I think I'm doing something wrong. I've been getting better, but I'm kind of getting burned out on working on the same panel without getting it finished to satisfaction. 1000-1500-2000 or 1200-1500-2000.
I've done what I hope is to be my final coat of paint, and I really didn't have much orange peel. I like the roller process, and each time I screw up my attempt at wetsanding, it gives me a chance to practice rolling. I will have to touch up a couple tiny spots along edges, but I'd prefer not to re-coat the entire panel because I'd be rendering moot (again) all of the wetsanding I've already invested.
So, if the rubbing compound can be done with the cheap buffer in lieu of major wetsanding, I'd like to consider this method. ...Which brings me now to the Turtle Wax (paste) Polish. I tried this on my 2000-wetsanded finish, and I was unable to come up with the "gun finish" gloss that I had before wetsanding. Let me be very clear about this, the Brightside black is ***GLOSSY*** straight out of the can! It really looks awesome. But no matter how long I spent with my cheap 6" random-orbit electric buffer with a brand new terry bonnet, I get a hazy gloss, not that awesome shine I had prior to wetsanding. I know, I know... 69Charger says to spend a LONG time with the buffer and polish... and I really did. About two hours. One spot especially so. Lots of polish. Plenty of water. But dang, I'm not gettin' that GLOSS! So would I be able to utilize *less* wetsanding, add the step of rubbing compound (cheapo Turtle brand? actually I have a little Meguire's in a tube already) with the terry on the cheapie polisher, then go to cheapie polish? And get that GLOSS??
Okay. Cheapie, cheapo, cheap. Let me also be clear that I have no reservations about spending a little more for better results. My time is valuable too... and I am considering investing in a nice DA buffer like Marq has done, and maybe going with a "Pro" compound such as System One (I like the idea of one compound that does everything instead of 2 or 3). I guess any way that I look at it I'm way overbudget, but still thousands less than having it done at a paint shop. The learning curve applies to purchases, too. I don't want to get suckered into buying an expensive product whose advertising makes it sound great only to be disappointed by ultimate results... any System One users out there?
|
|
|
Re: Paint job on a budget!? CONTINUED..page 44........
#25692
09/02/06 02:10 AM
09/02/06 02:10 AM
|
Anonymous
Unregistered
|
Anonymous
Unregistered
|
I am ready to give Brightside a shot, BUT: Is there an executive summary for the Brightside process available from anybody? I am looking for the process from a fully prepared car (straight, OEM paint with primer patches) to final polish please! I got the gist of it from the 80 pages (roflmao), but I would like a single page or post to reference from, including materials needed, thinning process, application techniques, sanding process, amount of coat steps, etc. for the Brightside boat methodology.
|
|
|
Re: Paint job on a budget!? CONTINUED..page 44........
#25693
09/02/06 08:07 AM
09/02/06 08:07 AM
|
Anonymous
Unregistered
|
Anonymous
Unregistered
|
Quote:
I've been having a hard time with the wetsanding.... inevitably I end up sanding through to metal on high edges. Another frustration is my sandpaper suctioning down to the panel, inhibiting the sanding motion, or paper sticking to the wet panel instead of the sanding block. It also seems like I'm using up the sandpaper so fast that I spend more time changing paper and loading up the block than I do wetsanding. I think I'm doing something wrong. I've been getting better, but I'm kind of getting burned out on working on the same panel without getting it finished to satisfaction. 1000-1500-2000 or 1200-1500-2000.
More water! If it is sticking to the panel you are too dry. You need lots and lots of water. You should be almost constantly adding water directly to the surface, and rinsing your paper in the bucket.
If you need to use the block, stay away from any raised edge. You will sand through them very quickly. Avoid the edges until you are done with the panel. Then go back with your most worn out finest grit paper, and just lightly hit the edges BY HAND. Most of the time you wont have lots of orange peel on the edges.
I would drop the 1000 and 1200 all together. I started with 2000 to wet sand, but 1500 doesn't sound out of line.
If you skip the wet sanding all together and opt for rubbing compound, you will still need to be very careful of the raised edges. I have seen people cut through their paint at the edges with normal buffing.
Good luck,
Jason
|
|
|
Re: Paint job on a budget!? CONTINUED..page 44........
#25694
09/02/06 01:02 PM
09/02/06 01:02 PM
|
Anonymous
Unregistered
|
Anonymous
Unregistered
|
Quote:
Quote:
I've been having a hard time with the wetsanding.... inevitably I end up sanding through to metal on high edges. Another frustration is my sandpaper suctioning down to the panel, inhibiting the sanding motion, or paper sticking to the wet panel instead of the sanding block.
Quote:
More water! If it is sticking to the panel you are too dry. You need lots and lots of water. You should be almost constantly adding water directly to the surface, and rinsing your paper in the bucket.
Believe me, I'm Wet and Wild! Lots of water and a bit of dish soap. Thanks, though for the pointers. My hood is a very flat panel (Scirocco MK 2), and with a wet fine grit paper I often get a vacuum situation that disrupts my sanding motion. I mean it really sucks it down, and then A) the paper flies right out of my fingers if I'm using a foam block, or B) the harder rubber block comes to a dead stop. I'm using short strokes, 3-5 inches, one direction. Maybe I'm pressing down too hard, but it seems if I dont put any pressure, then I don't get any sanding done...
I think I've learned now to stay away from the edges, and do as you say to sand w/o block using only fingers and well-used paper. The front lip has been the trickiest for me. My last wetsand left me pretty good but for a 1/2 inch line on the lower edge that went through. Doh! I touched up my sand-thru's last night with a kiss of paint, and they look good (glossy!). Maybe I'll add a second thin coat on those spots today for extra protection.
|
|
|
Re: Paint job on a budget!? CONTINUED..page 44........
#25695
09/02/06 03:37 PM
09/02/06 03:37 PM
|
Joined: May 2006
Posts: 575
Canada
Marq
mopar addict
|
mopar addict
Joined: May 2006
Posts: 575
Canada
|
Quote:
I am ready to give Brightside a shot, BUT:
Is there an executive summary for the Brightside process available from anybody?
I did a fairly detailed write up on the Brightside paint somewhere back in this section of the thread. Basically the technique is the same recipe as for using the Tremclad/Rustoleum... with the major difference being that you don't have to cut the Brightside paint with thinner UNLESS you really want to ( in order to get more working time on the paint or to lay down a slightly thinner coat with each application ).
The other main difference is that the Tremclad/Rustoleum paint is applied extremely thin ( because it is heavily cut with mineral spirits. The boost in the mineral spirit juice helps to make the bubbles that appear when you roll your paint self pop ). Whereas with the Brightside you do a two handed application... in that you roll the paint on... level it out and then go over the paint with a brush or a second roller to pop any bubbles that exist.
So check back in this thread any you should be able to find the 'process' steps that I used with Brightside
.
|
|
|
Re: Paint job on a budget!? CONTINUED..page 44........
[Re: Marq]
#25696
09/02/06 04:41 PM
09/02/06 04:41 PM
|
Anonymous
Unregistered
|
Anonymous
Unregistered
|
Ok, well I went and picked up a tiny cans of the ACE STOPS RUST paint and primer. The paint has the same uses as Rustoleum and can be thinned with mineral spirits, so I'm going to do some testing on my replacement tailgate that I am doing body work on and see how it turns out. Maybe this will be a good alternative for those who want to use Rustoleum but also want to get it color matched (no one around here color matches Rustoleum). Or it could turn out horrible... we'll see... Wish me luck!
|
|
|
Re: Paint job on a budget!? CONTINUED..page 44........
#25697
09/03/06 01:35 PM
09/03/06 01:35 PM
|
Anonymous
Unregistered
|
Anonymous
Unregistered
|
Quote:
Quote:
More water!
Believe me, I'm Wet and Wild! Lots of water and a bit of dish soap. Thanks, though for the pointers. My hood is a very flat panel (Scirocco MK 2), and with a wet fine grit paper I often get a vacuum situation that disrupts my sanding motion. I mean it really sucks it down, and then A) the paper flies right out of my fingers if I'm using a foam block, or B) the harder rubber block comes to a dead stop. I'm using short strokes, 3-5 inches, one direction. Maybe I'm pressing down too hard, but it seems if I dont put any pressure, then I don't get any sanding done...
You got it. You are using too much pressure. The sanding takes time, lots of time. You are squeezing the water out from under the paper and causing in effect that same thing as not using enough water.
Good luck,
Jason
|
|
|
|
|


