|
 Re: My On-Going 727 Rebuild Questions Post
[Re: dusturbd340W5]
#1673427
09/19/14 12:20 AM
09/19/14 12:20 AM
|
Joined: Apr 2007
Posts: 1,165
Central Ohio, USA
Bigbeep

super stock
|

super stock
Joined: Apr 2007
Posts: 1,165
Central Ohio, USA
|
Quote:
I have built hundreds of these over the years all you need to do is lube up the front drum and seals real good and just wiggle the piston while applying pressure and it will slip right in no need for zip ties or a freezer.
Same way I do it. Works fine just don't force it. Beep
|
|
|
 Re: My On-Going 727 Rebuild Questions Post
[Re: Big Bad Bee]
#1673428
09/19/14 04:19 AM
09/19/14 04:19 AM
|
Joined: May 2008
Posts: 5,399
Aurora, Colorado
451Mopar

master
|

master
Joined: May 2008
Posts: 5,399
Aurora, Colorado
|
You should have not removed the stock sprag if it was tight and you plan to reuse it. The stock one was peened in place (the flat marks around the sprag in the aluminum case.) For a stock powered driver, reusing the old sprag would be OK if it is still tight when replaced, but for a performance car I would at least get the lower priced bolt-in sprag. If your making really good power, get the more expensive bolt-in super sprag. Consider the cost of the bolt-in sprag as step one to preventing a possible front drum explosion. Step two is the billet drum (pricy $$$.)
For bushings, replace front pump bushing, and front drum bushing (if it is sloppy the sealing rings won't seal and you will loose pressure to the front clutch pack.) The tail shaft bushing also (check fit to driveshaft yoke.) When installing the front pump (converter) bushing, use the round side of a phillips screwdriver to peen it in place, then fit to the converter to make sure it fits before installing the seal and re-assemblin the pump. The front pump thrust bushing (large thin fiber/plastic washer) comes in various thickness. It should be OK if you are re-using the stock gears and drums, but if you start replacing them with the billet parts, then you may need a different thickness bushing to get the correct clearance.
Last edited by 451Mopar; 09/19/14 04:39 AM.
|
|
|
 Re: My On-Going 727 Rebuild Questions Post
[Re: WILD BILL]
#1673429
09/19/14 02:21 PM
09/19/14 02:21 PM
|
Joined: Dec 2003
Posts: 10,951
Spokane Valley, WA
Big Bad Bee
 OP
OP
I Live Here
|
 OP
OP
I Live Here
Joined: Dec 2003
Posts: 10,951
Spokane Valley, WA
|
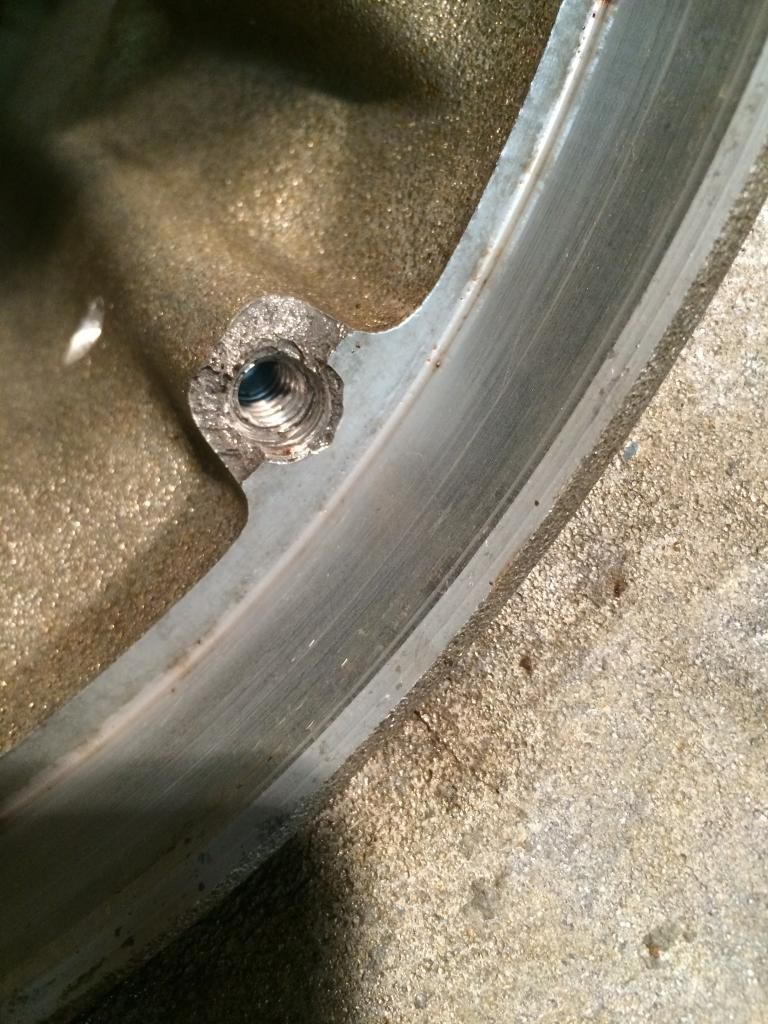
Wild Bill, The valve body is the stock unit. I'm installing a TransGo Shift kit. What is an LBA? I don't have a lip seal tool. I'll definitely consider it. Leigh, do you have photos? I have no idea what you are suggesting. I'll get back to all the lip seal comments when I get to that point of the rebuild. Right now I don't even know what the lip seal looks like. Thank you all for the information so far. Here's a new development. Inspecting the housing I found this.  This is a pump bolt hole is at the 9 o'clock position. The bolt was threaded in tight and it looks like it's got a helicoil in it??? I've lost a quarter inch of thread. So obviously somebody else has been under lucy's skirt... Like I said, there are enough threads for the bolt to get a good grip. Is the case still okay? I don't see any fractures beyond this little break.
I’m listening.
|
|
|
 Re: My On-Going 727 Rebuild Questions Post
[Re: John_Kunkel]
#1673432
09/19/14 09:28 PM
09/19/14 09:28 PM
|
Joined: Dec 2003
Posts: 10,951
Spokane Valley, WA
Big Bad Bee
 OP
OP
I Live Here
|
 OP
OP
I Live Here
Joined: Dec 2003
Posts: 10,951
Spokane Valley, WA
|
John K, excellent picture. Thank you.
Bill, thanks for the clarification. A follow up question. If I drag race with a stock VB and shift kit, do I risk over-spinning the trans in the water box in first gear?
I got the bolt in sprag ordered and on the way. I'll be busting my hump getting the assemblies cleaned, inspected and reassembled with new parts so that they are ready to assemble monday when the sprag gets here. More to follow. Thanks guys.
I’m listening.
|
|
|
 Re: My On-Going 727 Rebuild Questions Post
[Re: Big Bad Bee]
#1673433
09/20/14 12:55 AM
09/20/14 12:55 AM
|
Joined: Dec 2007
Posts: 10,542
BROOK PARK, OH
WILD BILL

Senior Member of the Junior Dragster Club
|

Senior Member of the Junior Dragster Club
Joined: Dec 2007
Posts: 10,542
BROOK PARK, OH
|
Quote:
A follow up question. If I drag race with a stock VB and shift kit, do I risk over-spinning the trans in the water box in first gear?
No, Not with the low band also holding in first gear.
The "problem" is when you have a VB without a LBA in first gear. The sprag is then the only thing holding in first gear. If that lets go, then the drum will spin roughly twice engine RPM and the stock drum just can't handle that and can come apart.
|
|
|
 Re: My On-Going 727 Rebuild Questions Post
[Re: Big Bad Bee]
#1673434
09/20/14 09:58 AM
09/20/14 09:58 AM
|
Joined: Jan 2003
Posts: 75,324
A gulag near you.
JohnRR

I Win
|

I Win
Joined: Jan 2003
Posts: 75,324
A gulag near you.
|
Quote:
John K, excellent picture. Thank you.
Bill, thanks for the clarification. A follow up question. If I drag race with a stock VB and shift kit, do I risk over-spinning the trans in the water box in first gear?
I got the bolt in sprag ordered and on the way. I'll be busting my hump getting the assemblies cleaned, inspected and reassembled with new parts so that they are ready to assemble monday when the sprag gets here. More to follow. Thanks guys.
With a stock Valvebody when you pull the trans down into Low it applies the rear band. The only time you risk overspinning is if the trans in in 1st and the sprag has failed , band not applied , that is when things will spin backwards thru the geartrain in the trans and potentially overspeed the drum.
Buy the super sprag , problem solved, the stock replacement bolt in is a complete waste of money , and you are half way to the good one.
|
|
|
 Re: My On-Going 727 Rebuild Questions Post
[Re: JohnRR]
#1673435
09/20/14 10:08 AM
09/20/14 10:08 AM
|
Joined: Jun 2003
Posts: 52,972
Romeo MI
MR_P_BODY

Master
|

Master
Joined: Jun 2003
Posts: 52,972
Romeo MI
|
Quote:
Quote:
John K, excellent picture. Thank you.
Bill, thanks for the clarification. A follow up question. If I drag race with a stock VB and shift kit, do I risk over-spinning the trans in the water box in first gear?
I got the bolt in sprag ordered and on the way. I'll be busting my hump getting the assemblies cleaned, inspected and reassembled with new parts so that they are ready to assemble monday when the sprag gets here. More to follow. Thanks guys.
With a stock Valvebody when you pull the trans down into Low it applies the rear band. The only time you risk overspinning is if the trans in in 1st and the sprag has failed , band not applied , that is when things will spin backwards thru the geartrain in the trans and potentially overspeed the drum.
Buy the super sprag , problem solved, the stock replacemtn bolt in is a complete waste of money , and you are half way to the good one.
Yep.. the production VB is a LBA valve body but like
John said.. its only applied in manual low.. if left
in drive it is not applied... and the super sprag
is worth the cost over the bolt in stock style

|
|
|
 Re: My On-Going 727 Rebuild Questions Post
[Re: cudadon]
#1673437
09/20/14 01:41 PM
09/20/14 01:41 PM
|
Joined: Dec 2003
Posts: 10,951
Spokane Valley, WA
Big Bad Bee
 OP
OP
I Live Here
|
 OP
OP
I Live Here
Joined: Dec 2003
Posts: 10,951
Spokane Valley, WA
|
Quote:
Mike how should one do a burnout @ the track with a stock (shift kit) VB so as not to overspeed the drum?
Start out in manually shifted 1, is it then ok to shift to 2nd?
Don
From what Wild Bill was saying, it sounds like you would be right but if you had a manual valve body you would run your burnout starting in second gear? Fascinating. I've never drag raced. Not even on the street. All this is news to me.
DVW, 451, Mr P, Big Beep, john, Bill, everyone, the collective knowledge here is fantastic and I appreciate the detail you've put in your posts. I'm learning so much. I'm sure I'll have more questions later today. 
I’m listening.
|
|
|
 Re: My On-Going 727 Rebuild Questions Post
[Re: MR_P_BODY]
#1673440
09/21/14 01:23 PM
09/21/14 01:23 PM
|
Joined: Dec 2003
Posts: 10,951
Spokane Valley, WA
Big Bad Bee
 OP
OP
I Live Here
|
 OP
OP
I Live Here
Joined: Dec 2003
Posts: 10,951
Spokane Valley, WA
|
Okay back to business. I'm ready to start removing and replacing bushings as I clean and reassemble my transmission sub-assemblies. I've got a few different opinions here on which ones to replace but since I have an entire bushing kit why not replace them all?
Obviously I don't want to bung something up here, and I'd rather not buy an expensive tool, so give me your methods. I've seen people use everything from 2 x 4's to sockets to drive bushings. The only specialized tool I have right now is a bushing and bearing race driver kit that I checked out from the local O'Reilly's auto-parts store. It has the tapered disks to accommodate wheel bearing races.
Removal: how? Is it okay to remove them with the drift? A socket? The bushing driver? How do I know which direction the bushing drives out?
Insertion: is that tool from O'Reillys going to be okay? There are small bushings I don't have the right size disc for. can I tap them in using the backside of a socket or something similar? Do you lubricate The outside sleeve of the bushing and the mating surface on the part it is inserted into?
All of the surfaces inside the rear drum are looking excellent, however the outside of the drum has a few little brown spots where it looks like band material is stuck to it. how do I clean this up? Emery cloth? 0000 steel wool?
I’m listening.
|
|
|
 Re: My On-Going 727 Rebuild Questions Post
[Re: Big Bad Bee]
#1673442
09/21/14 03:02 PM
09/21/14 03:02 PM
|
Joined: Jun 2003
Posts: 52,972
Romeo MI
MR_P_BODY

Master
|

Master
Joined: Jun 2003
Posts: 52,972
Romeo MI
|
Quote:
Okay back to business. I'm ready to start removing and replacing bushings as I clean and reassemble my transmission sub-assemblies. I've got a few different opinions here on which ones to replace but since I have an entire bushing kit why not replace them all?
Obviously I don't want to bung something up here, and I'd rather not buy an expensive tool, so give me your methods. I've seen people use everything from 2 x 4's to sockets to drive bushings. The only specialized tool I have right now is a bushing and bearing race driver kit that I checked out from the local O'Reilly's auto-parts store. It has the tapered disks to accommodate wheel bearing races.
Removal: how? Is it okay to remove them with the drift? A socket? The bushing driver? How do I know which direction the bushing drives out?
Insertion: is that tool from O'Reillys going to be okay? There are small bushings I don't have the right size disc for. can I tap them in using the backside of a socket or something similar? Do you lubricate The outside sleeve of the bushing and the mating surface on the part it is inserted into?
All of the surfaces inside the rear drum are looking excellent, however the outside of the drum has a few little brown spots where it looks like band material is stuck to it. how do I clean this up? Emery cloth? 0000 steel wool?
Sorry I cant help with the bushing aspect... its been
a while since I last installed them... back then I
made up a installer tool for the larger ones and
installed them first and kept cutting the tool down
for each smaller bushing... at the time I didnt have
enough stock at home to make a tool for each bushing
so I could keep the tools.. I dont recall any of
them going in or out in any one direction... scotch
brite pad should clean the drum

|
|
|
 Re: My On-Going 727 Rebuild Questions Post
[Re: Big Bad Bee]
#1673444
09/21/14 03:45 PM
09/21/14 03:45 PM
|
Joined: Jun 2003
Posts: 52,972
Romeo MI
MR_P_BODY

Master
|

Master
Joined: Jun 2003
Posts: 52,972
Romeo MI
|
Quote:
Quote:
Sorry I cant help with the bushing aspect... its been
a while since I last installed them... back then I
made up a installer tool for the larger ones and
installed them first and kept cutting the tool down
for each smaller bushing... at the time I didnt have
enough stock at home to make a tool for each bushing
so I could keep the tools.. I dont recall any of
them going in or out in any one direction... scotch
brite pad should clean the drum

That's ok Mike. Better to be humble than to lead me astray. I'm assuming you drive em out from whence the came. Some races have a shoulder so I guess that's obvious. I've also learned to measure how deep the old bushing sits and where the oil holes are before knocking em out. I've read how some guys knock a bushing out with a Cove chisel. Like I said. Don't wanna FUBAR the thing.
I have cut some bushings with a course hack saw blade
then they come out easy.. if you do it that way just
be CAREFUL not to cut the housing area that the bushing
sets in

|
|
|
 Re: My On-Going 727 Rebuild Questions Post
[Re: MR_P_BODY]
#1673445
09/21/14 11:49 PM
09/21/14 11:49 PM
|
Joined: Dec 2003
Posts: 10,951
Spokane Valley, WA
Big Bad Bee
 OP
OP
I Live Here
|
 OP
OP
I Live Here
Joined: Dec 2003
Posts: 10,951
Spokane Valley, WA
|
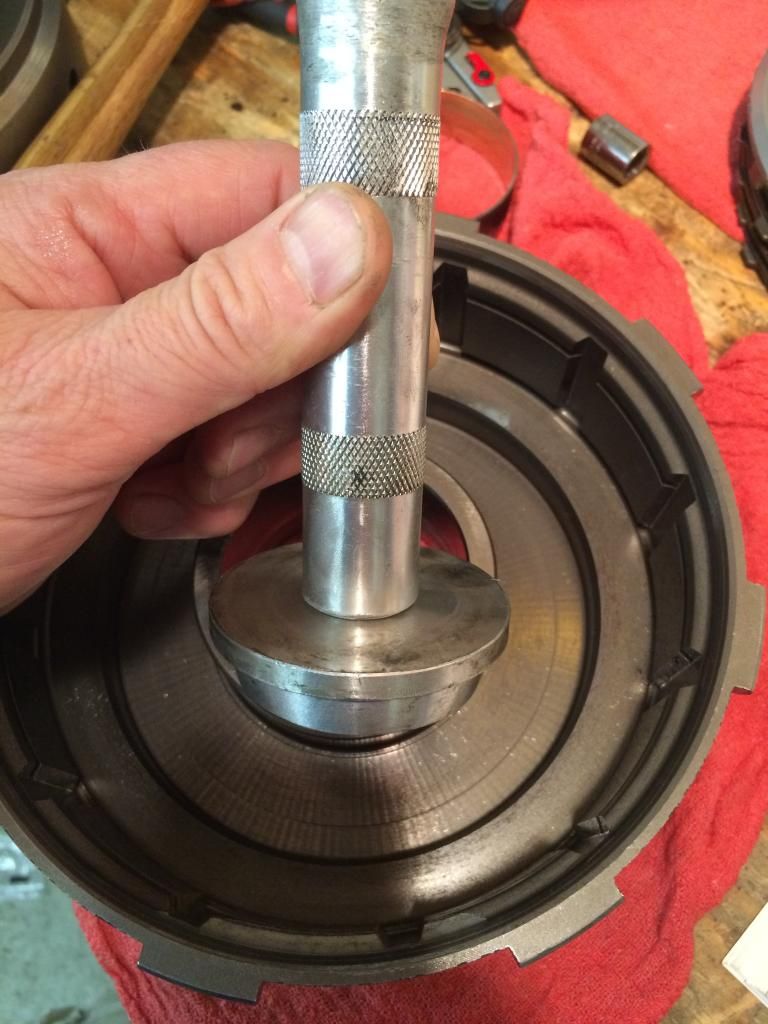
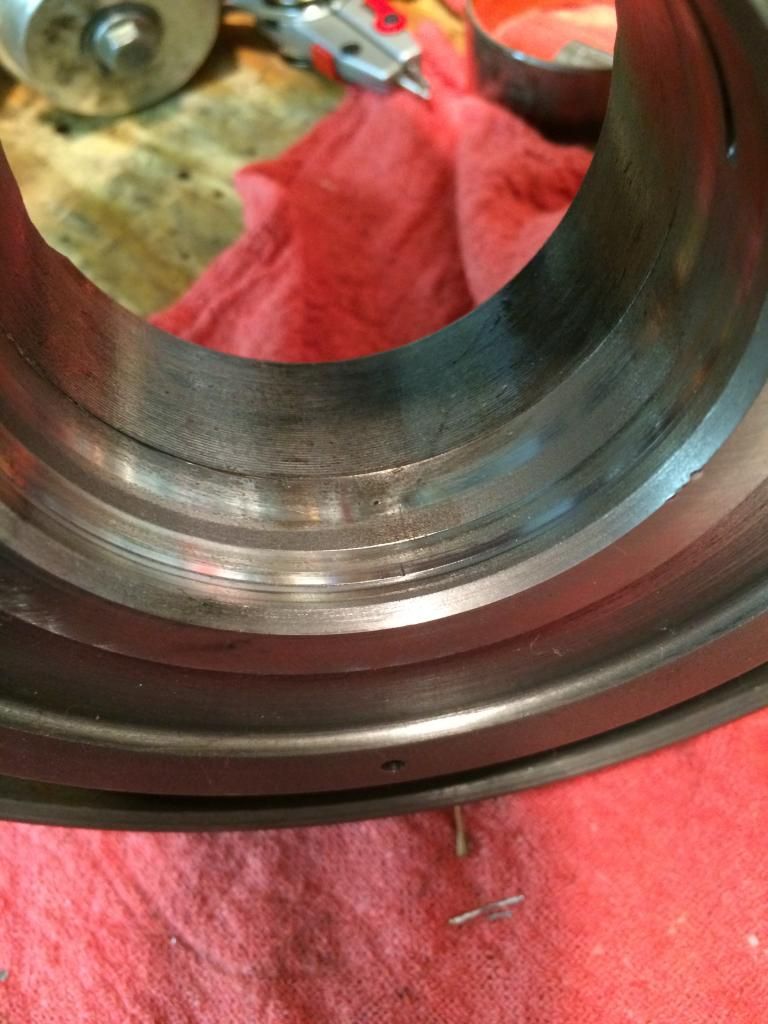
Well, in the absence of enough wisdom and the right tools I've learned another lesson tonight. After unsuccessfully trying with a cold chisel, I used this bearing and race tool to remove the bushing from the rear retainer.  It was the right size and even with the tapered inside lip, worked sufficient.  I cleaned and inspected the bore, hit the new bushing and the bore with petroleum jelly and tried to knock it in with the same tool. When I was removing the bushing the tool had the bore to keep it aligned and it worked great. Inserting it with nothing to guide it was not so successful. It started a little cocked. MISTAKE: Rapping on one edge of the driver to even the bushing out caused the joint in the bushing to split. I got the unit in the rest of the way with a 2x4, which I should have used in the first place. You can see a nice new oiling groove I've created. The crack is puzzling.   I attempted to remove the bushing in the tail piece but the tool kit didn't have a proper sized tool. It was almost right but because the disks are aluminum, the lip of the bushing just beat the heck out of the disk and I was done for the evening. Thanks for listening. More to come. I got this. 
I’m listening.
|
|
|
|
|

