|
 Re: Dash Restoration is done....finally
[Re: burdar]
#165795
Re: Dash Restoration is done....finally
[Re: burdar]
#165795
07/22/11 11:40 AM
07/22/11 11:40 AM
|
Joined: Oct 2006
Posts: 7,371
Iowa
burdar
 OP
OP
Owen's Dad
|
OP
Owen's Dad
Joined: Oct 2006
Posts: 7,371
Iowa
|
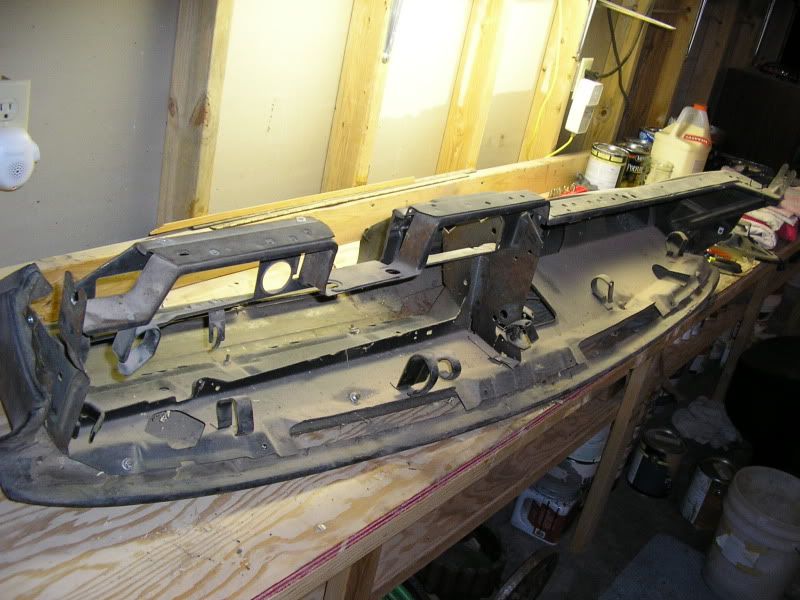
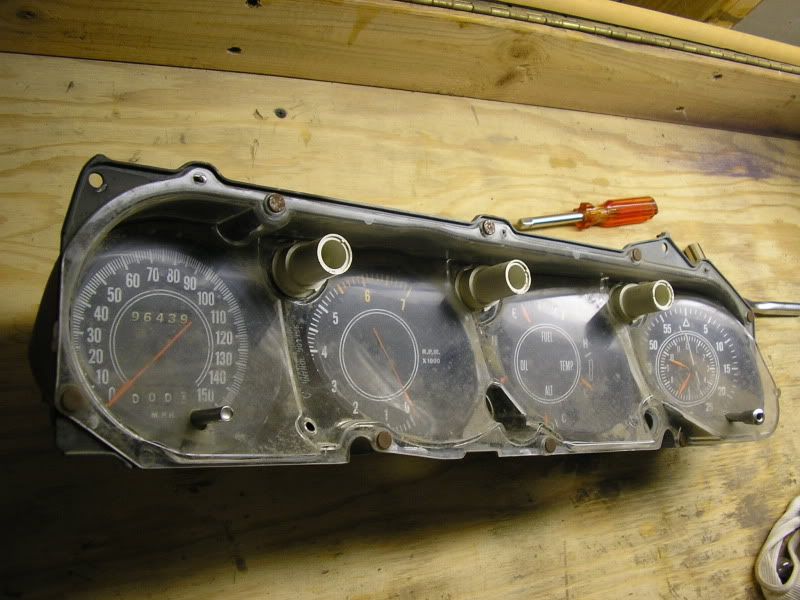
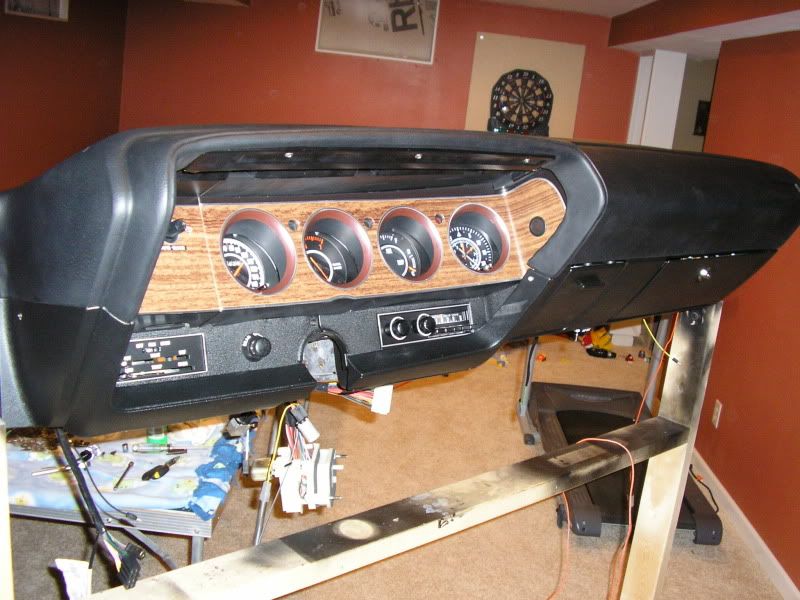
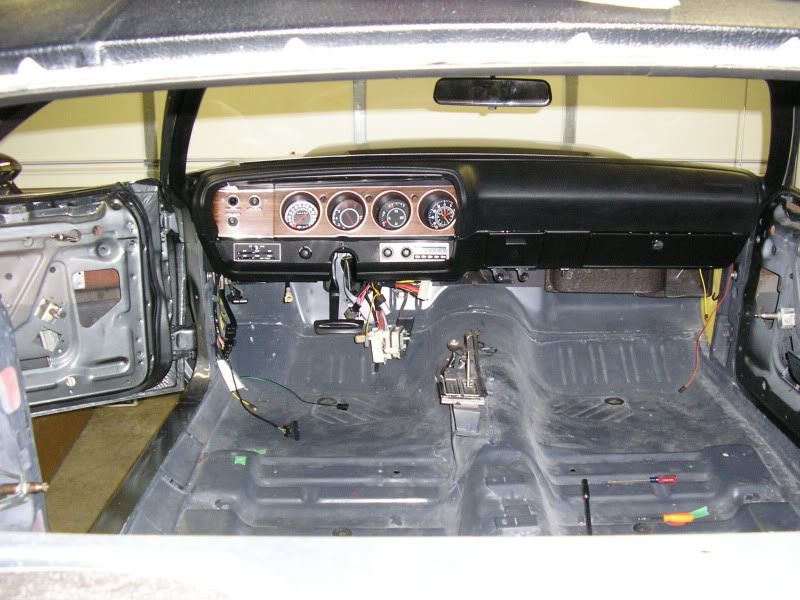
I got the dash pad back within 3 weeks. There was a lot of extra foam that needed to be removed but that's to be expected with an Ultimate Rides pad. I trimmed a lot of foam out of the light bar area and was able to get that to fit. The drivers side lower dash trim didn't initially fit. I was able to get it fitting pretty good with just a little sectioning of the foam in a couple areas. I wasn't impressed with the fit of the right hand lower dash trim though. The pad was way too thick in that area and didn't line up with the trim.(where the trim and pad come together by the gauges) I should have just heated up the trim with a heat gun and moulded it to fit the contour of the pad...but I didn't. Like an idiot I tried to cut some foam out of the pad and ended up ruining it. I called Dave and told him what happened. I was fully expecting having to buy a new pad again. He got in touch with me a few days later and said UR would fix it for me as long as I paid the shipping both ways. So...the brand new messed up pad went back to UR. I waited about six weeks and still didn't have the pad back. A couple calls to UR didn't seem to make a difference. Finally, I called Dave. Even though it was no longer his problem, he was nice enough to give UR a call for me to see what was going on. The next day I got a call saying the pad was shipping. As soon as I opened the box, I knew that I hadn't been sent my original core back. I had engraved my initials in the core so I'd know if I got mine back. I think UR sold my core to someone else...that's why it took so long to get one back. The first pad was accually nicer then this one but I wasn't going to press the issue. I'd had enough messing around and just wanted to start the assembly. It's definatly nicer to be working with the original core because I had to redrill the speaker grill holes as well as the VIN plate holes in order to get those parts to fit. I mounted the pad on the frame and installed it. I wanted to make sure it fit before I had it completely assembled.  There were a few issues but was able to work those out after talking with a few people and seeing some pictures of original dashes.
|
|
|
Re: Dash Restoration is done....finally
[Re: burdar]
#165796
07/22/11 12:23 PM
07/22/11 12:23 PM
|
Joined: Oct 2006
Posts: 7,371
Iowa
burdar
OP
Owen's Dad
|
OP
Owen's Dad
Joined: Oct 2006
Posts: 7,371
Iowa
|
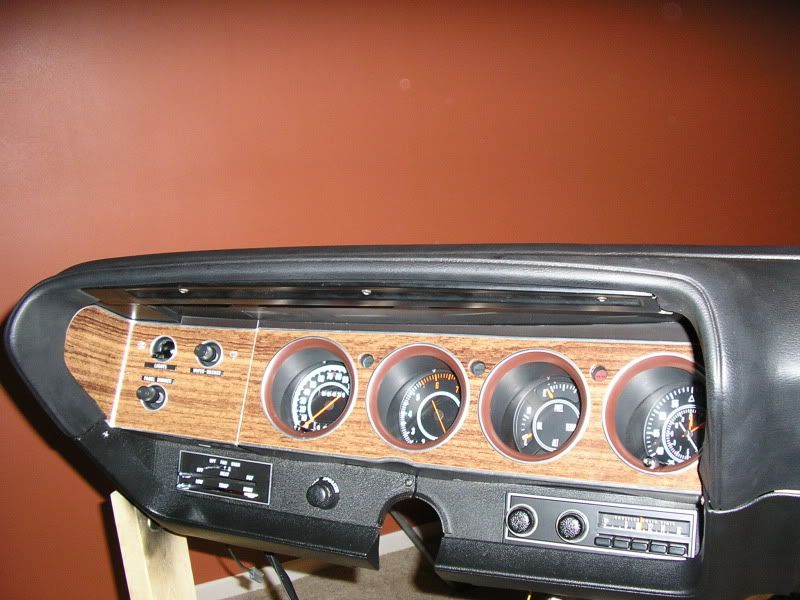
Here's a pic of the original heater control bezel.  This was my first time trying to refinish a part like this. It was accually pretty fun to do. It took four different paint steps to get it done. I think it turned out nice for being my first time doing it. After cleaning off all the original paint, I sprayed the inner rectangle area with SEM Trim Black paint. Once that was dry, I masked off the inner section and sprayed the bezel with VHT Wrinkle Paint. Before spraying that paint, I sprayed a test sample because I'd never used the wrinkle paint before. The test turned out good so I went ahead with spraying the bezel. I sprayed it on a hot and sunny day and left the part in the sun for a couple hours. The heat made the wrinkles tighter and it matches what was originally there very closely. I let that paint dry for two weeks before continuing. The next step was to mask off the entire bezel except for the raised rectangle around the controls. I sprayed two light coats of chrome paint onto the rectangle. The chrome paint isn't very chromey(is that a word?) but it looks a little better then a silver paint pen I think. Finally, I used a white paint pen to redo the letters. After going over them once, they still looked dirty. It took another going over to get the white looking crisp. The finish looks very rough in the picture but it is accually very fine in reality.  Here is a pic of the entire part. It's a little blotchy but you have to spray the wrinkle paint very heavily to get it to wrinkle. It looks better without the flash. The speaker fader knob and bezel are NOS parts my dad bought 20 years ago.  I redid the AM radio face plate the same way. I sprayed it with SEM Trim Black and sprayed the chrome paint on the raised rectangle area.
|
|
|
Re: Dash Restoration is done....finally
[Re: burdar]
#165799
07/23/11 01:16 AM
07/23/11 01:16 AM
|
Joined: Jan 2008
Posts: 1,300
Washington
19cuda73
pro stock
|
pro stock
Joined: Jan 2008
Posts: 1,300
Washington
|
Darren that car is looking sweet. Keep the pictures coming.
1966 Charger 383 4 speed (Black with Red interior)
1973 Cuda 340 4 speed (Lemontwist)
1972 Corvette
|
|
|
Re: Dash Restoration is done....finally
[Re: 19cuda73]
#165800
07/23/11 12:20 PM
07/23/11 12:20 PM
|
Joined: Jan 2008
Posts: 2,592
None
71rm23
master
|
master
Joined: Jan 2008
Posts: 2,592
None
|
Quote:
Darren that car is looking sweet. Keep the pictures coming.
 
|
|
|
Re: Dash Restoration is done....finally
[Re: burdar]
#165801
07/23/11 05:55 PM
07/23/11 05:55 PM
|
Joined: Jun 2008
Posts: 1,822
Colorado
denfireguy
top fuel
|
top fuel
Joined: Jun 2008
Posts: 1,822
Colorado
|
You will be caught up with me in no time. Looking great.
Craig
2014 Ram 1500 Laramie, 73 Cuda
Previous mopars: 62 Valiant, 65 Fury III, 68 Fury III, 72 Satellite, 74 Satellite, 89 Acclaim, 98 Caravan, 2003 Durango
Only previous Non-Mopar: Schwinn Tornado
|
|
|
Re: Dash Restoration is done....finally
[Re: burdar]
#165804
07/27/11 11:07 PM
07/27/11 11:07 PM
|
Joined: Aug 2004
Posts: 8,526
Tenn.
jrwoodjoe
master
|
master
Joined: Aug 2004
Posts: 8,526
Tenn.
|
The dash turned out great Darren. Looks awesome! Funny, the dash stand you built looks very similar to mine. It worked out good for me and looks like yours worked out good too.  Joe
65 Barracuda
70 Challenger
|
|
|
Re: Dash Restoration is done....finally
[Re: burdar]
#165807
09/29/11 09:54 PM
09/29/11 09:54 PM
|
Joined: Jun 2008
Posts: 1,822
Colorado
denfireguy
top fuel
|
top fuel
Joined: Jun 2008
Posts: 1,822
Colorado
|
Quote:
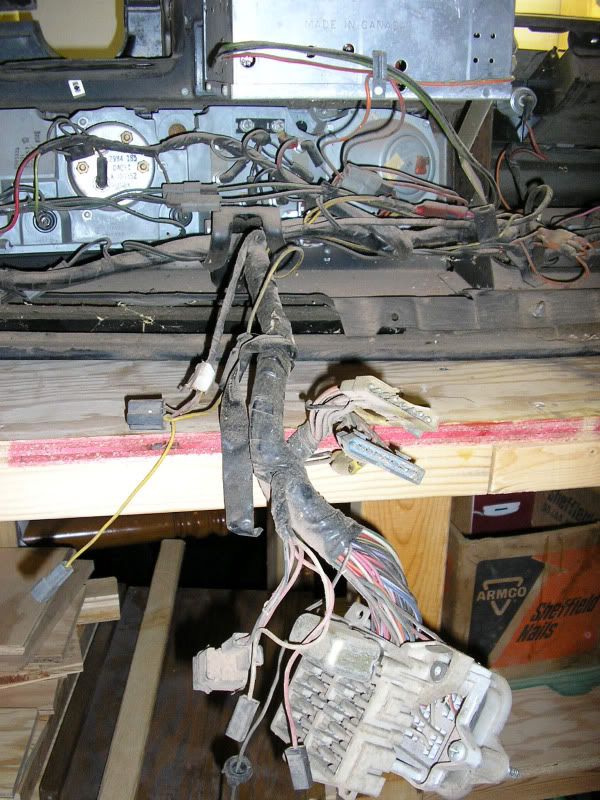
I bought a new M&H dash harness even though the original one was in good shape. The only problem area was the white connector at the steering column. The large blue wire melted the connector and had been bypassed a long time ago. I laid the old harness next to the new one and transfered all the secondary harnesses over.
Does this look familiar? Mine was the Red wire that burned.
2014 Ram 1500 Laramie, 73 Cuda
Previous mopars: 62 Valiant, 65 Fury III, 68 Fury III, 72 Satellite, 74 Satellite, 89 Acclaim, 98 Caravan, 2003 Durango
Only previous Non-Mopar: Schwinn Tornado
|
|
|
Re: Dash Restoration is done....finally
[Re: denfireguy]
#165808
10/03/11 12:45 PM
10/03/11 12:45 PM
|
Joined: Oct 2006
Posts: 7,371
Iowa
burdar
OP
Owen's Dad
|
OP
Owen's Dad
Joined: Oct 2006
Posts: 7,371
Iowa
|
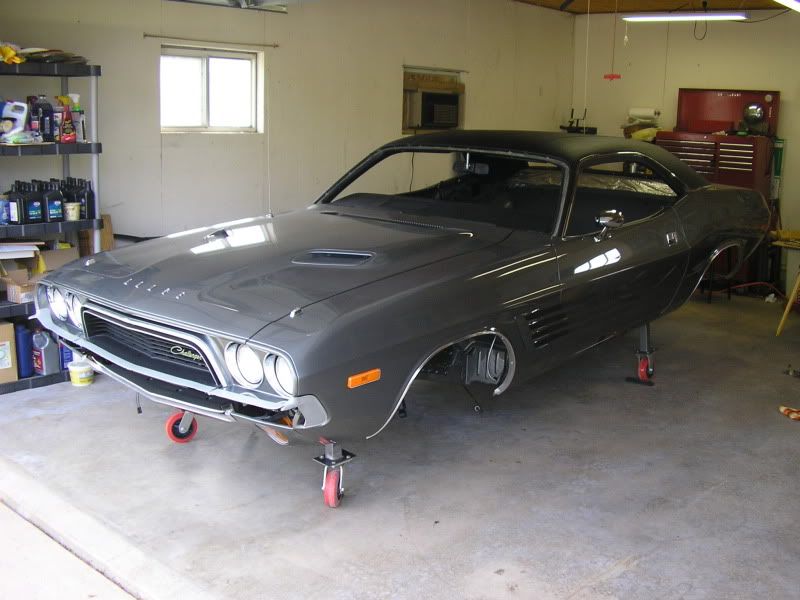
Over the last week I installed the brake and fuel lines. I also installed the fuel tank yesterday. The lines are stainless and are from Fine Lines. They fit fairly well but needed some tweeking here and there. The tanks straps and J-bolts needed to be modified a little bit to fit in their mounts. Before the tank went in I bolted the shocks to their upper mounts and installed the passengers side over axle pipe hanger. The exhaust hanger(Accurate) isn't 100% stock looking but it's close enough for me. The differences don't affect the function of the hanger. You can see that the original part used bolts to clamp onto the pipe where the new part uses carriage bolts and nuts. The lower strap is also different. 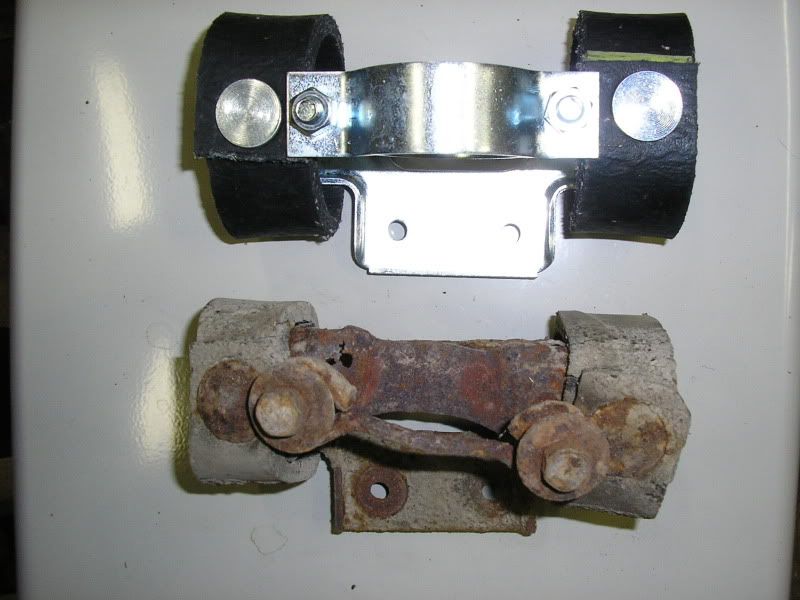 I preinstalled the vapor separator onto the new tank and made a new tank pad. 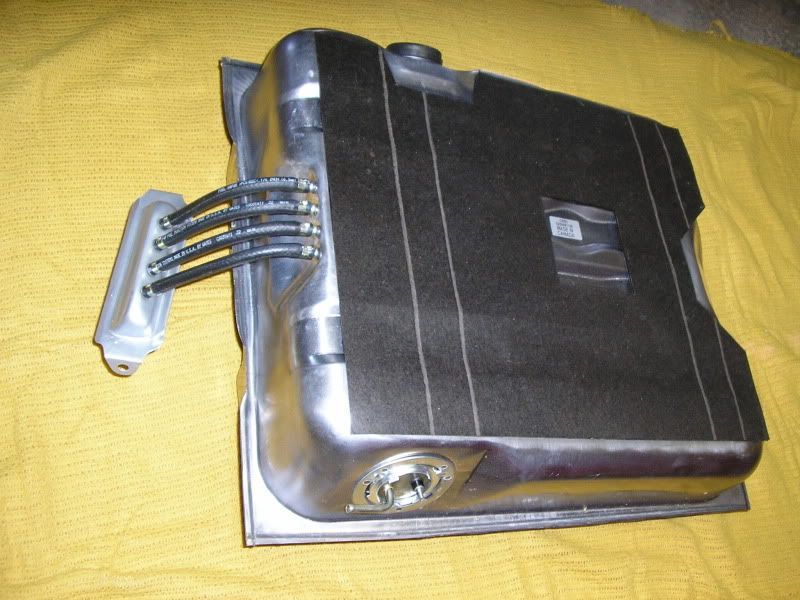 fuel tank and vapor separator installed  Once the fuel line connection was hooked up I installed the new muffler heat sheilds from Dales Cuda shop. 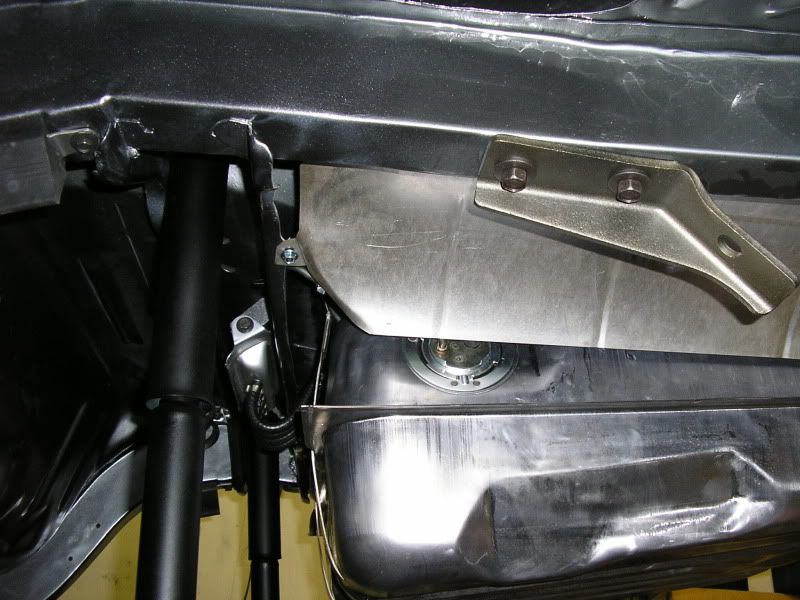
|
|
|
Re: Off the stand!
[Re: burdar]
#165810
10/03/11 05:30 PM
10/03/11 05:30 PM
|
Joined: Jan 2008
Posts: 1,300
Washington
19cuda73
pro stock
|
pro stock
Joined: Jan 2008
Posts: 1,300
Washington
|
Darren your car is really looking Sweeeet!!!. First class job. You are building a car that is turning heads already. Keep up the good work.. I appreciate your help trying to work out the tough issues as well.
1966 Charger 383 4 speed (Black with Red interior)
1973 Cuda 340 4 speed (Lemontwist)
1972 Corvette
|
|
|
|
|


 Wow it looks sweet. Thanks for including the procedure and paints you used on the heater control panel BTW
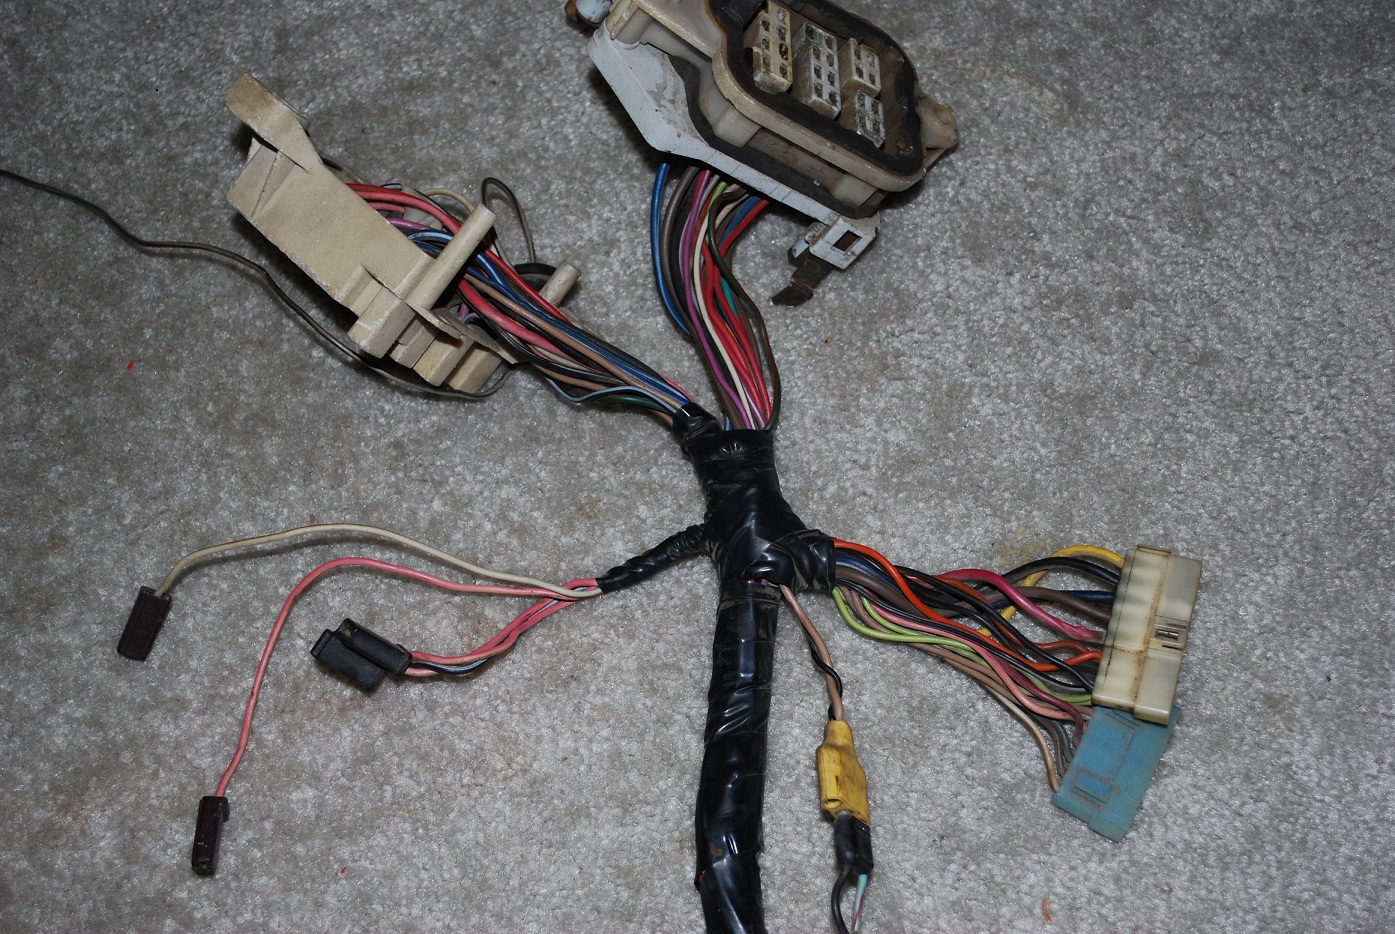