|
 PAINTING SEQUENCE
#126672
PAINTING SEQUENCE
#126672
09/26/08 07:25 PM
09/26/08 07:25 PM
|
Joined: Jun 2006
Posts: 160
Wisconsin
Mopar Mark
 OP
OP
member
|
OP
member
Joined: Jun 2006
Posts: 160
Wisconsin
|
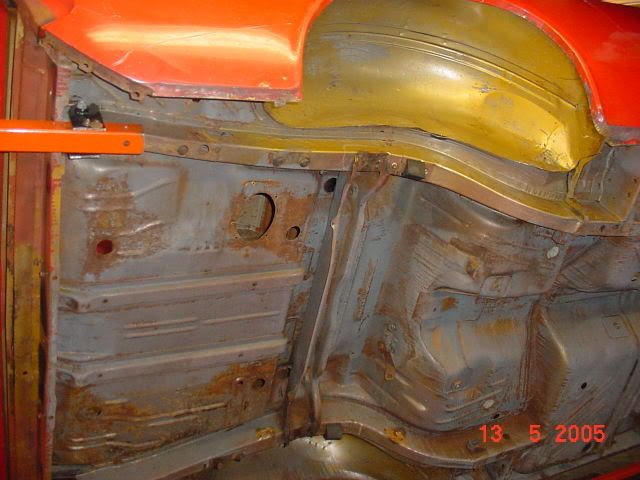
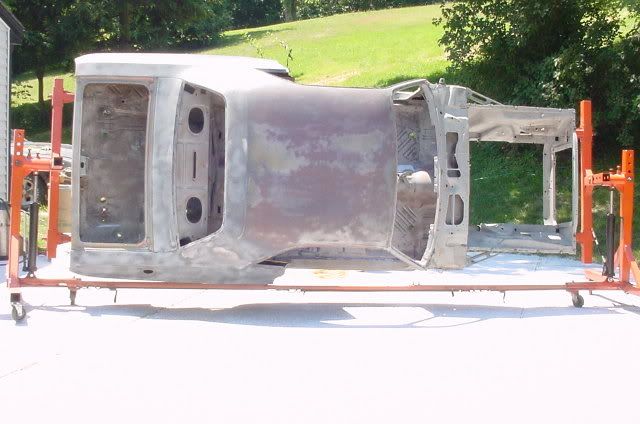
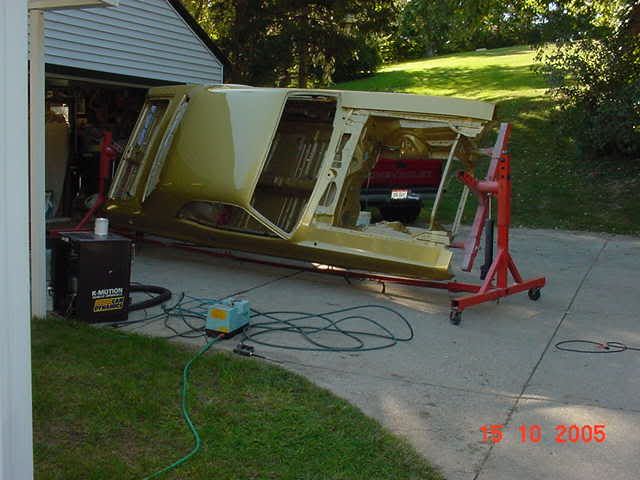
I have my 70 R/T Challenger on a rotisserie and it is almost ready for paint. Does anybody know of a proper way to paint all the panels? Do you paint the door jams and the hinges seperately, Do you paint the Body Shell without the doors fenders, etc installed? Just trying to do this the best way possible. Any input greatly appreciated.
Thanks in advance,
Mark
1970 Challenger R/T 440-4 Auto
2000 Ram Quad Cab 4x4 360 Auto
1973 Dodge 1/2 ton 4x4 318 Auto
1995 Dodge Dakota 4x4 318 Auto
|
|
|
Re: PAINTING SEQUENCE
[Re: Mopar Mark]
#126673
09/26/08 08:36 PM
09/26/08 08:36 PM
|
Joined: Nov 2004
Posts: 2,234
BFE
vancamp
super street
|
super street
Joined: Nov 2004
Posts: 2,234
BFE
|
for me it has alot to do with if its a metallic or not, if its not you can paint it apart, if its a metallic its easier to paint if the car is together or the very least all panels hanging in the same direction as if they were on the car.
VanCamp Dent Systems
Paintless Dent Repair/
Mopar Restification
|
|
|
Re: PAINTING SEQUENCE
[Re: Mopar Mark]
#126674
09/26/08 09:40 PM
09/26/08 09:40 PM
|
Joined: Oct 2006
Posts: 4,165
Florida
cataclysm80
master
|
master
Joined: Oct 2006
Posts: 4,165
Florida
|
Just sort of thinking as I go here...
Paint door hinges & spots where door hinges, hood hinges mount, & fenders mount. Basically assuring good paint coverage on any metal to metal contact areas to prevent rust.
Then bolt all the pieces on, align the panels properly, paint the bottom of the car first (make sure doors, hood, & trunk a latched before flipping car over!), then turn it right side up and open all the doors, hood, trunk, paint the inside of the car next (it's hard to get to), then paint the engine compartment and all the outside parts.
This way your panels will be aligned, and all your bolts will be painted, no paint chips, and you can just start putting it together.
I'm hoping to paint mine soon. What do you guys think, will that work?
Of coarse that's not OE, and also doesn't account for special stuff like bumblebee stripes or blackout areas.
Tav
|
|
|
Re: PAINTING SEQUENCE
[Re: vancamp]
#126675
09/26/08 10:08 PM
09/26/08 10:08 PM
|
Joined: Feb 2005
Posts: 28,312
Cincinnati, Ohio
Challenger 1
Too Many Posts
|
Too Many Posts
Joined: Feb 2005
Posts: 28,312
Cincinnati, Ohio
|
Quote:
for me it has alot to do with if its a metallic or not, if its not you can paint it apart, if its a metallic its easier to paint if the car is together or the very least all panels hanging in the same direction as if they were on the car.

|
|
|
Re: PAINTING SEQUENCE
[Re: cataclysm80]
#126676
09/27/08 09:54 AM
09/27/08 09:54 AM
|
Joined: Feb 2005
Posts: 28,312
Cincinnati, Ohio
Challenger 1
Too Many Posts
|
Too Many Posts
Joined: Feb 2005
Posts: 28,312
Cincinnati, Ohio
|
Quote:
Just sort of thinking as I go here...
Paint door hinges & spots where door hinges, hood hinges mount, & fenders mount. Basically assuring good paint coverage on any metal to metal contact areas to prevent rust.
Then bolt all the pieces on, align the panels properly, paint the bottom of the car first (make sure doors, hood, & trunk a latched before flipping car over!), then turn it right side up and open all the doors, hood, trunk, paint the inside of the car next (it's hard to get to), then paint the engine compartment and all the outside parts.
This way your panels will be aligned, and all your bolts will be painted, no paint chips, and you can just start putting it together.
I'm hoping to paint mine soon. What do you guys think, will that work?
Of coarse that's not OE, and also doesn't account for special stuff like bumblebee stripes or blackout areas.
Tav
Started with this with no rust, got really lucky.
I blasted the whole car and primed with two different primers and then a sealer and single stage color all in four long days. It was done with NO scraping, sanding or scuffing at all.Sat I blasted the bottom and Sun I did the outside with plastic. Then Mon etch prime, epoxy. Tues AM it got single stage color, next time I think I'm gonna go clearcoat.  I'm only talking about the bottom,engine compartment and interior, I did'nt touch the outside body panels at this point. I'm only talking about the bottom,engine compartment and interior, I did'nt touch the outside body panels at this point.


Then spent 205 hours pulling out dents and blocking the car(Thanks to Markz528!) and it was ready for paint.

Right at this point the doors and fenders need to be put on the car or setup with the car in the booth.
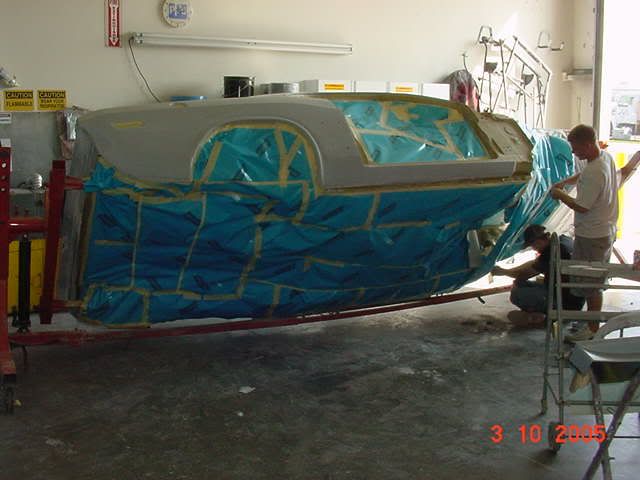
Mine were done separatly and there was color variations after the paint cured, luckly my painter repainted my car at his expense the second time. I even warned him ahead of time about metalics but he did'n think there would be a problem, he was wrong. He wanted no lines anywhere on the car so is why he did it that way. Solid colors may not be a problem. 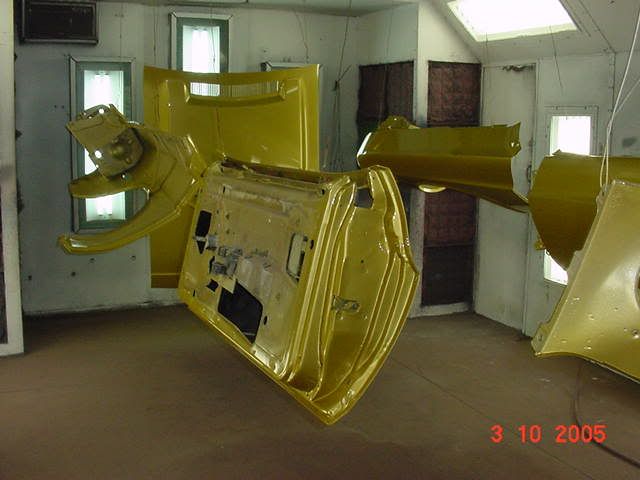
Here is the car a few days after the first paint, it matched for about the first 60 days or so,but as more time went by the more varaitions I could see. 
It all worked out in the end. Hope this helps someone.

|
|
|
Re: PAINTING SEQUENCE
[Re: Challenger 1]
#126677
09/27/08 10:30 AM
09/27/08 10:30 AM
|
Joined: Oct 2006
Posts: 4,165
Florida
cataclysm80
master
|
master
Joined: Oct 2006
Posts: 4,165
Florida
|
Quote:
I primed with two different primers and then a sealer and single color all in four long days. It was done with NO sanding or scraping at all.
Are you saying that you didn't do ANY prep work other than a basic wash?
Quote:
Tues AM it got single stage color, next time I think I'm gonna go clearcoat. Then spent 205 hours pulling out dents and blocking the car(Thanks to Markz528!) and it was ready for paint.
Wouldn't you want to fix dents Before painting the inside just incase the dents require hammering on the interior of the panel?
Thanks for your input.
Tav
|
|
|
Re: PAINTING SEQUENCE
[Re: cataclysm80]
#126678
09/27/08 10:45 AM
09/27/08 10:45 AM
|
Joined: Feb 2005
Posts: 28,312
Cincinnati, Ohio
Challenger 1
Too Many Posts
|
Too Many Posts
Joined: Feb 2005
Posts: 28,312
Cincinnati, Ohio
|
The car never got wet ever,after media blasting. I etched primed directly on top of sand blasted metal, I never touched it. All the primer goes on wet on wet and as long as you don't let the epoxy sit more more than a day or two you can recoat with out scuffing. I'm only talking the bottem,engine and interior compartments. Once you have your car blasted you got to be ready to get it in primer and why not the bottem color too if it means I don't have to scuff all those nooks and crannys. It'll never stick as good as wet on wet. Even if I have alot of metal replacement, they last thing I would do right before primer is to blast the car, gives a great foundition for the paint to stick too. I only did the rear clip and we did ding the inside quarter(only one) a little when we bumped out the dent. Easy to touch up. This is a driver type car and only planed to show it that once.The doors were perfect and front fenders were done inside after body work. I had panels on and off the car many times during those 205 hours. It tooks 35 hours to paper and paint the car including buffing. 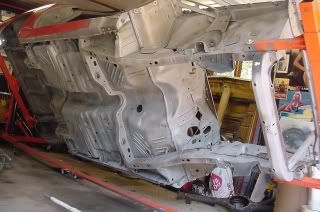 Like I said I blasted the bottom on a Sat, Sat nite welded in the torque boxes and frame connectors, then Sun I touched it up before I put plastic in my blaster for the outside. 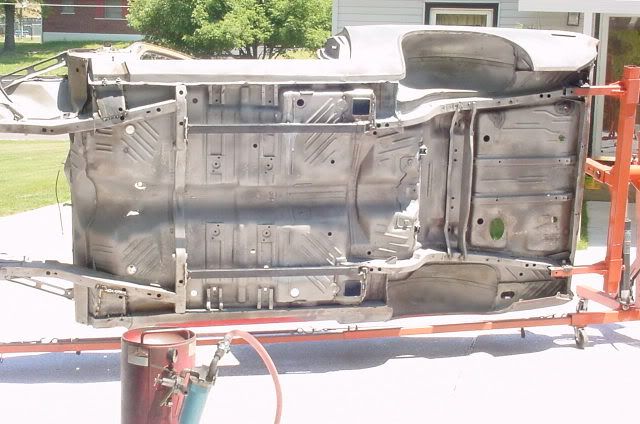 You want know the truth. I started with a bare car at about 11 AM on MON and did'nt leave the shop till about 11 AM Tues. Sprayed etch, epoxy, sealer, and final color during that 24 hour period. There's alot of waiting between coats. I was shot but it was done. Felt good.  PS I did have the entire car spotless with my trusty steam pressure washer a couple weeks before I media blasted. Once the media blasting is done for the last time, you got to get it in paint as soon as poss, like in 24-72 hours. Lot's of people will say otherwise, but I've been blasting since the 80s. Saw alot of damaged cars because guys didn't heed my advise and let them sit there and rust.  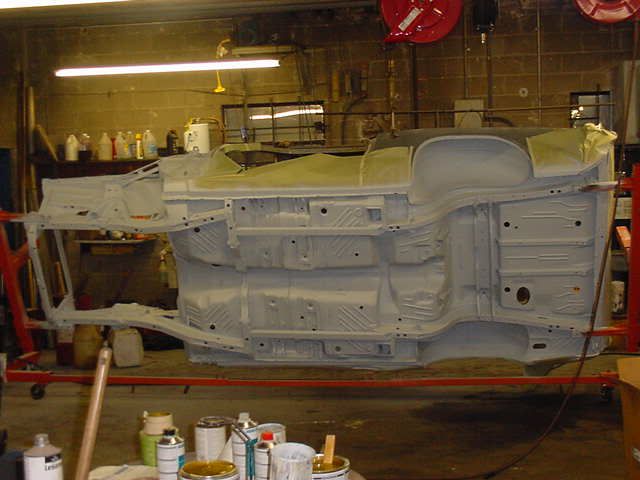 This last picture is with overspray still in the air after only the first or second coat. I do have a big exhaust fan built into wall but there's still some overspray as I put down the gun and took this picture.  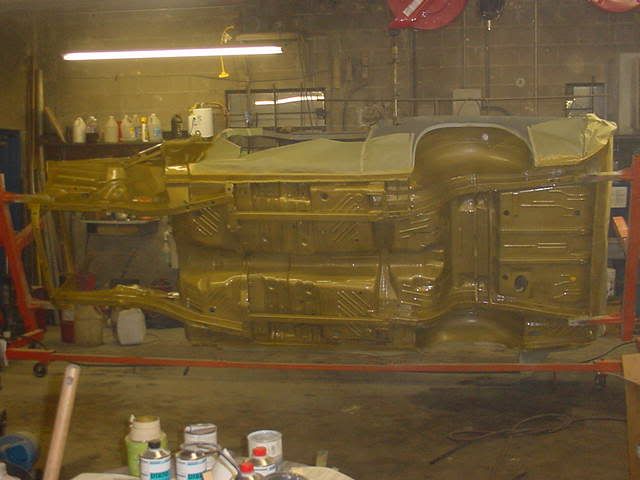
|
|
|
Re: PAINTING SEQUENCE
[Re: cataclysm80]
#126679
09/27/08 12:23 PM
09/27/08 12:23 PM
|
Joined: Feb 2005
Posts: 28,312
Cincinnati, Ohio
Challenger 1
Too Many Posts
|
Too Many Posts
Joined: Feb 2005
Posts: 28,312
Cincinnati, Ohio
|
Quote:
Wouldn't you want to fix dents Before painting the inside just incase the dents require hammering on the interior of the panel?
Thanks for your input.
Tav
I had to media blast the outside to see what body work I had to do. So I didn't want have to blast more than one weekend so the bottom got done ahead of time all at once. That make sense?
|
|
|
Re: PAINTING SEQUENCE
[Re: cataclysm80]
#126680
09/27/08 04:17 PM
09/27/08 04:17 PM
|
Joined: Jan 2003
Posts: 7,978
Bethel Ct
AdamR
master
|
master
Joined: Jan 2003
Posts: 7,978
Bethel Ct
|
Quote:
Just sort of thinking as I go here...
Paint door hinges & spots where door hinges, hood hinges mount, & fenders mount. Basically assuring good paint coverage on any metal to metal contact areas to prevent rust.
Then bolt all the pieces on, align the panels properly, paint the bottom of the car first (make sure doors, hood, & trunk a latched before flipping car over!), then turn it right side up and open all the doors, hood, trunk, paint the inside of the car next (it's hard to get to), then paint the engine compartment and all the outside parts.
This way your panels will be aligned, and all your bolts will be painted, no paint chips, and you can just start putting it together.
What if your doing base/clear ?
Same thing then scuff the clear and shoot more color and clear ?
|
|
|
Re: PAINTING SEQUENCE
[Re: cataclysm80]
#126681
09/28/08 12:26 AM
09/28/08 12:26 AM
|
Joined: Feb 2008
Posts: 287
Greenville, N.C.
BarrsRestoration
enthusiast
|
enthusiast
Joined: Feb 2008
Posts: 287
Greenville, N.C.
|
Quote:
Just sort of thinking as I go here...
Paint door hinges & spots where door hinges, hood hinges mount, & fenders mount. Basically assuring good paint coverage on any metal to metal contact areas to prevent rust.
Then bolt all the pieces on, align the panels properly, paint the bottom of the car first (make sure doors, hood, & trunk a latched before flipping car over!), then turn it right side up and open all the doors, hood, trunk, paint the inside of the car next (it's hard to get to), then paint the engine compartment and all the outside parts.
This way your panels will be aligned, and all your bolts will be painted, no paint chips, and you can just start putting it together.
I'm hoping to paint mine soon. What do you guys think, will that work?
Of coarse that's not OE, and also doesn't account for special stuff like bumblebee stripes or blackout areas.
Tav
You do not want to have an assembled car on a rotisserie! When you combine the problems of added weight and loss of balance, body sag, having doors, a trunk lid and hood that latch(?) and the overspray/dryness issues in the jambs, you will have a disaster on your hands.
Paint only the shell on the rotisserie and have the other panels set up for paint as they hang on the vehicle. Doing otherwise will also create color match problems.
You can see how we do it at the website link. Click on "Total" and see our most recent completed projects. At Clark Classic Restorations we now have the benefit of 2 paint booths, most shops don't. Everything is set up in 2 booths and shot back-to-back. In other words, the body shell gets a coat in booth 1 and then the other panels get a coat in booth 2. Same number of color and clear coats for everything, along with panel position, assures a correct color match. Like mentioned above, doors and fenders need to be sprayed hung as they would be on a car, not laying flat. This is very critical with metallics, solids are more forgiving.
Steve
www.clarkclassic.com
|
|
|
Re: PAINTING SEQUENCE
[Re: BarrsRestoration]
#126682
09/28/08 10:58 AM
09/28/08 10:58 AM
|
Joined: Jun 2006
Posts: 160
Wisconsin
Mopar Mark
OP
member
|
OP
member
Joined: Jun 2006
Posts: 160
Wisconsin
|
That is what I was thinking.
(Will this work)
1. Fit all panels (Drill 1/8' line-up holes?)
2. Complete all body work.
3. Disassemble car.
4. Paint body shell on rotisserie and all panels hanging in sequence, also painting hinges seperately.
5. Then start assembling car by installing fuel tank, fuel lines, and brake lines, etc on rotisserie.
6. Transfer car to 'body wheels' and continue to finish assembling car.
The only question I have with this procedure is how to paint the body bolts?
1970 Challenger R/T 440-4 Auto
2000 Ram Quad Cab 4x4 360 Auto
1973 Dodge 1/2 ton 4x4 318 Auto
1995 Dodge Dakota 4x4 318 Auto
|
|
|
Re: PAINTING SEQUENCE
[Re: BarrsRestoration]
#126683
09/30/08 08:59 AM
09/30/08 08:59 AM
|
Joined: Jan 2003
Posts: 2,322
sixbbl69
top fuel
|
top fuel
Joined: Jan 2003
Posts: 2,322
|
Quote:
Quote:
Just sort of thinking as I go here...
Paint door hinges & spots where door hinges, hood hinges mount, & fenders mount. Basically assuring good paint coverage on any metal to metal contact areas to prevent rust.
Then bolt all the pieces on, align the panels properly, paint the bottom of the car first (make sure doors, hood, & trunk a latched before flipping car over!), then turn it right side up and open all the doors, hood, trunk, paint the inside of the car next (it's hard to get to), then paint the engine compartment and all the outside parts.
This way your panels will be aligned, and all your bolts will be painted, no paint chips, and you can just start putting it together.
I'm hoping to paint mine soon. What do you guys think, will that work?
Of coarse that's not OE, and also doesn't account for special stuff like bumblebee stripes or blackout areas.
Tav
You do not want to have an assembled car on a rotisserie! When you combine the problems of added weight and loss of balance, body sag, having doors, a trunk lid and hood that latch(?) and the overspray/dryness issues in the jambs, you will have a disaster on your hands.
Paint only the shell on the rotisserie and have the other panels set up for paint as they hang on the vehicle. Doing otherwise will also create color match problems.
You can see how we do it at the website link. Click on "Total" and see our most recent completed projects. At Clark Classic Restorations we now have the benefit of 2 paint booths, most shops don't. Everything is set up in 2 booths and shot back-to-back. In other words, the body shell gets a coat in booth 1 and then the other panels get a coat in booth 2. Same number of color and clear coats for everything, along with panel position, assures a correct color match. Like mentioned above, doors and fenders need to be sprayed hung as they would be on a car, not laying flat. This is very critical with metallics, solids are more forgiving.
Steve
www.clarkclassic.com
1st on rotisserie for stripping . then epoxy everything. have a factory [copy] car table where body and all bolt on parts are assembled and lined up. then remove everything except for door hinges which stay on cowl that already has 3 coats of SPI epoxy. the shell goes back on rotisserie for paint. dark gray SPI epoxy is applied to bottom then masked off. color is applied to inside of trunk and rest of inside then masked off. all bolt on parts are jambed ,outside body painted then back to car table to be assembled. then on to lift where body is lowered to k-frame with engine and tranny.for next few months i assemble car and sit in chair starring at it wondering what i am going to do with it. 
|
|
|
Re: PAINTING SEQUENCE
[Re: sixbbl69]
#126684
09/30/08 09:26 AM
09/30/08 09:26 AM
|
Joined: Oct 2006
Posts: 4,165
Florida
cataclysm80
master
|
master
Joined: Oct 2006
Posts: 4,165
Florida
|
Quote:
1st on rotisserie for stripping . then epoxy everything. have a factory [copy] car table where body and all bolt on parts are assembled and lined up. then remove everything except for door hinges which stay on cowl that already has 3 coats of SPI epoxy. the shell goes back on rotisserie for paint. dark gray SPI epoxy is applied to bottom then masked off. color is applied to inside of trunk and rest of inside then masked off. all bolt on parts are jambed ,outside body painted then back to car table to be assembled. then on to lift where body is lowered to k-frame with engine and tranny.for next few months i assemble car and sit in chair starring at it wondering what i am going to do with it.
So how do you paint your bolts?
Tav
|
|
|
Re: PAINTING SEQUENCE
[Re: cataclysm80]
#126685
09/30/08 09:08 PM
09/30/08 09:08 PM
|
Joined: Feb 2008
Posts: 287
Greenville, N.C.
BarrsRestoration
enthusiast
|
enthusiast
Joined: Feb 2008
Posts: 287
Greenville, N.C.
|
You can do something as simple as punching holes in a box, or drilling partially into a piece of plywood to stand the bolts in. We use plywood with 24 1/4", 36 5/16" and 26 3/8" holes, not all the way through. Clips can be hung on mig wire or string stretched from point a to point b. Chipping is unavoidable on some of the bolts, but touch up is easy. Just go easy on the clear stage and avoid the threads if possible, no need for 3 coats of clear on a bolt head. Less clear, less chipping. I also made a spring stretcher that I paint hood springs on. Regarding the 1/8" alignment holes, I would not do that. Instead, while all parts are test fitted, take a sharp punch or awl and strike about 3 tiny dimples on the hinges at the edges of your washers. This will give you a reference point to align to when the painted parts/bolts are installed for the final time, and will get you very close to where you were before. Steve www.clarkclassic.com
|
|
|
Re: PAINTING SEQUENCE
[Re: BarrsRestoration]
#126686
10/01/08 02:58 AM
10/01/08 02:58 AM
|
Joined: Dec 2004
Posts: 196
out front
jerrya
Comin to a Labor Day Telethon
|
Comin to a Labor Day Telethon
Joined: Dec 2004
Posts: 196
out front
|
I did all the prep work on my car on the rotisserie. When it was ready to paint, I painted the backside of the doors, fenders, hood, deck lid, bottom of car, trunk area, and underhood. Set the car down off the rotisserie on a stand, bolted on doors, fenders, etc. painted entire car except for valance panels on the rotisserie. Panels were all lined up with no sagging. worked out great. check it out at www.americanmusclecarrestorations.com
Last edited by jerrya; 10/01/08 04:26 AM.
Man does not plan to fail... he fails to plan
|
|
|
Re: PAINTING SEQUENCE
[Re: cataclysm80]
#126687
10/01/08 05:44 AM
10/01/08 05:44 AM
|
Joined: Oct 2003
Posts: 523
Virginia
larry4406
mopar
|
mopar
Joined: Oct 2003
Posts: 523
Virginia
|
Quote:
Quote:
:have a factory [copy] car table where body and all bolt on parts are assembled and lined up.
What is the car table you reference? A frame machine or rigid baseplate? Any pictures?
|
|
|
Re: PAINTING SEQUENCE
[Re: larry4406]
#126690
10/02/08 11:14 AM
10/02/08 11:14 AM
|
Joined: Oct 2006
Posts: 4,165
Florida
cataclysm80
master
|
master
Joined: Oct 2006
Posts: 4,165
Florida
|
supporting the car under the frame (especially around the torque box areas) distributes the cars weight similar to how it will be after assembly.
supporting the car from brackets at either end could result in some minor body flex which could affect your gaps/panel alignment, etc.
imagine you have 18 feet of string and have someone hold it at each end. The string will bow downward in the middle.
All cars flex some. Torque boxes, sub frame connectors, roll cages, etc. help to reduce this, but still, all cars flex some. They question is, Does your car flex enough to have gap issues if aligned on a rotisserie? The answer is usually, Better safe than sorry.
I do know a local restoration shop that aligns all their panels on the rotisserie, and they don't ever seem to have any gap problems. In fact, cars he builds often win trophies for their owners at shows.
To each their own.
Tav
|
|
|
Re: PAINTING SEQUENCE
[Re: sixbbl69]
#126691
10/02/08 12:21 PM
10/02/08 12:21 PM
|
Joined: Jan 2008
Posts: 2,592
None
71rm23
master
|
master
Joined: Jan 2008
Posts: 2,592
None
|
Quote:
in the factory the cars [unibody] ride on a rail system. anytime they need to remove the car from line to check a panel,primer or paint thickness or any other reason they can divert the car from line to a car table or a dolly on wheels without touching it. like a switch yard at rail station.my table is made using 6" square tube on dolly wheels from scaffold. the rear has adjustable 3/4" [three point hitch pins for tractor] where the frame holes on car rest on 2" flat washers. the front i use 18"X 3/4" all thread for leveling.just roll table under body ,run all thread rods up and release rotisserie. pins in rear and all thread are located in frame holes and lowered to height you want and body is level for fit up of bolt on parts. the table is under body out of the way and sits lower then rotisserie so it can be put in enclosed trailer if needs to be moved to paint shop.the factory is all done with hydraulics in a few minutes. it takes me about 2 hours to have body rolling around. working 1 hour bullsh...... the rest.
Has anyone done this, made a stand, for a '71 B Body? I'm interested in making one, or pay someone to make me one. Anyone have drawings on the specifics?
Thanks
|
|
|
|
|


