|
 Re: Understanding how to use Advance Timing Light
[Re: 66Dodge]
#740406
Re: Understanding how to use Advance Timing Light
[Re: 66Dodge]
#740406
07/04/10 07:03 PM
07/04/10 07:03 PM
|
Joined: Jan 2003
Posts: 25,200
Upper Midwest
MoparforLife

Too Many Posts
|
Too Many Posts
Joined: Jan 2003
Posts: 25,200
Upper Midwest
|
Quote:
On most stock crank dampners the marks on it only show +10, +5, 0, -5, -10.
When setting your total advance at 2800rpms to 36degrees, that will be hard to figger where that is on the dampner.
So with the timing light that has an advance knob, you would set the dial to 36, then shining the light at the timing pointer, you would turn the distributor until the pointer points to 0 on the dampner (much easier to see).
And you can't do this unless you have recalibrated distributor that is fully advanced before said 2800 RPM's
|
|
|
Re: Understanding how to use Advance Timing Light
[Re: wh23g3g]
#740408
07/04/10 07:27 PM
07/04/10 07:27 PM
|
Joined: Sep 2009
Posts: 153
Georgia
wh23g3g
OP
member
|
OP
member
Joined: Sep 2009
Posts: 153
Georgia
|
Ok I went out and followed what you said RapidRobert and I got it perfectly aligned with 10BTC. The motor settled down and idled lower. It's still idling a little higher than it should at about 1000-1100. You can tell it's still idling a little on the high side. So I know I need to readjust. I have the air cleaner off because there's no way to get to the curb idle screw on the Thermoquad with the air cleaner on. So I hooked back up the vacuum advance. I have the air cleaner hose port on the back of carb plugged up while the air cleaner is off. I sat there and turned out the curb idle screw but it never changed the idle. One thing I'm noticing is the carb has a lot of smoke coming out of it after you shut it off. It probably needs the mixture adjusted. I really don't know how to do that. One veteran mechanic told me to not mess with it and let it run a little lean or rich I can't remember what he said, but he says if you changed it right away it might melt a piston. I can feel the fumes, it burns my eyes a little. And you can smell it on your clothes while out there adjusting. But I checked the timing again after I tightened the screw and it's still dead on 10. So what do I need to do now. Oh yeah I forgot to add that when I finally got the timing right the oil pressure dropped from 75PSI to about 30-35PSI. I'm assuming that's because it was running at 1000 vs 1200 RPM. It just shocked for a second. But that's correct isn't it? I've got HP pump there and when it was running before the timing was adjusted it was 75PSI. So is that normal?
Last edited by wh23g3g; 07/04/10 07:30 PM.
|
|
|
Re: Understanding how to use Advance Timing Light
[Re: 66Dodge]
#740414
07/04/10 09:31 PM
07/04/10 09:31 PM
|
Joined: Mar 2005
Posts: 862
Iowa State fan
kilroy
super stock
|
super stock
Joined: Mar 2005
Posts: 862
Iowa State fan
|
dont forget the ever present idle speeding up vacuum leak..
1973 Charger, former SE, former auto
I'm not trying to be difficult, it comes naturally....
|
|
|
Re: Understanding how to use Advance Timing Light
[Re: wh23g3g]
#740418
07/05/10 09:55 PM
07/05/10 09:55 PM
|
Joined: Apr 2010
Posts: 1,216
Under My Car
Mopar_Country
pro stock
|
pro stock
Joined: Apr 2010
Posts: 1,216
Under My Car
|
Quote:
It is the stock replacement carb, the Carter Thermoquad. It is definitely the curb idle screw I am turning out. I turned it out just a little bit, but I thought the idle should drop right away some. So I may not have turned it out far enough. I did change the throttle cable. I got one from Pioneer. I compared it to the original cable and it was the same length, the only difference being the grommet was larger on the original. I don't think anything is sticking I had someone watch the linkage and everything's moving freely when I press in the gas. I was talking to a friend last night and he told me something that could make a difference but I don't know. He said because I have the air cleaner off it's sucking in more air so it might idle a little higher. I had to remove the air cleaner because it's impossible to adjust the curb idle with it on. So when I took it off I did plug the vacuum port on the carb where the air cleaner vacuum hose went to. I don't really know anyone that could properly adjust the mixture screws. But I say a exhaust gas analyzer for sale on EBAY for $230 w/ digital readout. Would that be helpful if I had it?
Turn that curb idle screw out until you get it where you need it. When you adjust the air/fuel screws "lightly" seat them and back them out 1 1/2 to 2 turns like the previous poster said. I run a TQ on my engine and it can be a tricky gadget for sure. IF your idle doesn't drop when you back the idle down check for vacuum leaks. What intake are you running, spreadbore I hope. Forget the analyzer, if you want to spend some money I would get a vacuum gauge instead. Adjusting the screws is not that big of a deal, you can do it. As far as idling faster with the air cleaner off, mine doesn't. As far as your linkage are you sure it's letting the throttle come to full rest, if you have it too tight that could keep you in the throttle circuit and not allow the idle circuit to come into play. If you continue to wonder simply unhook the throttle cable and start the engine and see if that makes a difference.
|
|
|
Re: Understanding how to use Advance Timing Light
[Re: wh23g3g]
#740429
07/11/10 07:20 PM
07/11/10 07:20 PM
|
Joined: Sep 2009
Posts: 153
Georgia
wh23g3g
OP
member
|
OP
member
Joined: Sep 2009
Posts: 153
Georgia
|
I readjusted the accelerator cable. The gas pedal feels how it should be. Firm. I started it up and it was still running at 600-650RPM. As you can see in the pic I have the curb idle screw all the way in and it doesn't even touch the lever. I moved one of those levers before I adjusted the cable and the curb idle screw barely touched the lever then, so I thought I was ok then. Only to find out it's still too far away when I started it up. I have not messed with the fast idle screw. The 73 manual even says to put 500 miles on the car before adjusting the fast idle. Could it be in too far still? I guess because of the size restrictions the photo is enlarged but hopefully you can see.
Last edited by wh23g3g; 07/11/10 07:22 PM.
|
|
|
Re: Understanding how to use Advance Timing Light
[Re: wh23g3g]
#740432
07/11/10 10:24 PM
07/11/10 10:24 PM
|
Joined: Apr 2010
Posts: 1,216
Under My Car
Mopar_Country
pro stock
|
pro stock
Joined: Apr 2010
Posts: 1,216
Under My Car
|
I can see from your pic that the s link for your accelerator pump is backwards, makes me wonder what else might be out of adjustment. Everything else that you are showing looks normal to me. I'm no expert on the TQ's but I am having to learn mine. Where are the air/fuel screws set at on yours? If they are too far in that will idle you way down. Here is a link, look at the upper left picture. You can click on it to enlarge it. http://oldcarmanualproject.com/manuals/Carbs/Carter/Thermoquad/1972/images/1972TQ_0007_jpg.jpgEDIT; After you get the s link switched around "lightly" seat the air/fuel screws and back them out 2 and 1/2 turns it also looks like your fast idle screw is way to far in also. Back it out some. I suspect that you will have to tinker some to get it right it's the nature of the beast. You are running a spreadbore intake correct?
|
|
|
Re: Understanding how to use Advance Timing Light
[Re: Mopar_Country]
#740433
07/11/10 10:39 PM
07/11/10 10:39 PM
|
Joined: Jan 2003
Posts: 667
CA
66Dodge
super gas
|
super gas
Joined: Jan 2003
Posts: 667
CA
|
|
|
|
Re: Understanding how to use Advance Timing Light
[Re: 66Dodge]
#740443
07/13/10 06:30 PM
07/13/10 06:30 PM
|
Joined: Sep 2009
Posts: 153
Georgia
wh23g3g
OP
member
|
OP
member
Joined: Sep 2009
Posts: 153
Georgia
|
I finally was able to get my buddy over to help adjust it. He did the exact thing I was told here. He moved the mixture screws and backed them out 2 turns. It ran for awhile and we got the idle about right 800-850. That curb idle screw was shorter than the one from another TQ. So I actually swapped it with one from a Holley 1920 1BBL which was the same length as the other TQ. I wasn't able to keep the screw from the other TQ because the guy didn't want to break up a good carb for that. Then after awhile it started to automatically idle up to 900-1000 and then the fan clutch came on. I checked the gauge and it was getting pretty hot so we shut it off. It may have been low on coolant. The expansion tank was empty and when we shut it off and I released the radiator cap valve it all went back in the tank. It didn't overfill or anything like that. Everything's new on this motor. Water pump, temp gauge, ported vacuum switch, thermostat, hoses, radiator, water valve, heater core. So it may not have all been full. Or do I need to run it with the cap off to bleed out the air? I guess it will get hot just idling but I guess that ported vacuum switch was working maybe that's why it idled up. Plus a valve cover kept dripping ever few mins right on the manifold and it was annoying. Do I need to put a fan in front of the radiator while adjusting the carb idling? What about that Water Wetter stuff from Redline, is that worth putting in? I sure don't want to melt the motor just adjusting the carb. It got pretty close to the H on the gauge. I can see this might be a problem on this motor. The thing sucks up coolant, the radiator is a little bigger than factory, like 27x1 1/2 core. I do have an original 28" shroud, new HD fan clutch, and 7 blade 20" fan.
Last edited by wh23g3g; 07/13/10 06:32 PM.
|
|
|
Re: Understanding how to use Advance Timing Light
[Re: wh23g3g]
#740444
07/13/10 08:08 PM
07/13/10 08:08 PM
|
Joined: Jan 2003
Posts: 667
CA
66Dodge
super gas
|
super gas
Joined: Jan 2003
Posts: 667
CA
|
I'm glad you got the idle to 800-850rpms.  But why did the engine temp almost get to H so fast just by adjusting carb idle ?  Did you fill your radiator with enough water ?! The level should be about 1" shy of the filler neck. Yes, Water Wetter is a good thing to add, can't hurt. Just don't add too much anti-freeze as Water Wetter works best with straight water however, you do need some anti-freeze for anti-corrosion protection. Less than 50/50 mixture is okay. No, you don't have to leave the radiator cap off to vent. Best to leave it on because as radiator/coolant gets hotter, the pressure cap actually helps suppress overheating.
|
|
|
|
|


 disconnect the linkage this will let the plates come all the way closed. then use your idle screw, reconnect the linkage. if the idle picks up, there is your problem. timing will change your idle but your idle will not change your timing.
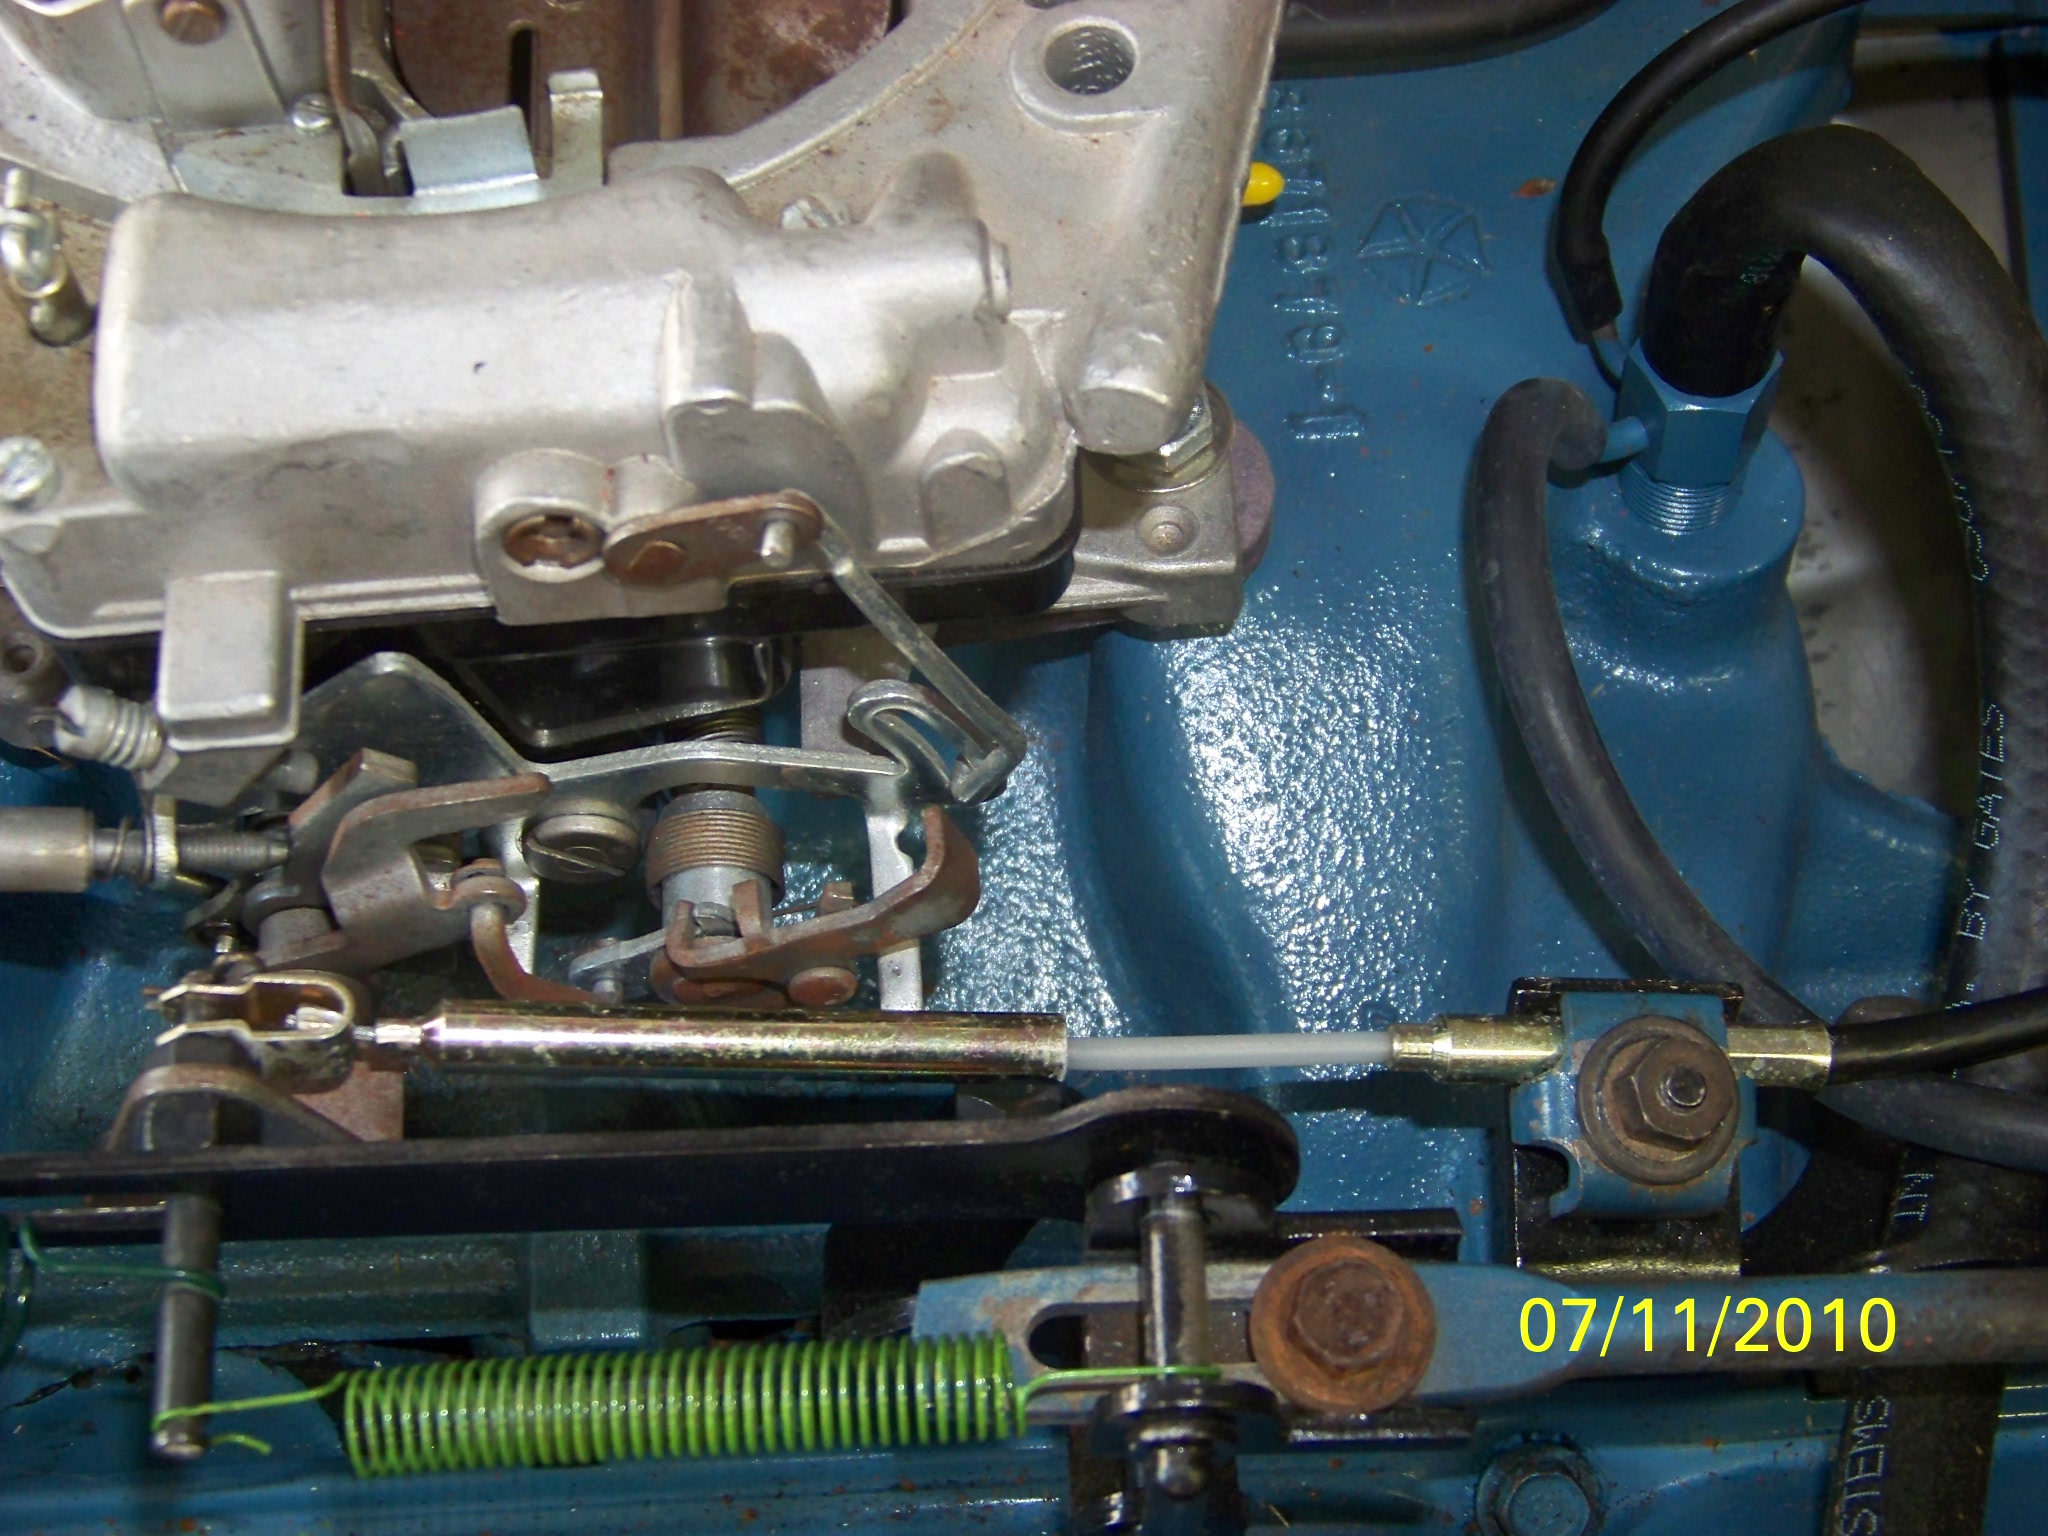