Previous Thread
Next Thread
Print Thread
Page 2 of 3 1 2 3
Re: Understanding how to use Advance Timing Light [Re: wh23g3g] #740423
07/06/10 11:27 PM
07/06/10 11:27 PM
Joined: Jan 2003
Posts: 667
CA
6
66Dodge Offline
super gas
66Dodge  Offline
super gas
6

Joined: Jan 2003
Posts: 667
CA
Yes, the curb idle screw should always be touching the linkage whether the engine is off or on. That's what keeping the primary butterfly plates barely open to expose the idle slot in the venturis.

Re: Understanding how to use Advance Timing Light [Re: 66Dodge] #740424
07/06/10 11:56 PM
07/06/10 11:56 PM
Joined: Sep 2009
Posts: 153
Georgia
W
wh23g3g Offline OP
member
wh23g3g  Offline OP
member
W

Joined: Sep 2009
Posts: 153
Georgia
So is there a general spec on how much slack to leave in the throttle cable? There's not even a removal/installation procedure in the 73 Dodge Chassis or Body manual as far as I can see.

Re: Understanding how to use Advance Timing Light [Re: wh23g3g] #740425
07/07/10 12:31 AM
07/07/10 12:31 AM
Joined: Jan 2003
Posts: 667
CA
6
66Dodge Offline
super gas
66Dodge  Offline
super gas
6

Joined: Jan 2003
Posts: 667
CA
Not really. It's more common sense.
1). Start with the throttle cable from gas pedal to carb.
Gas pedal should be all the way up.
Carb linkage all the way forward, primaries are closed.
At this point there should be no slack.
2). Adjust curb idle screw so the throttle moves just
enough to expose the idle slot in the venturies.
Maybe 2-3 turns of the screw for starters.
3). The throttle cable will now have some slack.
Take up the slack in the cable.
4). Start the car and see what rpm it's idling at.
adjust screw as needed.
5). When you have your desired idle rpm re-check the
throttle cable to make sure there is no slack.
Otherwise there will be unnecessary movement of the gas
pedal before enough slack is taken up to actually move
the carb linkage.

Re: Understanding how to use Advance Timing Light [Re: 66Dodge] #740426
07/07/10 12:36 AM
07/07/10 12:36 AM
Joined: Jan 2003
Posts: 667
CA
6
66Dodge Offline
super gas
66Dodge  Offline
super gas
6

Joined: Jan 2003
Posts: 667
CA
Ya know, a good test would be to back off the idle screw completely so it's touching nothing. Then check to see if the throttle cable has enough slack/length to allow the throttle linkage to go all the way forward.

If you back off the idle screw completely and the throttle cable is long enough you should see the primary butterfly plates go horizontal/close. If it doesn't that means the throttle cable is too short.

Re: Understanding how to use Advance Timing Light [Re: wh23g3g] #740427
07/07/10 12:43 AM
07/07/10 12:43 AM
Joined: Jan 2003
Posts: 667
CA
6
66Dodge Offline
super gas
66Dodge  Offline
super gas
6

Joined: Jan 2003
Posts: 667
CA
When you swapped cables and found that it's too tight,
are you referring to the entire cable being stretched out taunt ? Because it shouldn't be. The shape of the cable from the firewall grommet to the cable clamp above the intake manifold should be a lazy S-shape.

Maybe it's time check out someoneelse's Mopar as an example.

Re: Understanding how to use Advance Timing Light [Re: 66Dodge] #740428
07/11/10 06:43 PM
07/11/10 06:43 PM
Joined: Sep 2009
Posts: 153
Georgia
W
wh23g3g Offline OP
member
wh23g3g  Offline OP
member
W

Joined: Sep 2009
Posts: 153
Georgia
Yeah I've been fooling with it again. Readjusted the cable again and it idles a little lower but now too low at 600-675RPM. The cable has the shape described. I think I had it pulled back too tight. Before the curb idle screw wasn't even near the lever on the carb now it is, but still doesn't touch it even with screw all the way in. The throttle plates are closed though. How firm should the gas pedal be with the engine off? It's pretty loose but not the bolts just the push of the pedal. When I start it up now I guess it's idling so low it won't stay running until I let it get hot. I know the old cable was hard to get out because of the grommet. I'm going to try and get a good used one and see if it helps. I've noticed in the 73 service manual there should be an idle stop solenoid on here. But I thought it was for California cars or Manual Transmission cars because I don't have one and I don't have a plug for on on the engine harness. It's a new harness from Year One for big blocks. Do I need one and where do I get it? I haven't messed with the mixture screws yet until I figure out the cable issues. Of course my buddy who's a mechanic and knows how to fix all this has once again left me hanging here. He said he was on his way to come help and never showed up and he did the same thing last week too. It's hit or miss with him sometimes, he helps sometimes and sometimes he acts like you didn't even ask him. So of course I'll be doing all this by myself again like I've done most everything on the car. Seeing someone elses 73 Charger would be very helpful but most of the ones people have are modified and the ones on EBAY no one cares what kinda help you need they just want to sell it. I understand the desire for more performance out of these cars so it's hard to come by someone who just has a original or restored 73-74 400-440 Charger. Especially since they weren't the fastest ones people aren't really restoring them to original. I just like the way they were original so I'm trying to. It ran the best when it was new so that's what I'm trying to go for. So definitely if anyone has a photo that would help me out for sure.

Re: Understanding how to use Advance Timing Light [Re: wh23g3g] #740429
07/11/10 07:20 PM
07/11/10 07:20 PM
Joined: Sep 2009
Posts: 153
Georgia
W
wh23g3g Offline OP
member
wh23g3g  Offline OP
member
W

Joined: Sep 2009
Posts: 153
Georgia
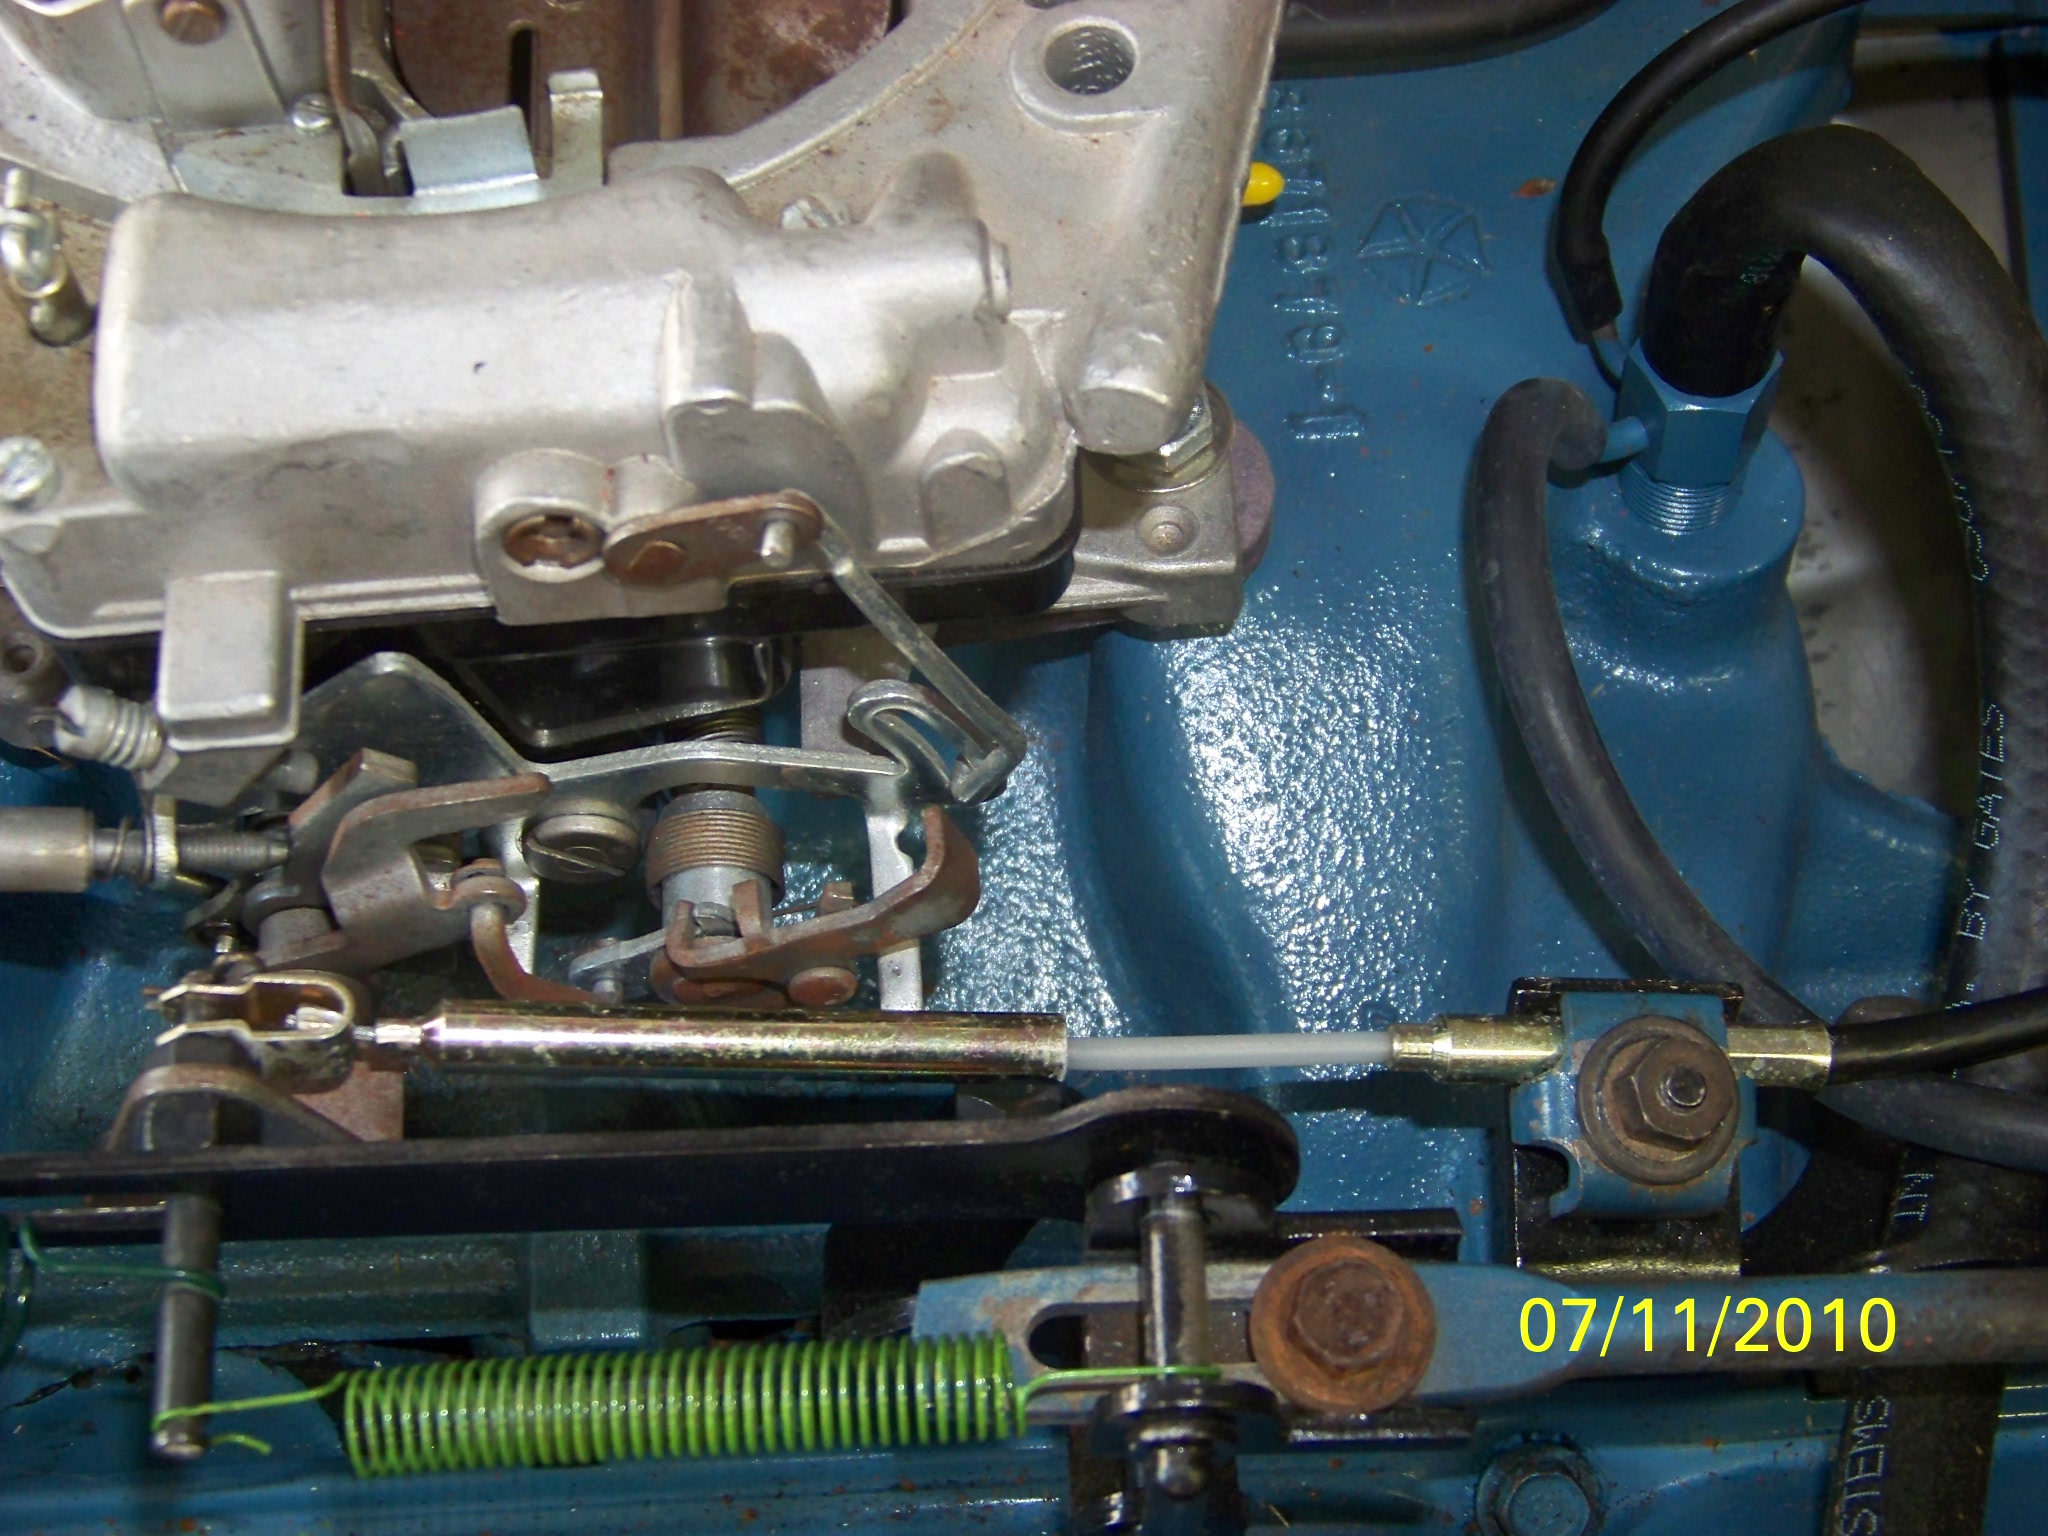
I readjusted the accelerator cable. The gas pedal feels how it should be. Firm. I started it up and it was still running at 600-650RPM. As you can see in the pic I have the curb idle screw all the way in and it doesn't even touch the lever. I moved one of those levers before I adjusted the cable and the curb idle screw barely touched the lever then, so I thought I was ok then. Only to find out it's still too far away when I started it up. I have not messed with the fast idle screw. The 73 manual even says to put 500 miles on the car before adjusting the fast idle. Could it be in too far still? I guess because of the size restrictions the photo is enlarged but hopefully you can see.

6080225-Picture351.jpg (1374 downloads)
Last edited by wh23g3g; 07/11/10 07:22 PM.
Re: Understanding how to use Advance Timing Light [Re: wh23g3g] #740430
07/11/10 07:39 PM
07/11/10 07:39 PM
Joined: Jan 2003
Posts: 667
CA
6
66Dodge Offline
super gas
66Dodge  Offline
super gas
6

Joined: Jan 2003
Posts: 667
CA
Looks like you need a longer curb idle screw.

Re: Understanding how to use Advance Timing Light [Re: 66Dodge] #740431
07/11/10 08:09 PM
07/11/10 08:09 PM
Joined: Sep 2009
Posts: 153
Georgia
W
wh23g3g Offline OP
member
wh23g3g  Offline OP
member
W

Joined: Sep 2009
Posts: 153
Georgia
Really they are different on different models? I didn't even consider that as being a problem. I got this TQ about 6-7 years back a few weeks after I got the car. I was going to put it on and run the car but the car was such a mess. I got it at a parts store as a remanufactured unit. At the time I didn't have any other options. The numbers on this TQ are 9096S. It is supposse to be from a 1977 Truck with a 440 and Automatic Transmission Intended for California use. This was according to a TQ id # list I found online. So would the screw be different for that application? I don't know if the remanufacturing company was using just the body as a core or just rebuilding the core using the original parts and replacing what's worn. Where do I get a new screw at?

Re: Understanding how to use Advance Timing Light [Re: wh23g3g] #740432
07/11/10 10:24 PM
07/11/10 10:24 PM
Joined: Apr 2010
Posts: 1,216
Under My Car
Mopar_Country Offline
pro stock
Mopar_Country  Offline
pro stock

Joined: Apr 2010
Posts: 1,216
Under My Car
I can see from your pic that the s link for your accelerator pump is backwards, makes me wonder what else might be out of adjustment. Everything else that you are showing looks normal to me. I'm no expert on the TQ's but I am having to learn mine. Where are the air/fuel screws set at on yours? If they are too far in that will idle you way down. Here is a link, look at the upper left picture. You can click on it to enlarge it.

http://oldcarmanualproject.com/manuals/Carbs/Carter/Thermoquad/1972/images/1972TQ_0007_jpg.jpg

EDIT; After you get the s link switched around "lightly" seat the air/fuel screws and back them out 2 and 1/2 turns it also looks like your fast idle screw is way to far in also. Back it out some. I suspect that you will have to tinker some to get it right it's the nature of the beast. You are running a spreadbore intake correct?

Re: Understanding how to use Advance Timing Light [Re: Mopar_Country] #740433
07/11/10 10:39 PM
07/11/10 10:39 PM
Joined: Jan 2003
Posts: 667
CA
6
66Dodge Offline
super gas
66Dodge  Offline
super gas
6

Joined: Jan 2003
Posts: 667
CA
Some more good stuff here:
http://www.thermoquads.com/page204.html

Re: Understanding how to use Advance Timing Light [Re: 66Dodge] #740434
07/12/10 02:15 AM
07/12/10 02:15 AM
Joined: Jan 2003
Posts: 667
CA
6
66Dodge Offline
super gas
66Dodge  Offline
super gas
6

Joined: Jan 2003
Posts: 667
CA
Found this TQ manual:
http://carburetor.ca/pdf_manuals/Carter/1972TQmanual.pdf

May have to adjust fast idle screw to the correct position before adjusting the curb idle screw.

Re: Understanding how to use Advance Timing Light [Re: 66Dodge] #740435
07/12/10 02:50 AM
07/12/10 02:50 AM
Joined: Sep 2009
Posts: 153
Georgia
W
wh23g3g Offline OP
member
wh23g3g  Offline OP
member
W

Joined: Sep 2009
Posts: 153
Georgia
I am running a spreadbore manifold correct for 73 with 73 casting numbers. I'll take a look at that manual. That should help out. How important is the idle stop solenoid? I see there is a screw hole on the RH front side of the carb where it should go. But it didn't come with it and it's missing the arm that goes on the carb shaft. I looked at the factory 73 wiring diagram and it looks like it plugs straight into the alternator. But I don't have a plug on the harness that would plug into an idle stop solenoid. I will be running factory A/C, I hope it won't cause many problems. Maybe I'll have to run it a little higher idle to compensate for the A/C. I'm sure I'll get it figured out but I've got to have someone else look at it.

Re: Understanding how to use Advance Timing Light [Re: wh23g3g] #740436
07/12/10 03:03 AM
07/12/10 03:03 AM
Joined: Jan 2003
Posts: 667
CA
6
66Dodge Offline
super gas
66Dodge  Offline
super gas
6

Joined: Jan 2003
Posts: 667
CA
The idle stop solenoid is there to make sure the engine doesn't continue to run-on after it's shut off.
Used for emission purposes. I think the manual will describe it's function better.
IMO it's not necessary to have one.

Re: Understanding how to use Advance Timing Light [Re: 66Dodge] #740437
07/12/10 04:52 PM
07/12/10 04:52 PM
Joined: Sep 2009
Posts: 153
Georgia
W
wh23g3g Offline OP
member
wh23g3g  Offline OP
member
W

Joined: Sep 2009
Posts: 153
Georgia
I changed around that S spring according to the manual link posted here. After reading that manual I don't think turning the idle speed stop screw above the fast idle screw was used originally to adjust the idle speed. According to this manual it looks like they adjusted it by turning the screw on the idle stop solenoid. The only way that curb idle screw touches is if I put the fast idle screw on the lowest step of the cam, then the curb idle screw touches. But as soo as you start it up it's back to the same, still running 150-200RPM too low. I can't find those idle speed solenoids anywhere anymore. It looks like I need it all too, the solenoid, bracket, and arm. Where could I get one?

Re: Understanding how to use Advance Timing Light [Re: wh23g3g] #740438
07/12/10 08:40 PM
07/12/10 08:40 PM
Joined: Apr 2010
Posts: 1,216
Under My Car
Mopar_Country Offline
pro stock
Mopar_Country  Offline
pro stock

Joined: Apr 2010
Posts: 1,216
Under My Car
As I said last post if your air fuel screws are in too far that will idle you down.Did you lightly seat them and back them out 2 and 1/2 turns. That's a good baseline to start with. And no you don't need the idle stop, I don't run one and I have no problems. A couple of us have suggested this and you have made no mention of attempting it. The air fuel mix is an integral part of tuning.

Re: Understanding how to use Advance Timing Light [Re: Mopar_Country] #740439
07/12/10 09:52 PM
07/12/10 09:52 PM
Joined: Apr 2010
Posts: 1,216
Under My Car
Mopar_Country Offline
pro stock
Mopar_Country  Offline
pro stock

Joined: Apr 2010
Posts: 1,216
Under My Car
I was looking at the picture again, where do you have your vacuum advance hooked up at? Is it ported(hooked to carb) or manifold vacuum?

Re: Understanding how to use Advance Timing Light [Re: Mopar_Country] #740440
07/12/10 11:02 PM
07/12/10 11:02 PM
Joined: Sep 2009
Posts: 153
Georgia
W
wh23g3g Offline OP
member
wh23g3g  Offline OP
member
W

Joined: Sep 2009
Posts: 153
Georgia
I still haven't messed with the mixture screws because I don't feel like I would know what sounds right on the engine. I keep waiting on my friend to come over and help me on the adjust. He's said he was on his way over the past three weeks on Sunday and on Monday because he always forgot on Sunday. But here it is again another Monday he said he was on his way to help and he didn't show up. So I'm going to either try it myself or try and find someone else who can help. I looked at another Thermoquad someone had and compared the idle stop screws because I saw in a reply my idle screw may be too short. It's definitely a different screw in my carb than the other one I looked at. They were around the same year 1976. It was a few threads longer and it had a raised tip, whereas the one in mine is just a few threads shorter with a flat bottom. Don't know if it's enough to make a difference though, the lengths were pretty close. What if I can't keep it idling high enough to stay running while I adjust the mixture? Should I run the screws in lightly with the engine off as a base setting? I've got every vacuum line hooked up on the car exact how it should. I'm using everything the car should have on it. So I've got the vacuum canister hooked up, the OSAC valve, the Ported Vacuum switch and the Air Cleaner Heated Inlet Air. I finally got my exhaust manifold heat stove in the mail today too. If I can get it running good without the idle stop solenoid I will, but will be looking to add it if I can find all the components.

Re: Understanding how to use Advance Timing Light [Re: wh23g3g] #740441
07/12/10 11:23 PM
07/12/10 11:23 PM
Joined: Jan 2003
Posts: 667
CA
6
66Dodge Offline
super gas
66Dodge  Offline
super gas
6

Joined: Jan 2003
Posts: 667
CA
You should adjust the idle mixture screws per previous instructions. If you don't feel secure then count how many turns it took to bottom them out and remember that so you can always back them out to original position. And don't screw them in super tight ! The tips of those screws are pointed and fragile. Hopefully, the idle will come back up the 200rpms you needed. As for the curb idle screw, the missing threads and flattened tip seems strange like someone grounded it down. Can you guestimate that if the missing threads plus the raised tip were restored, the curb idle screw would be just the right length you needed ?
Good Luck.

Re: Understanding how to use Advance Timing Light [Re: 66Dodge] #740442
07/12/10 11:34 PM
07/12/10 11:34 PM
Joined: Jan 2003
Posts: 667
CA
6
66Dodge Offline
super gas
66Dodge  Offline
super gas
6

Joined: Jan 2003
Posts: 667
CA
You're making too big a deal about the idle mixture screws.
With the engine off just turn them both clockwise until they lightly bottom out then back them off 2 and 1/2 turns.
then fire up the engine and hope the idle is at 800-850 rpms. In fact, if the idle still doesn't change then just leave those screws as they are because all you did was reset them to initial position per the factory. No harm in that. And you asked what does a correct idle sound like ?
It sounds slower than the former 1200rpms and faster than the current 650 rpms. LOL

Page 2 of 3 1 2 3


Powered by UBB.threads™ PHP Forum Software 7.7.1