|
 Re: New Paint job on a budget thread Part III
[Re: v8mirage]
#39135
Re: New Paint job on a budget thread Part III
[Re: v8mirage]
#39135
10/21/09 10:38 AM
10/21/09 10:38 AM
|
Anonymous
Unregistered
|
Anonymous
Unregistered
|
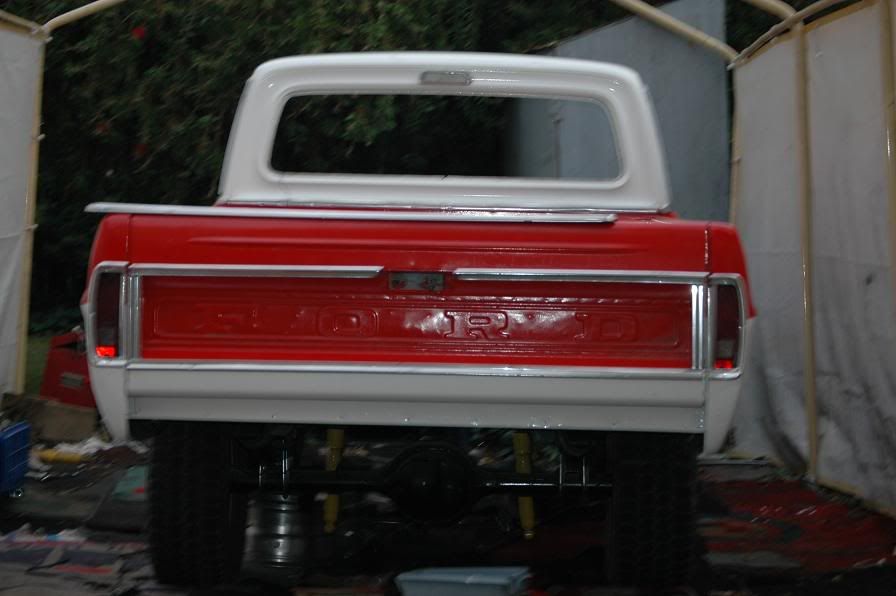
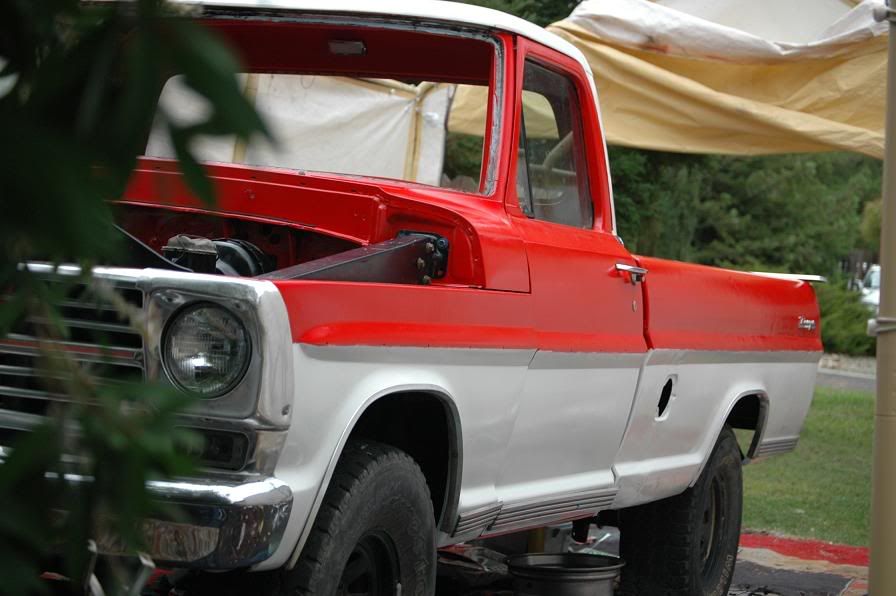
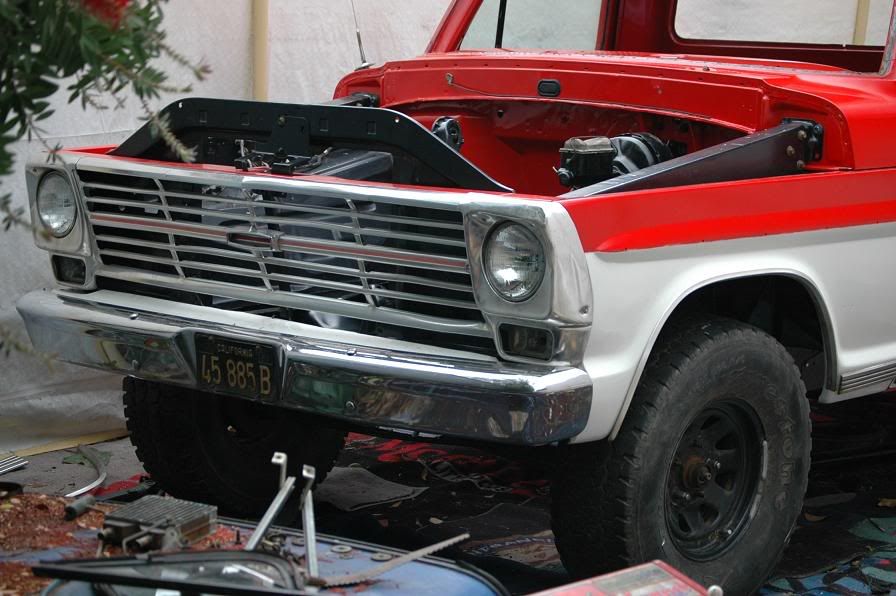
Thats good. well i think i'm going to start buying supplies. and i', going to spend the extra money and make a make shift paint booth out of LOTS of home depot sheet plastic to prevent dust. and i have and orbital buffer will that work as a sander too if i get some sanding pads? or should i go with blocks. the car is small but not small enough that i would want to do the whole car by hand. and i've decided on the gloss white  
|
|
|
Re: New Paint job on a budget thread Part III
#39136
10/21/09 11:57 AM
10/21/09 11:57 AM
|
Joined: Aug 2009
Posts: 51
CA
Peckinpah

member
|
member
Joined: Aug 2009
Posts: 51
CA
|
Re the plastic bumper, I think there was another guy who had some adhesion problems on his plastic bumper, but IIRC, this was because he did nothing to prepare the surface prior to painting (i.e., no sanding).
I can see how a smooth surface like that, especially one that shrinks and expands depending on temperatures, might cause problems if not prepped. So I would be sure to rough up the surface with some fine grit paper (maybe 400-600) to give the paint something to adhere to.
Re blocks, I didn't use any, but now wish I had. I had to do a ton of wet sanding and my fingers were literally bleeding at one point. But I have not of anyone using an orbital sander for sanding, most people tend to think it would be too powerful, but i have not tried using one myself.
Also, I burned through the paint in a lot of spots and suspect a block might help prevent that, at least on flat areas. Be sure to watch out for edges when you're sanding, it's really easy to over sand, so I would err on the side of sanding places like that too little rather than risking burning through.
Finally, watch out for drips. I let far too many of them slide on early coats, thinking I could sand them down, but it's almost impossible to sand them perfectly flat. Fortunately, since I used gloss white (probably the most forgiving color) they're not too noticeable as long as the paint has a good shine. The reflections really do a good job of keeping the eye from seeing them.
I think a week to 10 days should be enough down time to get all your coats down and then reassemble the car. The final wet sanding and all that can be done days or weeks after you finish laying down you last coat, and the car can be driven while it's drying. Good luck and post some pics when you're done.
|
|
|
Re: New Paint job on a budget thread Part III
[Re: Soopernaut]
#39138
10/21/09 03:29 PM
10/21/09 03:29 PM
|
Anonymous
Unregistered
|
Anonymous
Unregistered
|
hey thanks for all the answers you guys have provided i should be starting soon and i for sure will post up some picturs of how it went along the way and if like the final results. basically i've conlcuded it's all going to come down to how much prep i do and if i put the effort and time into it to make it look good. so i'll keep ya all posted. one more question i have a 8" orbital buffer that i was going to use to wax the car could i put some sanding pads on it and would that work for my wet sanding and some of the prep work????????? h a i love the avatar selection the forum has !!  
|
|
|
Re: New Paint job on a budget thread Part III
#39139
10/21/09 03:38 PM
10/21/09 03:38 PM
|
Anonymous
Unregistered
|
Anonymous
Unregistered
|
oh also maybe so this gets answered if some one could pm their answer. i was reading above and saw that you can do RustOleum / Tremclad under coats then finish up with interlux bright side..
so my question is brightside > RustOleum ????
and will i like the Rustoleum White over the Brightside White? has any one seen these two?
|
|
|
Re: New Paint job on a budget thread Part III
[Re: Peckinpah]
#39141
10/21/09 05:32 PM
10/21/09 05:32 PM
|
Anonymous
Unregistered
|
Anonymous
Unregistered
|
ok sounds good. cause i have a vibrating sander and the orbital it's pretty big so maybe it's good for the roof or hood. and i always have my hands.
but whats every ones opinion on what paint to use
should i go few coats rusto then top coats brightside? what the advantage or should i just do all rusto?
|
|
|
Re: New Paint job on a budget thread Part III
#39142
10/21/09 05:46 PM
10/21/09 05:46 PM
|
Anonymous
Unregistered
|
Anonymous
Unregistered
|
Quote:
...
but whats every ones opinion on what paint to use
should i go few coats rusto then top coats brightside? what the advantage or should i just do all rusto?
General experience is that Brightside has more shine to it, and some have been able to lay down final coat of Brightside and stop there (no final buffing to get appropriate shine). Of course, Brightside can be final buffed / polished for better shine and finish if desired.
For Rustoleum, the general experience has been that final appearance almost always requires final buffing / polishing.
There is also some thought that Brightside may be harder and provide a more durable finish than Rustoleum. This could mean less ongoing maintenance (buffing and waxing) of Brightside. Brightside is intended to be UV resistant on its own, whereas Rustoleum requires waxing for best durability.
The idea of Rustoleum first, then final coat or coats with Brightside is simply because Rustoleum is so much less expensive. All of the properties outlined as Brightside advantages above should be gained with Brightside just as the final coat(s) -- assuming, of course, that the earlier coats of Rustoleum are fully cured before laying down the Brightside.
|
|
|
Re: New Paint job on a budget thread Part III
#39143
10/21/09 10:58 PM
10/21/09 10:58 PM
|
Anonymous
Unregistered
|
Anonymous
Unregistered
|
oh ok that sounds good then but one of the main reasons i liked the idea of rustoleum was they had a spray can wich i was hoping to use on the front bumper wich would be time consuming to roll on.
but i guess i could spray the rist coats and then roll on the bright side. ok thats good to know. but since the bright side is harder will i have a problem with it being on the plastic front and back bumper covers?
|
|
|
Re: New Paint job on a budget thread Part III
#39144
10/21/09 11:24 PM
10/21/09 11:24 PM
|
Anonymous
Unregistered
|
Anonymous
Unregistered
|
sorry even after lots of reading i still have tons of questions. but i guess i dont need to know every thing, but i do need to know exactly wich line of bright side paint to choose there were like 10
i'm assuming i want Interlux Topside Paint or do i want bottom side? and there were like 3 types of bottom side or 5 but i dont know what any thing is.
sorry im sooooo impatient i'm stoked to give this a try
|
|
|
Re: New Paint job on a budget thread Part III
#39145
10/22/09 02:26 PM
10/22/09 02:26 PM
|
Anonymous
Unregistered
|
Anonymous
Unregistered
|
Quote:
... but i do need to know exactly which line of bright side paint to choose there were like 10
i'm assuming i want Interlux Topside Paint or do i want bottom side? and there were like 3 types of bottom side or 5 but i dont know what any thing is...
You want Brightside, which is a topside paint. Interlux is the manufacturer and Brightside is the paint line.
Interlux makes two other topside paints, but you don't want those : Toplac and Perfection.
Toplac is not as high gloss as Brightside and is available is available if far fewer colors than Brightside.
Perfection is a 2 part paint (meaning it is mixed with a hardener). Again, it is available in far fewer colors than Brightside. The 2 part nature means that it will cure faster (and maybe be harder in the end), but people painting boats with it have said it is much harder to work with than Brightside.
You do not want any bottom side paints. These are meant to be below the waterline of a boat. The final finish of these paints does not need to be high gloss and they do not need to be as UV resistant as the topside paints which are meant to cover all exposed surfaces above the water.
|
|
|
Re: New Paint job on a budget thread Part III
#39146
10/22/09 02:43 PM
10/22/09 02:43 PM
|
Anonymous
Unregistered
|
Anonymous
Unregistered
|
k thats good to know thanks very much. so i got paid today so i will be going to home depot and cleaning out the garage this week end so there is room for my car. i guess my list is... sanding blocks sand paper (400, 600, 800, 1000, 1500, 2000) Cause i have some body work to do rustoleum professional white, also a can or to of spray incase i get lazy mineral spirits(unless there is something better) and i'll check to see if they have bondo i think i'll have to check an auto supply store for the bondo and i'll be getting a sealer too. and whats a good website for the brightside paint? oh i'll be picking u pa bottle of meguires as well i'm super syked and i think i'll do a pretty decent job. i'm pretty sure i know what to do. and i'm going to practice the process on our beater first, but if there is anthing i forgot let me know
|
|
|
Re: New Paint job on a budget thread Part III
#39147
10/22/09 04:02 PM
10/22/09 04:02 PM
|
Anonymous
Unregistered
|
Anonymous
Unregistered
|
One more thing, the official name is Brightside Polyurethane. That's the one you want.
I think they have another paint which is called Brightside traditional enamel.
Don't know the best place on the web to purchase. Just do a Google search for Interlux Brightside and compare prices. There are even some people on eBay who sell it from time to time. Some places on the web only have limited colors.
If you happen to live near a body of water, find a local boat supply house (like West Marine). They will probably have it on the shelves. If they do, they will probably also have a paint chip card so you see what the colors really look like. They will likely also have smaller cans so you can purchase just to try it out -- then buy more in bigger quantities on-line once you decide exactly what you want.
|
|
|
Re: New Paint job on a budget thread Part III
[Re: RoboGeek]
#39149
10/22/09 08:26 PM
10/22/09 08:26 PM
|
Anonymous
Unregistered
|
Anonymous
Unregistered
|
k well i dont have my camera right now but i do have a corner with a 3/4" by 3" spot where i can rust and i want to grind it down and put a nuetralizer down then odds are i will have some sort of indentation so what do i put there? i'm assuming some sort of body filler i dont expect the missing metal to be deep i just dont know any products and i have a very small door ding that is big enough to notice could i fill that? ha ok i'll look around cause i live right by the great salt lake and they had to paint all those sail boats some how so i guess it's worth looking around and there are reservoirs every where. so yah help me under stand the body work i need to do. 
|
|
|
Re: New Paint job on a budget thread Part III
[Re: RoboGeek]
#39150
10/24/09 08:50 AM
10/24/09 08:50 AM
|
Anonymous
Unregistered
|
Anonymous
Unregistered
|
For very small areas, I used fiberglass cloth covered with jb weld. Sands pretty easily,
hardens well, and is better than bondo. A thin coat of body glaze over the top, feathered, and primered and...bada bing, nada ding...or rust!
|
|
|
Re: New Paint job on a budget thread Part III
[Re: joeshmo]
#39152
10/24/09 06:20 PM
10/24/09 06:20 PM
|
Joined: Nov 2007
Posts: 93
New York
tt455
member
|
member
Joined: Nov 2007
Posts: 93
New York
|
Well after practicing on a trunk lid which I posted here last Summer,I found the opportunity to try this method on a car.My Son will be driving soon,and I had this low milage 87 LeSabre that my Brother let sit for a couple of years. I fixed it up and got it road worthy,but as in most late 80's early 90's cars the car had peeling on the roof,trunk,and hood.The sides where good,so I decided since I'll never match the Charcoal gray,I'll two tone it with Black. Using the Rustoleum method I finished her up yesterday,which took a couple of weeks because of weather and work. It came out very good,but as I had read in earlier posts I encountered some hazing in spots. Now,I read posts that said the reason for this is there's no hardner in the paint,let the paint cure before buffing,and use better polishing compounds along with PC 7424. What I don't understand,is why my roof came out almost flawless while my hood and trunk have the dreaded hazing.Like others,looks good from 5ft, but as you close in the cloudiness appears.I used Turtle wax polisher and a Craftmens rotary polisher,but put the terry bonnet over a foam one to prevent me from burning through. Did I miss a post about conclusions on hazing? Should I wait a couple of weeks and polish again? Here are some pics,thanks for reading.      HERE IS THE HAZING ON THE TRUNK AND HOOD. 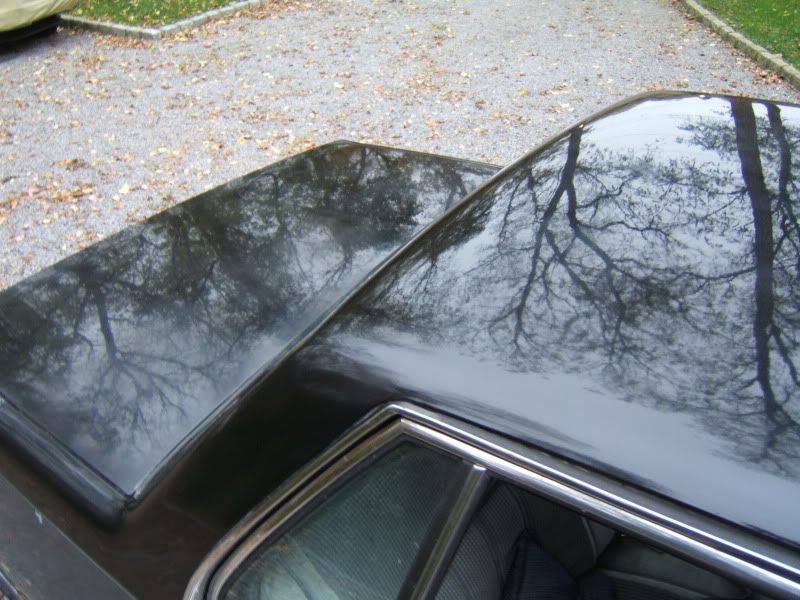  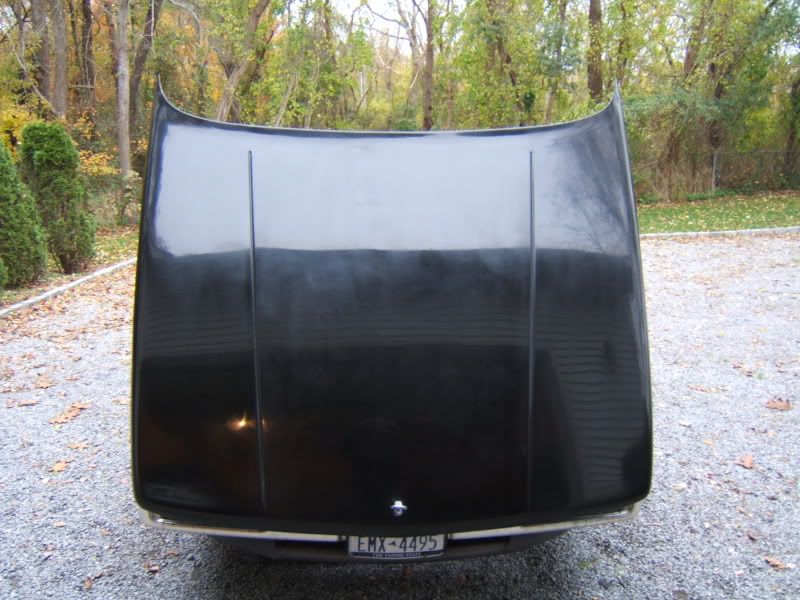
|
|
|
|
|