Previous Thread
Next Thread
Print Thread
Page 137 of 167 1 2 135 136 137 138 139 166 167
Re: New Paint job on a budget thread Part III [Re: Peckinpah] #39034
09/16/09 05:32 PM
09/16/09 05:32 PM
Joined: Sep 2009
Posts: 52
Cornfields of Illinois
R
RoboGeek Offline
member
RoboGeek  Offline
member
R

Joined: Sep 2009
Posts: 52
Cornfields of Illinois
This is a 93 cavy that I use as a toy/winter beater. It has ported head, cat back, 1.6:1 rockers, bigger TB, shift kit and a reprogrammed chip. I've fixed up cars since the early 70's and with this car rusting out horribly, I decided to try the cheapo way.
It was going to be a RWD V8 transplant, since its hard to find unrusty Vega's, but I let it go too long, then saw the fast and the furious and just had to make this run better. Not a big problem since we race midgets with 300hp 4 bangers, including the pontiac version of this motor.

Synopsis of the car before work started:
There were no rockers, lower doors, left fender flare or right quarter left. Rather than replace it with metal, I build skis, so I thought I'd use some of that on the car.
The left flare was molded from the intact right one, and the right quarter was molded from the left. From the molds I used triax glass and epoxy to recreate the parts, which were installed with regular glass. The triax and epoxy will be strong enough to take the snow blobs that build up and break off regular fiberglass/bondo.

total cost for this was $141.69 - and I have many new supplies left over. That includes the bodywork stuff too - lots of expensive triax fiberglass, and I used the epoxy I use for building ski's, which is much more expensive than fiberglass resin. But it releases from molds easily, and its super strong - needed that since the lower quarter panels and one fender flare are solid glass now - don't want snow accumulating and breaking things off!
That also includes the plaster of paris and other things to create molds from the good side for the bad side - most people wont need that.
Actual paint supplies was $46.41

If anyone tries this, here's what I learned (the hard way).

1. Spraying is much easier, but requires more taping
2. If you do roll it on, roll it very thin and wet sand after every 2 coats
3. Change the tape every 2 coats. I'm spending more time removing paint hardened tape than I did actually painting!
4. Contrary to the internet lore, I found 6" rollers easier to keep the paint even with
5. THIN!! I can't say it enough! The thinner a coat you apply, the smaller the orange peel, and the less sanding you'll have to do
6. Make sure to wait at least a couple weeks of hot weather before final sanding and buffing. Oil based enamels take longer to harden than acrylic enamels do
7. This is the biggie - make sure your surfaces are as perfect as you want your paint to be. If you don't mind dings and dents showing after your done, go for it. A light sanding and cleaning, and rustoleum will stick fine. If you want it to look like a mirror (and this paint will shine up that good), you need a perfectly smooth surface. Trust me - any little flaw looks 100x worse after its got shiny paint on it!
And if you are changing colors, get a can of spray paint in the same color for the door jambs, under the hood and trunk, and any places you cant reach easily (like under door handles). Spray those first, then the rest of the paint will blend in perfectly

Fun factor for this project = 5 stars
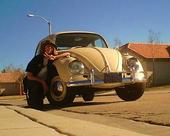
before..


after..


I like the flag reflection in this shot


tha car is also featured on Rustoleums website: http://www.rustoleum.com/CBGCommunity.asp?m=pro&cc=AUTO&pid=5

Re: New Paint job on a budget thread Part III [Re: Peckinpah] #39035
09/17/09 04:20 AM
09/17/09 04:20 AM

A
Anonymous
Unregistered
Anonymous
Unregistered
A


Ok, lesson learned, but first thanks for the advice on the gloss white paint issue. As I was reading this thread and taking it all in before I started, I remembered lots of people saying to make sure your working in a VERY well lit area. I used to own an aquarium shop and had some metal halide lights stored away. I figured this would be the perfect light source for me to use while painting as I'm painting in a climate controled garage and no outside. WRONG idea.. I pulled the car out of the garage today to take a closer look and the paint looks flawless no scratches no discoloration at all. Metal halide lights are literally brighter than the sun and 10k spectrum will make you go batty if your using them to identify blemishes. Sure there are scratches but none of the problems I listed in the earlier post show up in any other kind of light at all. I figure no one else probably has metal halides but if you do, a little fyi. DON'T inspect your buffing job with them!! I am going to continue on to the rest of the car as the paint looks great. I'll post some pics of the completed project in a couple of weeks. Thanks again guys, it's always nice to see such good folks willing to help.

Re: New Paint job on a budget thread Part III #39036
09/19/09 01:39 PM
09/19/09 01:39 PM
Joined: Feb 2009
Posts: 246
middleOnowhere CA
THEYOUNGGUN53 Offline
enthusiast
THEYOUNGGUN53  Offline
enthusiast

Joined: Feb 2009
Posts: 246
middleOnowhere CA
you did a great job on that wheel arch, the whole car looks fantastic! Thats one of the best shines I've seen!

whats your secret?


a car is never "done"
Re: New Paint job on a budget thread Part III [Re: THEYOUNGGUN53] #39037
09/19/09 03:48 PM
09/19/09 03:48 PM
Joined: Sep 2009
Posts: 52
Cornfields of Illinois
R
RoboGeek Offline
member
RoboGeek  Offline
member
R

Joined: Sep 2009
Posts: 52
Cornfields of Illinois
sweat equity..
Its all in how you wet sand it and rub it out. Unfortunately my camera makes it look kinda pinkish, but its basically fire engine red.

And I really could have gone to 1200 grit for an even better shine. But the car had massive clear coat failure and surface rust over the whole thing in addition to the rotted panels. All I wanted was for it to not be embarrassing to drive - wifey wouldn't even ride in it before! And it was her car she bought brand new in 93!

I had some pics of the sunset reflecting that looked really cool, except the low light made the images look grainy.


Little better image of the wheel well (ignore the ugly dude and uncleaned bumper cover)


Re: New Paint job on a budget thread Part III [Re: RoboGeek] #39038
09/19/09 05:29 PM
09/19/09 05:29 PM
Joined: Sep 2008
Posts: 14
usa
A
aussie Offline
member
aussie  Offline
member
A

Joined: Sep 2008
Posts: 14
usa
What a transformation , that paint looks really nice.

Re: New Paint job on a budget thread Part III [Re: aussie] #39039
09/20/09 05:13 AM
09/20/09 05:13 AM

A
Anonymous
Unregistered
Anonymous
Unregistered
A


Gorgeous finish. Looks like it came out of a professional booth. No, sorry - it looks like it has been restored by someone with a passion!

I have been looking to see if it is possible to roller or brush the modern 2K car paints in the same way and have posted in the forum today "Can you Roller or Brush 2K paints". Maybe give it a look sometime?

Re: New Paint job on a budget thread Part III [Re: RoboGeek] #39040
09/21/09 02:12 PM
09/21/09 02:12 PM

A
Anonymous
Unregistered
Anonymous
Unregistered
A


Quote:

5. THIN!! I can't say it enough! The thinner a coat you apply, the smaller the orange peel, and the less sanding you'll have to do


I hear you -- and many, many others -- who recommend really thing coats. I don't doubt that's important.

But can you go too thin? A few times I've squeezed so much paint out of the roller, it goes on blotchy and ends up being matte. It seems like there's simply not enough paint on there for it to level. Could that be the case? Maybe one needs to put as little as possible paint, yet still enough that it can level?

Re: New Paint job on a budget thread Part III #39041
09/21/09 04:51 PM
09/21/09 04:51 PM
Joined: Sep 2009
Posts: 52
Cornfields of Illinois
R
RoboGeek Offline
member
RoboGeek  Offline
member
R

Joined: Sep 2009
Posts: 52
Cornfields of Illinois
the way I did it was to put it on thin and even, then roll over the top different directions with just the weight of the roller doing the work to make it perfectly uniform thickness. It smoothed it so good I never had to worry about it leveling. It also made the orange peel much finer.

The first coats I did bit thicker - I was experimenting a bit. But I ended up sanding most of what I applied to get it smooth again. Then I tried different mixtures and thats when I found 50/50, 6" rollers and thin coats smoothed the way I outlined worked perfect.

This paint method is basically foolproof. Once you have the needed thickness, what makes it look so smooth is the sanding. The polishing brings out the shine - but I'm sure everybody knew that already.. lol

Re: New Paint job on a budget thread Part III [Re: RoboGeek] #39042
09/21/09 07:52 PM
09/21/09 07:52 PM
Joined: Sep 2009
Posts: 66
NY
J
joeshmo Offline
member
joeshmo  Offline
member
J

Joined: Sep 2009
Posts: 66
NY
Quote:

the way I did it was to put it on thin and even, then roll over the top different directions with just the weight of the roller doing the work to make it perfectly uniform thickness. It smoothed it so good I never had to worry about it leveling. It also made the orange peel much finer.

The first coats I did bit thicker - I was experimenting a bit. But I ended up sanding most of what I applied to get it smooth again. Then I tried different mixtures and thats when I found 50/50, 6" rollers and thin coats smoothed the way I outlined worked perfect.

This paint method is basically foolproof. Once you have the needed thickness, what makes it look so smooth is the sanding. The polishing brings out the shine - but I'm sure everybody knew that already.. lol


My problem with ultra-thin coats is this:
In order to apply another layer you have to sand off the gloss right? Well when I sand off the gloss it seems as though all the paint I had just applied is gone. I see miniscule improvements after 2 coats and after sanding my blotchy(yet smooth) base coat of primer shows through again. Is it necessary that ALL the shine be gone to apply another layer? I guess I don't have this wet sanding thing down quite yet.

Re: New Paint job on a budget thread Part III [Re: joeshmo] #39043
09/21/09 11:12 PM
09/21/09 11:12 PM
Joined: Aug 2009
Posts: 51
CA
P
Peckinpah Offline
member
Peckinpah  Offline
member
P

Joined: Aug 2009
Posts: 51
CA
Yeah, tell me about it. I had the same problem. That's why i was thinking it might be better to get all 8 or 10 of your layers down before you start wet sanding.

I spent countless hours sanding off the paint I had just applied, only to end up with about as much paint as I had before I started sanding. Or even less, in the spots where I sanded all the way through to the primer.

Re: New Paint job on a budget thread Part III [Re: RoboGeek] #39044
09/22/09 12:51 AM
09/22/09 12:51 AM

A
Anonymous
Unregistered
Anonymous
Unregistered
A


Quote:

the way I did it was to put it on thin and even, then roll over the top different directions with just the weight of the roller doing the work to make it perfectly uniform thickness. It smoothed it so good I never had to worry about it leveling. It also made the orange peel much finer.


Did you also squeeze out most of the paint by rolling the brush hard on the ridges? how many rolls would you do if so?

Re: New Paint job on a budget thread Part III #39045
09/22/09 03:02 PM
09/22/09 03:02 PM

A
Anonymous
Unregistered
Anonymous
Unregistered
A


Satin Black Question: Okay, I've never worked with Satin Black Rust Paint, and I've painted my RR Bulge Hood, front valence, and 1/2 the roof the satin black. I used this method, roller method, fifty percent mineral spirits, and sanded in between coats.

I now have a very slick surface, no orange peel, no drips, no runs on the areas where I wanted a matte black appearance and it looks good. I do have a few small dings that showed up in the black that I didn't see with the primer layers, and this weekend I'm getting some body glaze to fill those in and repaint.

I've never seen a car with matte/satin black, so I'm not familiar with the surface of the paint at the end result. I'm treating this more like a primer and not wet sanding. Just sanding down the orange peel and sometimes the runs with increasingly finer grits of sandpaper. All in all, it's a very level, evenly covered surface that feels smooth as silk, but without the gloss of the high gloss paints.

Is this the end result I want for matte black, or should it feel like an unsanded surface, rough to the touch? Will I have to polish with an orbital polisher? Again, at the tender age of 52, I've never seen a matte black surface on a car.

Stupid questions I know, but man, I'm stoked with the look.

Re: New Paint job on a budget thread Part III #39046
09/22/09 06:09 PM
09/22/09 06:09 PM
Joined: Sep 2009
Posts: 52
Cornfields of Illinois
R
RoboGeek Offline
member
RoboGeek  Offline
member
R

Joined: Sep 2009
Posts: 52
Cornfields of Illinois
another old fart.. lol

btw.. if your interested, there is a forum dedicated to rolled on paint jobs.

http://www.rolledon.com/forum.htm

hate to spam another forum, but lots of good resources there

Re: New Paint job on a budget thread Part III [Re: RoboGeek] #39047
09/22/09 06:48 PM
09/22/09 06:48 PM
Joined: Aug 2009
Posts: 51
CA
P
Peckinpah Offline
member
Peckinpah  Offline
member
P

Joined: Aug 2009
Posts: 51
CA
Hey, that's a good idea to start a forum on the subject, I just wish he hadn't gone for the "all black" look on his board. I hate trying to read sites like that which a black background and white type.

Seems like it takes twice as much effort to read every sentence.

Re: New Paint job on a budget thread Part III [Re: Peckinpah] #39048
09/22/09 07:04 PM
09/22/09 07:04 PM
Joined: Sep 2009
Posts: 52
Cornfields of Illinois
R
RoboGeek Offline
member
RoboGeek  Offline
member
R

Joined: Sep 2009
Posts: 52
Cornfields of Illinois
yeah.. not a fan of black websites either.. but there are some really good paint jobs there, as well as some that should have never touched a car!! Good for the comical value.

The guy that won his class at the Street Rod Nationals in St Paul this year got Rustoleum interested enough to figure out there are a ton of people doing this kind of paintjob. So maybe they might come out with some more specialized paint for us..

Or some varieties in colors anyway...

Re: New Paint job on a budget thread Part III [Re: RoboGeek] #39049
09/22/09 08:12 PM
09/22/09 08:12 PM
Joined: Sep 2009
Posts: 66
NY
J
joeshmo Offline
member
joeshmo  Offline
member
J

Joined: Sep 2009
Posts: 66
NY
Does anyone have any advice for me as to fixing several small chips that still show through even AFTER a coat of primer and 3 coats of black paint? I was thinking bondo but these chips are extremely small and I doubt I could make them look all that great with bondo due to the way it has to be applied. I heard something about a glazing compound or something? Should I give that a try? I tried using duplicolor filler primer but its messy and I get overspray and ect... Any advice?

Re: New Paint job on a budget thread Part III [Re: joeshmo] #39050
09/22/09 09:21 PM
09/22/09 09:21 PM
Joined: Sep 2009
Posts: 52
Cornfields of Illinois
R
RoboGeek Offline
member
RoboGeek  Offline
member
R

Joined: Sep 2009
Posts: 52
Cornfields of Illinois
glaze is basically thick primer in a tube - its great for deep scratches, chips, etc.
It dries fast, but it also shrinks and cracks if its too thick, so you want to do several layers.

My car chases storms, so I had to fill a few hail dents that way. They were too shallow for bondo, and I was on a budget.. lol
I have a ton of pics on facebook from start to finish that shows how bad the car really was. I don't think they will show unless your a friend though...

linky if it does work..

http://www.facebook.com/album.php?aid=2011608&id=1596698065

if not, let me know and I'll add anyone interested in seeing it

Re: New Paint job on a budget thread Part III [Re: RoboGeek] #39051
09/24/09 01:20 AM
09/24/09 01:20 AM
Joined: Feb 2009
Posts: 246
middleOnowhere CA
THEYOUNGGUN53 Offline
enthusiast
THEYOUNGGUN53  Offline
enthusiast

Joined: Feb 2009
Posts: 246
middleOnowhere CA
I've switched from 400 grit wet sanding to 1000 grit and thinned the paint out a little more than I have been and it made a giant difference!!


a car is never "done"
Re: New Paint job on a budget thread Part III [Re: THEYOUNGGUN53] #39052
09/24/09 09:19 AM
09/24/09 09:19 AM
Joined: Aug 2009
Posts: 51
CA
P
Peckinpah Offline
member
Peckinpah  Offline
member
P

Joined: Aug 2009
Posts: 51
CA
I take it these pictures are from before wet sanding, since the paint is so shiny. Are you using Brightside or Rustoleum? What type of mineral spirits?

Whatever you're doing, it seems to be going very well.

Re: New Paint job on a budget thread Part III [Re: Peckinpah] #39053
09/24/09 11:27 PM
09/24/09 11:27 PM
Joined: Feb 2009
Posts: 246
middleOnowhere CA
THEYOUNGGUN53 Offline
enthusiast
THEYOUNGGUN53  Offline
enthusiast

Joined: Feb 2009
Posts: 246
middleOnowhere CA
yep, this is before wet sanding. Its Rustoleum and a lot of patience


a car is never "done"
Page 137 of 167 1 2 135 136 137 138 139 166 167


Powered by UBB.threads™ PHP Forum Software 7.7.1