|
 Re: New Paint job on a budget thread Part III
[Re: dodgeram440]
#38874
Re: New Paint job on a budget thread Part III
[Re: dodgeram440]
#38874
08/01/09 08:25 PM
08/01/09 08:25 PM
|
Anonymous
Unregistered
|
Anonymous
Unregistered
|
hey barry i was an earlier member years ago and i painted my chevelle with rusto and it looks good trust me i have a yellow and black combo 
|
|
|
Re: New Paint job on a budget thread Part III
[Re: wvmarv]
#38875
08/01/09 10:16 PM
08/01/09 10:16 PM
|
Joined: Dec 2003
Posts: 2,042
Leucadia, Ca.
vdriver

top fuel
|
top fuel
Joined: Dec 2003
Posts: 2,042
Leucadia, Ca.
|
Quote:
This a mopar site. We don't care about that other junk.
Completely uncalled for.  There have been owners of LOTS of different makes involved in this thread, and as stated, the most helpful is a Mustang guy. There have been owners of LOTS of different makes involved in this thread, and as stated, the most helpful is a Mustang guy.
|
|
|
Re: New Paint job on a budget thread Part III
#38876
08/01/09 11:39 PM
08/01/09 11:39 PM
|
Joined: May 2006
Posts: 575
Canada
Marq
mopar addict
|
mopar addict
Joined: May 2006
Posts: 575
Canada
|
Quote:
I am new here and a Chevy owner (69 Chevelle). Just looking for opinions on the color combo. When I got the car in 85 it was black/parchment.
Almond white looks clean and sharp. I would probably go that route then 'yet another black' one... And best of all... the almond white combo will bounce heat, hide dust and bird droppings... and is the most forgiving for any imperfections during the painting process.
White with parchment works for me... and reminds me of the color combo on the 70's Z-28s..
.
|
|
|
Re: New Paint job on a budget thread Part III
[Re: THEYOUNGGUN53]
#38878
08/02/09 04:10 AM
08/02/09 04:10 AM
|
Anonymous
Unregistered
|
Anonymous
Unregistered
|
hi guys i am back the cheap export spray cans was a bad idea so i will now be going brightside black.
|
|
|
Re: New Paint job on a budget thread Part III
#38879
08/02/09 01:14 PM
08/02/09 01:14 PM
|
Anonymous
Unregistered
|
Anonymous
Unregistered
|
I used to kinda be that way too. If it wasn't a Chevelle, it was junk. I understand that, and also expected to see it sooner or later. Now I want at least one of everything and will go to any kind of car show and drool.
The reason I went ahead and began rolling the car is because I didn't want to spend a ton of money to have it painted and then hate the color. I know myself, and if I got it home and didn't like it, I would probably go out in the garage at 2am and start sanding because I wouldn't be able to stand it.
I've had the car since I was 17 (1985) and will give it to one of my kids one of these days. Resale value is of no interest, but part of me thinks that since it is an original big block car, and the #'s match, I should put it back to like new condition. Part of me wants to put it back like it was when I bought it and fell in love with it to "yet another black one", and there are a lot of them. Also, I have never personally seen another Dover White/Parchment one. Very few people I've talked to have.
I am incredibly surprized at how well the roller paint job can turn out and REALLY appreciate the information here and owe the man with the orange 69 Charger a big thanks for getting it all started.
|
|
|
Re: New Paint job on a budget thread Part III
#38880
08/02/09 06:08 PM
08/02/09 06:08 PM
|
Joined: Feb 2006
Posts: 2,590
Piqua, Ohio
dodgeram440
master
|
master
Joined: Feb 2006
Posts: 2,590
Piqua, Ohio
|
Quote:
I used to kinda be that way too. If it wasn't a Chevelle, it was junk. I understand that, and also expected to see it sooner or later.
That's cool. I think maybe the longer members here may have been offended by the other guys comments. I know I was. Over three incarnations of this topic, I don't know of anyone else who has ever been so narrow minded as this guy. And that's after people have posted about their Toyota's, Honda's, VW's, Saab's, and whatever they drive over in other countries. All have been welcomed. I'm sure glad this guy doesn't speak for me. 
YoungGun, I'm not a real big fan of Bug's, but I've seen some pretty cool ones over the years. I remember a couple from when I lived in Phoenix. One was a Baja Bug with a 455 Olds with the transaxle mounted in the back!  And another was a custom shorty Bug with a one piece nose and a one piece fiberglass roadster body. You lifted the nose, then tilted the body forward to get to the engine. I may have some pics around. I'll have to see if I can find them and post them for you, if you want. And another was a custom shorty Bug with a one piece nose and a one piece fiberglass roadster body. You lifted the nose, then tilted the body forward to get to the engine. I may have some pics around. I'll have to see if I can find them and post them for you, if you want.
|
|
|
Re: New Paint job on a budget thread Part III
#38881
08/02/09 07:45 PM
08/02/09 07:45 PM
|
Joined: May 2006
Posts: 575
Canada
Marq
mopar addict
|
mopar addict
Joined: May 2006
Posts: 575
Canada
|
Quote:
I have never personally seen another Dover White/Parchment one. Very few people I've talked to have.
I am incredibly surprized at how well the roller paint job can turn out and REALLY appreciate the information here and owe the man with the orange 69 Charger a big thanks for getting it all started.
I think we all have gone through the 'great color debate' in our minds. My McLaren Mustang... came from the factory black, was converted by ASC McLaren and painted a bright red... a subsequent owner painted the car back to black... I got my hands on it and I went through the same 'color debate' in my mind.
In the end... I took the car back to Fire Red... because I didn't want to endure the hassles and patience required to get things to a level of perfection required for black.
BUT in my heart... the color I truly want on that car is the Ford Mineral Gray that they used on the 2007 Mustangs. Because in my heart I really believe that ultimately you need to slap a color on to the car that PLEASES YOU ! To h*ll with purist who will turn up their snoot if it is not a concours matching color... To h*ll with folks who might not like YOUR CHOICE of color. The bottom line is to do whatever satisfies you. Your the dude that has to pay the bills... so who is a stranger or family to tell YOU what color 'it should be'.
At some point in the future... when money is a plenty and I can afford it... my car will ultimately lose it's 'roll your own' paint job and graduate to the genuine Ford Mineral Gray paint job done in the top of the line polyurathane. BUT until that magic bag of money drops in to my lap, I am more then pleased to enjoy my ride in its 'roll your own' Fire Red. Chicks dig red sportscars anyhow 
Another thing to think about regarding color choices... is that the color palettes of various cars over the years has been overly influence by Detroit designers who in some fashionable way DICTATE to the market ( consumers ) what color YOU may have.
Sadly these Detroit fashion designers did not always make available the colors that were most flattering for the particular body line or look of a car. That is the beauty of paint shops ( or even within the limited color palette of the roll-your-owns' in that we can use colors that were not made available.
In the end... we should all fall back to the immortal words of William Shakespeare... who said : " To thine own self be true "... and that in a nutshell sums it all up... do what pleases you...
.
|
|
|
Re: New Paint job on a budget thread Part III
[Re: Marq]
#38882
08/02/09 08:32 PM
08/02/09 08:32 PM
|
Joined: Feb 2009
Posts: 246
middleOnowhere CA
THEYOUNGGUN53
enthusiast
|
enthusiast
Joined: Feb 2009
Posts: 246
middleOnowhere CA
|
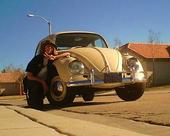
in the very far future I plan on stuffing in a 2.0 Porsche 914 engine in it. The car only weighes about 1000lb so power to weight ratio will make it insane, way more than I need!
but for now I love it, even my Shelby driving dad likes it. The only thing I can compare driving a VW to would be like driving a go cart at the fair. Not to mention they have really tourqey bottom ends.
a car is never "done"
|
|
|
Re: New Paint job on a budget thread Part III
[Re: THEYOUNGGUN53]
#38883
08/03/09 02:26 PM
08/03/09 02:26 PM
|
Joined: Aug 2007
Posts: 20
MN
tsbrewers
member
|
member
Joined: Aug 2007
Posts: 20
MN
|
Quote:
The only thing I can compare driving a VW to would be like driving a go cart at the fair.
growing up VW's were some of the only cars we could afford. Unfortunately, comparing it to a go cart is pretty much dead on.
Yes we even had a bug that my dad drove to work for a few years. He would have to dress in his hunting gear to stay warm enough in the winter, especially since he had to drive with the window down so he could scrape the outside of the windshield while he drove.
Brew
|
|
|
Re: New Paint job on a budget thread Part III
[Re: tsbrewers]
#38884
08/03/09 04:24 PM
08/03/09 04:24 PM
|
Joined: Feb 2009
Posts: 246
middleOnowhere CA
THEYOUNGGUN53
enthusiast
|
enthusiast
Joined: Feb 2009
Posts: 246
middleOnowhere CA
|
lol, yeah the defrosters aren't to up to date on these cars. Considering they are 1930's technology.  I still like em none the less, my mom was the same way. Every one in her family always had VW's. She said they weren't as cool as they are now. Just basic transportation.
a car is never "done"
|
|
|
Re: New Paint job on a budget thread Part III
[Re: THEYOUNGGUN53]
#38885
08/04/09 08:09 PM
08/04/09 08:09 PM
|
Joined: Feb 2007
Posts: 13
Beaverton, OR
StevesBug
member
|
member
Joined: Feb 2007
Posts: 13
Beaverton, OR
|
Here�s an update. I finished my 69 Bug with Rustoleum in August 2007. It has lived mostly outside since then, and been in daily use. It�s had one wax job, and nothing special as far as care. The paint still looks great, the car gets lots of compliments, and I�m a happy camper. Couple months ago it got swiped on the front fender ( my wife!), so I pulled the fender, straightened it out, 4 coats of paint and it looks terrific.  This is a great way to make your car look decent at a very reasonable cost. You are trading your time for money, but it�s been a good deal for me.
|
|
|
Re: New Paint job on a budget thread Part III
[Re: StevesBug]
#38886
08/06/09 09:01 AM
08/06/09 09:01 AM
|
Joined: Aug 2009
Posts: 51
CA
Peckinpah
member
|
member
Joined: Aug 2009
Posts: 51
CA
|
OK, I spent about a week using the roller method to paint my truck, and here's how it went.
DAY 1
I decided to go with the Gloss White, since I would not have to worry about it fading too much. I spent an entire day prepping, namely taping around the headlights, tail lights, and grill and rubber around the windows. Then I got some 120 grit sandpaper and went over the entire truck, then 220, then 400. Then i wiped the truck down with a damp cloth (probably should have used mineral spirits though). That was a lot of work, and I assumed the worse was over.
DAY 2
The next day, I mixed up some primer with the gloss white, about 50-50 (in hindsight, I think this was dumb and feel I should have used straight primer) Then I thinned the mix out with mineral spirits, to about the consistency of milk. It was around 105 degrees that day, so the paint did not need a whole lot of thinning. I think I used between 1/2 and 1/3 mineral spirits. So I put on the first coat.
I had previously done a test section on the inside of my tailgate which yielded some impressive results once wet sanded. However, I found that the paint ran like crazy when applying it to the sides of the truck. Also, many drips would occur several minutes after the paint had been applied, while I was working on a different panel. So needless to say, I got a ton of drips, probably due mostly to putting the paint on too thick. I figured (wrongly) I could just sand out the drips the next day. After this coat dried, I applied a second coat and let it dry overnight.
I saw a lot of orange peel finish before going to bed, but assumed it would level out. It didn't.
DAY 3
I could see the paint was obviously not dry, so I gave it an extra day to dry.
DAY 4
I got out some 600 grit paper and tried wet sanding, but soon discovered that the paint was still only partially dry. And the drips (which I most wanted to sand down) were quite rubbery and could be scored easily with my fingernail. When I tried to sand them, I ended up sanding off all the paint around the drip, plus clogging up the sandpaper. Also, the paint went on quite rough and failed to "level out" like i expected. Also, in addition to drips, I had roller marks everywhere, plus terrible orange peel texture. The roller marks were a nightmare to try to sand down, probably more difficult than the drips.
So I smoothed out the paint the best I could and went through about 10 sheets of wet/dry sandpaper of various grits. Some places I had sanded right through to the undercoat, and there were so many drips and roller marks that it would have taken days (and most of the paint I had just applied) to smooth out every single one.
So I mixed up some paint and mineral spirits for coat # 3, assuming that the new paint would smooth over some of the orange peel and mistakes I made on coats #1 and #2, but nothing doing.
You could see every little imperfection, and the original factory paint was still showing through in lots of places (probably my fault for going from factory metallic blue to white). Worse yet, the Rustoleum / mineral spirits mix seemed to be beading right off an areas where the factory paint had been exposed by excessive wet sanding. VERY frustrating.
Also, I can't emphasize enough how important it is to lay down your first two coats smoothly, without roller marks or drips. Applied coat # 4 that night.
DAY 5
Another wet sand, still using 400 grit paper. I took off a ton of paint I had applied the day before, and tried as hard as I could to smooth everything out and spent a good 6 hours wet sanding. Both hands had blisters and I kept getting blood on the white paint from my hands, so i had to wear plastic gloves to prevent this from happening.
I was determined to have a smooth finish for coats #5 and #6, and I think I accomplished this. However, I still got nasty orange peel and roller marks, no matter how careful I was. I did develop a game I would play in my head, to keep from applying too much paint. I would tell myself that the paint coat $1000 an ounce, and my goal was to use as little of it as possible. This worked well to keep me from putting the paint on too thick.
So applied coats #5 and #6, which were supposed to be the last ones, but there were still spots showing through. I stupidly hit the exposed spots with primer white just before painting, but the primer, being slightly darker was now showing through quite badly. So I decided I was going to need 8 coats total instead of 6.
DAY 6
More wet sanding, applied coats #7 and #8.
This was a week ago, and I'm still waiting for the paint to FULLY dry before I do the final wet sand. Meanwhile, I bought a can of spray on Gloss White and have been touching up the door jambs and I took the bed off and sprayed in between the bed and the cab. It looks fine now because it's pretty dark in there and you can't tell it was sprayed on. BTW, the spray-on paint goes on A LOT smoother than I was ever able to get the regular paint to go on.
So all in all, this was a hell of a lot more work than I anticipated, and the drying time of the paint has been a major headache, along with the roller marks and orange peel finish. So I don't know if I would recommend this method unless you have a huge big chunk of time on your hands.
I never did see this "self leveling" phenomenon occur. The paint went on about as smooth as interior paint in your house does with a roller (maybe a little smoother). I was not impressed at all, and the wet sanding is an absolute nightmare.
If I had it to do over again, I think I would take extraordinary care to lay the paint on smoothly, and just put on 6-8 coats. Then let it dry for a week to 10 days and then worry about wet sanding. Because I kept losing all the smoothness I had gained each time I put on a new coat. All that wet sanding between coats was totally wasted effort, I thought
Last edited by Peckinpah; 08/06/09 09:06 AM.
|
|
|
Re: New Paint job on a budget thread Part III(help!)
[Re: Peckinpah]
#38887
08/06/09 08:17 PM
08/06/09 08:17 PM
|
Joined: Aug 2009
Posts: 6
Indianapolis IN
Jones0007
member
|
member
Joined: Aug 2009
Posts: 6
Indianapolis IN
|
Hi, I've been reading a lot on this forum, and i really wanna do this to my Van, which is yellow on top and white on bottom, I was reading a lot about the method(the 50$ with RUSTALEUM), but i'm not exactly sure what materials to use. I'm not sure if I wanna use Primer(which one??), and after that i'm not sure about the using rollers, i found this and wondered if this would substitute all(primer,mix): http://www.homedepot.com/webapp/wcs/stor...amp;R=100670334plz help!!
|
|
|
 Re: New Paint job on a budget thread Part III
[Re: Peckinpah]
#38888
Re: New Paint job on a budget thread Part III
[Re: Peckinpah]
#38888
08/06/09 08:24 PM
08/06/09 08:24 PM
|
Anonymous
Unregistered
|
Anonymous
Unregistered
|
This is UNREAL! I laid out coats 4 and 5 on the hood, trunklid and fenders of my Chevelle, thinned it so much I was scared and after it sat for about 20 minutes, it looks GREAT! My earlier coats were too thick and had orange peel about like DuPont Centari used to. I took my time wetsanding and thinned the paint more and there is NO orange peel and no runs. It is very humid in the St Louis area right now, and the only bad spots are where sweat hit the paint. I figure 2-3 more coats and it should look beautiful. I can't thank you all on this board enough.
|
|
|
Re: New Paint job on a budget thread Part III(help!)
[Re: Jones0007]
#38889
08/06/09 08:28 PM
08/06/09 08:28 PM
|
Anonymous
Unregistered
|
Anonymous
Unregistered
|
My roof was bare sandblasted metal, my quarters and fenders had the factory primer that new sheet metal comes with and my doors, hood and trunklid had $1400 worth of bodywork, primer and white sealer on them. There is NO difference in how the paint turns out. The primered parts looked like they covered better at first becaust the primer was white, but once you get about 4 coats on, there is no difference. Unless you are smoothing something out with a high build primer, don't waste the time. Spend 10 bucks on a package of 10 high density foam rollers, get the mineral spirits and a gallon of whatever color you want and go to town.
Last edited by barry13; 08/06/09 08:31 PM.
|
|
|
Re: New Paint job on a budget thread Part III(help!)
[Re: Jones0007]
#38891
08/06/09 09:30 PM
08/06/09 09:30 PM
|
Anonymous
Unregistered
|
Anonymous
Unregistered
|
I don't know that I would say it's a "no no" at all, as long as it's compatable. I know that there has always been a general "rule" drilled inot all of our heads that you have to primer everything, but it doesn't apply with this paint. Look at 69Charger's original posts and he said it over and over, "no need to primer with this paint", and he was right, you can go direct to metal with it, or paint over primer, paint, etc.
|
|
|
Re: New Paint job on a budget thread Part III(help!)
#38892
08/07/09 02:02 PM
08/07/09 02:02 PM
|
Joined: May 2006
Posts: 575
Canada
Marq
mopar addict
|
mopar addict
Joined: May 2006
Posts: 575
Canada
|
Quote:
I don't know that I would say it's a "no no" at all, as long as it's compatable. I know that there has always been a general "rule" drilled inot all of our heads that you have to primer everything, but it doesn't apply with this paint. Look at 69Charger's original posts and he said it over and over, "no need to primer with this paint", and he was right, you can go direct to metal with it, or paint over primer, paint, etc.
Actually the rule of thumb about whether to use primer or not......
a ) if you have a car of many colors - it pays to primer the car all to one uniform color. It just makes the later painting easier and more evenly colored as you proceed. It could save you the effort of one or two painted coats later...
b ) if you have a relatively rough sanded surface to start with - you might use the primer to build up the surface so that it can be sanded smooth. The idea being that the smoother the starting surface, the better the paint will apply and the shinier the end product.
Otherwise, the Brightside paint or the Rustoleum/Tremclad paint can go directly on without a primer. Basically both paints seal out the oxygen from getting to the exposed metal ( if there is any ) and that does the anti-rust function of a primer.
.
Last edited by Marq; 08/07/09 02:04 PM.
|
|
|
|
|