|
 Re: Flat black rolling
#38134
Re: Flat black rolling
#38134
04/05/08 08:18 PM
04/05/08 08:18 PM
|
Joined: Jan 2003
Posts: 12,405
Southern, Ca.
69DartGT
 OP
OP
moparts member
|
OP
moparts member
Joined: Jan 2003
Posts: 12,405
Southern, Ca.
|
Quote:
I've started rolling flat black onto my car, is there a certain way to roll it so you don't see the outlines of the roller after it dries? Or is that part of the process?
Practice practice practice, I found after I'd rolled a couple of coats on I got much better at leaving those lines out, I overlapped a tad also.
How many coats so far?
|
|
|
Re: Flat black rolling
[Re: 69DartGT]
#38135
04/05/08 08:38 PM
04/05/08 08:38 PM
|
Anonymous
Unregistered
|
Anonymous
Unregistered
|
Quote:
Quote:
I've started rolling flat black onto my car, is there a certain way to roll it so you don't see the outlines of the roller after it dries? Or is that part of the process?
Practice practice practice, I found after I'd rolled a couple of coats on I got much better at leaving those lines out, I overlapped a tad also.
How many coats so far?
thats what I thought, pratice and more pratice. So far only around 3 for my trunck, 4 for my roof, and 1 big thick layer on my hood, I mean thick, I've been using a 220 grit paper with water to take it down again and smooth it out. My hood was my first go at it and I put too thick of a layer on it, I thought you were suppose to make it so it doesn't show the bottom paint. My friend said it might show though up to 4-6 coats later.


|
|
|
Re: Flat black rolling
#38136
04/05/08 10:02 PM
04/05/08 10:02 PM
|
Joined: May 2006
Posts: 575
Canada
Marq
mopar addict
|
mopar addict
Joined: May 2006
Posts: 575
Canada
|
Quote:
...thats what I thought, pratice and more pratice. So far only around 3 for my trunck, 4 for my roof, and 1 big thick layer on my hood, I mean thick, I've been using a 220 grit paper with water to take it down again and smooth it out. My hood was my first go at it and I put too thick of a layer on it, I thought you were suppose to make it so it doesn't show the bottom paint. My friend said it might show though up to 4-6 coats later.
The problem with the world is that when we are painting things... like walls, bikes, tractors and patio furniture we expect to nail it in one or two coats. And that is kewl for those types of items.
But to do a car paint job with the roller, you need to lay down coats of paint that are thinned down with mineral spirits in order to achieve self-leveling. For the paint rolling job... self leveling is our first priority and the color coverage is simply something that we acquire as we lay on our layers of leveled paint.
And that means that with the roller jobs YOU MUST EXPECT to take four or five coats of thinned paint to achieve color coverage.
The paint coverage comes from the amount of pigment in the paint you are rolling on. So simply imagine it this way... IF each coat of thinned paint is only equal to 25% pigment coverage... then the first coat that is laid down with be almost see through ( since there is only 25% of the color pigment in what has been laid down.
When you add your second coat of paint... you now have gotten 50% pigment coverage ( 25% from the first coat and 25% from the second coat ). You will still see through the paint to the original paint that you are painting over BUT it will be slightly tinted more towards the color you are trying to achieve.
When you add your third coat of paint... you now have gotten to 75% pigment coverage... fourth coat... gets you to about 100% pigment coverage... fifth coat gets you to about 125% pigment coverage etc.
But you also have been doing some wet sanding between every second coat and that DEDUCTS a percentage of the pigment coverage up to that point.
So the bottom line is that you are slowly building up your layers of percentage coverage to finally reach a true 100% or higher coverage.
NOW... with regards to the flat paint and lines. It probably is the result of the paint mixture being slightly too thick. Thin the paint mixture down a bit so that you are not getting so much pigment color coverage with each applied coating.
As well... when laying on a coat... feather the paint over the demarcation line of where your rolling is at. Basically what I am saying is that if your paint is sufficiently thinned, you should be able to overlap the last area you just had laid down. I had to do the same thing with the high gloss paint... feathering each section with the previous just rolled area.
NOW the other thing that I found important in reducing lines is how I loaded and unloaded the foam roller before applying the paint. What I tended to do is this : I would roll the roller around in the paint tray to load up the paint on to the roller. THEN I would slighly unload some of the paint off the roller in the tray. THEN I would tilt my roller and apply a little extra pressure while rolling the roller in the tray to more significantly reduce the amount of paint on the end or tip of the foam roller. THEN I would tip the foam roller the other way to reduce the amount of paint on the opposite end of the foam roller.
00000000000000 if this is the foam roller
XXX00000000XXX I would have applied more pressure while the roller was in the tray to the end tips.
The whole point to this being to reduce any excess paint at the ends of the roller and leave the greater concentration of paint in the middle of the foam roller.
SO... when I actually put the roller on the car and start spreading the fresh paint, it is the center of the roller that is primarily spreading out the paint. And as you roll it back and forth on the panels surface, the paint from the center of the roller will spread out to the tips to give you coverage.
This quirky method of loading up your roller and then unloading the tips will greatly reduce the chances of a concentration of paint at the end of the tips building up and producing those lines.
WHAT you see in your picture of your roof.. are lines that were created when the paint at the end of the tips was laid down in a higher concentration then at the center of the roller. AND when you laid down the next section of paint, the concentration of paint at where you overlapped, basically double or tripled the concentration or percentage of color pigment where the overlap occurred.
As long as the paint self leveled out, it would eventually disappear and not be as noticable when all areas of the roof hit 100% color pigment coverage. You can have areas of 100% color pigment coverage and areas with a higher color pigment coverage and yet the EYE will only visually see 100%. BUT if the actually thickness of the paint at those overlap areas is thicker then you would still see the lines - NOT because of the amount of color pigment that is laying there, but because of the way light will defract differently against the two different thicknesses of paint on that surface. A light wet sanding might be in order to cut back any 'extra thickness' that has been built up so far and to give you one level starting point from which to continue with your build up of coats of paint.
Hope this info helps.
Marq
Last edited by Marq; 04/05/08 10:14 PM.
|
|
|
Re: Flat black rolling
[Re: Marq]
#38137
04/06/08 05:23 AM
04/06/08 05:23 AM
|
Anonymous
Unregistered
|
Anonymous
Unregistered
|
|
|
|
choice of paint
#38139
04/06/08 05:09 PM
04/06/08 05:09 PM
|
Anonymous
Unregistered
|
Anonymous
Unregistered
|
before i order the paint can someone please confirm
brightside is the ultimate choice for the best shine ??
i done my tests with combi color and the whole
self flatting process seems to be working fine
with minimal peel ,but of course if i can get a
better glos with brightside i would like to buy
that for doing the whole car ?
|
|
|
Re: New Paint job on a budget thread.
[Re: 69DartGT]
#38140
04/06/08 06:47 PM
04/06/08 06:47 PM
|
Anonymous
Unregistered
|
Anonymous
Unregistered
|
Hi Guys ! I see this thread keeps on going ! all good info ! for the newbies out there, keep it going, don't give up ! As I posted before I tried the rolling method and I liked it, but I have limited time and a bunch of cars to paint, so I decided to paint my cars using 2-3 Coats of rustoleum and then 2-3 coats of Brightside with a 10 dll. spray gun from Harbor Freight. Here's an update on my cars: The Mustang is almost done, It should've been done by now but limited time made me stop with only a few trim pieces to assemble to finish the exterior, the interior is another story. remember this car has EVERYTHING from a 2003 Mustang GT, EVERYTHING: Before: (4cyl. engine still there) 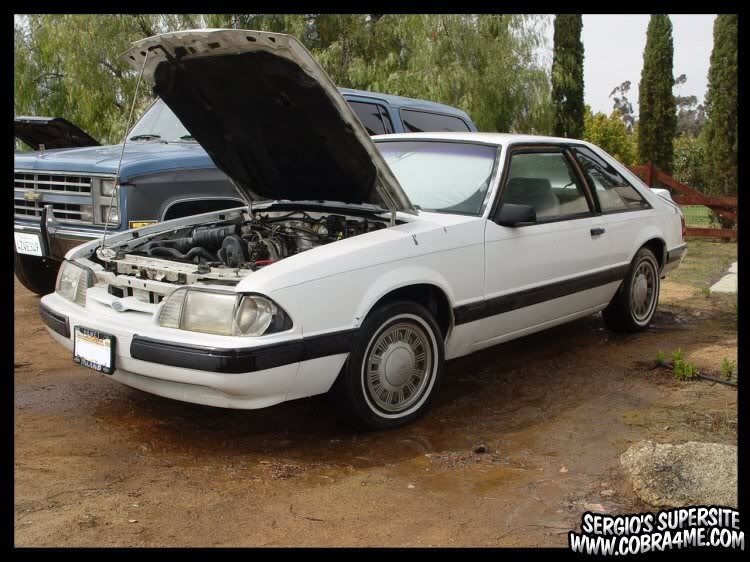 after: 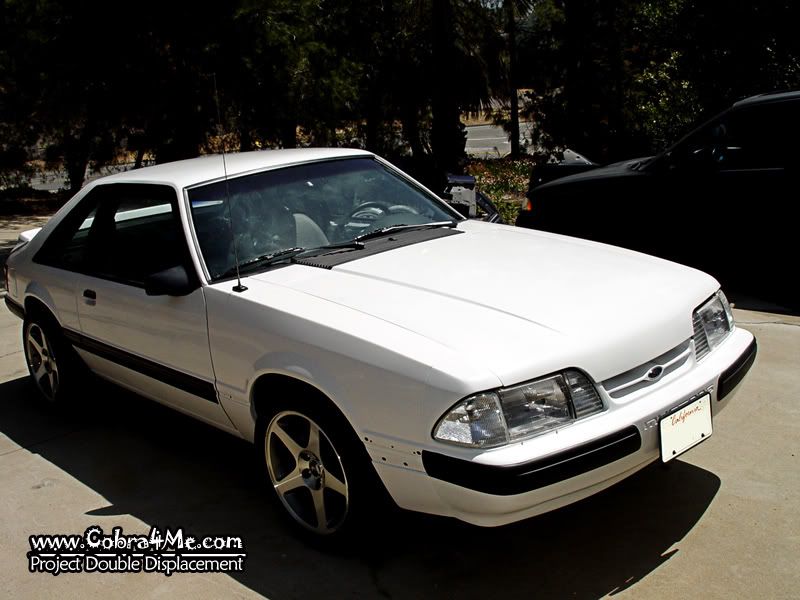 The whole story on this car is here: http://www.cobra4me.com/phpBB/viewforum.php?f=13All of the trim in the Mustang was painted Rustoleum Flat black. and then I decided to paint my 99 Subaru Legacy GT also, the Clearcoat was peeling badly, for this car I decided to paint it Flat Black after seeing how the flat black looked on the trim in the Mustang, and needing no wetsanding, just shoot and let it dry. Here's before: 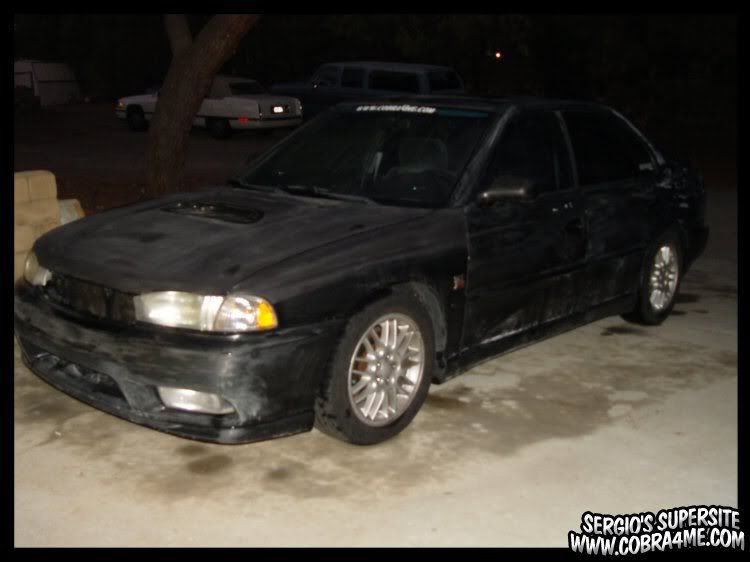 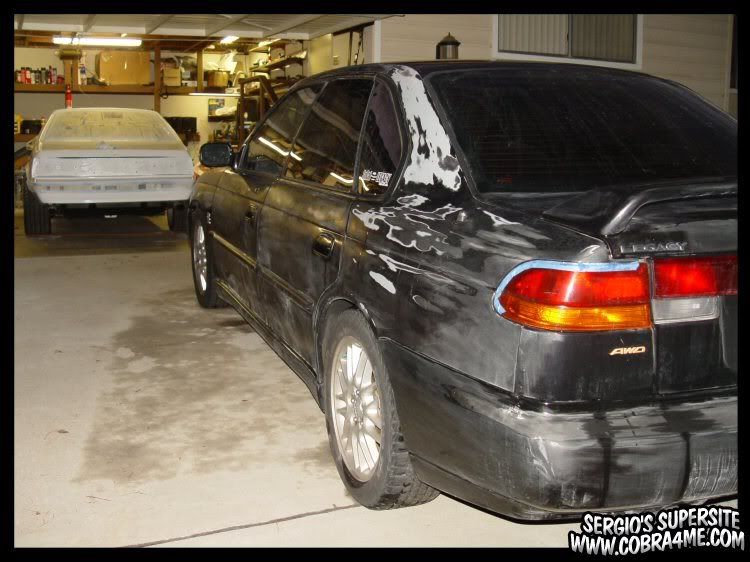 and after:  I even painted the rims ! Next is the Suburban in the background, I've decided to go also with Flat Black.
|
|
|
Re: choice of paint
#38141
04/06/08 09:03 PM
04/06/08 09:03 PM
|
Joined: May 2006
Posts: 575
Canada
Marq
mopar addict
|
mopar addict
Joined: May 2006
Posts: 575
Canada
|
Quote:
before i order the paint can someone please confirm
brightside is the ultimate choice for the best shine ??
i done my tests with combi color and the whole
self flatting process seems to be working fine
with minimal peel ,but of course if i can get a
better glos with brightside i would like to buy
that for doing the whole car ?
Rustoleum & Tremclad are enamel paint...
Brightside is a polyurathane paint...
Polyurathane is basically a plastic and has a naturally higher level of gloss built in to it...
BUT most importantly... the paint can only get you so far with a high shine and gloss. The real secret in the end rest with the final wet sanding, polishing, waxing and buffing.
In theory... in the hands of a good 'detail' man, you could paint your car with HOUSEPAINT and with the right wet sanding ( color sanding some folks call it ), polishing and final waxing and buffing you can make even it shine like a jewel. That is why there have been numerous discussions in this thread about the products to use when going for the final polishing stage etc.
My personal feeling is that the polyurathane wins when it comes to high gloss and shine. I think it takes less wet sanding and polishing to maximize its shine.
BUT above all, the key consideration with a polyurathane paint job is that in theory it is the more 'premium' paint job for the long term.
IF you call up MAACO... their cheapest ( errmm.. lowest cost ) paint jobs are the enamel ones. BUT if you check out their 'top of the line' paint job, you will find out that it is a polyurathane. So that should give a bit of a hint that a one stage polyurathane must have some features in it that are a few notches above an enamel paint job.
But getting back to maximum shine... just remember that it is the finishing work that will be delivering the maximum shine and gloss that can be achieved... ( and this holds true even if you had sitting in front of you a 2009 Corvette or a new Dodge Cuda with a factory paint job ). Even a factory paint job can be cranked up to a shiner and glossier level in the hands of a detailer ).
|
|
|
Re: New Paint job on a budget thread Part III
[Re: 69DartGT]
#38142
04/06/08 10:28 PM
04/06/08 10:28 PM
|
Anonymous
Unregistered
|
Anonymous
Unregistered
|
My name is Joe and i have been reading this thread for the last month or so. It just seems great! I have been thinking about painting my car for quite a while and found this thread about a month ago. I have been reading and getting real excited about trying out the process for a while. I just started with my first coat today! i really need some practice. From what i have read i found the best results seem to come from really thin coats. So this is what i did. I think my paint was too thin. I went with a 50/50 mix and it ran everywhere. No big deal though, i am still in th practicing stage so i am experimenting right now. I think things will turn out well. I will update with pictures every so often. Im sure i will have some questions as i go too so i figured id start posting now with my intro. Here is my car as is now:  I know the paint doesn't look bad but it had just been washed in the pic and looks much better then usual. But i am using Rustoleum gloss white and i may add a flat black stripe around the bottom when i am done. Hope all goes well. I love the idea and process so far. I am 19 years old and do not have a bit of painting experience in my life. So if i can do this then anyone can. Im even having my little brother help as i go and he is 15 
|
|
|
Re: choice of paint
[Re: Marq]
#38144
04/07/08 06:13 AM
04/07/08 06:13 AM
|
Anonymous
Unregistered
|
Anonymous
Unregistered
|
Quote:
Rustoleum & Tremclad are enamel paint...
Brightside is a polyurathane paint...
Polyurathane is basically a plastic and has a naturally higher level of gloss built in to it...
BUT most importantly... the paint can only get you so far with a high shine and gloss. The real secret in the end rest with the final wet sanding, polishing, waxing and buffing.
In theory... in the hands of a good 'detail' man, you could paint your car with HOUSEPAINT and with the right wet sanding ( color sanding some folks call it ), polishing and final waxing and buffing you can make even it shine like a jewel. That is why there have been numerous discussions in this thread about the products to use when going for the final polishing stage etc.
My personal feeling is that the polyurathane wins when it comes to high gloss and shine. I think it takes less wet sanding and polishing to maximize its shine.
BUT above all, the key consideration with a polyurathane paint job is that in theory it is the more 'premium' paint job for the long term.
IF you call up MAACO... their cheapest ( errmm.. lowest cost ) paint jobs are the enamel ones. BUT if you check out their 'top of the line' paint job, you will find out that it is a polyurathane. So that should give a bit of a hint that a one stage polyurathane must have some features in it that are a few notches above an enamel paint job.
But getting back to maximum shine... just remember that it is the finishing work that will be delivering the maximum shine and gloss that can be achieved... ( and this holds true even if you had sitting in front of you a 2009 Corvette or a new Dodge Cuda with a factory paint job ). Even a factory paint job can be cranked up to a shiner and glossier level in the hands of a detailer ).
thanks for all that info marq 
i think the price difference between combi color (rustoleum ) and brightside makes more sense now .
i am deffo ordering brightside today .
could you give me some ideas on what grits to
use for the prep process on my car ?? as i have not got a clear coat on the original paint
i dont know whether to start with a higher grit
than 80 /120 like most people did here 
|
|
|
Re: Rolling Top Secret Epoxy Paint
#38147
04/07/08 11:47 AM
04/07/08 11:47 AM
|
Joined: Jun 2007
Posts: 49
Maine
Blackstone
member
|
member
Joined: Jun 2007
Posts: 49
Maine
|
Quote:
has anyone tried rolling TS-100 1-Part Epoxy?
http://www.topsecretcoatings.com/ts-100_1-part_epoxy_4849812.htm
from the description above it sounds great and comes in numerous colors. Although, the mfr doesn't supply a chip card. the price also seems pretty good. Notice they also have a hardener for this paint. Does this sound like a good idea?

thanks for any ideas
I can speak for the TS-4. I rolled a test panel last summer and left it facing the sun for about 10 months. I went out back last week and gave the hood a few whacks with a hammer... NOTHING! I'm convinced that this stuff will stand up to anything it meets on the road, at least as durable as a typical factory finish.
Regarding shine, I really can't say since I never followed up with final polishing. One thing's for sure, it looks just as good as it did when I left it last summer. If the TS-4 is this good, TS-100 can only be better.
|
|
|
Re: choice of paint
#38148
04/07/08 01:06 PM
04/07/08 01:06 PM
|
Joined: May 2006
Posts: 575
Canada
Marq
mopar addict
|
mopar addict
Joined: May 2006
Posts: 575
Canada
|
Quote:
could you give me some ideas on what grits to
use for the prep process on my car ?? as i have not got a clear coat on the original paint
i dont know whether to start with a higher grit
than 80 /120 like most people did here
I am pretty sure I would stay away from an 80 grit for sure. A 120 would work out nicely and even a 180. Sometimes it depends on the sandpaper itself.
One of the sandpapers I was using was the next nearest thing to useless on the paint. It either would not sand anything off or it would clog up with whatever particles it was able to sand off.
My best luck came with one of the 3m papers that I bought at Home Depot. But before coming to that conclusion I had gone through a couple of sheets of crappier sand paper.
The key thing to think about with the sandpaper is you don't want it to be scoring up the body panel surface too much. Some of the grits can really cut quite a good scar into the original paint ( or even the later coats of paint that you apply ).
Since the paint is being put on in such thin layers, it may happen that a badly scarred surface will not find the scratches ( or the low area of the scratch filled in fully with each coat of paint.
As we had discussed previously in this thread, when you add a layer of paint to a scarred surface, equal amounts usually end up deposited in the valley of the scratch and on the peak of the scratch. So the original scratched surface ends up not really being leveled out. That is why we use the increasing grit size of the sand paper during the process to lessen and lessen the size of any scratches created by the previously used lower grit of sand paper.
So you may have to experiment with the different brands of sandpaper out there to find the one that does the best job for you, with the least scratching and clogging.
I seem to recall that my favorite 3m sand paper was an aluminized type sandpaper and there was actually a patter in the paper so that the sanded off artifacts could be channeled out of the sand paper so that it didn't clog up while sanding.
When I moved on to wet sanding, I went with the 3m wetsanding paper ( which is pretty universally available ) and is manufactured on a cloth like material that can handle repeated wettings without falling apart.
Dunno if this helps...
.
|
|
|
Re: choice of paint
[Re: Jerry]
#38149
04/07/08 01:10 PM
04/07/08 01:10 PM
|
Joined: May 2006
Posts: 575
Canada
Marq
mopar addict
|
mopar addict
Joined: May 2006
Posts: 575
Canada
|
Quote:
Also Marq,
since yous eeem to have all the answers, how do you wetsand a two tone paint job? i would like to add stripes or something on top of the base rustoleum job. should the stripes be sprayed? i am tempeted to do the stripes flat black so i don't have to wetsand.
Tee hee... nope... I didn't do a two tone... so I never had to cross that bridge. BUT it has been definitely discussed earlier in this message thread by a 240Z owner that laid three stripes on the side of his car, a truck owner who two toned his pickup truck and there are a few who two toned their hoods to make their scoop lines stand out. They will probably be able to answer any specific questions...
|
|
|
Re: choice of paint
[Re: Marq]
#38150
04/07/08 02:10 PM
04/07/08 02:10 PM
|
Anonymous
Unregistered
|
Anonymous
Unregistered
|
Hmm, I'm asking them to send me a chip card for TS-1. They didn't have one for TS-4. They've got an awful lot of colors.
I'm curious about the epoxy's gloos compared to a urethane. I previously used Brightside which had a wonderful gloss.
The TS-1 description sounds almost as though its being marketed for low cost (roller) body panel painting.
thanks
|
|
|
Re: choice of paint
[Re: Marq]
#38151
04/07/08 02:54 PM
04/07/08 02:54 PM
|
Anonymous
Unregistered
|
Anonymous
Unregistered
|
Quote:
Quote:
could you give me some ideas on what grits to
use for the prep process on my car ?? as i have not got a clear coat on the original paint
i dont know whether to start with a higher grit
than 80 /120 like most people did here
I am pretty sure I would stay away from an 80 grit for sure. A 120 would work out nicely and even a 180. Sometimes it depends on the sandpaper itself.
One of the sandpapers I was using was the next nearest thing to useless on the paint. It either would not sand anything off or it would clog up with whatever particles it was able to sand off.
My best luck came with one of the 3m papers that I bought at Home Depot. But before coming to that conclusion I had gone through a couple of sheets of crappier sand paper.
The key thing to think about with the sandpaper is you don't want it to be scoring up the body panel surface too much. Some of the grits can really cut quite a good scar into the original paint ( or even the later coats of paint that you apply ).
Since the paint is being put on in such thin layers, it may happen that a badly scarred surface will not find the scratches ( or the low area of the scratch filled in fully with each coat of paint.
As we had discussed previously in this thread, when you add a layer of paint to a scarred surface, equal amounts usually end up deposited in the valley of the scratch and on the peak of the scratch. So the original scratched surface ends up not really being leveled out. That is why we use the increasing grit size of the sand paper during the process to lessen and lessen the size of any scratches created by the previously used lower grit of sand paper.
So you may have to experiment with the different brands of sandpaper out there to find the one that does the best job for you, with the least scratching and clogging.
I seem to recall that my favorite 3m sand paper was an aluminized type sandpaper and there was actually a patter in the paper so that the sanded off artifacts could be channeled out of the sand paper so that it didn't clog up while sanding.
When I moved on to wet sanding, I went with the 3m wetsanding paper ( which is pretty universally available ) and is manufactured on a cloth like material that can handle repeated wettings without falling apart.
Dunno if this helps...
.
nice one marq ,i got a big roll of 120 grit aluminium oxide paper made by BLACKSPUR which
should be up to the task for DRY sanding .
than will hit it with 240 and 400 before i roll
my first coat , am i right thinking i can do
the 240 and 400 grit sandinG WET ????
as i am quite impressed with the results wilso
got i will follow his recipe for mixing the paint
but i cant find penetrol in u.k for some reason
however i might have found a susbstitute called
OWATROL , from what i read this stuff is doing exactly what penetrol is supposed to do and it says it can be used on OIL BASED paints
WILL THIS DO THE JOB ??
http://www.nwepaints.co.uk/acatalog/RustTreatments.html
also managed put the final coat on my test piece done using combi color (rustoleum)and gone up to 1000g and 1500g papers over it ,very smooth but totally dull looking surface at the moment .will
give it a few days to harden more and hit it with some rubbing compound .
|
|
|
Re: jeep progress
#38152
04/08/08 01:09 PM
04/08/08 01:09 PM
|
Anonymous
Unregistered
|
Anonymous
Unregistered
|
Hood doors with only 2 coats..
|
|
|
 Re: jeep progress
#38153
Re: jeep progress
#38153
04/08/08 01:16 PM
04/08/08 01:16 PM
|
Anonymous
Unregistered
|
Anonymous
Unregistered
|
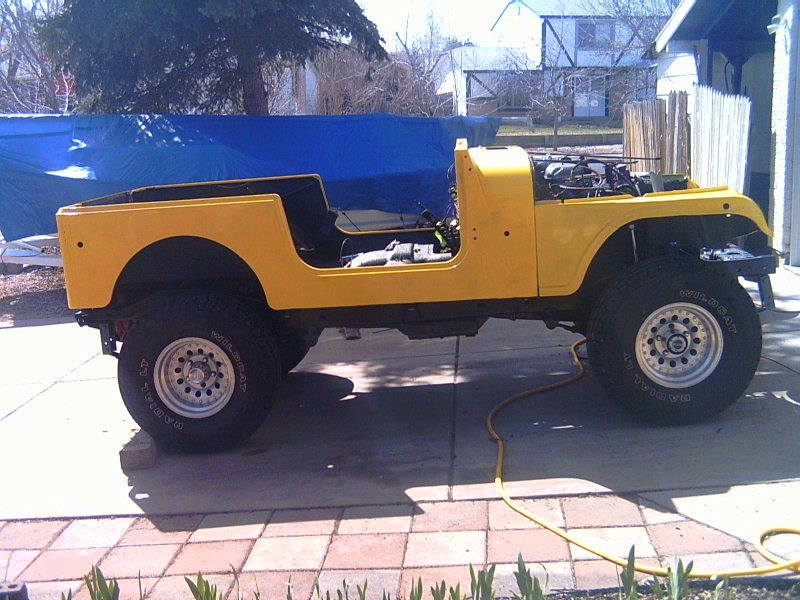
Full pic of jeep so far.. I primed everything and but found after sanding that needed more sanding.... I figured paint would fill in more, but was wrong... Tub had 3 coats on it before I got real agressive with 320 grit and block sanded it down with paint... Now has another 2 on it... Can see just a little orange peel in places... Hope with more coats it will lesson... The Rust Sunburst Yellow has no issues showing it's gloss... Think she will look pretty sharp!!!
|
|
|
|
|


