|
 Re: c20 pics
#37815
Re: c20 pics
#37815
01/01/08 03:21 PM
01/01/08 03:21 PM
|
Anonymous
Unregistered
|
Anonymous
Unregistered
|
Well the beat goes on. With the holidays I have been a bit distracted but I have had time to continue the project. I now have the top of the shell to 2000 grit sandpaper and I am very pleased with this system. The sides will need a couple more coats but it is ready for windows and installation onto the truck for the trip back to Washington.
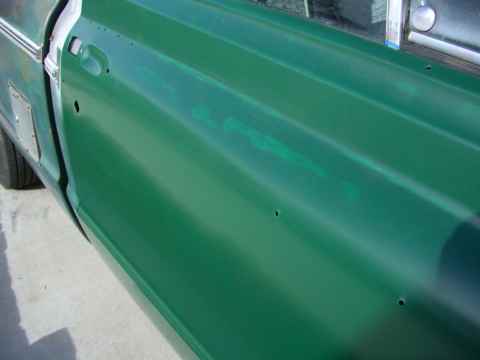
I have also started on the truck. I like the red primer as a base because the hunter green appears darker much faster (compare the door to the hood). I may take Marq's suggestion and mix some black paint with the primer when I work the top this week.
Here are a couple of in progress pics.
john
|
|
|
Re: c20 pics
#37816
01/01/08 03:25 PM
01/01/08 03:25 PM
|
Anonymous
Unregistered
|
Anonymous
Unregistered
|
|
|
|
Re: c20 pics
#37817
01/01/08 03:26 PM
01/01/08 03:26 PM
|
Anonymous
Unregistered
|
Anonymous
Unregistered
|
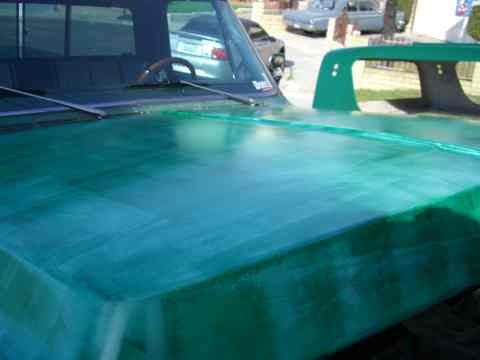
the shell (this is a couple of coats earlier with a couple of light spots showing through).
One of my motivations for using this system is that repairs to the paint can be accomplished later with very little mess! I found a couple bad spots on the shell that I didn't notice when I started so I am sanding and filling them. As I put paint on the truck I will paint those spots. I hope to learn how well the new paint blends with the existing paint.
Last edited by jpsageusa; 01/01/08 03:31 PM.
|
|
|
Re: New Paint job on a budget thread Part III
#37818
01/04/08 09:01 PM
01/04/08 09:01 PM
|
Anonymous
Unregistered
|
Anonymous
Unregistered
|
Mike, Thanks for the feedback ...I currently have sandpaper grits 100/150/220/320/400/600/800/1000/1500 and will get 2000 grit when I get a chance. About the 1/4" nap roller ...I surprisingly got much better results with that roller than I had with the other panels I have done with just m 4" High-density foam sticks. What I did was roll it really slow and with my other hand smooth it out further with the foam sticks. I did this with the large parts (hood and roof). A couple of days ago I sanded the other parts of my truck with 320 grit and removed all wax with acetone before that ...then mixed a much more thin mix of rustoleum with mineral spirits and went really quick all the way around. I think I may even worked too fast because spots would run in places and I had to move all over the place. When it dried, I ended up with tears and the coat wasn't anywhere as thick as my first go ahead with crappy results ....I plan on sanding these parts in prep for my second coat with 400 grit, wetsanding it ....any tips/tricks or help I would greatly appreciate it from anyone ..... 
|
|
|
Re: New Paint job on a budget thread Part III
#37819
01/06/08 12:01 PM
01/06/08 12:01 PM
|
Anonymous
Unregistered
|
Anonymous
Unregistered
|
I hadn't thought about using the nappy roller as just a way to transfer bulk paint to the surface where you use a foam roller to spread it out. Cool. There are many ways to do this and I am sure there are some new ways to be discovered.
That said, according to the conventional wisdom if you are getting runs, you are putting on too much paint for your mixture/conditions.
You are looking to lay down a thin, smooth coat that won't require as much sanding. The depth of color comes from the multiple coats and if you didn't have to sand as hard between coats, it is much easier to lay those coats down.
I think charger said his wet sanding took like 30 minutes to do the whole car (correct me if I'm wrong). That would only be possible if the paint has laid down smooth.
|
|
|
Re: New Paint job on a budget thread Part III
#37820
01/07/08 12:01 PM
01/07/08 12:01 PM
|
Anonymous
Unregistered
|
Anonymous
Unregistered
|
take your time with the wet sanding, this is where your will either make or brake your paint job. sand too much and to will have light spots in your paint. and use lots and lots and lots of water. i have known a couple of people to use a tiny bit of liquid soap in the water they use to dunk the sandpaper into. this actually serves as a lubricant and makes it a little bit easier to sand. remember water is your friend. 
|
|
|
Re: New Paint job on a budget thread Part III
#37821
01/07/08 01:26 PM
01/07/08 01:26 PM
|
Anonymous
Unregistered
|
Anonymous
Unregistered
|
I'm in the process of taking out the trim from the car (1995 Integra 4dr). There are a couple of trim items I don't know how to remove, can you help me with this?
1) Trim on top of the windshield. I was able to remove all the trim around the windshield except for the thin piece on the top. This is the piece that covers top of windshield and roof.
2) Door handles. I don't know how to remove the door handles.
3) Trim piece around the doors. Not the bottom pieces, I removed those no problem. Its the top piece that goes from the rear view mirrors, up the front pillar, along the roof line, then down the rear pillar towards the back of the door. Do I simply yank it out hard?
I've attached some photos too.
Thanks.
|
|
|
Re: New Paint job on a budget thread Part III
#37822
01/07/08 01:28 PM
01/07/08 01:28 PM
|
Anonymous
Unregistered
|
Anonymous
Unregistered
|
|
|
|
Re: New Paint job on a budget thread Part III
#37823
01/07/08 01:29 PM
01/07/08 01:29 PM
|
Anonymous
Unregistered
|
Anonymous
Unregistered
|
|
|
|
Re: New Paint job on a budget thread Part III
#37824
01/07/08 02:07 PM
01/07/08 02:07 PM
|
Anonymous
Unregistered
|
Anonymous
Unregistered
|
door handles - bolted from the inside. Need to remove interior door panels and plastic vapor barrier. Probably has funky connections to the lock, so take a picture before you start unhooking it if you can.
Last edited by Mike Da Wrench; 01/07/08 02:17 PM.
|
|
|
Re: New Paint job on a budget thread Part III
#37825
01/07/08 04:47 PM
01/07/08 04:47 PM
|
Anonymous
Unregistered
|
Anonymous
Unregistered
|
Hey man, That trim on top of the windshield and back window is tricky. Any of the local auto parts stores should carry a window trim removal tool that looks like this  use the hook on the tool to pry under the edge of the trim and pop the clips loose. the trim piece around the doors should be retained by plastic clips and can be pryed out by working under them at one end with a thin screwdriver and pop the clips out of their holes. Thats how those pieces came apart on my accord, and Honda is pretty good about maintaining uniformity among model lines. If you can get your hands on a shop manual for the car, it will have detailed illustrations on how to take it apart. Hope that helps, -Trent
|
|
|
Re: New Paint job on a budget thread Part III
#37826
01/13/08 12:30 AM
01/13/08 12:30 AM
|
Anonymous
Unregistered
|
Anonymous
Unregistered
|
Hello, I have been working on another roller project over this past Christmas break. It's my daily driver honda accord. Here are a few pictures of the car before I started. 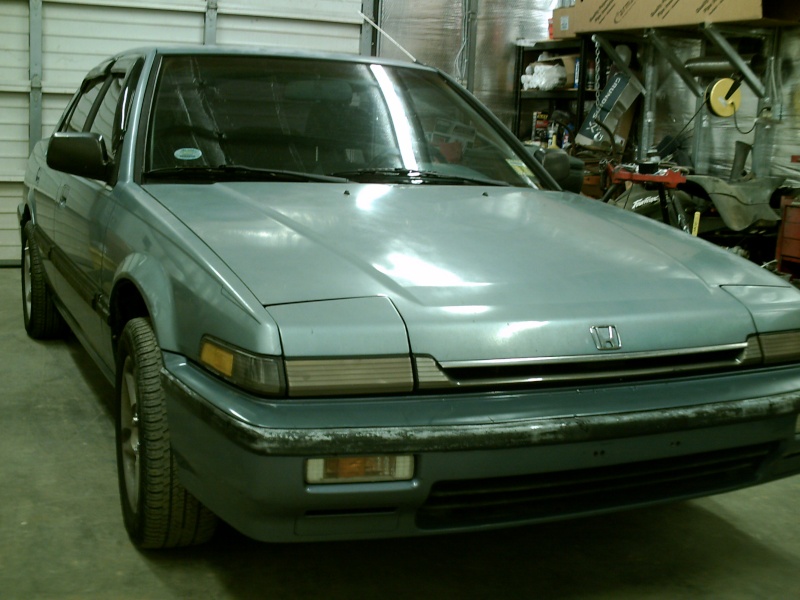 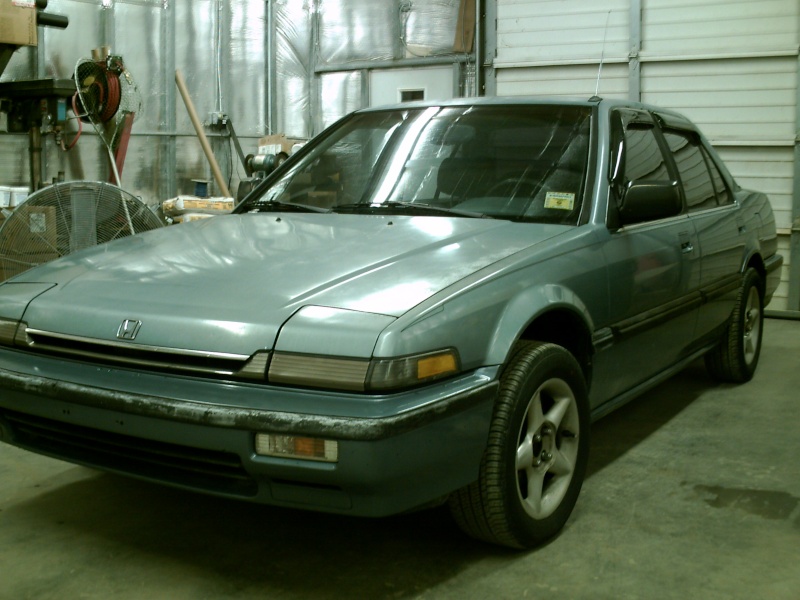 I used Interlux Brightside In Dark Blue to paint this car using odorless mineral spirits in about a 1:1 mixture. Heres the car all dolled up after 7 coats from 1 1/4 quarts of paint. 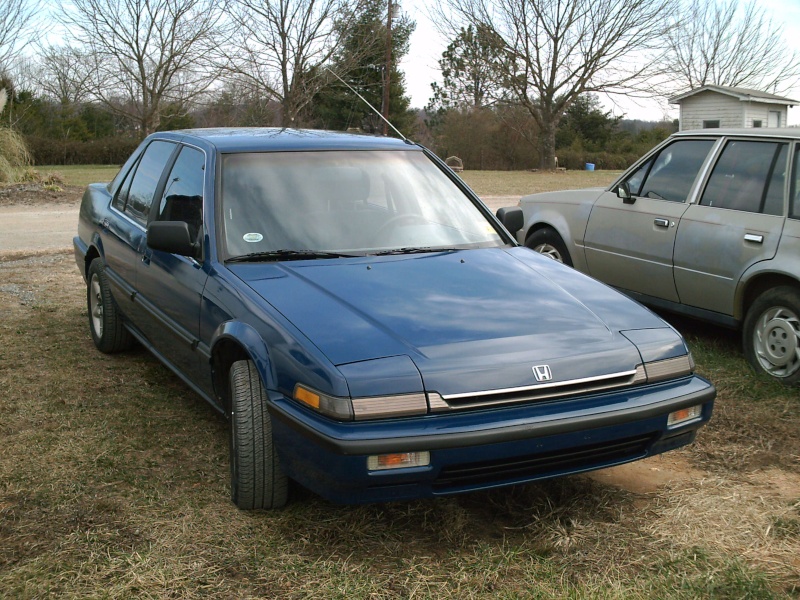 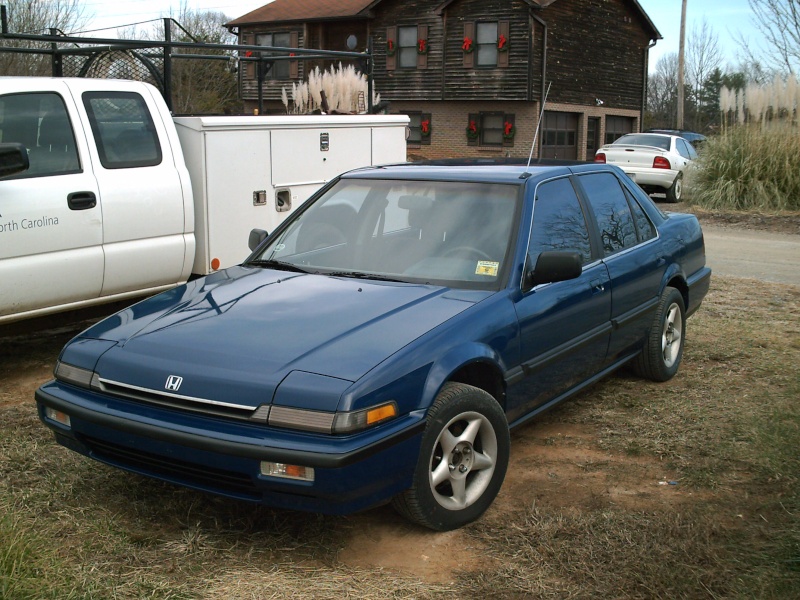 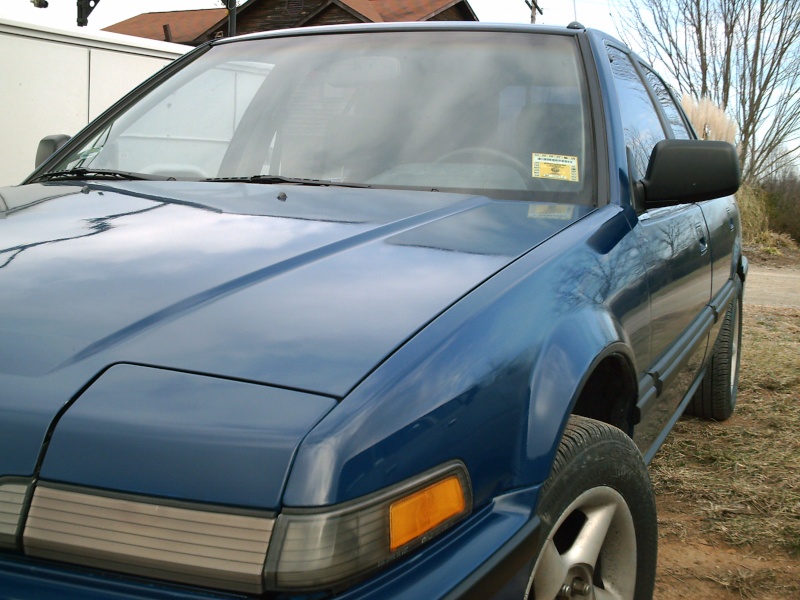 I have all of the progress shots and detailed journal of this paint job at www.rolledon.com I think after trying Rustoleum and Brightside I can justify the extra cost of the Brightside for the results that I got.
|
|
|
Re: New Paint job on a budget thread Part III
#37827
01/13/08 12:58 AM
01/13/08 12:58 AM
|
Anonymous
Unregistered
|
Anonymous
Unregistered
|
according to chargers method, 2 coats, wetsand, 2 coats, wetsand process, are these 2 coats back to back? I mean after you apply 1 coat, you follow immediatly with another coat?
|
|
|
Re: New Paint job on a budget thread Part III
#37828
01/13/08 07:59 AM
01/13/08 07:59 AM
|
Joined: May 2006
Posts: 575
Canada
Marq

mopar addict
|
mopar addict
Joined: May 2006
Posts: 575
Canada
|
Quote:
according to chargers method, 2 coats, wetsand, 2 coats, wetsand process, are these 2 coats back to back? I mean after you apply 1 coat, you follow immediatly with another coat?
NO. You need to allow the first coat to dry and cure properly before slapping on the next coat. If you slap on the second coat before the first one properly cures, you will end up trapping the lower layer while it is curing - which will lead to the paint wrinkling into the orange peel effect. Normally you just need to allow about 1 day for the coat to dry ( with times varying according to the temperature you are working in and the amount of humidity in the air.
Colder temperatures - give it extra drying time
Warmer temperatures - 18 to 24 hours
Very humid - give it a little extra time
Very dry air conditions - 18 - 24 hours
.
|
|
|
Re: New Paint job on a budget thread Part III
[Re: Marq]
#37829
01/13/08 11:20 AM
01/13/08 11:20 AM
|
Anonymous
Unregistered
|
Anonymous
Unregistered
|
god damn...i woke up early morning to start this project around 7am. suns up and cloudy, nothing to serious. 3 hours later i hear thunder in the distance. i turn on the tv to check the weather and sure enough its heading this way.
will the rain ruin the paint?
|
|
|
Re: New Paint job on a budget thread Part III
#37830
01/13/08 12:17 PM
01/13/08 12:17 PM
|
Anonymous
Unregistered
|
Anonymous
Unregistered
|
Any happen to have a link to the post regarding spraying interlux paint with the Harbor freight refilled spray can?
|
|
|
Re: New Paint job on a budget thread Part III
#37831
01/14/08 12:49 AM
01/14/08 12:49 AM
|
Joined: May 2006
Posts: 575
Canada
Marq
mopar addict
|
mopar addict
Joined: May 2006
Posts: 575
Canada
|
Quote:
god damn...i woke up early morning to start this project around 7am. suns up and cloudy, nothing to serious. 3 hours later i hear thunder in the distance. i turn on the tv to check the weather and sure enough its heading this way.
will the rain ruin the paint?
No... If you are just at the starting layers of painting... the rain will not harm the paint IF you take appropriate procedures before adding the next layer of paint.
For example, rain is full of all sorts of odd chemicals ( if only it was just h20 ). There are acids, sulphurs and other other crapola in rain water.
So before you add your next coat of paint, just give the previous coat a light sanding, a wash with very little liquid dish detergent in in it. Thoroughly rinse off and when the car is dried, give it a final wipe down with a cloth damped LIGHTLY with mineral spirit. That will ensure that all potential contaminants are gone.
If the rain has put a lot of humidity into the air, be sure to allow extra drying time for the paint. Humidity in the air tends to slow down the drying/curing time.
Depending on the air temperature, the moisture in the air tends to be attracted to the body of the car. If you can imagine the condensation that occurs on a hot water pipe that is exposed to cold air, the same type of moisture attaction is occurring at a less visible ( almost microscopic level ) on the car body. The wipe down of the car with the cloth slightly damped with mineral spirit helps to displace some of that near invisible moisture.
I know for myself, that during my paint job we were going through quite a few rainy days. In order to avoid any problems caused by the humidity in the air I chose to just keep holding off on further painting until the weather changed and the humidity was gone. I may have just been overly cautious, but I just wanted to make absolutely sure that if something went wrong with the paint job, it was because I had rushed things.
.
|
|
|
Re: New how to paint your car on a budget with a roller
[Re: 69DartGT]
#37832
01/14/08 01:17 AM
01/14/08 01:17 AM
|
Anonymous
Unregistered
|
Anonymous
Unregistered
|
heres mine. I think it's budget it was done at home in the garage..
|
|
|
Re: New how to paint your car on a budget with a roller
#37833
01/14/08 01:18 AM
01/14/08 01:18 AM
|
Anonymous
Unregistered
|
Anonymous
Unregistered
|
|
|
|
|
|


