|
 Re: New Paint job on a budget thread.
[Re: 69chargeryeehaa]
#37054
Re: New Paint job on a budget thread.
[Re: 69chargeryeehaa]
#37054
07/11/07 01:54 PM
07/11/07 01:54 PM
|
Anonymous
Unregistered
|
Anonymous
Unregistered
|
Quote:
Not to pee on your parade, but it won't work. Auto paints use a catylist, where a chemical reaction occurs to "cure" the paint. Without hardner, the paint will stay soft for years, too much and it will over dry, become brittle and crack. You'd be trying to roll single stage paint, and you would have to use a hardner, single stage paints are much like bondo, when you mix in the hardner you got about 3mins to work the bondo before it becomes hard and blobs making it impossible to smooth out, which is basically the same mess you'll end up with auto paints. Plus the metalics would be hard if not impossible to keep uniform, even with spraying using HVLP/spray gun (air) it's hard for the inexpirenced painter to get the metalic uniform and not end up with "zebra" strips on their whole car let alone trying to roller metalic paint. The enamels (tremclad/rustoleum) do not use a catylist, the "gas/vent" and dry. To and extent the mineral spirits is a catylist, ineffect decreasing pot life, but at the same time making the paint thinner, and giving you the ability to apply thinner coats and they self level. You may be able to do a small peice with a roller and auto paints like a mirror, but a hood/roof, no way, you'll end up with a big ball roller with auto paint in a stringy mess!!! SIngle stage paints are designed to "flash" litterelly within 20 mins, that's why with single stage paints you have 20-30mins to recoat, or 5 days until it's fully vented (enough to recoat and not disturb/re-wet the underlying layer; which typically presents it'self by "wrinkling". I'd rather explore putting metalic in tremclad/rustoleum, and explore mixing in tremclad clear coat (liquid, only available to us lucky guys in canada!!!); that i think has a really good chance. 

Any alkyd enamel like Rustoleum,, Tremclad, TSC, Van Sickle, etc. can be used with a catalyst just like alkyd synthetic car paint. Most people don't, and given the safety concerns that's probably a good thing. The TSC/Van Sickle usually has the urethane catalyst sold on the same shelf. You mix it 8:1. Pot time is around 3 hours IIRC (going on memory here...could be longer). I've used this catalyzed paint with both a roller and a brush...never had any problems with the working time. I've never painted a whole car, but I have done the entire trunk of my Olds in one sitting. Never had any problems with lifting/sticking etc. It does cure much faster than a non-catalyzed paint (tacky in about 3 hours, dry to the touch in 4 or 5). Here's the trunk:
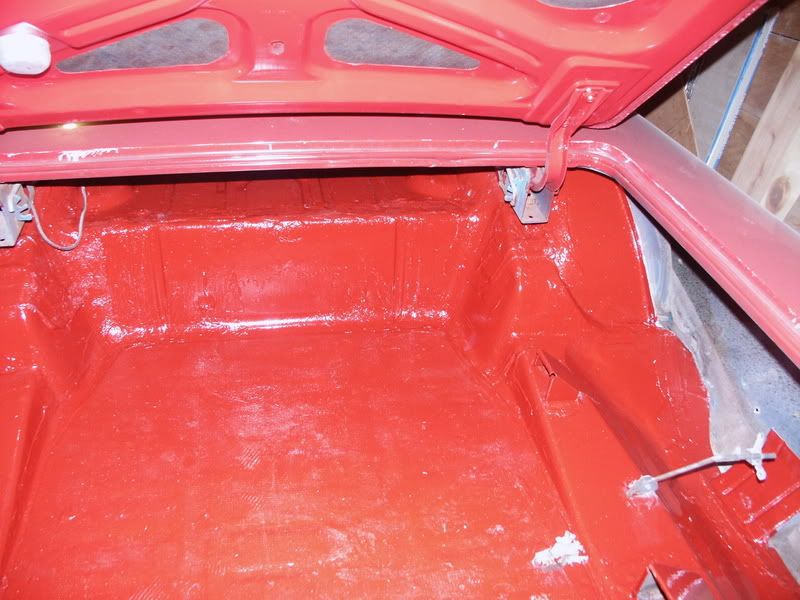
Here's the interior:
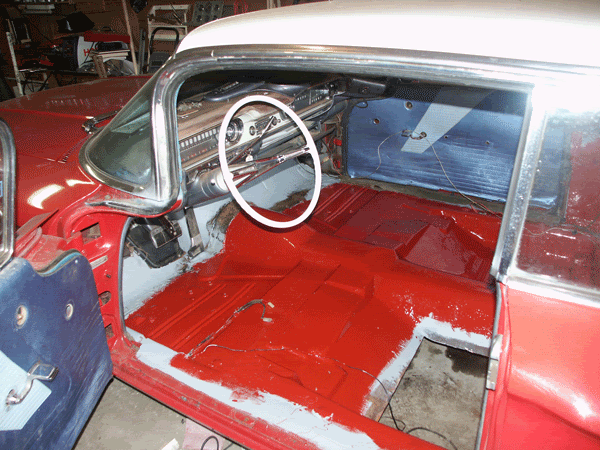
Both areas are pretty big, and I painted them both in one sitting. Both got a second coat about a week later. I also painted an old junk fender with catalyzed enamel, and a brush. Here was the result:
The paint flows out very well...the brush strokes aren't that hard to sand out. The nice thing about doing it this way vs. a roller is I got this kind of coverage IN ONE COAT. With a brush and hardened enamel, it's probably a two-coat paint job. The only downside is the roller is done for good...the paint cures in it solid. I did manage to clean my brush...leaving it sitting in reducer seems to help a lot.
Anyway, all I'm getting at is that I don't see any reason you couldn't do this with catalyzed car paint. Synthetic car paint is an alkyd enamel just like Rustoleum. Acrylic enamel car paint may very well behave differently...I don't know, I haven't tried it...yet. I've got some PPG urethane clear coat out in the garage...if someone wants to mail me a roller I'd be happy to try and see what happens  And I agree that getting a metallic to look decent might be hard if not impossible...but I still think it's worth trying. I'm just going on my own experience here...YMMV, of course And I agree that getting a metallic to look decent might be hard if not impossible...but I still think it's worth trying. I'm just going on my own experience here...YMMV, of course  . .
And if someone does want to make a metallic Rustoleum, any decent size body/paint shop should be able to sell you metal flake. If you can't find it locally, just shop on line.
|
|
|
Re: New Paint job on a budget thread.
#37055
07/11/07 01:56 PM
07/11/07 01:56 PM
|
Joined: Jan 2006
Posts: 1,220
toronto canada
69chargeryeehaa

pro stock
|
pro stock
Joined: Jan 2006
Posts: 1,220
toronto canada
|
Quote:
If anyone knows it would be the original roller. Charger has spoken! I figured it was worth a try by someone in the Pioneer spirit of all those here, but a friend of mine did do an amatuer job on a car of his, and even shooting it through a gun he had a zebra on his hands. It was a beater so he didn't mind much.
What about making rusto stick to aluminum parts???

they sell primer for allum, and galavinized metal. But from what i've seen/done, the stuff sticks to anything like crazy. My plastic recycle bin still has paint on it (from needing something to put the front valance of the charger while painting) and it gets thrown around every week on pavment, and the damm paint is still there strong. I've got a drop on chrome, and that's been there for 7yrs, and i can't get it off!! once this stuff cures it's stuck there for good.
Also, last night i saw my old charger, the new owner just put the General Lee decals on and the car looks sweet, i kinda miss it. It was a sad sight, the car lives outside in the elements, under some big trees, and this guy washed the car once since he's had it. Guess what? The paint still look great, even though the "new" year one bumpers i traded my first born for are rusting, and the engine is starting to rust from sitting outside, but the paint.....   I'll get a pic of the car next time i'm over at his house, and post it here. I'll get a pic of the car next time i'm over at his house, and post it here.
|
|
|
Re: New Paint job on a budget thread.
#37056
07/11/07 02:17 PM
07/11/07 02:17 PM
|
Joined: Jan 2006
Posts: 1,220
toronto canada
69chargeryeehaa
pro stock
|
pro stock
Joined: Jan 2006
Posts: 1,220
toronto canada
|
toolbox - anything that uses a catylist in my opinion won't work, a hardner is a different story, they accellerate the drying time, but with single stage paints, including enamels and laq, the reducers used are specific to spraying and have very fast flash times, barley enough time to roller anything before it starts drying. Typically anything with a recoat time of <1 hour, or after 5 days uses a catylist. One another note, i think it would be quite easy to mix the tremclad products (including the liquid/brush clear coat) with metalics, and there's no doubt it would work. I can see it now, about 10-15% mix of clear to paint, and some small metal flakes, that would be lighter than the paint and keep in a "suspended" state in the paint and not run out of the paint. That would work for sure, and the only expirementing would be with the ratios, but i can "feel" it now.!!!
|
|
|
Re: New Paint job on a budget thread.
[Re: 69chargeryeehaa]
#37057
07/11/07 02:23 PM
07/11/07 02:23 PM
|
Anonymous
Unregistered
|
Anonymous
Unregistered
|
Quote:
Quote:
If anyone knows it would be the original roller. Charger has spoken! I figured it was worth a try by someone in the Pioneer spirit of all those here, but a friend of mine did do an amatuer job on a car of his, and even shooting it through a gun he had a zebra on his hands. It was a beater so he didn't mind much.
What about making rusto stick to aluminum parts???
they sell primer for allum, and galavinized metal. But from what i've seen/done, the stuff sticks to anything like crazy. My plastic recycle bin still has paint on it (from needing something to put the front valance of the charger while painting) and it gets thrown around every week on pavment, and the damm paint is still there strong. I've got a drop on chrome, and that's been there for 7yrs, and i can't get it off!! once this stuff cures it's stuck there for good.
Also, last night i saw my old charger, the new owner just put the General Lee decals on and the car looks sweet, i kinda miss it. It was a sad sight, the car lives outside in the elements, under some big trees, and this guy washed the car once since he's had it. Guess what? The paint still look great, even though the "new" year one bumpers i traded my first born for are rusting, and the engine is starting to rust from sitting outside, but the paint..... I'll get a pic of the car next time i'm over at his house, and post it here.
Thanks for the info. I'd rather have it stick like a son of a gun instead of peeling off in a month. Like I said, the side and hood louvers were my concerns. When I bought the Mustang the regular autopaint was already mostly peeled off those parts.
I'm sorry to hear that the Charger is not being taken care of the way it should be, but it's nice to know that the paint is holding up well.

|
|
|
Re: New Paint job on a budget thread.
[Re: 69chargeryeehaa]
#37058
07/11/07 08:48 PM
07/11/07 08:48 PM
|
Anonymous
Unregistered
|
Anonymous
Unregistered
|
Ok... long story short I bought a 63 220B Mercedes Benz from a friend and decided one day to post on my car clubs forum about how to paint a car, some 6 months later I am here typing this up with the first coat of paint on the car. Ive been following this thread (now the third one I think) for some time, and now its my time to post. And yes... my father thinks Im crazy for trying this with a roller. Any ways I stripped the car of chrome and all and sanded with 40, then moved to 60 then wiped it down with degreaser to make sure it was clean and then shot it with rattle can Rustoleum automotive primer which not only covered the bare metal due to rust removal but covered those hideous sparkles embedded in the 2 mil thick clear coat  . http://i14.photobucket.com/albums/a325/Ghia109/P1040672.jpg?t=1184200629So I coated it pretty well and the primer came out rough so it should bond well with the Rustoleum. I mixed at exactly 20% pure mineral spirits to the gloss black. I rolled on and got this. http://i14.photobucket.com/albums/a325/Ghia109/P1040683.jpg?t=1184200935 http://i14.photobucket.com/albums/a325/Ghia109/P1040689.jpg?t=1184200980I think I might have made a mistake by repeatedly rolling over the paint after it started to dry. There are tiny bubbles but no runs and some orange peel which seems to be normal. Im planning on adding another coat on tomorrow then wetsanding. Overal I know its not the best and I know it could be better but I have to say I am pretty pleased with the way it has turned out given that I stole the car for 300 bucks. I am wondering if the wet sanding will take care of this, does the direction of how you roll seriously matter, and did you get lines in the paint due to paint collecting on the edge of the roller. Thanks to every one that has been in this thread. www.autoblog.com wrote about a $50 paint job from some other website and I told them that this place was first and to give you guys credit. Sorry for the length but thanks again.
Last edited by Pegasus_red; 07/11/07 08:49 PM.
|
|
|
Re: New Paint job on a budget thread.
#37059
07/11/07 09:36 PM
07/11/07 09:36 PM
|
Joined: Jun 2007
Posts: 40
WA State
Roadster_wa
member
|
member
Joined: Jun 2007
Posts: 40
WA State
|
Quote:
I rolled on and got this......I think I might have made a mistake by repeatedly rolling over the paint after it started to dry. There are tiny bubbles but no runs and some orange peel which seems to be normal.
1st, I think that you need to thin it way more than 20%. The paint doesn't look "wet" like mine did. I thinned around 50% to the point that it looks almost like water. Like I said in an earlier post, I over thinned it and it turned out really smooth, however it didn't have enough black to cover everything and it looked cloudy up close.
2nd, You have to continue to roll the paint lightly until the bubbles start to work out, almost to being tacky. Then get off it. If the orange peel doesn't level itself out then one of two things: 1) not enough paint was put on -or- 2)not thinned down enough
I ran the roller all sorts of ways and it looks great.
Quote:
I am wondering if the wet sanding will take care of this, does the direction of how you roll seriously matter, and did you get lines in the paint due to paint collecting on the edge of the roller.
I ran the brush all sorts of ways and it looks great. You get lines and bubbles on the first few passes, but then they are gone when you run over them time and time again, different ways. You paint a house the same way.
Wet sanding will fix all issues if you sand it long enough.
That is just my 2 cents.
- Darrin
http://home.comcast.net/~SpokaneHotRod/Darrin_vette/vette_main.html
|
|
|
Re: New Paint job on a budget thread.
#37060
07/11/07 10:50 PM
07/11/07 10:50 PM
|
Joined: May 2006
Posts: 575
Canada
Marq
mopar addict
|
mopar addict
Joined: May 2006
Posts: 575
Canada
|
Quote:
Any ways I stripped the car of chrome and all and sanded with 40, then moved to 60 then wiped it down with degreaser to make sure it was clean and then shot it with rattle can Rustoleum automotive primer which not only covered the bare metal due to rust removal but covered those hideous sparkles embedded in the 2 mil thick clear coat .
I am wondering if the wet sanding will take care of this, does the direction of how you roll seriously matter, and did you get lines in the paint due to paint collecting on the edge of the roller.
Ok... here is my initial thoughts on your story. First I shivered when you mentioned the 40 / 80 grit sand paper. That is pretty coarse.
And when you sprayed the primer on... I can't imagine it having sufficient build to level up the scratches from the lower grit sand paper. Something in the 320 grit sand paper might have been better.
Once the primer was sprayed... you should have wetsanded that primer to smooth it out. Let's say using a 600 to 800 grit...
The way the picture looks.... it is almost like you rolled the paint onto unsanded primer. That would have explained the fuzzy appearance of the black coat.
IF you had sanded the primer - you also needed to again wipe the primer down with a mineral spirit dampened cloth to remove any foreign matter or debris that was left over from the sanding of the primer. Otherwise... you would have ended up with those dots in the paint appearing like in the pictures you provided.
Given where you were at in this posting... I would suggest getting some 800 grit sandpaper out and wetsanding what you have done so far. The idea being to smoother out whatever black paint is already laid down on the car. As always... the rule of thumb is that the smoother the subsurface... the smoother and shinier the paint will look when you roll it on.
Ok... so you wetsand down with the 800 until you have a fairly smooth surface with minimal defects. Then get out your trustly mineral spirit dampened cloth and wipe all the surface down again to remove the debris and crap left over from the sanding.
One hint is that when you wipe a mineral spirit dampened cloth over your wet sanded paint - it will give it a 'hint of its shine potential' until the spirit evaporates off the body. You can use this as a clue to how the potential shiny factor will be when the next layer of paint is rolled on.
Ok... Hopefully at this point we will have gotten the body and paint back to the point where the next coat of paint can be added and hopefully give better visual results and overall gloss.
At this point and onward through the next couple of coats of paint... you should be working with 800 grit and higher ( 1000 or 1200 ) while wetsanding each subsequent or alternative layer.
Hope this helps you get things on track...
Marq
.
|
|
|
Re: New Paint job on a budget thread.
[Re: Marq]
#37061
07/11/07 11:04 PM
07/11/07 11:04 PM
|
Anonymous
Unregistered
|
Anonymous
Unregistered
|
 well, this is just a fun car but Im glad to be learning. I was thinking that the rougher the surface, the better the purchase or bond of the paint would be. I was noticing that the finish was a bit gritty but I will put in the elbow grease tomorrow and try to work it out a little more. Thanks for the help guys. Ill post up once I get the things settled out a bit more.
|
|
|
Re: New Paint job on a budget thread.
[Re: 69chargeryeehaa]
#37062
07/12/07 01:20 AM
07/12/07 01:20 AM
|
Anonymous
Unregistered
|
Anonymous
Unregistered
|
Quote:
toolbox - anything that uses a catylist in my opinion won't work, a hardner is a different story, they accellerate the drying time, but with single stage paints, including enamels and laq, the reducers used are specific to spraying and have very fast flash times, barley enough time to roller anything before it starts drying. Typically anything with a recoat time of <1 hour, or after 5 days uses a catylist.
Not sure we're on the same page... The hardener I'm talking about is a urethane catalyst that should be just about identical to the hardener used in automotive enamels. It doesn't just speed the drying time, it polymerizes the paint. It's got the same ugly isocyanate ingredients as "real" car paint hardener...which is why I said it's probably good that most people don't use it.
But...that's also why I think there's a good chance you can use "real" car paint for this. The reducers used in automotive paint are just solvents that evaporate at different rates depending on which "speed" you use. For this, I'd probably use a retarder instead, giving you maximum working time. Or, don't use a reducer at all...if you use a catalyst, the paint will cure just fine without it. It might not flow out very well, but that's another issue .
And there are still 1K acrylic enamel paints available that don't use any kind of catalyst at all...you just reduce and spray. Today this has really fallen out of favor...but people still shoot it. The one nice thing about it is since they don't have any iso's, you don't need any special respirator equipment. It's how everything from Chrysler and Ford was painted in the '50s and '60s (GM clung on to acrylic lacquer forever). OTOH, you're not supposed to touch it for a month so it can cure.
I think the answer to whether or not you could use real car paint for this is going to lie with whoever actually tries it. I'd love to see someone with more time on their hands than me do some experiments with a synthetic enamel, an acrylic enamel, and if you want to get really crazy--an acrylic urethane. Try using slow reducer, a retarder, or no reducer...try w/hardener and without. Try a brush, try a roller...see if it works. That's the only way we'll know. Maybe there's no way to make it work. Maybe there is . You can buy car paint in pints, and it's not very expensive.
If it did work...the color palate would be limitless. And the "value" lines from the major paint manufactures aren't that much more expensive than Rustoleum. More expensive yes, but it's really not bad if you look into it.
Anyway...I still think it's worth a shot. Any volunteers... 
Last edited by toolbox; 07/12/07 08:40 AM.
|
|
|
Re: New Paint job on a budget thread.
#37063
07/12/07 01:24 AM
07/12/07 01:24 AM
|
Joined: May 2006
Posts: 575
Canada
Marq
mopar addict
|
mopar addict
Joined: May 2006
Posts: 575
Canada
|
Quote:
well, this is just a fun car but Im glad to be learning. I was thinking that the rougher the surface, the better the purchase or bond of the paint would be. I was noticing that the finish was a bit gritty but I will put in the elbow grease tomorrow and try to work it out a little more. Thanks for the help guys. Ill post up once I get the things settled out a bit more.
I understand what you were thinking. Suffice to say that a 320 grit sanded surface will leave plenty of places for the paint or primer to get good adhesion.
But as you will notice... as you add more layers of paint and start wet sanding with 800 / 1000 or 1200 grit paper, the paint will still be able to grab a solid foothold and bond with the paint subsurface that you are rolling on to.
The more important theory to keep in mind is that the smoother you wet sand each subsequent or alternative coat of paint... the smoother and shiner/glossier the paint will turn out.
The other benefit is that as the top surface keeps getting smoother.. it takes far less work to wet sand the top layer in preparation for the next coat of paint. Catch the message I posted just a week ago where I try to explain the concept like a Zomboni ice surfacing machine and the similarity in concept to how we add thin layers of paint.
It all will add up to a great learning experience for you as you progress through the layers of paint. At the very least it is a great exploration into your own limits of patience and meticulousness. It takes time and patience to do this job right... and fortunately it doesn't take the highest levels of skills or secret knowledge to accomplish.
.
|
|
|
Re: New Paint job on a budget thread.
#37064
07/12/07 10:01 AM
07/12/07 10:01 AM
|
Anonymous
Unregistered
|
Anonymous
Unregistered
|
I have a question for the satin/flat roller's out there!
Our journeyman was given the task to try this on his project. He is rolling flat black rustoleum. he is on the 5th or 6th coat and it still has really bad roller marks.
I went over it as I have been playing with the method for a while, and I had no better success. it goes on easy, but then when it dries it looks bad.
I am thinking for flat we may need to shoot it.
|
|
|
Re: New Paint job on a budget thread.
#37065
07/12/07 12:28 PM
07/12/07 12:28 PM
|
Anonymous
Unregistered
|
Anonymous
Unregistered
|
Quote:
I have a question for the satin/flat roller's out there!
Our journeyman was given the task to try this on his project. He is rolling flat black rustoleum. he is on the 5th or 6th coat and it still has really bad roller marks.
I went over it as I have been playing with the method for a while, and I had no better success. it goes on easy, but then when it dries it looks bad.
I am thinking for flat we may need to shoot it.
Maybe there's a difference in the satin vs. flat in the way it comes out. I'm sure you saw the 69 Mustang that looks really cool in satin a few pages back...other than that maybe your friend wasn't sanding every other coat. If not then the roller marks from previous coats will just multiply with each layer.
I found that on a test panel where I tried both ways. Saving a few coats to wet sand only the last one did not look nearly as good as the other half where I followed the original method everyone here goes by.
I'm guessing that is not the case and it could be that flat is just tougher to get right compared to the gloss and satin colors.

|
|
|
Re: New Paint job on a budget thread.
#37066
07/12/07 12:31 PM
07/12/07 12:31 PM
|
Joined: Mar 2007
Posts: 5,660
Flint, MI
Gusteve
I Love the Unicorn Song!!
|
I Love the Unicorn Song!!
Joined: Mar 2007
Posts: 5,660
Flint, MI
|
Quote:
I have a question for the satin/flat roller's out there!
Our journeyman was given the task to try this on his project. He is rolling flat black rustoleum. he is on the 5th or 6th coat and it still has really bad roller marks.
I went over it as I have been playing with the method for a while, and I had no better success. it goes on easy, but then when it dries it looks bad.
I am thinking for flat we may need to shoot it.
I've been mid-process with Satin for about a month. My first couple coats, thinned probably 35% or more, left no marks whatsoever (and looked really good).
My last coat I think was thinned only around 20% or so, and I did get roller marks.
I'm doing another coat tonight and I plan on going back to 30 to 40% thin mix.
I'm also switching to oderless mineral spirits to have more time to "roll out" the roller marks when doing large areas like the roof, C pillers and rear quarters. (which are all one giant section on my 68 Charger).
|
|
|
Re: New Paint job on a budget thread.
[Re: Gusteve]
#37067
07/12/07 01:30 PM
07/12/07 01:30 PM
|
Anonymous
Unregistered
|
Anonymous
Unregistered
|
I think he had sanded it every 2nd coat (he is gone today, will have to ask him) I am not 100% on the mixture, I know doing the run-drip test on the stir stick it was about 4 seconds for it to go to a drip. It went on thin and looked good, it was not untill it dried it looked bad. I had no issues when I was testing with gloss colors. I will have to try to play with his mixture. he thought we were kidding when we told him to try it 
|
|
|
Re: New Paint job on a budget thread.
#37068
07/12/07 02:41 PM
07/12/07 02:41 PM
|
Anonymous
Unregistered
|
Anonymous
Unregistered
|
Quote:
well, this is just a fun car but Im glad to be learning. I was thinking that the rougher the surface, the better the purchase or bond of the paint would be. I was noticing that the finish was a bit gritty but I will put in the elbow grease tomorrow and try to work it out a little more. Thanks for the help guys. Ill post up once I get the things settled out a bit more.
Very interesting car that you've got...I'm jealous that you got it for $300! You'll have to go very aggressive sanding the paint. Some of the gouges from the grit you used just look to deep from your pictures. 
The sandpaper you used initially would have been ideal for prepping the metal for a skim coat of body filler. It was much to rough for any paint or even primer for that matter to level out without a ton of coats.
Try with the 600 like Marq suggested, but keep in mind that you may have to cut into the primer in some spots to get it smooth enough for the next coat.
I hope it turns out well for you! I applaud you for being able to buy such a unique car with the change found in your sofa! 
|
|
|
Re: New Paint job on a budget thread.
#37069
07/12/07 03:01 PM
07/12/07 03:01 PM
|
Anonymous
Unregistered
|
Anonymous
Unregistered
|
ok. i feel really rediculous for having to resort to asking this here, but its my last resort.
i have started my project. i finally got my penetrol and everything i need. i have snaded and prepped my replacement fender. i have started sanding the rest of my car.
my question is, how much do i have to sand this thing? the car is a light blue. when i sand a lot i hit three different colors. one, the blue gets darker. i assume this is when im past the clear coat. the next, i hit white. i assume primer. third, i hit metal. ive only hit metal where ive needed to to remove rust.
my paint is good, a little sun faded in parts, but nothing bad. do i have to sand all the way through the clear on the whole car? or do i just need to spend some time on a spot and make sure its rough. i just dont want to waste a lot of time going through the clear on the whole car if i dont have to.
any help is greatly appreciated.
thanks.
just wanted to add. im wet sanding with 400 and a block. im also using a 320 sponge. it doesnt feel like i can get as much done with the sponge, its too soft.
Last edited by aws140; 07/12/07 03:12 PM.
|
|
|
Re: New Paint job on a budget thread.
#37070
07/12/07 03:19 PM
07/12/07 03:19 PM
|
Joined: Jun 2007
Posts: 49
Maine
Blackstone
member
|
member
Joined: Jun 2007
Posts: 49
Maine
|
There's been a lot of this lately. Sounds like you're oversanding. At least you're not using 50 grit. You don't need to remove any clearcoat except for where peeling exists. Once any defects such as rust, dents, chips, deep scratches are smoothed out, you're only looking to roughen the surface with 320-400 grit to give the new paint something to adhere to.
I think it's OK to dry sand for prep work. I did so with 320 grit. It saved a lot of effort and any scratches were easily filled by my first coat of paint.
Last edited by Blackstone; 07/12/07 03:27 PM.
|
|
|
Re: New Paint job on a budget thread.
[Re: Blackstone]
#37071
07/12/07 03:24 PM
07/12/07 03:24 PM
|
Anonymous
Unregistered
|
Anonymous
Unregistered
|
Quote:
There's been a lot of this lately. Sounds like you're oversanding. At least you're not using 50 grit. You don't need to remove any clearcoat except for where peeling exists. Once any defects such as rust, dents, chips, deep scratches are smoothed out, you're only looking to roughen the surface with 320-400 grit to give the new paint something to adhere to.
this is my first time doing any body work. so i have no idea. thank your for clarifying it for me. wow. makes my job a lot easier 
|
|
|
Re: New Paint job on a budget thread.
#37072
07/12/07 03:27 PM
07/12/07 03:27 PM
|
Anonymous
Unregistered
|
Anonymous
Unregistered
|
Quote:
ok. i feel really rediculous for having to resort to asking this here, but its my last resort.
i have started my project. i finally got my penetrol and everything i need. i have snaded and prepped my replacement fender. i have started sanding the rest of my car.
my question is, how much do i have to sand this thing? the car is a light blue. when i sand a lot i hit three different colors. one, the blue gets darker. i assume this is when im past the clear coat. the next, i hit white. i assume primer. third, i hit metal. ive only hit metal where ive needed to to remove rust.
my paint is good, a little sun faded in parts, but nothing bad. do i have to sand all the way through the clear on the whole car? or do i just need to spend some time on a spot and make sure its rough. i just dont want to waste a lot of time going through the clear on the whole car if i dont have to.
any help is greatly appreciated.
thanks.
just wanted to add. im wet sanding with 400 and a block. im also using a 320 sponge. it doesnt feel like i can get as much done with the sponge, its too soft.
Here's what I've done before. If your paint is not cracked then you basically have to scuff sand it with 400 grit. If it's cracked you'll need to sand deeper.
What you'll want to do is pay attention to the small area's that you have been down to bare metal. Maybe rolling the paint is more forgiving, but in the past I've found that you should spray over the bare metal with primer(or roll it on if you prefer), and then feather it down to the same level as the surrounding area on the panel. If not you may notice an uneven patch under your finished paint job especially on darker colors.
I've always been told a good looking paint job depends mostly on the prep before hand. I'm sure it applies here just as much.
Last edited by 1967mustang; 07/12/07 03:30 PM.
|
|
|
Re: New Paint job on a budget thread.
#37073
07/12/07 03:39 PM
07/12/07 03:39 PM
|
Anonymous
Unregistered
|
Anonymous
Unregistered
|
noted.
i should be wet sanding with 400 correct. not dry sanding?
i already primered all the parts where i went to metal. ill wet sand them to insure theyre ready to go.
|
|
|
|
|


