|
 Re: New Paint job on a budget thread.
#37934
Re: New Paint job on a budget thread.
#37934
02/05/08 05:12 PM
02/05/08 05:12 PM
|
Anonymous
Unregistered
|
Anonymous
Unregistered
|
Quote:
-------------------------
As for that mosquitoe that attached himself to your hood... that was nasty. Maybe you could burn one of those RAID citronella bug repellant incense things to force the bugs away from your work area.
... I lit up one of those citronella bug repellant incense things and it drove the buggers off.
They work equally well outside. Maybe you could get one of those garden type ones, that are mounted on a bamboo shaft.
.
What a GREAT IDEA Marq! I never thought of that! WOW. Home Depot should change their name to "Home and AUTO PAINTING Depot." We roller guys already get our foam rollers, Penetrol, mineral spirits and paint(Rustoleum) from them. Now add Citronella bug repellent to the list. Thanks again for the tip!
Good thing I work at The Home Depot! I can pick up my supplies after my shift is over. I could of swore the Citronella candles were on clearance too! Im gonna give that a shot. I just hope the neighbors dont think im about to sacrifice a goat or something with all those citronella candles laying around in my backyard. 
|
|
|
Re: New Paint job on a budget thread.
#37935
02/06/08 09:16 AM
02/06/08 09:16 AM
|
Anonymous
Unregistered
|
Anonymous
Unregistered
|
I think my paint job is FUBAR-ed! I went ahead and sanded the hood with 1000g to find no shine and tons of fossilized bugs in the hardened paint. Its sopposed to rain today so all I did was wetsand, no paint. this is how I uncovered the fossilized bugs. Theres somewhat of a shine but definitely not a keeper. What I don't get is that there is 6 layers and after sanding with 1000g to move onto coat 7, there is no shine. I mean right now I should technically be finished, right? or maybe it was because of a thicker 6th coat that messed it up. can someone fill me in on how the final wet sand surface is supposed to look like? well here are the FUBAR-ed pictures. Sanded with 1000g after 6th coat 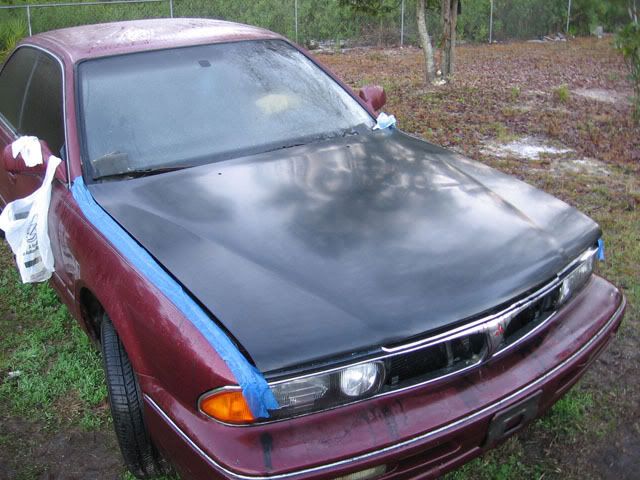 -------------------------- Closer shot  -------------------------- Fossilized bugs  -------------------------- Little to no shine  -------------------------- ouch! original paint showing!   Im not giving up yet. Help me out here guys 
|
|
|
Re: New Paint job on a budget thread.
#37936
02/06/08 09:55 AM
02/06/08 09:55 AM
|
Joined: May 2006
Posts: 575
Canada
Marq

mopar addict
|
mopar addict
Joined: May 2006
Posts: 575
Canada
|
Quote:
I think my paint job is FUBAR-ed! I went ahead and sanded the hood with 1000g to find no shine and tons of fossilized bugs in the hardened paint.
Its sopposed to rain today so all I did was wetsand, no paint. this is how I uncovered the fossilized bugs. Theres somewhat of a shine but definitely not a keeper. What I don't get is that there is 6 layers and after sanding with 1000g to move onto coat 7, there is no shine. I mean right now I should technically be finished, right?
or maybe it was because of a thicker 6th coat that messed it up. can someone fill me in on how the final wet sand surface is supposed to look like?
The final wetsanded surface should have an overall dull gloss - almost like a satiin wall paint compared to a glossy wall paint. The dullness should be similar everywhere on the panel or hood that you are working on.
What you are looking for here is to ensure that the final painted coat is all at one level.
For example, if you were to slice your hood in half and look at a side profile it, it should look like this :
====================================== Paint layer
XXXXXXXXXXXXXXXXXXXXXXXXXXXXXXXXXXXXXX metal hood
IF you were look at a side profile of the paint and it looks like this :
========wwww========www=======wwwwwwww== paint
XXXXXXXXXXXXXXXXXXXXXXXXXXXXXXXXXXXXXXXX metal hood...
Then it means that the paint is not all at one level layer.
Now... taking a close up of the problem layers
WWWWWWWWWWWWWW====== you need to sand the peaks
wwwwwwwwwwwwww====== after light sanding you might be able to get it a little closer. For some people this might work out OK. But the key to a high gloss shine is to get one level contiguous surface...
==================== This is ultimately where you want to get to.
IF you have reached a point where your 1000 grit has successfully dulled the entire surface to the point where you can not see shiny patches, then you are probably at about the right point for the 1000 grit. But you have to remember that the 1000 grit wet sand is not suppose to leave you with a shine. Afterall, it is scratching away at that final outer skin of the paint - removing the paints natural outer shine.
IF you have a uniform dull look to the paint job, then you can start moving up to the 1200 grit, 1400 or even 1600 grit.
You have to remember that each time you are going up to a higher level of grit ( finer ), then the sanding scratches left by the wetsanding will be getting smaller and smaller. As the wet sanding gets finer it takes away from the scratches left by the previous coarser grit sand paper.
If a microscope view of the 1000 paint looks like this :
\ /
\/
When you take it to the 1200 grit, it will look like :
\/
And when you take it up to the 1600 grit it will look like this :
__
At each point where you apply a finer grit sand paper to the wetsanding, you will find the overall surface is taking on a more and more shiner overall look.
This is because the scratches from the wet sanding are taking the surface closer and closer to a smooth surface. The smoother the surface, the shiner it gets.
When you move on to compounding and polishing the surface, that is when you will regain the actual shine. But you have to remember that what the compounding or polishing product is doing, it is simply sanding at a higher level of grittiness. I think most compounding paste are probably equal to a 2500 to 3000 grit sand paper. Polishing compounds might range in equivalency to 2500 to 3500 grit. Remember that compound paste and polishing products are not magically putting something into the surface to regain the shine. They are simply making the surface smoother and smoother. The more smooth it is, the better the reflective value. The better the reflective value, the more shiner it becomes.
NOW... when you finally get to the WAX stage, it does a couple of things. It fills in the microscopic scratches of caused by the wet sanding. But wax can only fill in 'so much' of the scratches. And that is why we have gone through a lengthy wet sanding, compounding and wetsanding sequence... to reduce the size of the scratches.
Now... for myself I went with the 100% pure Carnuba wax from Meguirs ( it had a lovely banana or cherry smell to it ). My theory was that pure Carnuba wax would allow the paint below to continue breathing as it evaporates ( and yes, the paint will be evaporating gases from it for a few months after you finish. The carnuba wax molecules are quite translucent and they are big enough to fill in and camoflage larger scratches.
But some guys have gone to the acrylic type polishes ( usually these newer 'wonder car waxes' that claim you only have to wax 'once a year' ( NuCar, NuFinish, Turtle ICE, etc ). Some folks have gotten great results... as the acrylic base liquid waxes are like pouring on a wet final coat that can fill in the scratches. The only problem I suspect is that because they are acrylics, they may cause a 100% non-breathable surface over your fresh paint. That would mean that evaporating gases trapped under the acrylic layer may give the overall look a bit of fogginess after a few months.
.
|
|
|
Re: New Paint job on a budget thread.
[Re: Marq]
#37937
02/08/08 07:00 PM
02/08/08 07:00 PM
|
Anonymous
Unregistered
|
Anonymous
Unregistered
|
Finished my 2nd paint job. I tried flat black for about a year, it looked good, but I wanted a more finished look. I have decided that this method isn't any easier than spraying, but it is a lot cheaper for a similiar ammount of work, plus the ease of touchup is huge. Color is Rusto Almond, with Rusto satin black. 6 coats, then polished with turtlewax rubbing compound, then polish. I ended up hand polishing and not using my polisher, I didn't really think that the rotary polisher worked that great, may be my technique. The car is really shining now though!   
|
|
|
Re: New Paint job on a budget thread.
[Re: Gusteve]
#37939
02/10/08 12:15 PM
02/10/08 12:15 PM
|
Anonymous
Unregistered
|
Anonymous
Unregistered
|
Thanks, yea, I like the look of a classic enamel color. If you aren't rich and actually want to drive your car this is the way to go.
Plus I have kids and they are constantly banging into my car, and my wife set's her groceries on it, etc. I'd be constantly freaking out if I had a 6K paint job.
My opinion, car restoration industry is now full of rich guys, when real hot rodding is rooted in the daily driver, on a budget, weekend crowd. I went to a car show and the "perfect" cars are so common now, and never driven by their drivers because they have like 40k in work in them.
|
|
|
Re: New Paint job on a budget thread.
[Re: Marq]
#37940
02/10/08 06:53 PM
02/10/08 06:53 PM
|
Anonymous
Unregistered
|
Anonymous
Unregistered
|
Hi Marq,
I just lied down my 6th coat of Anodized Bronze, tremclad flat.
I let it dry for 2 days. For some reason the paint is "soft" to the touch. What I mean is that if I rub it gently with the palm of my hand, it feels grainy. It doesn't feel strong or hard.
When I rub it a little more with gentle pressure, you can feel some of the paint coming off.
Tried the finger nail test and I can diffinately scratch it.
My first 2 coats were at 50% mineral spirits. The next 2 coats were at 30%. The last 2 coats were at 25% mineral spirits.
Am I doing something wrong? I haven't wetsand with 1500 grit paper yet, but I'm worried that the paint may not be curing properly.
Should I wait a few more days so that the paint can harden? Or, should I wet sand it with 1500 grit and just polish it up?
The other options is to wet sand with 1500 then spray on a tremcald clear coat to protect the "soft" paint.
Any suggestions?
|
|
|
Re: New Paint job on a budget thread.
#37941
02/11/08 12:13 AM
02/11/08 12:13 AM
|
Anonymous
Unregistered
|
Anonymous
Unregistered
|
Quote:
Hi Marq,
I just lied down my 6th coat of Anodized Bronze, tremclad flat.
I let it dry for 2 days. For some reason the paint is "soft" to the touch. What I mean is that if I rub it gently with the palm of my hand, it feels grainy. It doesn't feel strong or hard.
When I rub it a little more with gentle pressure, you can feel some of the paint coming off.
Tried the finger nail test and I can diffinately scratch it.
My first 2 coats were at 50% mineral spirits. The next 2 coats were at 30%. The last 2 coats were at 25% mineral spirits.
Am I doing something wrong? I haven't wetsand with 1500 grit paper yet, but I'm worried that the paint may not be curing properly.
Should I wait a few more days so that the paint can harden? Or, should I wet sand it with 1500 grit and just polish it up?
The other options is to wet sand with 1500 then spray on a tremcald clear coat to protect the "soft" paint.
Any suggestions?
No offense but, I think you missed out on the part where your paint mixture has to be the consistency of low fat milk.;) 50\50 is way to thin. believe me Ive tried, lol.
|
|
|
Re: New Paint job on a budget thread.
#37942
02/11/08 12:35 AM
02/11/08 12:35 AM
|
Joined: May 2006
Posts: 575
Canada
Marq
mopar addict
|
mopar addict
Joined: May 2006
Posts: 575
Canada
|
Quote:
Hi Marq,
I just lied down my 6th coat of Anodized Bronze, tremclad flat.
I let it dry for 2 days. For some reason the paint is "soft" to the touch. What I mean is that if I rub it gently with the palm of my hand, it feels grainy. It doesn't feel strong or hard.
I would give it a week or so to get to a more hardened state. If it is soft at this moment, it would appear to indicate that the softness is coming from the percentage of mineral spirits that are still trapped with the paint.
One nice thing is that given enough time and warmth, all the mineral spirits will evaporate and the paint WILL harden.
I don't think there are too many options or ways to proceed until the paint coat cures to a more hardened state.
Sanding while the paint is soft to the touch would just clog up the sand paper...
What are the temperatures like at the present time ? Cool, warm or hot during the day ?
.
|
|
|
Re: New Paint job on a budget thread.
[Re: Marq]
#37943
02/11/08 02:16 AM
02/11/08 02:16 AM
|
Anonymous
Unregistered
|
Anonymous
Unregistered
|
I live in Vancouver. Currently the temperature is close to +3 or 4 degrees celcius. It is fairly humid as well.
So give it a week to evaporate, ok ... I'll try that. I should probably open the windows more and plug in the heater to help the drying process.
What I intend to do is probably 1 or 2 more coats in a week or so. Its looking really good.
What I've done to this point is coat 1, then wait 18-24 hrs, then coat 2, then wait 18-24hrs, then wet sand, then repeat coats 3 & 4, then wet sand, then 5 & 6.
So ... on this close to last one, I'll the all the coats 1 week so the mineral spirits can evaporate properly then do the last 2 coats. Then I'll wait another week or 2 before I polish it or clear coat it.
Am I cutting the paint too thick? Should I go back to 50% mineral spirit for the last 2 coats?
I'll send some photos soon.
|
|
|
Re: New Paint job on a budget thread.
#37944
02/11/08 02:35 PM
02/11/08 02:35 PM
|
Joined: May 2006
Posts: 575
Canada
Marq
mopar addict
|
mopar addict
Joined: May 2006
Posts: 575
Canada
|
Quote:
I live in Vancouver. Currently the temperature is close to +3 or 4 degrees celcius. It is fairly humid as well.
The higher humidity and the cooler temperatures would tend to indicate that more time is required between coats. So one week should be plenty of time for the major percentage of evaporants from the mineral spirits to escape.
With the Brightside and the Tremclad, I found that my final coats were accomplished with about a 15% mineral spirit to about 85% paint. The paint was wet but not runny.
The real trick was to minimize the amount of paint that I loaded on to the roller from the tray. I would load it up heaviliy and then squeegy it back out of the roller using the draining flat surface with its ribs in the paint tray. I would also give a little extra pressure to each end of the foam roller to offload excess paint from the ends of the foam. The idea being that the majority of paint ( that was left after squeeging it out ) was mostly located in the center of the foam roller.
Then the trick was to act like the biggest miser in the world and see just how much of the panel I could get some level of wet coverage on to with the least number of refills from the paint tray.
Normally I was able to do a panel with only 2 or 3 loadings of the roller. The hood would take usually about 3 or 4 loadings of paint.
And even then, I had my trusty clean roller in my free hand to quickly run over any spots where the laoded roller had left bubles waiting to be popped.
.
|
|
|
Re: New Paint job on a budget thread.
[Re: Marq]
#37945
02/11/08 11:38 PM
02/11/08 11:38 PM
|
Anonymous
Unregistered
|
Anonymous
Unregistered
|
I'm officially done! The stripes were really my biggest problem. When i took the tape up, the paint underneath came with it. Gotta love it. Anyways, it has 10 coats of rustoleum blue mixed with a little black, and poorboy's products sealed the deal. I wish more of you guys would properly polish and wax your completed cars, it's beyond worth the effort! I've asked people who didnt know i painted this myself how much they thought the job had cost, and it's shocking! It's as smooth as glass, and the best part is if i get tired of blue, it wont cost me an arm and a leg to change things up! 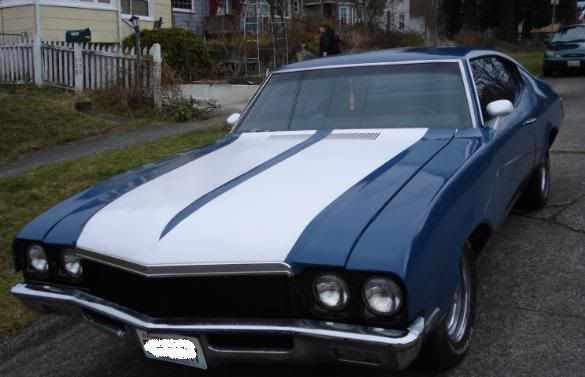
Last edited by skylark72; 02/11/08 11:40 PM.
|
|
|
Re: New Paint job on a budget thread.
#37946
02/12/08 01:43 AM
02/12/08 01:43 AM
|
Anonymous
Unregistered
|
Anonymous
Unregistered
|
Has anyone tried the rustoleum that comes in a spray can? im assuming its the same paint but thinned so its spray-able.
|
|
|
Re: New Paint job on a budget thread.
#37947
02/12/08 08:01 AM
02/12/08 08:01 AM
|
Joined: May 2006
Posts: 575
Canada
Marq
mopar addict
|
mopar addict
Joined: May 2006
Posts: 575
Canada
|
Quote:
Has anyone tried the rustoleum that comes in a spray can? im assuming its the same paint but thinned so its spray-able.
It is usable but does not have the same effect.
The aerosol bombs are great for spraying hard to reach places, like door jambs etc.
But if you aerosol spray a body panel, it lays down a fairly thick coat. You have to remember that when you are using a foam roller with a very thinned paint, it leaves a much thinner coat of paint. Being wetter it has time to fully self-level. Whereas the aerosol spray and its evaporant ( carrier ) are designed to dry quickly ( reducing the time the paint has to self-level ).
With the roller system you are looking at laying on multiple coats, with each stage allowing you the opportunity to make corrections by wet sanding before moving on to the next roller coat.
I have seen some 'aerosol' spray jobs that do come out amazing. But these have usually been performed by guys who really knew what they were doing. But to get a 'good' job, they also had to go through multiple wet sandings.
Aerosol spray bombs are pretty unpredictable. Their spray pattern varies between cans and the nozzles on them.
Their spray patterns are not overall uniform in most cases. In some cases they will lay down a greater concentration of paint on the outer area of the spray pattern and sometimes a greater concentration in the center of the spray pattern.
And there is nothing more annoying about aerosol bombs then when they start spitting blobs of paint at the targeted surface.
With spray bombs, the tendency is to lay on a thicker coat. If you were to try to lay on just a minimal 'thin' coat, you would notice that the paint takes on a bit of a furry feel to it. The surface would not be shiny.. it would be fuzzy. That is because the paint content being propelled at the surface you are painting is attempting to dry even in those microseconds it is flying through the air to land on the body surface. So instead of blending in with the paint particles already sprayed on the body part, it instead 'stacks' on top of the paint particles that were previously sprayed. They end up not having a secure adhesion to the lower surface. So if you rub your finger over a 'lightly sprayed' aerosol surface, you would find your finger picking up all the lost paint particles that were not securely adhered to the painted surface.
Then of course there is a simple question of CO$T... with the number of aerosol bombs you would need to do a car or truck taking quite a bite out of your project budget.
Then let us think about the 'overspray' factor, where half the paint content in the aerosol bomb ends up in the air, on the floor, in your lungs, on your hair, leaving a color mist on your garage walls and on your dog 
The propellants themselves in the aerosol car are a nasty bit of work on your overall health. That presents a problem if you are working in the confines of your garage. And if you are working outside to disperse or lessen the impact of inhaling the propellants, well the overspray landing on everything around will be increased.
Aerosol spray bombing is possible... and I have seen some end results that were truly amazing. But the kudos for those amazing jobs was more directly due to the people who were doing the work.....
.
|
|
|
Re: New Paint job on a budget thread.
#37948
02/12/08 01:37 PM
02/12/08 01:37 PM
|
Anonymous
Unregistered
|
Anonymous
Unregistered
|
Quote:
Has anyone tried the rustoleum that comes in a spray can? im assuming its the same paint but thinned so its spray-able.
You just don't get it do you...

|
|
|
Re: New Paint job on a budget thread.
#37949
02/12/08 08:21 PM
02/12/08 08:21 PM
|
Anonymous
Unregistered
|
Anonymous
Unregistered
|
Quote:
Quote:
Has anyone tried the rustoleum that comes in a spray can? im assuming its the same paint but thinned so its spray-able.
You just don't get it do you...
Well before this 50 dollar paint job project, i knew ZERO on painting anything but a wall and paper. I stumbled onto this epic thread back when it was only 30 pages..then after it collapsed on itself, i simply forgot about it. So now that I had some free time i decided to come back and read as much as I can. to be honest with you i never knew what a "spray bomb" was until now. I meant to ask, but never bothered too. so you'll have to forgive my ignorance, im still learning.
|
|
|
Re: New Paint job on a budget thread.
#37950
02/13/08 08:55 AM
02/13/08 08:55 AM
|
Anonymous
Unregistered
|
Anonymous
Unregistered
|
Quote:
I'm officially done! ...
That looks awesome! Please post more pics. Please post more pics.
What was your blue/black ratio?
|
|
|
Re: New Paint job on a budget thread.
[Re: Marq]
#37953
02/15/08 04:44 PM
02/15/08 04:44 PM
|
Anonymous
Unregistered
|
Anonymous
Unregistered
|
Hi all, I'm a fellow roller from Australia. I first stumbled upon the part 1 thread at the start of the year and after reading almost all the pages I was sold on the method and decided to buy some Brightside Black and paint my car. My car isn't a mopar but its a 1989 Holden VN Commodore Wagon. The paint that was on it was in desperate need of some attention as I had tried to patch up various areas using spray cans. Anyway at the moment I'm currently half way through painting my car but I thought I'd show you all some nice pictures to show you my progress. I've ended up creating a website for my little project as I felt this was easiest to show friends and family how its going. Website here. Special thanks to 69chargeryeehaa for showing the world this technique and also the likes of Marq, Exit and more for a lot input and tips. PS: My Brightside paint from the tin was pretty thick, I tried to use it without thinning it down but it was hopeless. I've since found a mix of about 30-40% thinned down works the best for me. I'm also adding a little Penetrol... Cheers guys.
|
|
|
|
|


