|
 Re: volare front clip in a Studebaker pickup need advice
[Re: Frankentrucks]
#1727399
Re: volare front clip in a Studebaker pickup need advice
[Re: Frankentrucks]
#1727399
01/13/15 03:25 AM
01/13/15 03:25 AM
|
Joined: Feb 2007
Posts: 1,608
fresno ca
mikeysmopars
 OP
OP
top fuel
|
OP
top fuel
Joined: Feb 2007
Posts: 1,608
fresno ca
|
We have acquired early f100 fab instructions and are trying to decide which direction to start but I would really like to see any other builds to see if
Folks used the mounting holes or notched the frame and welded solid.
Last edited by mikeysmopars; 01/13/15 03:28 AM.
Founder and CEO of the Central Valley Mopar Drag Pack
|
|
|
Re: volare front clip in a Studebaker pickup need advice
[Re: Frankentrucks]
#1727401
01/13/15 12:14 PM
01/13/15 12:14 PM
|
Joined: Oct 2012
Posts: 1,106
Northeast
VincentVega
super stock
|
super stock
Joined: Oct 2012
Posts: 1,106
Northeast
|
I think you need to take some measurements to start with. There's lots of F/M bodies still around, and plenty on this forum. Find out what the kframe to floor distance is when the car is down on the ground with a correct alignment and tire pressure. This will give good placement of the control arms and such if you plan to use that size tire (and simply adjust up/down depending on the tire height difference you plan to use). Now you know the torsion bar screws and control arms will be in the right ballpark when all is said and done. This give you a good place to mock up the Kframe without anything bolted to it.
Then you need to get the Stude mocked up where you want it - rake, ride height - and that gives you a way to determine whats going to fit into where, and what needs to be cut/sectioned. You can take measurements from that to the floor as well and begin to form an idea of what's going to interfere. I don't think this sort of thing can be planned ad-hoc over the internet according to other similar builds. Any time you see people doing this seriously, it's on a level concrete floor with mockups and tape measures
Looking for 1975 through 1978 B body 4 door sedan sheet metal or parts cars - monaco, fury, coronet. Please let me know
|
|
|
Re: volare front clip in a Studebaker pickup need advice
[Re: VincentVega]
#1727402
01/13/15 06:13 PM
01/13/15 06:13 PM
|
Joined: Jan 2003
Posts: 10,538
Freeport IL USA
poorboy
I Live Here
|
I Live Here
Joined: Jan 2003
Posts: 10,538
Freeport IL USA
|
VincentVega is correct. This is not a one size fits all project. Each vehicle will have its own unique dimensions and issues that will need to be addressed. When I built my 54, I began with a copy of Tex Smiths How to build a Chrysler Plymouth Dodge Hot Rod copyrighted in 1990. The book has been out of print for several years. The article is titled "A Mirada Subframe Into A 53 Dodge Truck" (A Mirada subframe is the same subframe as the Volare, 5th Ave, & Diplomat) and begins on page 62 of the book. From that article, I had to make modifications for it to work on my 54 truck. Following the given measurements, the steering column angle was too sharp, the firewall cut out was too small, and the suspension was too low. (even lowering the tubing into the frame 2", it was still lower then it should have been) from the measurements in that book. To summarize the article: They set the truck on jack stands, [there was no info on how the stands were positioned or how the height was determined] removed the axle & springs, then cut the frame off 11" in front of the front cab mount (I cut mine off 13" in front of the cab mount, but not at this time, it set the front wheels forward in the wheel openings, but gave a much better steering column angle.)[2 things to check before whacking your frame, position of the wheels in the opening, and steering column angle]. After they whacked the frame, the did a "test fit" of the "loaded" K member.  Then they used 2" x 4" Tubing to join the k member with the truck frame. The over all length of the tubing is 26". Measuring forward 7" of the rear portion of the tube, they welded the tube to the top of the frame rail (the 7" mark is the end of the original rail, 7" of tube will be welded to the rail). [This tube position in relation to the original frame determines the ride height. I cut the top frame rail flange off, and dropped the tubing down 2" into the frame (I could have easily gone 3" deep or even completely inside the original frame). Doing this will raise the front of the truck. (Do not assume I have confused the positioning of the tubing and the frame rail and what the end result will be!) Before everything was hacked off, and welded up, there are holes to drill & cut in the 26" long pieces. From the 7" line, coming forward 6 1/2" is a center line for a 2" diameter hole that must be cut through the inner side of the frame extension to permit access to the k member mounting bolt. On the bottom side of the tubing, a 5/8" hole is drilled at the center line of the previously mentioned 2" hole. This 5/8" hole is for the mounting bolt. There is also a clearance notch that has to be made to clear the K member on the bottom outside part of the frame extension. At this point, they welded the 26" long tubes to the frame and boxed everything in.[I did not, and would not suggest you do the finish weld this at this time. I did tack those extensions to my frame.] Then they bolted the subframe to the frame extensions using the original rubber mounting pads and bolts. [the k member will need front support while doing this.] The second section of frame is made of 2" x 4" tubing with a clearance notch and holes drilled for access for the mounting bolts. The note said ("see accompanying sketches for exact dimensions") of which no sketches existed. The poor picture showed a notch about the size of the rubber mount cut into the bottom and boxed in, then the 2" holes & the 5/8" holes were drilled. You will have to use your K member for the hole dimensions. The "new extensions" are installed with a 2" offset to the outside. [and welded and boxed] The K member now bolts up to the frame extension just as if Dodge designed it that way. Neat! [ Yep, after you finish up what they started.] There are many poor blurry, small, black and white pictures, and several more 1/2 truths concerning the rest of the swap that followed my summery. Once I got the measurements I needed from my K member and transferred then to the tubing, I welded both extension pieces together and did the boxing of the extension pieces joint. Then I bolted both extensions to the K member and positioned it where it needed to be and tacked the whole subframe & extensions to the frame rail, installed the tires, and set it on the ground, set the motor & trans on top of the K member. bolted the front sheet metal to my cab and determined what needed to be changed for the correct ride height and steering column angle and what would be an acceptable tire to wheel opening position, then took everything off the frame, made the required changes and tacked the subframe extensions on and mocked up everything again, until I was happy with what I had. Then I blew everything apart and did the finish weld and boxing and added the front crossmember. Then I pulled the cab & painted everything up. I found some pictures of the finished frame. Gene
|
|
|
Re: volare front clip in a Studebaker pickup need advice
[Re: poorboy]
#1727404
01/13/15 06:14 PM
01/13/15 06:14 PM
|
Joined: Jan 2003
Posts: 10,538
Freeport IL USA
poorboy
I Live Here
|
I Live Here
Joined: Jan 2003
Posts: 10,538
Freeport IL USA
|
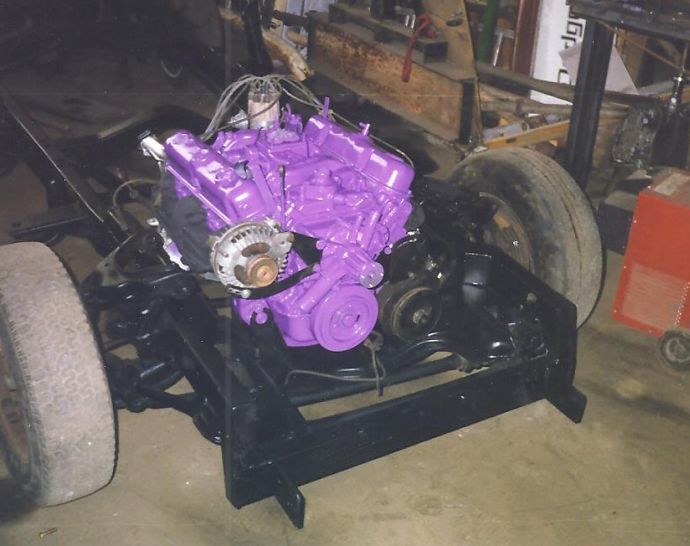
picture 3
Last edited by poorboy; 01/13/15 06:14 PM.
|
|
|
Re: volare front clip in a Studebaker pickup need advice
[Re: poorboy]
#1727406
01/13/15 06:25 PM
01/13/15 06:25 PM
|
Joined: Feb 2007
Posts: 1,608
fresno ca
mikeysmopars
OP
top fuel
|
OP
top fuel
Joined: Feb 2007
Posts: 1,608
fresno ca
|
And we have a winner! Thanks Gene and all that has chimed in, This is what I had in mind but couldn't visualise where the frame came in, Sweet this helps tremidously!  I'll shoot some pix of the progress when i dive in!!
Founder and CEO of the Central Valley Mopar Drag Pack
|
|
|
Re: volare front clip in a Studebaker pickup need advice
[Re: mikeysmopars]
#1727407
01/13/15 06:34 PM
01/13/15 06:34 PM
|
Joined: Jan 2003
Posts: 10,538
Freeport IL USA
poorboy
I Live Here
|
I Live Here
Joined: Jan 2003
Posts: 10,538
Freeport IL USA
|
On my truck, I used the factory rubber bushings between the k member and he tubing, there are sources out there that have aluminum spacers to replace the rubber bushings with. That would probably help with some of the mushy feeling on corners. This is a picture of my other personal ride with a Volare clip under it.  The Dakota clip is a lot easier to do, they just slide right into many older frames at about the firewall until mid way under the cab. Gene
|
|
|
Re: volare front clip in a Studebaker pickup need advice
[Re: Twostick]
#1727410
01/18/15 12:13 PM
01/18/15 12:13 PM
|
Joined: Jan 2003
Posts: 10,538
Freeport IL USA
poorboy
I Live Here
|
I Live Here
Joined: Jan 2003
Posts: 10,538
Freeport IL USA
|
I find it interesting that several suggest the Crown Vic suspension because it mounts on 4 bolts. I would also like to point out the Volare cross member also bolts on with 4 bolts. As I understand, so does a Jag crossmember, and a Pacer did also, if I remember correctly. There are a lot of modern suspension systems that are bolted to their original cars that don't transfer well to something else.
The issue is not so much how the suspension system attached to the original vehicle, but how those bolt locations will transfer to the "new" vehicle's frame. It should be fairly obvious the bolt mounting holes for what ever modern suspension system used, will not be on a different chassis. I don't know how the Crown Vic bolt pattern is arranged, but I suspect you probably can't bolt the Crown Vic crossmember onto the same year F 150 because the mounting bolt locations for the Crown Vic are not present on the F150, unless you add the bolt mounting locations to the F150 chassis. That may not be difficult, or it may be very difficult, depending on the F150 chassis design, and how many things need to move.
The aftermarket Mustang II suspension systems are not popular because they are a superior system (because they are not), but because some guys took the time to develop a process and supply the needed parts to attach them to a wide variety of different vehicles. If no one has developed a Mustang II style system for your specific vehicle, you will still have to do some fabrication.
The bottom line is, regardless of how a suspension system was attached to its original vehicle, unless someone has made an attachment system for that suspension system to attach to your specific chassis, nothing other then the original equipment designed for your vehicle is going to bolt on. Some kind of fabrication is going to be required.
If you choose to modify your original vehicles suspension, there is no easy way to do it, but there are some ways that are more difficult then others. There is a reason it is called "modify and build" instead of "bolt on and exchange". Gene
Last edited by poorboy; 01/18/15 12:18 PM.
|
|
|
Re: volare front clip in a Studebaker pickup need advice
[Re: Twostick]
#1727412
02/13/15 03:03 PM
02/13/15 03:03 PM
|
Joined: Jul 2012
Posts: 102
pensacola, fl
53fopar
member
|
member
Joined: Jul 2012
Posts: 102
pensacola, fl
|
P-S-T.com sells upgrade parts, including bigger sway bar, for the Volare/Aspen front ends.
Last edited by 53fopar; 02/13/15 03:06 PM.
|
|
|
Re: volare front clip in a Studebaker pickup need advice
[Re: mikeysmopars]
#1727413
04/04/15 01:15 PM
04/04/15 01:15 PM
|
Joined: Feb 2006
Posts: 1,179
Canada
demon
super stock
|
super stock
Joined: Feb 2006
Posts: 1,179
Canada
|
Here is something to consider.
Put a complete Dakota frame under the Stude. The dimensions are almost bang on. Way easier to mount a cab and box than to re-engineer, cut and weld a frame.
Buy a running Dakota, pull the body off, mount the cab and box and now you have disc brakes, rack and pinion steering, fuel injected Magnum engine and all the wiring etc is plug and play. Plus all Dakota aftermarket stuff will bolt on.
Dakota's come with 112" 124" or 131" wheelbases. On a 49-64 Stude shortbox, the wheelbase is 112" just like a shortbox Dakota. Not sure what your truck has, but altering he Dakota frame is super easy since they have a sliding section in the center, or you can shorten your truck box if needed.
You can even leave the Dakota cab floor and box floor and attach the Stude cab and box sides to them. Tha Dakota guages are in a neat little box that can easily be adapted to your dash too. Use the 87-96 Dakota for the simplest swap but the 97 and newer Dakotas will work too.
Last edited by demon; 04/04/15 01:32 PM.
|
|
|
|
|


