|
 Re: 71 Duster 340 4spd resto, from ruster to duster!
[Re: NV69B7RR]
#1055862
Re: 71 Duster 340 4spd resto, from ruster to duster!
[Re: NV69B7RR]
#1055862
09/16/12 01:48 AM
09/16/12 01:48 AM
|
Joined: Jan 2003
Posts: 8,150
New Mexico
UCUDANT

Troll Hunter
|
Troll Hunter
Joined: Jan 2003
Posts: 8,150
New Mexico
|
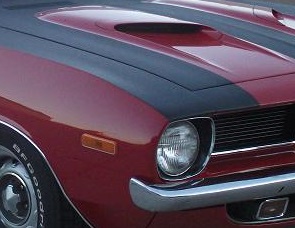
Yup that looks like the driver side head pipe and the recess/indent is to clear the tortion bar (do I win anything?) The car looks great Brent.... and I did a double take  Even your garage floor is expoxied tan?
|
|
|
Re: 71 Duster 340 4spd resto, from ruster to duster!
[Re: ScottSmith_Harms]
#1055864
09/16/12 03:10 PM
09/16/12 03:10 PM
|
Joined: Nov 2006
Posts: 6,005
Reno, Nevada
NV69B7RR
OP
master
|
OP
master
Joined: Nov 2006
Posts: 6,005
Reno, Nevada
|
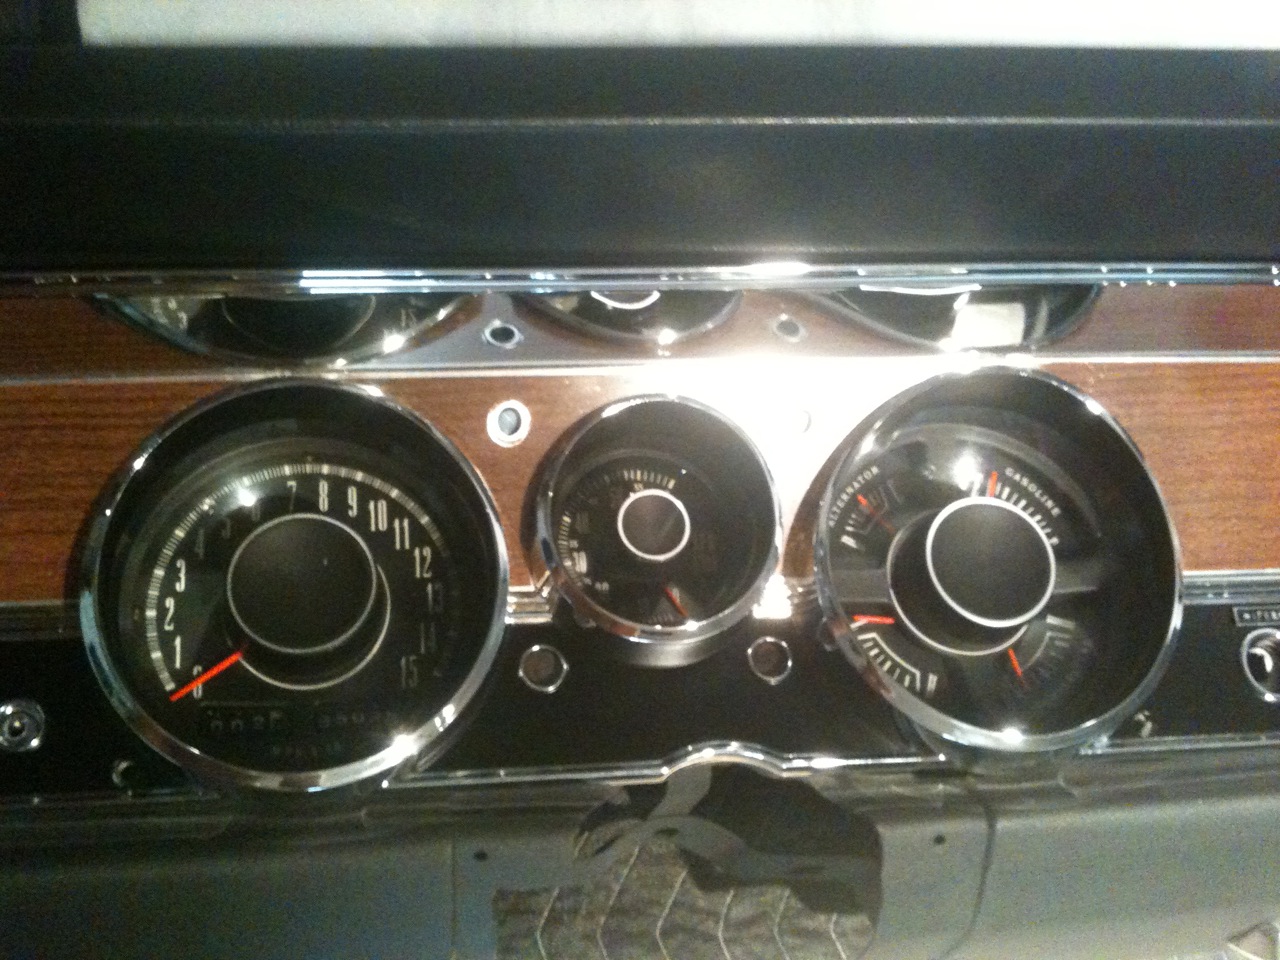
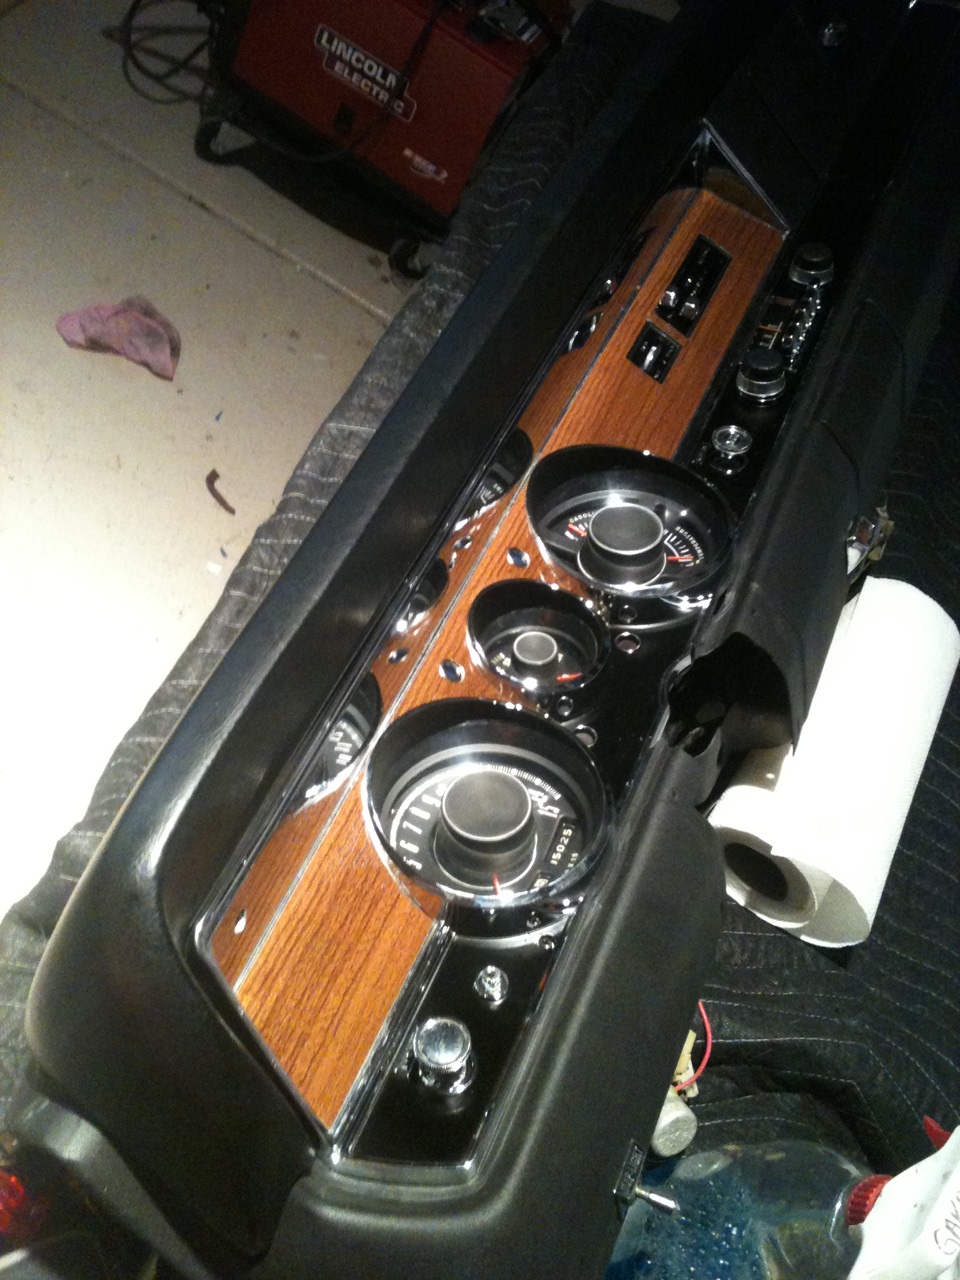
Thanks everyone for the kind words of encouragement! I took a new job that requires more of my time, so Duster work has been pushed back. I got the gauges done this morning. The BEA panels fit and look great. Heres what I can relate about mine. You will have to drill out the hole for the tripmeter shaft, which isn't exactly centered. You will need to come up with some type of Green/Blue plastic lenses if you didn't buythe lense kit from BEA, as the red Brake & High Beam lense come out easliy. I scrounged around the garage and found a blue lid to cut a couple of circles out of. Then went over it with a green sharpie to get the same greenish blue hue. I used a hot glue gun to keep those and the upper bezel retainers in place. I had to melt the lower bezel posts, the same as the factory did it. I used Meguiars clear lens polish and cleaner to bring back the new appearance to my gauge lenses...saving $200.  Whenit comes to the glove box bezel I'd highly encourage drilling out the holes to a larger size closer to the screw. Somebody over on FABO broke their post off the bezel trying to screw it on their glovebox, so I learned from their mistake. It fit and looks great. The only gripe I have about them, and its minor/anal is that some holes aren't 100% centered compared to factory, but its beautiful, its staying and I'm grateful to have this important part reproduced. I picked up my new yellow top battery from Summit yesterday.  Bob, thats creepy!!  Yes, tan epoxy coating on floor done by yours truly. You don't have any Robby Gordon posters in there by chance do you? Thanks for the encouragement. Scott, I'm down to just buying a quart of Evaporust instead of gallons! I have faith you'll get yours done  I'll be at MATS for sure. I plan to run the autocross with the E70's  That way I can get a baseline of how it handles stock, then see the difference once I upgrade the suspension. Maybe I can pursuade Hotchkiss to showcase a before and after with my car in exchange for some free parts! 
|
|
|
Re: 71 Duster 340 4spd resto, from ruster to duster!
[Re: NV69B7RR]
#1055865
09/16/12 03:42 PM
09/16/12 03:42 PM
|
Joined: Jan 2003
Posts: 42,714
Spokane Washington
ScottSmith_Harms
Mr Wizzard
|
Mr Wizzard
Joined: Jan 2003
Posts: 42,714
Spokane Washington
|
Quote:
Scott, I'm down to just buying a quart of Evaporust instead of gallons! I have faith you'll get yours done I'll be at MATS for sure. I plan to run the autocross with the E70's That way I can get a baseline of how it handles stock, then see the difference once I upgrade the suspension. Maybe I can pursuade Hotchkiss to showcase a before and after with my car in exchange for some free parts!
Yes, I had to buy 6 gallons of Evaporust (OUCH!$) but it's all looking good. I find that after an overnight soaking 90% of the rust is gone, but a layer of black oily slime keeps it from getting more so I wipe the parts clean with thinner and then they go back in for another overnight clean up soak which gets the rest.
Your Hotchkis idea is a good one, thought of doing that myself actually. First I'm going all stock (every detail of the car to as close to the fender tag and OE correct as possible considering that I started with a "parts car"), then bagging all the OEM stuff and swapping on all the Hotchkis stuff and some big brakes and better wheels/rubber as I plan to drive the car a lot. I don't mind add ons that can easily be swapped back in a days work, as long as no welding or mods are needed.
|
|
|
Re: 71 Duster 340 4spd resto, from ruster to duster!
[Re: dmoore]
#1055872
09/22/12 02:00 PM
09/22/12 02:00 PM
|
Joined: Nov 2006
Posts: 6,005
Reno, Nevada
NV69B7RR
OP
master
|
OP
master
Joined: Nov 2006
Posts: 6,005
Reno, Nevada
|
Finally feeling better. Especially once I got home from work yesterday to find my tires waiting for me!! Thanks to fellow 71 Duster lover/restorer & member; fc7freak (David) for selling me these. Since they were the original E70 size I had to go that route. Hope to get the wiring cleaned and installed on the dash today. Although I really need to get busy and repaint my ralley wheels so I can get the tires mounted ASAFP! Duster fever.. Might have been bird flu or something that came inside my recently acquired Chinese parts.. Ever seen the Simpsons episode where the sick Chinese worker coughs in the box before taping it shut?
Last edited by NV69B7RR; 09/22/12 02:06 PM.
|
|
|
Re: 71 Duster 340 4spd resto, from ruster to duster!
[Re: UCUDANT]
#1055879
10/04/12 02:07 AM
10/04/12 02:07 AM
|
Joined: Dec 2010
Posts: 12,375
SoCal
MuuMuu101
I got lucky at Woodward!
|
I got lucky at Woodward!
Joined: Dec 2010
Posts: 12,375
SoCal
|
Quote:
Just write a to do list and go at it like an emotionless machine. Dude do you know how many folks are following this post?? You ROCK 
 Your car will probably be 1000x's better than my Dart will ever be. And you've been flying on your car! Keep it up! The finish line is just ahead. Your car will probably be 1000x's better than my Dart will ever be. And you've been flying on your car! Keep it up! The finish line is just ahead.
|
|
|
Re: 71 Duster 340 4spd resto, from ruster to duster!
[Re: MuuMuu101]
#1055880
10/18/12 12:36 AM
10/18/12 12:36 AM
|
Joined: Nov 2006
Posts: 6,005
Reno, Nevada
NV69B7RR
OP
master
|
OP
master
Joined: Nov 2006
Posts: 6,005
Reno, Nevada
|
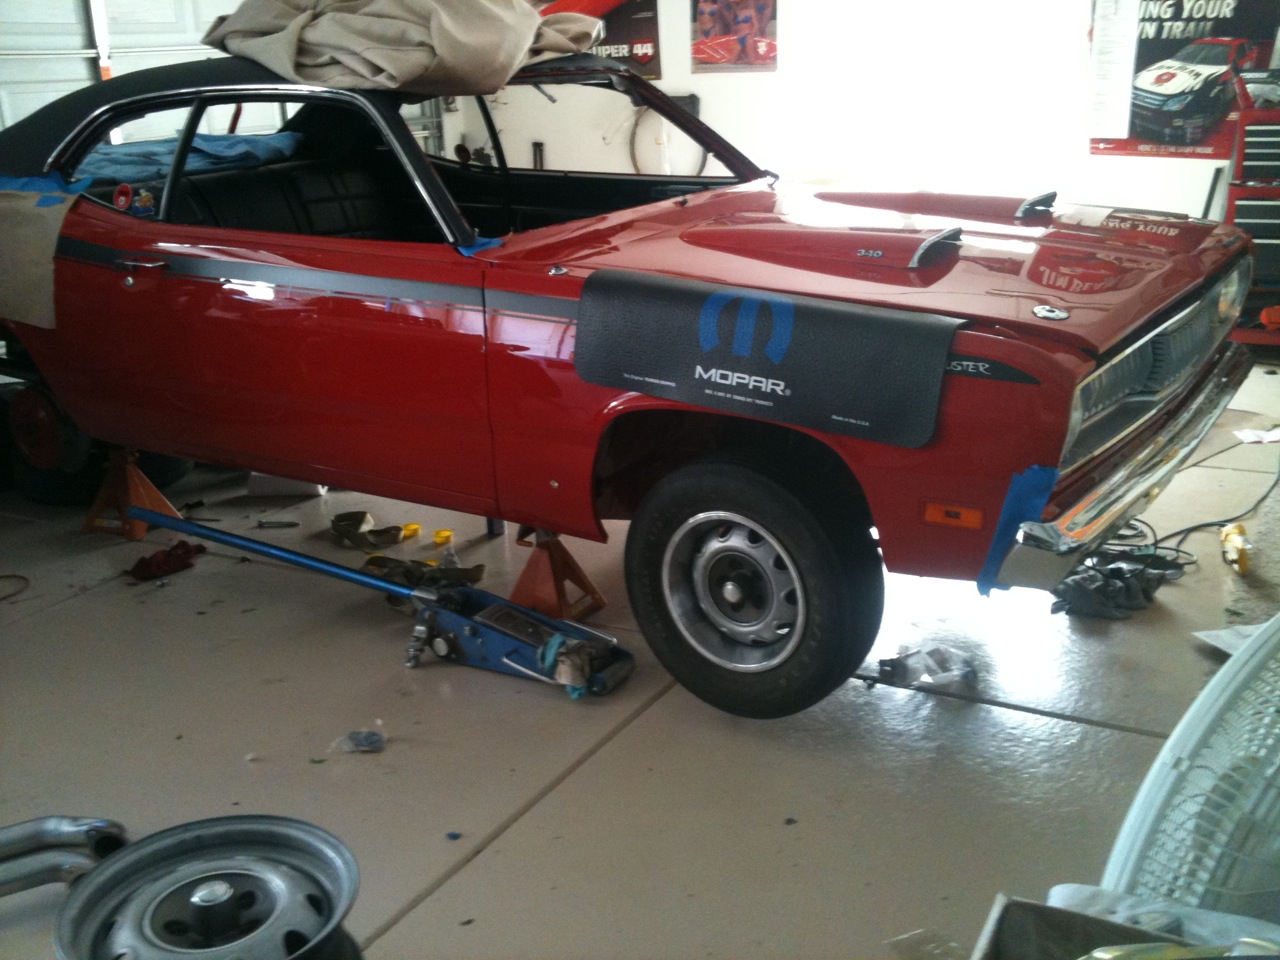
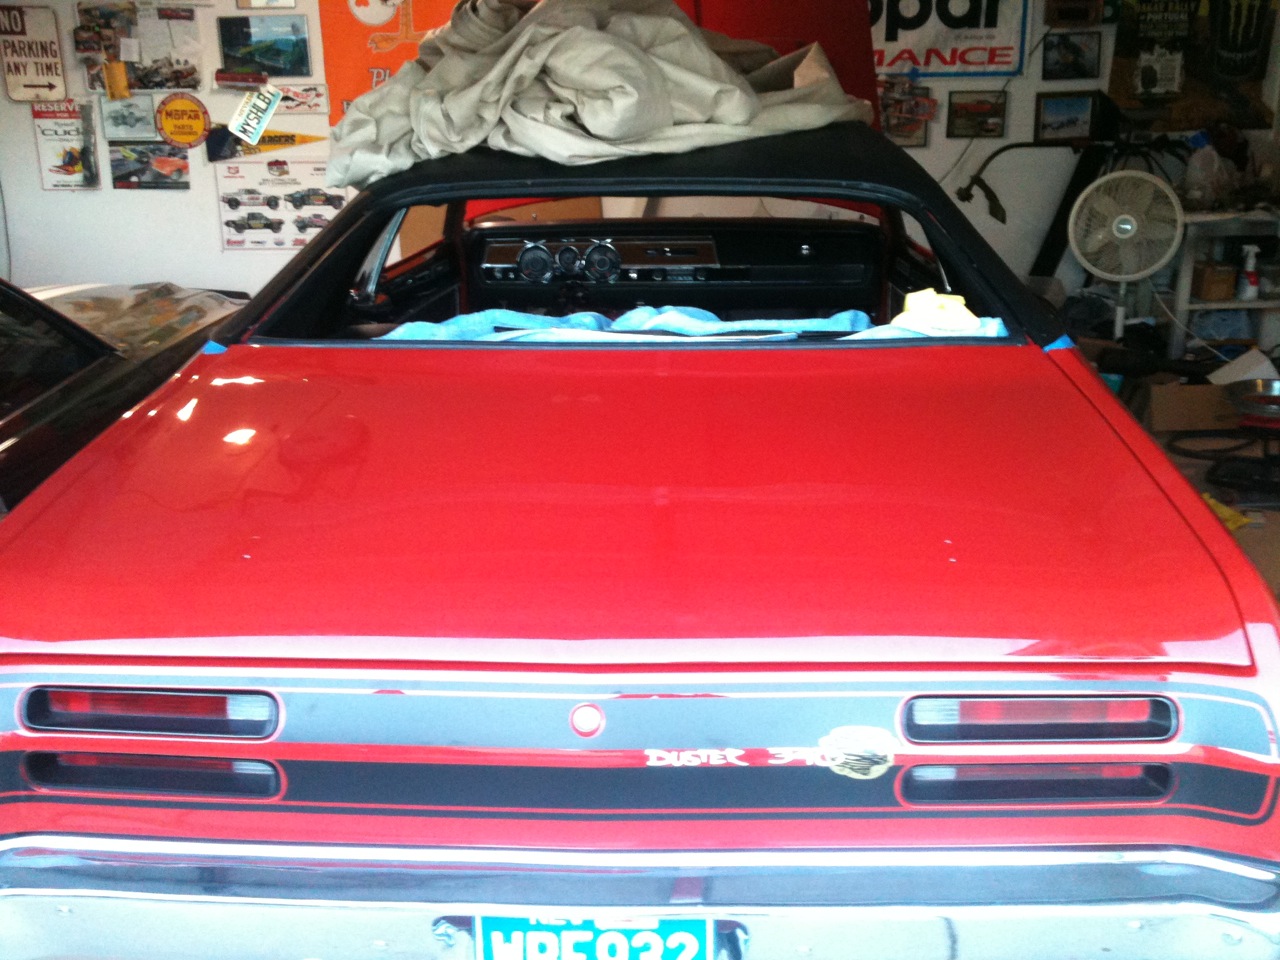
Thanks Bob & Mu I got back at it cause it aint gonna get done by itself.   This picture shows most of what I've done lately: The decklid is finally done and installed! Headliner is done for the 2nd time  Dash is in and most everything is hooked up. All of the weather stripping (hood x2, trunk, doors, and roof) is done and permanently attached. Wheels are off getting powdercoated. Undercoating will get done in 2 weeks.  Only downside today was the discovery of some cat urine on the bottom of my car cover.. 
|
|
|
|
|


