Moparts

Painted 14 years ago, it's time to put it together

Posted By: gtx6970

Painted 14 years ago, it's time to put it together - 06/22/10 02:12 AM
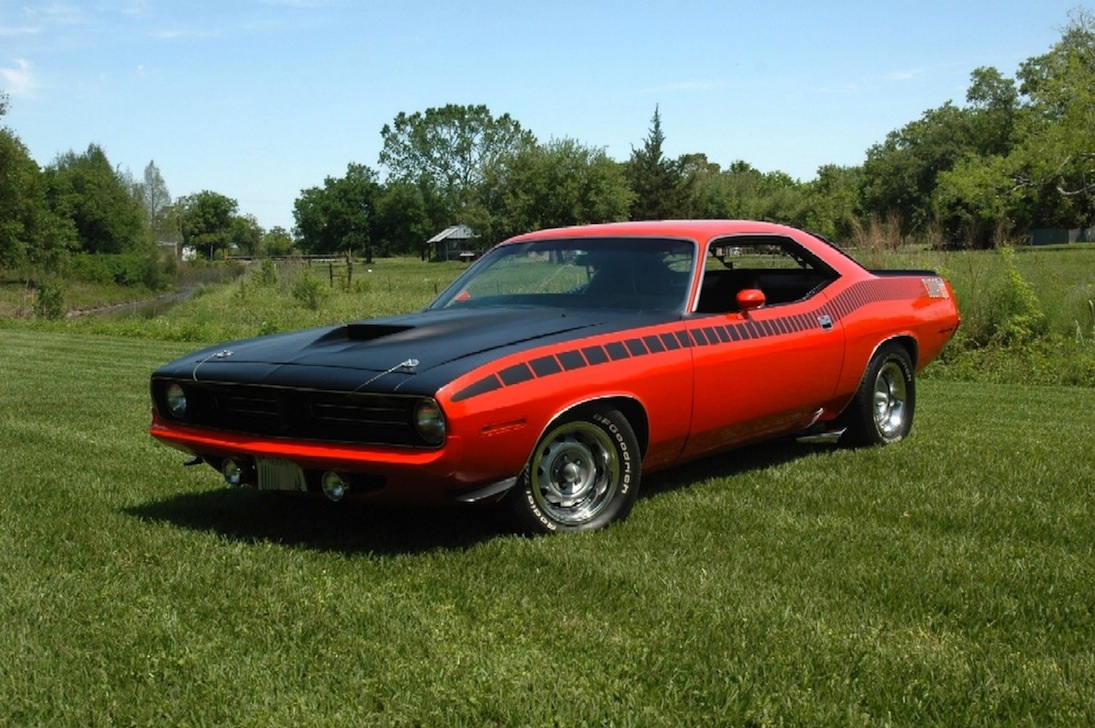
1970 Cuda
After nearly 3 years of ribbing him, I got the job to assemble the mans dream. The body was painted in 1995 or 96 and has sat covered ever since. He's owned it since about 1982 or 83'

ps, yes, it's a real AAR but it was missing all it's original drivetrain back then. Considering how longed he's owned it. The chances he's gonna sell it anytime soon is very unlikley. So, he decided to build his dream car. I assure you he will die with this car in his ownership.

Attached picture 6048498-DSC00636.JPG
Posted By: gtx6970

Re: Mix a little dis and just a dash of that + You get - 06/22/10 02:13 AM

Mix in a bit of dis

Attached picture 6048501-DSC00637.JPG
Posted By: gtx6970

Re: Mix a little dis and just a dash of that + You get - 06/22/10 02:16 AM

Powered by
Tim Banning built 470 plus cuin monster

Attached picture 6048507-DSC00639.JPG
Posted By: gtx6970

Re: Mix a little dis and just a dash of that + You get - 06/22/10 02:20 AM

Plan was to have it ready for the Nats, but I think Sept and Monster Mopar show is more realistic

Attached picture 6048516-DSC00626.JPG
Posted By: ChallengerGary

Re: Mix a little dis and just a dash of that + You get - 06/22/10 03:19 AM

Bill,

Something like this?

Gary

Attached picture 6048622-customCudaAARw426inshield.jpg
Posted By: gtx6970

Updated - 09/24/10 01:03 PM

Been kinda busy with other projects so progress is slow .
But it's at least progress

Spent to better part of 2 days insulating the inside of the passenger compartment. From roof to floor and firewall to speaker shelf.Inside of the doors and 1/4 area will get covered as well, once all the regualtors and glass are in and adjusted.


Attached picture 6214370-DSC01177.JPG
Posted By: gtx6970

Re: Updated - 09/24/10 01:06 PM

Park brake assy, Steering column support, and the vent box have all been done and re-installed.

Attached picture 6214375-DSC01185.JPG
Posted By: gtx6970

Re: Updated - 09/24/10 01:11 PM

Roof is insulated front to rear. You wouldn't believe how solid the roof sounds when you tap on it,no more ting ting when you hit it, now it's a solid 'thud'. I think it's going to be much quieter inside.

I went with a fatmat.com material called 'rattle trap'

Attached picture 6214380-DSC01179.JPG
Posted By: gtx6970

Re: Updated - 09/24/10 01:18 PM

Car gets a Vintage Air a/c system , thus why theres a bare spot on the firewall.
My one pet peave with this system is how the box mounts.
I plan to make a new heater-a/c box mounting brackets to use the original non-a/c box mounting points, that way theres no extra holes to be drilled into the firewall.

Attached picture 6214384-DSC00903.JPG
Posted By: gtx6970

Re: Updated - 09/24/10 01:24 PM

Rear end is an all new Strange 3.54 Dana. Using 1" offset shackles to allow a bit more tire under the car. Hung on AAR arched Hemi style springs from Detroit spring ( bushings are now in btw)
Shocks are KYB's painted to replicate something close to OE.

Attached picture 6214389-DSC00927.JPG
Posted By: gtx6970

Re: Updated - 09/24/10 01:28 PM

Neil at Dynamic Renovation did some plating for me. From the door latches and strikers to jack mast, every piece came back looking great.
Latches

Attached picture 6214391-DSC01136.JPG
Posted By: gtx6970

Re: Updated - 09/24/10 01:30 PM

Drivers door latch and striker are in and adjusted, but I'm sure they have to be re-adjusted once the weatherstriping goes on.

Attached picture 6214392-DSC01143.JPG
Posted By: peabodyracing

Re: Updated - 09/24/10 01:31 PM

You're making me feel very bad. My 69 Roadrunner was painted in 96 and I've still not gotten to putting it back together.

Good progress pictures. Thanks for posting!
Posted By: gtx6970

Re: Updated - 09/24/10 01:32 PM

Jack assembly was taken apart , mast replated and all the mechanisims glass beaded and repainted in dove grey.

Attached picture 6214396-DSC01137.JPG
Posted By: gtx6970

Re: Updated - 09/24/10 01:33 PM

Back together

Attached picture 6214400-DSC01139.JPG
Posted By: gtx6970

Re: Updated - 09/24/10 01:37 PM

Quote:

You're making me feel very bad. My 69 Roadrunner was painted in 96 and I've still not gotten to putting it back together.

Good progress pictures. Thanks for posting!


Don't feel bad, this body was painted in 1993-94 time frame. Most of the parts he bought for it back in the 90's . Dash wiring and interior soft trim were dated 1994 - 1995 respectivily.
Engine was picked up in 2005 I think.
Posted By: gtx6970

Re: Updated - 09/24/10 01:41 PM

Tail lights were ugly to say the least.
Trying to keep something of a budget, the customer asked to see what could be done. The housings were glassbeaded to bare metal.

Attached picture 6214416-DSC00936.JPG
Posted By: gtx6970

Re: Updated - 09/24/10 01:42 PM

Insides were done with a chrome paint.

Attached picture 6214419-DSC00939.JPG
Posted By: gtx6970

Re: Updated - 09/24/10 01:46 PM

The next day. The exterior was sprayed with Eastwoods carb renew paint. This stuff goes on kinda thin so it takes a few coats to get what I felt was a good color match.

shown with camera flash

Attached picture 6214422-DSC00958.JPG
Posted By: gtx6970

Re: Updated - 09/24/10 01:47 PM

without camera flash.
outside in natural light.


Attached picture 6214424-DSC00959.JPG
Posted By: gtx6970

Re: Updated - 09/24/10 01:57 PM

Original lenses and chrome bezels are all polished up, everything back in the car.

Attached picture 6214433-DSC01046.JPG
Posted By: gtx6970

Re: Updated - 09/24/10 01:59 PM

Last one for now.
Replated trunk latch and hardware.
Lock cover was powder coated gloss back and the finished and installed tail light.

Attached picture 6214436-DSC01145.JPG
Posted By: 68shifter

Re: Updated - 09/24/10 03:32 PM

Awesome attention to detail. Cudas just look good green. Is that going to be a stick or auto car?
Keep up the good work, and the updates.
Posted By: jrwoodjoe

Re: Updated - 09/24/10 05:50 PM

Looks really nice Bill. He's gonna be so stoked when he gets it back.

Joe
Posted By: BloFish

Re: Updated - 09/24/10 11:13 PM

Posted By: Finoke

Re: Updated - 09/29/10 01:02 PM

Looking forward to more pics, Looking good
Posted By: gtx6970

Re: Updated - 10/08/10 10:34 PM

Been working on it all week. Like previously stated, it gets A/C . Took several attempts to get everything lined up.

Everything on the motor came from Buochillon,,, from the compressor to all the brackets, including the power master alternator.

IMO, use the supplied instructions as a guide, I ended up moving spacers and washers around to make it fit to where I was happy.

Attached picture 6240010-DSC01206.JPG
Posted By: gtx6970

Re: Updated - 10/08/10 10:36 PM

Sanden compressor.
This is just a trial fit, as the owner wants it painted black before final installation

Attached picture 6240011-DSC01210.JPG
Posted By: gtx6970

Re: Updated - 10/08/10 10:37 PM

So much for the factory coil mounting.

( ps,and yes that little spring bracket is already painted engine color)

Attached picture 6240014-DSC01215.JPG
Posted By: ChallengerGary

Re: Updated - 10/09/10 01:53 PM

Incredible!!!
Posted By: gtx6970

Re: Updated - 10/11/10 01:30 AM

Quote:

Is that going to be a stick or auto car?


It's going to be a console auto. He had John Cope build the trans with several internal upgrades in the name of safety and performance. With a PTC 3000 stall 9.5" convertor for it as well
Posted By: gtx6970

Re: Updated - 10/21/10 01:48 PM

Well, It's been kind slow going. having to rework most of the repop parts brought in.

Here is the repop OIL dipstick tube to manifold bracket.
As you can see the bracket is bent completely opposite of the way it needs to be.

Attached picture 6261349-DSC00025.JPG
Posted By: gtx6970

Re: Updated - 10/21/10 01:49 PM

I ended up bending - making a new bracket to attach the tube to the manifold and hold it in place

Attached picture 6261352-DSC00041.JPG
Posted By: gtx6970

Re: Updated - 10/21/10 01:52 PM

Got all the allignment issues with the A/C compressor, power steering and alternator straightend out.
Compressor is painted the black he wants it and is on for the last time.
Bouchillon recomended the saginaw power steering pump and brackets.

Attached picture 6261357-DSC00029.JPG
Posted By: gtx6970

Re: Updated - 10/21/10 01:54 PM

So much for the pre-bent fuel pump to seperator line. This one went in the trash

Attached picture 6261359-DSC00035.JPG
Posted By: gtx6970

Re: Updated - 10/21/10 01:57 PM

1 new line and a little bit of time with a tubing bender and it's all better now.

Attached picture 6261363-DSC00053.JPG
Posted By: gtx6970

Re: Updated - 10/21/10 02:00 PM

Tim Banning recomended not to use the choke tubes, and the fact the car has an electric choke , means the tubes are for looks only.

Attached picture 6261369-DSC00057.JPG
Posted By: gtx6970

Re: Updated - 10/21/10 02:03 PM

All together and,anyone will be hard pressed to tell.
Repop trans dipstick tube and indicator fit perfectly

Attached picture 6261375-DSC00058.JPG
Posted By: gtx6970

Re: Updated - 10/21/10 02:05 PM

A couple friends dropped by sunday afternoon,,,, and like Prego, it's in there.

Attached picture 6261378-DSC00078.JPG
Posted By: gtx6970

Re: Updated - 10/21/10 02:06 PM

View from the other side

It went in from the bottom as engine, trans, and K-frame exactly as you see it.
To say it was tight fit is an understatement. Once it got close , Coming down with the lift at about 1/2" increments takes a while. But we didn't scratch anything

Attached picture 6261379-DSC00079.JPG
Posted By: gtx6970

Re: Updated - 10/28/10 01:54 PM

Finally found dash speakers that fit without to much majory surgery to the dash frame.
These are Clarion 3.5" 2 ways . They fit the grille perfectly, and I only had to trim the metal dash frame maybe 3/4" of an inch.
top view

Attached picture 6272430-DSC00020.JPG
Posted By: gtx6970

Re: Updated - 10/28/10 01:55 PM

view from the bottom( left front speaker)

Attached picture 6272431-DSC00017.JPG
Posted By: gtx6970

Re: Updated - 10/28/10 01:58 PM

Vintage Air a/c box is all done and mounted using home made brackets to avoid drilling anything extra in the car

Attached picture 6272433-DSC00124.JPG
Posted By: gtx6970

Re: Updated - 10/28/10 01:59 PM

Dash is , for the most part done. and now in the car.

Attached picture 6272436-DSC00132.JPG
Posted By: gtx6970

Re: Updated - 10/28/10 02:01 PM

Drivers side view
Used the metal woodgrain applique from PG, and gauge overlays from Mister Heater box

Attached picture 6272438-DSC00130.JPG
Posted By: gtx6970

Re: Updated - 10/28/10 02:06 PM

Yesterday I concentrated on engine wiring and ignition system cleanup
Due to the a/c compressor mounting location. Using the factory Hemi coil mount was out of the question.
So, I'm using a Accell coil
mounted on the rear/ side of the intake, similar to a 440 six pack mounting .
Fabbed up a bracket yesterday with some leftover 18 gauge stainless and a bench vise. It's not super pretty, but once painted and the coil is mounted. You not going to see it anyway.

Attached picture 6272445-DSC00135.JPG
Posted By: gtx6970

Re: Updated - 10/28/10 02:10 PM

This is the coil I'm going with. And once the air cleaner is on it your not going to really see the coil anyway, which is kind of the point.

Attached picture 6272448-accel-140008.jpg
Posted By: shakerjoe

Re: Updated - 11/03/10 02:56 PM

Bill, do you know what the chrome paint was that was used on inside of tail light housings ? Looks good in pics - what is real world look with brakes applied - does it reflect nicely - thanks - Joe
Posted By: gtx6970

Re: Updated - 11/04/10 11:27 PM

Quote:

Bill, do you know what the chrome paint was that was used on inside of tail light housings ? Looks good in pics - what is real world look with brakes applied - does it reflect nicely - thanks - Joe


Jpoe,
I'll ck the can leftovers I have. and post a pt # and brand

I can't answer on the reflective quality as of yet, as the car isn't done .
I felt it looked very close to the original satin chrome look of the original hsgs.
Posted By: peter

Re: Updated - 11/10/10 10:36 AM

Hello

Can you please tell me where you got the aircon compressor brackets from

thank you
peter
Posted By: gtx6970

Re: Updated - 11/12/10 02:49 PM

Quote:

Hello

Can you please tell me where you got the aircon compressor brackets from

thank you
peter


http://www.bouchillonperformance.com/
Posted By: gtx6970

Re: Updated - 11/18/10 01:49 PM

Well, The body is out having the vinyl top, Ft and rear glass and headliner installed I turned my atention to the interior trim.

My customer decided not to wait on the upcoming new interior trim panels.

So, I cleaned, cleaned and cleaned again all 4 of the originals. dyed them with Sems brand vinyl dye with an adhesion promotor. Should there be a problem later one, he may re-evaluate the new ones.

I think they came out great, these were not perfect, but very nice used originls.

Ft's

Attached picture 6307533-124.JPG
Posted By: gtx6970

Re: Updated - 11/18/10 01:50 PM

2

Attached picture 6307535-125.JPG
Posted By: gtx6970

Re: Updated - 11/18/10 01:51 PM

3

Attached picture 6307537-122.JPG
Posted By: gtx6970

Re: Updated - 11/18/10 01:52 PM

kick panels

Attached picture 6307538-118.JPG
Posted By: gtx6970

Re: Updated - 12/01/10 09:22 PM

Car is back from the trim shop. Had the top and headlier installed. As well as polishing all the exterior stainless trim. New windshield and rear glass installation


Attached picture 6331331-115.JPG
Posted By: gtx6970

Re: Updated - 12/03/10 02:55 AM

It's starting to look like the mans dream ride. Tires and wheels are just rollers for now

Attached picture 6334136-DSC00224.JPG
Posted By: gtx6970

Re: Updated - 12/03/10 02:58 AM

Getting the underhood A/C system mocked up and trial fitted, so far I'm impressed. It took a little bit of tweaking on the hard line to the drier but thats about it

Attached picture 6334148-DSC00245.JPG
Posted By: gtx6970

Re: Updated - 12/03/10 02:59 AM

top view

Attached picture 6334153-DSC00243.JPG
Posted By: gtx6970

Re: Updated - 12/03/10 03:00 AM

again

Attached picture 6334160-DSC00242.JPG
Posted By: gtx6970

Re: Updated - 12/03/10 03:01 AM

a more overall view

Attached picture 6334161-DSC00241.JPG
Posted By: gtx6970

Re: Updated - 12/03/10 03:03 AM

Didn't like the idea of hanging a ECU on the firewall( neither did the owner )
So,

Attached picture 6334163-DSC00238.JPG
Posted By: gtx6970

Re: Updated - 12/03/10 03:04 AM

Viola,

Attached picture 6334165-DSC00239.JPG
Posted By: gtx6970

Re: Updated - 12/03/10 03:06 AM

Spent this morning dis-assembling 1/4 window glass and trim.

The tinted glass had 71-74 trim on it,so I took all of the apart to transfer the 70 only trim that was on the clear glass but needs to be on the tinted glass going in the car.
70 is on the right and the later ones on the left

Attached picture 6334167-DSC00237.JPG
Posted By: gtx6970

Re: Updated - 12/03/10 03:20 AM

Seats are done to !

Attached picture 6334193-DSC00208.JPG
Posted By: gtx6970

Re: Updated - 12/03/10 03:21 AM

Major plus for an E-body. Adding a 6 way seat

Attached picture 6334195-DSC00223.JPG
Posted By: gtx6970

Re: Updated - 12/03/10 03:26 AM

on a side note.
If your glass has scratches in them, don't bother with the Eastwood polishing kit. about all it's good for is removing haze

Attached picture 6334207-DSC00184.JPG
Posted By: JDMopar

Re: Updated - 12/03/10 03:44 AM

Lookin good Bill. If the AC compressor lines up correctly to use 2 belts as the original does...I'd use them. I've got Classic Air brackets on a small block, and it only uses one belt. It will squeel under load sometimes. Use 2 if you can.
Posted By: Dave Watt

Re: Updated - 12/03/10 02:38 PM

Very nice Bill. Looks like a sweet ride.
Posted By: jrwoodjoe

Re: Updated - 12/03/10 03:43 PM

Looking great Bill!
Posted By: gtx6970

Re: Updated - 12/03/10 11:13 PM

Quote:

Lookin good Bill. If the AC compressor lines up correctly to use 2 belts as the original does...I'd use them. I've got Classic Air brackets on a small block, and it only uses one belt. It will squeel under load sometimes. Use 2 if you can.


Thanks fellas

JD,
I tried and would prefer 2 belts, BUT the pulley alignment makes that out of the question.It's one belt or nothing.
Posted By: Desmond

Re: Updated - 12/04/10 12:54 AM

really cool build!
Posted By: wally426ci

Re: Updated - 12/04/10 04:30 PM

Coming along nicely!!

Great find as far as speakers!

I had no idea 1/4 trim was different in 70.

I love the location of the ECU!
Posted By: 70RT70

Re: Updated - 12/04/10 10:27 PM

Nice Project!
Posted By: jrwoodjoe

Re: Updated - 12/04/10 11:23 PM

Quote:


I had no idea 1/4 trim was different in 70.


Me either, is that just a Barracuda thing or was diff. on 70 Challengers also?

Joe
Posted By: gtx6970

Re: Updated - 12/05/10 09:23 PM

Quote:

Quote:


I had no idea 1/4 trim was different in 70.


Me either, is that just a Barracuda thing or was diff. on 70 Challengers also?

Joe


Joe, as a far as I know Yes it applies to all E-bodies.

The vertical weatherstrip in this stainless steel moulding is unique to a 1970
Posted By: Gavin

Re: Updated - 12/08/10 12:19 AM

Bill did you replace the rubber trim at the base of the quarter glass as well - I guess you might call it window channel? If so what did you use, thanks
Posted By: gtx6970

Re: Updated - 12/08/10 02:59 AM

Quote:

Bill did you replace the rubber trim at the base of the quarter glass as well - I guess you might call it window channel? If so what did you use, thanks


Gavin,
If your talking about the strip thats keeps the glass in the lower aluminum lift plate ?
No , I just want to transfer the stainless trim from the leading edge to the tinted glass.

btw, 3M makes a 2 part adhesive to attach the glass to the lift plate as well as the stainless trim
Posted By: kingdust

Re: Updated - 12/08/10 05:19 AM

you do nice work. attention to details makes or breaks a car. its alot of work and its nice when you have the parts already there, seems like your getting alot done in a short amount of time. good luck finishing it.
Posted By: gtx6970

Re: Updated - 12/09/10 03:36 PM

was just playing around over the weekend.

15x7 on the front with way to tall 225-70R15's
and 15x8's with 275-60-15's on the rear

Attached picture 6347115-DSC00232.JPG
Posted By: gtx6970

Re: Updated - 12/09/10 03:37 PM

side view

Attached picture 6347118-DSC00233.JPG
Posted By: gtx6970

Re: Updated - 12/09/10 03:38 PM

I'm not sure if I like it or not. And with this tire size the rear end needs to drop a bit

Attached picture 6347119-DSC00242.JPG
Posted By: Motoman172

Re: Updated - 03/04/11 06:33 PM

Thanks for sharing the pictures... seeing everyone's projects gives me motivation to get started with mine...
Posted By: PAINT IT BLACK

Re: Updated - 03/07/11 03:06 PM

Quote:

I'm not sure if I like it or not. And with this tire size the rear end needs to drop a bit


I like the stance. Especially if you use 235/60 tires up front and drop the apex of the opening to about an inch below the crown of the tire. Dropping the rear about an inch would help too, but makes the pinion angle even harder to get right (4* down). It especially looks better with Rallyes. Full disclosure, that is how mine is setup...

By the way, excellent work. Cool car. I'll be happy to be able to contribute with one of my air cleaners to this project!


Attached picture 6515752-DSC_01282.JPG
Posted By: jrwoodjoe

Re: Updated - 03/07/11 04:09 PM

So what wheel and tire size do you have on the rear? That stance is pretty close to what I would like to have on mine.
Posted By: gtx6970

Re: Updated - 04/14/11 01:34 PM

Big Thanks to Hybrid Fiberglass Solutions. The air cleaner has arrived.
It's a Hemi / AAR style base designed to seal against the AAR hood AND clear all the obsticles I have.

Attached picture 6584446-DSC01372.JPG
Posted By: gtx6970

Re: Updated - 04/14/11 01:35 PM

Drivers side clears everything just fine

Attached picture 6584448-DSC01375.JPG
Posted By: gtx6970

Re: Updated - 04/14/11 01:37 PM

My main concern was clearing the coil. And it fits perfectly.

Many thanks Steve., well done

Attached picture 6584450-DSC01373.JPG
Posted By: basketcase

Re: Updated - 04/16/11 12:59 AM

I love the stance! sweet looking 'cuda. and it's nice to see Magnums on an e body for a change.
Posted By: gtx6970

Re: Updated - 07/27/11 09:37 PM

Well, The cars owner has finally made his choice on wheels and tires
15x7's on the ft and 15x8's on the rear 235-60-15 and 295-50-15's respectively.

The project was back burned over the winter into early spring due to some parts delays.
But for the 1st time in over 15 years, the cars owner will have his own car at the nats next month.

Thanks for all the help from board members here with issues I was not familiar with.
A big thank you to ;
John Cope at CRT. Tim Banning at FHO ,
Glen Bridges at Bridges Upholstry
Ben at Promax for the TTI exhaust


Attached picture 6749617-6-26-8.JPG
Posted By: gtx6970

Re: Updated - 07/27/11 10:08 PM

And how could I forget these nifty custom decals from Challenger Gary

Attached picture 6749675-6-26-9.JPG
Posted By: MidPenMopar

Re: Updated - 07/28/11 01:17 AM

I just stand in awe of the talent you and some of the others on here have. Amazing job!
Posted By: jrwoodjoe

Re: Updated - 07/28/11 03:08 AM

The car turned out very nice Bill. I'm sure the owner is going to really enjoy the car. Nice touch with the custom AAR graphic too.

Joe
Posted By: phantomx

Re: Updated - 07/28/11 09:42 AM

Very nice Since this is his dream car, is the color original to the car or was it changed? Completely off topic, but I spy a copper 67 Coronet in the background of one pic. What is it? My bro has a copper 67 convertible 500.
Travis..
Posted By: gtx6970

Re: Updated - 07/28/11 12:28 PM

Car had a color change ( plus much much more) His dream color has always been limelight and added the vinyl top for contrast.

Copper 67 Coronet 440 is a friend of mines.
383 , column auto. Originally copper ext with copper interior but the interior has been changed to copper and white . All copper in and out was just to much
Posted By: gtx6970

Re: Updated - 07/28/11 01:41 PM

Also a big thanks to Steve Mathews at Hybrid Fiberglass Solutions for the custom air cleaner base and lid

Attached picture 6750632-6-26-11small.jpg
Posted By: phantomx

Re: Updated - 07/28/11 09:01 PM

Quote:

Car had a color change ( plus much much more) His dream color has always been limelight and added the vinyl top for contrast.

Copper 67 Coronet 440 is a friend of mines.
383 , column auto. Originally copper ext with copper interior but the interior has been changed to copper and white . All copper in and out was just to much


Car looks great, though the limelight doesn't look right in the shop pics, kinda looks more avocado. Looks good either way. What was the original color?

I hear ya on the all copper thing, my brothers car has a brown dash and carpet, but the rest is copper. Looks like a shiney penny.
Travis..
Posted By: gtx6970

Re: Updated - 07/30/11 10:28 PM

Quote:


Car looks great, though the limelight doesn't look right in the shop pics, kinda looks more avocado. Looks good either way. What was the original color?


I'm not 100% , but I think the color is right in person.( I didn't paint it so I had no say on it) BUT, The floorpan is to dark that he knows and is not worried about it.

Per the vin , it was an FC7 Plum crazy AAR,
BUT, it was rebodied back in the early 90's .
And in his mind it's no longer an AAR. SO ,,, he built what he wanted out of it regardless of what the vin 'says' it is.
Posted By: phantomx

Re: Updated - 08/01/11 08:37 AM

100% gotcha, cool car and he gets exactly what he wanted. I'm not saying the color is wrong, just that the lighting in the indoor shop pics makes the color look less limelight and more avocado. I do fully dig it .
Travis..
© 2024 Moparts Forums