Moparts

A new start for my '77 Cordoba

Posted By: DynoDave

A new start for my '77 Cordoba - 04/10/20 08:07 PM

I'll save all the details on this for another day. But the car has been in our family since new. 1977, 38k miles, 400 4barrel, Formal Sunfire Black Metallic paint, black halo top, black leather interior. The body needs work, and the suspension needs some love. The interior is good, and the car complete. A recent job changefor both the wife and I (pre-C-19 virus) has me hopefully that I can finally get some work done on this (and other) projects.

First step, gutting the old repo battery to make room inside for an Odyssey PC925. Inspiration from Moparts members RealWing and 6PKRTSE. A proper resto battery is THE look for these cars when they have an original, uncut battery ThermoGard. I'm starting on that tonight.

BATTERY THREAD 1

BATTERY THREAD 2

Before Tuesday I want to get the radiator out of it. It split open the last time I drove the car. It's been confined to the front garage (which is heated in the winter) ever since. There's a local shop that I want to have re-core it (putting in a 2 row in place of the factory 1 row).

If I can keep the momentum up through the spring and summer, the gas tank should be pulled and cleaned at a minimum. Preferably I'll swap it for a narrow (dual exhaust) tank. I have a couple of options there. While that's out, I'd like to also swap axles. The factory 8.25 with 2.4 ratio on open diff is not gonna get it long term. I have a complete, drum-to-drum '71 Road Runner 8.75 3.23 ratio SureGrip axle with good leaf springs sitting on the floor. I would like to clean it up before I put it in. The springs are badly needed, as the originals have 100% failed, and it is sitting on it's bump stops.

[Linked Image]

[Linked Image]

Posted By: Magnumguy

Re: A new start for my '77 Cordoba - 04/10/20 10:02 PM

Looks good Dyno. Definately keep us posted
Posted By: DynoDave

Re: A new start for my '77 Cordoba - 04/12/20 12:04 AM

Ran out last night and picked up a few battery conversion supplies. Deep tub that I can reuse for parts storage after, and if there's any "splash", it should help contain that. Kitchen gloves that reach half way up my forearms Vs my nitrile gloves. And a couple of big boxes of baking soda.

The old gal looks sorta past it. But it's been in there since the early '90s, a Turbo Start unit that lasted 8-9 years with little use and a battery tender.

[Linked Image]

I have a whole box of these cut-offs from when we built the shop in back. 3 of them should be perfect for protecting the posts when the battery is inverted.

[Linked Image]

I removed the vent caps, set her inside, and rolled her into place. Amazingly drama-free.

[Linked Image]

And out flows what's left of the acid.

[Linked Image]

Set the lid over it, but left a little room to let fumes out if needed. The caps went into a bath of baking soda and water.

[Linked Image]

After a half hour soak, they were cleaned with an old tooth brush, rinsed, and look good as new.

[Linked Image]

While the caps dried and the battery finishes dripping, I took a moment to check out the battery tray. When the battery was installed, the tray was solid, but had surface rust. It was neutralized, coated in POR-15, and sprayed over with Eastwood battery tray coating. Two layers of Battery Mat were cut to shape. The upper layer is dirty from sitting, as is the rest of the engine compartment. But no other wear or damage.

[Linked Image]

The lower mat and tray look like the day I put them in.

[Linked Image]

I'll get another hour or so out there this evening.
Posted By: UCUDANT

Re: A new start for my '77 Cordoba - 04/12/20 06:52 PM

A triple black car up up
Posted By: DynoDave

Re: A new start for my '77 Cordoba - 04/12/20 11:37 PM

Yes sir UCUDANT! I've always loved the colors of this car. Looks fantastic when it's all clean and shiny.Can't wait (any longer) to make it look that way again.

After sitting overnight, and rolling the battery around to drain it as best I could, this is all that came out. She was pretty dry.

[Linked Image]

Neutralized with a layer of baking soda.

[Linked Image]

Dried off, and noticed there is a crack radiating from the positive post. It's still very solid, not loose in the case. Should not matter for what I want to do with it. Not happy about it, but it should not be a show stopper.

[Linked Image]

Refilled with a mixture of baking soda and water.

[Linked Image]

I drained out the "acid" from the tub, and left the layer of baking soda. After letting the battery sit all day with the soda/water mix inside, it's back into the tub to drain.

[Linked Image]

I'll pull this out of the tub, drain the tub one more time, and refill the battery with pure water, and let it sit over night.
Posted By: DynoDave

Re: A new start for my '77 Cordoba - 04/14/20 04:52 AM

I had a good final day off before returning to work tomorrow. Stayed on schedule with the Cordoba, my daughter helped me in the shop quite a bit, and I even found toilet paper on the shelf at Meijer today!

I'll need to find replacements for these decals at some point.

[Linked Image]

[Linked Image]

The car was very cooperative today. Upper radiator hose came off the neck without issue (no coolant, as expected). The four bolts for the shroud and 4 at the water pump for the fan clutch and fan blade assembly came right out, and the shroud/fan/clutch all lifted right out of the way.

[Linked Image]

The brass is green with corrosion, and the steel side brackets are rusty, but it seems structurally sound to me.

[Linked Image]

Bottom hose put up a little bit of a fight, but came off clean, with no damage to the tank or nipple. Got about a gallon of coolant out of the block/water pump housing, all clean and bright green. I couldn't have been happier about that. Having topped it off with pure water when the radiator split eons ago, I was afraid there would be some corrosion inside the engine. But no signs of that here.

[Linked Image]

Taking a break from the radiator, I dumped the pure water out of the battery, and set the fan up to try and dry the battery out as much as possible before I start drilling on it.

[Linked Image]

Back to the radiator. Last night, I found that the threaded adapters in the lower tank for the trans cooler lines would turn in the tank. Good news. The the lager nut on the line would turn on the adapter. Also good news. But then I noticed that on both the inlet and outlet lines, the nut was NOT spinning on the tube, but was corroded to it. Any major effort to turn them would twist the cooler lines. So before I turned in, I dropped some PB Blaster on them, and let it soak overnight.

Today we broke out the small acetyline torch set I have, and heated both nuts (I did one, my daughter did the other), then tapped on the nuts and pipes with a hammer. Tried them both again with a line wrench, and they came apart smooth as butter. Four more bolts on the radiator frame, and out she came.

[Linked Image]

Rod that ties the two frame sides together. Threaded only on the last inch of the end with the nut. This end is just like a nail head.

[Linked Image]

Hard to believe that a thread and nut that rusty and that small will come apart. We'll see what they can do with it. I went ahead and hit it with PB Blaster tonight, so it can soak until I take it over to them tomorrow.

[Linked Image]

Given it's age, I didn't think it looked too bad inside. Upper and lower hose openings into the upper and lower tanks shown.

[Linked Image]

[img]https://live.staticflickr.com/65535/49772189872_f02e8f82d5_b.jpg[/img]

That "extra" tank width from having one one row or core makes a great place for debris to get trapped behind the condenser.

[img]https://live.staticflickr.com/65535/49771326048_d61f266120_b.jpg[/img]
Posted By: DynoDave

Re: A new start for my '77 Cordoba - 04/15/20 02:36 AM

Radiator dropped off today. Waiting to hear back about their evaluation.

Battery is as dried out as I can get it. Hoping to drill into the bottom of it tomorrow.
Posted By: DynoDave

Re: A new start for my '77 Cordoba - 04/16/20 02:01 AM

Was going to dig into the battery from the bottom yesterday. Even started to center punch the holes I was going to drill in the bottom of the case. But I thought I should make sure it was completely dead. So I checked it with a multi-meter, and the darned thing is still making volts! 2.6-2.7v to be exact.

[Linked Image]

Lacking a carbon pile load tester to drain off the remaining voltage, I added an 1157-style bulb on some test leads. Not enough voltage to illuminate it, but hoped by giving the current a load, that I could drain it. After sitting like that all night, I'm happy to say that as of this morning, I'm down to 00.8v, not even enough to create a spark when I jumper the two terminals together. So I think I'm going to call that good enough, and dig into it tonight.

Edit: Well, I would have dug into it more. But....SQUIRREL! I got distracted by another set of headers for sale. Was pretty excited about them though, so I spent most of my "old car" time tonight driving. After I got home, I did take the time to disconnect everything from the battery, flip it over, and drilled holes in the four corners. I'll let it sit tonight, with the fan blowing through those holes to try and dry the inside some more. Then tomorrow I will "connect the dots" to slice the bottom open.
Posted By: DynoDave

Re: A new start for my '77 Cordoba - 04/17/20 02:00 AM

Started to cut the case open. Painting mask, rubber gloves, safety glasses, hat. Glad there was no one to take a picture of me.

I had bought this HF tool when they were on some super sale...was less than $10 as I recall. Never had a need for it until now. Cuts pretty good. I'm not so hot at cutting a straight line, even when using the edge of the tool along the edge of the battery as a guide. Not quite sure how that happens.

[Linked Image]

Then the bit snapped. Of course, in our current C-19 world...do I have a spare? I do not. Are any of the stores that would have one open? They are not. So I guess I'm done with battery work for the night.

[Linked Image]

As a note to anyone who might do this same job later....the bottom of this case is not the same material as the sides. Almost seems like a poured material of some sort. When center punching it, or drill holes, it chips and flakes apart to a small degree. Makes a fair amount of dust when cutting it, so I kept a vacuum handy. Doesn't smell too good either.
Posted By: jughed

Re: A new start for my '77 Cordoba - 04/17/20 09:17 PM

Nice looking Cordoba. Very low on the miles as well. Glad it stayed in the family!!

I used to have a '77 Cordoba, with a lean-burn 400, and of course the rich Corinthian leather. I wanted to keep it but had too many projects at the time...still have a NIB spare dual pickup for the distributor.
Posted By: DynoDave

Re: A new start for my '77 Cordoba - 04/18/20 01:27 AM

Thanks jughed! It's not as nice as the pictures make it look, but I'll take the compliment! And I'm glad I've kept all my old cars. Don't think I haven't taken a ribbing from just about everyone over it.

A less than wonderful garage day.

Broke another rotozip bit, but had purchased 4!

Got around the perimeter of the bottom of the case. Tried to leave an edge to put some screws into later for a new bottom plate, but I think that's going to have to come off, which isn't going to be easy now.

Two corners of the case cracked, one quite seriously. I hope it holds together through the rest of the process of gutting it. Thank God I have a Thermoguard to cover it.

And is it just the lead and acid fumes, or did none of my photos come out in-focus this time?

[Linked Image]

[Linked Image]

[Linked Image]

[Linked Image]
Posted By: DynoDave

Re: A new start for my '77 Cordoba - 04/19/20 03:59 AM

Like most things I jump into for the first time, this is a longer, messier job than I thought it would be. (rofl)

Only one way to the bottom, err, top. Keep on digging! Gasket scraper to separate several plates about 3/4 - 1" down, one of granspa's old ball-peen hammers to tap it in, regular pliers to rip out a little section, needle nose piers for the more stubborn wires at the edges of the plates. Do it again, and again, and.....

Got a couple of hours in on it today. Added clamps to help support all four corners, hoping to avoid further damage. Trimmed off a little more of the bottom, so I could more easily remove plates all the way to the edges and ends. I'm about 2 cells short of finishing my second pass. I'm gonna say I'm 1/3 to 1/2 half way to the top when I finish this row. Doesn't seem like that's going to be this weekend though.

[Linked Image]

[Linked Image]
Posted By: DynoDave

Re: A new start for my '77 Cordoba - 04/20/20 03:35 AM

AM: The odds of this little project succeeding got a little bit longer today, when this sizeable hole appeared in the side of the case. Not good. The case is old and brittle, and does not like me hammering and tugging at it. I haven't even looked at the top, to see how that crack around the negative post is looking. I'm trying to be careful, but there's only so much I can do.

[Linked Image]

Plan B is it to scrap the case and save just the top, if it comes to that. But this top needs to be functional, with the cables attached. I'm not sure if the repro toppers have real terminals that pass all the way through or not. But something like that is plan C. Buying another repro battery is the last stop for this train wreck.

Hey, nothing ventured, nothing gained. The good thing for me is that all of the sides, and 50% of the top are hidden by the Thermoguard. So I can get away with a lot.


PM: At last...a breakthrough. While breaking off little 1/2" squares of lead plate, I finally got a large piece of a plate!

[Linked Image]

Seems that while much of the battery is badly decayed, including all of the battery at the bottom (top as viewed), the further I dig down toward the top of the case, the better the condition of the plates, and some are hanging together well enough to come out in larger pieces.

After a few more rows pulled out in the a similar fashion, I broke through into the fluid space at the top!

[Linked Image]

The rest of that cell, and the couple next to it came apart in a more typical (difficult) fashion. Then this cell started pulling apart in huge pieces, until I could see the first daylight through of the cap holes on the top cover! I feel like I just escaped from Shawshank!

[Linked Image]

Here's where I left off for the night. Did a little shop cleanup, and called it a day.

[Linked Image]

[Linked Image]
Posted By: DynoDave

Re: A new start for my '77 Cordoba - 04/21/20 02:19 AM

Going, going...

[Linked Image]

...gone!

[Linked Image]

[Linked Image]

What's left are the huge lugs that all the plates tie into, then connect to the next cell. Don't ask me how I'm getting those out, because I have NO IDEA.
Posted By: DynoDave

Re: A new start for my '77 Cordoba - 04/23/20 02:03 AM

Took yesterday off, but got back at it today for an hour +.

So I'm left with these spots...lead tie plate, with the remaining ends of the lead battery plates attached. You can see in the cells marked 1 and 3, the ends of the lead battery plates have all but fallen apart, with little remaining to be removed.

[Linked Image]

In cell 2, I have taken a Dremel, and cut about 2/3 of the way through them horizontally (that's as far as the cut-off wheel would reach), and using pliers I have started to twist them off, working right to left.

Cell 4 is what most started out looking like. To get a "clean" stack of plates to cut as in cell 2, I had to use a small screwdriver to scrape the debis from behind one plate, fold it over, clean the next gap, go to the next, all the way across.

Here's the "finished" product. The lugs in the upper left and upper right corners are the underside of the posts on the top of the battery. Here I have trimmed them down to be round posts on the inside, more or less. And I think this is about as far as I'm going to go. Working to cut away more of the remaining tie plates is difficult, and stressing the plastic case pretty severally. The corner posts are not going to live, as there's nothing tied to them on the underside. And the small battery I'm going to place in here will come no where near the remaining lead pieces. Tomorrow I'll give it a bath.

[Linked Image]

The good news...an inspection of the exterior of the case, sides and top, showed no more damage than what we had already seen. The crack around the positive post on the top of the battery has not changed since I removed the battery from the car. With some repairs, I think the case is entirely salvageable.
Posted By: dmoore

Re: A new start for my '77 Cordoba - 04/25/20 03:37 AM

They are nice cars if in the proper hands.....hard to beat original low mileage! Good luck Dave!

Attached picture 20191130_163817.jpg
Posted By: DynoDave

Re: A new start for my '77 Cordoba - 04/25/20 09:01 PM

Man that's a beautiful example dmoore. I can only hope mine turns out as nice some day.

I do have one advantage. A member of my 3rd gen Charger forum goes to a fall show that I attend as well. And he travels to the show with a few friends. One is a painter/body man, and he just redid this fellows Charger SE in the same color. Gives me an exact idea of what he could do with my car, and what it would look like when done. I hope to put him to work on it in the not too distant future.

[Linked Image]

[Linked Image]

And my car, back in the day.

[Linked Image]
Posted By: DynoDave

Re: A new start for my '77 Cordoba - 04/25/20 09:11 PM

Well, the NFL draft is close enough to over for me to get back to work!

Cleaned up the mess I made gutting the battery, and cleaned and oiled the tools. I'll start in on cleaning the case later tonight. Was going to call it a morning, then started looking at the mess the engine compartment is. Where to start? EVERYTHING needs cleaning, replacing, work work work.

I thought if I was going to start to work in here, then cleaning up around where the radiator mounts would be the place, before the radiator is re-installed. There were quite a few bent over fins on the condenser (I think the radiator has been in and out once before), so straightening that out and cleaning that area was the thing to do, it seemed.

A few "before" photos of the damaged areas.

[Linked Image]

[Linked Image]

The magic radiator comb!

[Linked Image]

Some of those areas are too bent up for the comb to get through, so I did a little pre-work in spots with a small screwdriver.

[Linked Image]

[Linked Image]

Those same two spots "after". Worked pretty darned good, I must say.

[Linked Image]

[Linked Image]

After working my way the rest of the way across, blowing it out with compressed air, then brushing it off, it turned out pretty nice. Not bad for 43 years old.

[Linked Image]
Posted By: dmoore

Re: A new start for my '77 Cordoba - 04/28/20 02:31 AM

Originally Posted by DynoDave
Man that's a beautiful example dmoore. I can only hope mine turns out as nice some day.

I do have one advantage. A member of my 3rd gen Charger forum goes to a fall show that I attend as well. And he travels to the show with a few friends. One is a painter/body man, and he just redid this fellows Charger SE in the same color. Gives me an exact idea of what he could do with my car, and what it would look like when done. I hope to put him to work on it in the not too distant future.

[Linked Image]

[Linked Image]

And my car, back in the day.

[Linked Image]


That back in the day pic is very sinister! Wow, if you could achieve that again you will be a happy man!
Posted By: DynoDave

Re: A new start for my '77 Cordoba - 04/28/20 08:19 PM

Originally Posted by dmoore
Originally Posted by DynoDave

[Linked Image]


That back in the day pic is very sinister! Wow, if you could achieve that again you will be a happy man!


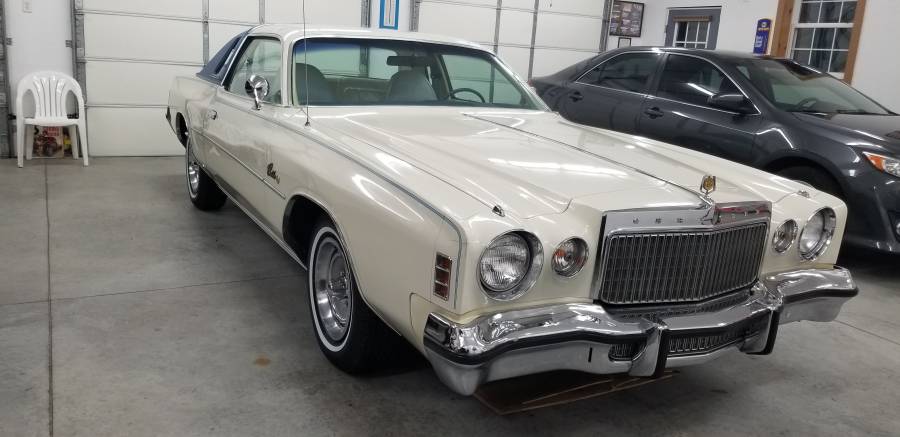
I agree. I'm going to add a nice stereo, a floor shift console, and some forged '80's Cordoba wheels (those hubcaps are from the '80s J-car based Cordoba that my great Aunt/Uncle traded this car in on...then my Grandma bought this car, then I bought it from her...the aunt preferred the original '77 hubcaps, and had the dealer swap them when she traded). Lots of mechanical mods in mind, but the appearance will be very much like this.

I'm just starting to clean up the grungy engine compartment, especially in the area around the radiator. And I have a few questions. If you could help me dmoore (or anyone with an original, unmolested car), I'd appreciate it. Photos would be very helpful.

1) Here's a yet-uncleaned are of the core support, right by the battery Thermoguard. Notice the little wiring harness retainer. I don't have a harness in this area. That means I unwrapped it 20 years ago and have forgotten what goes there (likely), or??? Do you have a harness in this location? If so, what circuits are in it / where do the wires go?

[Linked Image]


2) Photo two is of the passenger side front corner of the engine compartment. In stock form, the washer fluid fluid bottle would be in this corner. On mine you will see the charcoal canister and an air intake duct. When I cleaned this surface off (this is a quick working ladies bath guys, not a pro detail...baby steps) there are the old adhesive remnants of a factory decal. As can be seen in the photos I posted on the 14th, the Buy MOPAR Parts decal, and antifreeze decal are still in place on the core support. Do you have a decal in this location, and if so, what is it for? It might have been an oddly placed oil change decal, but it seems too small for that.

[Linked Image]


3) No mystery here...this is where the factory thin rubber hood-to-cowl seal mounted on the underside of the hood. Mine was there once upon a time, but was literally as fragile as a thin potato chip, and just shattered into pieces over the years. I don't have any good photos of a factor one in place. If yours is intact, I'd love some photos of it.

[Linked Image]


4) A couple of surface finish questions here.

[Linked Image]

- Arrow 1 is the a/c condenser bracket. appears to have had a black painted finish on it, which is largely popping off of this bracket. I'm assuming is some form of supplier sprayed flat or semi-gloss / chassis black. What does your look like?

- Arrow 2 is the horn bracket, and horn. Like the a/c condenser bracket, this one is decayed enough that it's hard to tell what the supplier finish was. If yours are in batter shape, photos would be great.

- Arrow 3 is the top of the frame rail. I have not cleaned it here, so I'll show a photo (below) of the same area on the passenger side. I have not cleaned that little pocket on either side, but it looks like it might have been chassis black, and not Formal Black
Metallic. What finish is on that surface on your white car? It should stand out a lot more on your white car Vs my black one.

[Linked Image]
Posted By: dmoore

Re: A new start for my '77 Cordoba - 04/29/20 02:33 AM

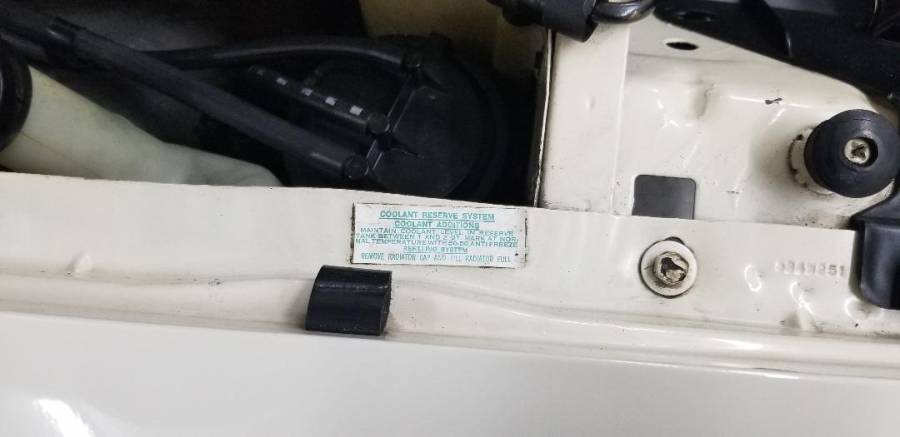
Dave let me get the car over to my home shop this weekend so I can answer those questions for you. That missing decal is the coolant reserve system instructions.

Attached picture coolant reserve instruction decal.jpg
Posted By: DynoDave

Re: A new start for my '77 Cordoba - 04/29/20 10:18 PM

Originally Posted by dmoore
Dave let me get the car over to my home shop this weekend so I can answer those questions for you. That missing decal is the coolant reserve system instructions.


Excellent! I'll have to get one of those if they are reproduced.

To make room for that second cold air duct, I switched to a '78/'79 style Thermoguard that has an integral washer fluid bottle. I had (c199?) unwrapped the engine compartment harness and moved that circuit to the other side of the compartment. I'll add the new decal over by the battery, and all will seem in order.
Posted By: dmoore

Re: A new start for my '77 Cordoba - 04/30/20 01:04 PM

You can try Jim Osborne

101 Ridgecrest Drive - Lawrenceville, GA 30045
Phone: (770) 962-7556 Fax: (770) 962-5881
Posted By: DynoDave

Re: A new start for my '77 Cordoba - 04/30/20 02:18 PM

Yes, just came here to update the post that I had found the Osborne decal via DuckDuckGo search on the NPD site.

NPD LINK

And it wasn't until I read the decal on that site that the little (very little apparently) light bulb in my head came on. COOLANT reserve....not Washer Fluid. Duh! So the repro decal will go right back in the same spot as before. Thank you!

By the way....is this you?

Mopar Connection Link
Posted By: DynoDave

Re: A new start for my '77 Cordoba - 05/01/20 02:14 PM

While you are under the hood, would you look for this also?

The area under the red arrow has brush marks. It's like they brushed on "something", then painted over. This run the whole top surface between the bolts and bushings for the condenser brackets. Beyond that, it tapers off quickly and ends. This is NOT blackout paint, as it's on no other surface of the core support, and this car didn't get blackout paint because it's black.

[Linked Image]

[Linked Image]

Does your white car look like this?
Posted By: dmoore

Re: A new start for my '77 Cordoba - 05/01/20 11:53 PM

Originally Posted by DynoDave
Yes, just came here to update the post that I had found the Osborne decal via DuckDuckGo search on the NPD site.

NPD LINK

And it wasn't until I read the decal on that site that the little (very little apparently) light bulb in my head came on. COOLANT reserve....not Washer Fluid. Duh! So the repro decal will go right back in the same spot as before. Thank you!

By the way....is this you?

Mopar Connection Link


So Dave does Osborne reproduce that decal?

Yes, that is another one of my cars......
Posted By: dmoore

Re: A new start for my '77 Cordoba - 05/01/20 11:54 PM

Originally Posted by DynoDave
While you are under the hood, would you look for this also?

The area under the red arrow has brush marks. It's like they brushed on "something", then painted over. This run the whole top surface between the bolts and bushings for the condenser brackets. Beyond that, it tapers off quickly and ends. This is NOT blackout paint, as it's on no other surface of the core support, and this car didn't get blackout paint because it's black.

[Linked Image]

[Linked Image]

Does your white car look like this?


Dave I cannot recall but I will look closely this weekend when I have it here at home.
Posted By: DynoDave

Re: A new start for my '77 Cordoba - 05/02/20 12:54 AM

Thank you sir. [Linked Image]
Posted By: Jerry

Re: A new start for my '77 Cordoba - 05/02/20 12:52 PM

way to go restoring the car. lots of little subtle upgrades can be done. I just picked up a 73 charger to get started on myself.
Posted By: dmoore

Re: A new start for my '77 Cordoba - 05/04/20 12:41 AM

Dave I wasn't able to get the Cordoba at my garage this weekend...waaaay to much going on...hopefully this week.
Posted By: DynoDave

Re: A new start for my '77 Cordoba - 05/05/20 04:04 AM

Congrats on the '73 Charger purchase Jerry! smile
Posted By: DynoDave

Re: A new start for my '77 Cordoba - 05/05/20 04:06 AM

Originally Posted by dmoore
Dave I wasn't able to get the Cordoba at my garage this weekend...waaaay to much going on...hopefully this week.


No problem. Whenever you have the time.

I haven't been neglecting the project. Decals are ordered and on their way. Some rust converting / stopping paint to touch up a few spots is getting ordered in the morning. Touch-up paint gets ordered next, then the battery.

Do you still have the "Unleaded Gasoline Only" decal on the rear bumper?
Posted By: dmoore

Re: A new start for my '77 Cordoba - 05/07/20 12:12 AM

Dave here is the fuel decal....I don't know if Osborne repro's that or not....

Attached picture thumbnail (4).jpg
Posted By: dmoore

Re: A new start for my '77 Cordoba - 05/07/20 12:16 AM

As far as your question on the brushed paint on top of your radiator support I do not see any signs of that on mine. Where you have the remains of a plastic clip I just have a hole. Not sure what would have been there. It does appear as if there was something there at one time just can't be sure.

Attached picture thumbnail (2).jpg
Posted By: dmoore

Re: A new start for my '77 Cordoba - 05/07/20 12:20 AM

As far as the hood to radiator seal I only have a few of the push in plastic clips left. To date I have not seen a Cordoba of any year with that seal still in place. I know of a 12,000 mile 77 and he doesn't have it either. Must have been a very frail piece right out of the box!

Attached picture thumbnail (3).jpg
Posted By: dmoore

Re: A new start for my '77 Cordoba - 05/07/20 12:26 AM

As far as the condenser bracket and the other area you asked about mine are a semi gloss or chassis black as you mentioned.
Posted By: dmoore

Re: A new start for my '77 Cordoba - 05/07/20 06:36 PM

Very good reference here....

https://www.forbbodiesonly.com/moparforum/showcase/1977-chrysler-cordoba.4764/?page=2
Posted By: DynoDave

Re: A new start for my '77 Cordoba - 05/08/20 12:02 AM

Super! Thanks for the photos and info. Interesting all these little details.

I have ONE original hood seal that I found in a salvage yard intact. Not appreciating at the time how rare they were, I didn't take photos of how it was attached. Shouldn't be too hard to figure out. I keep it for reference...it's probably too brittle to use for long. I have one of a later car that is very soft, but a completely different design.

Do you still have original hoses and clamps? If so, what do types of clamps are used on the radiator hoses, and heater hoses?


Posted By: dmoore

Re: A new start for my '77 Cordoba - 05/08/20 02:50 AM

Dave this is the top correct rad hose....I will get you another photo of bottom hose soon. Both top & bottom hoses utilize a double wire formed clamp. The heater hoses utilized the Corbin style clamp from previous years.

Attached picture 20191201_170016 (2).jpg
Attached picture download.jpg
Posted By: DynoDave

Re: A new start for my '77 Cordoba - 05/11/20 04:06 PM

Thank you for that. I still have all the Corbin clamps on my heater hoses, but parts store worm gear clamps on the radiator hoses. I would have suspected Corbins for all hose ends. Interesting that they mixed the two types. I see those wire type for sale on the internet, but always listed as a Ford application.

Do you have the wire type clamps on the radiator hoses at all four spots (both ends of both hoses)?
Posted By: dmoore

Re: A new start for my '77 Cordoba - 05/11/20 05:23 PM

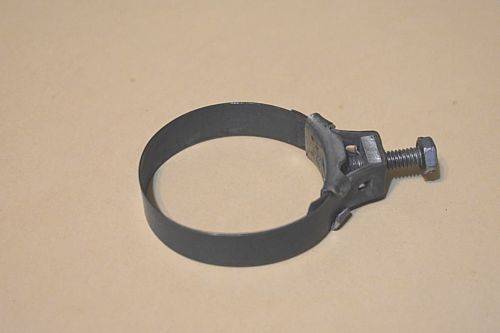
Wire formed at both ends of both rad hoses. Ford & GM used the Wittek style clamp.

Attached picture whittek clamp.jpg
Posted By: DynoDave

Re: A new start for my '77 Cordoba - 05/11/20 11:01 PM

Excellent. I'll work on tracking those down as soon as I get my new hoses, and know what sizes I need.

FYI...

Ford
Mustang Depot Link

Oldsmobile
Inline Tube Link
Posted By: dmoore

Re: A new start for my '77 Cordoba - 05/14/20 05:06 PM

Dave are you going the very difficult route of tracking down NOS hoses or just generic?
Posted By: DynoDave

Re: A new start for my '77 Cordoba - 05/14/20 06:41 PM

Just generic, but I'm going to try and mark them to look like your originals.

Speaking of which:

This project has NOT stalled! laugh

Just searching for, ordering and waiting on parts. And getting distracted by parts for another project which do me no good now, but were too good of a deal to pass up on.

Squirrel!

Decals ordered from NPD have arrived.

[Linked Image]

They even wished me an very belated (7 months) or very early (5 months) happy birthday!

[Linked Image]

All in duplicate so I have a new one, and a spare. Mostly for the Chrysler, but there are jacking decals and door decals for the Charger Rallye in there as well.

[Linked Image]

Rust treatment products from KBS ordered and arrived.

[Linked Image]

Noted this lavender paint on the nose of the water pump for reference, in case I change the pump while I'm in here. (Despite the rediculous ease of doing the pump now, I consider this a mission creep issue, and have promised myself not to fall into that trap, as I have so many times before.)

[Linked Image]

On a long call a few nights ago with Magnumguy (Hi Bill!), so I started straightening the fins on the front of the condenser while he was on speaker phone. Hard to tell in these photos, but the folded over fin "damage" on this corner was from the supplier 43 years ago, as when I straightened the fins out, there was no blackout paint applied under them. So they were folded over before it got painted. Not surprising given how delicate the part is, but just interesting to find. The whole face of this will get a flat black spray bomb touch up after I get it brushed out, blown out, and sprayed out with water.

[Linked Image]
[Linked Image]

Then my wife wakes me up before 6am this morning asking me if I was expecting a big box. I knew what it was, and fetched it in off the porch. Probably delivered late last night, and sat there under my porch light all night long. Glad I face a busy road in a halfway decent neighborhood. mad

I'll open it this afternoon. It's for the T/A. This is the "Squirrel" expenditure referenced above.

[Linked Image]

I still have (it appears) all the original clamps on my heater hoses, but the lower and upper radiator hoses have been changed, and the clamps along with them (with a generic parts store worm gear type clamp that is not correct). So I have ID'd the correct clamps (Thank You dmoore), and found a few sources (popular type on Fords and Oldsmobiles) that reproduce them. I just need to get the radiator back, and measure for hose size to know what clamps to order. Also need to get on Rock Auto and get hoses and other parts ordered. Also ordering a low tack repositionable spray adhesive to use holding a stencil on the hoses, as I want to try and recreate the factory markings. Not a big deal if I can't but I've always wanted to try it on my T/A (which still has all of it's date coded hoses, plug wires, etc). So it will be good practice. Will need some spray paint or a stamp pad too.

Oh, and the radiator shop called Friday...the radiator is ready. Just need to go pick it up. boogie

So lots of progress actually, lots of money spent (yikes!), but not a lot to show for it just yet.
Posted By: DynoDave

Re: A new start for my '77 Cordoba - 05/15/20 02:58 AM

I spent a few hours disassembling and cleaning the clutch and fan this evening. The clutch and fan blades are aluminum, but the fan hub is steel, and has some surface rust. So chips on the core support, fan hub, steel input shaft on the clutch, water pump pulley and the lower core support are all going to get the KBS Coatings rust treatment...sort of a batch job.

A few more of those factory part numbers...

[Linked Image]
[Linked Image]

[Linked Image]

[Linked Image]

[Linked Image]


Surprised at the level of gloss in the semi-gloss paint on those blades. They will need a quick dusting of paint too.

[Linked Image]

The fasteners that hold the fan to the clutch were surprisingly tight for threads into an aluminum casting. I may have to throw a little blue thread locker on those when they go back in. Don't need that fan coming loose. Also, those 4 bolts, the bolts for the radiator, and bolts for the fan shroud, etc...all have surface rust, and need to be blasted, then re-coated in something. Will probably go with a black phosphate coating of some sort.
Posted By: DynoDave

Re: A new start for my '77 Cordoba - 05/16/20 03:13 AM

Noticed these markings on the water pump / power steering belt that I had removed. Appears to be the original, which would go a long way toward explaining it's petrified state. I expect these markings are too small and the belt too narrow for me to be able to replicate them.


[Linked Image]

[Linked Image]

[Linked Image]


NOS radiator cap arrived today. Not 100% like the production piece, but pretty darned close, and far closer than anything else on the market.

[Linked Image]


Having discovered that cloth friction tape was used to hold the small ground wire off of the negative terminal to a harness clip, I picked up a roll of it at the local ACE.

[Linked Image]


Started cleaning up the other side, opposite the battery, near the core support.

[Linked Image]


It's a little hard to tell in these photos, since the whole photo(s) came out with a yellow cast. But that clip bolted to the inner fender is painted bright yellow. Not important, just interesting.

[Linked Image]


Charcoal canister cleaned up.

[Linked Image]


Filter doesn't look too bad. Blew it out with a little compressed air to be sure.

[Linked Image]
Posted By: DynoDave

Re: A new start for my '77 Cordoba - 05/17/20 11:49 PM

While I'm working on getting one of my Mopars on the road again, I do have another brand P vehicle that I can take out cruising.

It was such a nice night out on Friday that the wife and daughter ran down to Woodward with me. After all the action I saw out there a few weeks ago on one of nicest nights of the year thus far (and one of the busiest cruise nights I've ever seen out there short of Dream Cruise week), I thought this Friday would be just as busy...maybe even better as people (cruisers) get more restless.

Boy was I wrong! There was no one out by comparison. 40-50 other nuts like me stretched over the whole run from Birmingham down to Ferndale, and that was it. Maybe a dozen people stopped and setup with chairs along the way. Since the super busy cruise night of a few weeks ago, Birmingham had closed all of the metered spots on Old Woodward (put bags over them). And I'm quite serious when I say I've NEVER seen so many police out on a normal cruise night. And with people (cruisers) pulled over. In many instances 2 or 3 squad cars per cruiser pulled over. While I obviously do not know the specifics of why they were pulled over, it certainly looked like an attempt to intimidate. I ran a few miles in the inside lane (next to the grass berm) behind a white fart-piped 350Z (from Birmingham/Hunter House down past the McDonald's at Coolidge). I NEVER broke the speed limit, often running 5 under just to be sure given the excessive presence of law enforcement. At Coolidge, an unmarked black Ford Exploder pulls up next to me. On the green, I laid back and had the cruise control set at 5 under, as I often do when cruising. The guy in the Z was minding his Ps and Qs too, but was slowly pulling away from me, running the speed limit with the rest of the pack (everyone had seen this police cruiser pull up on us, so he wasn't surprising anyone). About 2 blocks from the corner at Coolidge, the cop pulls over in front of me, right on the Z's , and moments later, hits the lights. Pulled him over into the old Harmony House record store parking lot right before the cemetery. That I had observed in the preceding 5 minutes or so of cruising, this guy had done nothing. Now, he might have gotten ticketed for taking a nice white 350Z with factory duals out the bumper and installing a cheap chinese amazon fart pipe hanging low off one side...it was an egregious violation of good automotive taste....but other than that, this guy was cruising like Grandma. There was never a time when we were out that you couldn't look in either direction and see the flashing lights of police cars with people (cruisers) pulled over. It was an embarrassing display on the part of local police IMO. Are you old enough to remember the late '70s Car Craft Street Machine Nationals in Indy, where they chased cruisers out with cops in riots gear with dogs? Well it wasn't like that, but it sure brought back memories!
grin

I was going to go back out last night to full-fill my duty as public menace (and more seriously to defend my right to be there...heck, even the Gov says to get outside), but it was sprinkling here about the time I would have left.

That was the bad. The good? With restaurants still shut down, it was a rare opportunity to slip up inside of Vinsetta garage (with 3 Berkeley cops with a guy pulled over just down the street) and get a picture under the neon. This is not usually an option as the place where I'm parked with be packed with customer cars at dusk.

[Linked Image]

Ordered a few more items for the Chrysler this week. Cleaning continues. No radiator yet. And no paint yet. Getting a little worried about that order, and going to follow up with them tomorrow. Just about done with a Rock Auto order for belts and hoses, though I'm not sure the belts are right. The lengths they list are shorter than what I have for the alternator and A/C compressor. Time will tell.
Posted By: UCUDANT

Re: A new start for my '77 Cordoba - 05/18/20 02:01 AM

Is that a GTA?


In regards to the local authorities pulling drivers over without justification, there are more of us than there are of them. I'd have everyone I know out there, you can't catch us all.
This is partly a control issue, and they are starting to implement measures that resemble a "Police state"

po·lice state
/pəˈlēs ˈstāt/
noun
a totalitarian state controlled by a political police force that secretly supervises the citizens' activities.

I'd take the ticket, and keep going
Posted By: ZIPPY

Re: A new start for my '77 Cordoba - 05/18/20 12:43 PM

Nice cars and project Dave.

Maybe I missed it -- how long has it been sitting?

The '71 axle and leaf springs should help quite a bit.
Posted By: DynoDave

Re: A new start for my '77 Cordoba - 05/19/20 02:11 AM

Originally Posted by UCUDANT
Is that a GTA?


In regards to the local authorities pulling drivers over without justification, there are more of us than there are of them. I'd have everyone I know out there, you can't catch us all.
This is partly a control issue, and they are starting to implement measures that resemble a "Police state"

po·lice state
/pəˈlēs ˈstāt/
noun
a totalitarian state controlled by a political police force that secretly supervises the citizens' activities.

I'd take the ticket, and keep going


Not a GTA, just a Trans Am. The wheels were available in any of the Trans Am line as RPO PW7. Though red was a one year option, with only 611 takers.
Posted By: DynoDave

Re: A new start for my '77 Cordoba - 05/19/20 02:20 AM

Originally Posted by ZIPPY
Nice cars and project Dave.

Maybe I missed it -- how long has it been sitting?

The '71 axle and leaf springs should help quite a bit.


Hey Rich. I bought this car in the mid-'90s. and it was a couple of years until I shipped the stripped shell of the '72 Charger Rallye back home for storage, and moved the Chrysler inside. It was used for short joy rides (failing Lean Burn computer kept me pretty close to home). I converted to an MP ignition and made a few other small changes, then the original radiator split open. I parked it expecting to get to it "soon". Then kids, jobs, parents, etc.

Just went and checked the rear plate. Last decal is 1999. So right at 20 years.

I had a '77 Dodge Royal Monaco Brougham in college that had this same 400 4 barrel and was a 3.23 SureGrip car. Makes it quite a bit more lively.
Posted By: UCUDANT

Re: A new start for my '77 Cordoba - 05/20/20 04:05 AM

I've attempted stamping. I had one made and the amount of paint and pressure you apply will vary the quality of your results, but with a little practice first you can achieve the result you desie..

Attached picture DSCF1395.JPG
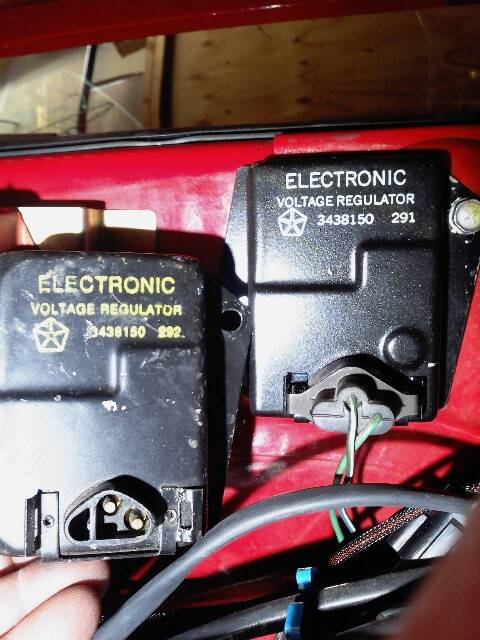
Attached picture Voltage regulator comparison.jpg
Posted By: dmoore

Re: A new start for my '77 Cordoba - 05/20/20 05:07 PM

Nice!
Posted By: DynoDave

Re: A new start for my '77 Cordoba - 05/20/20 11:36 PM

Originally Posted by UCUDANT
I've attempted stamping. I had one made and the amount of paint and pressure you apply will vary the quality of your results, but with a little practice first you can achieve the result you desie..


Nice results! How did you go about getting that made? Send in a picture and some dimensions?
Posted By: UCUDANT

Re: A new start for my '77 Cordoba - 05/21/20 04:28 AM

I took an original part to a woman who made stamps. She did a great job.
Posted By: DynoDave

Re: A new start for my '77 Cordoba - 08/06/20 08:20 PM

More life delays (virus, work from home, kids moved from and back to University, etc)....just the usual stuff I guess. But I have not been at a complete standstill. Aside from coolant, I "think" I have just about everything ordered and received to get the car back together. RockAuto, Herbs, Ebay, National Parts Depot, InLine Tube, etc. The last parts are in, so time to get back on it. Low on the excitement scale, but necessary, the new water pump is getting wiped down with Pre, etch primed, and painted today. While that cures over the coming days, I'll get the block flushed out, and the tension rod for the radiator made. Then more cleaning, prep and touch-up in the engine compartment.

I started to slide down that slippery slope of "while I'm at it I will....", but stopped myself. Just bought a good iron pump off Rock. I'll get a nicer aluminum piece when the engine comes out. Same with swapping to an aluminum pump housing....that's for another day.

[Linked Image]
Posted By: UCUDANT

Re: A new start for my '77 Cordoba - 08/15/20 11:36 AM

Dave you mentioned the non glamorous work and the slippery slope of "While I'm at it...." Thanks, that made me chuckle.
Posted By: DynoDave

Re: A new start for my '77 Cordoba - 02/26/21 02:04 AM

Well, damn it...garage fire.

Not too many items directly consumed in the fire...car cover, water pump, new Wen belt & disc sander that was an anniv. gift from work, and some other odds and ends. A dozen items in a shop full of thousands of pieces. So that's almost the good news, though that sentence is hard to say.

[Linked Image]

But the smoke and water damage are extensive. And there's limited coverage on the parts (my choice), and none on the Chrysler. So I'll be unboxing, cleaning, and repackaging a thousand parts, collectibles, items of petroliana, and tons of paper docs. The Chrysler is being towed to a detail shop next week to see what they can do with it.

[Linked Image]

Look at the underside of that middle cabinet. Strange how the air/smoke/soot traveled and swirled in the air.

[Linked Image]

I have no experience at estimating such things, but my guess is that this sets me back at least 6 months on all projects. Some longer if parts are not salvageable.
Posted By: ZIPPY

Re: A new start for my '77 Cordoba - 02/26/21 08:51 PM

Oh $#!+.

Glad the loss was limited to the items mentioned.

Especially glad no mention of harm coming to anyone.

Very sorry for the setback frown
Posted By: DynoDave

Re: A new start for my '77 Cordoba - 02/27/21 03:31 AM

Thanks Rich. Yes, people and pets were fine. A little scared, but fine.

Continuing to make progress, though most folks would have a hard time telling.

Ozone generator arrived and has been put to work. Does a good job of killing smoke odor, but it comes back after a few hours. This was expected, as the smell won't go away permanently until the shop is gutted and redone.

I got insurance on an old truck I was going to work on this spring, and had it towed to a shop. It's going to cost me more, but at least it will be done. And it's in the way of towing the Chrysler out of the garage on Tuesday. Also getting info on insurance for the Chrysler.

My son and I will work on moving parts away from the Chrysler this weekend. That's a fair amount of stuff, including a fully dressed 8.75" axle with leaf springs. We'll also finish cutting that door open so the car can get out.

I took a few minutes this afternoon and raked up the small mountain of leaves that had collected under the truck. It's funny what is heavily smoke and soot damaged and what is not. Rake that was 3' from the fire? Not bad at all. Ear buds hanging on a hook 20' away? Absolutely black (they were white).

Picked up some 2.5 gal. ziploc bags last night, and will experiment with some gas mileage log book pages I had printed out and sitting on the bench in the shop. A dusting of baking soda, a piece of paper, more soda, more paper, etc. Seal it up and let it sit overnight. This seems to be about the only cure offered online for smoky paper. Books you can clean the cover. In summer, set them out in the bright sun and fresh air. But for winter in Michigan, this is all I've found. I sure hope it works, because I have a TON of paper in that garage, and I have to clean it all. It's covered by insurance, but the remediation company will not touch paper...they will just write it off as a loss. So 100 posters, 50 service manuals and parts books, a large number of reference books form college and other places, hundreds of magazines, and a lifetime of paperwork are all out there. If I want the stuff, I've got to clean it somehow.

This weekend also includes time spent in the back garage trying to create a spot for the Chrysler when it comes back (assuming it does not still smell smoky). That's bay 2, and it is currently full of parts, tool boxes, kids college stuff, bikes, tractor, push mower, etc. Not sure where I will put it all. Also cleaning out bay 3 of it's firewood debris and racks, and filling it with new totes to move the cleaned parts into. So that will be a good days worth of work for sure.

If I'm REAL ambitious, I will try to get the utility trailer out of the back corner of the shop, and park it outside (sorry '38 Ford based farm trailer). That's the spot earmarked for a pallet rack to put those containers on. That was always the long range plan. As long as I'm moving stuff around, maybe I'll try and get that trailer out of there. Then I can say that despite the fire, I made some real "progress" on finishing the back garage in 2021!
Posted By: MadMopars

Re: A new start for my '77 Cordoba - 02/27/21 05:14 AM

Sorry to hear about the fire. Glad everyone is okay though. Certainly could have been worse. Hopefully you'll get everything straightened out in time. Any idea what caused it? -Trent
Posted By: DynoDave

Re: A new start for my '77 Cordoba - 03/03/21 06:01 PM

Yes. I had a bullet heater / salamander on a thermostat. Something fell in front of it when I wasn't here. When the thermostat kicked on....

I have been acquiring cleaning supplies, testing a few methods I've seen on line for the things that I will have to clean. Slow but sure.

Insurance company and restoration company are moving faster than I am! No complaints there thus far.

I did manage to get the overhead door open. Patched together, but it works. I'll be spending the rest of this week getting parts out from under and next to the Chrysler, and hopefully have it off to the detail shop early next week.
Posted By: DynoDave

Re: A new start for my '77 Cordoba - 03/14/21 03:00 AM

The good(ish) - she's back on the ground, and ready to be towed to the detail shop.

[Linked Image]


The bad - That dark stripe on the roof is carbon / soot. The shiny, lighter areas are portions of the roof that were covered.

[Linked Image]


The ugly - The interior (which was in nice shape and needed the least amount of work of any part of the car) did NOT escape carbon and soot deposits as I had hoped. This paperwork was sitting on the passenger seat, and you can see the light rectangle on the paper where the envelope was sitting.

[Linked Image]


The build sheet, which was on the dash, survived, but was soot covered. Cleaned gently with the dry chemical sponge, then a few day in a ziploc bag with some baking soda, and it should be in decent shape.

[Linked Image]
Posted By: DynoDave

Re: A new start for my '77 Cordoba - 03/16/21 04:21 PM

Transported to detail shop yesterday. I went and met with them to go over what needed to be done. They seemed very nice, and interested in helping save the car. It's stored indoors, and behind a locked gate, so it should be in good hands.

[Linked Image]

The cement under the car, not so good. A lot more carbon and soot than I had hoped. Probably means that despite appearances, the underside of the car has a little soot on it too.

To give you an idea of how thoroughly the smoke leached it's way into small space, those squares with an X shape in them...those were gallons of distilled water for the new radiator. The X is the moulded shape of the bottom of the jug.

[Linked Image]

The white outline is where a piece of rolled up carpet was sitting under the car. Front of car was to the left, fire to the lower right. It's amazing how the smoke traveled, with more soot up under the front of the car than there is nearer where the fire was. There are cabinets in front of the car that are heavily covered in soot, while items 2 feet from the fire are much cleaner.

[Linked Image]
Posted By: DynoDave

Re: A new start for my '77 Cordoba - 03/18/21 03:07 PM

I'll try not to bore you with all of the tedious steps of the cleanup process. But for a lot of the contents of the shop, cleanup is on me. And much of it will go like this past day did (or at least I hope it will).

Thus far, for items stored in a container or box with a full lid, the contents survived well. No detectable smoke smell, no soot. So I'm taking those containers, laying them out on sunny days to air out and bake in the sun (helps break down the smoke molecule).

[Linked Image]

Plastic containers absorb too much smoke smell to clean, and must be replaced. Obviously, the same is true for cardboard as well. I started with these plastic containers. After a day in the sun and fresh air, I transferred all the contents to new containers, and stacked them away in the back garage. I did do one copy paper box of stuff. It did not fare as well, as you could easily see the smoke and carbon/soot got under the edges of the lid all the way around. The smoke molecule is tiny, and gets everywhere. Unless sealed air tight, there's going to have been some level of smoke damage. In this case, the box was full of old magazines, and after a day outside, there was no detectable smell, and no detectable soot deposits. So they did NOT have to go through the bagging with baking soda procedure seen above with the build sheet. Got lucky.

We'll see later how the old containers with split design lids, or cardboard boxes with folded flaps fared. The parts that are not in a container of any kind will require quite a bit of work, if they are savable.
Posted By: DynoDave

Re: A new start for my '77 Cordoba - 03/20/21 02:39 AM

Container arrived yesterday. "Contents" crew was going to be here Monday, but we backed that up a week so I can make more progress on my part of the deal.

[Linked Image]

Broke into a stack of boxed parts today. Except for a pitman arm for the T/A, it's all Mopar parts....refinished 340 (Charger) A/c brackets and fasteners, restored Charger HVAC controls, floor mount cassette player and housing, Ramcharger hood vacuum harness, dash switch and bezel, solenoids, concealed headlamp relays, Charger cruise control system, Charger sport mirrors, NOS Cordoba lower grille, nearly NOS Cordoba Lean Burn air cleaner pie plate, NORS Cordoba heater core, etc. Out of frame a spare tire subwoofer, and Rock Auto closeout Bendix rotors for the Cordoba, and a pair of Cadillac rear disc calipers for use with conversion brackets on the Cordoba. All aired out, cleaned if needed, repacked and reboxed.

[Linked Image]

And a whole lot of smokey, soot covered old boxes hit the recycle container.

[Linked Image]
Posted By: DynoDave

Re: A new start for my '77 Cordoba - 03/20/21 10:42 PM

Didn't think to grab a photo of today's goodies, but dug out 2 more crates of parts, and started in to the dreaded stack of parts on top of and between the crates....items that were wrapped or packaged, but those packages were not in a box or crate....my custom made dual snorkel air cleaner, two battery thermogards, Edelbrock Performer intake, Mopar Performance (MP) cam and lifters, chromed rocker shafts, aluminum shaft hold-downs, valve seals, two Carter Strip-Kits, Mopar TQ rebuild kit, spare O.E. gauges, power door lock system, CPDP aluminum water pump housing, MP aluminum water pump, repro decals and documents, and dozens of other small parts. Also some parts that were full-on exposed. Got everything re-packaged and crated up, air cleaner carefully cleaned with a chemical sponge and wrapped in a clean towel, but ran out of time to do the parts that were bare. I'll have to get back on those tomorrow.
Posted By: DynoDave

Re: A new start for my '77 Cordoba - 04/03/21 02:02 AM

Been a whale of a week. Content cleaning crew in the garage all 5 days, working the first 4, calls in about detailing, about processing the contents, with the insurance company...

So after a week, this side of the sop is looking pretty empty.

[Linked Image]

[Linked Image]

But the other side of the shop, not so good! But this was expected, and I would say we are roughly on schedule.

[Linked Image]

That's the front of that bay. The back is no better. The row of "stuff" nearest the photo is content that has been inventoried, and written off, awaiting my final decision on if I want to keep and try to restore the items my self, or if they go straight to the dumpster. A slow, and painful process. Depending on what day of the week, and what section was being inventoried, the amount I "saved" varied.

Here's an example. This AC item came off of a shelf directly above the garage door, which had the worst smoke/soot damage. Several boxes of petroliana in similar condition. I didn't take the time to clean everything...Many items were simply reboxed (because the cardboard is dirty and smelly, but the contents not as bad...they will get a thorough cleaning when they come back out of the box to but placed back in the restored garage). But I needed to do a test clean on a few pieces, to see if they were worth saving.

As it came off the shelf.

[Linked Image]

After a light dry cleaning with a shop towel, then a more aggressive rubdown with a dry towel.

[Linked Image]

Then a final cleaning with some spray cleaner.

[Linked Image]

Another can half finished.

[Linked Image]

Since several test piece looked good, and went ahead and gave all of the pieces from shelves a similar treatment. Time consuming, but I did not want that acidic soot staying on the container finishes all summer until I pulled them out of storage.

If you go back up to the shot of the full side of the garage, you can see the soot stained Steelcase file cabinet. Here's the same cabinet after cleaning.

[Linked Image]

And a few form the lighter side....is that some sort of liquid sealer in that control joint? Nope...that's liquid car cover. Melted from a synthetic fiber to a liquid that flowed into the crack and cured post-fire.

[Linked Image]

I had a row of old license plates and frame above the pegboard wall. The last plate above the worst area....you can actually read the plate that was there. It's the only one that did that. Even the plate right next to it left no legible trace.

[Linked Image]

So just lots and lots of cleaning to come. But it is nice to see some visible progress being made. And I AM throwing out a LOT of stuff. Stuff I just didn't need, stuff I haven't touched or used in 20 years...get it gone, give me the money and the space. Like that sand blaster. Nice to have at times, but I haven't used it in a decade, it makes a mess when you do use it, and it takes up a ton of space. Just let 'er go.
Posted By: DynoDave

Re: A new start for my '77 Cordoba - 04/07/21 04:34 AM

I was fortunate to have a 4 day weekend around Easter, so I was able to work in the garage with the cleaning crew on Friday and Monday, and got some other work done over the weekend as well.

The workbench side of the shop is 99% cleared. About 2/3 of the contents from the attic were marshalled in the center of the shop, and gone through. Lastly I started to attack the bay that was full of stored parts. It may not look like a lot of progress, but that table made of saw horses and a file cabinet was full of boxes underneath around it, and stacked 7' high on top of it. All have been gone through, lightly cleaned as needed for now (full cleaning will come later, as needed), and moved to clean new boxes. Not inventoried at this time, just moved to clean, safe packages.

[Linked Image]

[Linked Image]

I'll continue to work on this side of the shop this week and weekend, then the crew will be back on Monday.

The Wen belt and disc sander is a little worse for wear.

[Linked Image]

Fortunately I had a bit of an obsession with keeping parts wrapped, boxed, crated, or otherwise protected. Probably only about 5% of the parts were out in the open, and thus heavily damaged in the fire (not counting the car cover, water pump and sander that were at the heart of it). Here are a pair of NOS rocker mouldings for the Cordoba, wrapped in several layers of Saran wrap. You can see the soot in the wrap.

[Linked Image]

[Linked Image]

Carefully unwrapped on the right. If it looks dark and streaky, it is not. That's the reflection of the trees above.

[Linked Image]

Look as good as the day I wrapped them up.

[Linked Image]

NOS wheel well trim turned out the same. The plastic wrap took a beating, but protected the part inside.

[Linked Image]

The box is restaurant food worker gloves. 2000 for like $10 or something at Sam's Club. Makes it very possible to wear a fresh pair to unwrap the part without touching the part itself and transferring soot to it. Throw them out, then a fresh pair to wrap the part, store it, then clean the clear-coated plywood table I made for this job. Unwrap another part, new gloves, and so on. Really helps eliminate contaminating parts that survived without damage.

[Linked Image]
Posted By: DynoDave

Re: A new start for my '77 Cordoba - 04/12/21 03:27 AM

The detailer finished their work with the Cordoba. I asked that they not waste time (and money) on polishing and waxing the car...just get it decontaminated and clean. It's the cleanest it's been since I bought it. I'm very happy with it.

[Linked Image]

[Linked Image]

By mid-day today, I had the second of three rows of parts cleaned out, with all the things stacked on top of that 2x4 table cleaned off, as well as all the things under it. As you can see, that 3rd row is actually a couple of boxes/items deep.

[Linked Image]

By late afternoon, I had broken through to the wall.

[Linked Image]

And by 10pm, all the smaller boxes along the wall are gone. Only large items (gas tanks, hyd. strut compressor, NOS condenser, grease drum and dispenser, foot locker, and sheet-metal) remain to the right of that photo.

[Linked Image]
Posted By: DynoDave

Re: A new start for my '77 Cordoba - 04/18/21 02:33 PM

Not a very productive week.

My son got a text from a co-worker that he (the co-worker) had covid. So my son went and got tested, but it was lab-type test, with 3-5 days to get results. I had to warn off the cleaning folks, and the painter for inside the house until we had results.

Work was super busy, and looks to be so for the next couple of weeks.

My son finally got the all-clear from his covid test, but the crews have to be rescheduled and have not returned.

I then got my second covid shot on Friday. While I did not have the kind of fatigue that I did the first time, I was a little lethargic yesterday, and only worked out there from 2-7. I did uncover a few nice Mopar parts, all of which seem to have survived OK.

My stack of forged Mirada wheels survived. Bought these 20 years ago. The clear coat is beginning to yellow very slightly, more from age I think. One has a touch of corrosion that crept around from the side where there is no clear, up under the edge of the machined/cleared surface. Could be used as-is, cleaned up at home, or professionally redone. We'll see.

[Linked Image]

Some of this stuff I bought so long ago, and there are variations on parts over the years, I'm going to have to refresh my memory on. This is a narrow tank for a Cordoba (and other late B-bodies). Used on cars ordered with the H.P. 400 and dual exhaust (std. tank is wider and offset to the driver side, eliminating room for the factory tail pipe and resonator, where this narrow one looks very much like a 3rd gen. Charger piece, sits centered in the body with room for exhaust down either side of the tank). Not very many made, which makes the tanks pretty rare. And it's not reproduced. Got this one as part of a lot purchase up in Toronto, Canada in the early 2000s. Was a new tank, modified with a sump (on the bottom side) for drag racing. Not sure if I'll use it as-is, or have a tank shop patch it. Includes a sending unit.

[Linked Image]

4 "Cordoba" hood seals, that go at the leading edge of the hood and seal to the core support. The '77 original is a very thin piece of rubber, and did not age well. My 38k mile car was missing it's seal, to give you an idea of how often they are missing. There is an original in that stack that I found on a Cordoba at Warhoops (salvage) back in '99. Sort of a miracle it survived. Still in good shape, semi soft/brittle. There's another thin one that is probably a '78/'79 part, which is just a subtly different design. Then there's the odd-ball, looks like that same '78/'79 design, but in a very different material...much thicker, and made of a very very soft, flexible material. There's a 4th one...but I don't know what it fits! laugh A pair of Studebaker trim mouldings, and a new in the box bug shield for the Suburban that I didn't even know I had. facepalm

[Linked Image]

And another Mopar tank. As much as I have perfect recollection of who/when/where and why I bought that other one, I have no recall of where this one came from. Probably ebay, but it's a very different shape than the black one. Going to have to do some homework.

[Linked Image]

A 6-way manual seat base for the Charger, bought from a forum member (thanks Tom!).

[Linked Image]

Once this tank is cleaned up and moved (along with all the other stuff) to the back garage, that end of the side wall is done. Cleaners will take care of the rest (because they are not car parts).

[Linked Image]

But I still have this corner to do. The good news is it's not all cars parts. But there are some in there, and many of them big body panels.

[Linked Image]

I'll be out there again today.
Posted By: DynoDave

Re: A new start for my '77 Cordoba - 04/21/21 03:33 AM

A few more parts moved out yesterday.

[Linked Image]

[Linked Image]

And I started moving out and cleaning some of the sheet-metal.

This battered and abused 18" or so shortened Charger hood was a freebee from a Moparts member. Picked it up at Carlisle, and our third gen. Charger forum member Bob let us use his shop to shorten it (so it would fit in my vehicle). But there are pieces of the hood inner structure intact that I need to repair another hood, so it has value.

[Linked Image]

The cleaning crew was back today, and they helped me move the rest of the sheet-metal and some other items into temporary storage. With the attic now emptied out, there are two stacks of "stuff" to go through, then the interior of the garage is official cleaned out. Restoration crew will deal with the rest. Cleaning crew thinks they will be done on Thursday.

[Linked Image]

[Linked Image]
Posted By: DynoDave

Re: A new start for my '77 Cordoba - 04/23/21 01:25 AM

About 98% cleaned out now, though some of that is an illusion. The container is full of stuff from the attic that I have to go through, and car parts that I have to 1) ship because I sold them 2) clean and store in the back garage 3) clean and move to the storage unit with the Cordoba (a possibility for some of the bigger sheet-metal parts) or 4) write off as a total loss. Another long weekend of sorting, cleaning, packing and moving is ahead.

[Linked Image]

[Linked Image]

[Linked Image]

[Linked Image]

[Linked Image]
Posted By: DynoDave

Re: A new start for my '77 Cordoba - 04/25/21 12:16 AM

Started going through the container today. This had a little carbon on one edge, but it cleaned up nicely. smile

[Linked Image]
Posted By: ZIPPY

Re: A new start for my '77 Cordoba - 05/12/21 05:16 PM

I'm looking at the melted mini blinds, imagining how hot it was in there to do that blush
Posted By: larrymopar360

Re: A new start for my '77 Cordoba - 05/12/21 11:54 PM

Glad to see others that appreciate the Doba! Man oh man, a Doba with 400-4. Dreamy! grin I don't own one but definitely would love to have one.
Posted By: DynoDave

Re: A new start for my '77 Cordoba - 05/19/21 04:07 AM

Thanks. I'm sort of anxious to get back to working on it. After the detail shop cleaned it up, it looks pretty nice! laugh2

Been busy for the last few weeks with "other things". Just not enough hours in the day.

Getting close. Down to just large items for the most part. Did take an hour this evening and clean up this NOS fender, and an original hood seal for the Charger.

[Linked Image]
Posted By: DynoDave

Re: A new start for my '77 Cordoba - 05/24/21 12:08 AM

A few more pieces of metal today. Starting to fall behind a little. Going to have to get a lot done this coming week.

[Linked Image]

So how long did MOPAR continue to stamp out replacement deck lids for 75-77 Cordobas? At least through late November 1983 it would appear.

[Linked Image]

[Linked Image]
Posted By: DynoDave

Re: A new start for my '77 Cordoba - 05/25/21 12:52 PM

A couple of more panels done yesterday afternoon.

[Linked Image]

[Linked Image]
Posted By: DynoDave

Re: A new start for my '77 Cordoba - 05/26/21 08:12 PM

A few more panels knocked out. I keep telling myself the front garage is almost empty, yet I keep finding more stuff!

I have 4 of these for the new shop. This is the only one that was charred. I'll have to have it blasted again, and start over.

[Linked Image]


[Linked Image]

[Linked Image]


My Charger's original hood.

[Linked Image]

[Linked Image]


Cleaning up nicely (right side). A '71 RR 383/727/8.75 prop that came with the 8.75 axle I bought. Both headed into the Chrysler.

[Linked Image]
Posted By: DynoDave

Re: A new start for my '77 Cordoba - 06/04/21 03:33 AM

The last few items were hurriedly moved out, and the demolition work began on Tuesday.

A few errors occurred here. They were not supposed to demo the drywall on the walls. By the time I saw it, it was too late. They also were not supposed to remove the 16' of workbenches, nor the 6-7' of desktop area. So those will have to be reconstructed somehow. The upside is the exterior walls (not shared with the house) were not insulated. I'm going to pay them to do that while they are in there. Also getting a little electrical work done, and having the exterior entry door replaced.

I now have a new pile of things to go through again...the old cabinets, a few missed contents, and some other odds and ends.

[Linked Image]

[Linked Image]

More curious smoke patterns, this time from a sheet of peg board sitting 1.5" off the wall. These were 4x8 sheets laid on their side, so 4' up from the workbench surface. Curious how the smoke pushed it's way through the first 5-10 rows of holes, then swept downward.

[Linked Image]

[Linked Image]

[Linked Image]
Posted By: DynoDave

Re: A new start for my '77 Cordoba - 09/23/21 11:14 PM

We're getting close. Painted, new overhead door, new opener, new man door, new benches, new peg board, second layer of insulation blown into the attic....and did I mention LIGHTS? It's like an operating room in there.

[Linked Image]

[Linked Image]

[Linked Image]

[Linked Image]
Posted By: ZIPPY

Re: A new start for my '77 Cordoba - 09/28/21 04:07 PM

Cool up
Posted By: DynoDave

Re: A new start for my '77 Cordoba - 12/05/21 03:35 AM

Exactly 3 months later than planned, all of my "stuff" is back (at least I hope it's all there).

[Linked Image]
Posted By: Copper Dart

Re: A new start for my '77 Cordoba - 12/05/21 01:37 PM

WOW a daunting task sir. I don't feel so bad about my situation anymore. grin
Do you have help or are you a one man band?
Copper
Posted By: DynoDave

Re: A new start for my '77 Cordoba - 12/07/21 12:12 AM

The remediation company offered to help me unpack, but half of the "places" these tools and items lived don't currently exist...pegboard, (there, but I need to clean all the hooks), benches (still have to paint the frames), wooden shelves and wire shelves (no tools to cut/build/hang), or old kitchen cabinets (all need to be stripped and rehung). So I had to decline their help. It's all on me.

I've started to unbox and put out what I can, but still moist of it needs a home. Some things I haven't found yet that are making me nervous.
Posted By: Copper Dart

Re: A new start for my '77 Cordoba - 12/07/21 02:20 PM

I get anxiety just thinking about your situation! Good luck and Gods speed sir.
Copper
Posted By: Magnumguy

Re: A new start for my '77 Cordoba - 12/08/21 11:42 PM

Wow Dave, it's really turning out great, from what could've been a disaster!

Glad I found this.
Posted By: DynoDave

Re: A new start for my '77 Cordoba - 12/09/21 01:05 AM

Thanks Bill. As long as all of my tools and things are returned, I'll be happy.
Posted By: DynoDave

Re: A new start for my '77 Cordoba - 02/19/22 08:52 PM

I've missed a few updates here. Still working on things when I get the time.

I have a couple of swivel lamps for each end of the bench. The lamps survived, but their mounting hardware did not. Also, the way the benches were reconstructed, there was no lip (overhang of the top) to clamp them to. So I had planned to used a couple of scrap 2x4 4" squares with a hole drilled in the middle to mount those lamps on.

Meanwhile, one of my favorite new YouTube channels is for the Battleship New Jersey. A few weeks or so back the curator had an episode discussing the ships teak wood deck. The are replacing it, and pieces of the old deck are for sale as souvenirs, the purchase of which helps support the museum/ship. Perfect! I ordered up two squares of. Waiting for some teak deck cleaner and conditioner to come in, then I'll get them mounted. Video below. Mine appears to my eye to be WWII vintage, based on his description.


[Linked Image]

[Linked Image]

Book cabinet survived and is all cleaned up. Very pleased that all of the books, manuals, and tons of factory documents and ads all survived. Lab coats and uniforms back from the dry cleaners.

[Linked Image]

Tools are all back up on the pegboard....at least the ones I got back.You'll notice there's a lot of vacant space on this section.

[Linked Image]

This side is a little more complete.

[Linked Image]

Because the benches were not reconstructed properly, the 340 short block for my '72 Charger lost it's home (it also got coated with drywall mud and paint speckles, thank you contractors without tarps). To get it back into it's previous home, a pair of drawers (also built in the wrong place) will have to be torn out and rebuilt, then I can wheel it into the corner under the bench on this engine stand (bought God knows how long ago...I believe from the old State Fair Winter Swap Meet, when it was at the State Fairground on 8 mile). The Mopar reman small block Mopar shipping crate c1987 will have to go.

[Linked Image]

[Linked Image]
Posted By: CDN72SE

Re: A new start for my '77 Cordoba - 02/22/22 09:07 PM

Coming along nicely Dave.
Posted By: DynoDave

Re: A new start for my '77 Cordoba - 02/26/22 06:58 PM

A little here, a little there. Wish I had more time to devote to it.

Dug out the cherry picker from the back garage (a small project in itself), and got the 340 moved from the pallet to the engine stand. Getting to this point was an entire evenings worth of work, starting at 5-ish, and didn't go into the house until 10:30. Wrestling that picker out of the over-stuffed back garage, dragging it across the frozen snowy yard, moving things in the attached garage to make space for it, assembling it (yes, even that fought me), figuring our how to mount the engine on the stand (tried it several ways before realizing it was not meant to be mounted with the engine mounts still bolted to the block), and finally wrestling the 4 arms of the stand into alignment with the holes on the block (this is a china made $39.99 swap meet item...precision is actually pretty good, but not perfect).

And here it is. Victory!

[Linked Image]
Posted By: DynoDave

Re: A new start for my '77 Cordoba - 02/26/22 06:59 PM

mad mad

[Linked Image]

It would appear that my measurements with tape measure of the assembled stand, engine and bench were off by a 1/16th or so.
Posted By: DynoDave

Re: A new start for my '77 Cordoba - 02/26/22 07:00 PM

I did try (no photos) moving the engine into the spot by the bench where I wanted it to be under, just to make sure the bench or floor didn't slope that 1/16" or so, but no luck. Standing there watching the news out the Ukraine, and thinking about this mess, I thought if I tipped the engine and stand (can this spindly stand take all the weight of the engine tipped at an angle and on two wheels without collapsing?) up on two wheels, I could duck that china wall under the bench frame, and when it came out on the other side, the block is lower after the wall, and I'd be good (the engine is too long to make it all the way under the bench, so the wall at the flywheel and of the block will not be an issue). Turned out that while the idea was sound, and while the block and frame of the stand would clear, the casters (which turned out to be the widest spot) would not, colliding with the leg of the bench and gouging into the drywall.

confused
Posted By: DynoDave

Re: A new start for my '77 Cordoba - 02/26/22 07:03 PM

Before I turned out the lights for the night, I stood there and thought about this for a while (a slow process laugh ).

So close. If I could just get that bench a "tiny" bit higher. Tried lifting up on the bench...zero play. So the only thing that would help would be making the stand lower. There is room under the pan. If this garage and the other were set up (not still being reconstructed), I could cut a 1/2" out of each leg, weld it back together, and life would be good. But that's not an option right now. So I started looking at the iron casters. Very beefy, but a full 4" tall. If I could find some that were just a fraction of an inch shorter, I'd have the room I needed.

A quick visit to the local Ace Hardware the next day produced these. Not much shorter, but I only need maybe an 1/8th inch to clear comfortably. 90lb. rating each, so 360 across the four of them, should be enough for the short-block. They will probably flat spot terribly over the coming years, but I'm not worried about that right now.

[Linked Image]


Smaller roller bearing area, and using flattened pins for an axle Vs. the bolt on design of the original. Not as strong and serviceable, but also quite a bit thinner. You can't see it in this photo of the new caster in front of the old, but the wheel itself is half the width, and the axle is much slimmer (you can see the bolt/axle of the original caster in the background behind the new caster).

[Linked Image]


The other issue I foresaw while at the hardware store...the new downsized casters have a mounting stud just as tall (which means they will have the same reach through the tube frame...that's a good thing), but smaller in diameter. This would allow the new casters to wallow around in that hole, and under load, get cocked sideways in the frame. So I walked one of the new casters over to the Ace bulk material center, and picked up a piece of aluminum tube that would just go around the outside of the stud.

[Linked Image]


Back in the shop, a test fit of that tube into the hole in the frame showed it to be just a touch too big around. A quick bit of work with a round file (one of the few files that got returned post-fire) removed the powder coat and opened up the hole just a touch. I only opened the upper hole. Leaving the hole in the bottom of the frame tube smaller will prevent the bushing from dropping out of the bottom of the frame.

[Linked Image]


Test fit = perfect.

[Linked Image]


Marked and cut to length to create a bushing for the caster stud.

[Linked Image]


Set it into place = perfect. Shown here only partially installed. It sits flush with the frame when fully installed.

[Linked Image]


A mixed bag on the amount of grease on the caster bearings from their factory. One had an OK amount, two barely any, and one appeared to have none. A trip to the back garage and the 25 gal. drum of '50s vintage Sinclair brand bearing grease (doesn't everyone one have one of those?) for a little scoop of product. Each caster bearing got packed.

[Linked Image]

[Linked Image]


Cleaned up and ready for action. Action in this case means rolling it about 8' and sitting for a decade.

[Linked Image]


As long as we're at it, a touch of grease for the new busing too. Installed and tightened. Now repeat 3 more times.
Posted By: DynoDave

Re: A new start for my '77 Cordoba - 02/26/22 07:04 PM

Victory (again)! And a damn site closer than I had hoped for. I was nervous for a moment.

[Linked Image]


While I expect those rubber casters to eventually flatten and fail under load, they are a day and night difference to roll around on. Those iron casters sucked, very hard to roll, and damn near impossible to steer. With these new casters, it's like steering a shopping cart. Super easy.

Wheeled into place for a long nap.

With a Trans Am powertrain build up (along with a whole host of other mods) as Job #1, the Chrysler Cordoba will be build #2. The Duster #3, and the poor Charger #4. Hope to get to it before I die. So easy access of this stored engine is not a priority.

[Linked Image]

Not sure the engine is even salvageable (or the car). But it's the numbers matching engine, so we'll keep it and determine it's fate another day. Before this space gets boxed in by a large filing cabinet, I'll add an additional layer of oil/grease to the bores and other machined surfaces, then bag it as best I can.
Posted By: basketcase

Re: A new start for my '77 Cordoba - 02/28/22 12:21 AM

The New Jersey channel is great, and Ryan shows a lot of great areas of the ship. Hope to visit one day.
Posted By: DynoDave

Re: A new start for my '77 Cordoba - 02/28/22 03:06 PM

Me too!

A guy I grew up with (we were next door neighbors and born 1 week apart) joined the Navy after college, and requested a battleship. I remembered that he served on one, but was thinking it might have been the Missouri. Nope...it was New Jersey! Chatted with him this weekend, and he's headed to the channel ti subscribe and start watching.
Posted By: Drei

Re: A new start for my '77 Cordoba - 04/29/22 03:03 AM

Originally Posted by basketcase
The New Jersey channel is great, and Ryan shows a lot of great areas of the ship. Hope to visit one day.


This was the topic at the shop the other day. Hope to visit it, too!
Posted By: DynoDave

Re: A new start for my '77 Cordoba - 08/04/22 08:44 PM

It's a great channel, and I've added several more ship channels, like the U.S.S Texas.

Ugh...last photos from February. not a lack of posting really, just sidelined with other projects.
© 2024 Moparts Forums