Moparts
68 Dart GT convertible
Posted By: burdar
68 Dart GT convertible - 09/07/13 11:56 PM
It's time to start a build thread on my next project. Like, the Challenger, it will be build over the coarse of a few years as money allows. I still haven't decided exactly what I want the finished product to look like. I know, that's not the right way to start out. The problem is that I like a lot of different styles. I like the stock look as well as the Pro Touring look. I keep going back and forth between these two looks.
Option 1. Stock looking engine, body colored steel wheels with dog dish hub caps and redline tires. I'd keep the GT body side mouldings as well as the DART letters on the quarters and the finish panel on the trunk lid. I'd return the interior to stock except for a volt meter conversion and a small tach on the front of the console.
Option 2. Newer aluminum master cylinder, aluminum intake and fabricated valve covers.(basically try to make the engine not look like a typical SBM) Large diameter wheels. Remove GT side mouldings, DART letters on the quarters and finish panel on the trunk. Interior close to stock except custom gauges in the dash and maybe an aftermarket shifter in the stock console. Rear disc brake kit.
Posted By: burdar
Re: 68 Dart GT convertible - 09/08/13 12:07 AM
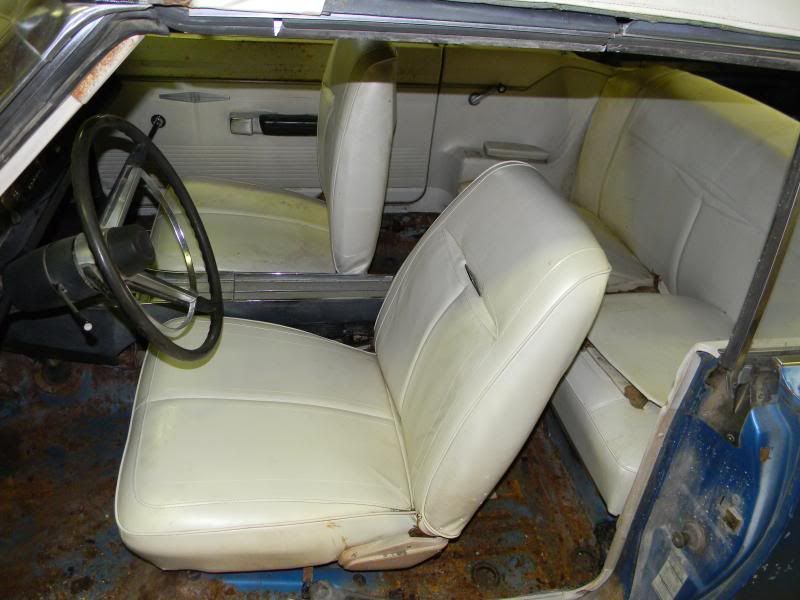
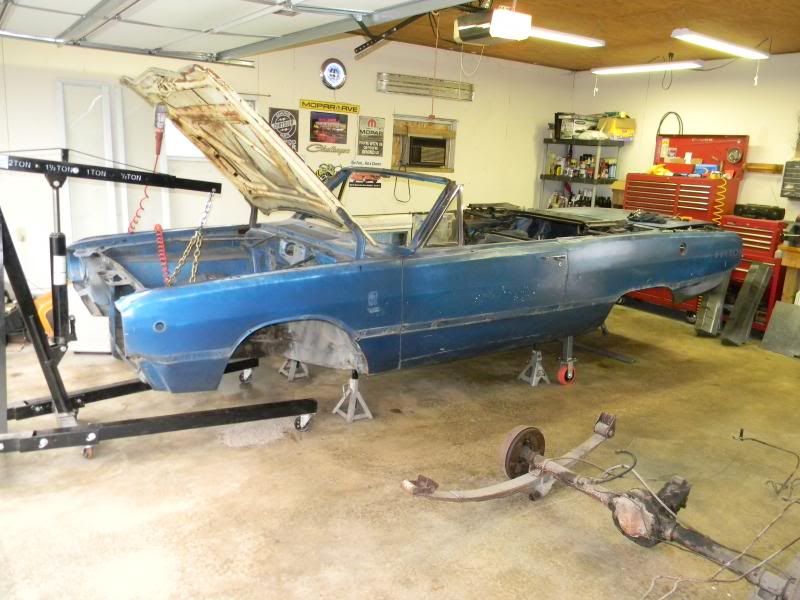
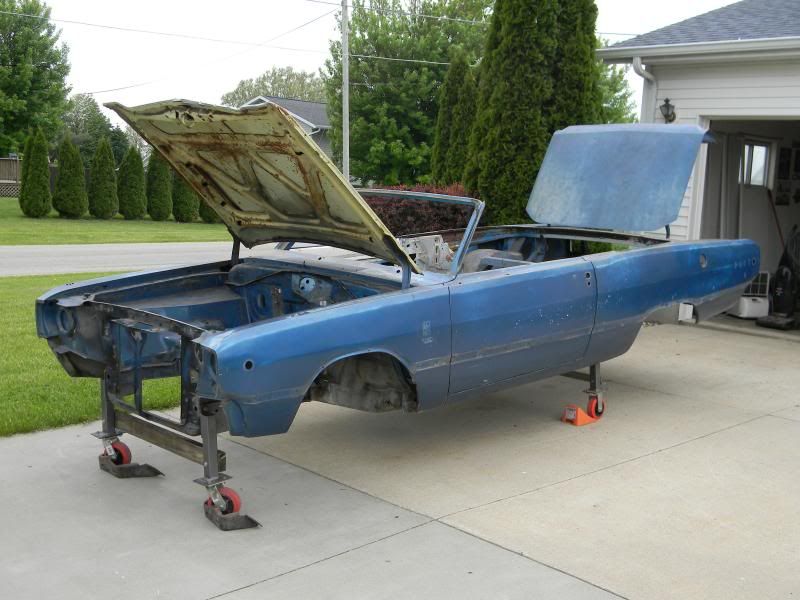
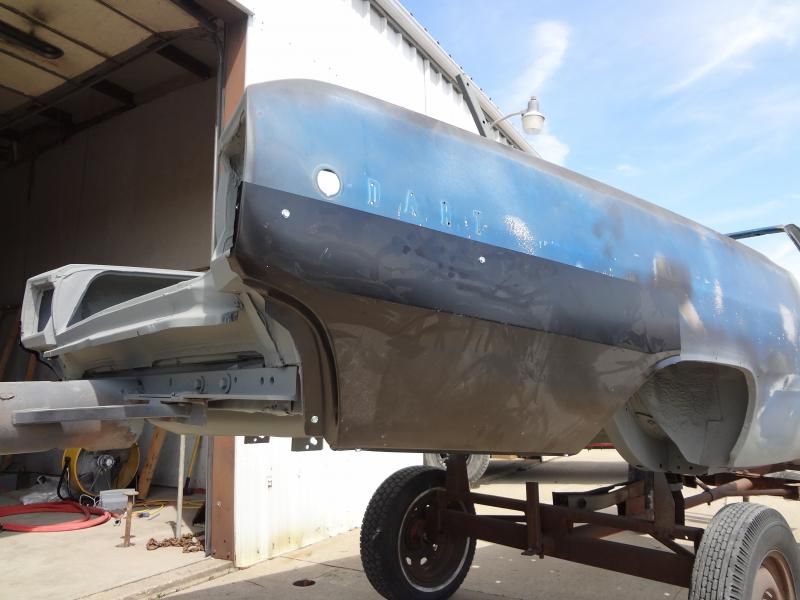
OK, here's the car. It has a 318/904, PS, manual drum brakes, no sway bar, 7 1/4 rear, white bucket seat interior with center console.
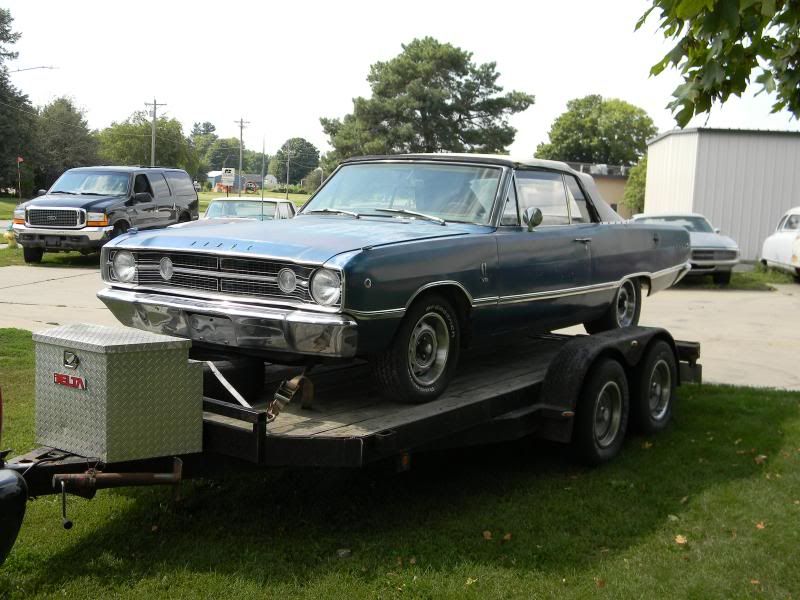
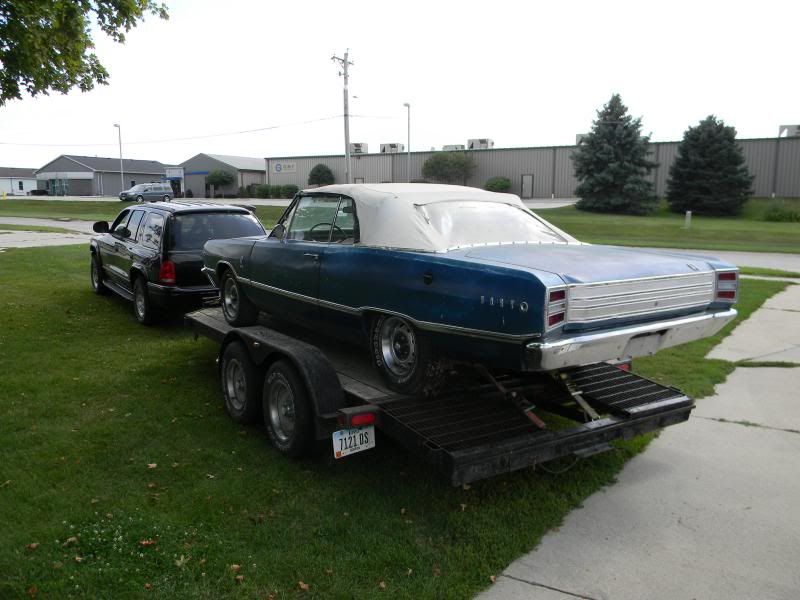
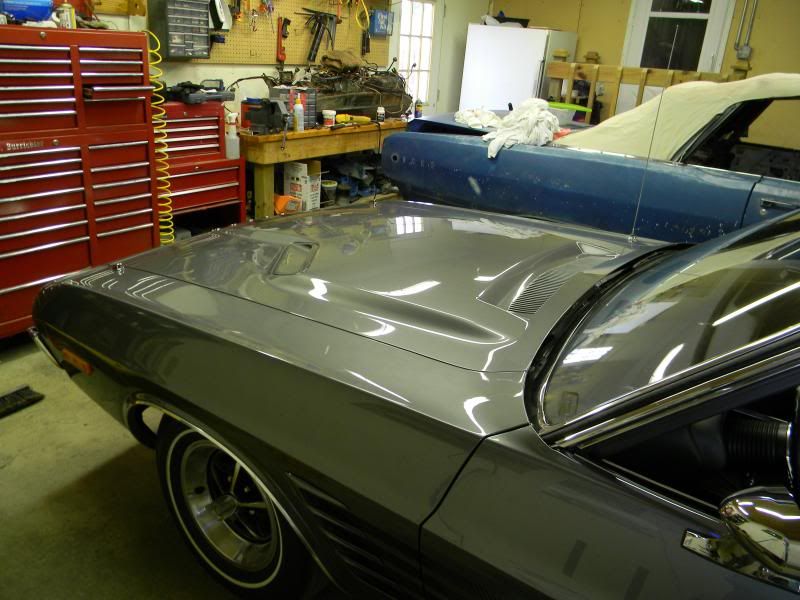
I got a GTS hood with the deal. That will be going on the car no matter which option I decide to go with.
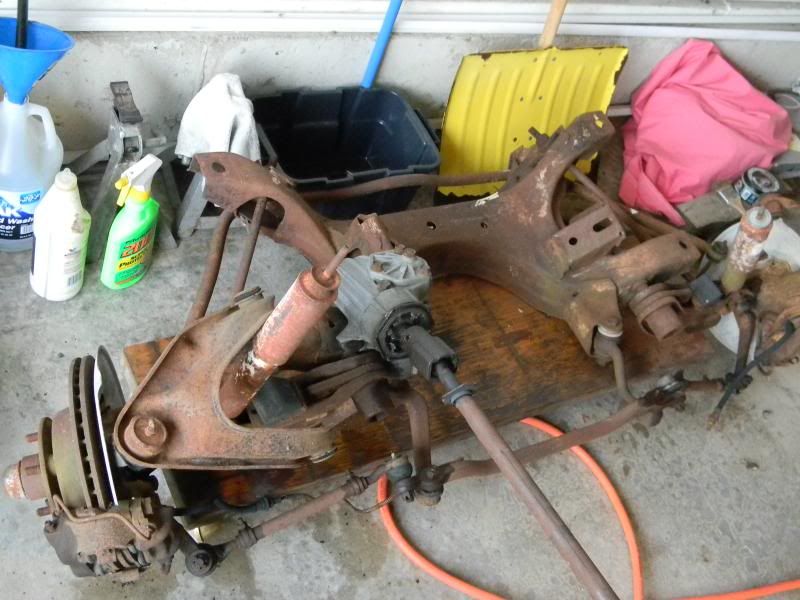
I found a complete disc brake front suspension on craigslist and bought it. I'll most likely do a BBP conversion with the Mustang rotors. I also have a C-body 8 3/4 rear that will be narrowed. I'm going to fit the widest tires on the back that I can. I'll move the springs in with the Dr Diff relocation kit and role the quarter lips if I have to. I don't want to do a mini tub although that would probably give me a nicer look.
Posted By: burdar
Re: 68 Dart GT convertible - 09/08/13 12:45 AM
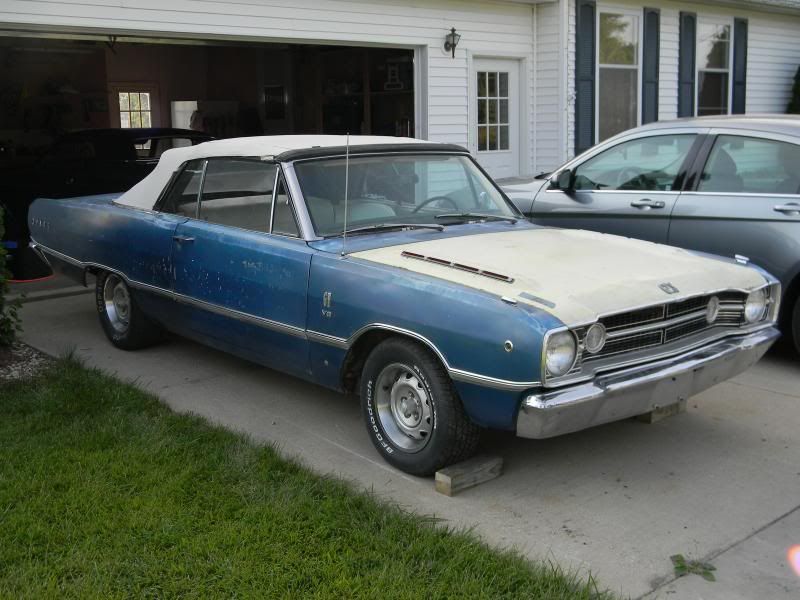
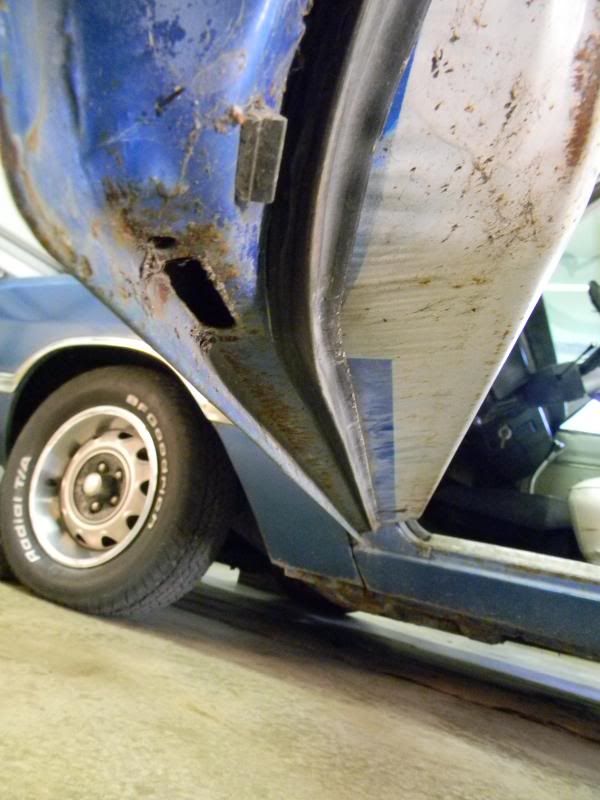
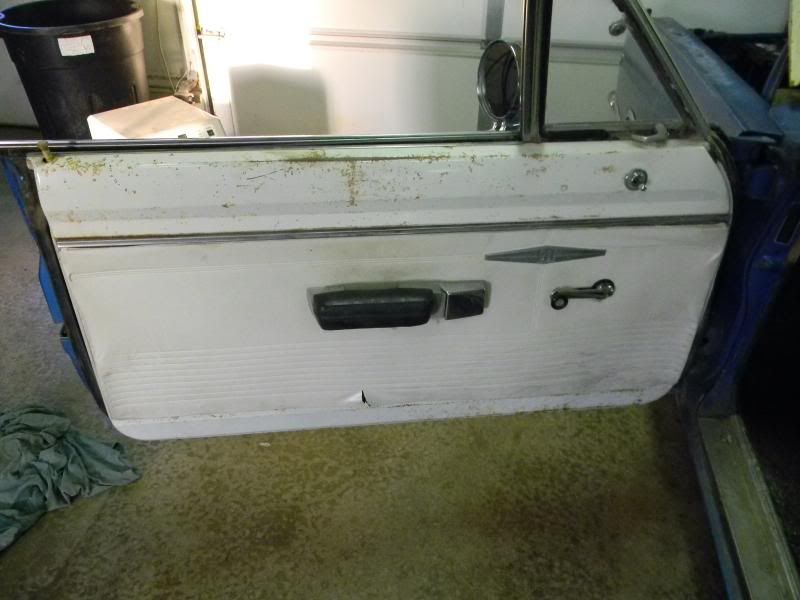
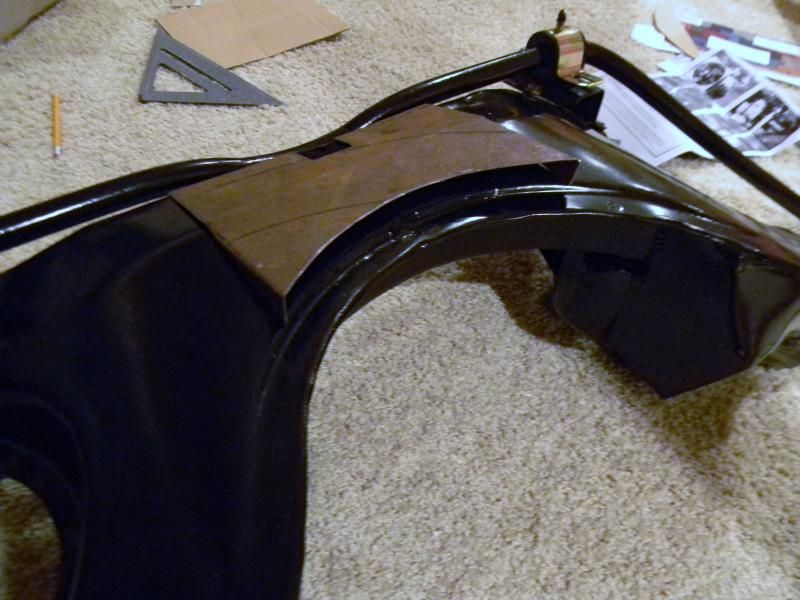
The car is in a lot better shape then the Challenger was. The door bottoms look good. Check out the nice mask job.
The door panel cardboard is pretty nasty and the vinyl is torn. I did take some 0000 steel wool to the upper door panel trim and it looks like it will clean up really nice.
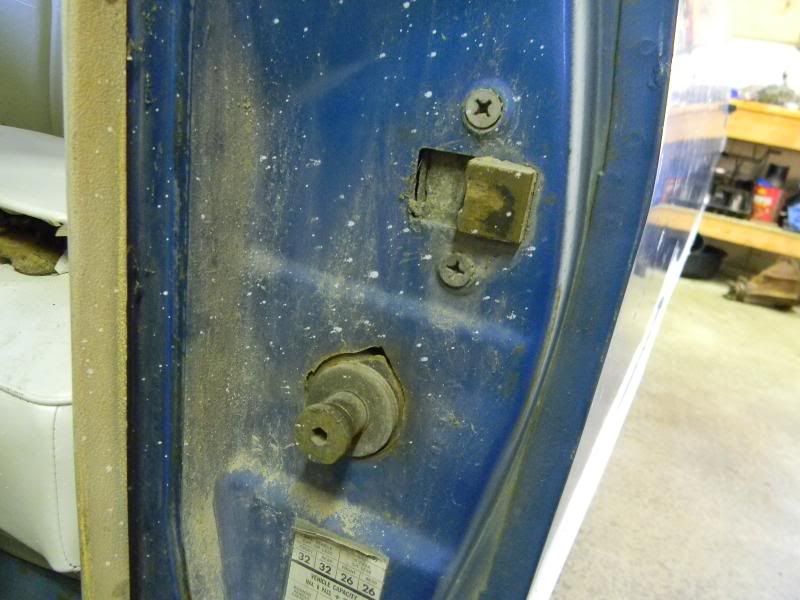
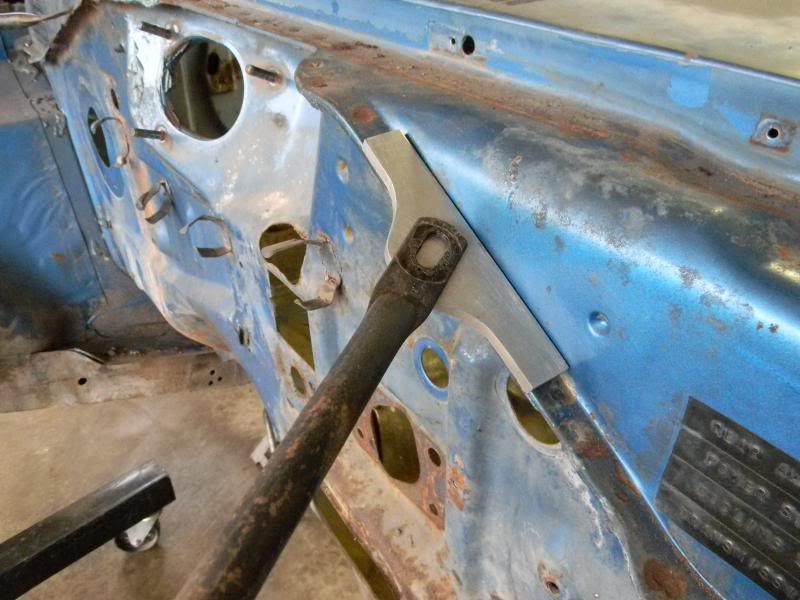
The metal is cracked around the door strikers which I guess is very common on A-bodies.
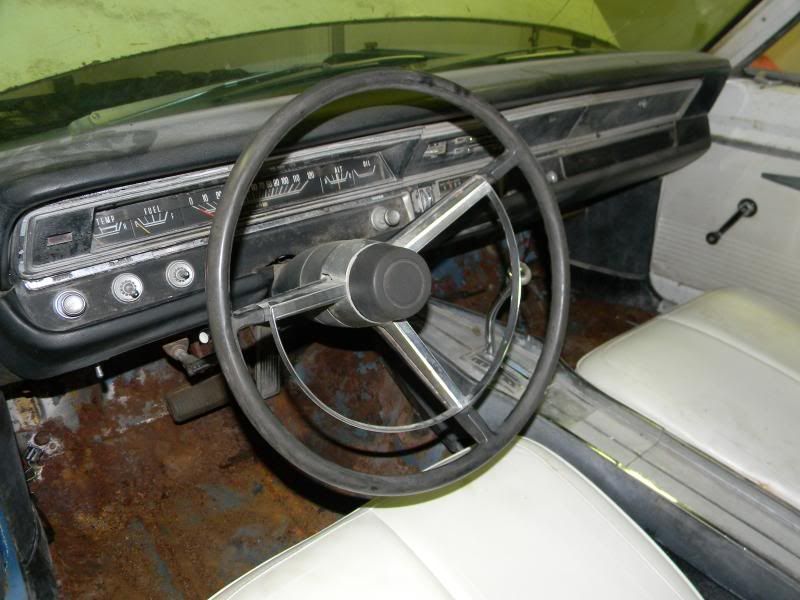
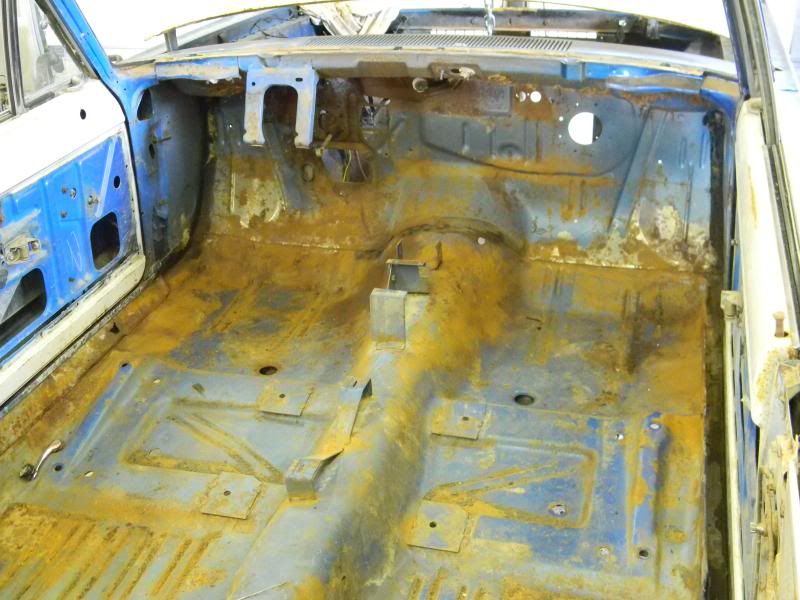
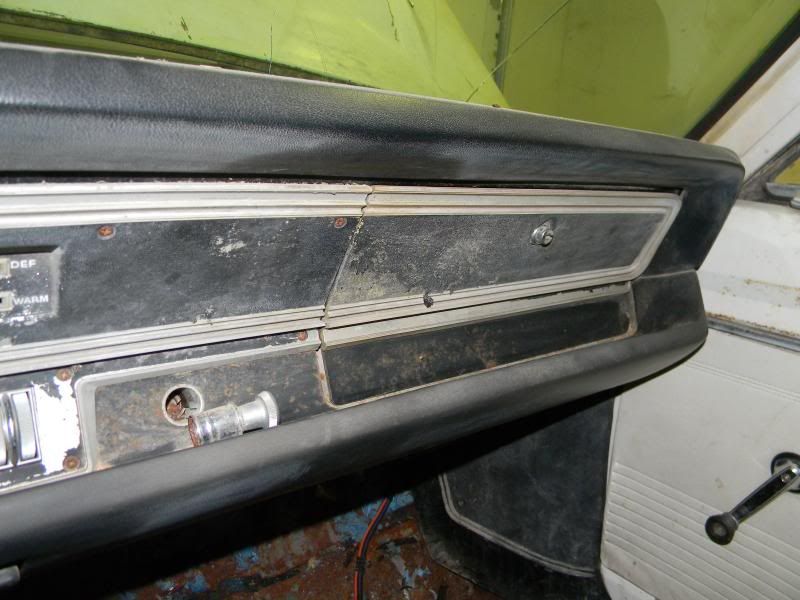
The upper dash pad will be replaced but the lower two pads look good. The interior of this car is the worst thing about it. It has some newer seat covers but the seat frames are very rusty. I hope they can be reused. The floor looked nasty too but I think it will be OK. The metal under the sill plates was perfect and once I vacuumed out the inside it didn't look as bad.
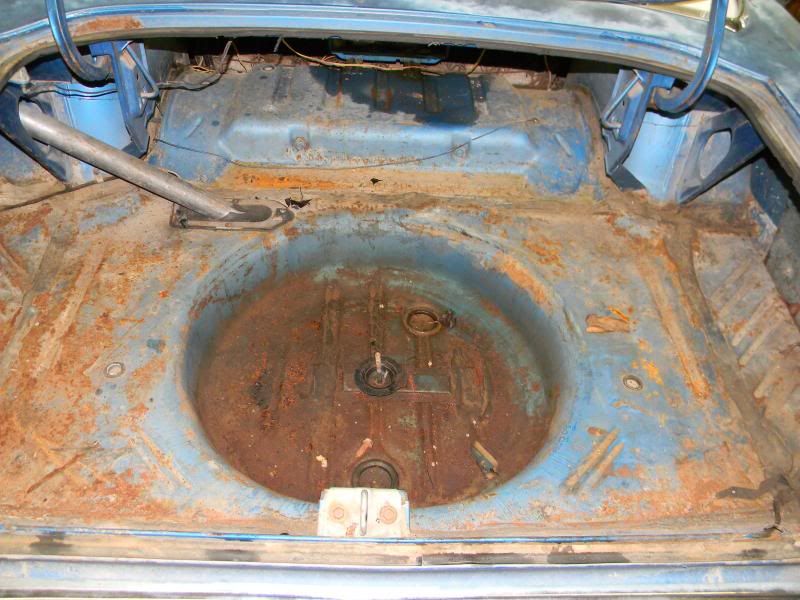
The trunk is in good shape too. The spare tire well is very solid. There is just some surface rust that will clean up. The picture makes it look worse then it is.
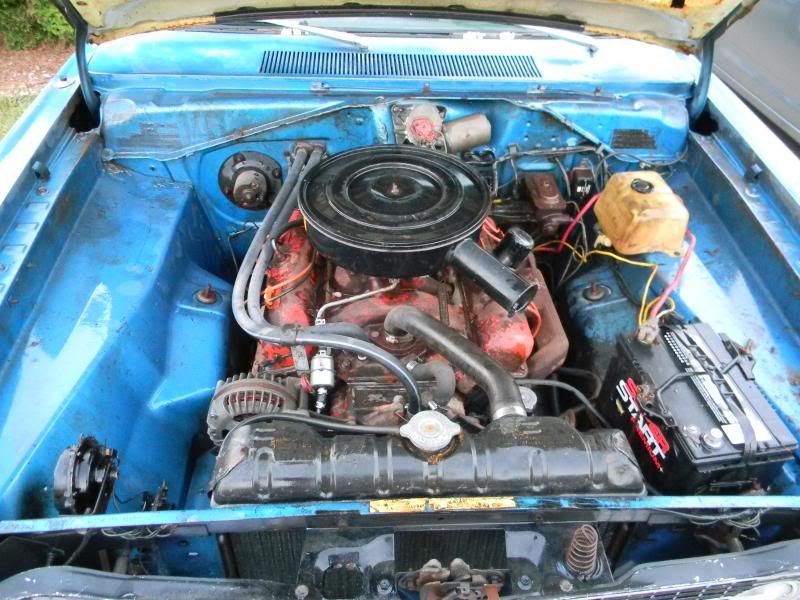
I haven't checked any of the engine stampings but there has been work done to it. The block, intake and valve covers are orange and the heads are turquoise. It really doesn't matter to me if it's original because a 360 will be going in its place.
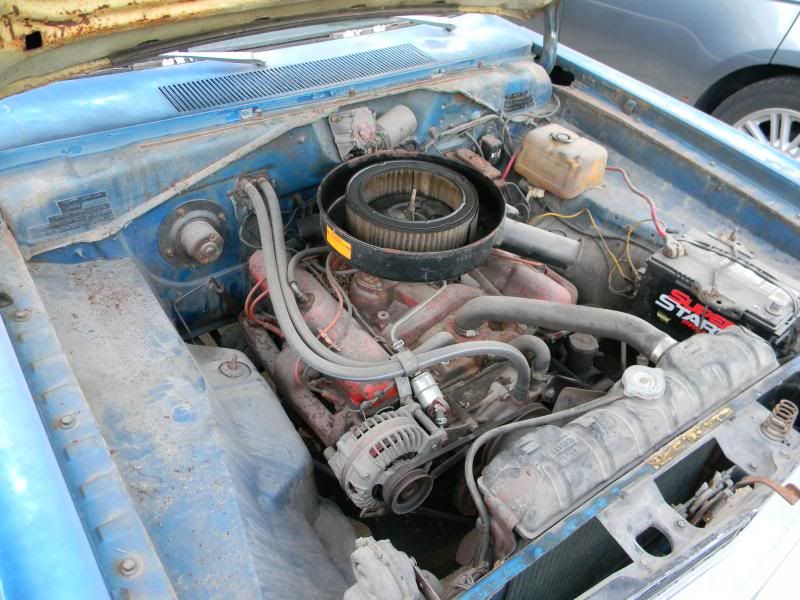
A little power washing made things look a little better. The engine looks red in the picture but it looks more orange in person. Maybe the factory red fades to an orangish color?
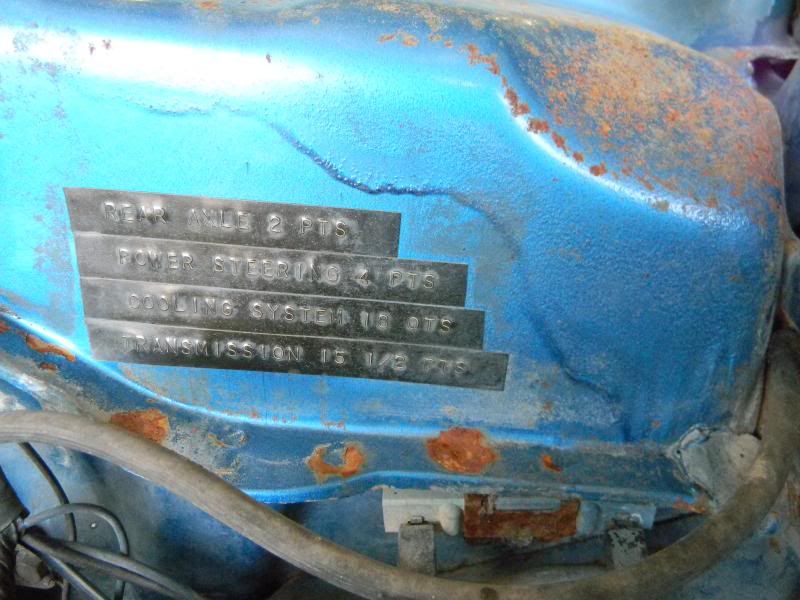
There are labels on either side of the firewall with timing instructions, spark plug numbers, points gap exc...
Posted By: burdar
Re: 68 Dart GT convertible - 09/08/13 01:02 AM
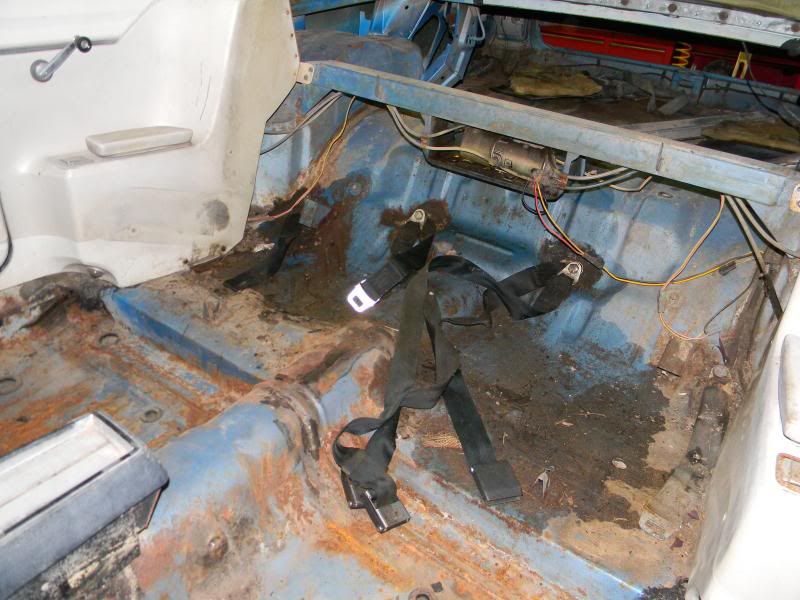
The hydraulic lines for the top are split, so fluid was leaking under the back seats. It soaked into all the dirt and made a mess.
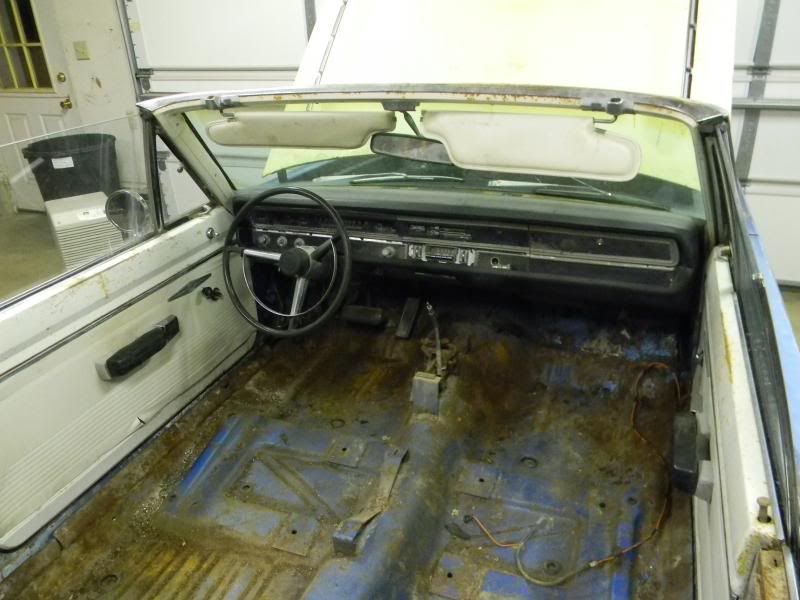
The interior is starting to come out.
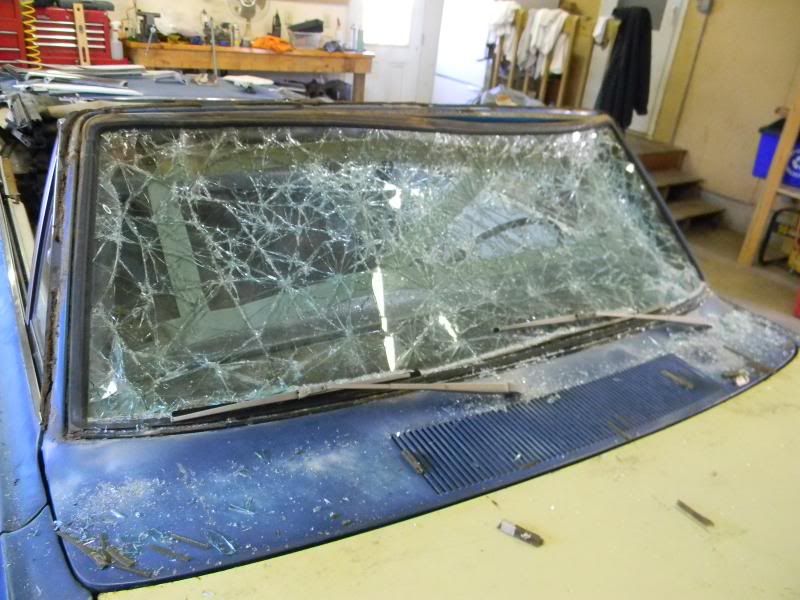
The windshield was broken already so I just broke it even more and pushed it out. The original gasket is in good shape.
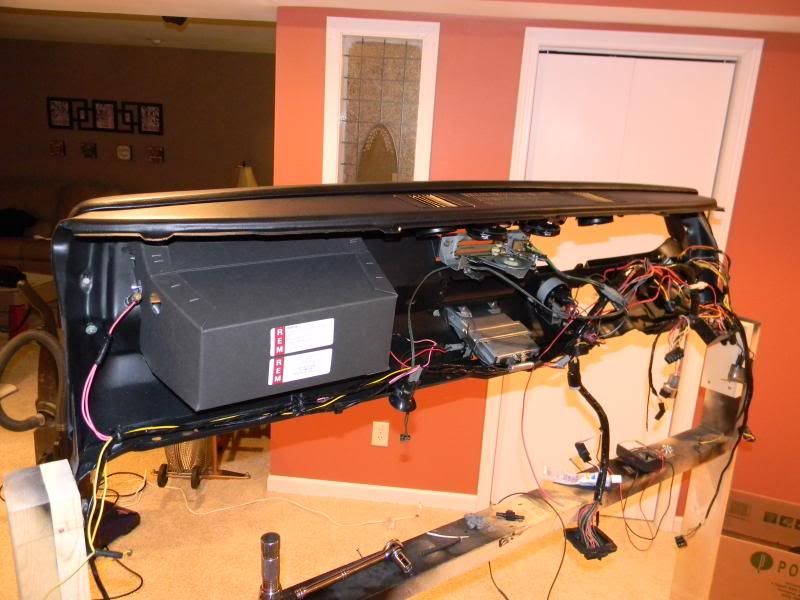
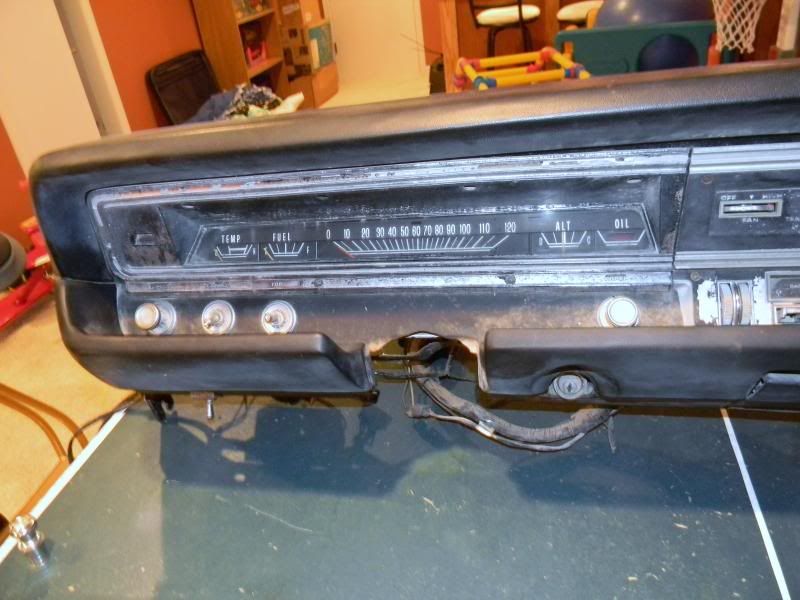
Dad came over and gave me a hand with the dash. The interior has been completely removed. I'll work on the heater box and steering column this winter. Then when I decide what I want to do with the gauges, I'll start working on the dash assembly. There's no point in removing all the side glass and tracks right now. I'd just have to find a place to store them. I'll disassemble everything in the doors before the bodywork starts.
Posted By: a12superbee
Re: 68 Dart GT convertible - 09/08/13 08:01 AM
That looks fun to play with.

Posted By: Anonymous
Re: 68 Dart GT convertible - 09/08/13 03:39 PM
Something thing to keep the mind busy, good for you.
Posted By: burdar
Re: 68 Dart GT convertible - 09/09/13 03:29 AM
Quote:
Something thing to keep the mind busy, good for you.
Exactly...I need something to focus on so life doesn't get overwhelming.
My friend Paul came over yesterday and helped me get the engine out. He's helped me a lot this year with everything that's been going on. He's never seen an engine removed this way so it was exciting for him.
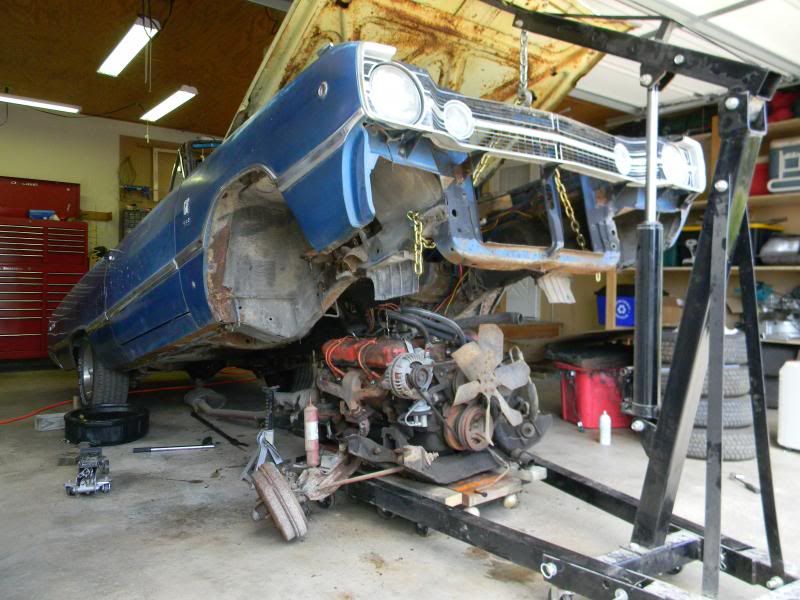
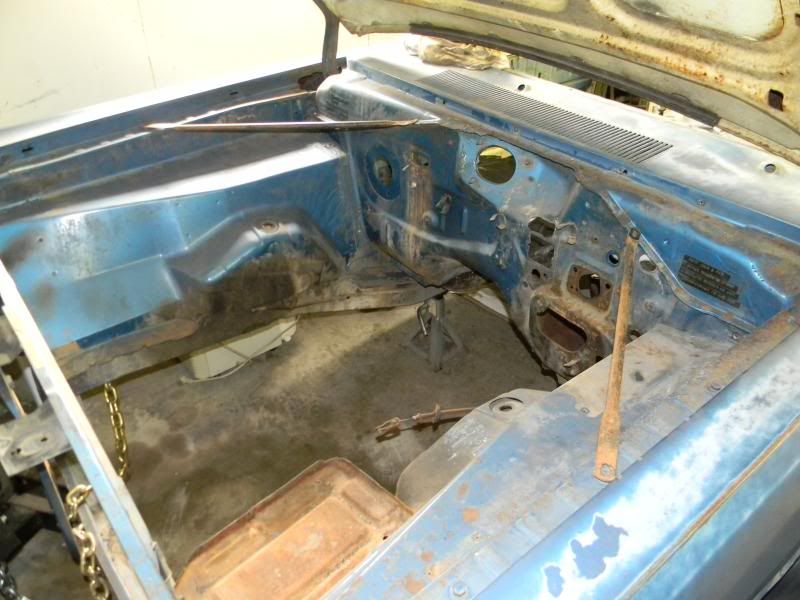
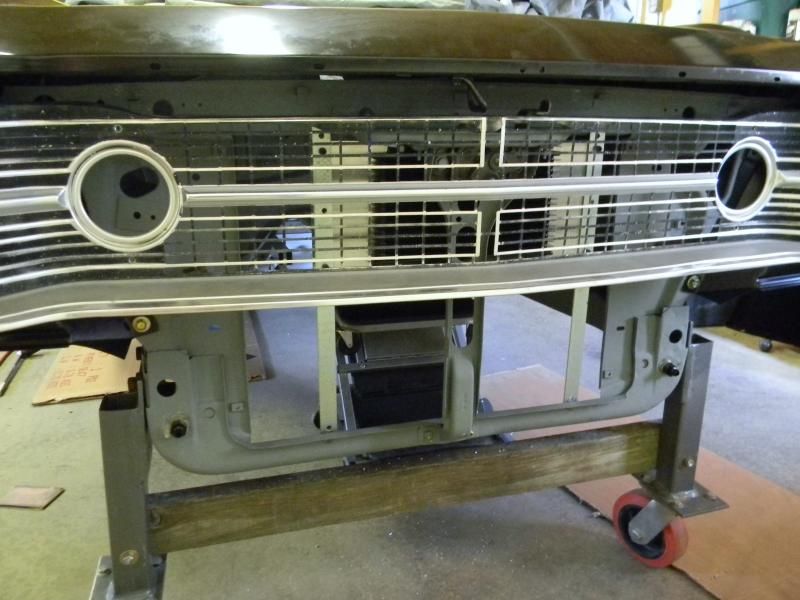
I didn't have much time out in the garage today. Most everything is out of the engine compartment except for the brake lines. The grill came out today too.
Posted By: Rhinodart
Re: 68 Dart GT convertible - 09/09/13 03:37 AM
Be very careful with the pot metal transition moldings near the quarter windows to the stainless pieces, those are almost impossible to find! There is a tab underneath the quarter window stainless that has a tendency to break. I sold one side this year for $125!

Also, the door and quarter glass are unique to a convertible too.
Posted By: burdar
Re: 68 Dart GT convertible - 09/09/13 03:53 AM
I haven't started removing any of the trim. I'll make sure to be extra careful. If I'm not sure how something comes apart, I'll ask.
Posted By: desotoman
Re: 68 Dart GT convertible - 09/09/13 11:43 AM
nice soild car ,good luck with it
Posted By: basketcase
Re: 68 Dart GT convertible - 09/09/13 06:51 PM
Posted By: burdar
Re: 68 Dart GT convertible - 09/10/13 04:35 AM
Posted By: OhioMopar
Re: 68 Dart GT convertible - 09/10/13 07:06 PM
Very cool car. Makes me want to get my butt in gear on my GTS. You seem to be moving right along.
Posted By: a12superbee
Re: 68 Dart GT convertible - 09/11/13 10:18 PM
I think that is the most haphazard black out picture I've seen yet, thanks for posting.
I did a sedan pro street a few years ago that we painted viper silver then laid out the butt stripe. Took the viper silver put in couple drops of black then put two light dust coats on it. Then cleared the entire car. It just shows up but at times blends in that you can't see it. Customer loved it. I took a scrap piece of metal and colored it in viper silver then tried various ideas with tinting the actual color with blacks & various pearls. Gave them it and let them decide. Wish I had a picture on my phone I could up load. Maybe I'll try from wife's computer tomorrow. Just an idea for you.
Posted By: burdar
Re: 68 Dart GT convertible - 09/15/13 02:14 AM
I'm toying with the idea of taking the GTS tail stripe and moving it between the tail lights...inplace of the trim panel. A friend is going to photoshop it for me.
Posted By: burdar
Re: 68 Dart GT convertible - 09/15/13 05:44 AM
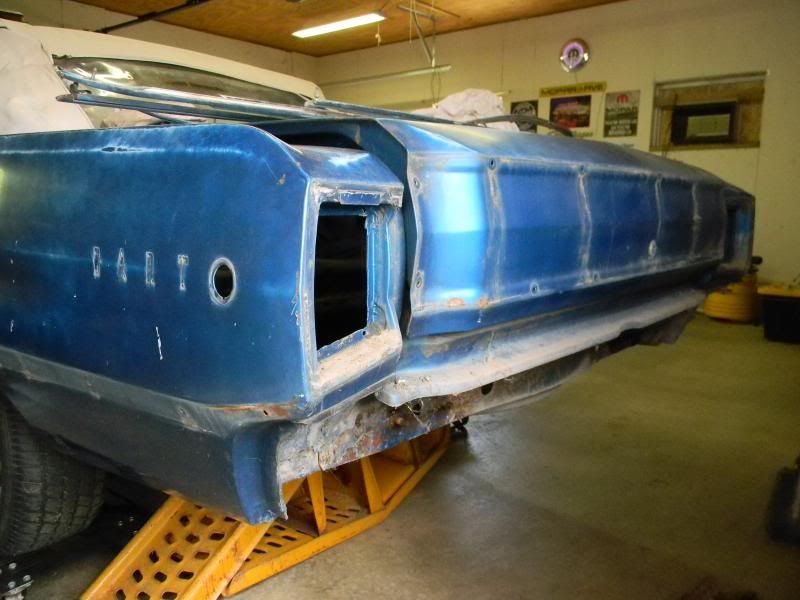
Still slowly taking it apart. I got the tail lights and bumper removed today. All I basically have to do yet is remove the rear end and convertible top.
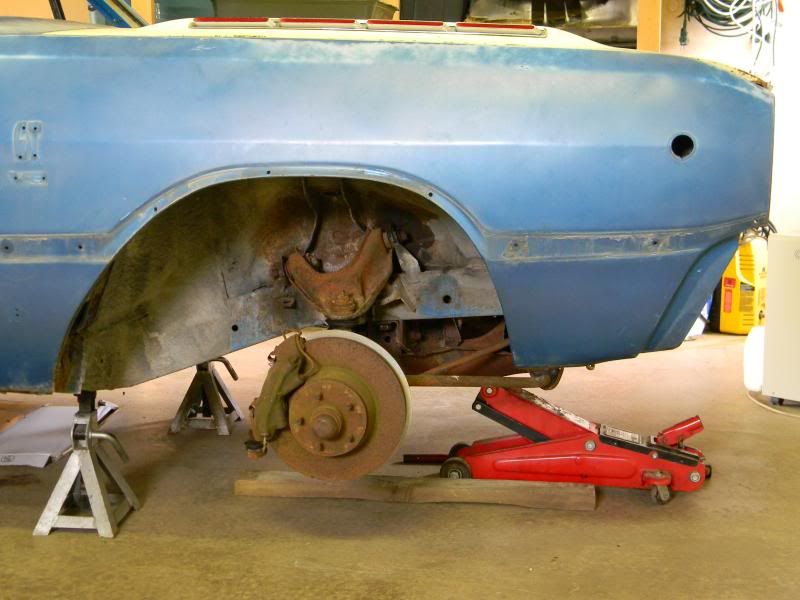
The upper control arms came off today too. I figured the cam bolts would be rusted solid inside the uca bushings but they came right out. Then I test fit the disc brake suspension I bought. Everything bolted right up.
Posted By: burdar
Re: 68 Dart GT convertible - 09/17/13 05:31 AM
The Challenger is back from the bodyshop and now I have no where to work. Remind me why I bought another project when I have no room for what I already had. I can't work this way. The Challenger needs to find another home for the winter.
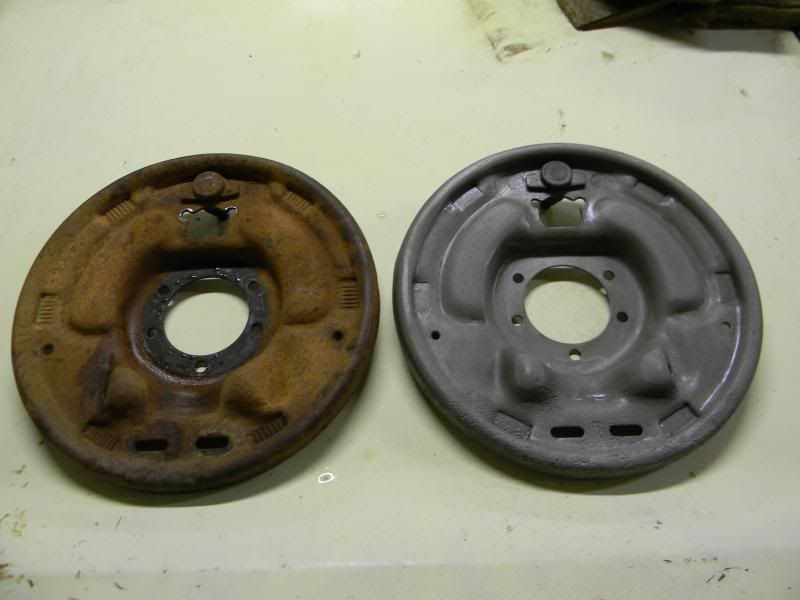
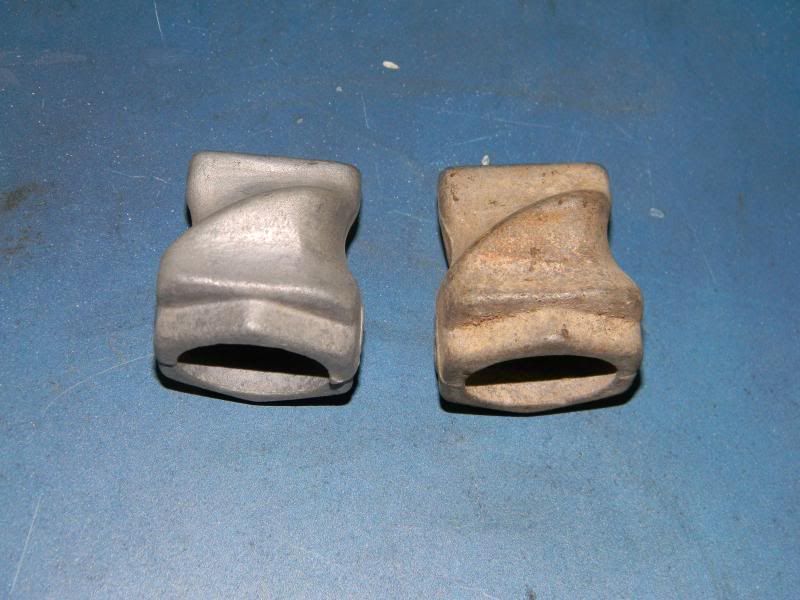
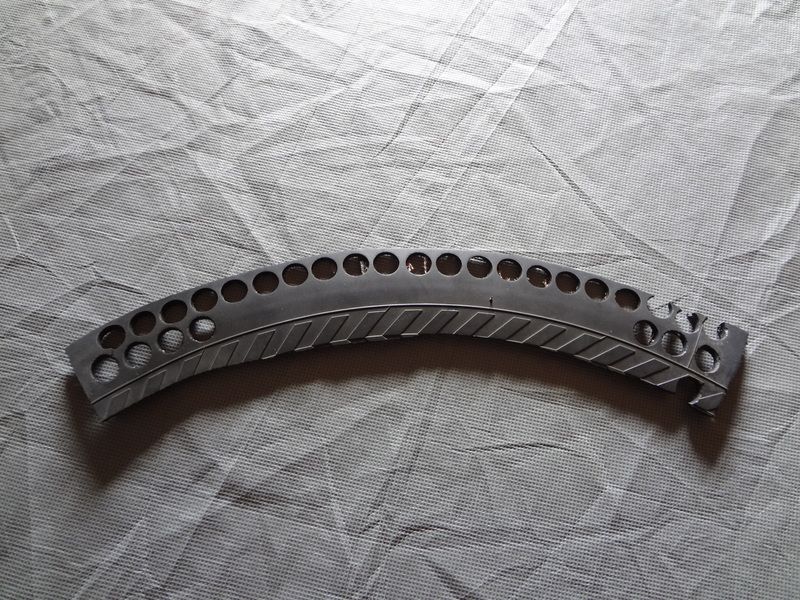
I started cleaning up the 11" backing plates that came with the 8 3/4 I got. They are heavily pitted from sitting on the ground for who knows how long. I don't feel comfortable useing them. The one on the right is decent except for the pitting on the bottom. That doesn't affect the function but it looks awful. The one on the left cleaned up nice on the outside but the inside is very bad. Some of the contact pads are almost completely corroded away.
Posted By: dmoore
Re: 68 Dart GT convertible - 09/18/13 12:45 AM
Darren, You can store it at my place if you want...:) Just make sure to leave the keys in the ignition...

You knew it was coming

Posted By: burdar
Re: 68 Dart GT convertible - 09/18/13 04:57 AM
Word has it that my aunt has a nice big shop that she isn't using. I may have to give her a call and see if I can store the Challenger there.
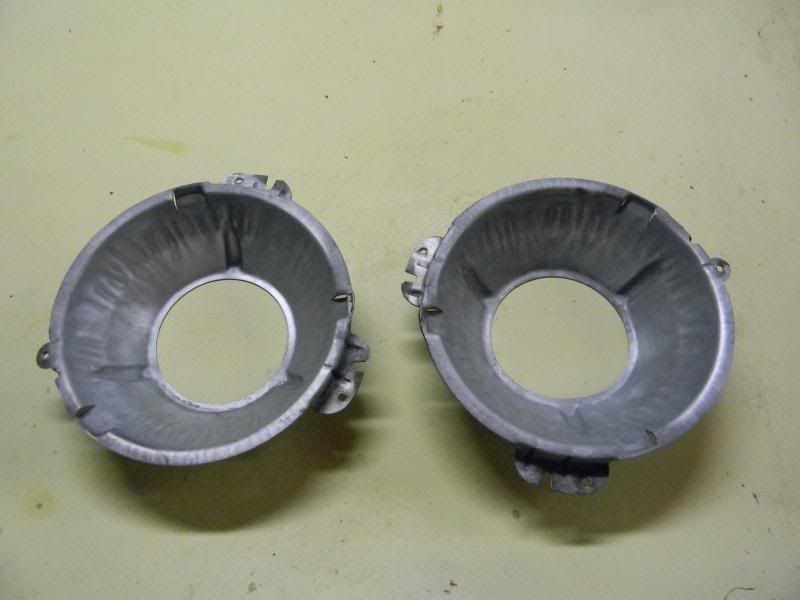
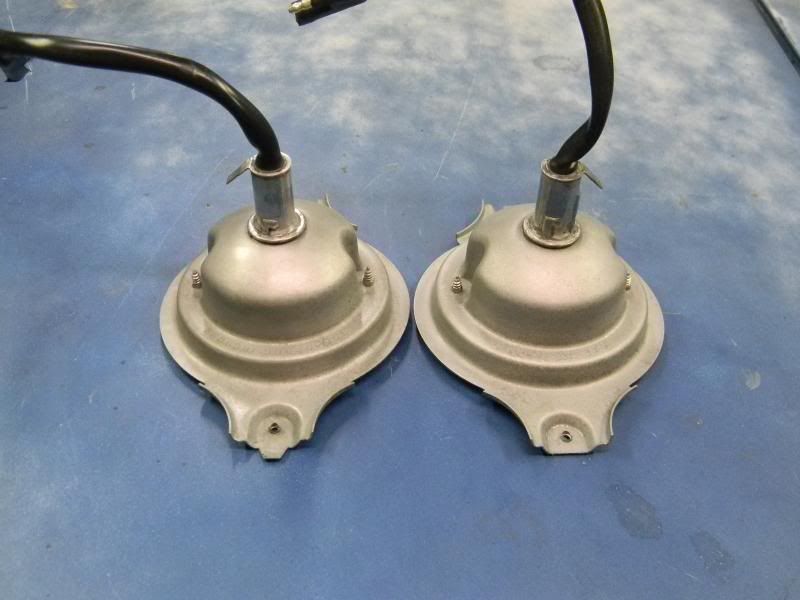
The headlight buckets cleaned up nicely. A 20 minute soak in EvapoRust and a light rub down with 0000 steel wool did the trick.

Any chance that car is from Northern California? I owned one exactly like it!
Posted By: burdar
Re: 68 Dart GT convertible - 09/18/13 05:09 AM
It was from Nevada. The story was that is sat under a lean-to for 20 years. I think that's a bit of a stretch but it is in really good shape.
Funny thing was I had a GTS hood bolted on mine as well, the car looked to be in nearly the same shape as well (back around 1989)
Posted By: burdar
Re: 68 Dart GT convertible - 09/19/13 04:03 AM
Posted By: burdar
Re: 68 Dart GT convertible - 09/19/13 04:10 AM
What's the original finish on the front parking light housings? Are they galvanised? They aren't' cleaning up very nice. They have a dark gray look to them. A few spots under the mounting flange are shiny. What should I do with these?
Posted By: Rhinodart
Re: 68 Dart GT convertible - 09/19/13 04:41 AM
Quote:
Any chance that car is from Northern California? I owned one exactly like it!
Just ask Jeff Bobst, I am sure he knows where it came from. I will ask him next time I see him.
Are you asking about the back side of the housings or the inside? 
Posted By: burdar
Re: 68 Dart GT convertible - 09/19/13 04:55 AM
The insides are sprayed with a reflective paint. What should the back sides look like?
I have an old registration from the original owner. The car was from Nevada. I believe I'm the 4th owner. Jeff bought it from the guy who bought it from the original owner.
Posted By: burdar
Re: 68 Dart GT convertible - 09/19/13 04:34 PM
I just saw that Classic Industries sells new housings. It looks like theirs are zinc plated. Is it possible to remove the sockets without damaging them...and then reinstall them after the housings are replated? Probably not.
Posted By: burdar
Re: 68 Dart GT convertible - 09/23/13 03:47 AM
Posted By: burdar
Re: 68 Dart GT convertible - 10/06/13 04:16 AM
I picked up the zinc fasteners yesterday and I'm not happy. When I picked them up, the guy said "These are going to have a little yellowish look to them because our solution is stronger. It resists a 100 hour salt spray vs the normal 40 hour spray."
When I got home, I remembered that I had gotten a call that morning confirming I wanted everything yellow zinc plated. I said NO, I want them silver zinc plated. They said "OK, no problem, I thought you wanted them yellow." I think everything was already in the other tank when he called. He probably pulled them out right way after talking to me but the color had already started to change.
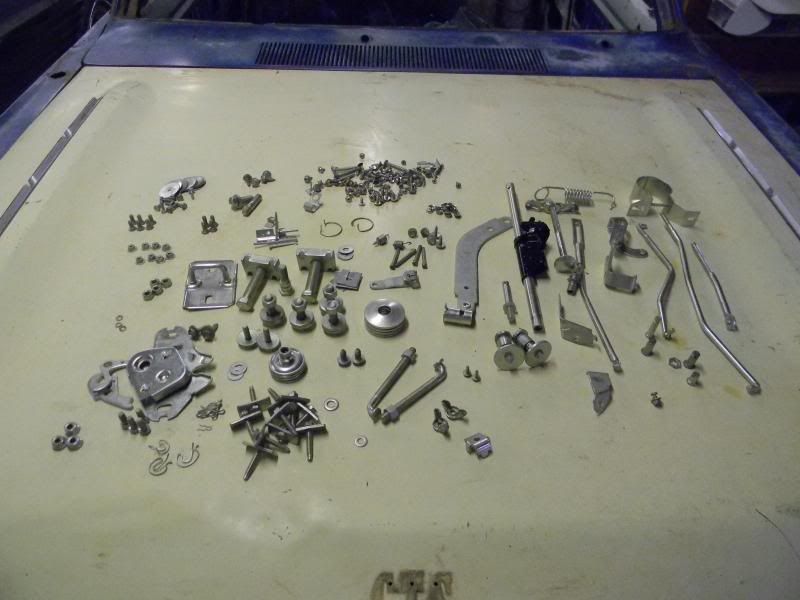
Some things will be OK. I'm not going back stock with this thing anyway...but some things in the engine comp are going to look like crap next to other things I have planned. I sorted everything out today so I didn't forget where anything goes and I'll deal with the engine comp stuff later.
I don't think they were in the yellow tank long but you can really tell the difference when you hold a silver zinc part up to them.

Posted By: burdar
Re: 68 Dart GT convertible - 10/06/13 04:42 AM
Here are some more parts I've been working on...
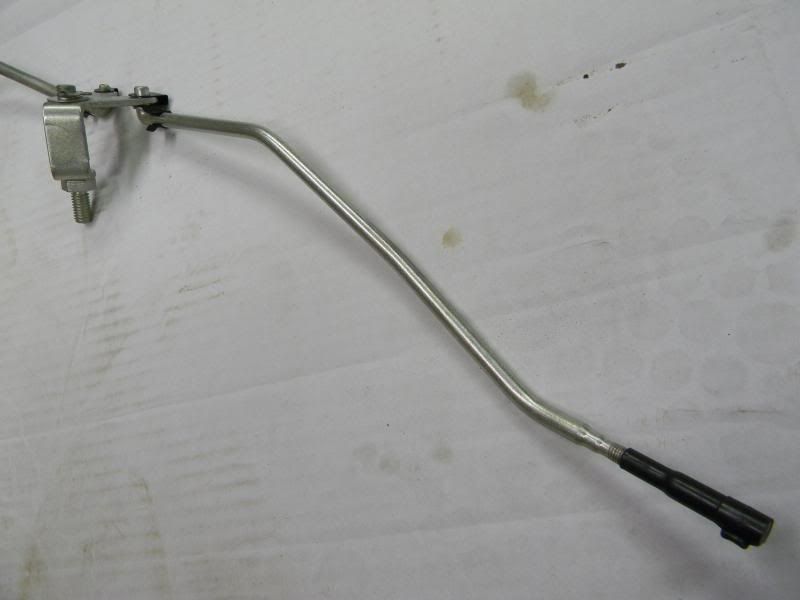
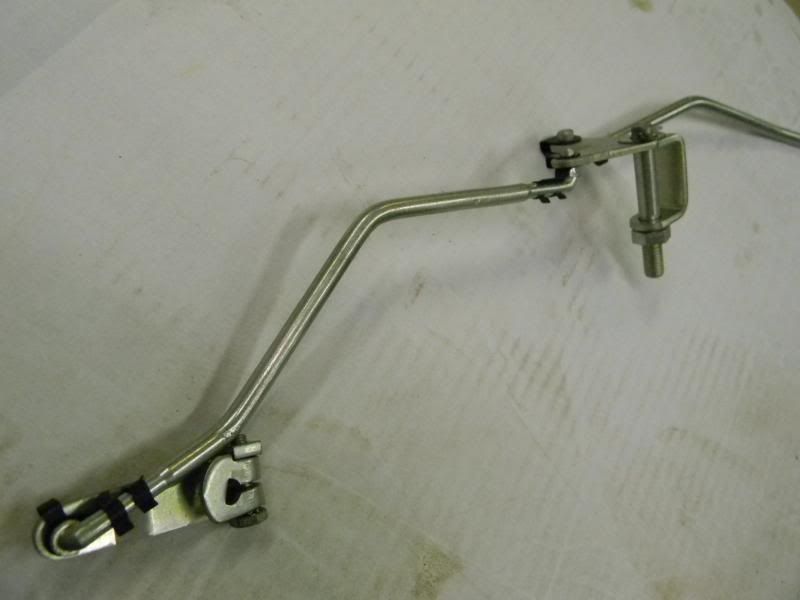
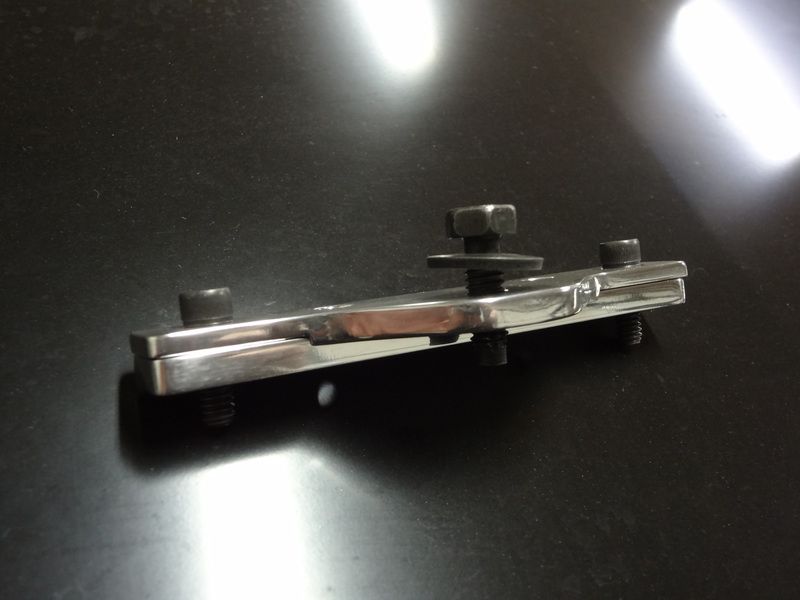
I put together the kickdown linkage today. I'm going to try and make it work on a 4-barrel. If not, no big deal. I just threw the rods in with the rest of the fastners so it didn't cost me anything.

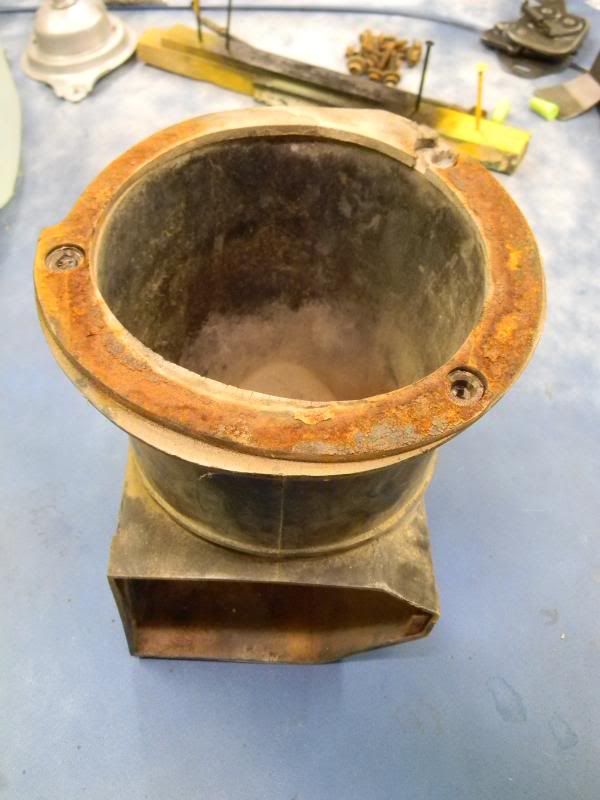
Parking light housings before EvapoRust soak.

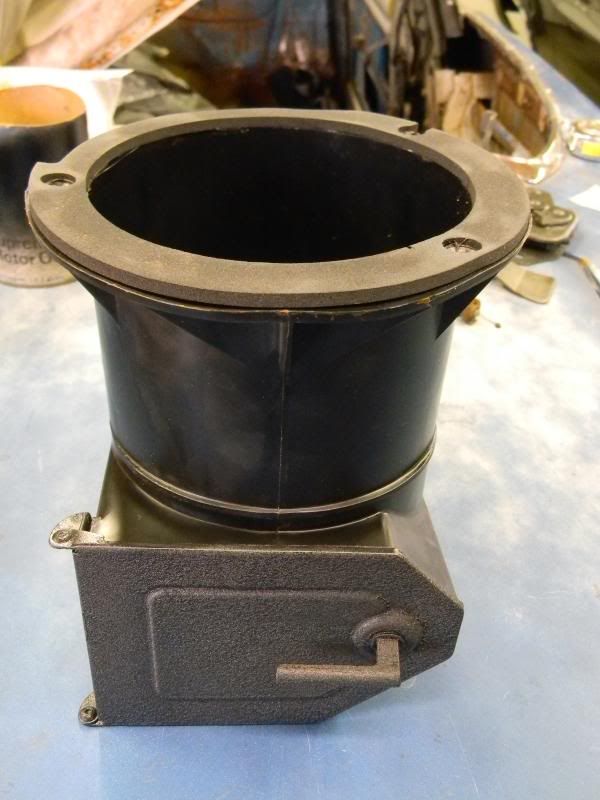
After EvapoRust soak. The sockets looked really bad so I just hit them with the buffing wheel to polish them up a little.
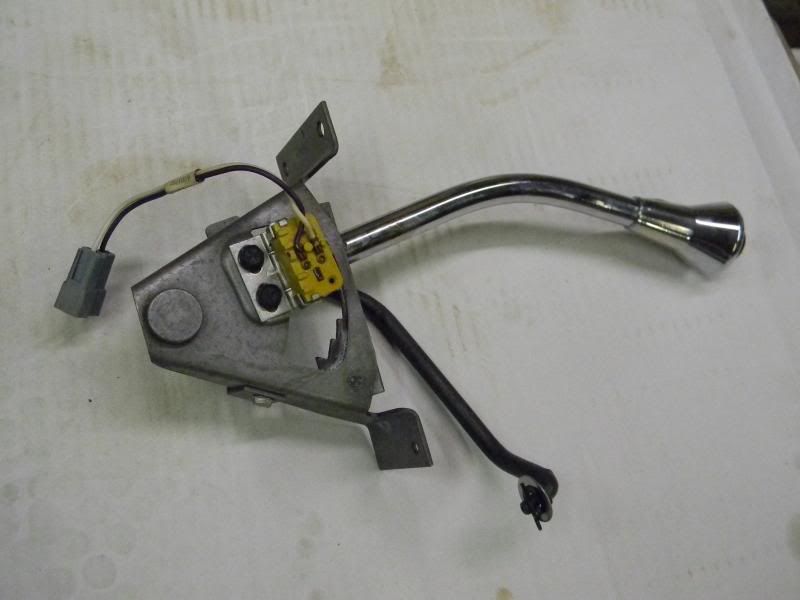
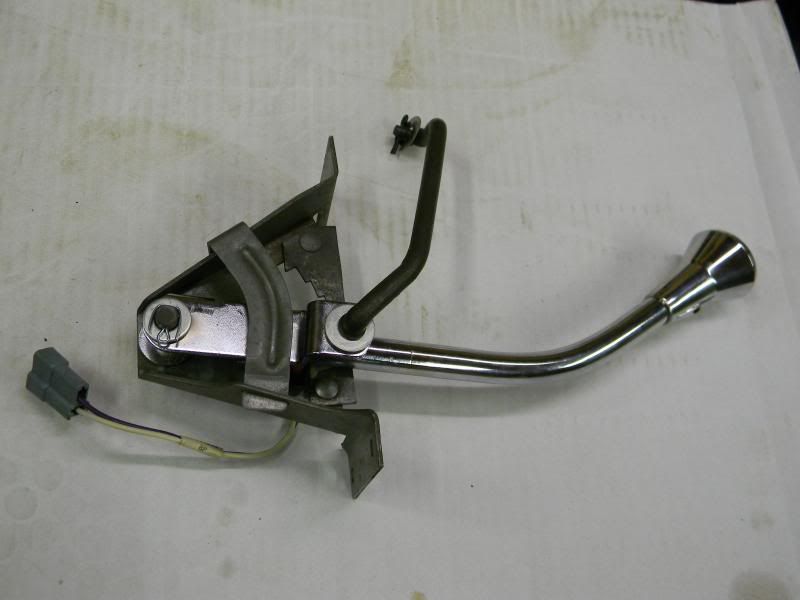
shifter before
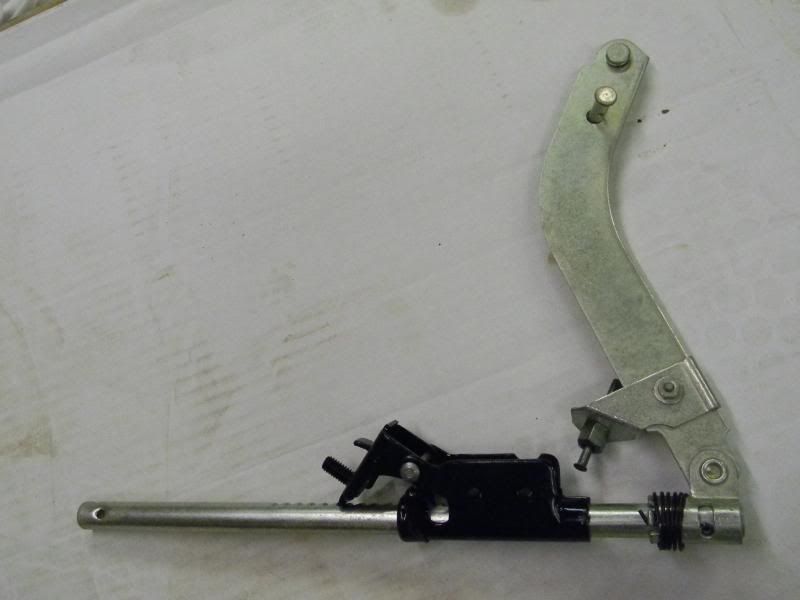
shifter after
DS fresh air door before
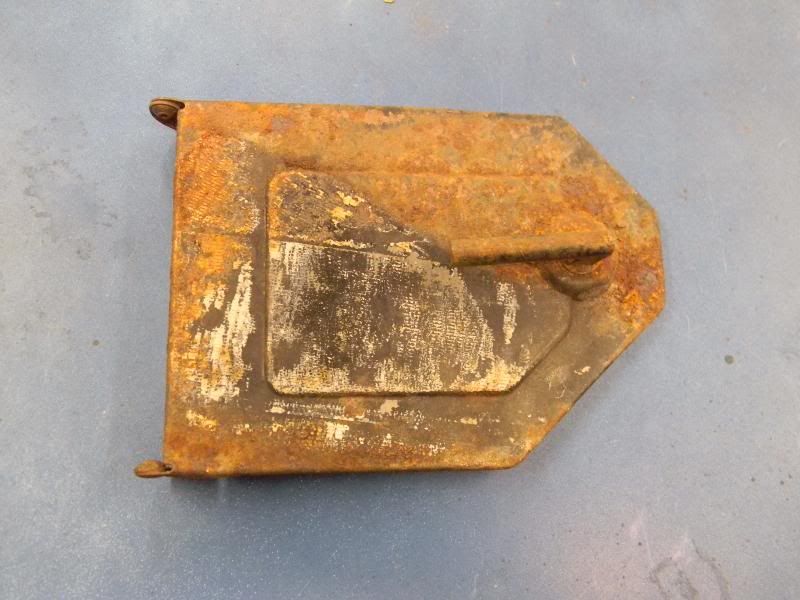
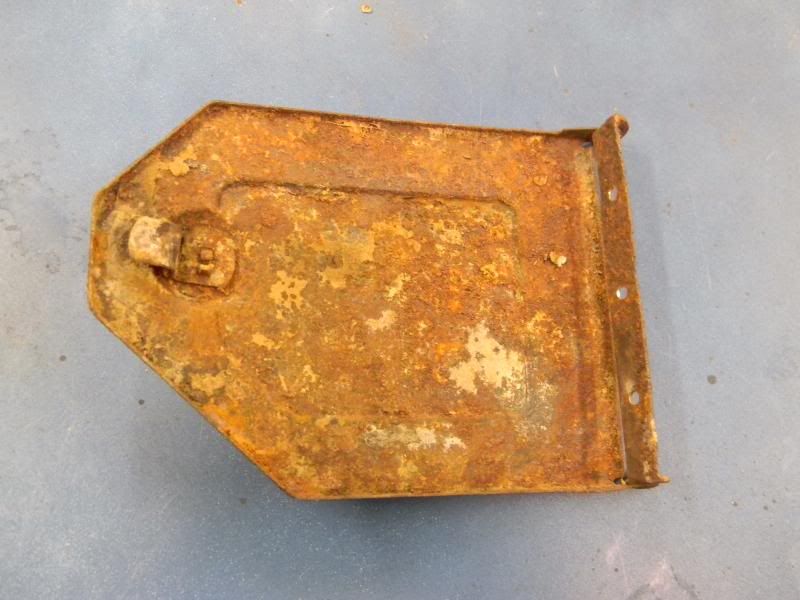
Even after spraying the door with multiple coats of high build primer and sanding it out, it still looked like crap. So...I sprayed it with wrinkle paint. I don't think it look bad at all.
E-brake mechanism before
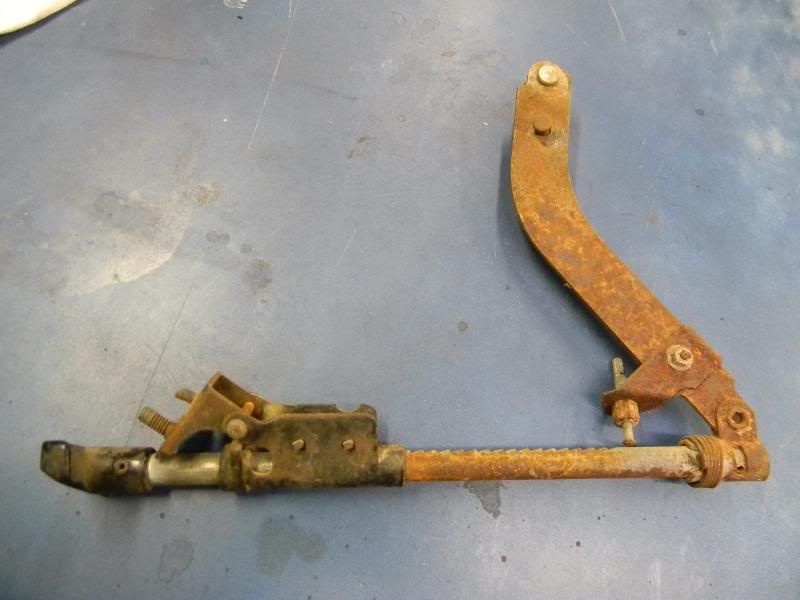
The bracket on the right wasn't originally plated. I didn't have a way to easily install a new rivet so it got left together and was plated. I still need to get a different handle.
Posted By: burdar
Re: 68 Dart GT convertible - 10/06/13 04:51 AM
I bought some Wood Bleach to try. I was curious what it would do to aluminum so I did a test. I took some old spring spacers I had and put one in the Wood Bleach. I put about a tablespoon full in a half gallon of boiling water. This is after a three hour soak with only a few scrubbings with a tooth brush.
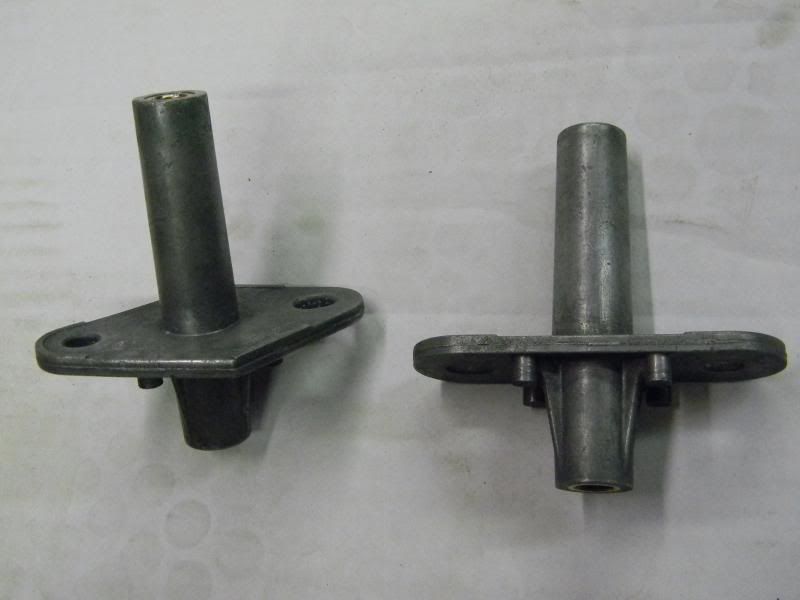
I thought I'd try it on the wiper pivots today.
Posted By: burdar
Re: 68 Dart GT convertible - 10/06/13 04:56 AM
Posted By: burdar
Re: 68 Dart GT convertible - 10/07/13 01:12 AM
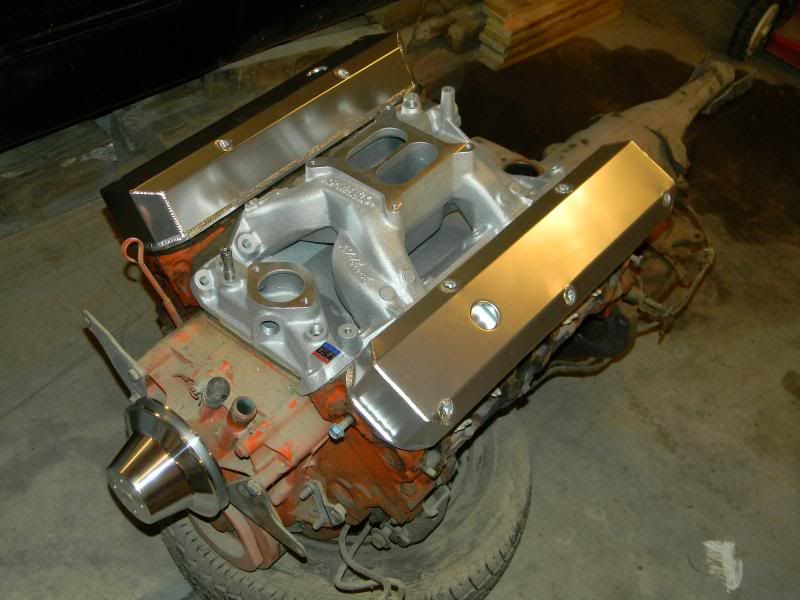
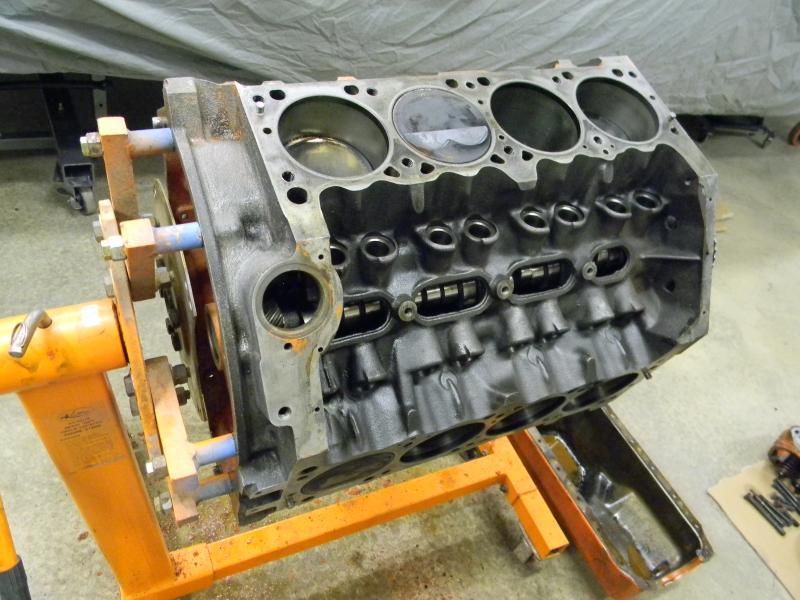
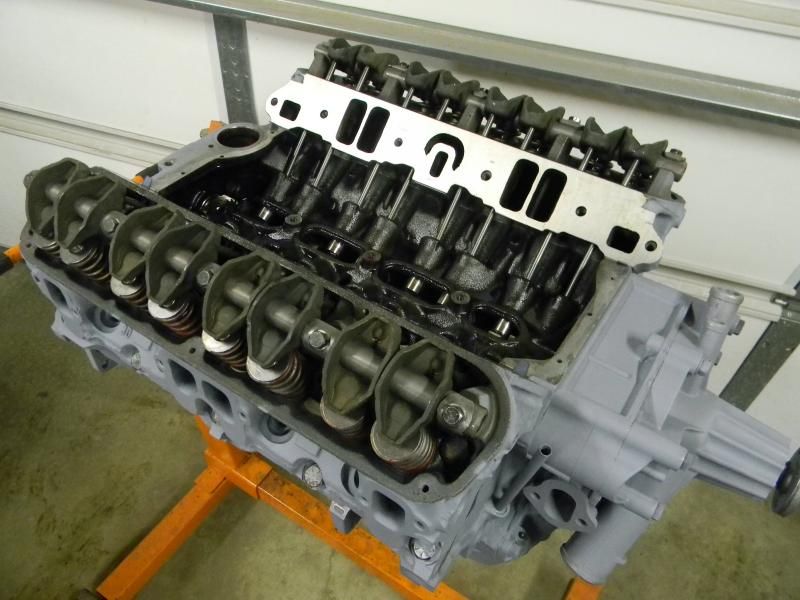
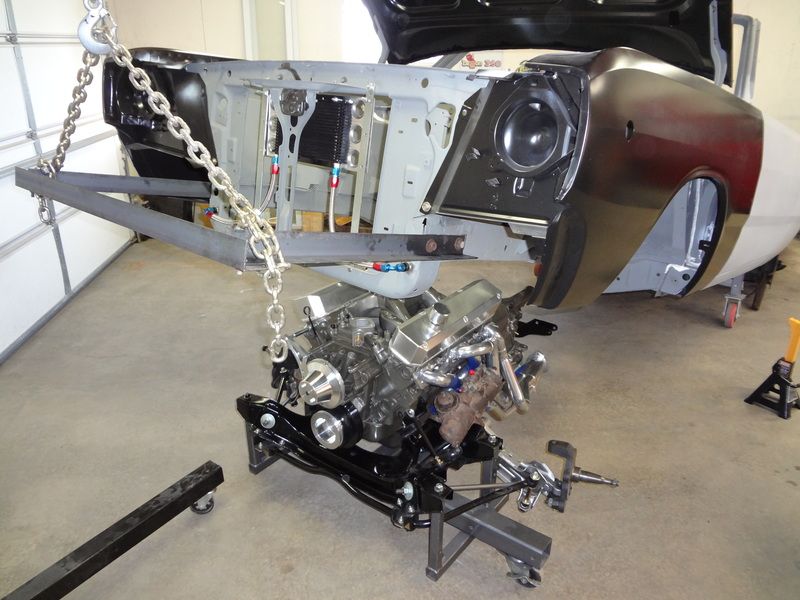
Here's the engine that's going in the Dart. As you can tell, it has been sitting for awhile. I think I pulled it out of my Cordoba in 06. It's a 360 MP short block(roller block)...the 10-1 compression version. It has home ported 360 heads with 1.88in 1.60ex valves. My Cordoba ran 12.70's with this engine. It's going to come apart for all new gaskets and to make sure everything still looks OK. It has very few miles on it so I hope it only needs gaskets.
The trans is a 904 that I built in 98. It has a 10" 3500 stall convertor and a TransGo TF-2 shift kit.
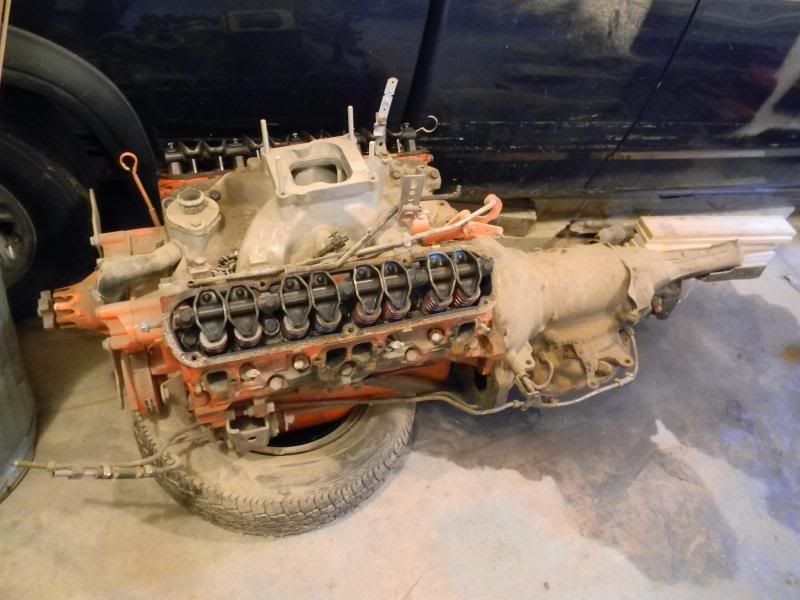
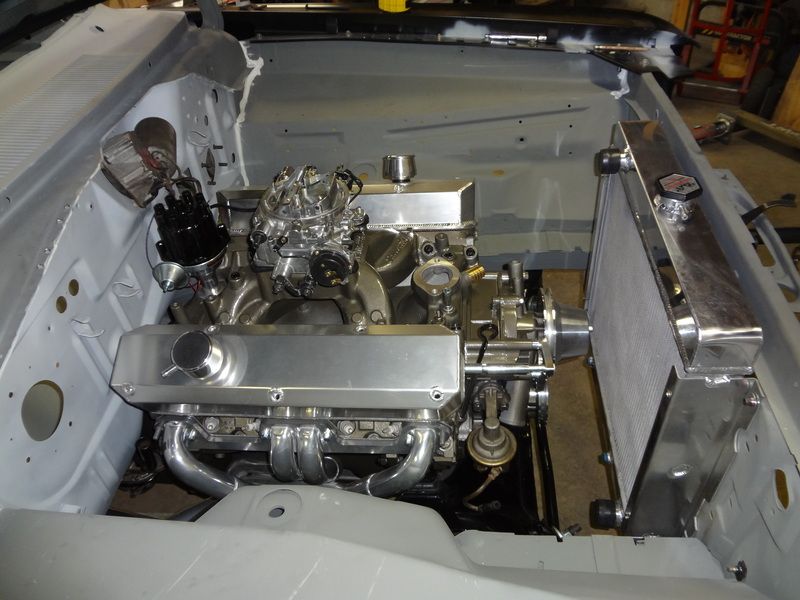
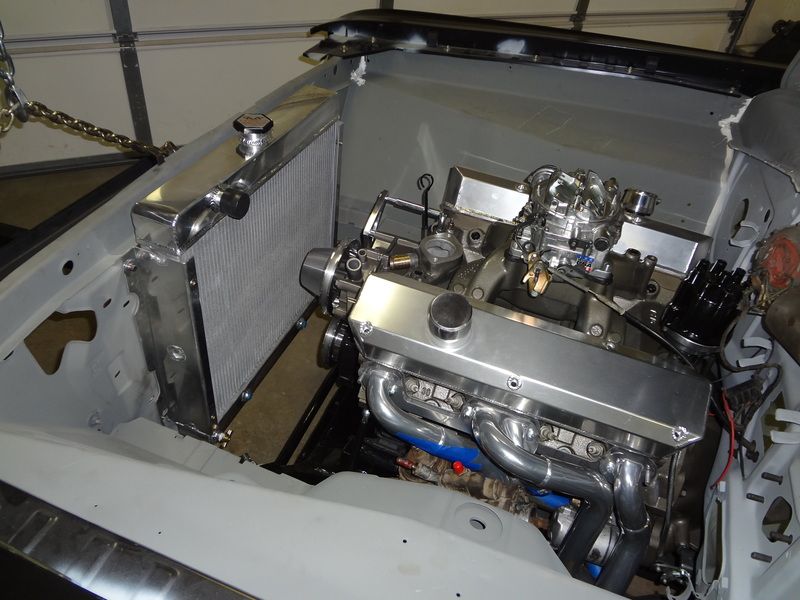
I started to mock up the new parts. I'm going to get everything fitting before I tear the engine apart. It looks like if I run a thermoquad, I'm going to have to make some kickdown linkage extensions and extend the throttle bracket. If I run a square bore carb, that will get rid the the adapter and lower things a little. There are already two valve cover gaskets on each side and covers are still very close to the intake. I think I'm going to look into those spacers I saw advertised on here. I don't want to grind on the valve covers or the intake.
The pulleys are an underdrive version. I plan on running relays under the battery tray for the headlights and make sure the cooling system is designed properly.
Looking good Darren. Evaporust is a wonderful thing.
Posted By: Rhinodart
Re: 68 Dart GT convertible - 10/08/13 11:36 PM
I ran a 380 crate 360 with a 904 in my Dart convertible, it really scooted!

The new owner finally put an 8-3/4 in it with 3.55 gears, I bet it was MUCH faster than the 274 geared 7-1/4!

Posted By: burdar
Re: 68 Dart GT convertible - 10/16/13 05:03 PM
Posted By: burdar
Re: 68 Dart GT convertible - 10/28/13 03:06 PM
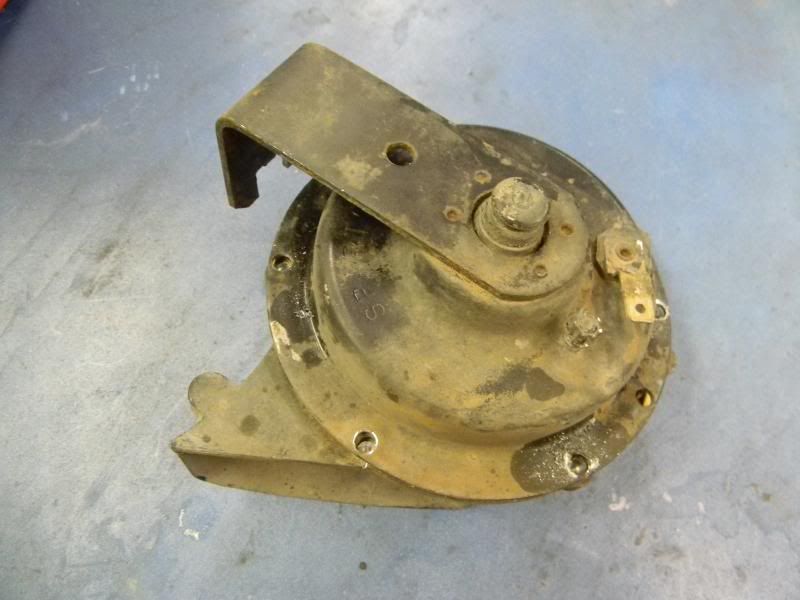
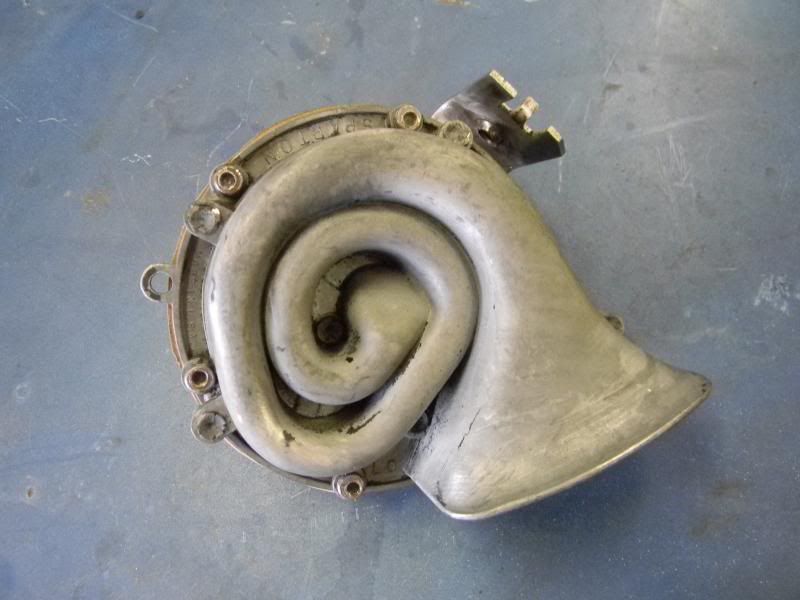
I got done rebuilding one of the horns yesterday. Only one of them worked when I tested them. I used Mike Ross' post on how to rebuild a Prestolite horn for reference. It was basically the same procedure rebuilding(just cleaning really)my Sparton horn.
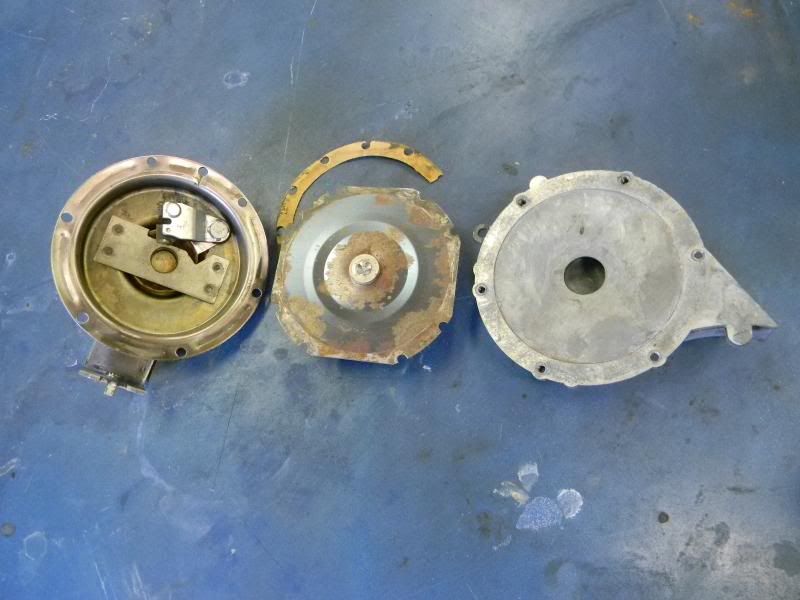
First I drilled the heads off of all six rivets and separated the two halves.
Once they were apart I drilled and tapped the rivets for 8-32 allen head screws. This wasn't fun because the rivets wanted to spin inside the cone housing. I had to remove them and glue them in the housing.
I made two new gaskets from a Christmas box my wife had been saving....don't tell her.

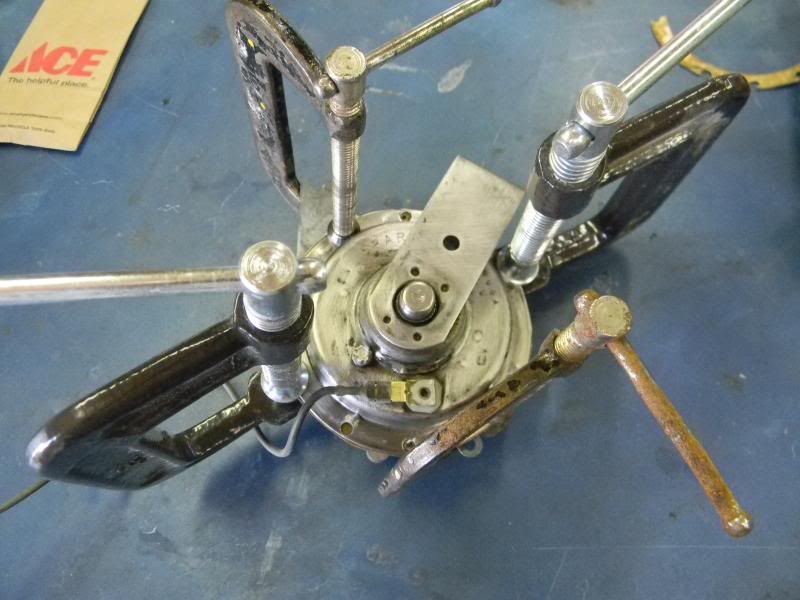
I used some C-clamps to hold the horn together while testing. Just like Mike said, all that was needed to get it working again was to sand the contacts.
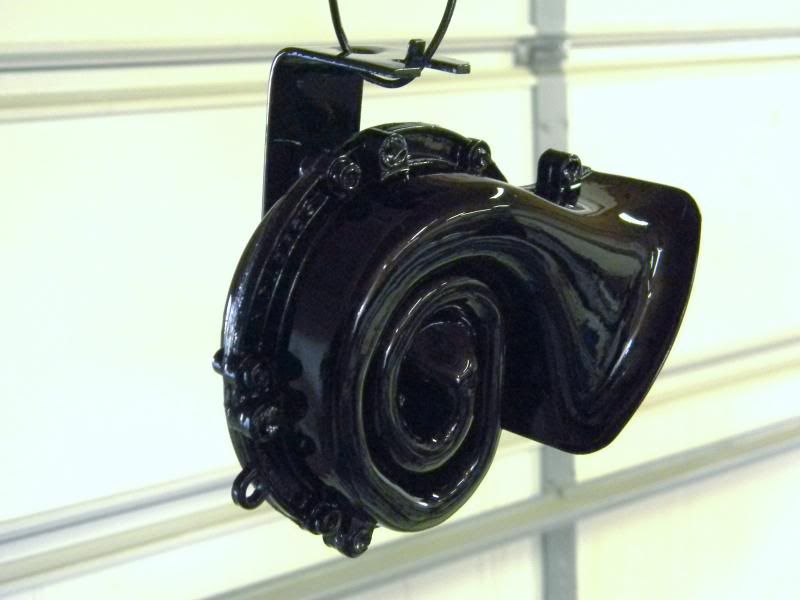
Once it was screwed back together I tested it again just to make sure the center piece hadn't shifted. It still worked so it was ready for paint. Since I'm not going back stock with the car I didn't bother sanding on the allen screws to make them look more like rivets. I'm going to use allen head fasteners on the engine so it will all tie together.

This picture was taken right after I sprayed it. It dried slightly less glossy then what it looks like in this picture.
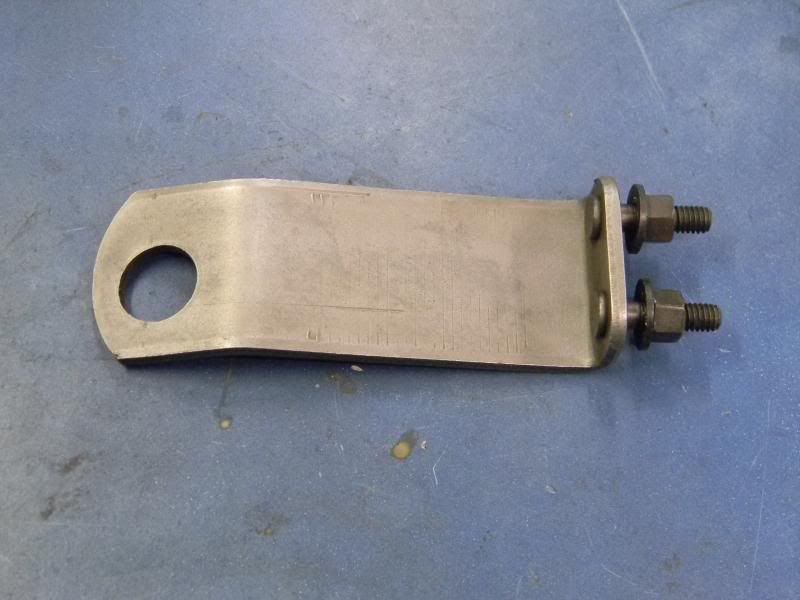
I also cleaned up the shifter pivot bracket that bolts to the trans. It cleaned up nicely.
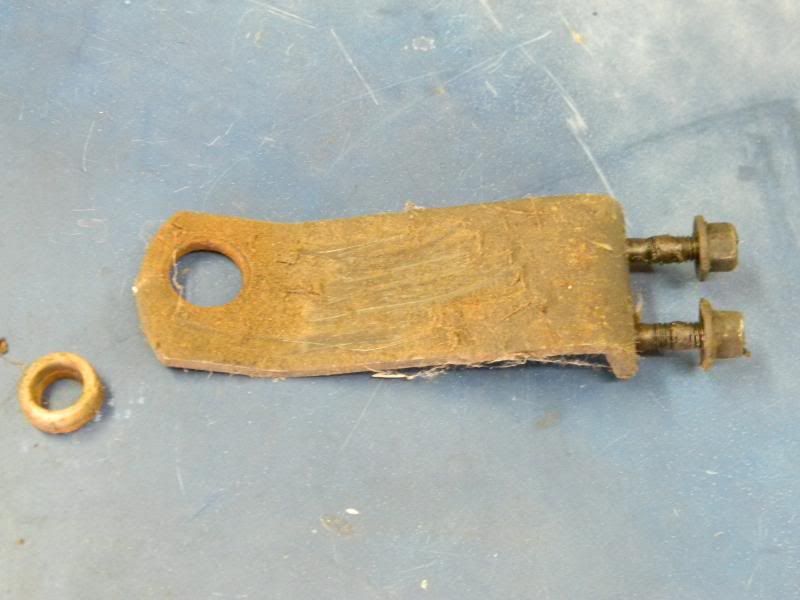
I still have to buy a new bushing...the original was in two pieces.
Posted By: burdar
Re: 68 Dart GT convertible - 11/17/13 02:07 AM
Posted By: burdar
Re: 68 Dart GT convertible - 12/05/13 03:22 AM
I've turned my attention to the dash assembly. A couple weeks ago I went over to my father-in-laws house and he machined me some switch bezel removal tools. A couple of them wouldn't budge by hand...they came loose right away with the correct tools.
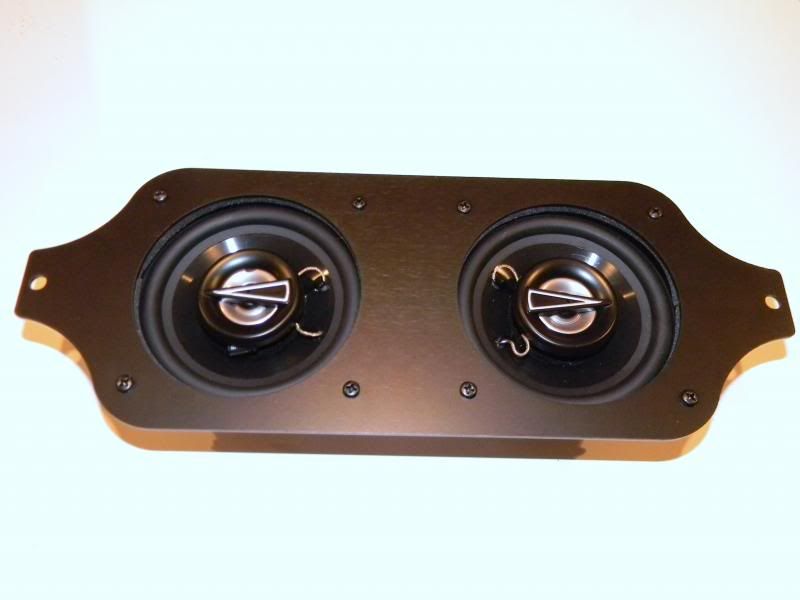
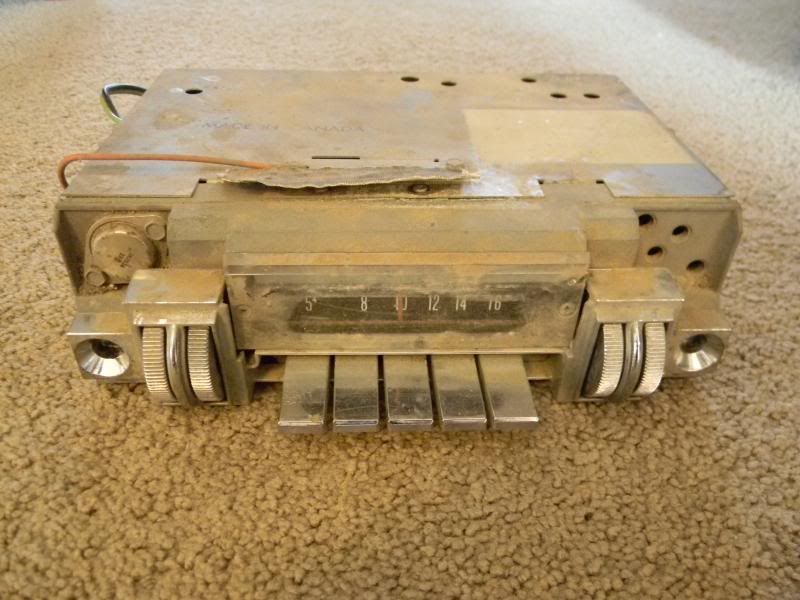
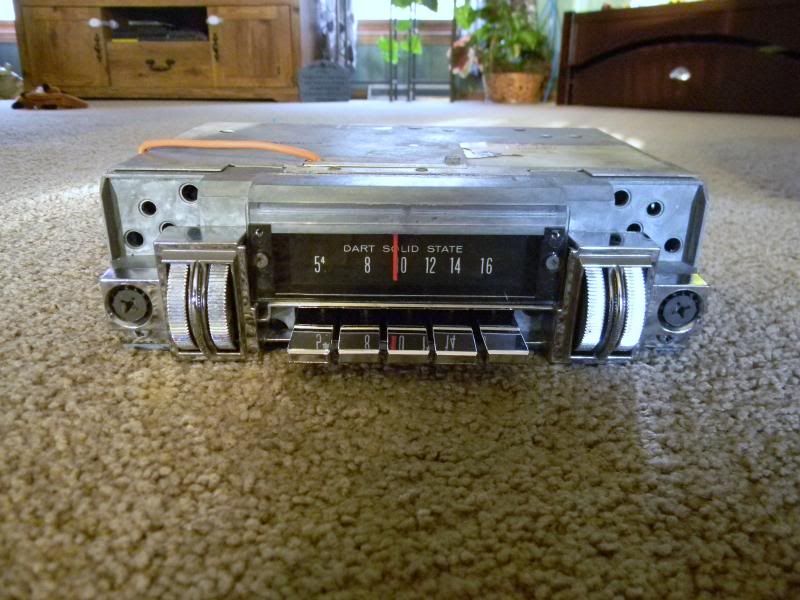
I bought a dual speaker bracket and some 4" speakers to replace the rotten original one. It turned out nice. At the beginning of the year I plan on sending the original AM radio to BigMoneyLewis for an FM conversion.
Posted By: wally426ci
Re: 68 Dart GT convertible - 12/14/13 09:34 PM
Nice work Darren. Is that all before and after with evaporust? I have never used it.
Posted By: burdar
Re: 68 Dart GT convertible - 12/15/13 12:31 AM
Muriatic acid(pool cleaner) for the big stuff. EvapoRust for more delicate stuff and stuff that's not rusted as bad. The blower motor mount was soaked in EvapoRust.
Posted By: burdar
Re: 68 Dart GT convertible - 12/26/13 06:12 PM
I've been working on the gauges. I still need to get them calibrated and buy a sold state voltage limiter.
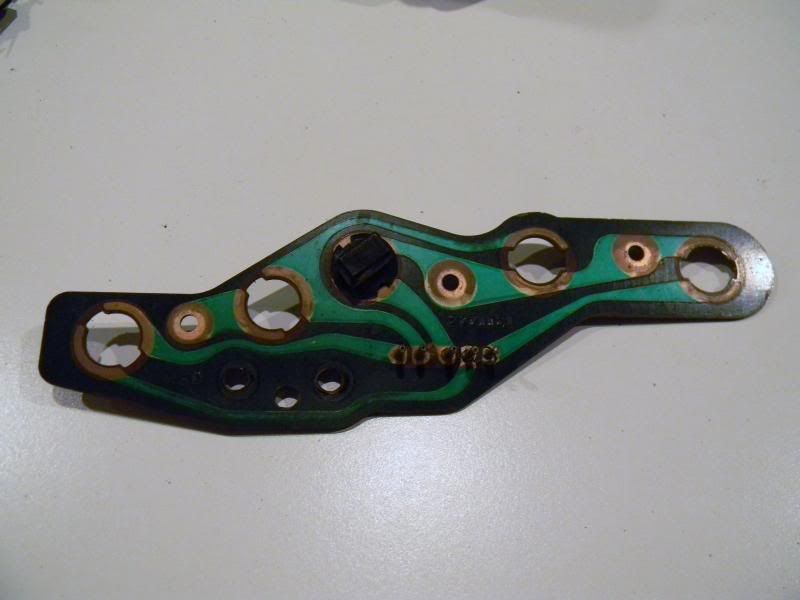
I was a little too aggressive when I removed one of the connectors from the printed circuit and damaged two of the pins. I read where I could fix them by inserting a paper clip as reinforcement so I thought I'd give it a try. I coated the inside of the pins with flux, inserted a paper clip through the pins and soldered them in. Then I cut off the excess paper clip from either end. I had to grind a little on the back side so the repair would clear the gauge cluster housing. It seemed to work and the pins are now solid.
The two pins on the right were loose.
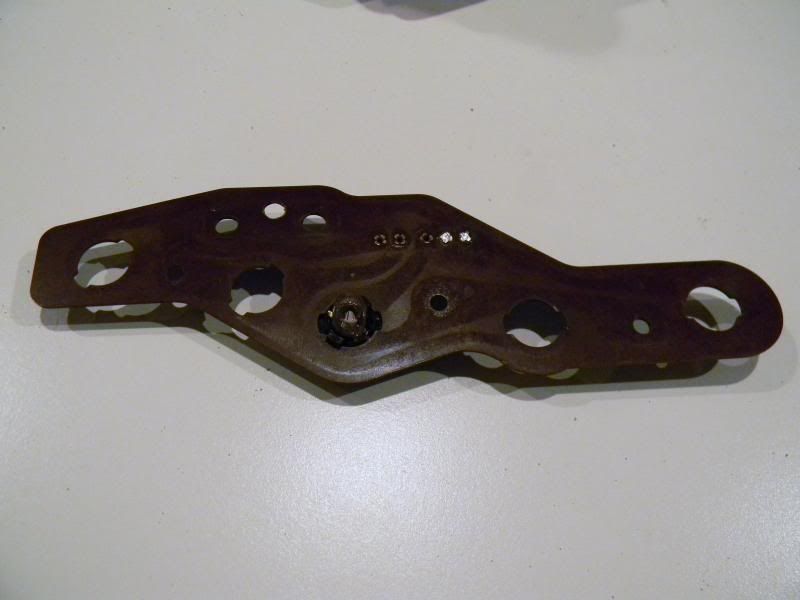
You can see they are now filled with solder.
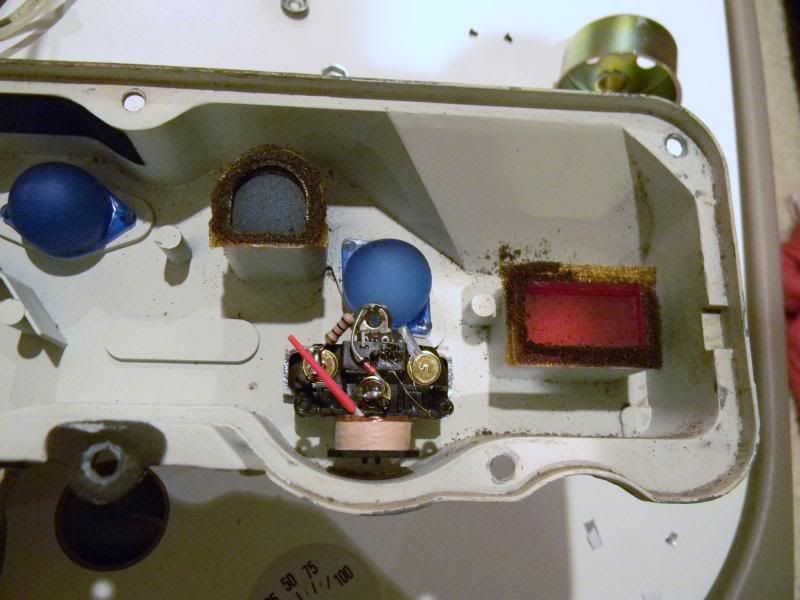
The car didn't come with an oil pressure gauge...just and idiot light. I wanted to add an oil pressure gauge but I don't like the look of extra gauges under the dash. I thought about adding one where the idiot light was but there wasn't enough room.(plus I like the idea of the idiot light)
I was going to bypass the AMP gauge anyway so I thought an oil pressure gauge would be more important than a volt gauge. I ended up buying a 2" SunPro electric oil pressure gauge and gutted it. I took the mechanism and mounted it in the gauge cluster housing in place of the AMP gauge. The + and sender terminals were the same distance apart as the factory AMP gauge. I had to drill a hole through the cluster housing and the printed circuit for the ground wire. Luckily there was a blank area in the printed circuit where I had to drill the hole.
The mechanism just barely clears the blue lense.

I removed the SunPro gauge face and used it as a template. I had to cut away some of the original gauge face so it would clear the new mechanism. I also cut off the AMP gauge needle and glued it onto the oil pressure gauge needle.
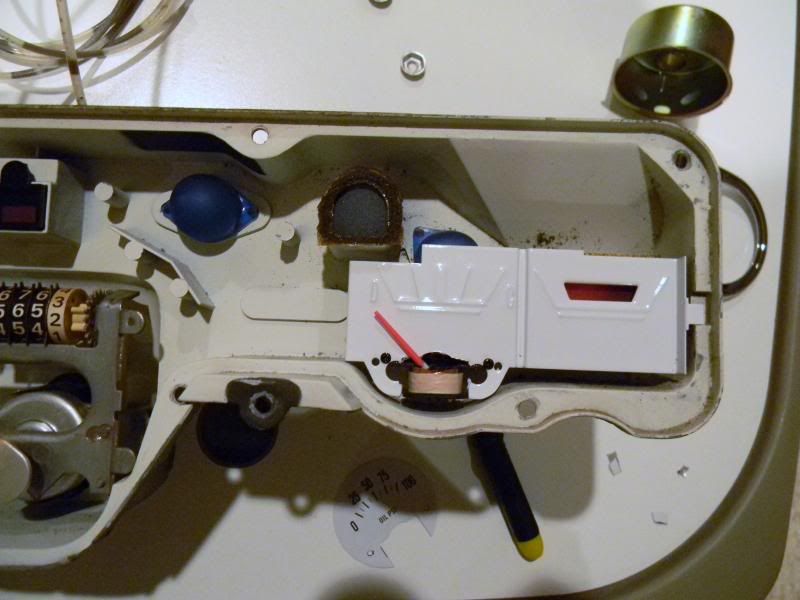
Here is what the back of the gauge looks like mounted in the cluster housing.
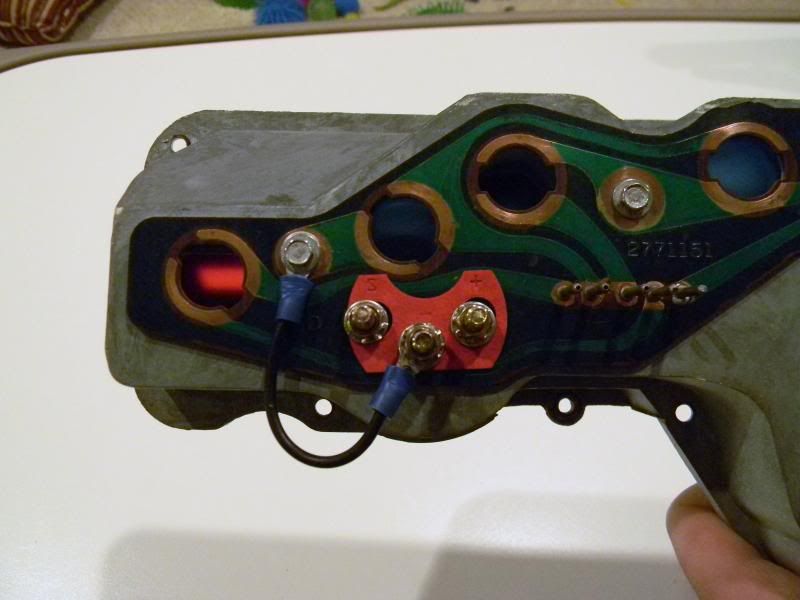
Next, I cleaned and repainted the inside of the cluster housing. I also made some new gaskets for the turn signal lenses and idiot light lense. Scrap foam from DMT gasket kits comes in handy for things like that.
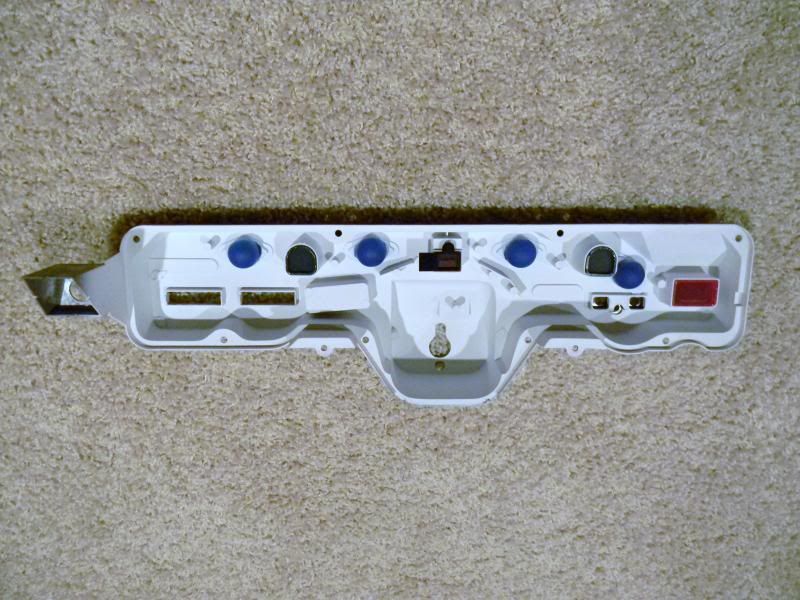
I tried repainting the gauge faces but I didn't have any luck. My plan was to paint the faces white, then spray SEM trim black over it. Then I was going to wipe off the black from the raised areas with lacquer thinner. I stripped the faces and painted them with single stage Centari with a Prevail sprayer. After four days I sprayed them with trim black. Four days wasn't long enough because the white paint lifted as soon as I sprayed the pieces with the trim black.
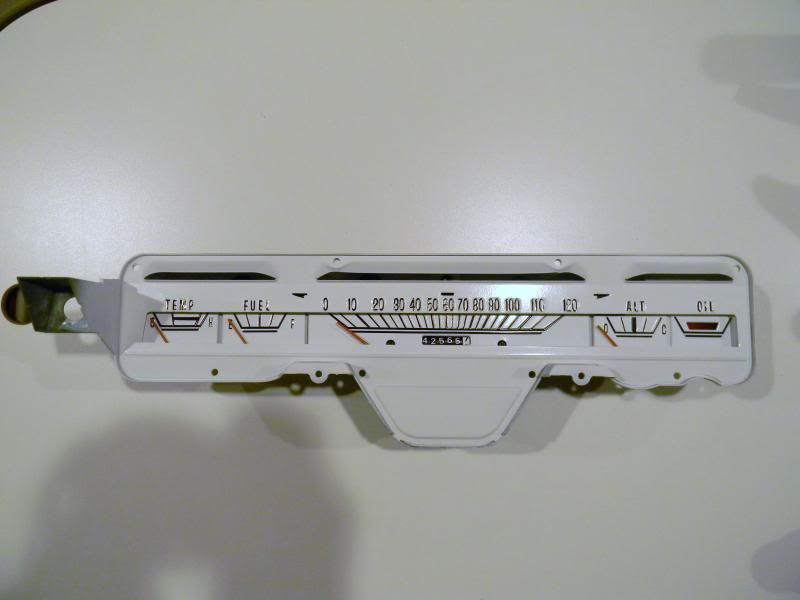
I stripped the faces back down to bare metal and purchased a white overlay kit. I'm not sold on the white gauge look so this may just be temporary. Since the interior is white, there's a chance it may look OK.
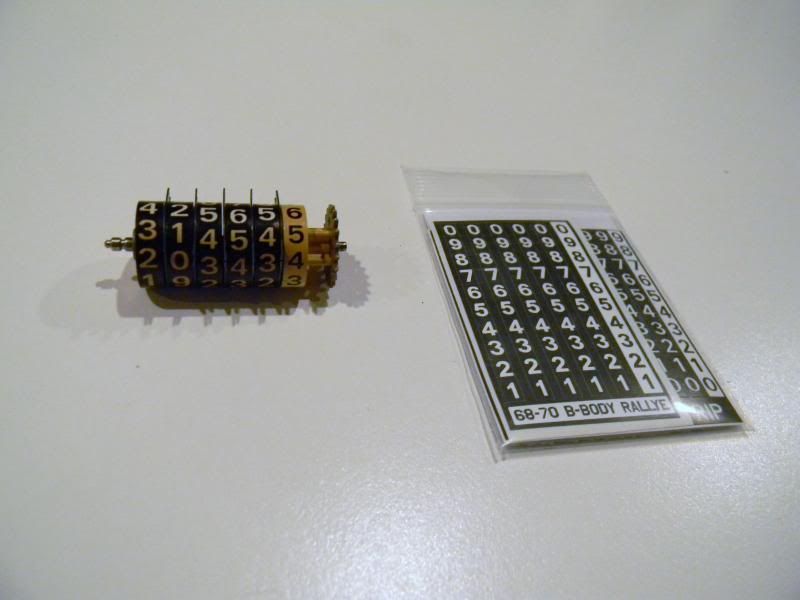
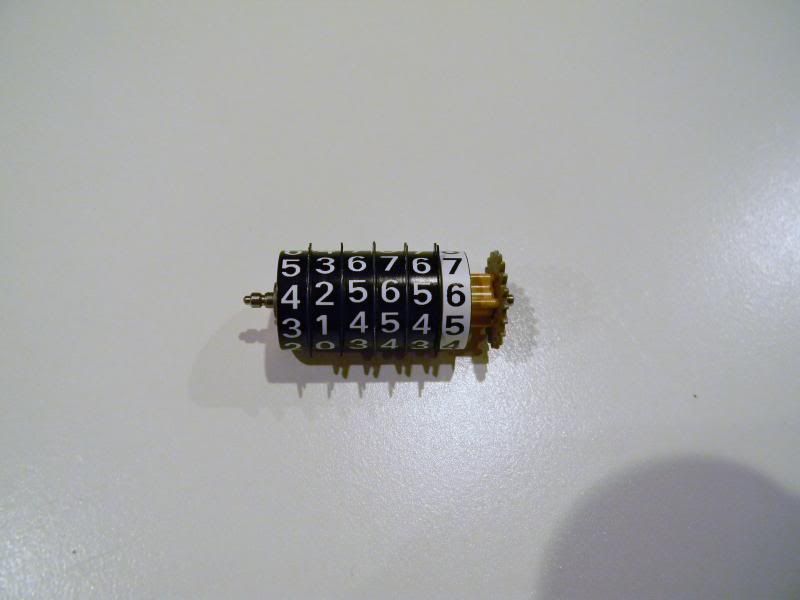
I also bought an odometer reface kit. Originally I bought one for a standard dash E-body since they didn't offer one for the Dart. The size of the overlays was correct but the Dart's odometer spins in the opposite direction so the numbers were reversed. They sent me an E-body Rallye gauge kit as well as a B-body kit to try. The E-body Rallye gauge kit worked great.
Here's what the gauge cluster looks like now. I'm going to wait for final judgment until I can see what it looks like with the entire dash assembly together. I've seen a picture of the gauges at night and they look cool with the blue light on them. I'm just not sure about how they'll look in the daylight.
I think that'll look great. It works with the theme you've chosen for the car.
Posted By: burdar
Re: 68 Dart GT convertible - 12/26/13 06:57 PM
There is so much black on the dash it kind of looks out of place with white interior. Hopefully this will look at home. I've got all my switches boxed up and will be sending them off to JS Restorations today.
Posted By: burdar
Re: 68 Dart GT convertible - 02/09/14 08:46 PM
A few months ago I took a bunch of parts to the powder coater.(K-member, swaybar, bumper brackets, splash shields, trans x-member, seat frames) I got everything back from the powder coater a couple weeks ago. I took the seat frames, new foam and new seat covers to the upholstery shop. It will probably be late March or April before I get them back.
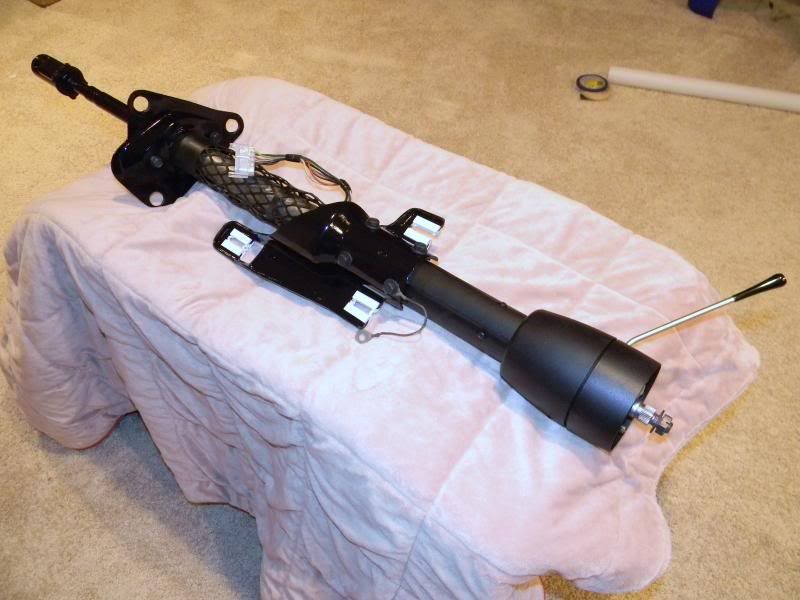
I sent in my dash switches to JS Restorations. Jim worked his magic and they all look great and work again. I just got done with the steering column so now it's time to turn my attention back to the dash assembly.
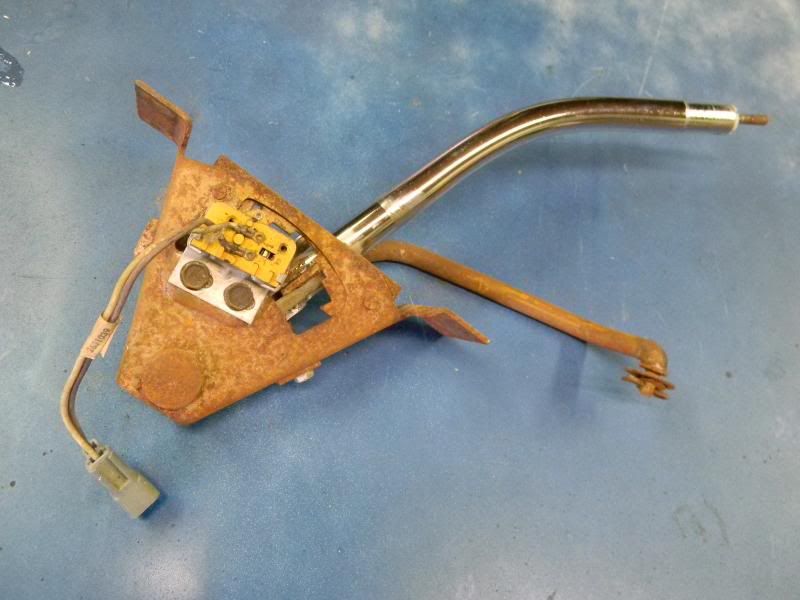
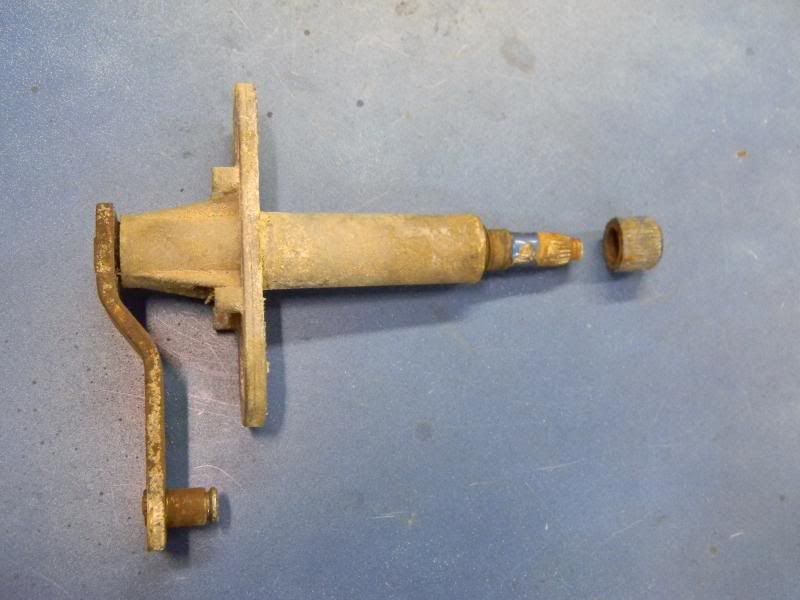
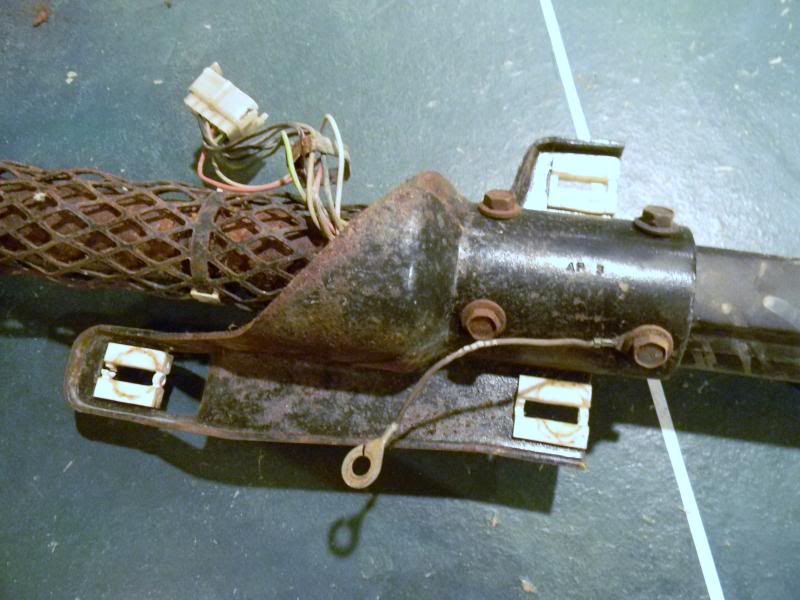
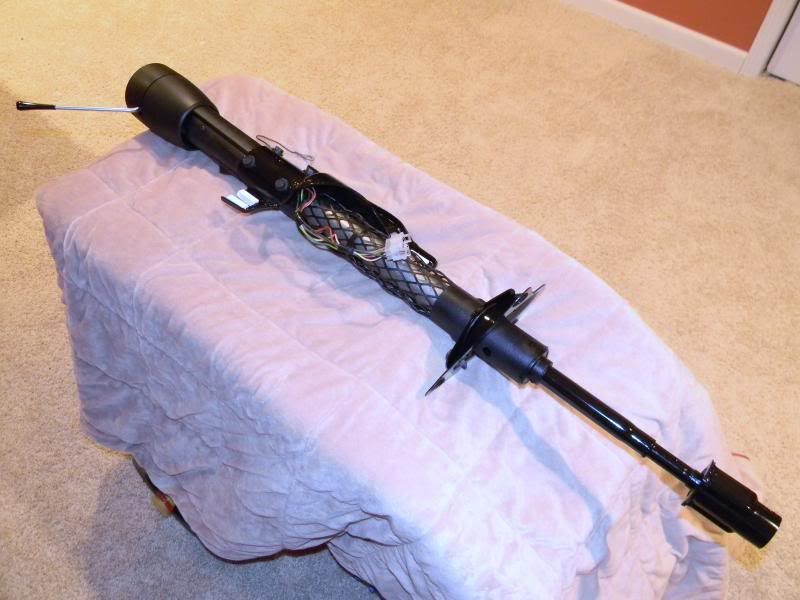
Here is what the steering column looked like when I started.
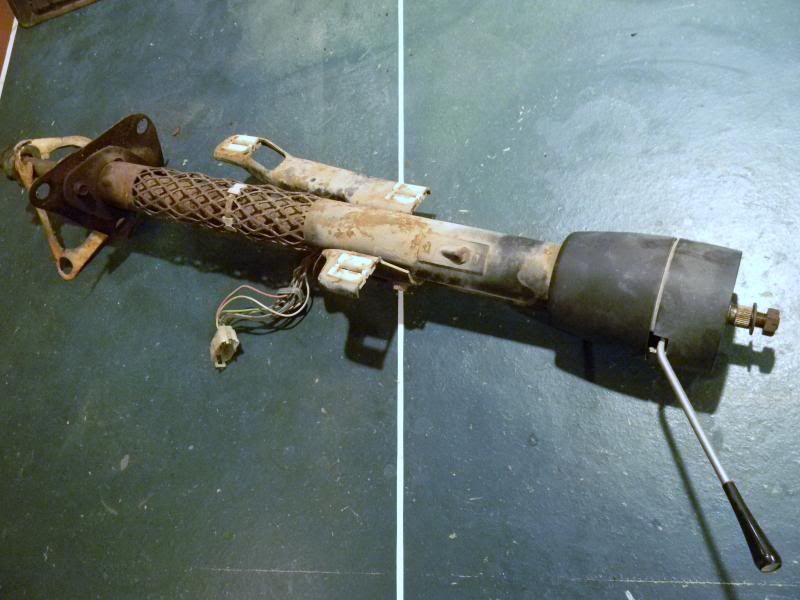
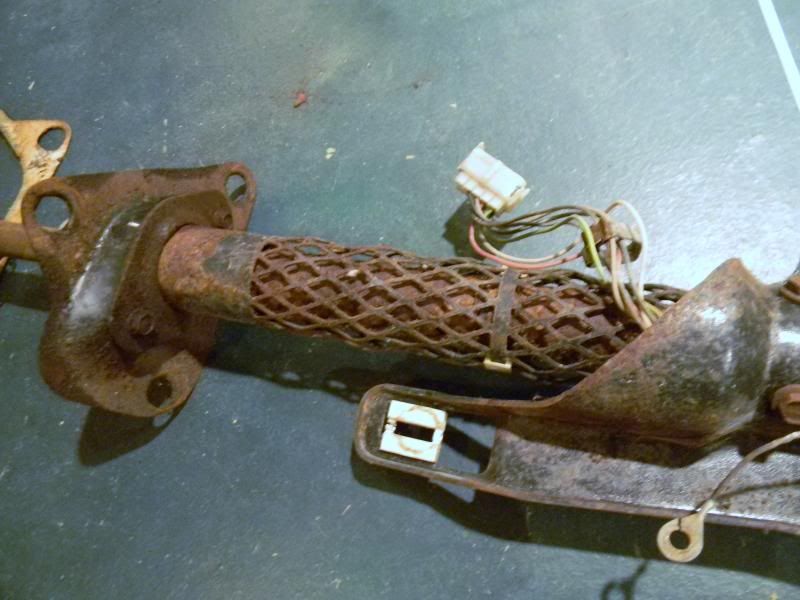
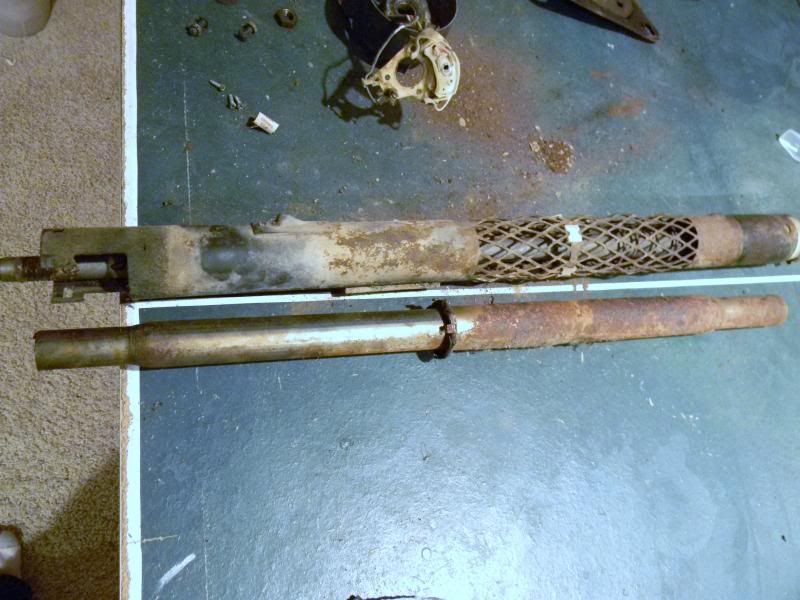
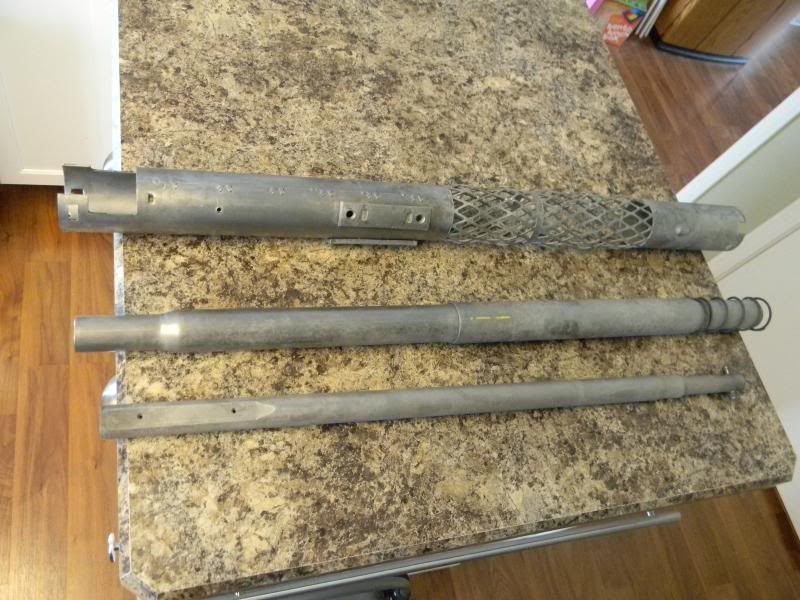
I soaked the outer column jacket, the lower steering shaft and inner tube in acid to clean them up. I'm converting the car to manual steering so I separated the inner and outer steering shafts and replace the lower one with a longer manual piece.
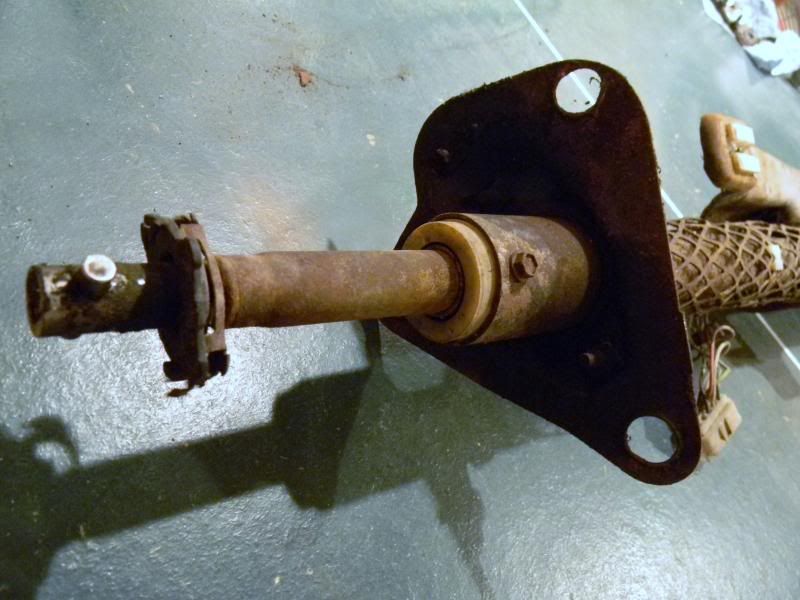
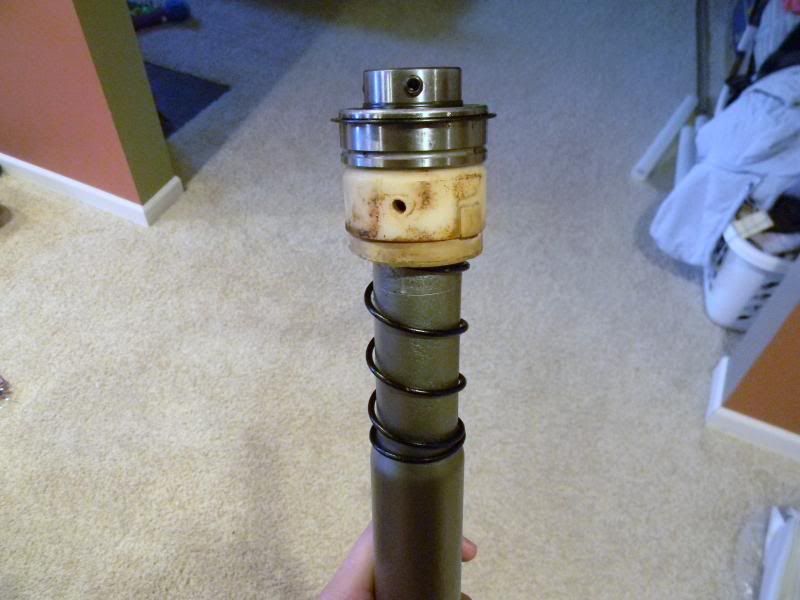
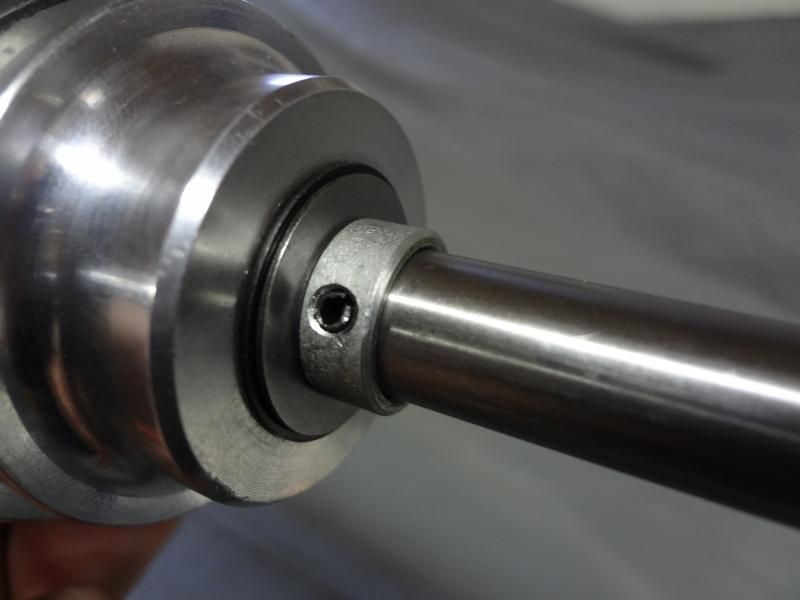
I used a $12 insert bearing on the bottom of the column instead of the $85 stock style bearing. I needed to grind 3/16" off the bottom of the inner tube and use the plastic housing from the original bearing to make it work. It took awhile to figure it out but it's going to be an improvement for sure.
This is what it looks like with the plastic housing now acting as a bushing for the inner tube. The actual bearing parts were removed from the original bearing and the locating tab was ground off so it would slide into the column farther.(it was also installed upside down) The plastic supports the bottom of the inner shaft......there is a step in the plastic for the spring to sit on.......and the spring puts upward pressure on the inner shaft to keep it from rattling around.
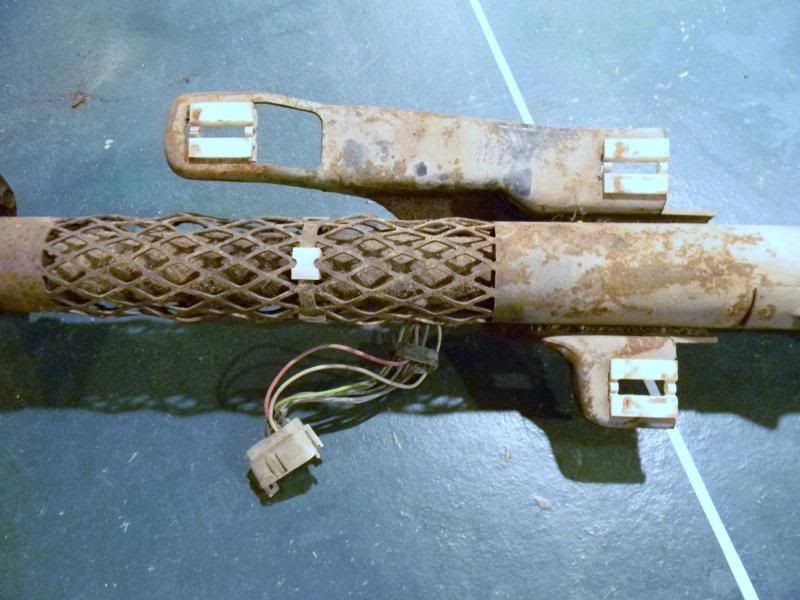
The turn signal switch was reused but the wiring connector was replaced. The mounting brackets were heavily pitted so they were sprayed with high build primer and sanded before being sprayed with gloss black. The upper column pieces as well as the column jacket were sprayed with Rustoleum fine texture. I installed a new coupler kit and painted the shaft gloss black.
Posted By: RV2
Re: 68 Dart GT convertible - 02/16/14 05:17 AM
Can you give more info on that lower column bearing?
What did you use on the parts after soaking in the muratic acid?
Posted By: burdar
Re: 68 Dart GT convertible - 02/16/14 05:46 AM
Here is a thread about the bearing on FABO. There is also one on CC.com
http://www.forabodiesonly.com/mopar/show...+column+bearingAfter the rust is gone, the acid is neutralised with baking soda and water. The parts will flash rust imediately after being cleaned this way. I found that if I soak them in EvapoRust for maybe 5-10 minutes, they won't flash rust. I rinse off the EvapoRust and dry them with compressed air. They end up looking like the one picture I posted. After that, they were sprayed with SEM self etching primer.
Posted By: burdar
Re: 68 Dart GT convertible - 02/20/14 04:18 PM
Just a small update. There is a company called Illumin8s that sells a multi function LED parking light kit for Challenger, Cuda, Charger and some GM products. You may have seen this video before but here's how they work...
http://www.youtube.com/watch?v=nactAwM4WtwThey didn't make a kit for the 68 Dart so I contacted them about making me one. I sent them one of my parking light housings and they designed a kit that they are now going to offer. Here is what it looks like installed in the housing. The LED just plugs into the existing socket...there is no modification to the stock wiring.
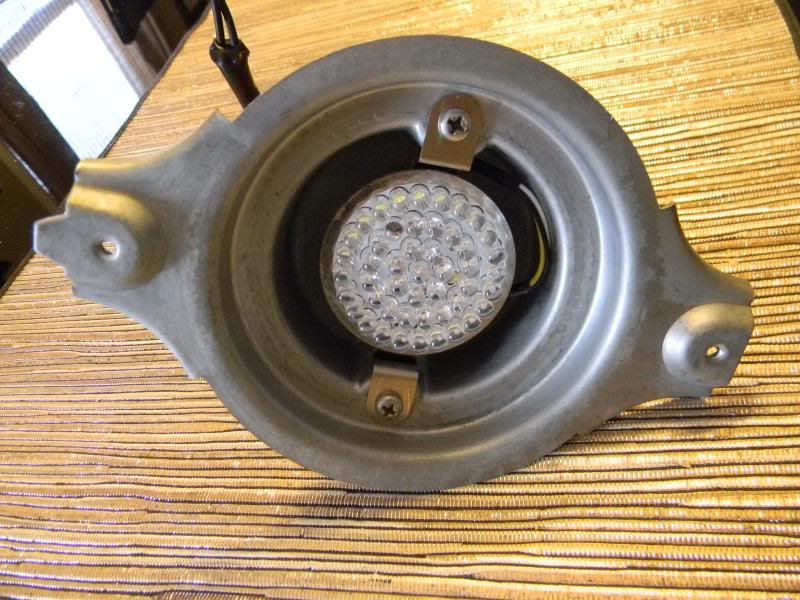
What I'm going to do is rewire the parking lights and hook them up to ignition "RUN" power. They will act as a daytime running light this way. Since I'm concerned they may be too bright at night,(they sit so high up on the grill)I'm also going to run the power wire through a toggle switch. I'll install a stock switch and bezel in place of the cigarette lighter. This way, I can turn them off at night.
Now I just have to come up with something for the tail lights. There is an LED kit available for the 69 Dart but nothing for the 68.
Posted By: Triple Threat
Re: 68 Dart GT convertible - 02/22/14 02:05 AM
Very impressive work you are doing! I dont have the patience for all of this, I just make them go faster haha. Keep it up, i'll be watching.
Posted By: burdar
Re: 68 Dart GT convertible - 03/09/14 03:49 PM
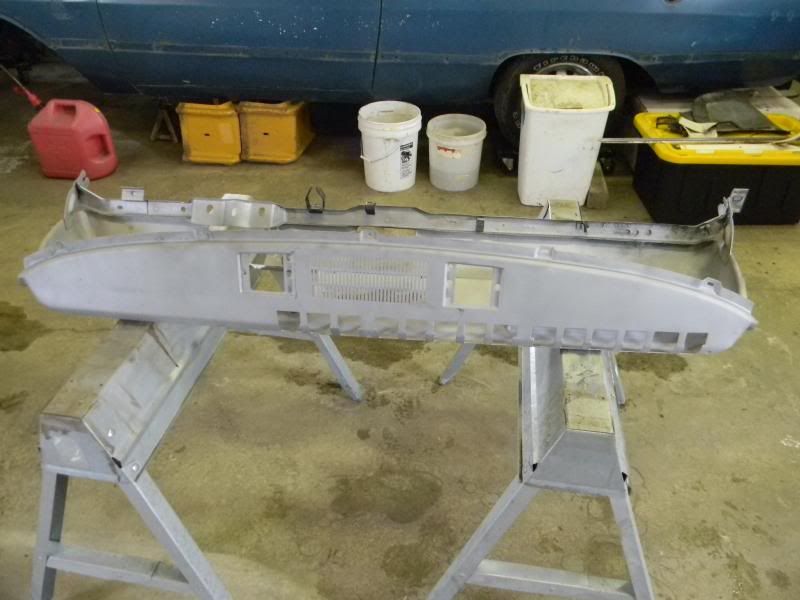
Here's an update on the dash assembly...
There was a bad spot in the dash frame.
I separated the outer skin from the lower frame so I could clean out the rust that had formed in between. Then I cut out the bad section and made a repair piece.
I had the frame blasted. Weld through primer was used between the outer skin and the lower frame before it was welded back together.
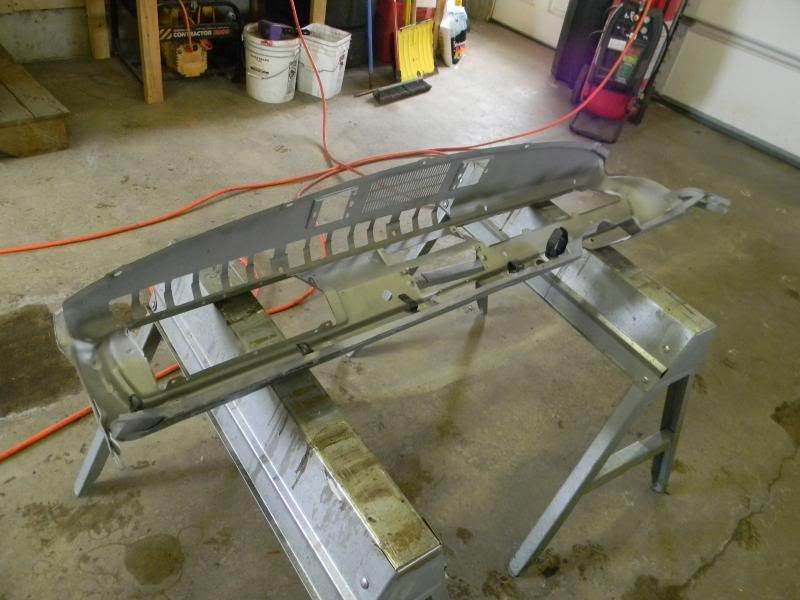
I sprayed the frame with self etch primer, Rustoleum fine texture black and satin clear. It's just slightly more texture then it had originally. I wasn't happy with how the top looked. I thought the texture would hide some minor pitting but it didn't. I stripped the top back down to bare metal, applied a thin layer of filler and sanded it back down. It looks good now.
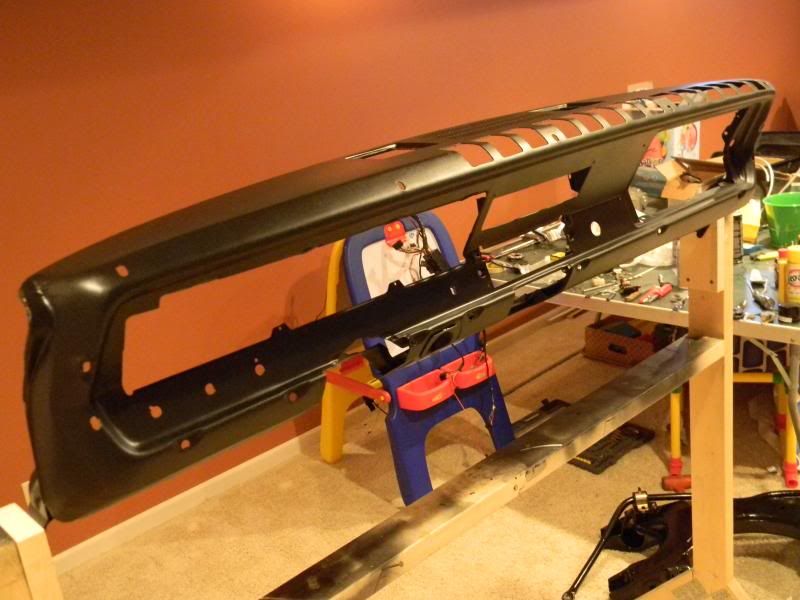
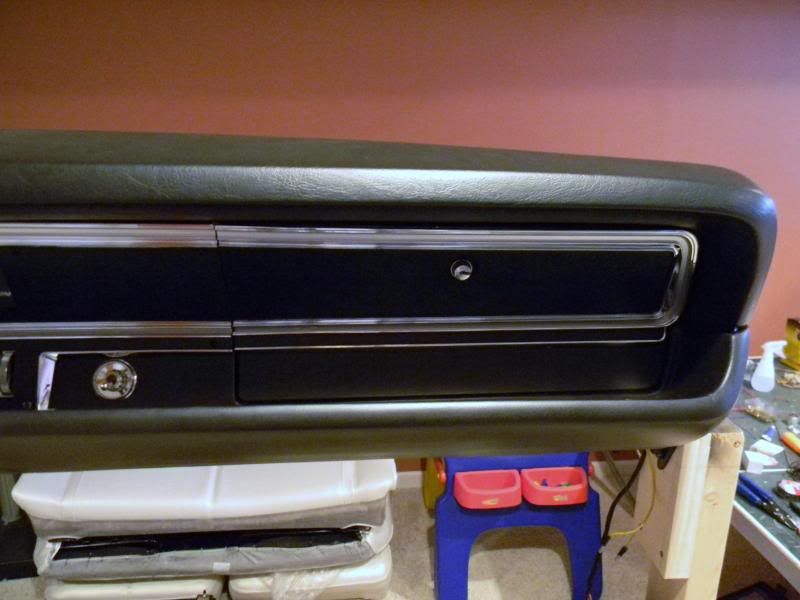
I sprayed the two lower pads with SEM Landau Black. If reproductions were available I would have replaced them. The vinyl is wavy in a few spots but there are no cracks. It will do for now. Having them redone will be a winter project down the road once the car is driveable. The upper pad is a new BE&A piece I bought from Dave at Roseville. It fit pretty good. There is a slight hump in the middle where it isn't sitting down against the frame. It should look fine in the car though.

All the switches were sent out to JS Restorations for a rebuild. The ash tray was hanging very low. I had to add some spacers between the dash frame and ash tray bracket to lift the tray up tight to the lower pad. The dual speaker bracket fit great and there is plenty of room between the speakers and the heater controls.

I cleaned up the dash harness and replaced a few wires and terminal ends that were chewed up by mice. The harness was really dirty but was in good shape otherwise. Right now I'm at a stopping point. I have to send the radio out for an FM conversion and I have to buy new dash bezels. I'll post more pics once it's completely done.
Posted By: burdar
Re: 68 Dart GT convertible - 03/12/14 12:19 AM
I've read that there is a lot of flex in a convertible. I want to stiffen things up, but I don't want to do anything that can't be reversed. I decided to add the fender to cowl braces found on the 74+ cars. Any time you can triangulate something, it should make it stronger. I'm going to have to make some mounting brackets for the pinch weld. The factory widened the pinch weld when these braces were installed.
I set them in place just to make sure they were going to work. I thought there might be some interference on the DS with the washer bottle. That wasn't the case though.
Posted By: NV69B7RR
Re: 68 Dart GT convertible - 03/12/14 05:24 AM
I love this build Darren!! You do fantastic work. That lower column bearing trick is really cool, I'm gonna do that on my Dart! Keep up the progress, I look forward to your updates.

Posted By: Steve G
Re: 68 Dart GT convertible - 03/12/14 06:06 AM
Get the frame connectors or make some to stiffen the body. I had a 67 barracuda convertible that we stuffed a 440 into. Took it to the track and ended up breaking the case on the auto trans because of the body flex. Broke where the speedo cable goes in, all the way around.
Posted By: burdar
Re: 68 Dart GT convertible - 03/12/14 03:22 PM
I don't think I can bring myself to install the welded on connectors. I do plan on installing some bolt-on ones though. The K-member has also been completely welded and the steering box mounts gusseted. Of coarse it already has the torque boxes from the factory.
Posted By: burdar
Re: 68 Dart GT convertible - 03/14/14 02:31 AM
Last night I worked on a white overlay for the radio. A guy over on FABO sent me the layout file he made for his Barracuda. I modified it for the Dart. I had an extra piece of vinyl left over from the gauge overlays. I was able to get the vinyl fed through the printer but unfortunately the ink didn't dry and it wiped right off. Next is to try and find some adhesive backed photo paper...not sure if that even exists.

Posted By: burdar
Re: 68 Dart GT convertible - 03/24/14 04:02 AM
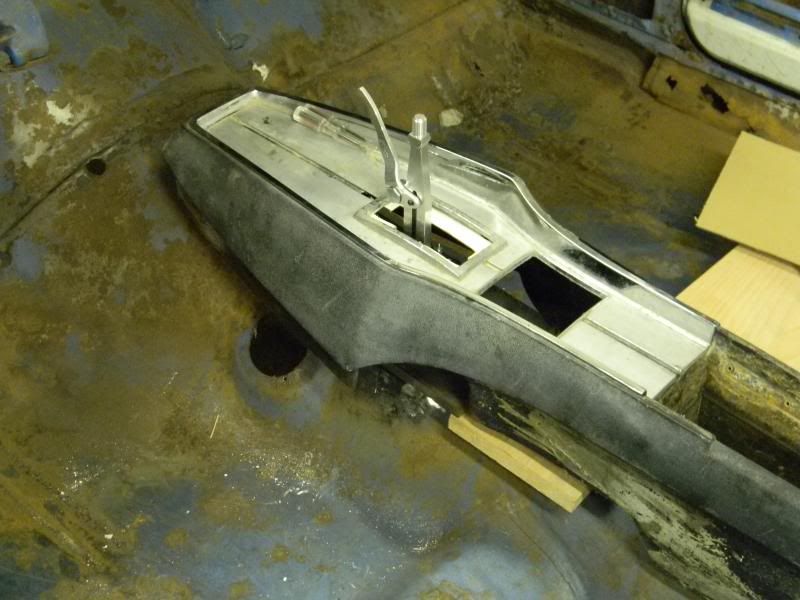
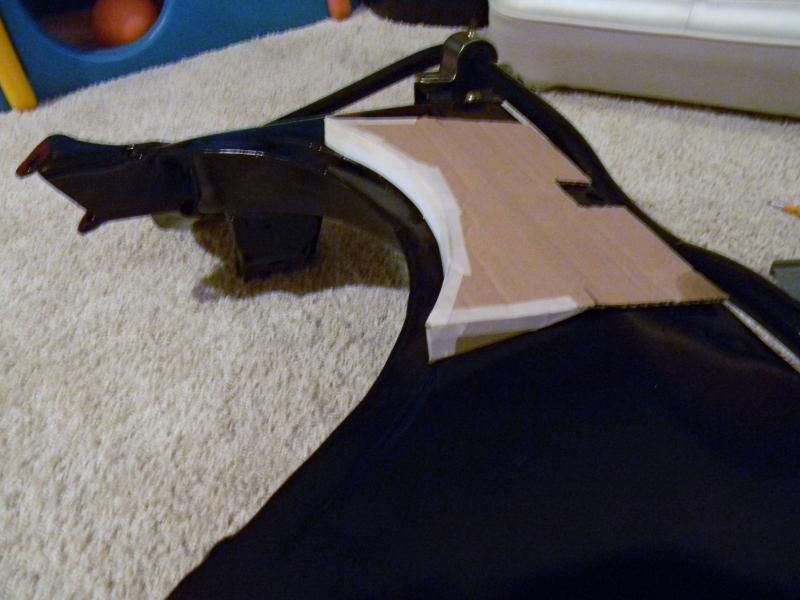
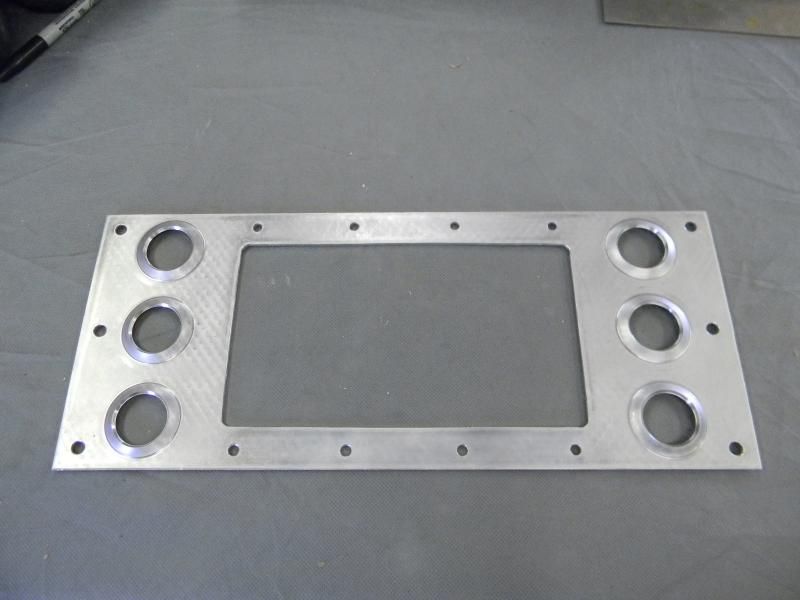
I started modifying the console to accept an aftermarket shifter. I've always liked the Pro Stick shifter but it doesn't lend itself easily to being used with a console. I've come up with a few different ideas but scrapped them. My latest idea should work but it requires removing a lot of material from the top plate. Modifying the original pitted top plate is easy...grinding on a brand new $350 part will be a little more stressfull.
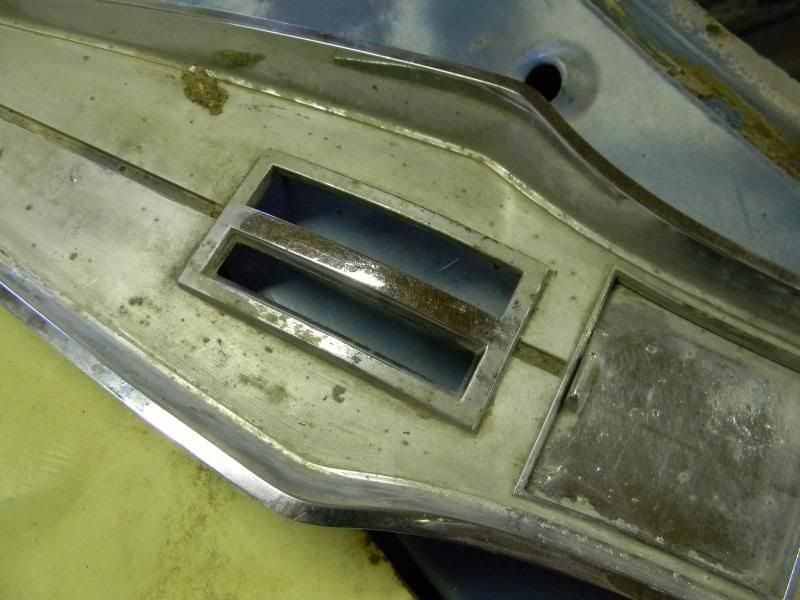
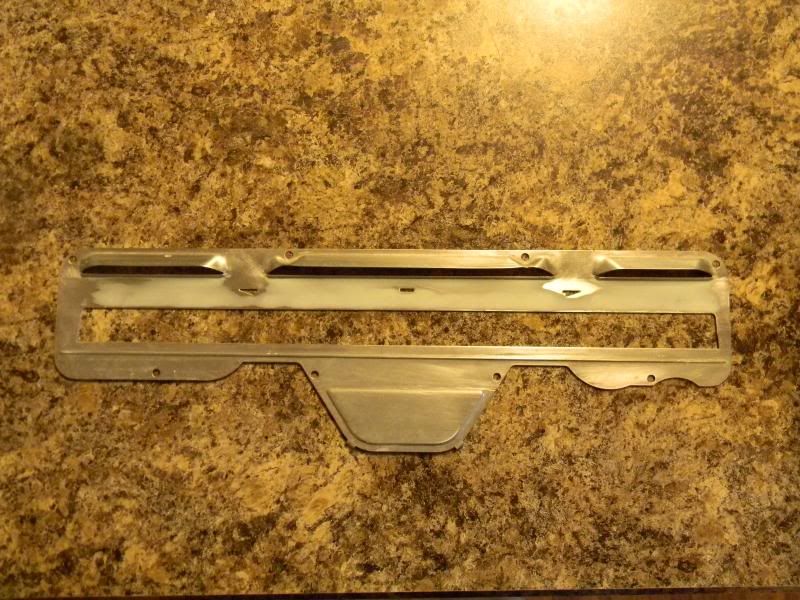
Here's what I started with...a well used and pitted automatic top plate. I think that's a 20 year old piece of gum sitting there.
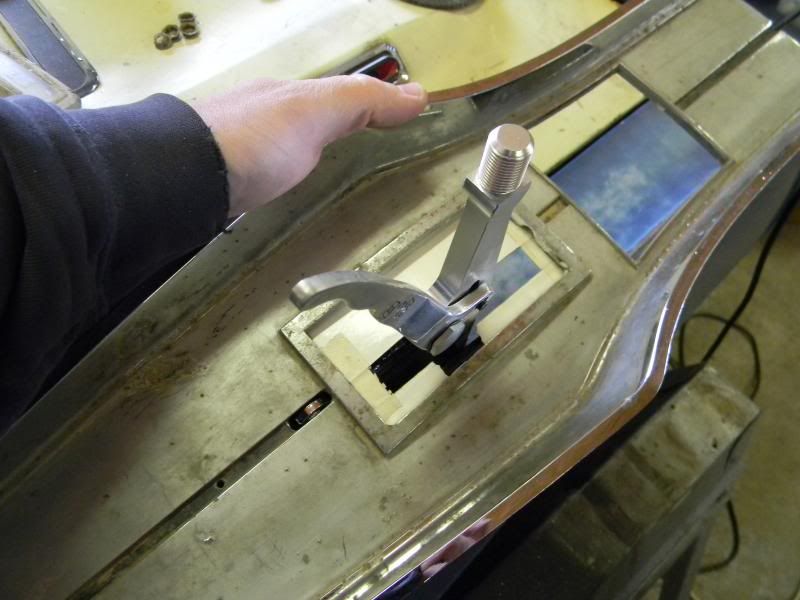
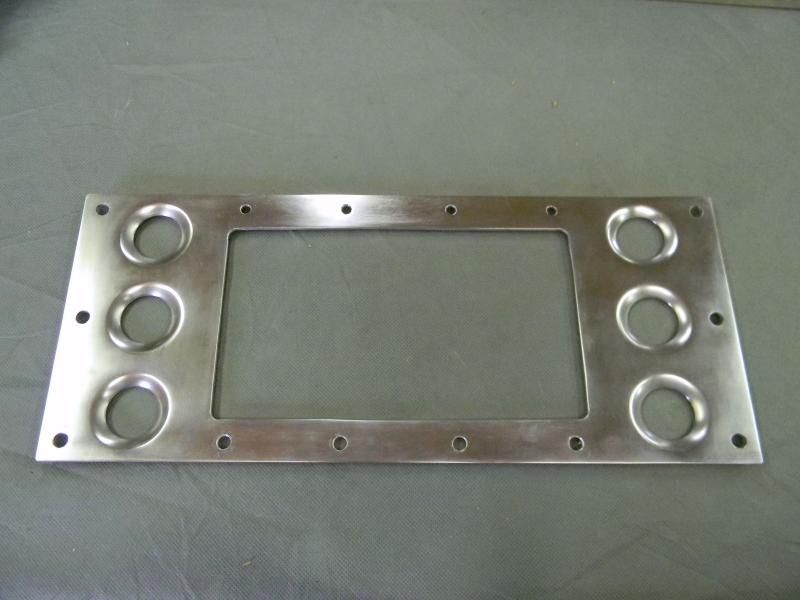
First I started by cutting off the center divider. I also removed quite a bit of material on the bottom side of the top plate. Then I cut a groove in the center recessed area for the reverse lockout lever. Once everything else is fitted, I will be making an extension for the reverse lockout lever. I made the first rough template for the shifter cover out of cardboard. (The rough notch in the side of the template is just temporary. It allows me to slide the template on and off the shifter easily. I'll have to remove the lever from the shift arm in order to slide the final piece onto the shifter.) So far so good. I think it will look good when it's done. I just hope I don't destroy a brand new top plate when it comes time to modify it.
Posted By: burdar
Re: 68 Dart GT convertible - 03/31/14 06:10 PM
Still working on the console.
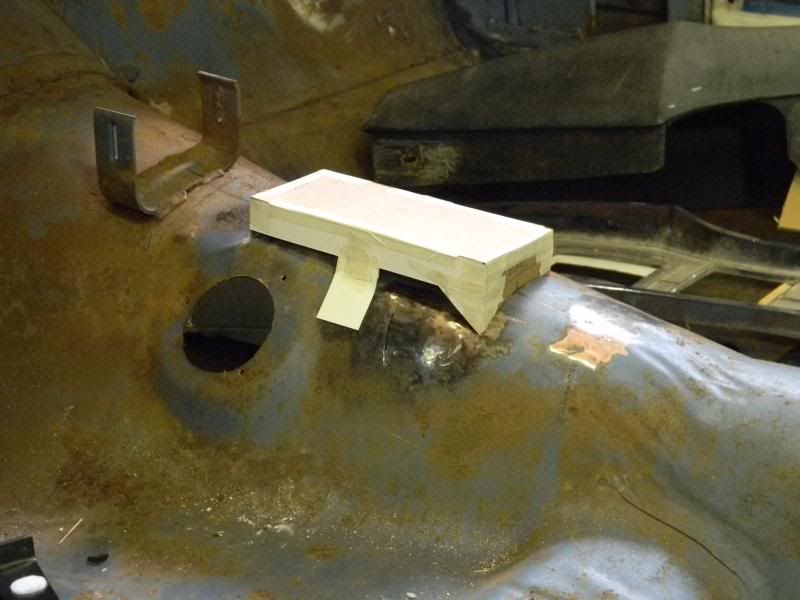
I cut the factory bracket off the floor since the new shifter requires a much shorter bracket.

I used a steel plate and some wood to mock up where I needed the shifter to be. I ended up moving it about an 1/8" to the passengers side from where I originally intended to put it. With it slightly farther to the right side, I can bolt an extension onto the side of the reverse lockout lever. Otherwise I would have had to weld an extension onto the top of the existing lever.
With my measurements taken, I started building a template out of cardboard. My father-in-law calls that a CAD system.(cardboard aided design)
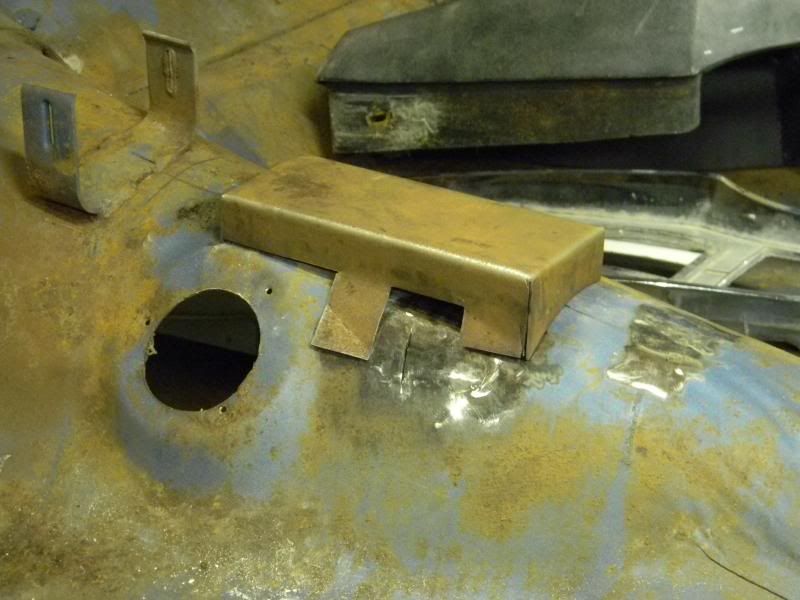
I reinforced the template so it would support the weight of the shifter and made sure the design was going to work. Then I started making the bracket out of 18 gauge sheet metal.

I cut the cardboard template apart and transferred it to the sheet metal. I bolted a 30" sheet metal brake to my work bench that my father-in-law had given me a few month prior. This was my first time using it but I think the bracket turned out nice. Once I have the final shifter position marked, I'll drill the holes and have nuts welded on the bottom side.
Posted By: burdar
Re: 68 Dart GT convertible - 04/13/14 03:39 AM
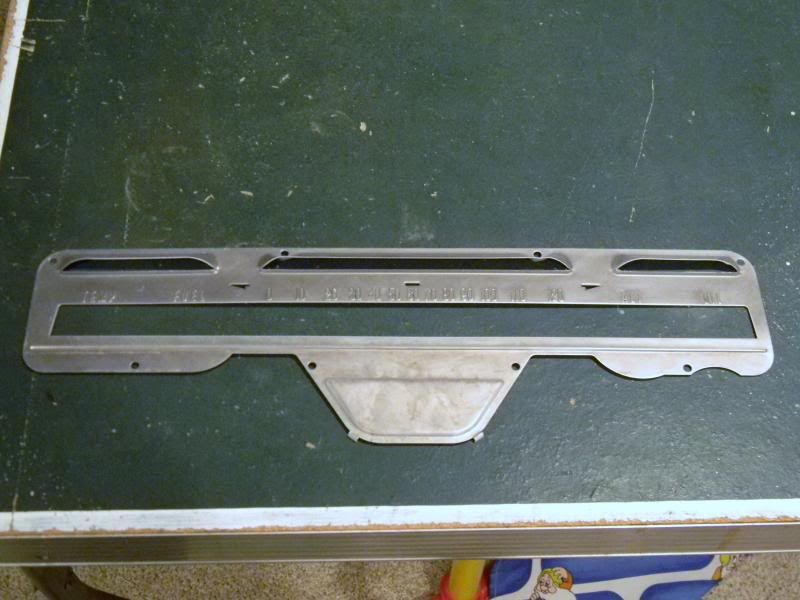
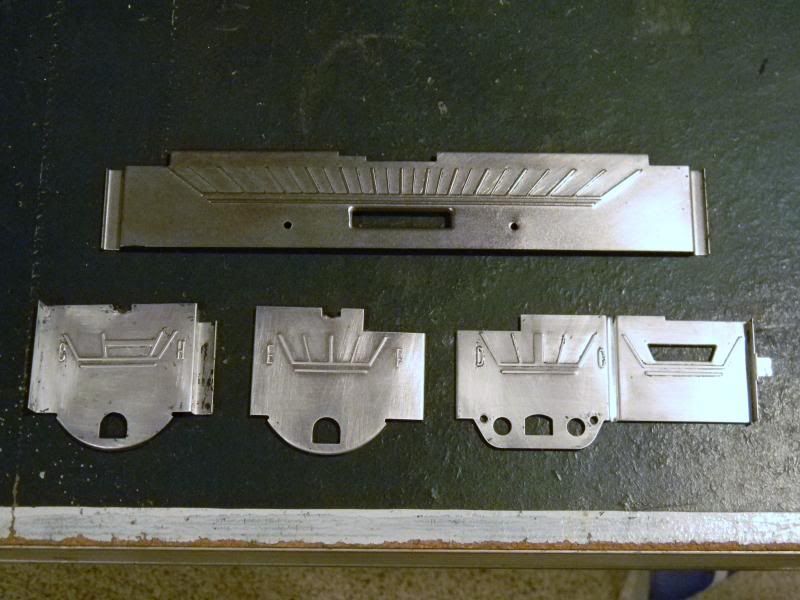
I wasn't happy with the way the gauge cluster turned out. The vinyl didn't stick to the raised numbers/letters very well. The worst looking piece was the large outer panel. I decided to redo all of the pieces using a matte vinyl instead of gloss. The matte material will hide any imperfections better.
I took the upper panel to my father-in-laws house and we machined off all the letters/numbers. I put a thin layer of filler over the area to cover the machining marks.
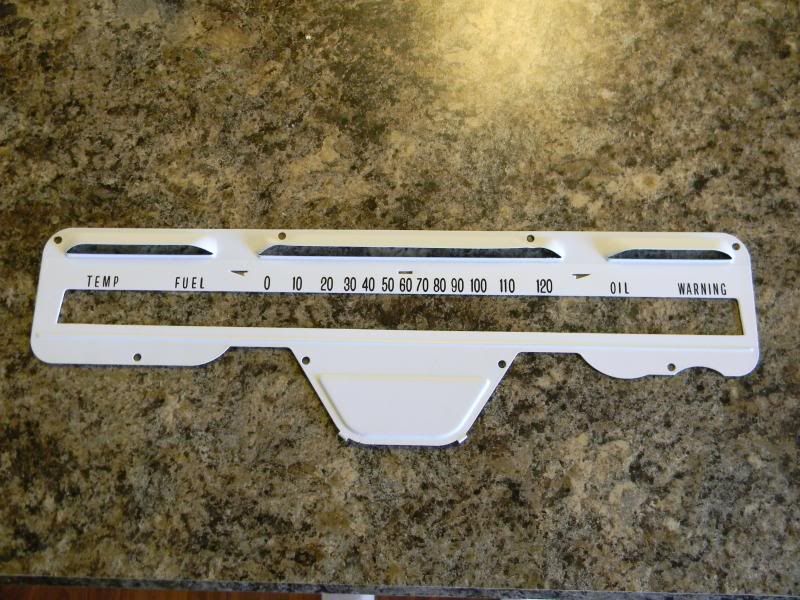
I sprayed it flat white.
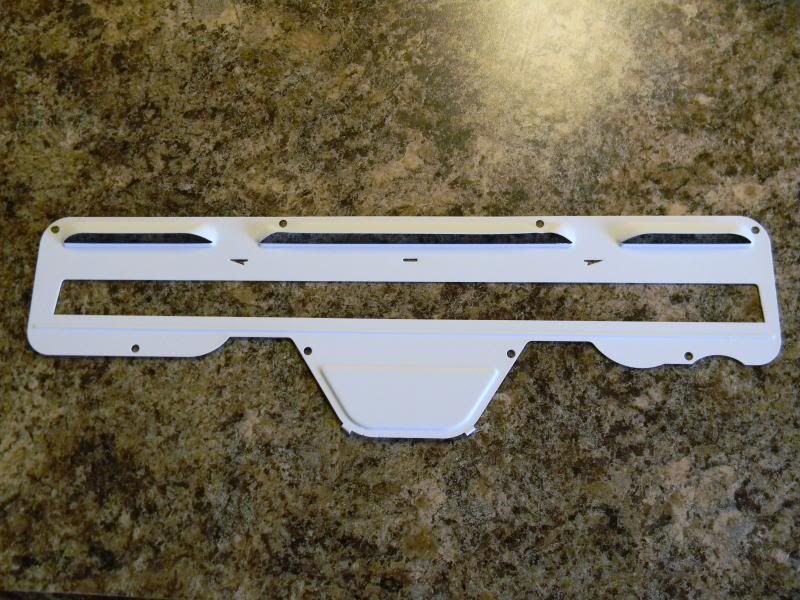
Since I was installing the vinyl on a flat surface, I had the wording changed to reflect the change I made to the cluster. I had the "OIL" wording moved over to where the "ALT" wording originally was. Then I had "WARNING" placed above the idiot light.
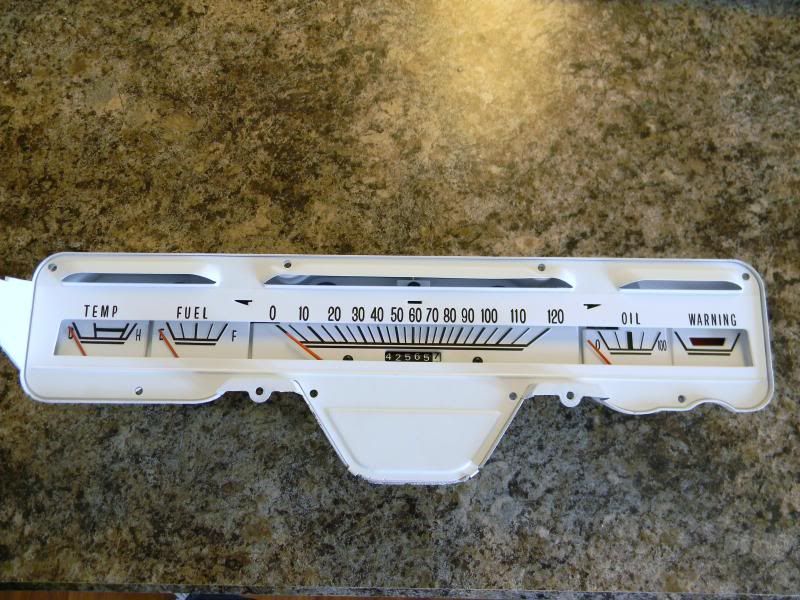
Here are the gauges after replacing all the vinyl overlays. I also ground off the "D" and "C" from the alt gauge face. I had "0" and "100" put in their place for the oil pressure gauge. The graduations on the original face match the graduations on the aftermarket gauge face, so it should read accurately.
Posted By: burdar
Re: 68 Dart GT convertible - 04/13/14 03:56 AM
Posted By: burdar
Re: 68 Dart GT convertible - 04/14/14 03:00 AM
I bought some LEDs for the cluster as well as some new bulb holders. I hooked up the dash lights to battery power and took a picture. It's not this bright in person. Some LEDs are dimmable. I'm not sure if these are or not. It should look pretty good once the bezel is installed.
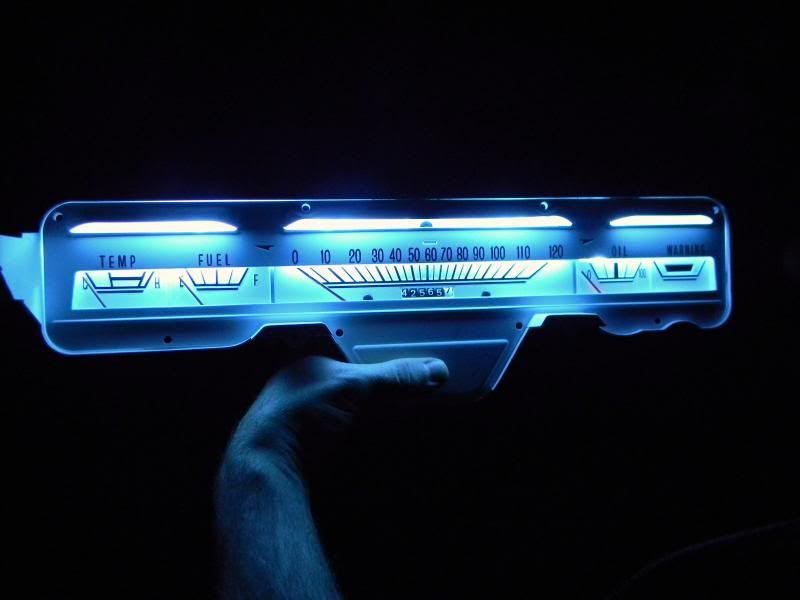
Very cool. I like that so much better than any other "custom" gauge cluster I've seen.
Posted By: burdar
Re: 68 Dart GT convertible - 04/15/14 02:34 AM
Thanks Steve. I'm anxious to get this dash assembly done. I don't want to move on to another large assembly until this one is completed. The stock AM radio is at Ward's right now getting an FM conversion. Once that's done, I just have to get dash bezels, a new glove box lock and a voltage limiter.
Posted By: burdar
Re: 68 Dart GT convertible - 04/16/14 01:15 AM
The spoiler I ordered showed up today. I really like the look of these. It attaches with only three bolts. One on the hood latch bracket in front of the radiator, and one in each bumper bracket.
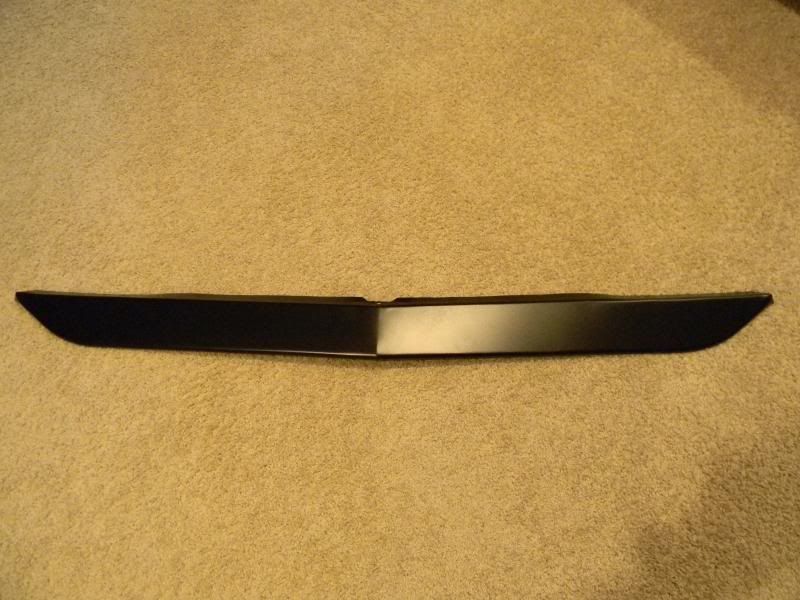
Here's what they look like installed...
http://www.spoilersbyrandy.com/Pages/6769Dartspoiler.aspx
Posted By: burdar
Re: 68 Dart GT convertible - 05/12/14 06:25 PM
The radio is done but I'm waiting on it to get back. That's the last thing I'm waiting on for the dash. I've got new dash bezels here ready to be installed.
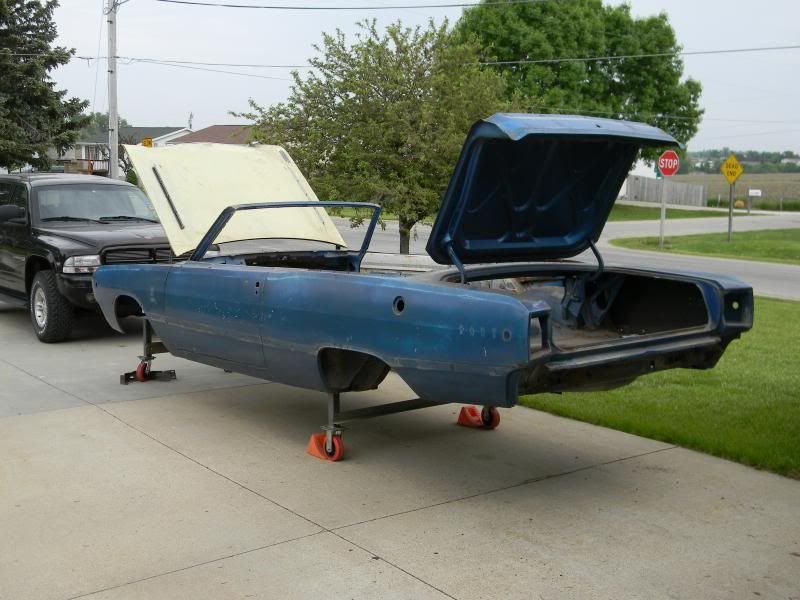
I want to get the car into the body shop ASAP. I'll have the car blasted and the few rust issues fixed. Then it will come home for engine/suspension and wheel test fitting. Yesterday morning I started stripping the few parts still left on the body. I got the rear end out along with the front E-brake cable and the fuel/brake lines. I still have to remove the glass and the top mechanism. Then it's ready to head to the body shop. I mounted my body stands to the rear of the car. They fit without any modifications. The front stands will require drilling new holes to line up with the holes in the frame.
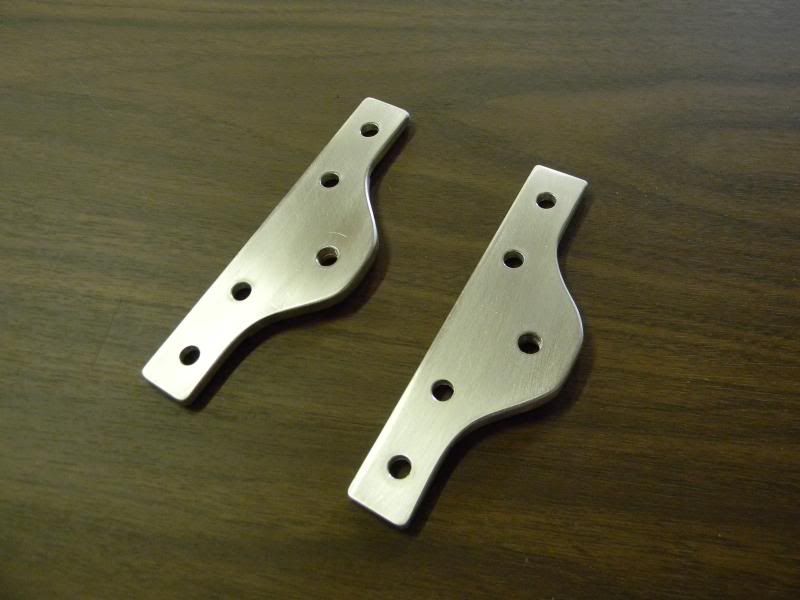
I also started making brackets to mount the fender braces to the firewall pinch weld. They are just rough at this point. I still need to drill mounting holes and machine some material off the bottom side. The braces and the brackets will get painted matte black.
Posted By: burdar
Re: 68 Dart GT convertible - 05/17/14 07:33 PM
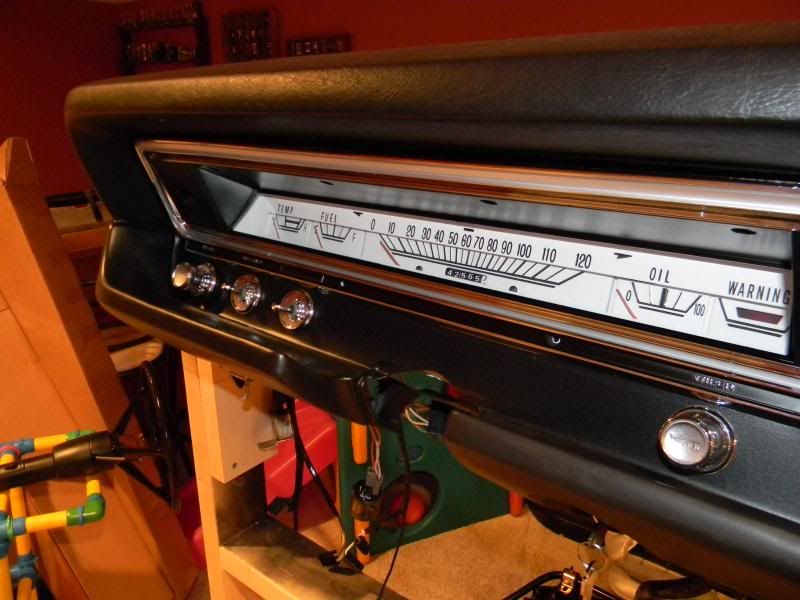
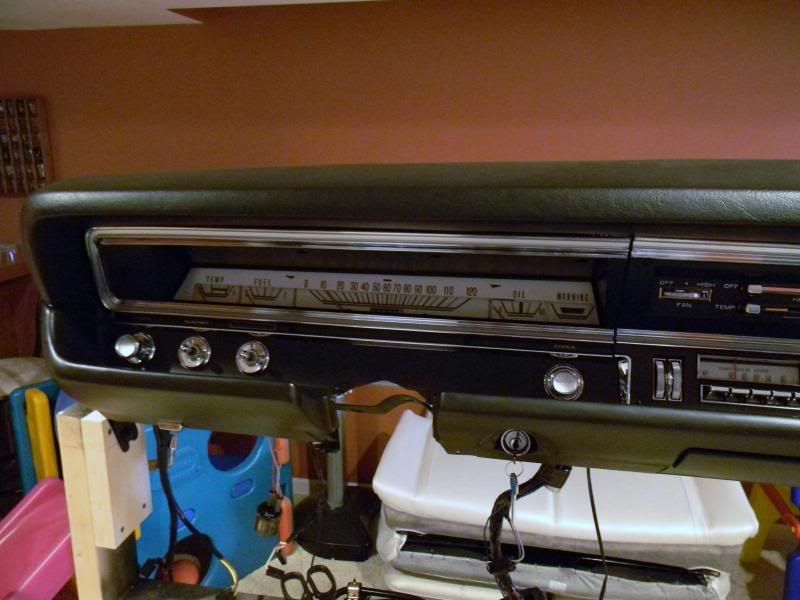
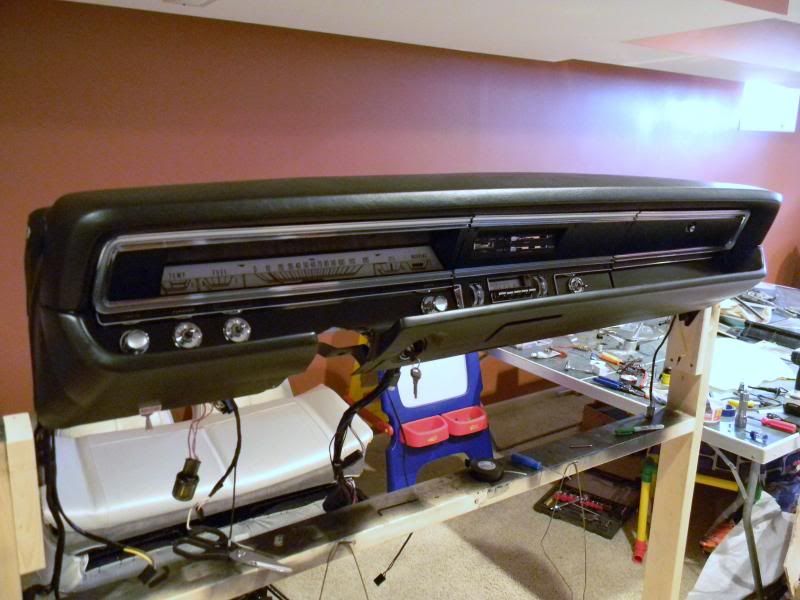
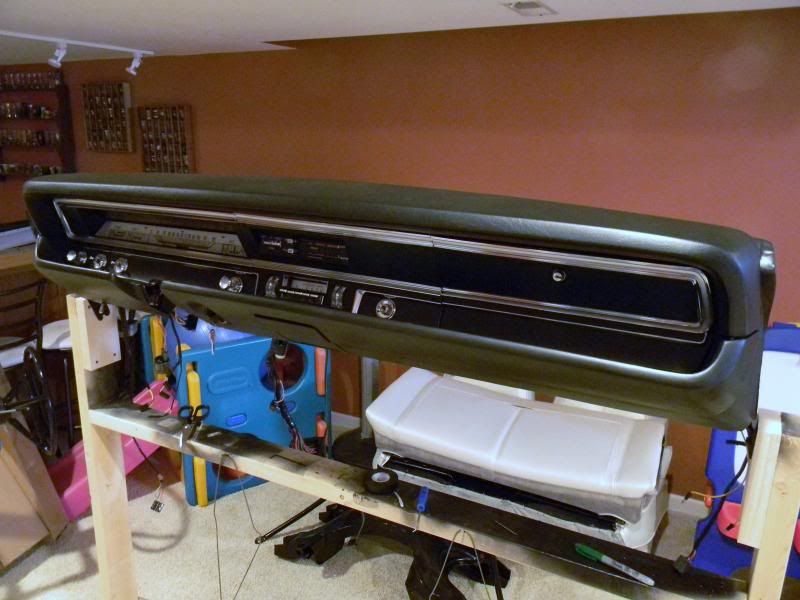
Finally, after slowly working on the dash for a few months, it's done. I got the radio back from Ward's yesterday.
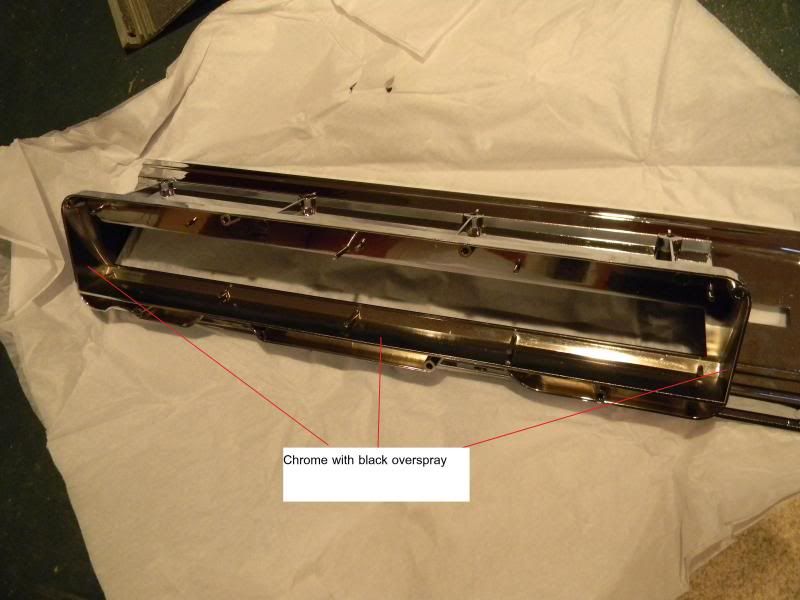
The new bezels are from BE&A and they fit pretty good. I had to drill some new holes in the frame for the radio bezel but that wasn't a big deal. I did paint one area of the gauge bezel so the white gauges would look nicer.
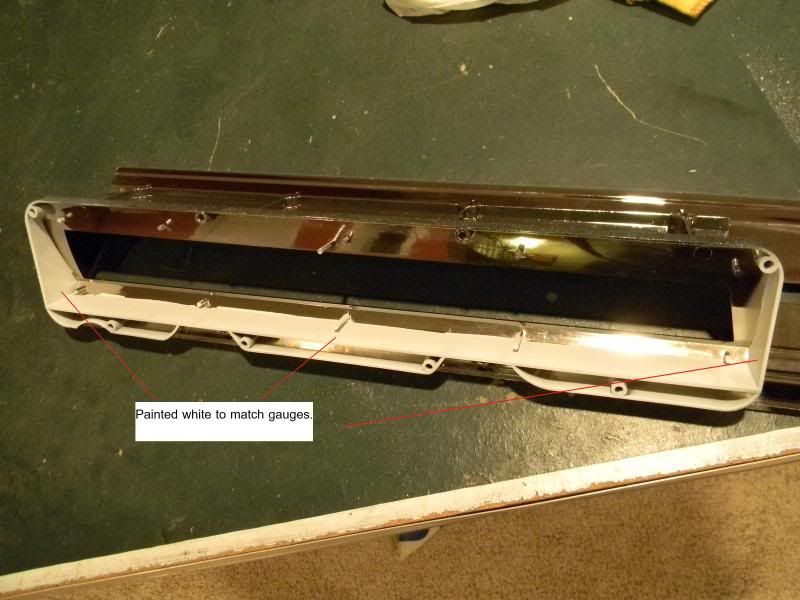
Now all you see behind the lense is white.
before...
after...
before...
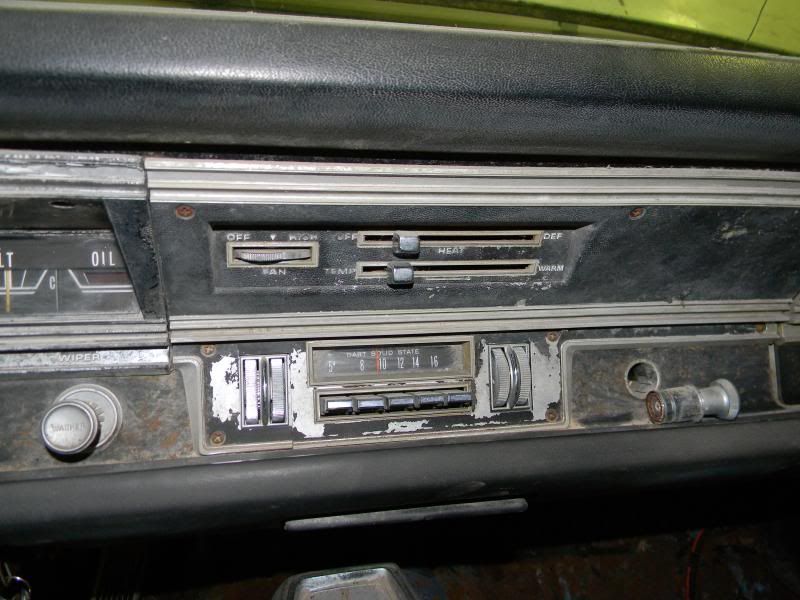
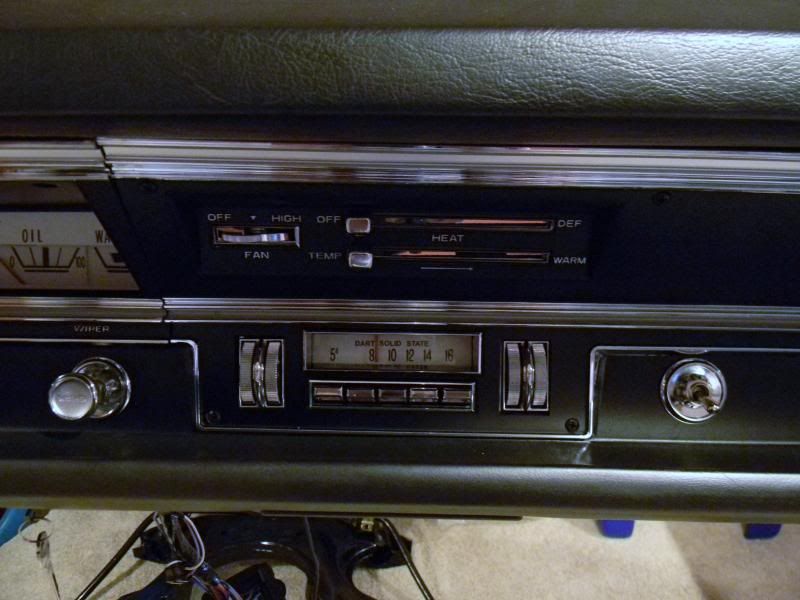
after...(added toggle switch for parking lights inplace of lighter and added white overlay on radio)
before...
after...
finished...
Posted By: Shoozy
Re: 68 Dart GT convertible - 05/17/14 08:46 PM
Nicely done sir
Posted By: burdar
Re: 68 Dart GT convertible - 05/27/14 02:28 AM
My wife worked today so I took the opportunity and worked on the car all day. I got the fender brace brackets done. They just need paint.
I scraped off the solidified oil in the engine compartment and on the floor pan where one of the top cylinders leaked. Then I wire wheeled the area. Then I started scraping all the seam sealer out of the trunk. After that, I blew out the dirt between the rockers and the quarters. I vacuumed it out and followed it up with a good power washing. The pinch weld drains are now clear. The car is now ready for the body shop.
Posted By: burdar
Re: 68 Dart GT convertible - 06/16/14 07:35 PM
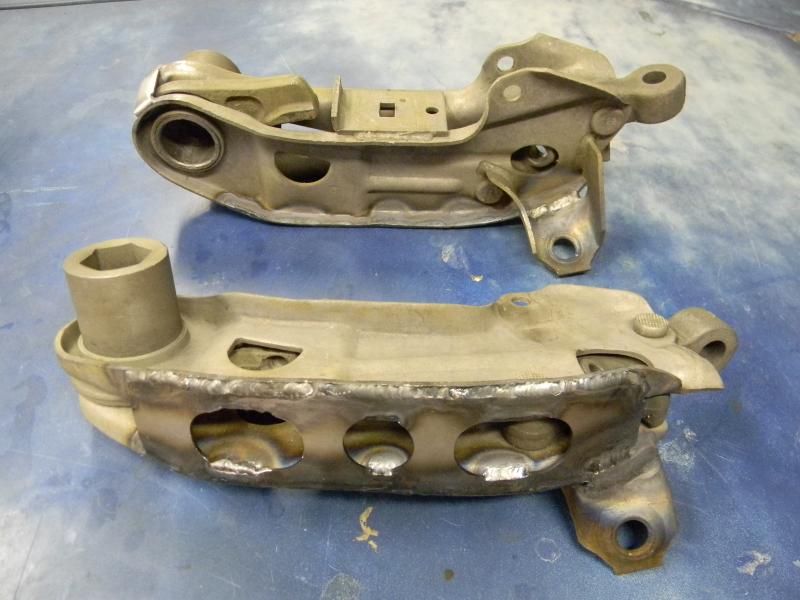
I started working on the LCAs. The suspension I'm using is off of a 72 Demon 340. The LCAs were pretty clean but had a layer of rust on them.
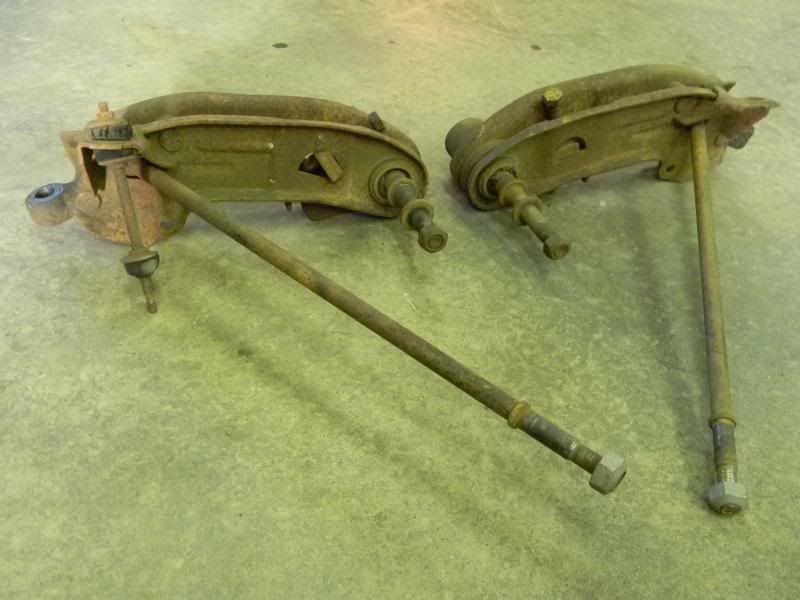
I tried using an 1 3/8" tap to remove the outer LCA bushing sleeve but I wasn't able to make it work. I don't know what I was doing wrong. The tap was just too big to thread into the sleeve. I ended up having to use an air chisel to split the shell. After the bushings were out, I soaked the LCAs in acid. After removing them I saw traces of black paint. I don't think these were dipped in cosmoline. I also found a blue inspection mark on one of the torsion bar sockets.
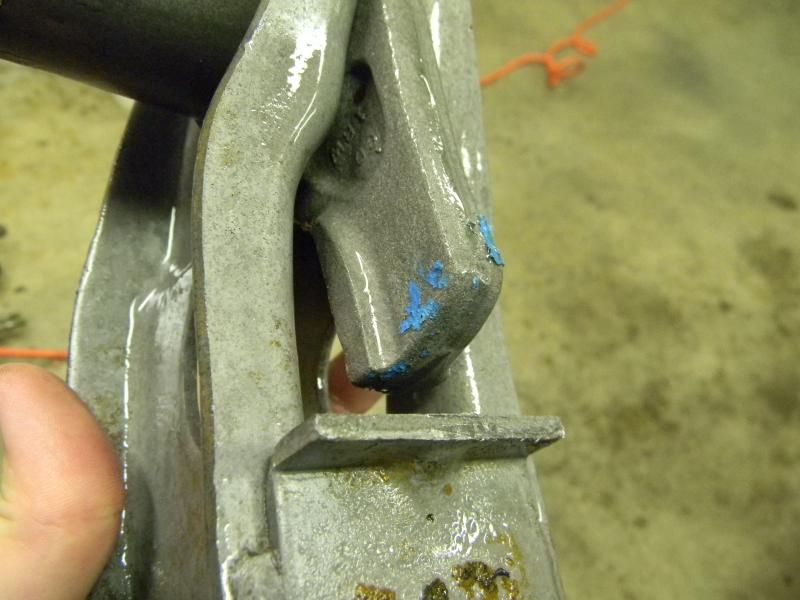
I had a friend of mine help me weld the stiffening plates on the arms. He also added some extra welds to the sway bar tabs. Finally, we champed the torsion bar end together and added a small strap to keep it in position. Adding that strap took out 99% of the slop in the arm. Now the LCAs are off to the powder coaters.
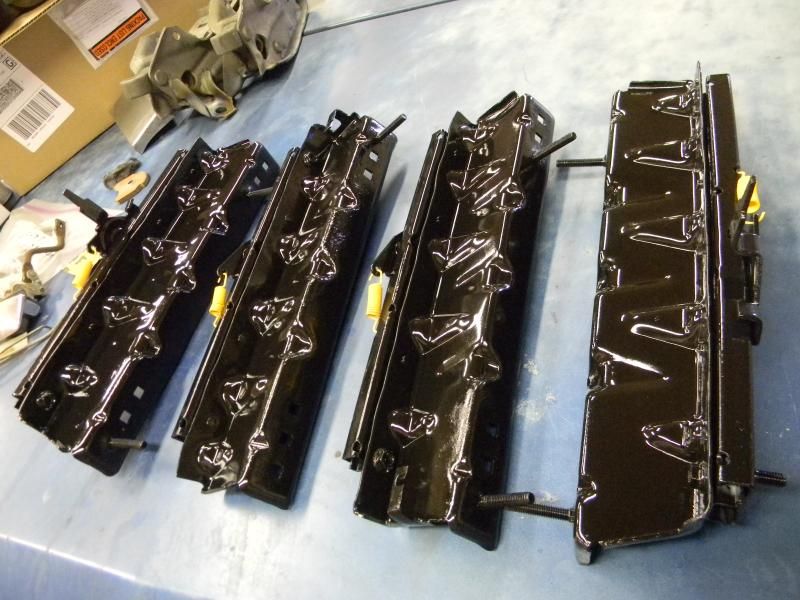
I also took apart all four seat tracks. They were very rusty from sitting against wet carpet for years and didn't slide any more. One of the slider assemblies was also missing. I had to drill out one rivet on each track in order to get them apart. After scraping out all the old grease, I dipped them in acid.
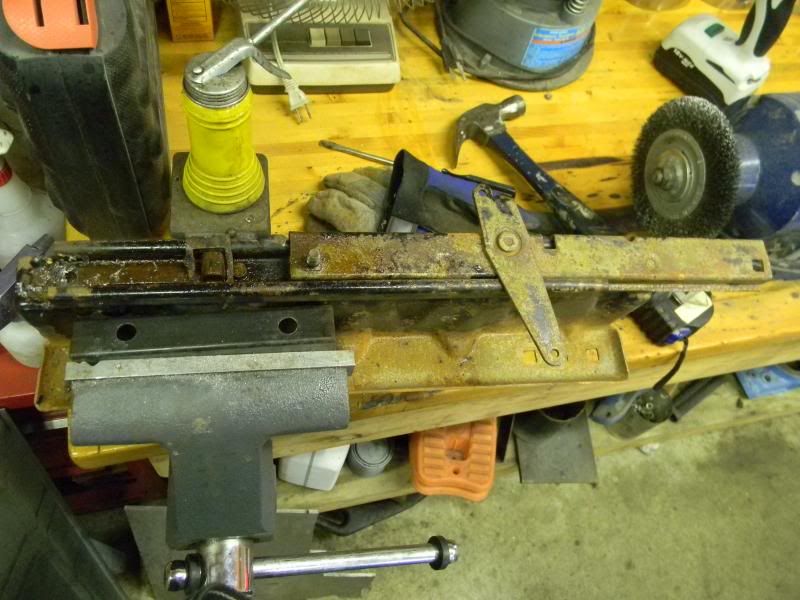

The heavily pitted areas will be up against the carpet so you won't see them. The lighter pits are mostly covered in paint. Hopefully the paint dulls a little. They are too glossy right now. I used allen head bolts to replace the drilled out rivets.
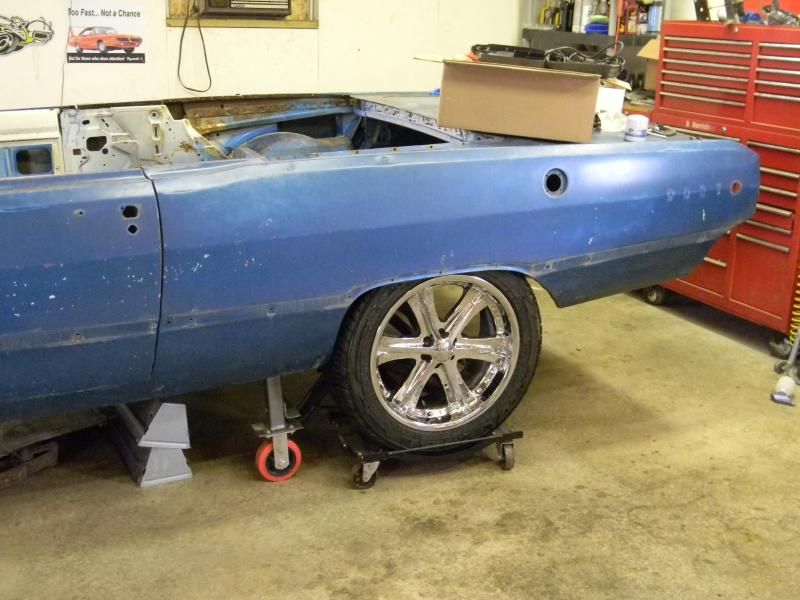
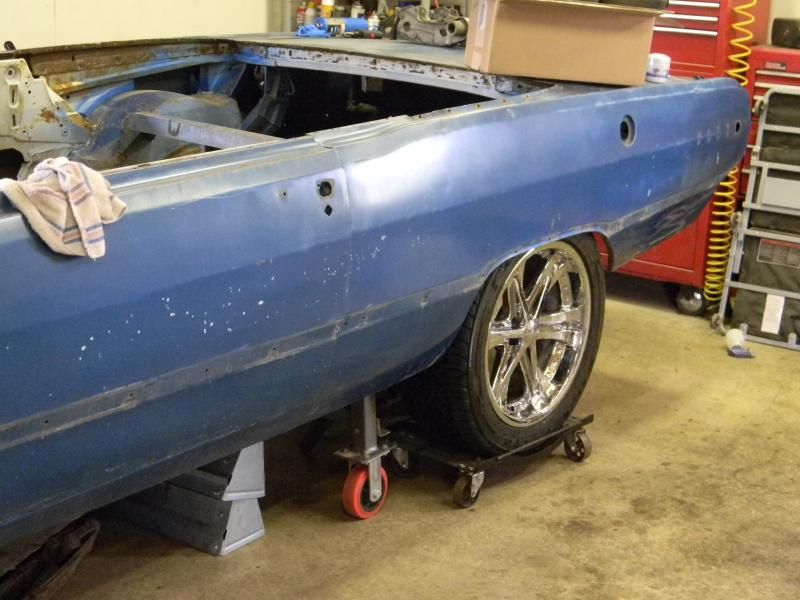
I also played around with one of my 20" Durango wheels. I pulled one of them out of the shed and stuck it up under the Dart. The tire is WAY too tall but the width is right. It's a 265-50 tire. I've got 5/8" clearance on either side. The 1/2" Dr Diff spring relocation kit should put the outer edge of the spring in line with the inner wheel well lip. The back spacing is also WAY too much on these wheels but at least I can get a feel for what 20's will look like on the back. A 35 series tire should let me tuck the wheel up into the wheel well a little more.
Posted By: burdar
Re: 68 Dart GT convertible - 06/23/14 05:24 PM
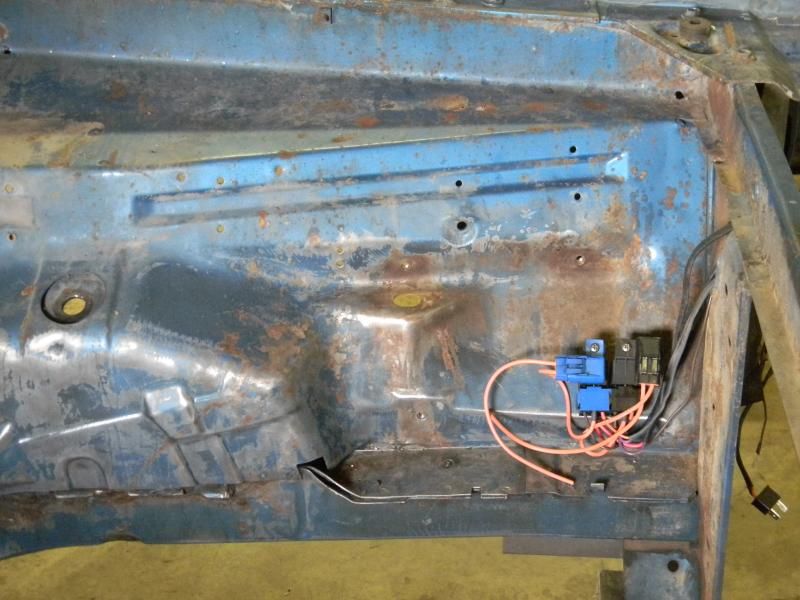
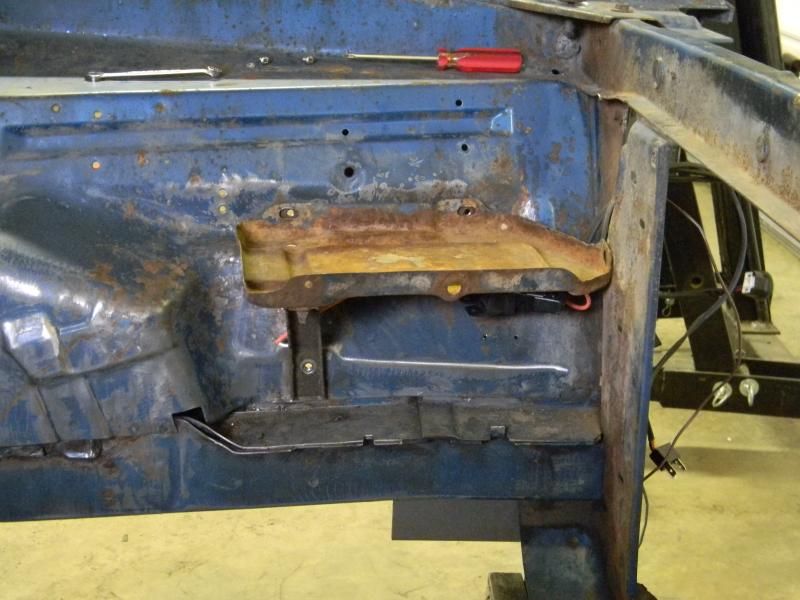
I ordered a headlight relay kit from a member over on FABO and it arrived on Saturday. At first I mounted the relays on the inner fender below the battery tray. I thought they would be hidden there but I was wrong.
I thought about building a cover that would hang down underneath the tray but didn't think that would look very good.
With some advice from other online friends, yesterday I remounted the relays to the underside of the tray itself.
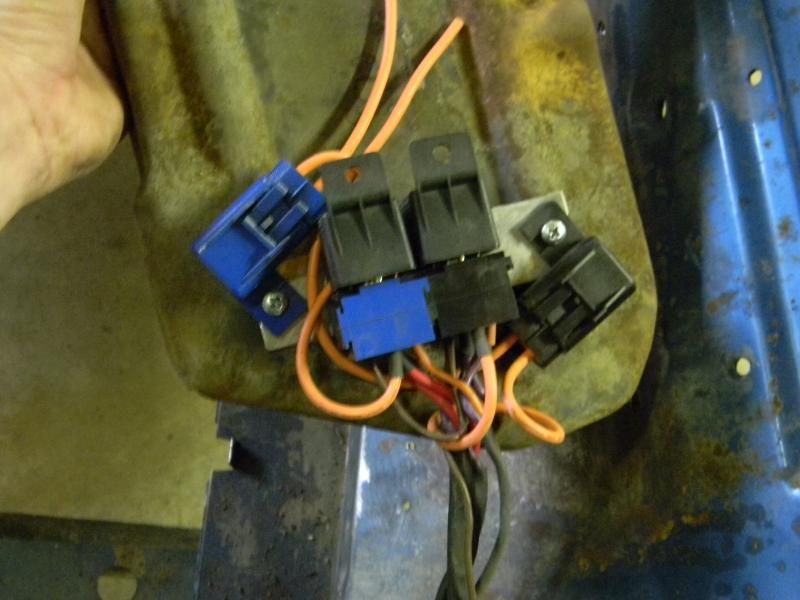
I like this a lot better. You can barely even see them now. With the rest of the engine compartment assembled, you probably won't be able to see them at all. I'll be mounting a bus bar to the underside of the tray as well. I'll run a wire from the starter relay to power the bar. When I install relays for the convert top motor, I can tie right onto the other terminals on the bar.
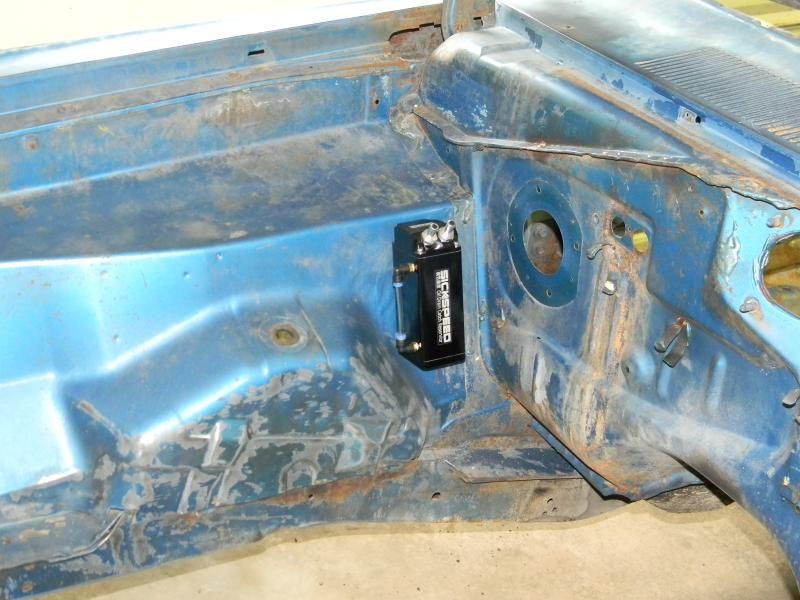
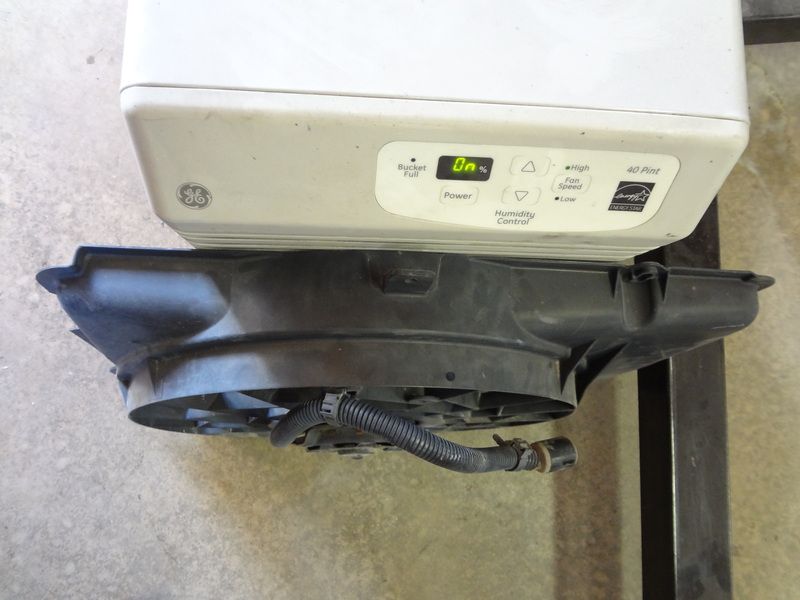
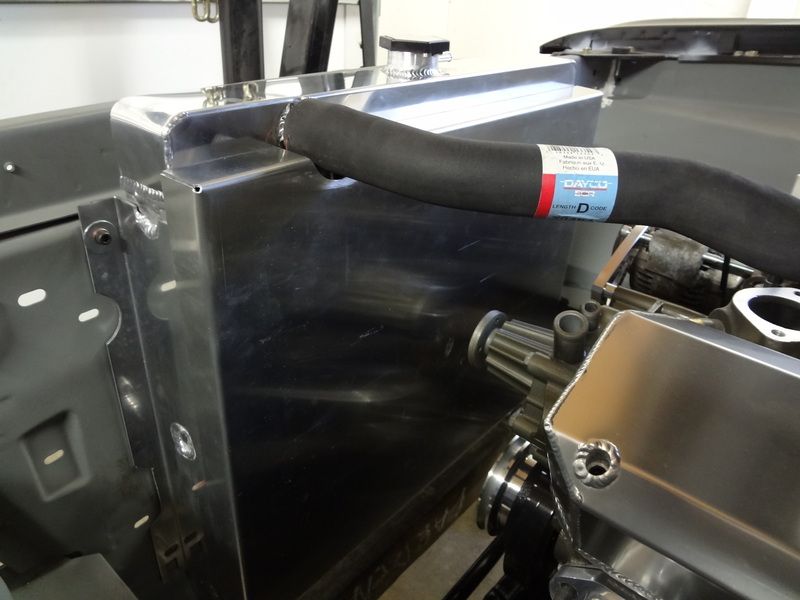
While I was at it, I also mounted the oil vapor separator to the PS inner fender. The PCV breather will be at the back of the PS valve cover. The hose will go right into the tank and then go right into the carb. It should look clean this way. I will be removing the lettering from the tank before it's installed permanently.
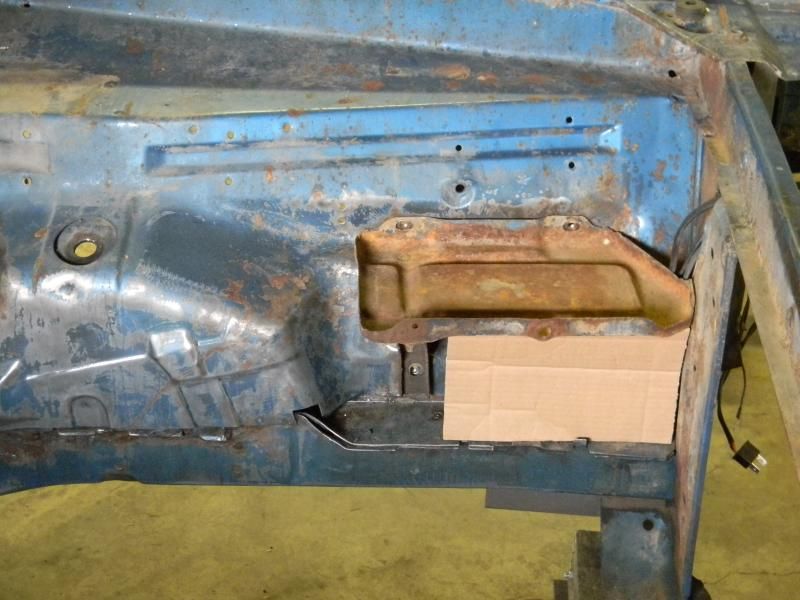
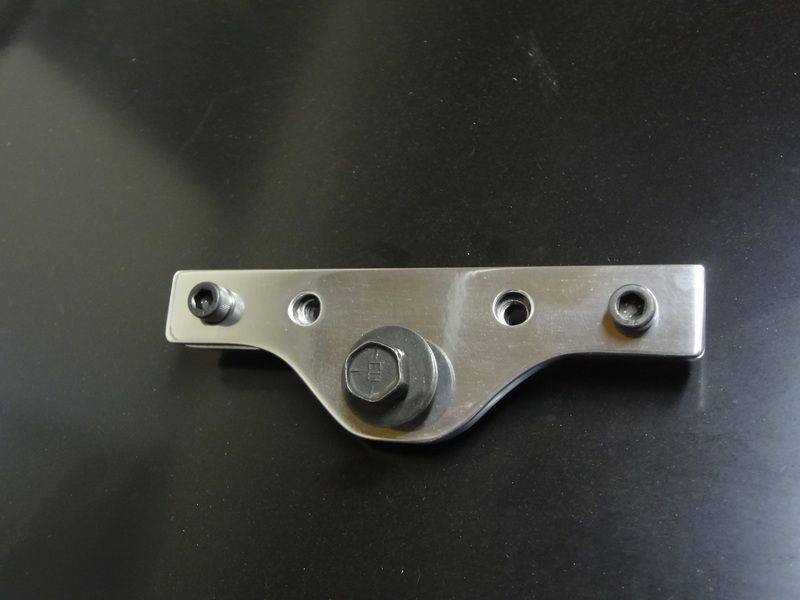
I was a little quick to get the K-member powder coated over the winter. There are some more modifications I want to make so it will need to be coated again. I bought a torque strap for the engine but ran into an issue with the K-member bracket. The pinch weld lip on this K isn't wide enough to mount the bracket. The holes that need to be drilled would be right at the edge of the lip. I thought about widening the lip but decided just to have the bracket welded to the K instead.
I also decided to add a skid plate to the bottom. I made one out of cardboard just to see what it would look like.
Then I made it out of metal.

The back curved section is open right now. I wasn't sure how to make that section. I ended up just cutting out a strip of metal and bent it to fit the area. It will be welded onto the back side once the rest of the plate is tacked on.
Posted By: gdonovan
Re: 68 Dart GT convertible - 06/23/14 11:39 PM
Exceptional work! Inspiring me to go out to the garage now.
Posted By: burdar
Re: 68 Dart GT convertible - 06/27/14 09:47 PM
Posted By: burdar
Re: 68 Dart GT convertible - 06/30/14 04:28 AM
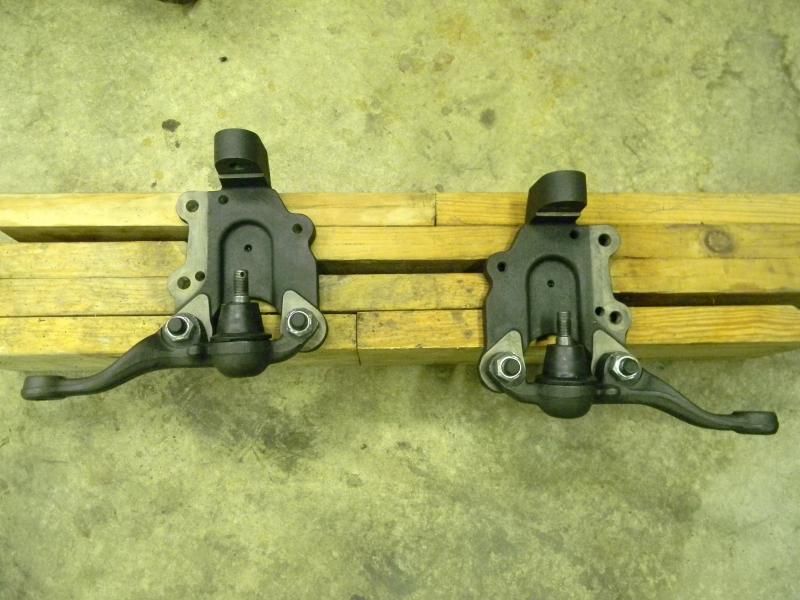
I bought a set of slightly used Magnumforce 2" drop spindles. I cleaned them up in the parts washer and then gave them a quick bath in EvapoRust. Today I RPMed them and installed the LBJ's. The LBJ's were also RPMed.
I also gather up the zinc plated parts once again. I'm taking them back to the platers tomorrow. I think they were put in the yellow zinc tank for a short time by mistake. I called them on Friday and said they needed to be redone. We will see what they have to say tomorrow.
Posted By: burdar
Re: 68 Dart GT convertible - 07/03/14 07:28 PM
Posted By: burdar
Re: 68 Dart GT convertible - 07/15/14 03:47 PM
Thanks for documenting and sharing this project with us Darren. I'm really enjoying watching its progress.
Posted By: burdar
Re: 68 Dart GT convertible - 07/15/14 05:11 PM
Documenting it seems to keep the momentum going. I don't want this one to drag on like the Challenger did.
Posted By: burdar
Re: 68 Dart GT convertible - 07/17/14 05:33 PM
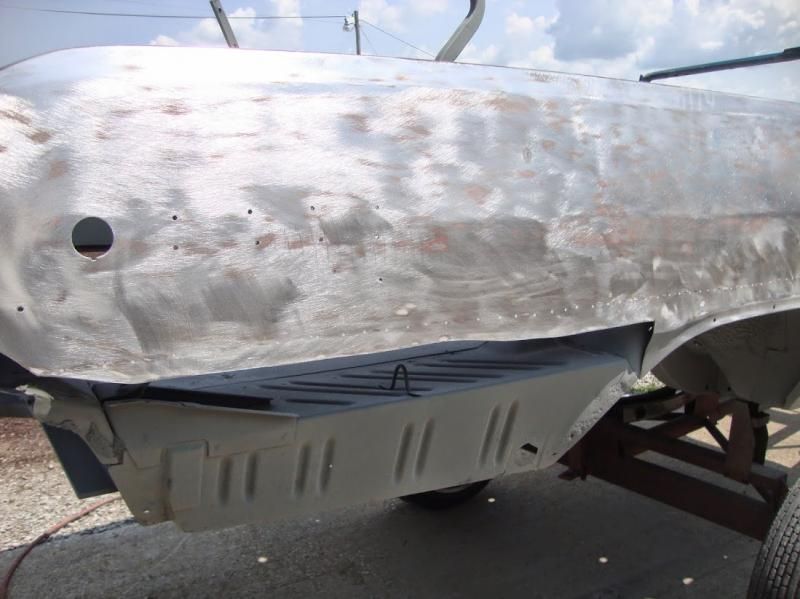
It looks like we are going to replace more metal. The trunk drop offs have some pin holes in them. They aren't very expensive so we will be ahead in the long run if we replace them. Same thing for the front fenders. The lower patches are expensive. It will be cheaper to replace the fenders than to fill all the trim holes, install patches and straighten them out. Hopefully I can find all that stuff at the Nats in three weeks. Here are the updated pics.
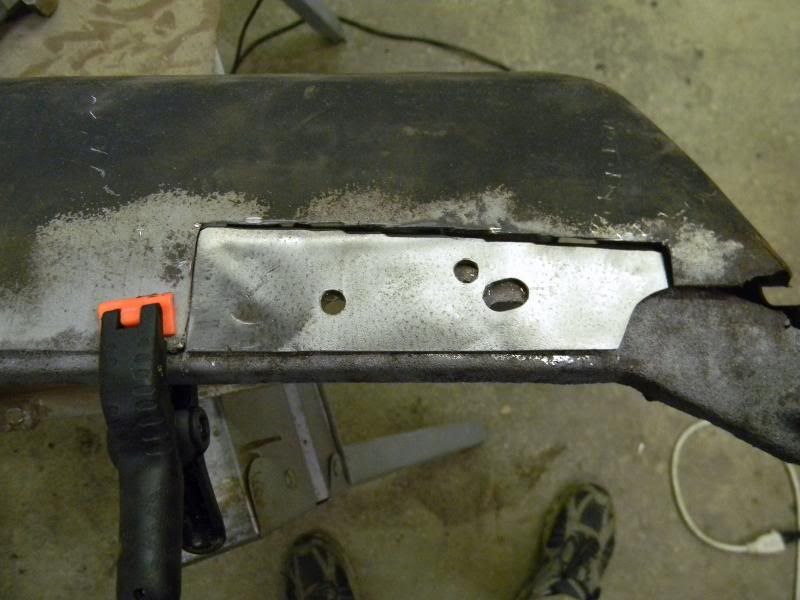
Lead cleaned out of the quarter to rocker joint.
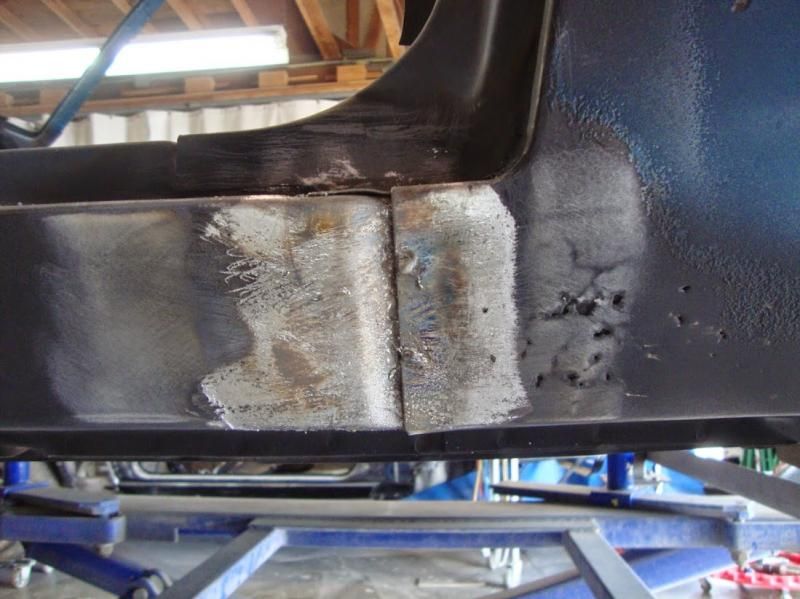
Bad spot cut out.
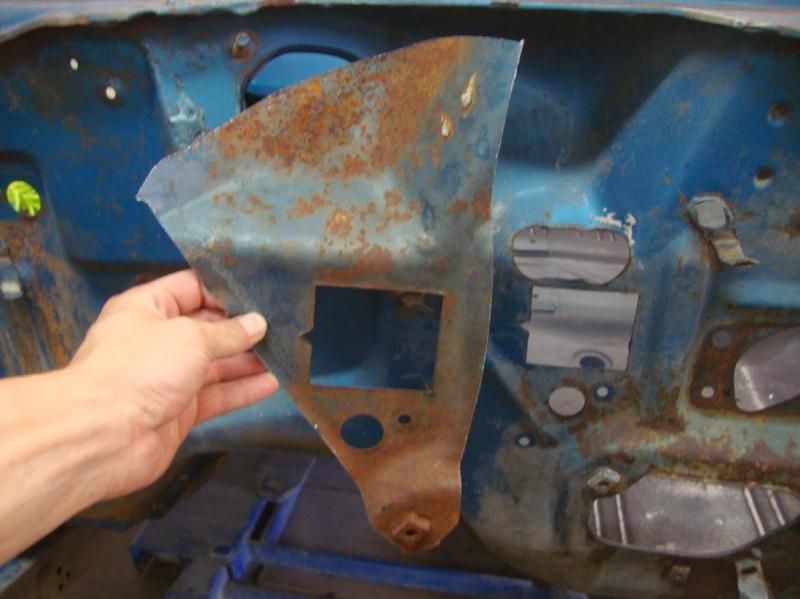
Someone butchered the firewall above the bulkhead connector. Here is the patch that will fix the area.
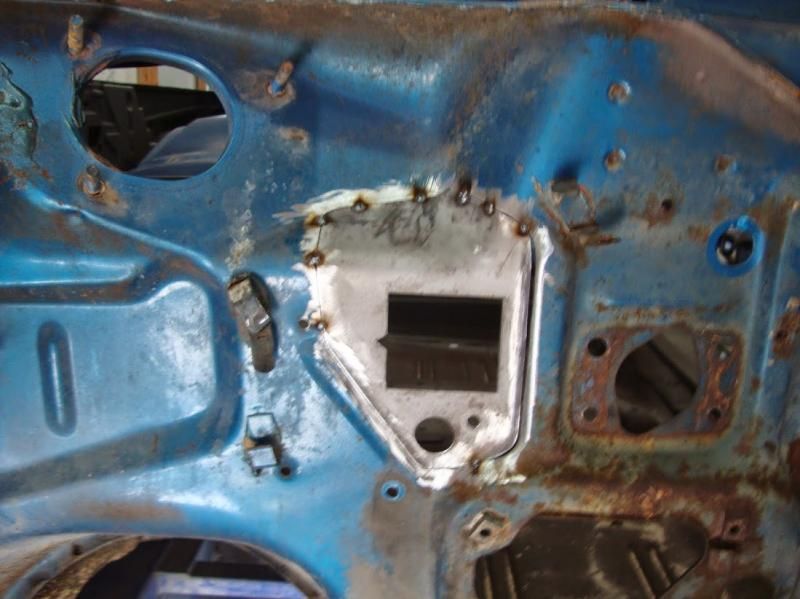
Tacked in place.
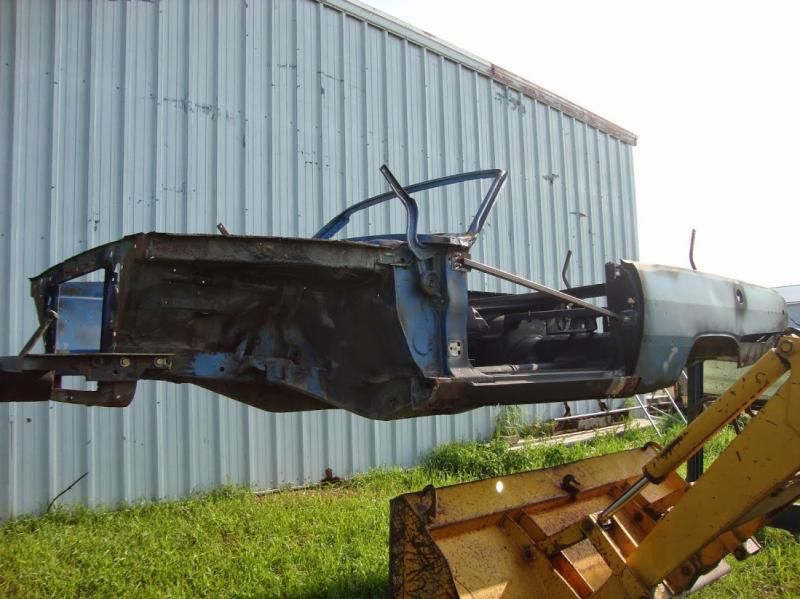
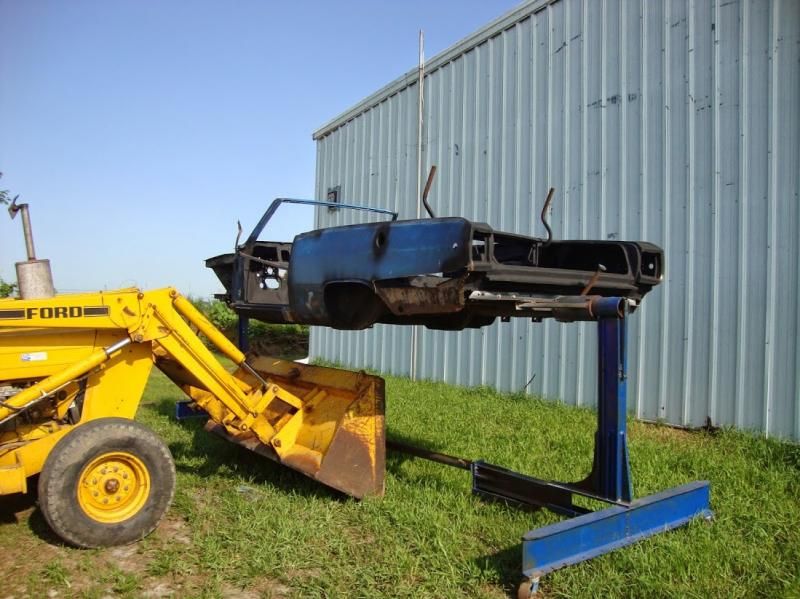
The car is on the rotisserie.
Posted By: burdar
Re: 68 Dart GT convertible - 07/20/14 06:34 PM
Posted By: JDMopar
Re: 68 Dart GT convertible - 07/20/14 07:11 PM
I always love getting a car to the 'blasted and primed' state. Mainly because it goes from being a nasty old car, to a nice clean project!
So, is the 904 a transmission you've had sitting around, or did you own the car earlier and get it back?
Posted By: burdar
Re: 68 Dart GT convertible - 07/20/14 08:18 PM
The engine and trans have been sitting around. They used to be in a Cordoba I had. The Dart originally had a 318. That won't be going back in.
Posted By: burdar
Re: 68 Dart GT convertible - 07/27/14 11:11 PM
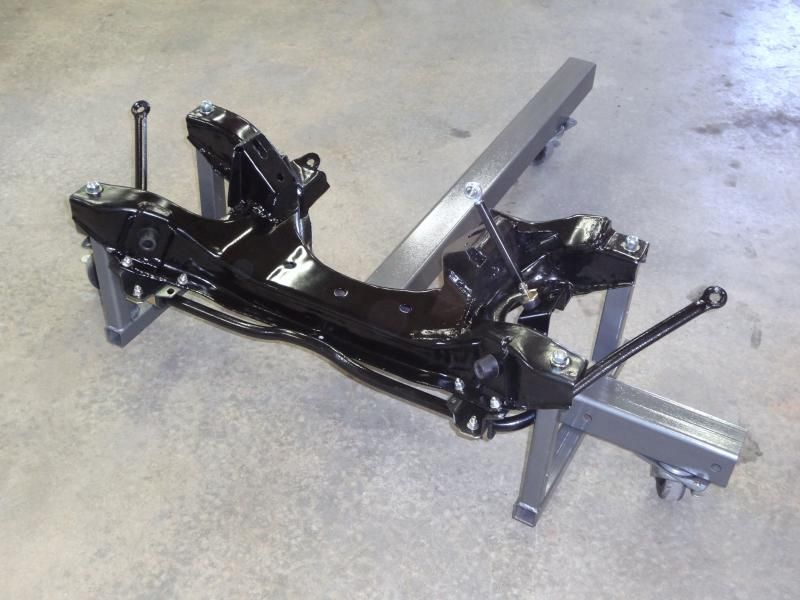
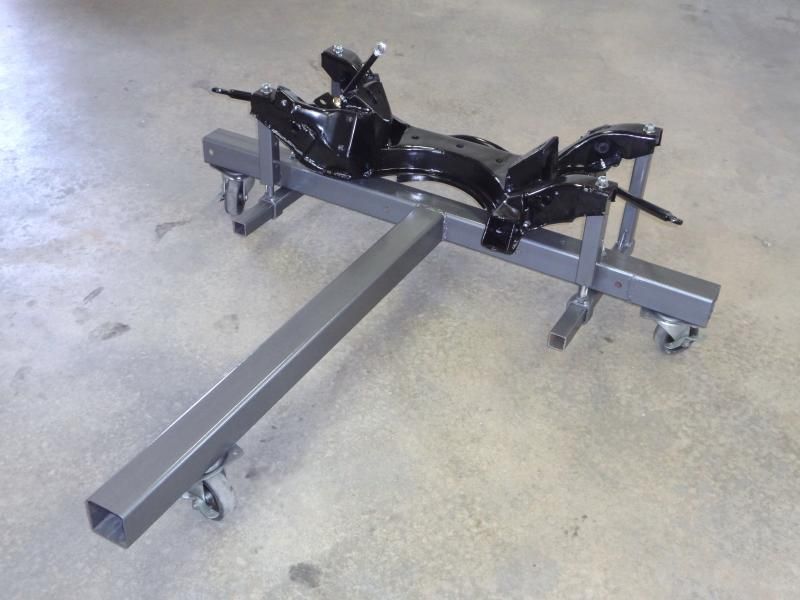
Yesterday my father-in-law and I built a K-member dolly. I used a small wooden cart to install the Challenger engine but it wasn't very stable. The engine wanted to tip side to side. I wanted something that would be solid that I could store an engine/suspension on long term. We started with a crude stand my dad and I had built years ago for the Challenger. The original stand didn't have any wheels on it and used the sway bar mount to attach the K. It did the job but I wanted something nicer this time around.
I used the outer frame mounting holes to attach the K to the dolly so it would be stable. The four arms that support the K are attached to the bottom of the main "T" so they can be unbolted and removed during installation. I didn't want to guess when making the trans support so I'll add that once the engine/trans are on the dolly.
There are better designs out there but this one didn't cost me anything and should do the job.
Posted By: burdar
Re: 68 Dart GT convertible - 07/28/14 05:07 PM
Last Thursday I went and had a look at the car. So far everything is going good. There aren't any real surprises. How do you like the 4x4 look?
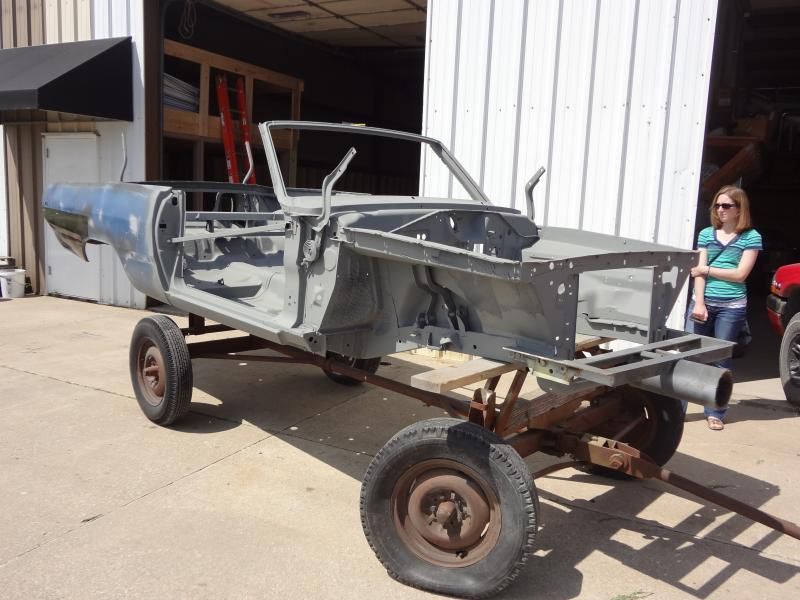
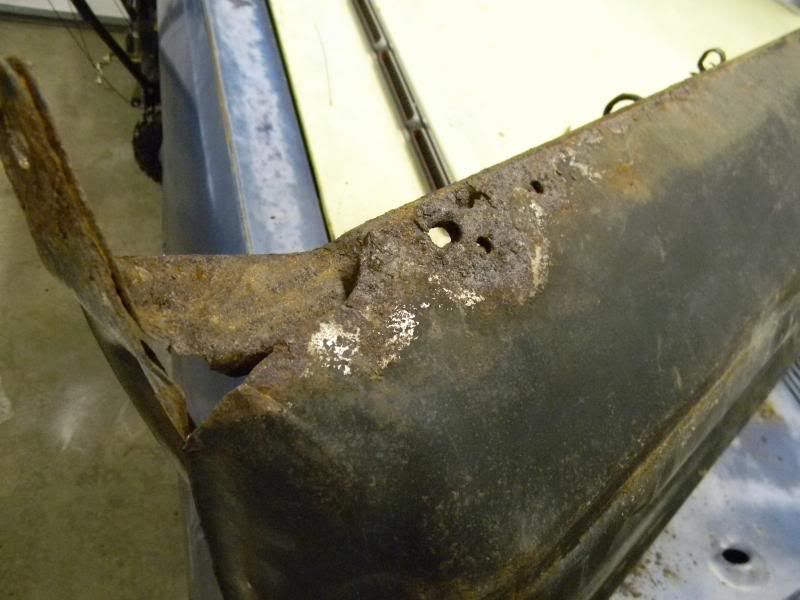
The patch panels go a lot higher then I thought they would.
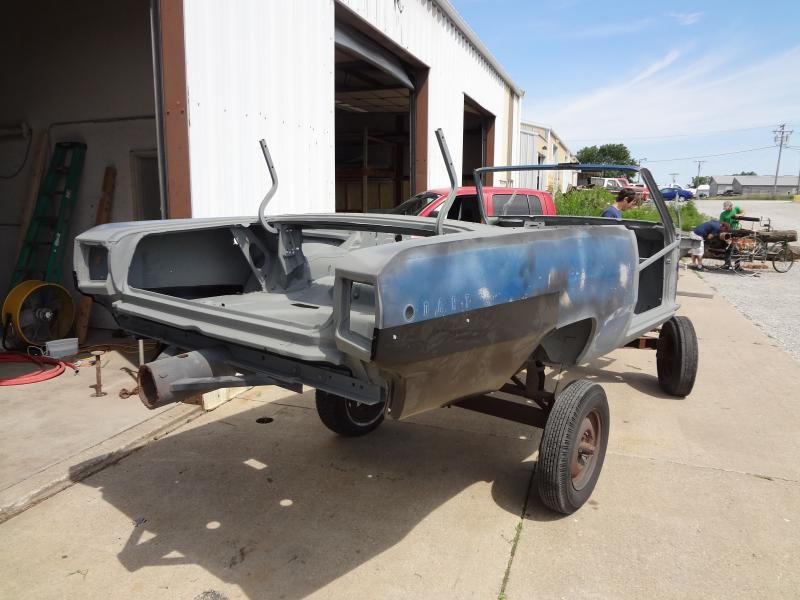
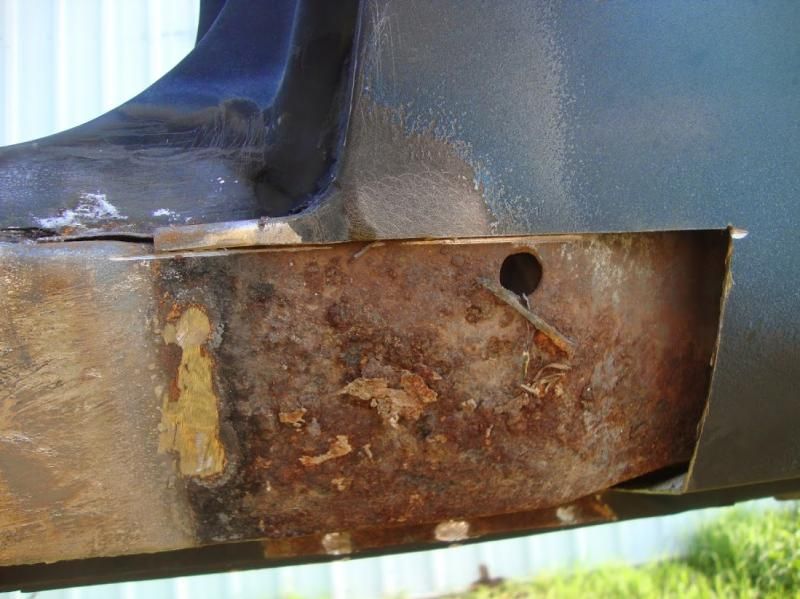
You can see the pin holes in the trunk drop offs. If the car hadn't sat around with the top down for 10+ years, I'm sure these wouldn't need replacing. Last I knew, they were just going to section in the lower part since everything else is real solid.
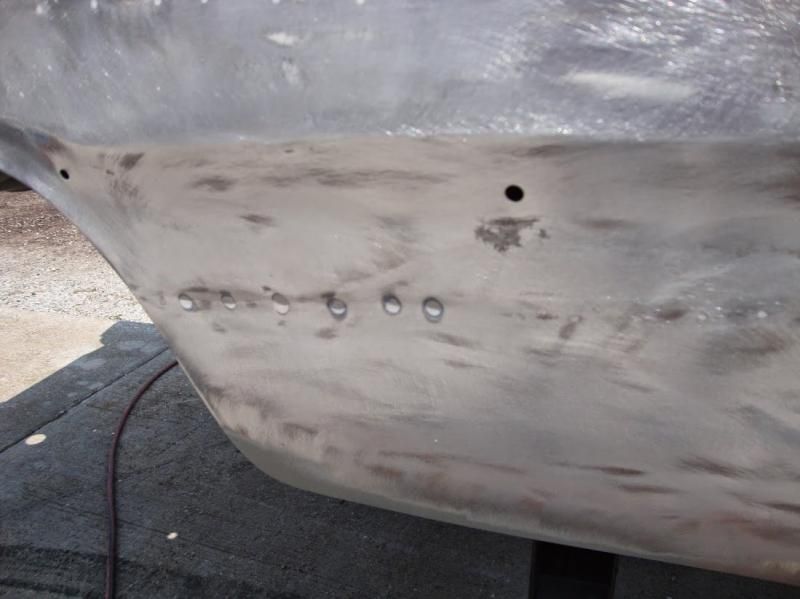
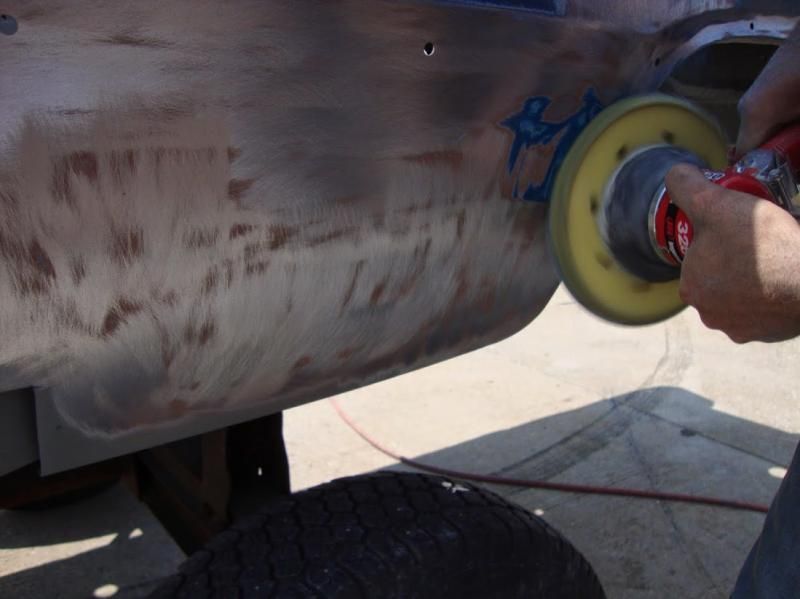
Here you can see the previous damage from possibly rubbing a guard rail. The old repair involved drilling a bunch of holes in the quarter panel, pulling out the dent and applying filler. You can see the filler oozing out of all the holes.(just above the initial cut line) The repair patch will cover a lot of this.
That's it for now. Hopefully they will get started on the floor patches this week.
Posted By: floridian
Re: 68 Dart GT convertible - 07/31/14 06:23 PM
HOw is the area under your sail panel for rust?? After your comment about trunk pinholes and if the top had been up got me thinking.
When I did my car ( in pic) after I had it blasted on a rotisserie and primered, a body man looked at my sail panel and told me to remove it. Got out my torch and removed the lead/spot welds.. I found alot of rust ( surface) issues.. I removed most of the body/convertible pieces under the sail panel, blasted and painted them, then reinstalled..
Just a thought

Posted By: burdar
Re: 68 Dart GT convertible - 07/31/14 06:52 PM
All that I saw was just light surface rust around where the convertible top attaches. I'll look over the area very closely next time I'm at the shop. Thanks for the heads up.
I don't think the filler panel to quarter seam has been stripped yet. There were no outward signs of rust there...no bubbles exc. The PS quarter was stripped the other day. You can really see the previously drilled holes.
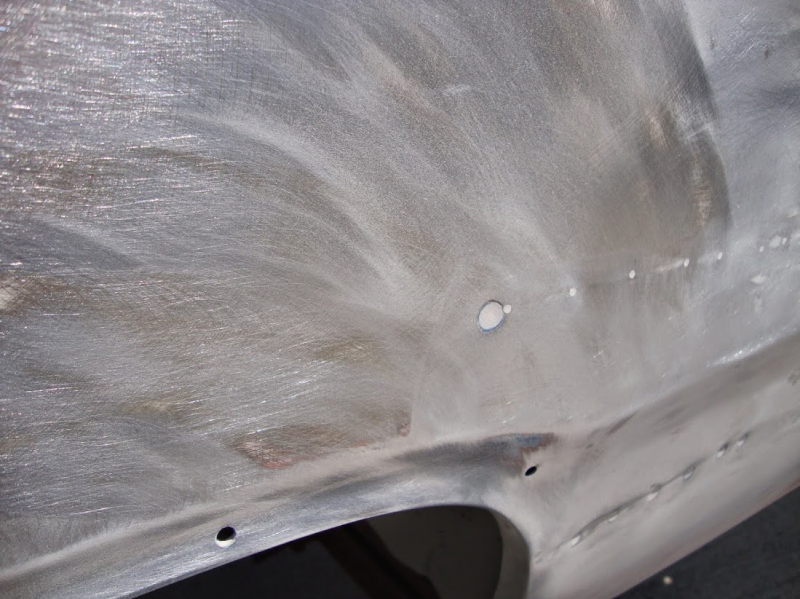
So far, it doesn't look like there is any filler on the DS.
Posted By: burdar
Re: 68 Dart GT convertible - 08/22/14 05:36 PM
Posted By: burdar
Re: 68 Dart GT convertible - 08/22/14 05:53 PM
Posted By: burdar
Re: 68 Dart GT convertible - 08/22/14 06:19 PM
Posted By: burdar
Re: 68 Dart GT convertible - 08/22/14 06:36 PM
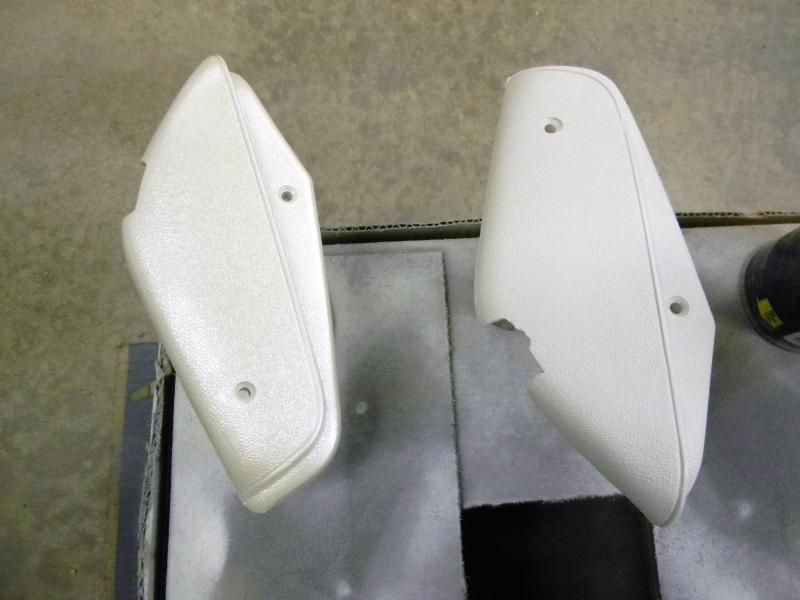
I worked on a couple things a few days ago. I found a couple nice hinge covers at the Nats. I knew two of mine were completely junk. I thought I could reuse two of them. I was wrong. I still need to find two more.
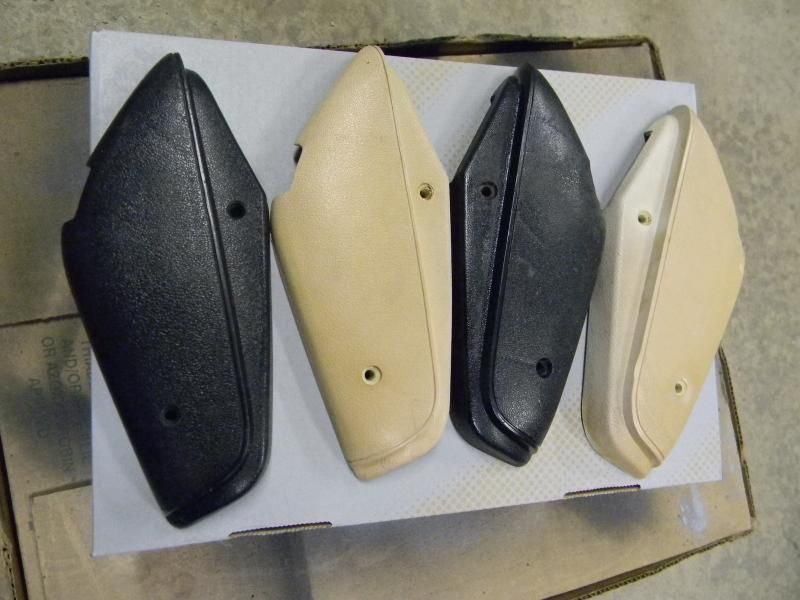
I picked up some Pearl White interior paint from Herb's. I sprayed it on the new black covers but it didn't cover well at all. It just turned them silver. So, I sprayed them with SEM Super White first....then sprayed the pearl on them followed by a clear. The picture isn't very good but you can kind of see the difference. The pearl is on the left and the SEM paint is on the right.
I also cleaned up the brake distribution block.
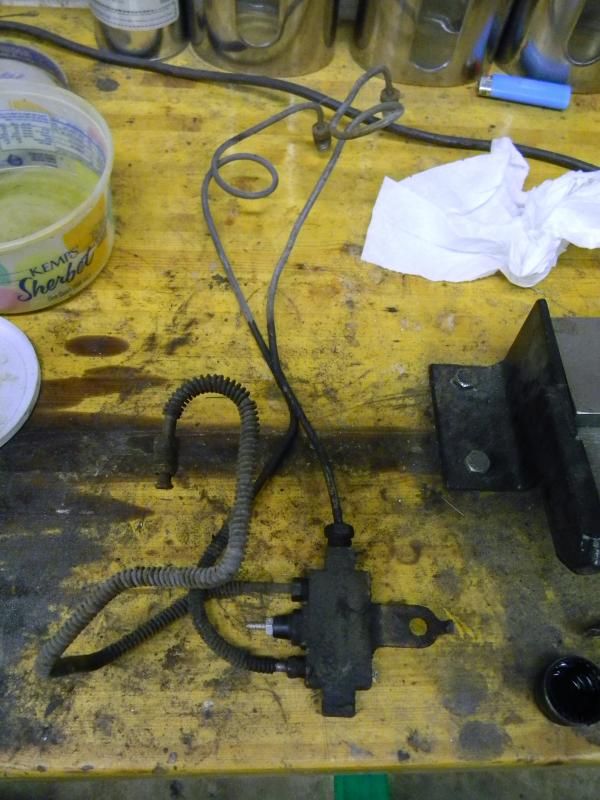
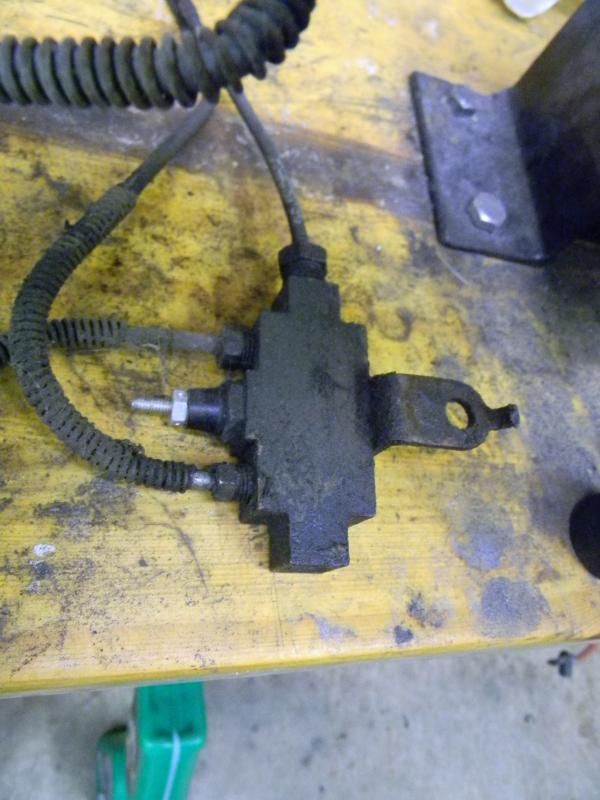
After the first cleaning.
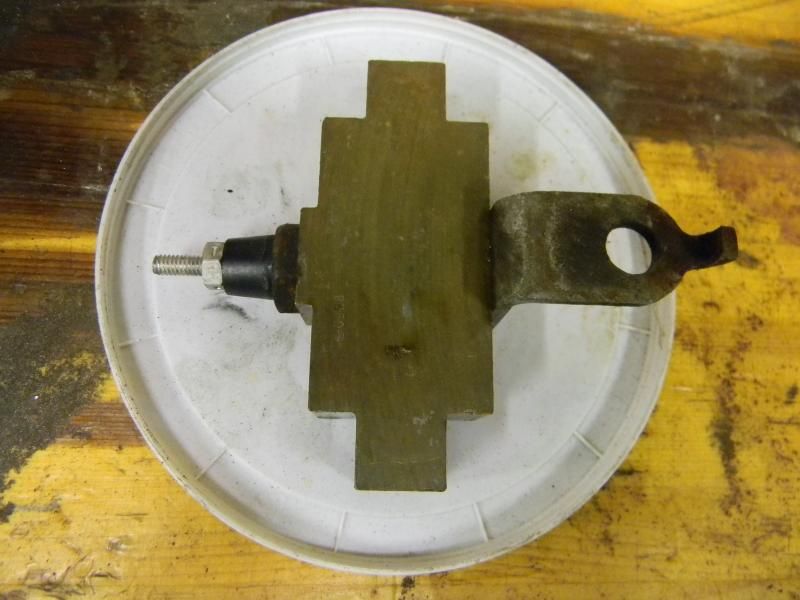
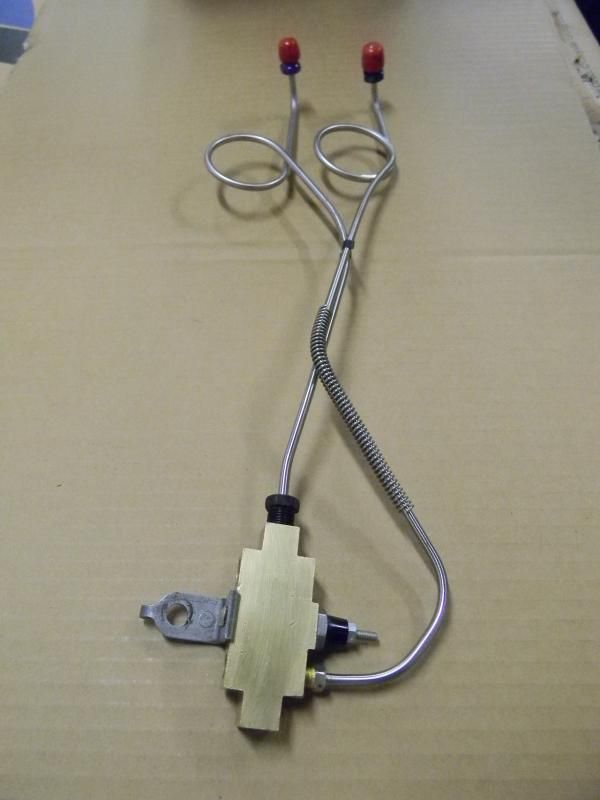
I tried getting the brass plug out of the bottom but it didn't want to budge. I ended up just flushing it out and making sure the internal valve still moved freely. After polishing the block with steel wool, I RPMed the bracket and lubed the inside with DOT5 brake fluid. I think it turned out nice.
Posted By: autoxcuda
Re: 68 Dart GT convertible - 08/22/14 09:05 PM
Bummer it needed front fenders too. I didn't realize the originals were that bad.
Posted By: burdar
Re: 68 Dart GT convertible - 08/22/14 09:25 PM
The bottom of the fenders needed patches on both sides. The DS was tweaked from a minor accident. The patches themselves are $117 each. Fenders were only $432. With the labor to weld in the patches and to straighten out the dents, I think I probably saved some money this way. I'll see if I can sell the original fenders. Maybe someone that can do their own bodywork will have a use for them.
Great progress. Are you going to use the hood as is? Seems strange that AMD would do that.
Posted By: burdar
Re: 68 Dart GT convertible - 08/22/14 10:47 PM
I was talking to a guy at the Nats that mentioned that extra crease. The 69 that was in the shop had previous work so who knows what it was like originally. It didn't have a definite line down the center like the AMD hood but it wasn't completely flat either. Maybe some other people with original hoods will shed some more light on the subject. I think some of it can be hidden with bodywork but it won't completely go away.
The fenders also have a couple differences. The main one is that the inner brace that goes from the wheel lip to the inner structure is welded in place on the AMD fender. The factory braces are bolted on. I need to check tire clearance with this brace once I get to that point. The braces might have to be removed and modified.
Posted By: burdar
Re: 68 Dart GT convertible - 09/29/14 08:58 PM
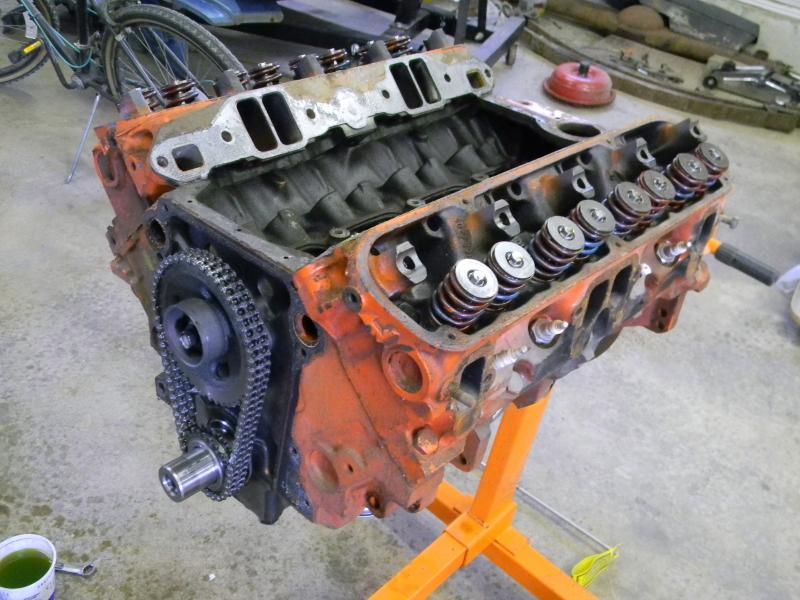
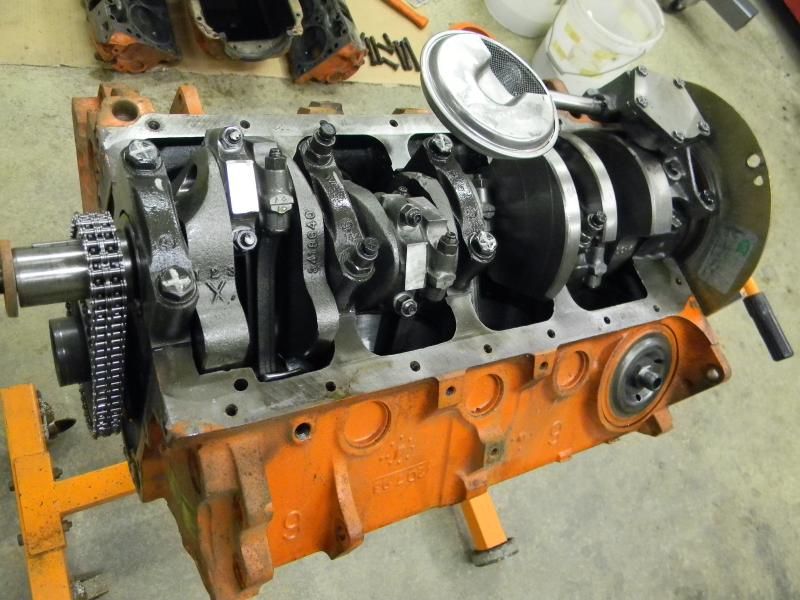
I haven't posted anything in awhile but I'm still working on some things. I started working on the engine last month. I think I mentioned earlier that the short block is a MP piece I bought back in 2000. The short blocks were made from reconditioned non Magnum roller blocks. It's the 10 to 1 compression version. I believe there was also a 9 to 1 version. The engine has been sitting since 2004 or 2005.
I previously ran a Weiand X-cellerator single plane intake on the engine. Last fall I bought an Edelbrock RPM Air-Gap for it. I pulled the Weiand and started mocking up the intake and carb but ran into an issue. The secondaries on the carb would hit the intake. It looked like the intake was cast wrong. After talking with tech support a few times, they had me send the intake in for them to look at. They ended up sending me a new intake but by that time it was the middle of winter and I had moved on to other things.
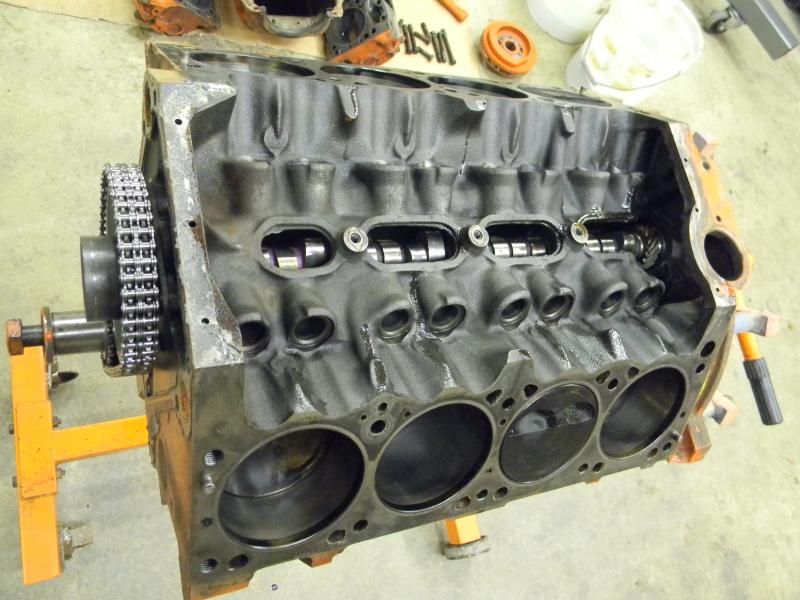
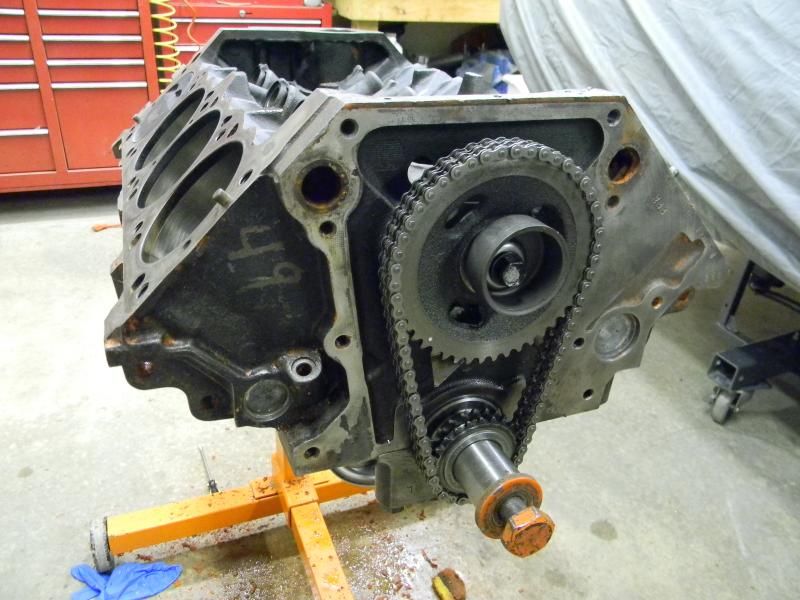
Last month I moved the engine over to my place. I pulled the plastic off the engine and found a mouse next in the valley. The nest was made from grass clippings so I knew it hadn't been there long. It wasn't there last fall when I was test fitting the new intake. I vacuumed up the nest and put the engine on the stand. I pulled the heads, water pump and front cover.
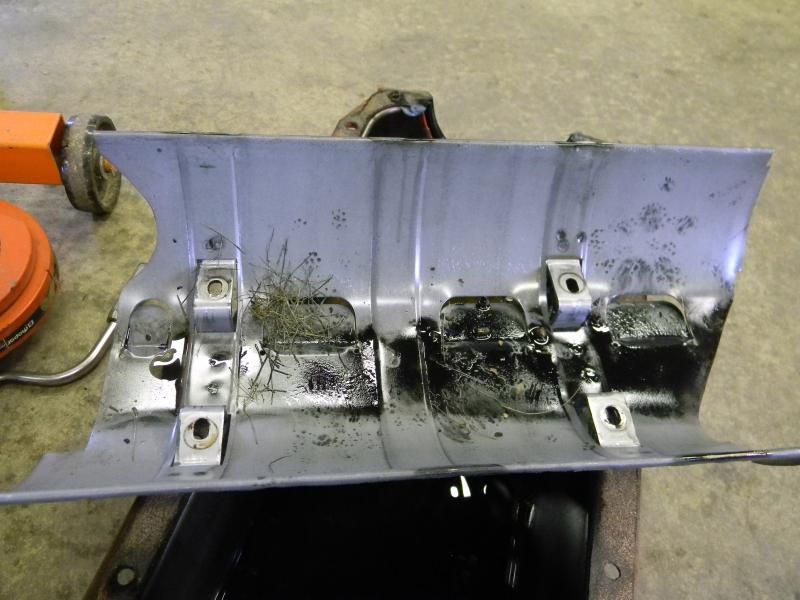
I didn't want to spin the engine on the stand incase there was crap in the pan. I pulled the pan with the engine upright and removed the windage tray. Sure enough, there were some grass clippings and mouse foot prints on the tray. There wasn't much of anything in the pan though. I think I got lucky and caught it early.
Other then the nest, the engine looked really good inside. Everything still looked clean without any rust from sitting.
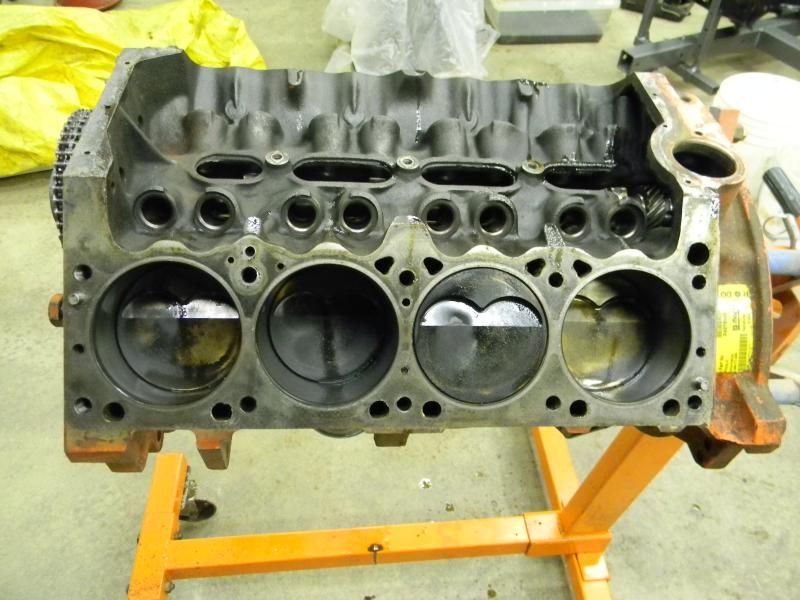
Then came the task of cleaning up the block. There were a couple layers of orange paint and layers of dirt, saw dust and oil to remove. What a nasty, crappy job that was. I think it took at least four cleanings to get everything off. Even after wearing gloves and goggles, some paint stripper would end up on my skin and start burning. I'm glad that job is over!
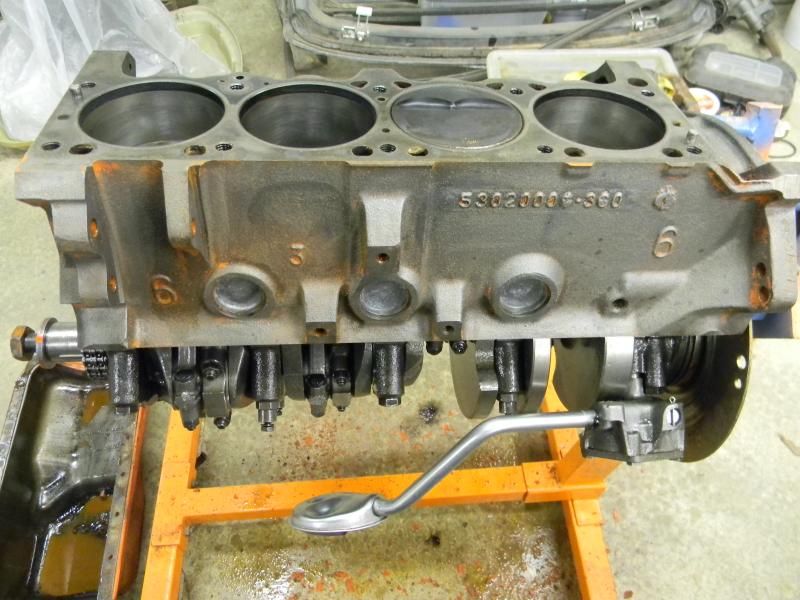
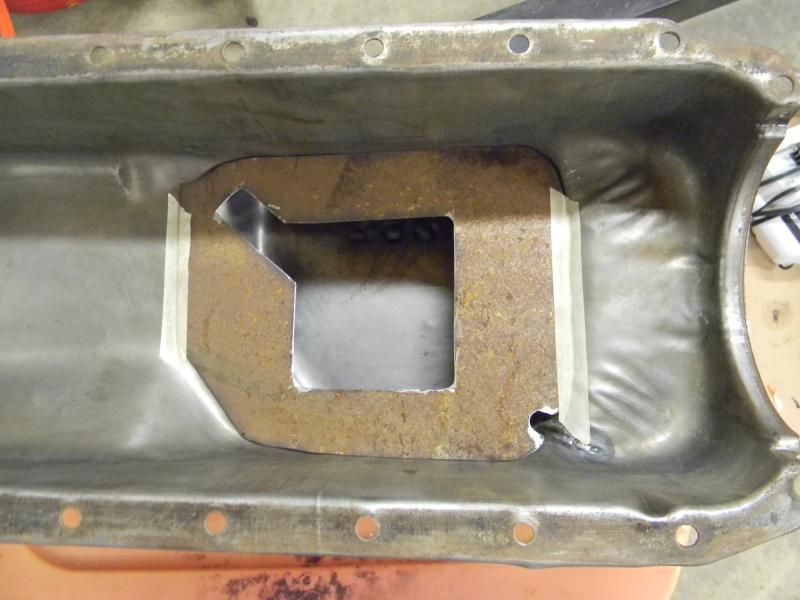
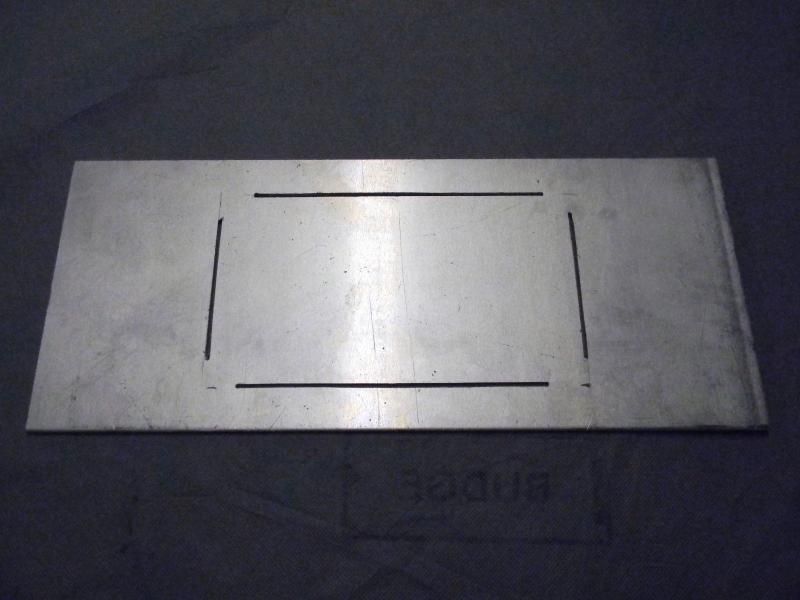
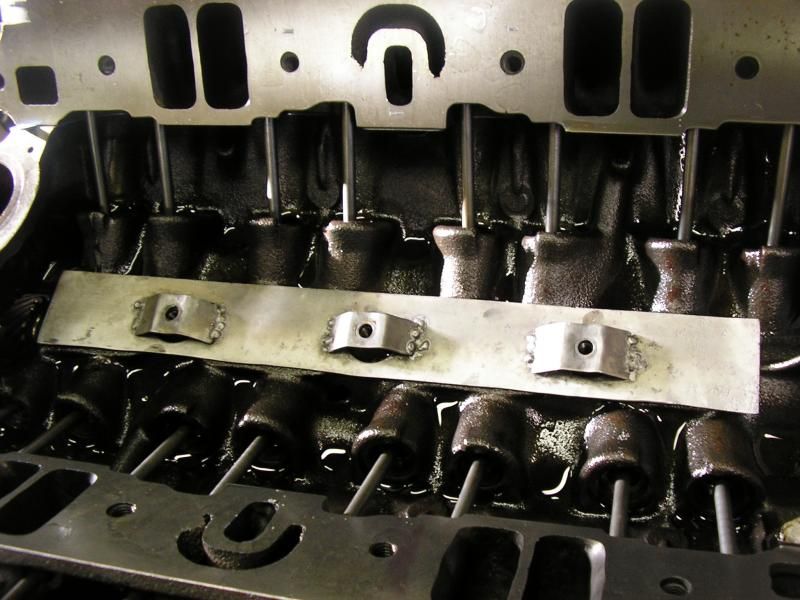
I installed the timing cover and put a new water pump on. Then I primed the everything. After that I moved on to the oil pan. The pan that was on the engine had seen better days. The sides were heavily pitted and would have taken a lot of work to refinish. A friend of mine had a 360 pan he wasn't using so he donated it to the cause. I saw and old Car Craft article on making a baffle for the stock oil pan. It didn't look too difficult so I thought I'd give it a try. I made a template out of card board and taped it onto the pan. I test fit it a few times onto the engine to make sure it cleared the pickup tube, then I transferred the template to a piece of metal.
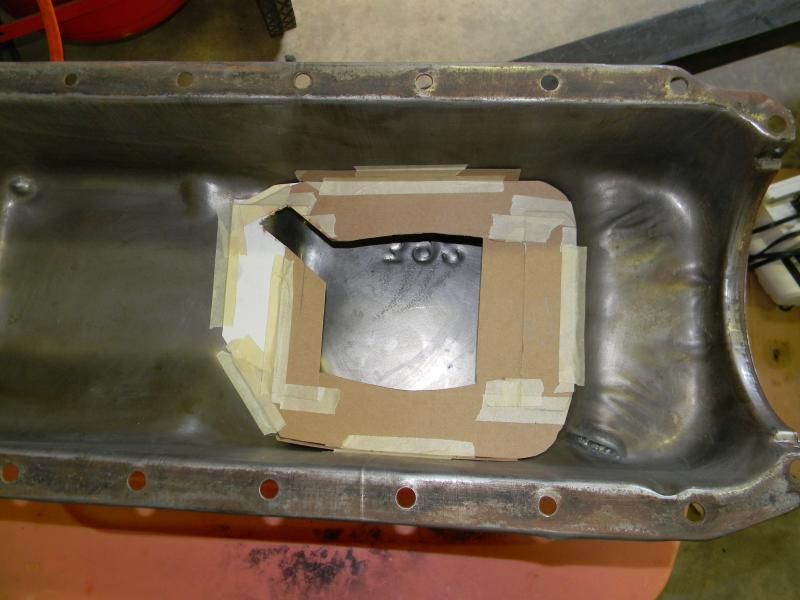
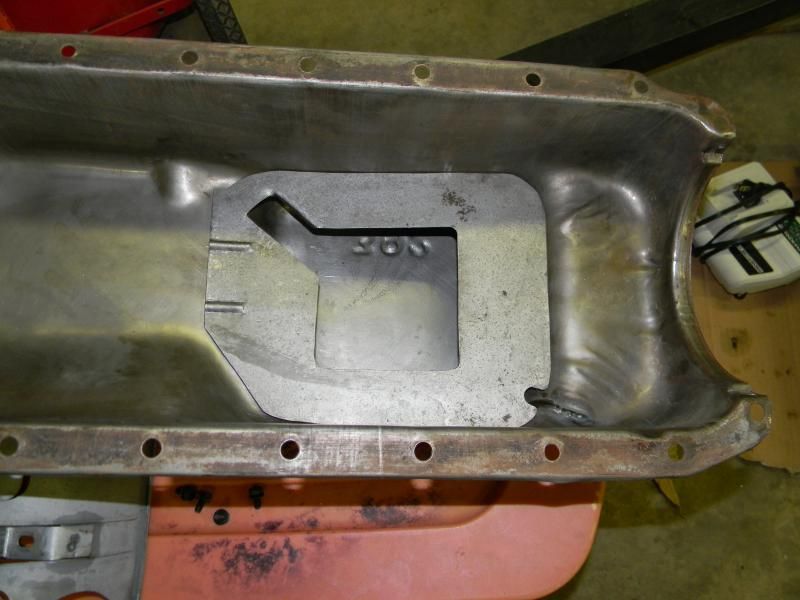
I taped the metal baffle to the pan and test fit again. So far so good. I had clearance around the pickup tube and nothing was hitting.
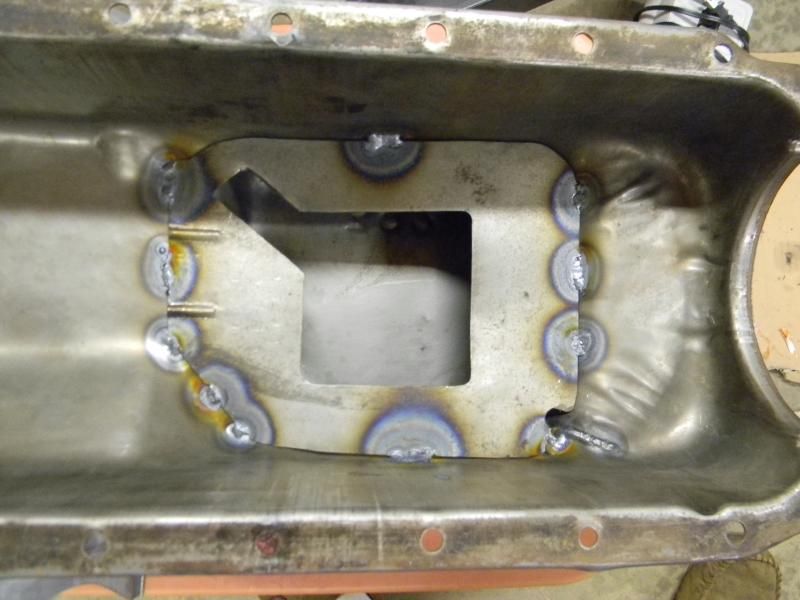
I soaked the baffle in EvapoRust and then added some drain back slots.
Here is the baffle welded in place. It works really good on deceleration but doesn't seem to do much on acceleration. I could have gotten the clearances tighter to the pickup tube if I would have had a bare block to test fit it on. I would have been able to look down through an empty cylinder and see how close it came to hitting. The pan isn't installed yet so I guess I could still add some metal around the back if I found someone local with a bare block I could borrow.
That's all the progress I have on the engine right now. I need to take the heads in and have them looked at. They only have a few hundred miles on them but I did the valve job and guides when I was in school. I want someone to double check my work so I don't have any issues down the road. I also need to get the intake surface of the heads milled down a little so the intake sits a little lower on the engine. I could barely get the intake bolts started when I was test fitting things.
Posted By: burdar
Re: 68 Dart GT convertible - 09/29/14 09:02 PM
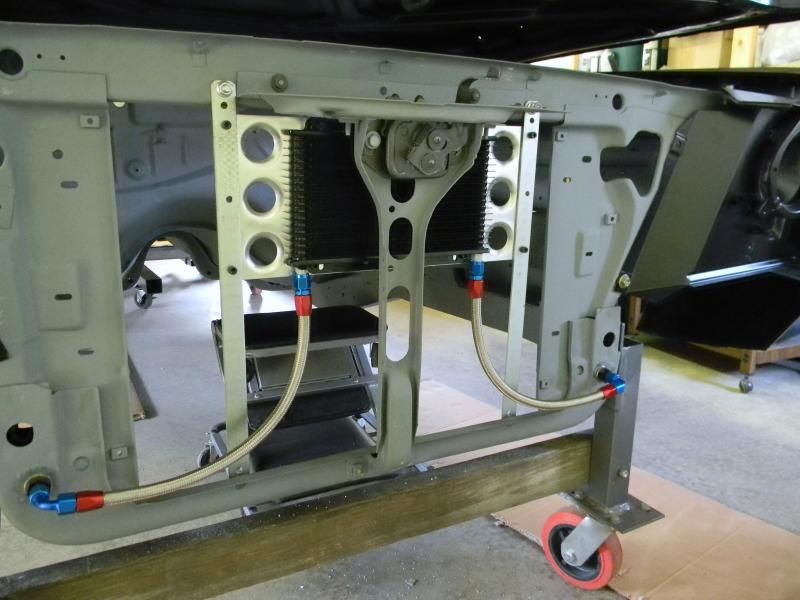
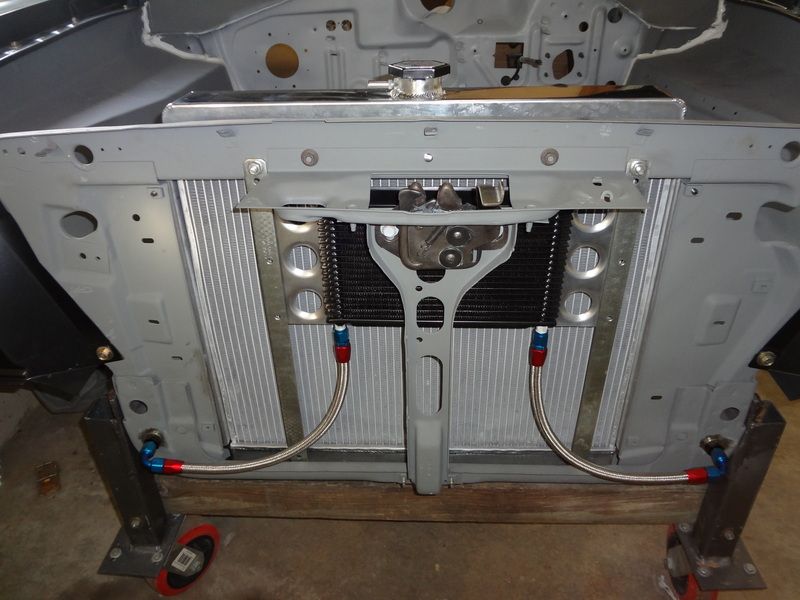
I've also been working on a bracket to mount a trans cooler in front of the radiator. I picked up a scrap piece of 1/8" aluminum and started cutting. I was surprised how nicely aluminum cuts on a table saw.
I bolted two vertical pieces to the rad support on either side of the hood latch bracket. After temporarily attaching the cooler, I tried to come up with an optimal location to mount the cooler bracket. I had planned on mounting it a lot lower but that wasn't going to work very well. The Dart has a tall bumper and no front valance. If I mounted the cooler towards the bottom of the opening, it wouldn't have received any air flow. The bumper would have blocked all of the air. I set the grill in place and decided to put the cooler up high so it would get direct air flow. The hood latch blocks a little bit of airflow but I didn't have much space to work with.
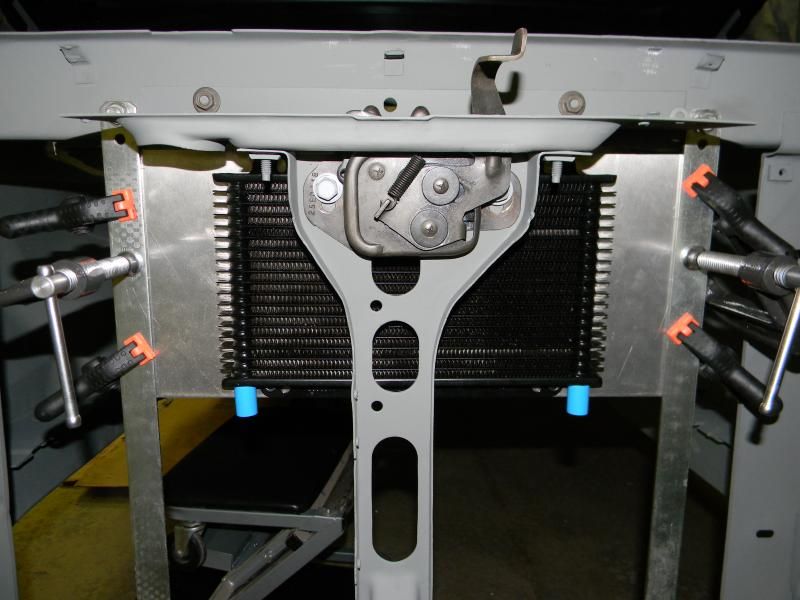
After I had the location figured out, I drilled three 1.25" holes through the bracket on either side of the cooler. These holes are so I didn't block air flow to the radiator.
I tried finding someone local who had some dimple dies so I could flare the holes. I wasn't able to find anyone though. I ended up buying a 1.25" dimple die and flared the holes myself.
I slightly polished the bracket with some steel wool and wadding cloth. I'm not sure what finish I want on it yet. I might polish it or I might paint it black. I think it turned out nice.
As far as hooking up the cooler lines, I didn't really want to drill extra holes through the rad support. Directly below the frame rails, there were some existing square holes I decided to use. I drilled out those holes a little larger and installed some 6AN bulkhead fittings. Now I can hook everything up with AN fittings for a clean look. Once I buy a radiator, I can work on hooking up the other side.
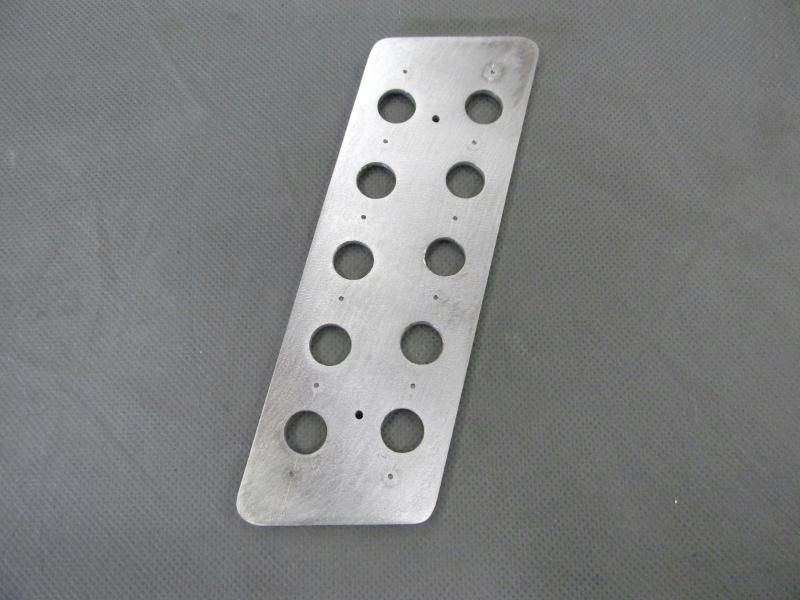
I also started making an aluminum gas pedal cover. I'm probably about half way done with that. Then I can start making a brake pedal cover.
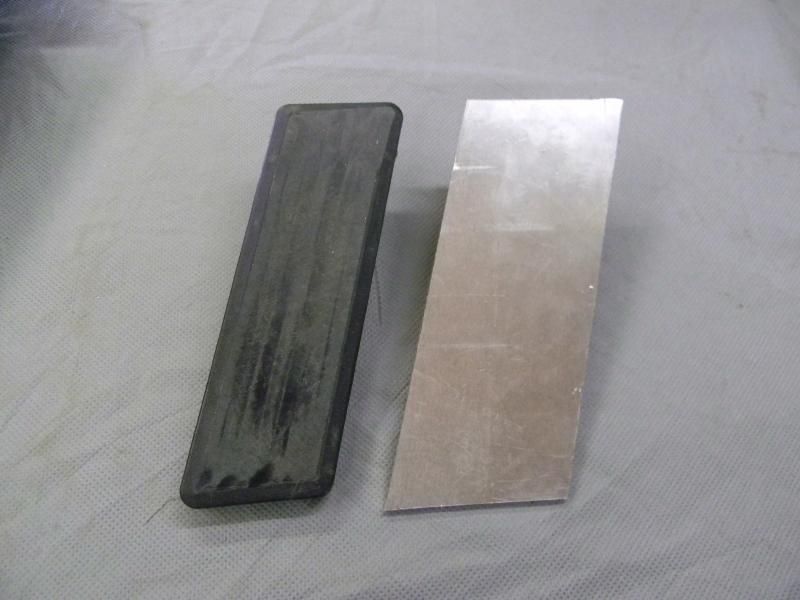
About half done...
Posted By: johnscudashop
Re: 68 Dart GT convertible - 09/30/14 09:36 PM
Nice work!
Posted By: burdar
Re: 68 Dart GT convertible - 11/09/14 06:59 AM
I don't know if anyone is following this or not but here's a small update. After waiting more than three months, the fasteners finally came back from the platers. I had then done at a local shop but the color turned out wrong. They came through with a yellow tint. I sent them to another place to get coated the correct silver color. This past week I dropped off the cylinder heads at the machine shop to be checked over. I'm also having some material removed from the intake surface of the head because I could barely get the intake bolts started. The intake needs to sit down a little bit lower.
Since the fasteners came back, I was able to mount the LCA/strut rods to the K-member. I also temporarily put the 2" drop spindles in place.

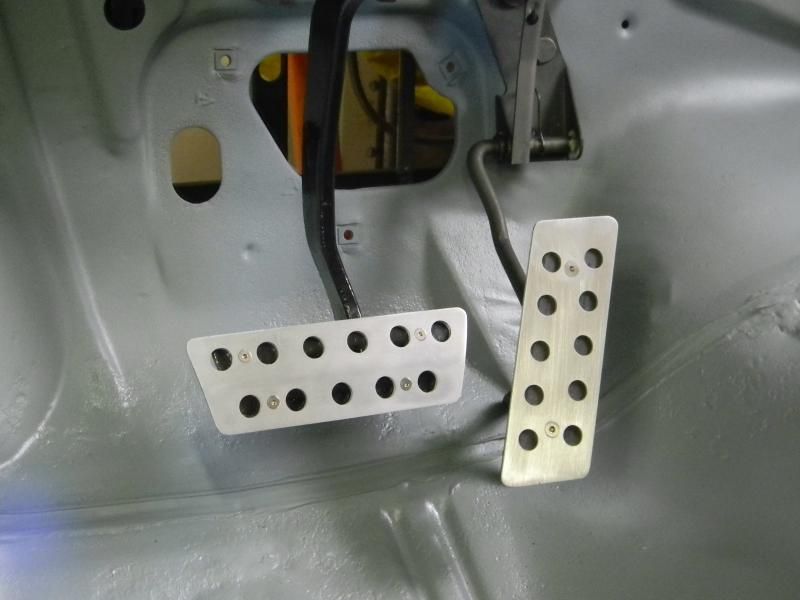
I got some work done on the aluminum pedal covers. I did some sanding on the gas pedal cover and mounted it to the original pedal to see what it would look like. Right now you can see the plastic gas pedal through the holes in the cover. I'm going to paint a thin piece of aluminum and put it between the pedal and the cover so it doesn't look cheap.
I also got the brake pedal cover made. I was able to put a curve in the aluminum so it matched the curve in the brake pedal arm. I think there needs to be some more grip on the pedal so my foot doesn't slide while applying the brakes. My plan is to put some 1/2" rubber pieces in the holes. The rubber will stick up maybe 1/8" from the surface of the cover. That should give me the grip I need and not change the look of the cover. I think they are turning out good so far. The best part is I only have a few dollars in the attaching screws. The rest was free.
Posted By: MuuMuu101
Re: 68 Dart GT convertible - 11/09/14 08:35 PM
If only I had half the skills and attention to detail as you have. Keep up the good work.

Posted By: burdar
Re: 68 Dart GT convertible - 11/10/14 04:23 PM
Thanks but...no real "skills" here. Just cleaning up components and bolting them back together. I've learned more by screwing up than anything else. When something goes wrong, fix it and try not to make the same mistake again.
Posted By: burdar
Re: 68 Dart GT convertible - 03/17/15 07:22 PM
I didn't do much work on the car over the winter. Now that the weather is warming up, I've gotten some things done.
If you remember, I'm adding engine compartment braces to the Dart. I made some aluminum brackets in order to attach the braces to the factory pinch weld.
I sprayed the brackets with a matte clear but wasn't happy with them. I stripped the clear coat and decided to polish them instead.
I test fit them with some nuts on the bottom side of the pinch weld. The nuts were more visible then I thought they'd be and they looked cheap. I ended up making another bracket to go on the bottom side. The lower brackets are threaded. Basically, the pinch weld will be sandwiched between the two aluminum brackets. I think this looks much nicer.

I'm going to use some polished button head bolts to attach them to the car.
I liked how the gas/brake pedals turned out but I wanted something that would give me some traction. Plain aluminum might get slick in certain conditions and not be the safest on the street.
My father-in-law cuts up old tires and uses them for traction around the yard during the winter. That gave me an idea. I used an old socket(with the edge ground to a sharp point)to punch holes in an old tire sidewall. The rubber plugs it created will go inside the holes of the pedals.(rubber will stick up higher then the aluminum)
Posted By: burdar
Re: 68 Dart GT convertible - 03/17/15 08:13 PM
The engine is now back together as well. I had the heads looked at by a machine shop. The valve seats left a lot to be desired so they ground those and machined the top of the guides for positive valve seals.
I also had them machine the intake face of the heads. The heads have been worked on a couple times and the block has been decked. This added up to having intake fitment problems. Having the heads machined should have let the intake sit down lower on the engine. Previously, the holes in the intake were too high and it was hard getting the bolts started. After having the heads machined, the intake still didn't fit. To make a long story short, I tried two different Edelbrock intakes with the same result.(Air Gap and a Performer) I tried a Weiand X-Celerator and it fit perfectly. I ended up having my Air-Gap machined to fit the engine.
I bought a new set of rocker arms/shafts and reinstalled the cam block-off plate I had made years earlier.
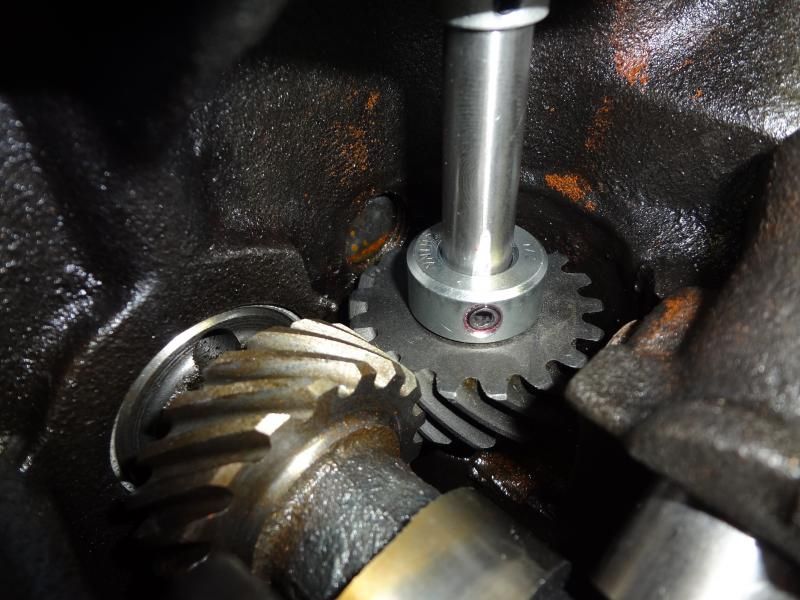
Before I installed the intake, I bought a Pertronix distributor and checked to see how it fit. After reading multiple posts on this site, I made some changes. First of all, there was a lot of up and down movement in the dist shaft. I took the collar off the bottom and added another shim. This took most of the movement out but still left a little bit for thermal expansion.
Next, I looked at how the drive lug fit into the intermediate shaft slot. There was a LOT of slop between the two. I noticed some wear on the edges of the intermediate shaft slot so I bought a new one. The fit was slightly better but there was still way to much slop. With advice from this site, I peened the four corners of the dist drive lug with a punch. This expanded the metal and tightened up the fitment. Lastly, I installed a shaft collar onto the bottom of the dist shaft to keep the gear from "bouncing".
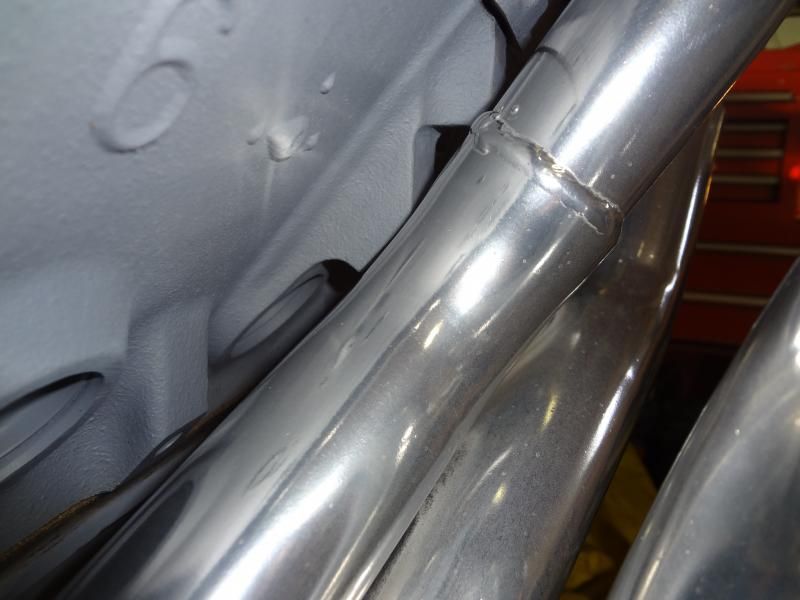
Then, I installed the intake manifold. At this point though, it had gotten cold so I couldn't paint the engine. I test fit my TTI headers and ran into a couple issues. The main issue is that my 360 came from a truck. The truck blocks must have an extra boss on the PS that the car blocks don't have. This extra boss interfered with the center header tubes. Some work with my angle grinder took care of the interference.
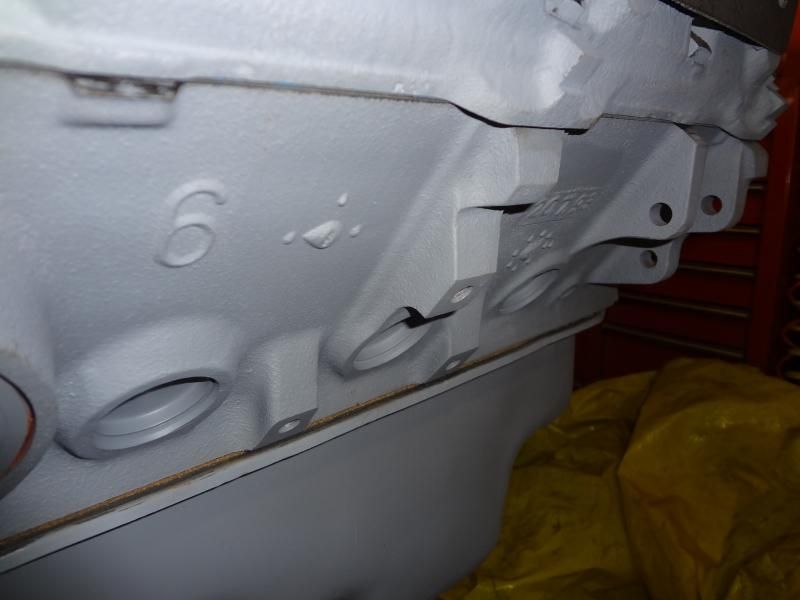
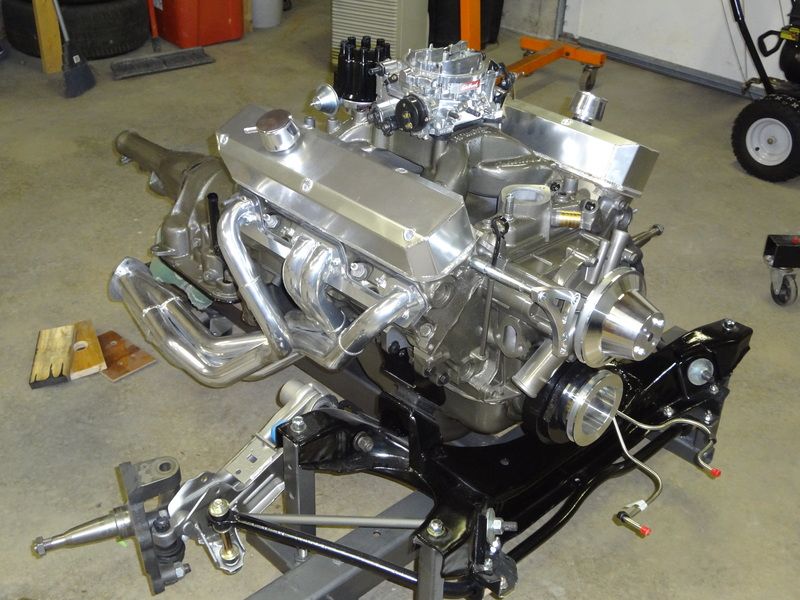
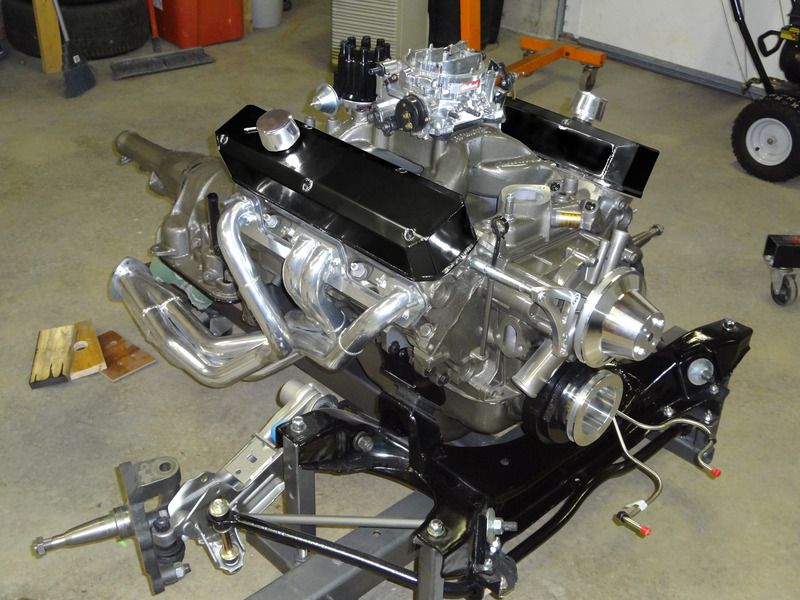
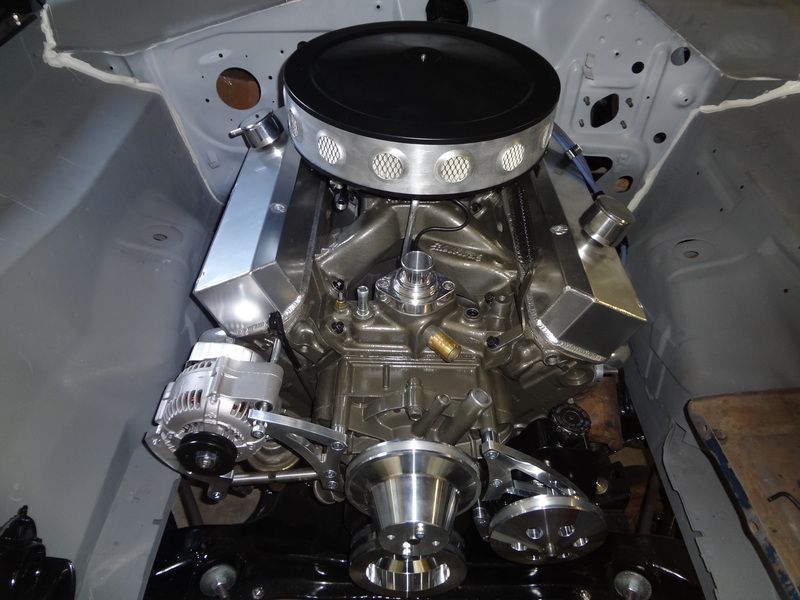
On Saturday, it was finally warm enough to paint the engine. On Sunday, I attached the trans and dropped the engine onto the K-member. I'm tired of seeing orange engines.(unless they are in stock restored cars) It's kind of like seeing a small block Chevy in every hot rod. I decided to go with a cast iron looking paint. I'm not 100% sure about it yet but I think it will look good in a blue engine compartment. The natural aluminum valve covers don't look the best IMO. A friend of mine photoshopped them black for me. I think they look a lot better black. I plan on running black accessores as well so it should all tie in together.

The trans cooler lines interfere with my aftermarket shifter bracket and the TTI headers. I think I'll need to make some custom cooler lines out of braided hose. Once I get the radiator fitted, I'll be installing the engine to test fit some things. I think the headers will be too low. If that's the case, TTI makes a shorty header that should give me more clearance.
Posted By: burdar
Re: 68 Dart GT convertible - 03/18/15 01:55 AM
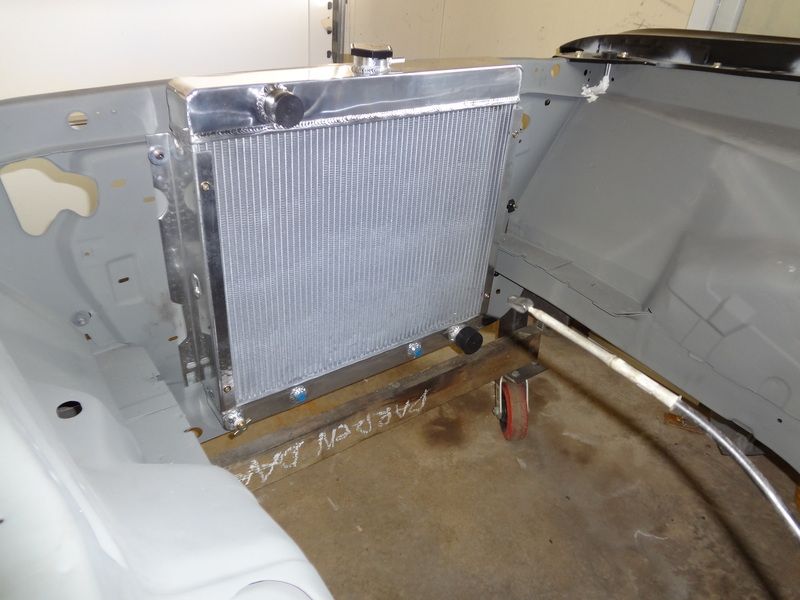
The radiator arrived today. It's a Champion cc526. A lot of people are using the cc2374 in the A-bodies but I don't like the look of the angled upper tank. The welds look good on this one and there isn't any twisting/warping that I can see. The mounting holes even lined up.
Posted By: JDMopar
Re: 68 Dart GT convertible - 03/18/15 04:14 AM
I've been using bulkhead connectors to get thru the radiator support, to the trans cooler on the last 2 builds that I have done. I use hard lines on the engine compartment side, and run them down the drivers side frame rail, behind the steering box. It gets them completely away from the exhaust and linkage. I then use steel braided flex lines to go from the end of the hard lines, over to the fittings on the transmission. They need to flex on that end, so the don't crack. Now I gotta figure out how to make trans cooler lines for the 545RFE going in my 70 Duster!
Good luck, and I think your motor looks GREAT.
I vote polished valve covers.

Posted By: burdar
Re: 68 Dart GT convertible - 03/18/15 02:55 PM
That's a good idea about the trans lines. I'll get the engine installed and see what I have to work with.
Posted By: JDMopar
Re: 68 Dart GT convertible - 03/19/15 05:09 AM
You should be able to buy 60" and 72" lengths of 5/16 steel line at a parts house, with the ends already flared. You'll have to cut one end off, and install a female fitting on one end. I used the end with the flare left on the bulkhead fittings, and re-flared the other end for whatever fittings I used on the braided flex hose. I used the rubber lined clamps to attach to frame rail. The place here in town that makes hydraulic hoses gave me a handful of fittings for the braided flex hoses, and I went home and decided what I wanted to use for the best fit. I cut the hose to the lengths I needed, and installed the fittings I wanted to use, and then made a mark with a Sharpie at the fitting and hose. Took em back and they crimped the fittings on where I marked them. It worked slicker'n cat poop on linoleum!
Posted By: burdar
Re: 68 Dart GT convertible - 03/22/15 06:40 AM
Last night I cleaned up an old mini starter from a 92 Dakota. I thought it was going to be a direct fit but it wasn't. I had to grind away a bump on the block as well as take some material off of the starter case. I had a mini starter on this block in the past which makes me wonder if I had it installed correctly the first time.
I started out today by cleaning up the ps box and mocking it up on the K-member. It was very close to hitting the headers but I knew the engine wasn't in the correct location just sitting on the stand. I decided to stay with power steering. I was originally going to install a manual box but decided against it. I'll eventually send the ps box to Firm Feel for a stage 3 rebuild.
I temporarily installed an old fuel pump because I know the alternators get fairly close to them. I'm going to mock up a smaller denso alternator and wanted to make sure everything was going to clear.
Now that those parts were installed, it was time to lift the body over the engine.
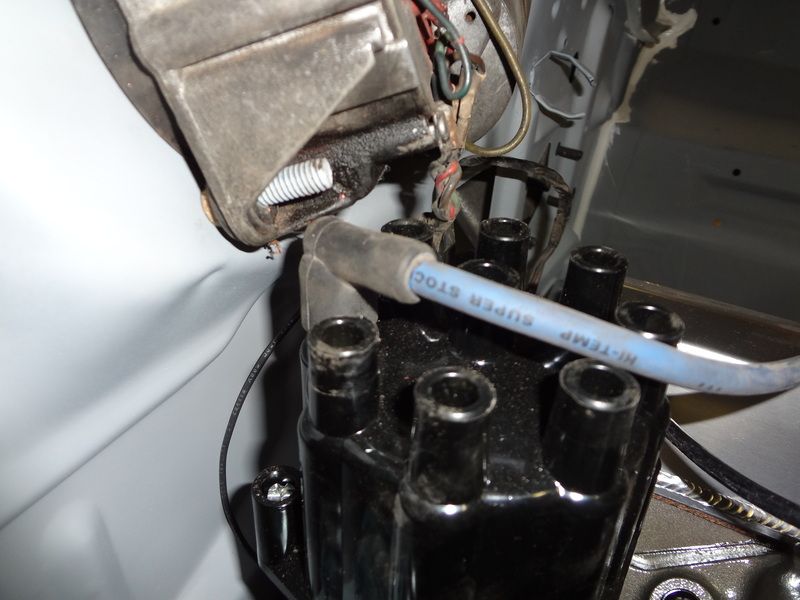
I read a post that said the Pertronix distributors don't fit the A-bodies. I was worried so I put the wiper motor in place and checked the clearance. It's very close but it should clear if I use 90 degree plug ends.
After getting the trans mount fastened, I checked the ps box clearance at the header. There is plenty of clearance now.
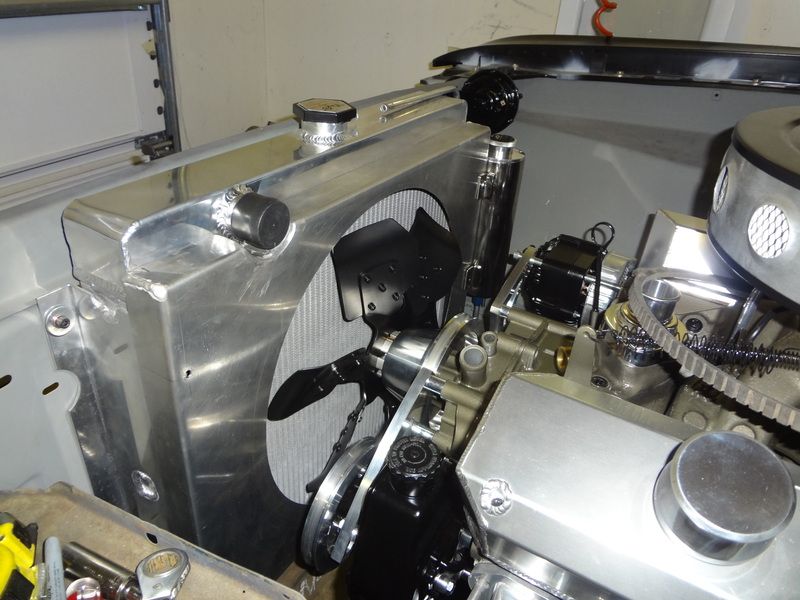
I've got about 2 3/4" of clearance between the water pump pulley and the radiator core. I was planning on running a Taurus electric fan. I'll have to see if I can find a depth measurement on that fan/shroud combo. Rock Auto shows length and width but not depth. If it's not too deep, it should fit this radiator nicely.
Posted By: burdar
Re: 68 Dart GT convertible - 04/27/16 04:49 PM
It looks like its been over a year since I posted on this. I got burned out and just needed the car to sit. I took the Challenger out of storage and drove it around a little last year but didn't really do a lot of "car stuff". Lately I've been working on the Dart a little. I've just been doing some small things that don't cost a whole lot.
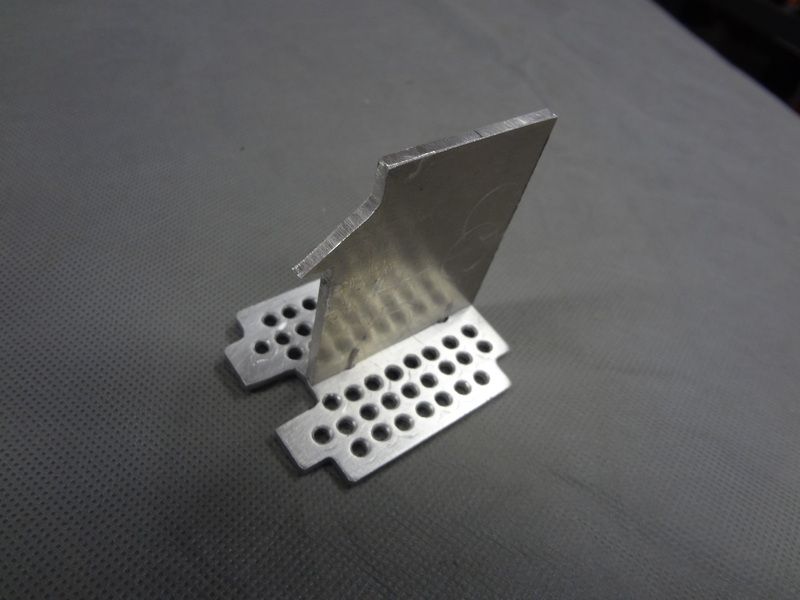
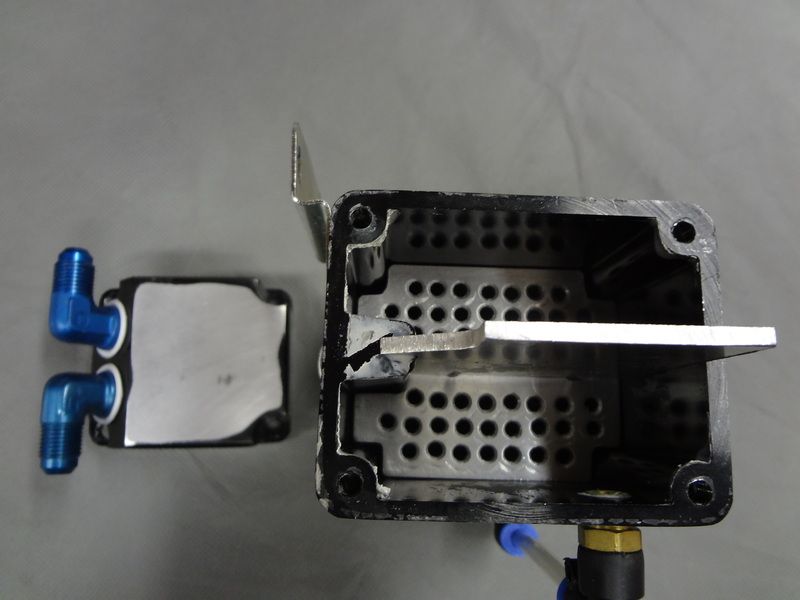
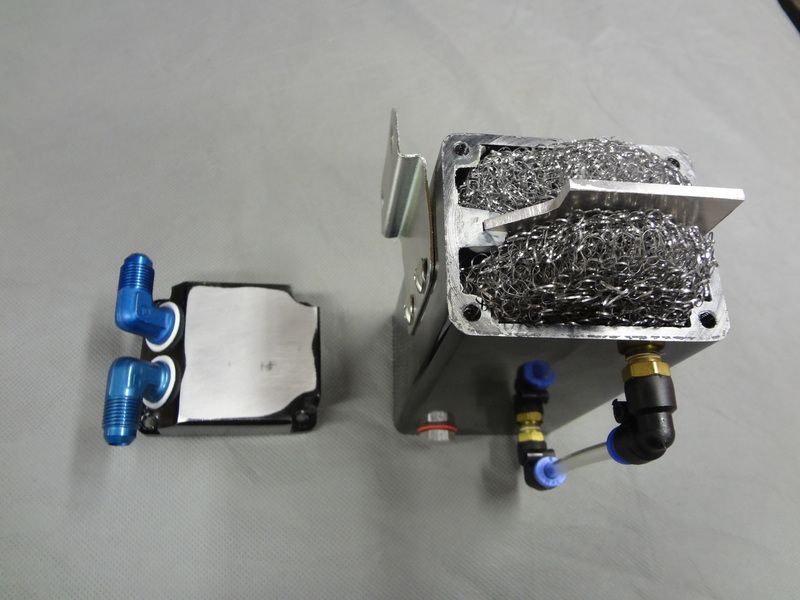
A couple years ago I bought a cheap $30 aluminum oil vapor separator. It was pretty worthless the way it was since it was just an empty shell. I bought a BT catch can for my Ram and saw how they had theirs designed. I tried to copy that as best I could.
I made a divider plate to separate the inlet and outlet lines. The plate follows the interior contours of the canister. Then I made a base that attaches to the divider so the stainless mesh would stay in place. The placement of the nipples that came on the canister weren't in the best spot. I turned the lid 180 degrees and installed some 90 degree fittings so I could route the lines as cleanly as possible. Instead of using a lot of rubber hose, I took some old 3/8" aluminum fuel tubing and made the PCV line out of that. From the front of the carb it goes straight down, under the air gap intake and angles down the back of the passengers side head. Now I only have to use a couple short pieces of hose to connect the entire system. Finally, I sanded off the obnoxious logos on the canister and sprayed it with a satin Extreme Chassis black.
Posted By: burdar
Re: 68 Dart GT convertible - 04/27/16 05:27 PM
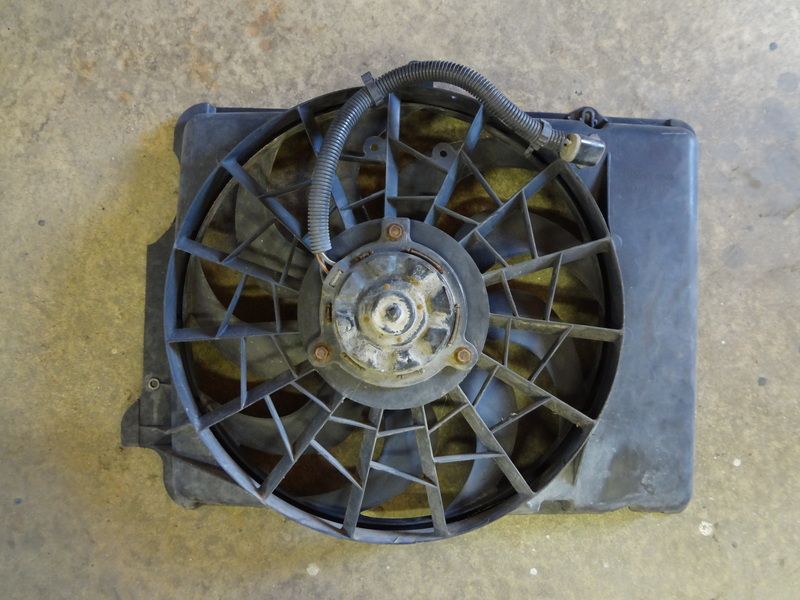
I went to a salvage yard and found a Ford Taurus electric fan to use for mock-up. One of the ears on the shroud was broken so I got it cheap. When I got it home, I quickly realized that it wasn't going to fit. The fact that I'm using a different radiator then most and that I'm using the newer/longer water pump must be why I have less clearance than other people who have successfully done this mod. Even if I trimmed the back of the shroud so the fan blade was right up against the core, the fan motor would have hit the water pump pulley.
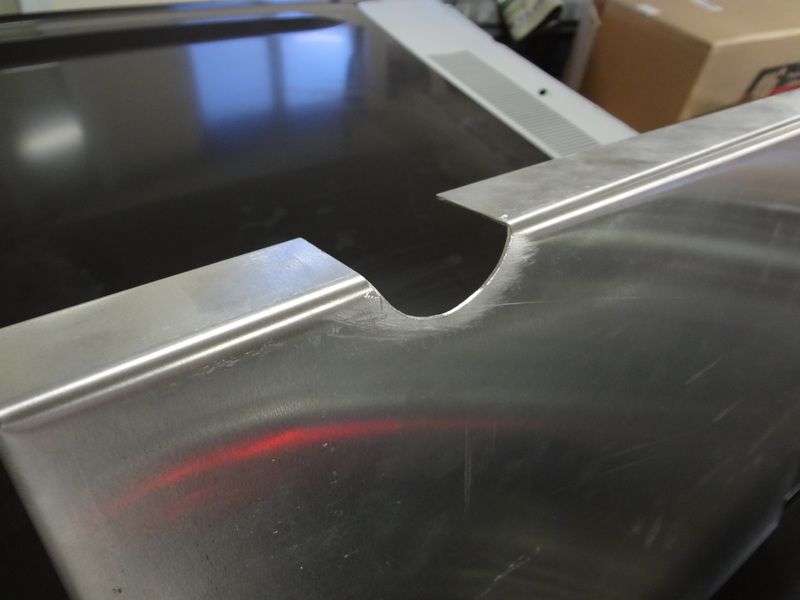
Since that wasn't going to work, I started building a fan shroud for a mechanical fan. I went down the street from where I work and bought a piece of .063 aluminum. My father-in-law had previously given me a sheet metal brake that he had never used. The brake was a little too flimsy to bend .063 aluminum but with some creative thinking, I made it work. I ruined the first attempt but it wasn't my fault. I had been given 6061 aluminum instead of 5052 and the corners cracked when I bent them to 90 degrees. Once I got the correct grade of aluminum, it went much smoother.
Here is the basic box just set in place.
The shroud was hitting the upper and lower rad nipples so I cut a clearance notch for the upper rad hose and moved the shroud up about an inch.
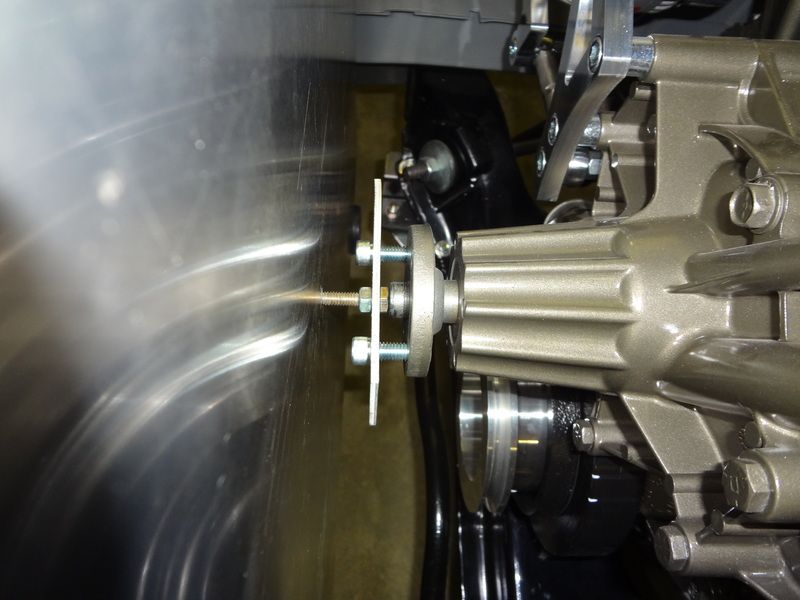
I started measuring to find the center location of the water pump snout but I wasn't confident in my measurements. I ended up making a contraption that mounted to the water pump so I could find the correct spot. After spinning the pump a few times the bolt scored the aluminum so I knew where the center was. Crude but it worked.
Posted By: burdar
Re: 68 Dart GT convertible - 04/27/16 05:43 PM
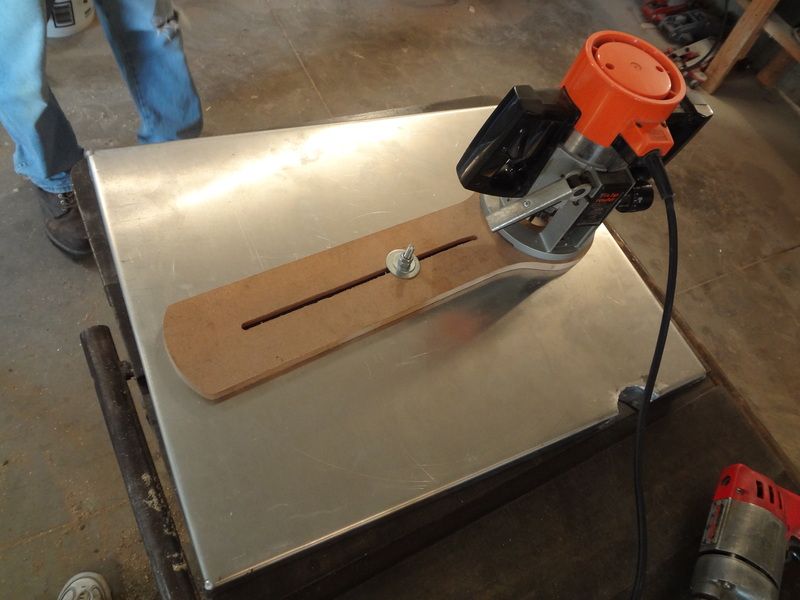
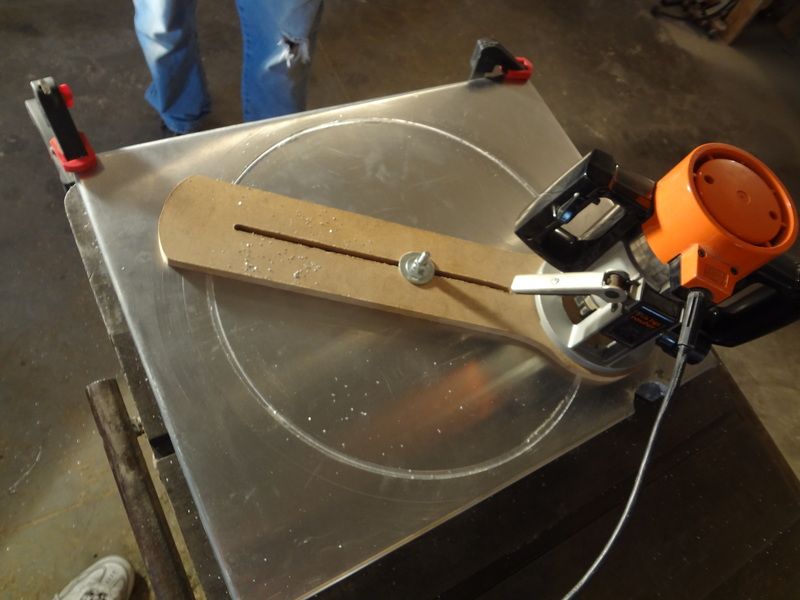
The next thing to do was get the corners welded up and a curved gusset welded where I cut the notch for upper hose clearance. Once that was done, I turned my attention to cutting out the large center hole. I found a Youtube video on how to make a circle cutting jig. Here is the video...
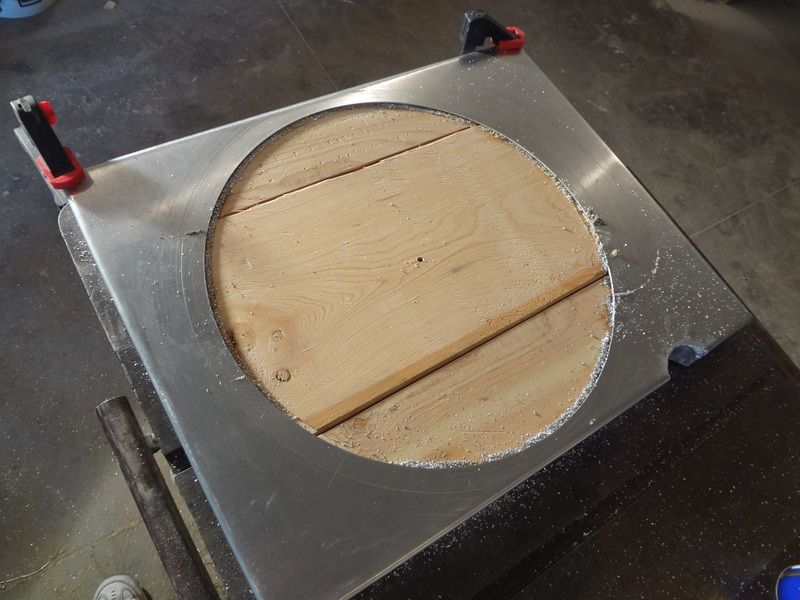
https://www.youtube.com/watch?v=brq3wtKuv0QAfter making the jig, I attached it to a router and slowly worked my way down until I was completely through. It worked great and the hole is perfectly round. I'm using a 15" fan so I made the hole 16.5" in diameter. That gives me 3/4" clearance for engine movement which is what the fan manufacture recommends.
Posted By: burdar
Re: 68 Dart GT convertible - 04/27/16 07:58 PM
Here's what the shroud looks like on the radiator. Mounting the shroud is easy. The rad came with rivnuts already installed in the side brackets. Just four holes drilled into the face of the shroud will hold it in place. The only down side is that the rivnuts that came installed are 6mm and not 1/4". I ground those off and will install 1/4" rivnuts in their place. The fasteners I'm going to use are stainless pan head bolts.
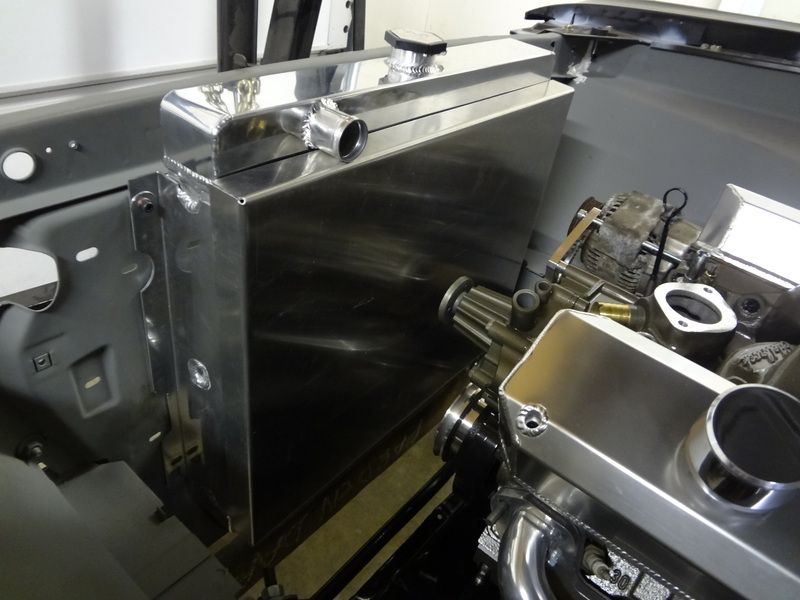
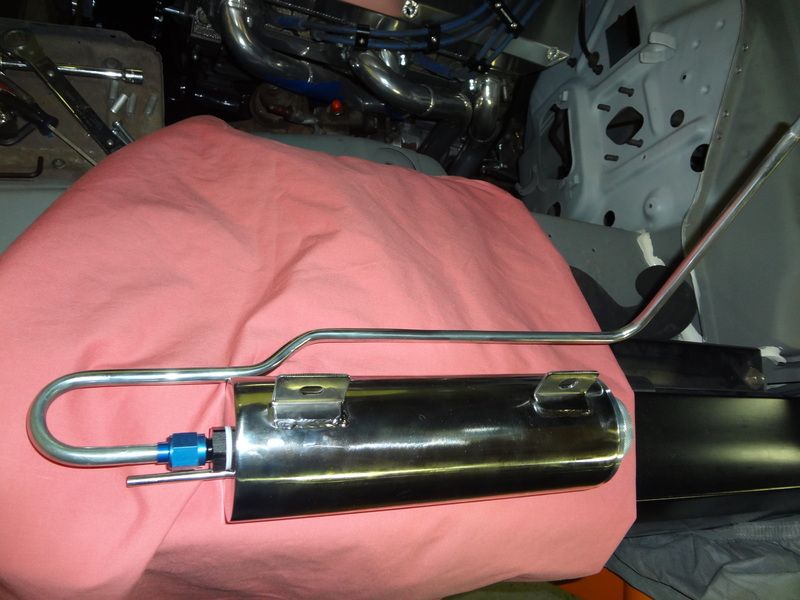
Once the shroud was installed, I was able to get the overflow bottle mounted. It will attach directly to the shroud. The bottle is a stainless piece from Summit. It came with two 1/4" tubes sticking out the bottom side. Since the overflow nipple on the rad is a lot larger then 1/4", the bottle needed some modifying. I cut off the center inlet tube and drilled the hole out larger. Then I installed a 6AN fuel cell fitting in its place. This allowed me to bend up some more of that old 3/8" aluminum tubing I had sitting around. I also had the 6AN tube nut/sleeve for attachment left over from another project. The above picture of the shroud also shows the overflow bottle installed.
Posted By: burdar
Re: 68 Dart GT convertible - 04/27/16 09:11 PM
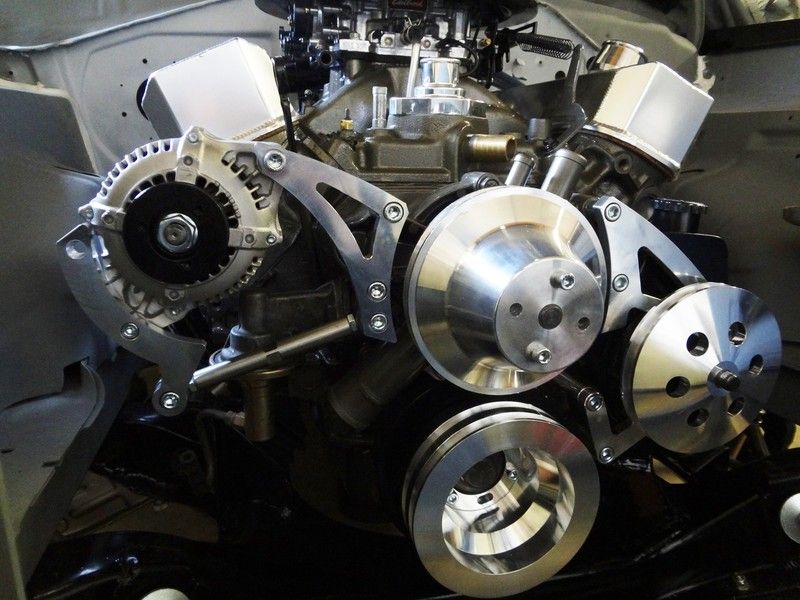
Since I don't have to worry about powering an electric cooling fan, I can get away with a smaller amperage alternator. I don't want to have any problems with amperage at idle so I went with a Denso alternator. I was able to get my billet brackets to work with the Denso. I just had to machine custom length spacers so the pulleys would line up. I also decided to stick with power steering. That meant buying the corresponding PS brackets and pulleys. Luckily, the company I bought them from was very nice and let me send back the single groove crank pulley since it was unused. The PS reservoir cover looks out of place right now but I see that Summit sells a billet cover for it. That will look much better. I also have to figure out a cover for the alt pulley. It looks really bad right now. I might have to make something myself.
Another project I've been working on is the air cleaner. I wanted something custom that you wouldn't see very often. The first order of business was just finding something that would fit with my limited hood clearance. I bought a $20 generic 14" air cleaner from Summit. It has a 1" drop base and came with a 3" filter. The problem is that the Edelbrock carb I'm using has an electric choke which really limits the amount of drop you can have in your base. The maximum drop that you can fit on an Edelbrock carb is 3/4". Mine was 1". Since I can't weld, I went over to a friends house and he helped me modify the base to fit the carb. We cut open the base, bent it up a little bit and welded it back together. Now it clears the choke cover. The next problem was that with that modification, the air filter didn't sit down flush onto the base. I took care of that by just grinding away some of the rubber on the inside of the filter. With the radiator removed, I could check my hood clearance. That extra 1/4" came in handy since I'm very close to one of the underhood braces. I could have installed a shorter filter but I really like the look of the 3" and wanted to make it work.
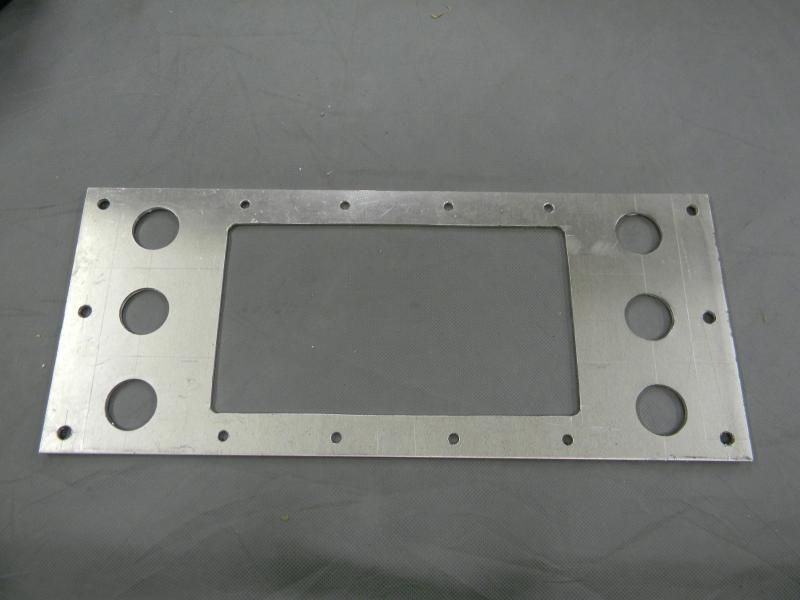
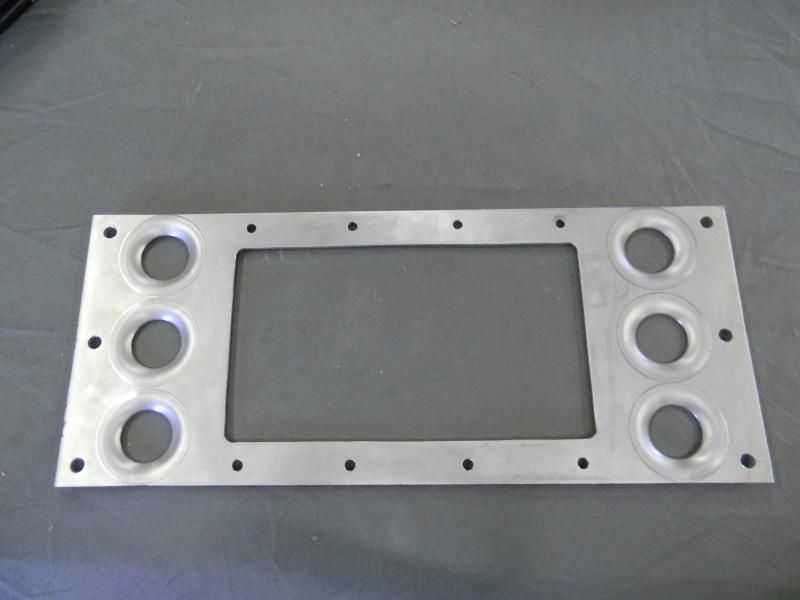
After I knew it was going to fit, I set out to make it look better and not so generic. I did a lot of searching online for air cleaner ideas and finally came up with something I liked. First, I bought a piece of .025 aluminum that was 3" tall and 4' long. I played around with the hole layout to see what looked the best. I used a 1 1/4" hole saw to drill 14 holes along the entire length of the aluminum.
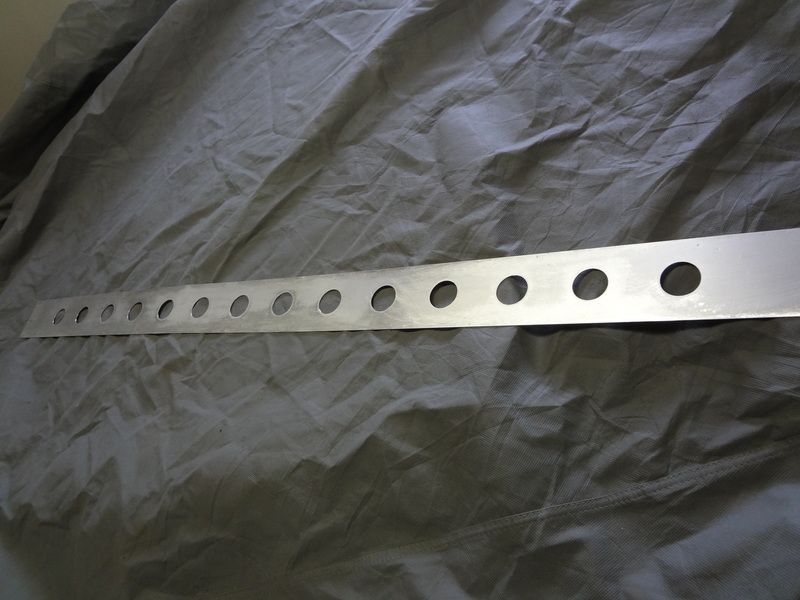
I bought a dimple die when I was making my trans cooler mounting bracket so it was just sitting in the tool box. I used that dimple die to dimple all 14 holes.
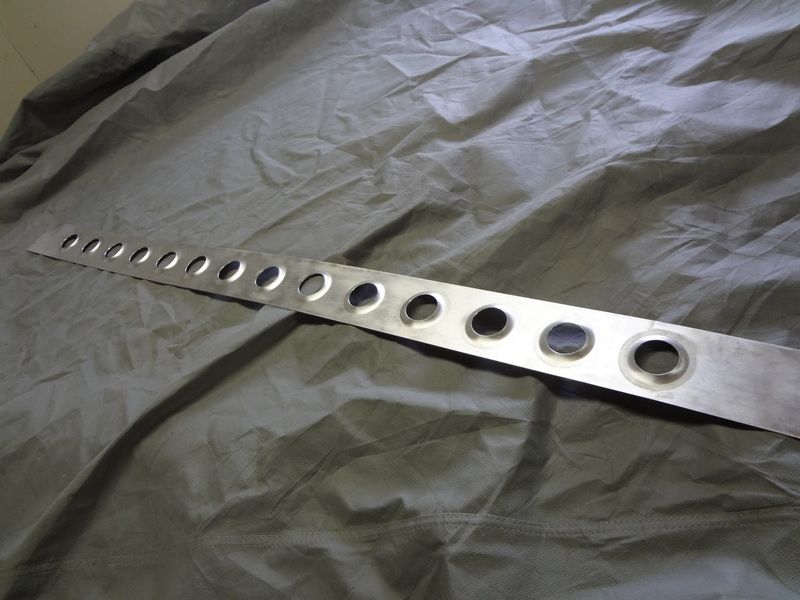
Then it was just a matter of bending the aluminum around the air cleaner. I didn't know how easily it would bend with all the dimples in it but it ended up bending really easy.
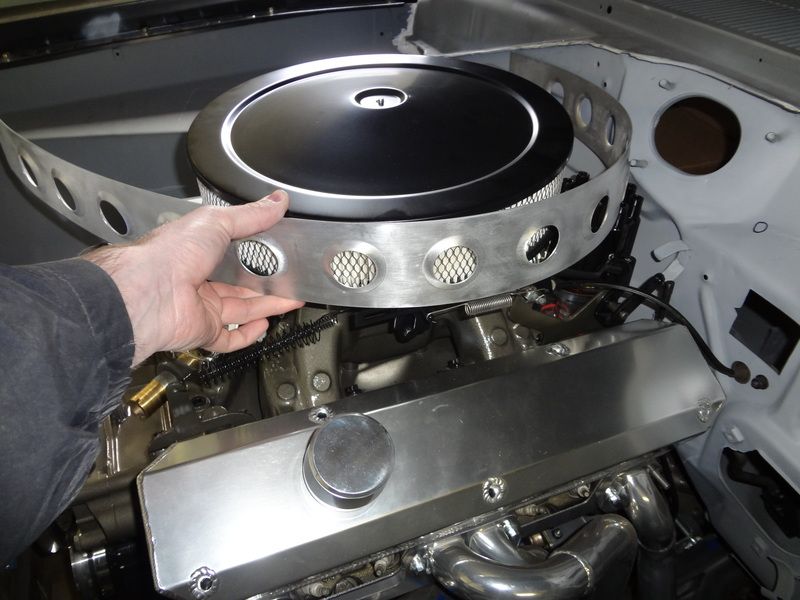
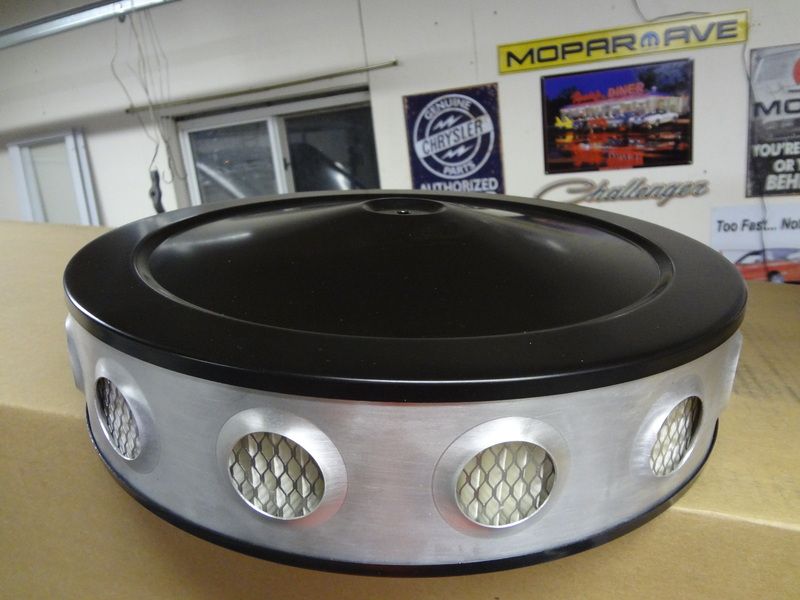
To hold it all together I just cut the aluminum strip to length and riveted the ends together. The aluminum piece fits inside the upper/lower lips of the air cleaner. I like how it looks. Before you question how well it flows, there are 14 holes all the way around it. That should be more area than a factory dual snorkel air cleaner.
Posted By: burdar
Re: 68 Dart GT convertible - 04/27/16 09:28 PM
Now you are pretty much up to speed. Not much has happened, just working on small projects. It's easier to get all this done before paint. That way, once the car is painted, the assembly should go much faster.
Figuring out spark plug wire routing with some aluminum wire separators.
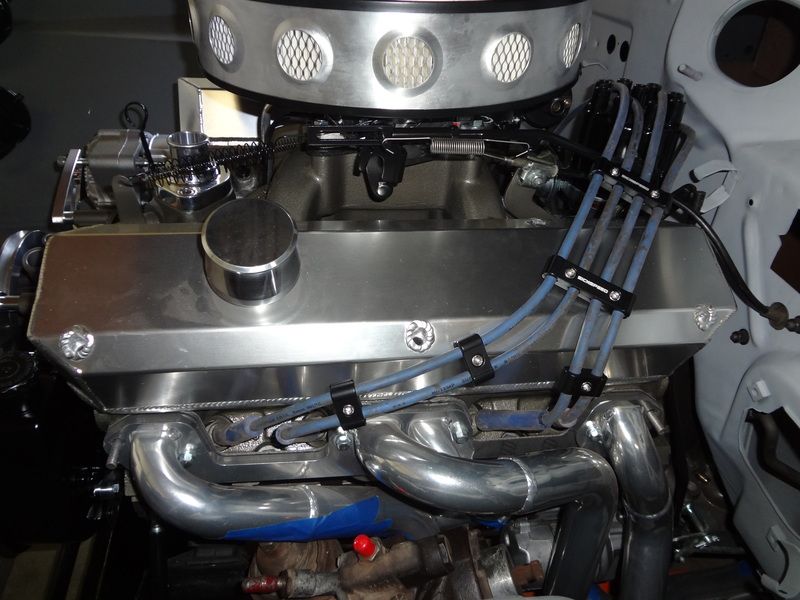
What engine compartment looks like so far.
Posted By: Geo4K
Re: 68 Dart GT convertible - 05/07/16 05:19 AM
Nice - glad you're back at it.
Posted By: JDMopar
Re: 68 Dart GT convertible - 05/08/16 06:10 PM
As always, top notch work!

Posted By: burdar
Re: 68 Dart GT convertible - 10/29/16 05:16 PM
A couple years ago, I gave a C-body 8-3/4 housing to someone to have shortened. I never got it back. They stopped answering emails and phone calls went unanswered. It was a freebie when I bought the Dart so I wasn't out any money, but it was still frustrating. This year at the Nats, I talked to the guy I bought the car from and told him the situation. Since scrap prices have been low for a long time, he still had some wide 8-3/4 housings sitting out back. He said I could stop by grab a new one.
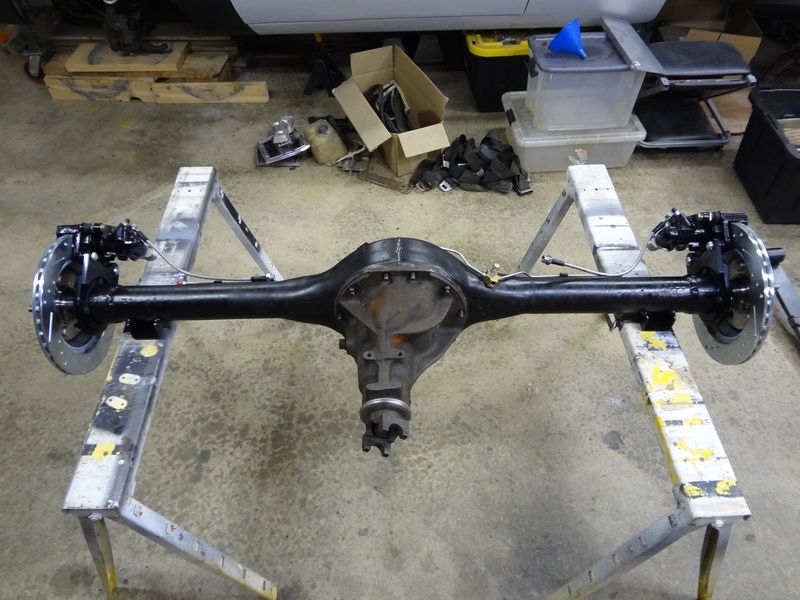
I found someone else local that has the equipment and gave him the housing. He was really busy but worked it in his schedule. I got it back last week. Stock A-body width is 52-5/8". I had the housing cut to 51-1/4". That's the minimum length Dr Diff recommends with his 1/2" spring relocation hangers. Any narrower and the outer U-bolts would hit the housing ends.
Last Sunday I ordered axles, rear disc brakes, E-brake cables and spring hangers from Dr Diff. Everything got here on Thursday. Talk about great service. I got the brakes all mocked up and they fit really nice. It's nice to buy something and have it fit like it should the first time.
I ordered new brake lines from Fine Lines a couple years ago. They cut the axle brake lines short for me since I told them I was going to use rear discs. At the time I was planning on using a Wilwood kit. The Wilwood kit must use shorter brake hoses because the lines are too long right now. I need to find someone that can double flare stainless lines so I can cut these shorter. I'd like to mount the brake hose bracket on the back side of the housing. I think it will look nice and be a cleaner install on the back side rather than on the top. My only concern is the shock clearance. I'm not sure how much clearance there is between the axle tube and the shock body. I don't want the hose/line to get in the way.
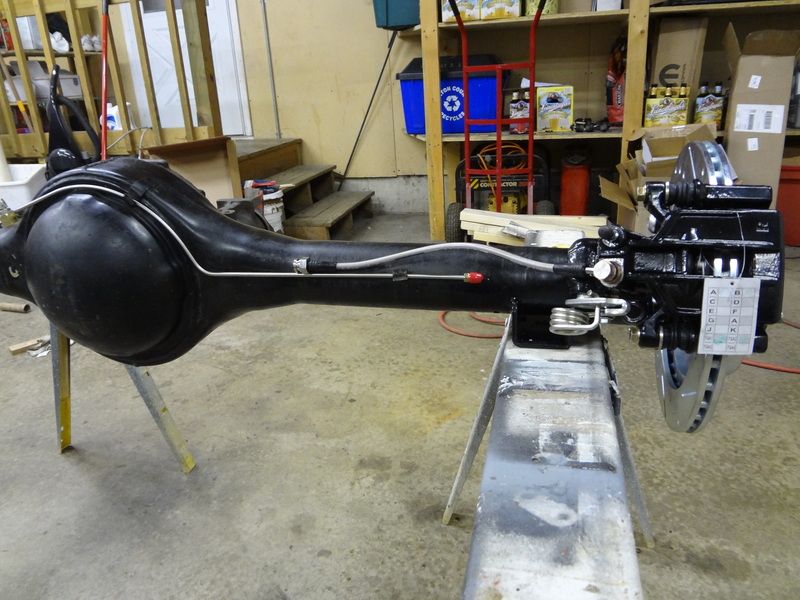
The E-brake cables that showed up are really nice looking pieces. I guess I was expecting some generic cut-to-fit type cable but these are super nice. I need to weld a clip to the front of the PS axle tube to hold the cable since this replacement housing didn't have one there. Once the lines are hooked up and the clip gets welded, I can mount the assembly under the car and measure for wheels/tires. Then it will come back out so I can blast, smooth and paint the housing. Now I need to save up for the front brake kit...
It's kind of funny the at 11.7", the rear rotors are larger then my Challenger's stock front rotors. The Dart originally came with 4 wheel drum brakes and no front sway bar. It should stop and handle a lot better once I'm done with it.
Posted By: burdar
Re: 68 Dart GT convertible - 10/31/16 03:51 AM
I worked on the springs today. The oval track springs use the larger B and E body shackle bushings. In order for them to work on an A-body, you have to get special bushings OR sleeve either the spring or the bushing. I have new A-body bushings here so I decided to sleeve the spring.
I went to the hardware store and bought a couple 1" OD black pipe sections. The OD was a little too big to fit into the rear spring eye, but the inner diameter was perfect for the A-body bushings. I went over to my father-in-law's house and used his lathe to cut down the outside of the pipe so it could be installed into the spring.


Posted By: burdar
Re: 68 Dart GT convertible - 11/03/16 06:56 PM
I shoved the springs and rear end under the car last night. I wanted to measure the shock clearance so I'll know if I have room to run the brake hoses where I want. I think these springs should work out well for the lowered look I want. The front spring eye is in the lower hole so I can lower the back even more if I need to. Obviously, the car will sag more once it's completely assembled. Right now though, I have 11" from the axle centerline to the wheel well lip.

For those of you who own a 67-69 Dart, take a look at this picture. The arrow shows a ledge inside the outer wheel well. Is this a convertible feature or do all Dart's have this? This is the limiting factor in wheel/tire width. The ledge is pretty much even with the wheel opening lip. I assumed I'd be able to cut/roll the lip if I needed to for clearance. This ledge is going to prevent that.
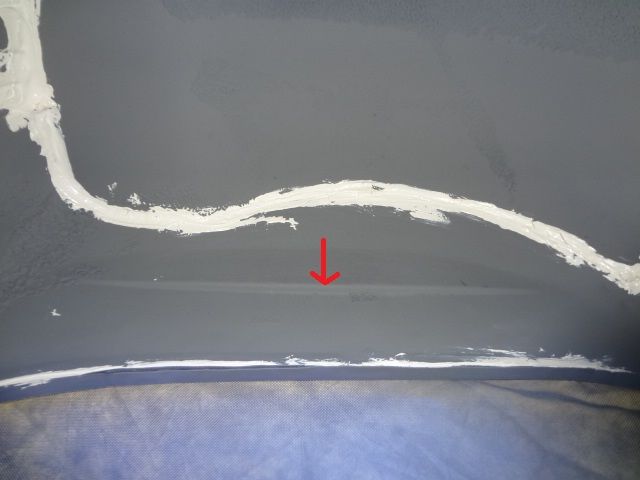
Posted By: burdar
Re: 68 Dart GT convertible - 02/10/17 07:35 PM
A little more progress on the Dart but not much. Really don't feel like doing much this time of year when I don't have a heated shop. I ordered front brakes from Dr Diff right before the new year. I had a little bit of a problem getting the calipers on. The rotors are thick and there isn't much of a gap between the pads even with the pistons pushed all the way in. I tried pushing the pistons in a little farther and got them to move just enough to get the calipers over the rotors. Still, the pads are dragging quite a bit.
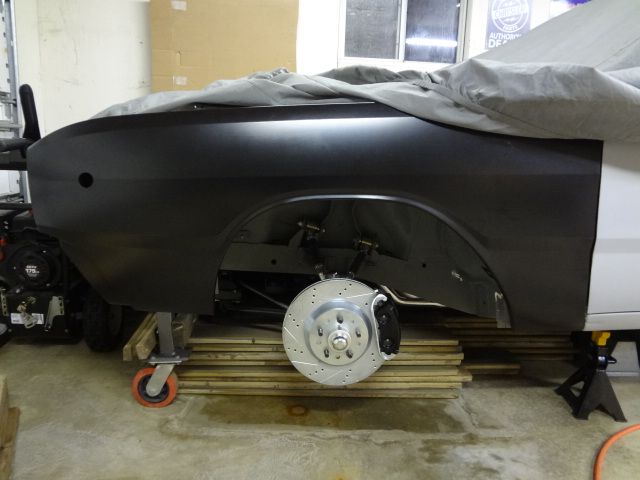
Looks like I need to get the steering mocked up so I can see how far the spindles will move in the real world. Right now the lower ball joint bolt hits the sway bar tab. I can't turn the bolt around because the head is tapered to fit the Magnumforce drop spindles. At minimum, I'll need to trim some material off of this bolt.

This is how the car is sitting right now. One of the next things to do is measure for wheels/tires. Just some quick measurements look like an 18x8 wheel with 5" backspacing might fit. I've got 5 5/8" from the rotor face to the rubber tie rod boot. Assuming that an 8" wide wheel is actually 9" from outer most lip to inner lip, and that a 225-40-18 tire has a 9.3" section width, that should give me plenty of room at the tie rod. I'd really like to borrow a wheel fitment tool or find a wheel to test fit though. The back should be easier to figure out.

Awhile back I was playing around with the paint program on the computer. I really like the look of the Coddington HR-01 wheels. I found a picture of them online and put one under the Dart. I like it.

Posted By: burdar
Re: 68 Dart GT convertible - 06/27/18 11:17 PM
It looks like it's been awhile since I posted anything on this car. Not much going on with it lately. I have been struggling to get motivated to work on it actually. A few things have been done since I last posted but nothing major.
Last year I was playing around with the computer and did a quick rendering with the paint program. I found a picture I had taken at Carlisle a few years ago. It was of a 69 but the color was close so I started with that. I got rid of the 69 side markers and pasted on some 68s. I did an online search for cars that had similar wheels to the ones I'm thinking of running. I found a Camaro picture that was framed the same and pasted the wheels onto the Dart picture. Finally, I put some carbon fiber stripes on the back. I think it looks pretty good! This is basically my idea of what I want the car to look like.
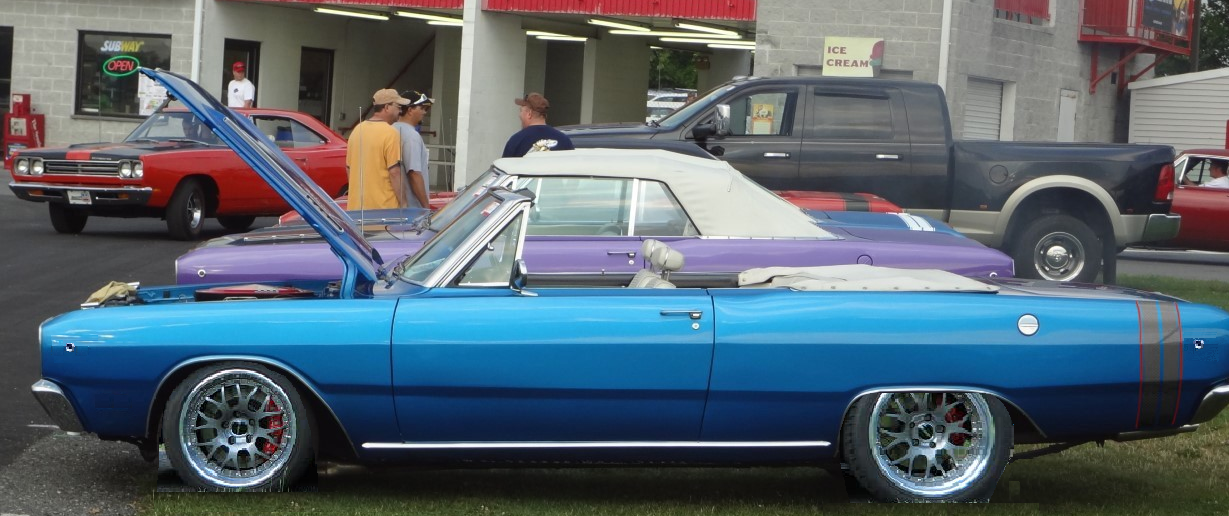
I read a post in the race section about proper trans cooler mounting. I realized I had mine mounted incorrectly.

I flipped it around so the fittings were pointing up. This way the cooler stays full of fluid and doesn't develop an air pocket in the upper passages. I had to redo the lines so I ended up running them both to the drivers side. I was going to run into issues trying to get a cooler line past the lower rad hose. With both of them on the drivers side, I have more room.
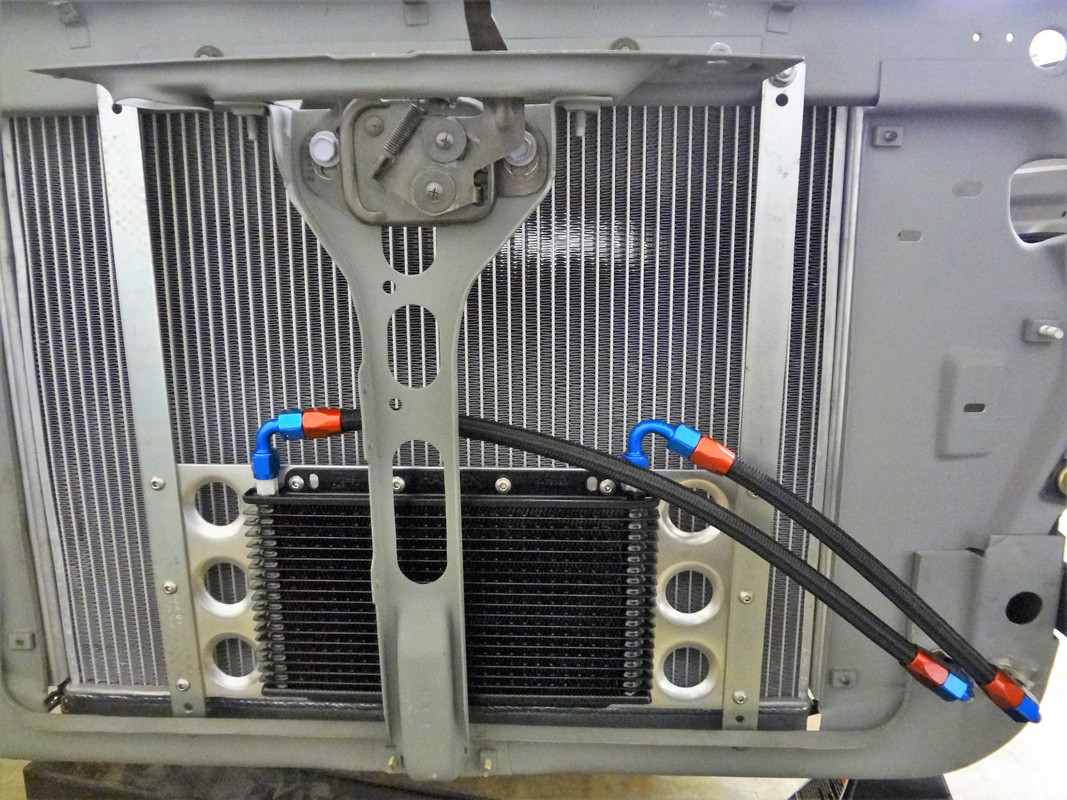
Posted By: burdar
Re: 68 Dart GT convertible - 06/28/18 04:54 AM
Posted By: burdar
Re: 68 Dart GT convertible - 06/28/18 05:09 AM
The valve covers looked pretty plain to me. I thought they would look better painted black to match the color scheme I'm going with. I still wanted a little something else though. I did some searching online and found a couple that I really liked.
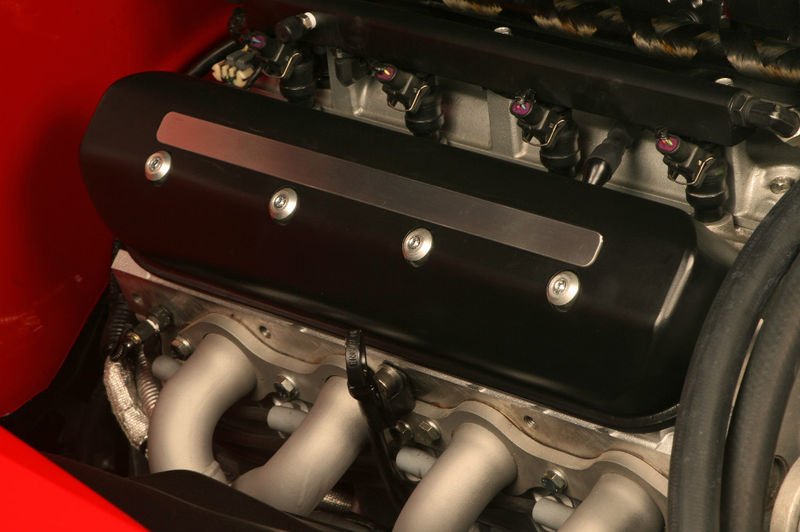
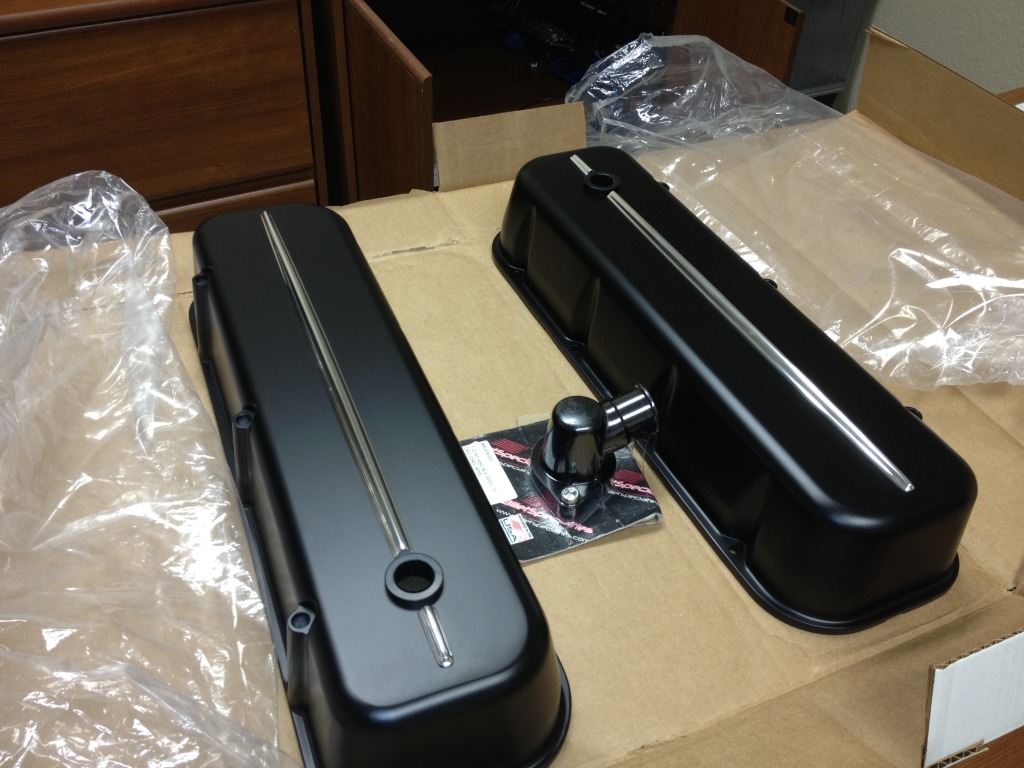
I looked for something I could buy to attach to my existing covers but didn't see anything so I thought I'd try to make something myself. I cut some strips of 1/4" aluminum and sanded them to the shape I wanted.
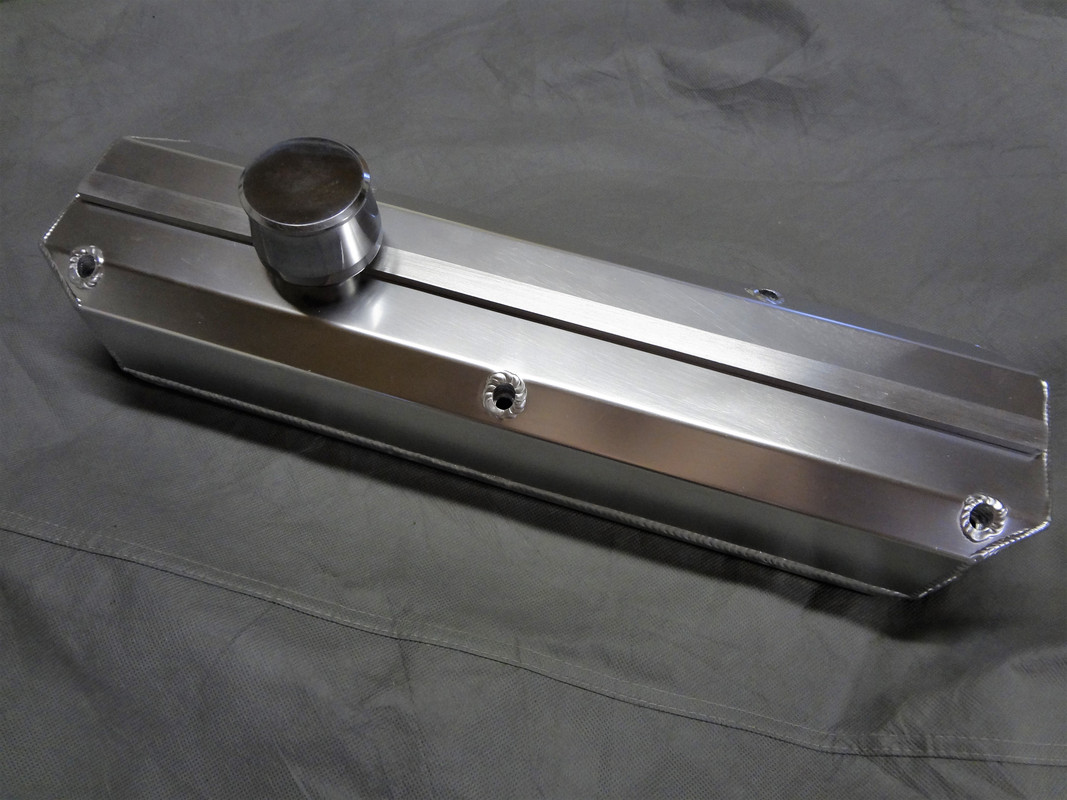
After polishing the trim pieces, I painted the valve covers.
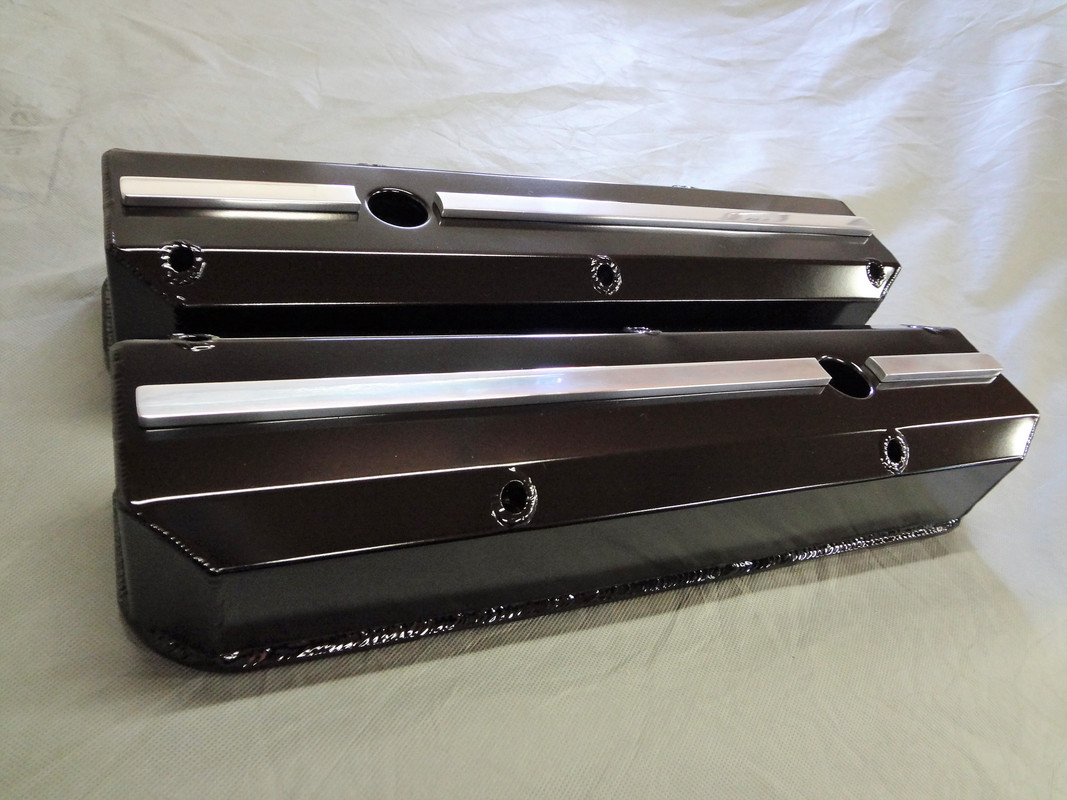
I really like the look. I drilled at tapped some holes in the bottom of the trim pieces and locktited some studs in the bottom. I was going to use some lock nuts to hold them on. Right now they are just sitting in place. I'm still thinking about another way to attach them.
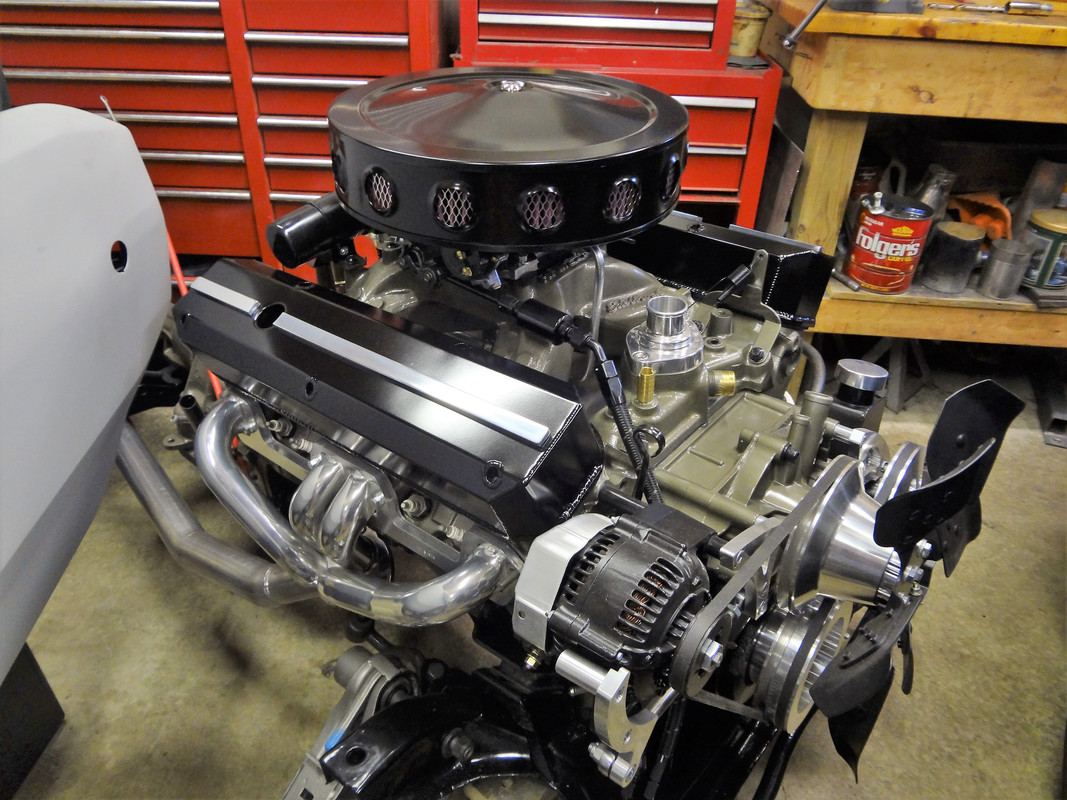
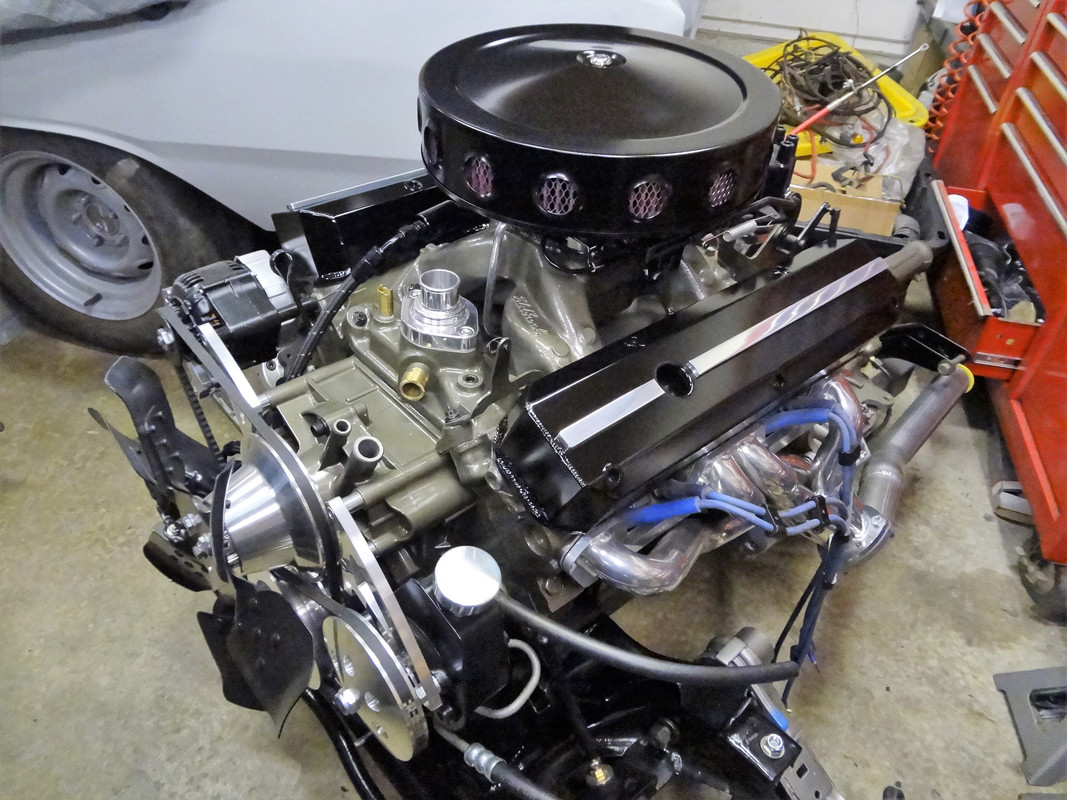
Posted By: burdar
Re: 68 Dart GT convertible - 06/28/18 05:19 AM
Posted By: burdar
Re: 68 Dart GT convertible - 06/28/18 05:56 AM
I rebuilt the steering column with the intent of swapping from power steering to manual steering. After the column was done, I changed my mind and decided to keep the power steering.
I pulled out the column shaft and swapped in the original lower shaft. I wanted to hold the two pieces together tightly but still allow movement in an accident. This is what I came up with...
The upper shaft just has indentations where hot plastic was injected into the assembly to hold it together.
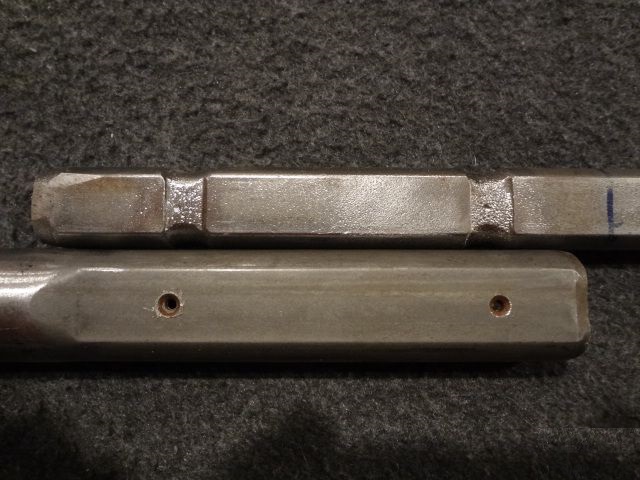
After marking the correct location, I drilled all the way through the upper shaft with an 1/8" bit. My father-in-law had some scrap lexan lying around that he thought would work as a "pin" to hold the two halves together. He turned a couple scraps into "pins" and I pounded them through the assembly. We heated the head of a nail with a torch and used that to melt the ends to lock them in place. Finally, I drilled through the center of the pins with a 1/16" bit. The shaft is held tight but it should easily collapse in an accident.

Last fall I shipped the steering box to Firm Feel. They did a stage 3 rebuild on it. I was able to get it painted and installed on the K right before it got cold.
A couple weeks ago I got this next piece done. I'm going to use a reproduction Tuff wheel on this car. I bought an adapter at the Mopar Nats last year. The problem is that the 68 column was never designed for the adapter. The 68 column is smaller in diameter then the 70 column that the adapter was designed for. The upper column rubs on the inside of the adapter. I had to sand the adapter to clear the column. That wasn't a big deal. The issue is that the adapter really looks like crap on the smaller column. Here is what the adapter looks like on a 68 column. UGLY!!!!
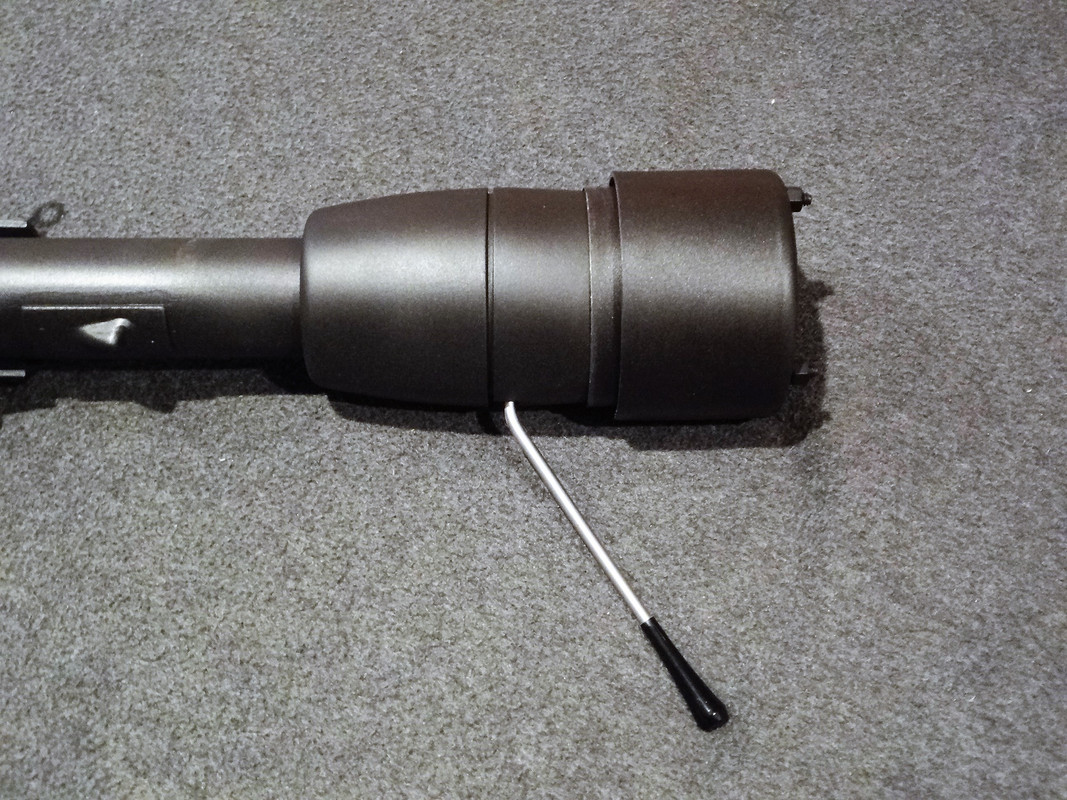
I was looking at a Dart under a tent in the swap meet at the Nats last year and noticed it also used the factory tuff wheel adapter. That car had an aluminum trim ring on the bottom of the adapter to help transition the two pieces. It really looked good. The owner said he bought the car with that trim piece already installed so he didn't know who made it. I took a couple pictures of it and made my own.
I started with a 5x5 piece of 1/2" aluminum. After cutting out the center hole on my father-in-laws mill, we mounted it to his lathe and turned the outside to the correct diameter.
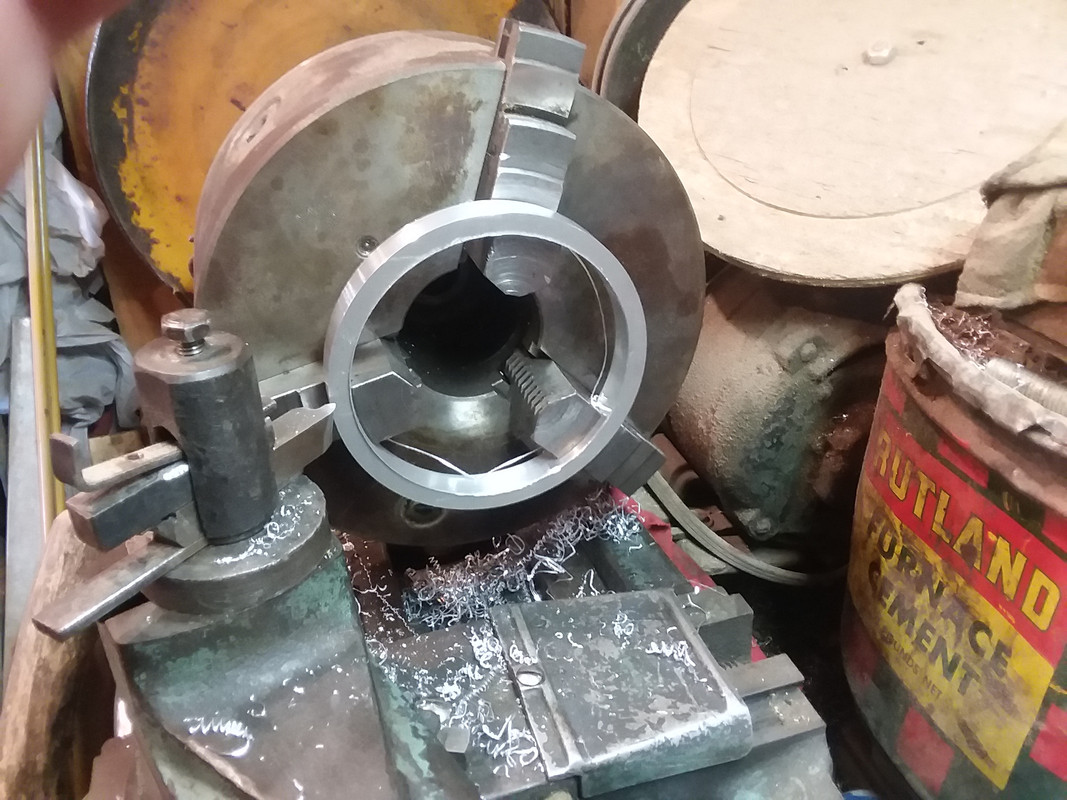
Then we readjusted the lathe and machined an angle into the piece.
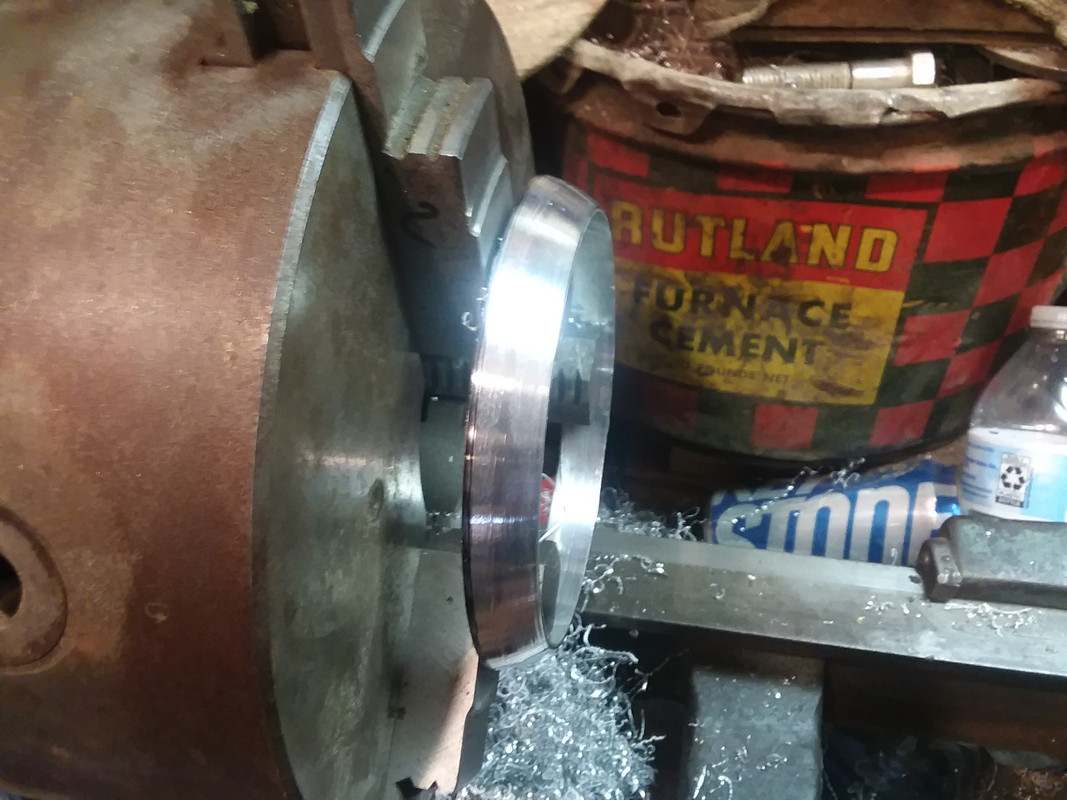
Here is the trim ring test fit onto the wheel adapter.
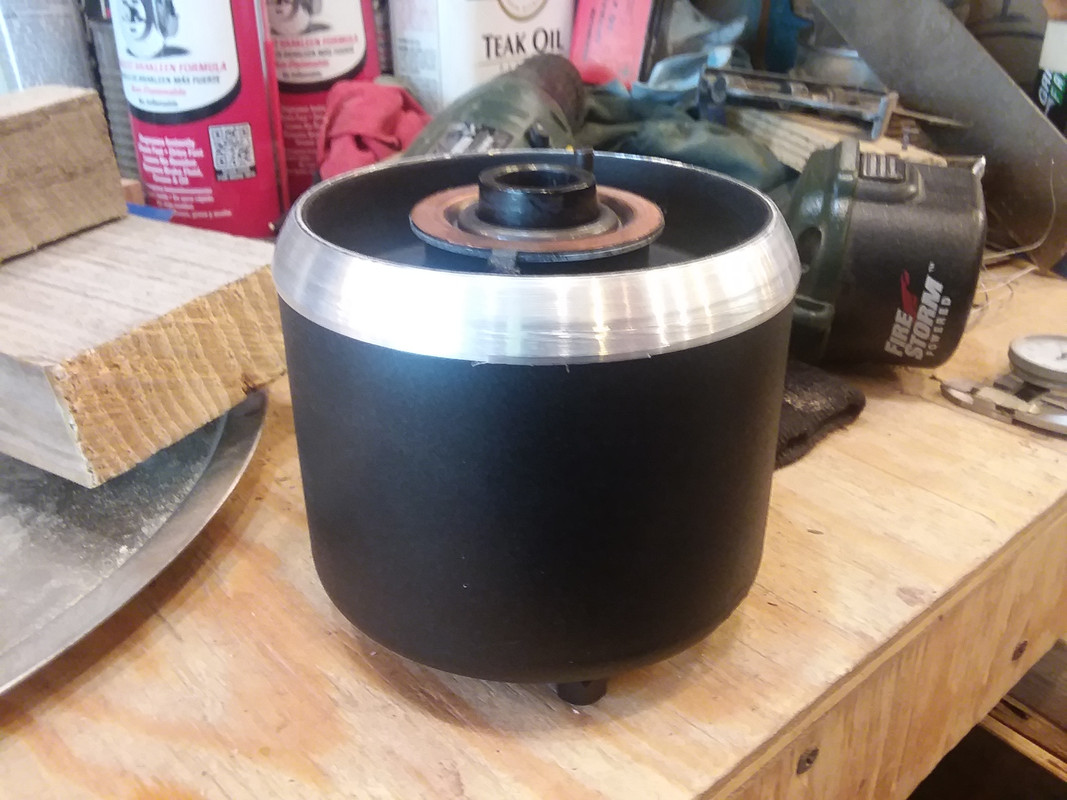
I still needed to do some hand sanding on the trim ring when I took this picture but this is basically what it looks like installed. I really like it. It makes the adapter look like it was made for the earlier columns.
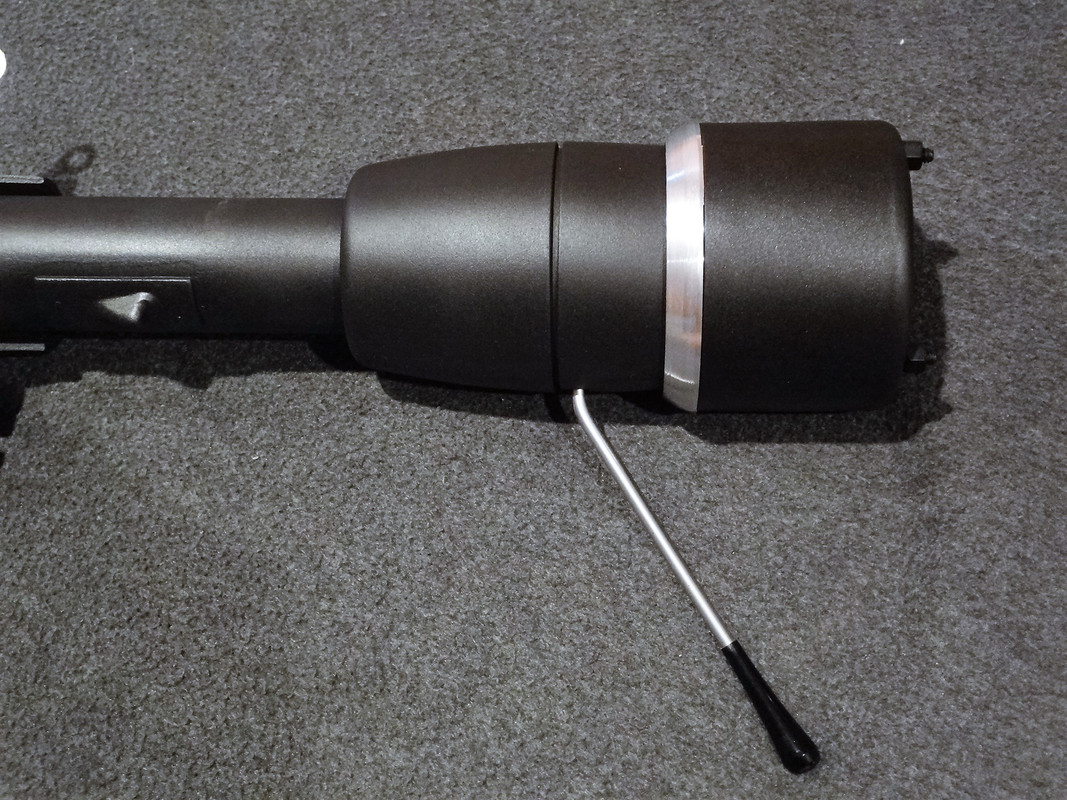
Posted By: burdar
Re: 68 Dart GT convertible - 06/28/21 03:59 PM
Posted By: burdar
Re: 68 Dart GT convertible - 06/30/21 02:23 PM
Since I have very limited work/storage space, the entire front suspension, engine/trans and rear end were installed years ago. It makes everything more compact so I can get another car in the garage. While the engine was in I decided it would be a good time to make some wiring harness modifications. I'd rather lean over an EDP coated fender then a freshly painted one. I laid the harness in place and routed it across the engine. I made some brackets to hold the harness up off the engine since the valve covers don't have the factory tabs. I used a couple intake manifold bolts to hold the brackets and some plastic wiring harness clips found on modern cars. After running an 8 gauge bypass wire from the alt output stud to the starter relay, I covered everything in a plastic braided mesh covering.(NOT convoluted tubing

) It looks really clean. Since the denso alternator is internally regulated, I was able to cut some wires out of the new harness and delete the voltage regulator on the firewall. I was also able to cut out the ballast wiring since the Pertronix coil runs on 12v.
I'm going to run relays for the headlights and for the convertible top. I previously mounted the headlight relays under the battery tray but wasn't totally happy with how that turned out. Since I needed to add a bus bar and convertible top fuse holder to the bottom I decided to just start over. I made a plate out of steel and put a few dimple died holes in it for strength. After drilling holes through the plate and battery tray I installed rivnuts on the plate to make attachment easy. After playing around with different arrangements I was able to fit everything under the tray so it's almost invisible.
![[Linked Image]](https://i.postimg.cc/5t5sZxj9/20200715-185951.jpg)
![[Linked Image]](https://i.postimg.cc/nLfdRsFw/20200715-192331.jpg)
I mounted the convertible top relays next to the pump at the back so they will be hidden as well.
![[Linked Image]](https://i.postimg.cc/C1Fc0WfG/20200718-082659.jpg)
Posted By: burdar
Re: 68 Dart GT convertible - 06/30/21 03:10 PM
Posted By: burdar
Re: 68 Dart GT convertible - 07/06/21 03:30 PM
Here's another small project I worked on awhile back. It's nice to have a father-in-law with mill and lathe.
I'm using aluminum pulleys on the 360 for the Dart. I'm also using a Denso alternator instead of the factory style. The company that makes the pulleys doesn't make a pulley/cover for the Denso so I had to make my own. As you can see by the first picture, the alternator pulley sticks out like a sore thumb.
![[Linked Image]](https://i.postimg.cc/6p08fRzt/2016-04-02_18.05.20_zpsz7ni3png.jpg)
The pulley that came on the alternator had three round holes in the face of the pulley. I'm not exactly sure what their purpose was. Maybe a tool fit in the holes to hold the pulley while the nut was being tightened? Anyway, the holes looked like the perfect place to bolt on a cover. So, the first thing I did was to drill them deeper and tap them. To make the cover I started with a 3" or 3.5" diameter piece of aluminum. I marked out the location of the three mounting holes and drilled them in the piece. Then I counter bored the holes to accept some allen head bolts.
![[Linked Image]](https://i.postimg.cc/pVs6WXCp/20200712-111426.jpg)
With the aluminum puck bolted to the pulley, I mounted the pulley onto the lathe and machined the outside diameter so it was perfectly round in relation to the pulley itself.
![[Linked Image]](https://i.postimg.cc/L58Qtr99/20200711-110046.jpg)
Once the outside was machined, I unbolted it from the pulley and mounted it in the lathe to make the next cut. I drilled out the center to take some weight away and to make sure the pulley cover would clear the alternator shaft and attaching nut.
![[Linked Image]](https://i.postimg.cc/4dZSdYjh/20200711-113911.jpg)
The next thing to do was to machine a "step" on the back side of the cover that would fit inside the center opening of the pulley. This "step" centers the cover on the pulley.
![[Linked Image]](https://i.postimg.cc/YqyZ3qLJ/20200711-131100.jpg)
Now the cover could be bolted to the pulley with the allen head bolts. Next it was back in the lathe to start giving it some shape. Now it's starting to look like something.
![[Linked Image]](https://i.postimg.cc/NM4PrgwC/20200711-134317.jpg)
![[Linked Image]](https://i.postimg.cc/vm5Kbr2s/20200711-140433.jpg)
![[Linked Image]](https://i.postimg.cc/vT2q33TW/20200711-142616.jpg)
All polished up and mounted.
![[Linked Image]](https://i.postimg.cc/Z5BgDtr0/20200712-103904.jpg)
![[Linked Image]](https://i.postimg.cc/Cx323PN7/20200712-103943.jpg)
Posted By: DynoDave
Re: 68 Dart GT convertible - 07/12/21 05:17 PM
Nice stuff.
How long is the body shop supposed to have it?
Posted By: burdar
Re: 68 Dart GT convertible - 08/02/21 05:23 PM
I've been putting off working on the convertible top mechanism because it was intimidating. Finally got to the point where I needed to work on it so...
I started out by taking a lot of pictures and measurements. There are two main adjustment links at the back that have a lot of adjustability. Before taking the bolts loose, I staked both sides of the links so I could line up the marks during assembly. With all the measurements and pictures taken I took the mechanism to the back yard and power washed it.
![[Linked Image]](https://i.postimg.cc/G3VhJ1YX/top12.jpg)
Here are all the pieces of the top mechanism laid out after disassembly.
![[Linked Image]](https://i.postimg.cc/gjbRyzpV/DSC04475.jpg)
I started with the bows since those looked simple. The tack strip material on the sides were in decent shape but there were signs of rust underneith them so they had to be removed. The factory installed the tack strips into bare metal bows...then they were painted. The tack strip material in the rear bow was in bad shape so that was removed as well. I'll talk to a convertible top installer and see what they recommend before I reinstall any new tack strip material.
![[Linked Image]](https://i.postimg.cc/HsQb7YYT/DSC04506.jpg)
![[Linked Image]](https://i.postimg.cc/fbbdFYxb/DSC04508.jpg)
Original paint underneath a side bracket. SEM Trim Black looks like a perfect match to me.
![[Linked Image]](https://i.postimg.cc/x1nMvw8M/DSC04509.jpg)
After the three bows were sanded down and painted, I turned my attention to the front header. It looked like it was in really good shape with no sections rusted through. After taking out the old latches though, a bunch of scaly rusty crap came out of the hollow inner cavity. I bought a cheap endoscope for my cell phone so I could see deeper inside to assess the rust. It looked pretty nasty.
I found a good deal on EvapoRust at Walmart.com believe it or not. A 3.5 gallon bucket was only like $46. I bought three. Then I picked up some scrap 2x4 / 2x6 and OSB from work and built two boxes. One to soak the header and one to soak the side mechanisms.
![[Linked Image]](https://i.postimg.cc/c1Q5TRtP/top4.jpg)
![[Linked Image]](https://i.postimg.cc/Hszv1T22/top5.jpg)
I lined the long box with plastic and soaked the header in the EvapoRust for close to 24 hours...checking it and hosing it out periodically. The results were impressive.
before
![[Linked Image]](https://i.postimg.cc/GtQKRjk2/top10.jpg)
after
![[Linked Image]](https://i.postimg.cc/qq0wWF6S/top11.jpg)
After the EvapoRust bath I sprayed the inside with Ospho(actually Concrete and Metal Prep which is the same thing) which turned the remaining rust in the tight seams black. Then I masked off the latch openings and poured black paint into the cavity. I poured a lot in and made sure I got everything inside coated. Then let the excess run out the other end.
Posted By: burdar
Re: 68 Dart GT convertible - 08/02/21 05:28 PM
Posted By: burdar
Re: 68 Dart GT convertible - 08/25/21 07:23 PM
I finished the console a couple nights ago. I bought reproduction top plates but had to send them back. They were warped badly and didn't fit. Luckily they were nice about it and sent a replacement set. I'm using an aftermarket shifter instead of the factory one. I modified the aftermarket shift handle to fit the console instead of modifying the console to fit the shifter. This way I can still use the original shifter some day and everything will still fit. The car sat with the top down for quite awhile and it looks like the console filled with water a time or two.
![[Linked Image]](https://i.postimg.cc/6pfKJd1S/DSC03263_zpspbzefxwa.jpg)
I used some "Iron Out" I found under the bathroom sink to clean the rust stains off the console.
![[Linked Image]](https://i.postimg.cc/kgF1XwCQ/DSC03264_zpssykvrydm.jpg)
The rest of the console body was cleaned in preparation for some SEM Landau Black.
![[Linked Image]](https://i.postimg.cc/cJjfH755/DSC04479.jpg)
After a few light mist coats of Landau Black
![[Linked Image]](https://i.postimg.cc/x16vrVGQ/DSC04487.jpg)
![[Linked Image]](https://i.postimg.cc/rwV1Ywrg/DSC04483.jpg)
I wanted to add a tach to the Dart but I don't really like how they look mounted to the steering column or dash. On a race car that's fine but on a street car I wanted something not so "in your face". I like the look of the console tachs but original ones are very expensive and they only came with a black face. Since I changed to white gauge faces, that wouldn't match. I had a white faced tach sitting around from another project that I could use. The problem was that it was meant to be installed into a dash opening and didn't have a mount to it. That's when I decided to try and make a mount for the tach I already had. I wanted to make it look like a factory tach.(as close to a factory look as I could anyway) I found some pictures online of a factory tach and made a template out of construction paper. Then I picked up a solid chunk of 4" diameter aluminum for the mount.
![[Linked Image]](https://i.postimg.cc/qMqSg1pc/20200724-194100.jpg)
The first step was to mount it in my father-in-laws lathe and bore a hole big enough for the tach insert to fit. This took awhile.
![[Linked Image]](https://i.postimg.cc/bNCB0C4j/tach1.jpg)
Once I had the tach insert fitting, I turned the aluminum around in the lathe and tapered the back side.
![[Linked Image]](https://i.postimg.cc/5NNrCd73/tach2.jpg)
Then it was off to the mill to machine a "flat" area so the mount would sit at an angle on the console.
![[Linked Image]](https://i.postimg.cc/fyMrC6wM/tach3.jpg)
Posted By: burdar
Re: 68 Dart GT convertible - 08/25/21 07:30 PM
Posted By: burdar
Re: 68 Dart GT convertible - 09/09/21 12:59 AM
Posted By: burdar
Re: 68 Dart GT convertible - 11/17/21 03:18 PM
Posted By: burdar
Re: 68 Dart GT convertible - 11/17/21 03:29 PM
Posted By: burdar
Re: 68 Dart GT convertible - 11/19/21 02:21 AM
I stopped by the shop this afternoon and took some pictures. The bottom side is sprayed with a single stage greenish/gray paint that is supposed to look like the factory dip primer.
![[Linked Image]](https://i.postimg.cc/NMQd3NGB/DSC04682.jpg)
![[Linked Image]](https://i.postimg.cc/nrz0zCQW/DSC04683.jpg)
The color in the engine compartment isn't correct yet. The computer got it wrong. It's way too light. It looks more like B5 than QQ1. That's still being adjusted.
![[Linked Image]](https://i.postimg.cc/G2zXdk9Y/DSC04684.jpg)
The undercoating is sprayed inside the trunk.
![[Linked Image]](https://i.postimg.cc/wBXWbKpw/DSC04681.jpg)
Posted By: burdar
Re: 68 Dart GT convertible - 11/23/21 01:58 AM
Posted By: burdar
Re: 68 Dart GT convertible - 11/23/21 01:59 AM
I've got some MP Oval track springs with 0 arch I'm going to use. I cleaned those up and re-sprayed them in a semi-gloss black. I like the look of factory paint markings so I couldn't resist soaking the original spring ends in EvapoRust to see if anything showed up. To my surprise, they did.
![[Linked Image]](https://i.postimg.cc/N01T7k7c/spring2.jpg)
![[Linked Image]](https://i.postimg.cc/QdKcV3FV/spring1.jpg)
Then, while I was at it, I put paint marks on the new 1.03 torsion bars as well.
![[Linked Image]](https://i.postimg.cc/fb4m9rdC/bar1.jpg)
Posted By: DynoDave
Re: 68 Dart GT convertible - 11/29/21 04:31 AM
You mentioned filling the pits in the axle housing. What did you use?
Posted By: burdar
Re: 68 Dart GT convertible - 11/29/21 02:54 PM
I welded up the bigger pits and ground them back down. On the small ones I just used a Bondo brand product I found at the local Walmart. It goes on like spot putty but is designed to fill larger areas. It was a bit of an experiment because I'd never seen the stuff before. It went on nice and sanded nice. We will see how it holds up.
Posted By: DynoDave
Re: 68 Dart GT convertible - 12/01/21 04:25 PM
yeah, that's why I asked...it's a rough environment down there. Hope it does well for you.
Posted By: burdar
Re: 68 Dart GT convertible - 01/11/22 02:23 PM
Posted By: JDMopar
Re: 68 Dart GT convertible - 01/12/22 02:18 AM
Wow....it's coming right along! What was the paint brand that was able to mix the QQ1 correctly? My 68 Roadrunner is that color, so I need to store that info somewhere in my foggy brain....lol.
Posted By: burdar
Re: 68 Dart GT convertible - 01/12/22 02:33 AM
I'm going to the body shop in a couple days and will get that info. Thanks
Posted By: JDMopar
Re: 68 Dart GT convertible - 01/13/22 03:35 AM
Thanks Darren.
Posted By: burdar
Re: 68 Dart GT convertible - 01/16/22 08:41 PM
Posted By: JDMopar
Re: 68 Dart GT convertible - 01/17/22 03:17 AM
Wow.....looks awesome! Did they say what brand of paint it was?
Posted By: burdar
Re: 68 Dart GT convertible - 01/17/22 02:11 PM
Wow.....looks awesome! Did they say what brand of paint it was?
Sorry, I posted the info in my QQ1 thread in the Restoration section. I forgot to post them here.


Posted By: burdar
Re: 68 Dart GT convertible - 01/17/22 02:16 PM
Posted By: JDMopar
Re: 68 Dart GT convertible - 01/18/22 03:13 AM
Wow.....looks awesome! Did they say what brand of paint it was?
Sorry, I posted the info in my QQ1 thread in the Restoration section. I forgot to post them here.
Thanks Darren. That will help a bunch when it's time to do my Roadrunner. Looks like it won't be long until you'll be in the "Bolt it together and don't skin it!" phase.

Posted By: UCUDANT
Re: 68 Dart GT convertible - 01/19/22 01:15 AM
Outstanding work
Posted By: burdar
Re: 68 Dart GT convertible - 02/16/22 10:04 PM
I saved all the videos the body shop posted to their Facebook page and combined them into this Youtube video.
https://www.youtube.com/watch?v=4xE5HQYVMxM&t=8s
Posted By: burdar
Re: 68 Dart GT convertible - 02/17/22 02:54 PM
Posted By: burdar
Re: 68 Dart GT convertible - 02/18/22 09:48 PM
Posted By: DynoDave
Re: 68 Dart GT convertible - 02/19/22 02:44 AM
Beautiful!
Posted By: larry4406
Re: 68 Dart GT convertible - 02/19/22 11:13 AM
Quite the understatement!!
WOW!
Posted By: crowbait
Re: 68 Dart GT convertible - 02/27/22 04:26 AM
Spectacular!
Man that guy aint waisting any time putting the paint on that car!
Posted By: burdar
Re: 68 Dart GT convertible - 03/08/22 07:07 PM
The car is back home. I need to let the paint sit for about 120 days before I can wax it. I'll probably wait that long before I start bolting on parts to the exterior. Until then I'll keep busy by installing things under the car and getting the glass into the doors and 1/4s. Once the glass is in and I make sure the doors don't need to be readjusted, the inner fender splash shields will be installed and undercoating will be sprayed in the wheel wells. Once the outside temps are a little warmer, I'll start installing the butyl sound deadener to the interior floor and inside the doors.
Late last week I installed the body plugs and set the tail light wiring in place.(man these A-bodies have a lot of body plugs...way more then my Challengers has) Saturday we had warmer temps so I decided to get the rad support blackout done. I set the old grill and headlight bezels in place so I could see which areas were visible through the grill. I didn't like how the factory blackout went all the way up to the top of the latch support so I decided to leave that area body color. The bottom of the latch support can be seen through the grill so the bottom was sprayed but not the top.
![[Linked Image]](https://i.postimg.cc/Z5vf7BqW/DSC04750.jpg)
![[Linked Image]](https://i.postimg.cc/CKycWhZm/DSC04752.jpg)
That was all the time I had to work on the car on Saturday. That afternoon I went to Disney on Ice with my wife and daughter. Then we rushed home at night to beat the severe thunderstorms and tornados passing through the area.
On Sunday I realized that the body shop had filled in the washer bottle mounting holes. I had them fill some extra holes on the inner fender but for some reason they filled all of them. After re-drilling those holes, I mounted the headlight relays to the battery tray and install that. Then I started running the new headlight wiring. The wiring was a little more difficult then I had expected though. I must not have tried fishing the plugs through the headlight bucket support during the test fitment stage. The aftermarket plugs are too thick to pass through the limited space available. I had to get out the cutoff wheel and cut a notch in the bucket support. About 1/4" more room was needed. Now the plugs will easily pass into the back of the headlight area. Once that was done, mounting the buckets and all the adjuster hardware went pretty quick. Later on Sunday I installed the brake/fuel lines and rear axle bumpers. Next thing to work on is cleaning up the gas tank and getting that installed.
![[Linked Image]](https://i.postimg.cc/6QdMKknw/DSC04761.jpg)
Posted By: DynoDave
Re: 68 Dart GT convertible - 03/13/22 02:37 PM
(man these A-bodies have a lot of body plugs...way more then my Challengers has)
Why do you think A-bodies are so light?

After re-drilling those holes, I mounted the headlight relays to the battery tray and install that.
I had to get out the cutoff wheel and cut a notch in the bucket support. About 1/4" more room was needed.
I would have agonized over doing this to a beautiful, newly painted car.
Posted By: burdar
Re: 68 Dart GT convertible - 04/07/22 05:03 PM
Still waiting until the 120 day mark so I can wax the engine compartment and start assembling things in there. For now I've been working on applying the sound deadener to the floor. I was concerned about the garage temps being in the 30s/40s but it installed easily. I was planning on using Kilmat but ordered some stuff called Siless by accident. It's 80 mil, made from butyl and came in the same quantity as Kilmat so I used it. I covered the entire floor pan and up the firewall to where the factory insulation starts.
![[Linked Image]](https://i.postimg.cc/4xsWFxgk/sound1.jpg)
I installed some under the rear seat but just in the middle. That's where the resonance was. The area above the frame rails were solid so I didn't think I needed anything there. The section of the floor pan where the convertible top will sit sounded really hollow so I installed some there as well. I put a couple strips of sound deadener on the seat back brace that spans between the wheel wells. It sounded really hollow too. The metal wire covers along the rocker area were really beat up and rusted through in a few places. Replacements seemed really expensive for what they are so I made my own. I just bought the thinnest sheet metal the metal company carried(20 gauge) and drilled some holes along the length. Then I dimple died it for strength. I thought about different ways to attach it but ended up just using the sound deadener itself to hold the pieces in place. Finally, I put some aluminum tape on all the seams. The edges of the sound deadener are exposed and sticky. I put the tape on it so the carpet doesn't stick to the floor when the temp warms up.
![[Linked Image]](https://i.postimg.cc/ZKrfcyXx/sound2.jpg)
I also got the 1/4 windows installed. What a PITA. I downloaded the 67 and 69 service manuals(the 68 manual isn't online) and read how they are supposed to be installed. The instructions left a lot to be desired. I ended up having to completely remove the rear stabilizer and unbolt the front track in order to move the glass forward inside the 1/4 so I could get the rollers attached. Before I could do any of that though, I had to sand/polish the stainless weather stripping channel at the leading edge of the glass. On my Challenger, the stainless was still attached to the glass so I carefully polished it as an assembly. On the Dart though, the glass setting tape had lost its hold and the stainless was loose. The convertible uses rivets to hold the stainless to the lift bracket at the bottom. Once I drilled off the rivet head I was able to tap them out and remove the stainless piece. Here are the rivets holding the stainless to the lift bracket.
![[Linked Image]](https://i.postimg.cc/x80pWfw4/20200528-080550.jpg)
I discovered that I could drill and tap the lift bracket holes for some 8-32 button head screws. This made reattaching it at the base easy. There was still the issue with the glass setting tape though. A few well respected people on this site said they never really had much luck using that stuff so I was a little nervous. While looking up weatherstrip adhesive online I stumbled on a product called "windshield and glass sealant". Its designed to fix leaks between glass and rubber gaskets. The tube was only $6 so I thought I'd give it a try. The glass setting tape was still well attached to the stainless...it had just come loose from the glass. So, after cleaning the old tape and the glass, I ran a bead of the sealant on the leading edge of the glass. Then I pushed the stainless in place. After attaching the bottom with the allen head screws, I wrapped tape around the glass to hold everything stationary while the sealant dried. So far it seems to be working great. If it fails, I'll just have to install new glass setting tape. The windshield sealant is basically thin, flowable silicone. It's quite a bit thinner then regular clear silicone you find in a big tube. Here are the button head screws used to attach the stainless to the lift bracket.
![[Linked Image]](https://i.postimg.cc/xCg3NKZ6/window.jpg)
Hey I do Paint and body work for a living. I got turned onto this wax a few years ago for fresh Paint. Stuff works great. I keep a gallon On hand. Did a black 55 ford crown vic that after I scuffed and buffed it applied it on the finish. Takes swirl marks out and comes off with ease.
https://www.amazon.com/Presta-32OZ-COMPL-Fast-PST-134132/dp/B00AZAESRG
Posted By: burdar
Re: 68 Dart GT convertible - 10/03/22 04:48 PM
Posted By: DynoDave
Re: 68 Dart GT convertible - 10/03/22 10:35 PM
Nice work!
I totally agree with your color choices on the wiper motor. It provides nice visual continuity with the blower motor and master cylinder.
Posted By: RTSrunner
Re: 68 Dart GT convertible - 10/10/22 01:51 AM
Nice work!
I totally agree with your color choices on the wiper motor. It provides nice visual continuity with the blower motor and master cylinder.
Agreed & that dash looks great!
Posted By: burdar
Re: 68 Dart GT convertible - 10/24/22 03:22 PM
The mirrors, door handles and locks are in. Dad came over and gave me a hand putting the vent window/side windows in the doors last week. I was not looking forward to that but it actually went pretty quickly/easily. This past spring I sent the vent window pivots off for re-chroming. I got an estimate back from the platers that it was going to cost $700. That wasn't going to happen so I started looking for some really nice factory replacements. A few people online said they had some but pictures that were sent were hard to tell their true condition. I've been burned in the past when 1 person says a part is nice...then I receive said part and it's anything but nice. In the end I sanded down the chrome on my original pivots and had them powder coated semi-gloss black. I think they will look OK since the vent window rubber seal is black. I see a lot of A-bodies with badly pitted chrome pivots at shows. This will at least look better then that.
![[Linked Image]](https://i.postimg.cc/wvFtQNGP/681.jpg)
Saturday morning I installed the inner fender splash shields. I had to take the 2 studs/nuts loose at the bottom of the fenders to get them slid into place. I also found that they were easier to install without the upper rubber seal in place. Once everything was adjusted and bolted in place, I re-installed the upper rubber seal.
![[Linked Image]](https://i.postimg.cc/NMQ9XDpm/682.jpg)
Then I started masking the car in preparation for spraying the undercoating. This was my first attempt at spraying undercoating and it was interesting to say the least. I should have masked off the UCA/upper shock mount area but I didn't. I thought I'd be able to direct the spray around the area. Needless to say, I got some overspray around that area but it is what it is I guess. The undercoating gun didn't come with a cup so I bought a bottle of 3M body schutz and used that as a base. Then I poured RestoRick's undercoating into that bottle and sprayed it over the top. 1 bottle of the 3M body schutz did a medium coat on 3 wheel wells. I used around 35 psi for the 3m product. That was way too high of a pressure for the RestoRick undercoating. My first pass with that stuff just flew out of the gun and layed out completely smooth. After lowering the psi to 20-25, it started spraying out like undercoating should look. The rear wheel wells look good. The back of the front wheel wells look good. I'm a little thin on the front sections behind the headlight and down the fender in-front of the tire. I might go back and spray another coat in those areas.
![[Linked Image]](https://i.postimg.cc/vTB4qBRm/683.jpg)
Posted By: DynoDave
Re: 68 Dart GT convertible - 10/28/22 01:51 AM
Looks good.
Posted By: burdar
Re: 68 Dart GT convertible - 11/29/22 01:49 AM
Posted By: burdar
Re: 68 Dart GT convertible - 11/29/22 02:36 AM
Then this past week I got the center console and steering column installed. I started with the console carpet by gluing it in place. That didn't work out the best so I ended up peeling it back off. I read that some people have had better luck using Velcro so I gave that a try. It actually worked a lot easier then the glue for me and you can't even tell.
I was worried at first that I wasn't going to be able to get the console in with the added tach and aftermarket shifter. Every time it had been test fit previously, the dash wasn't installed so I could just set it down in place. Now that the dash is in it wasn't so easy. In order to get it in I had to remove the ash tray from the dash, remove the lockout lever from the shifter, have the shift handle in a certain position and finally, shove the tach under the dash sideways with the tail end way in the air. Then rotate it into place. It's very tight but it fits. Luckily the steering column basically just fell into place.
![[Linked Image]](https://i.postimg.cc/SNDMFGXT/int2.jpg)
![[Linked Image]](https://i.postimg.cc/2StL387n/int3.jpg)
![[Linked Image]](https://i.postimg.cc/W4JFZL5C/int4.jpg)
I had to shove a battery in it just to see if the dash lighting all worked. It did NOT. There was an issue with the map light and the shift indicator light. After probing some connections with a test light and trying incandescent bulbs in place of the LEDs I found the issue. The factory Mopar wiring has the + wire on the side of the bulb(the bulb body) and the - wire on the bottom "pin" of the bulb. This works fine for an incandescent but not for an LED. The map light was an easy fix. I just pulled the wires out of the "T" connector and swapped them. Now the + is going to the bottom "pin" on the bulb and the - is on the side body of the bulb. The shift indicator bulb wasn't as easy. The bulb socket doesn't have terminal ends that can be removed. The easiest solution was to cut the 2 wires under the console and splice them back together reversed.
![[Linked Image]](https://i.postimg.cc/Wb2kHy4q/int5.jpg)
Posted By: gtx6970
Re: 68 Dart GT convertible - 12/01/22 10:52 PM
Good looking car.
years ago I had B5 with white 1969 Dart GT conv.
simple 318 car . But I liked it. A LOT.
Midwest rust took its toll on it though.
I ended up parting it out and sent the shell to the crusher
Posted By: DynoDave
Re: 68 Dart GT convertible - 12/05/22 08:24 PM
Nice work burdar!
Your description of lugging that axle up the stairs made my back hurt!


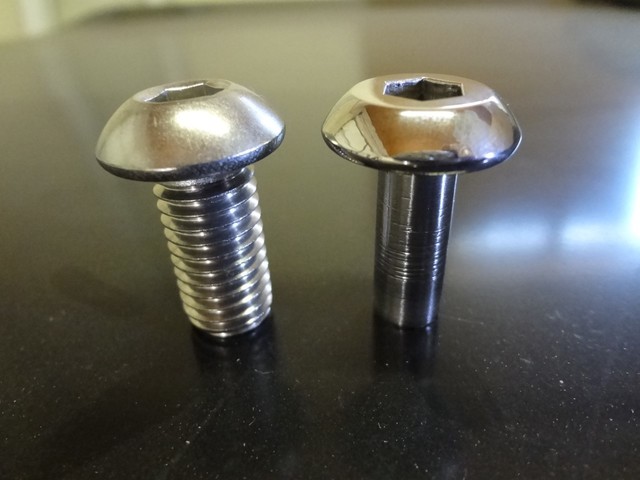
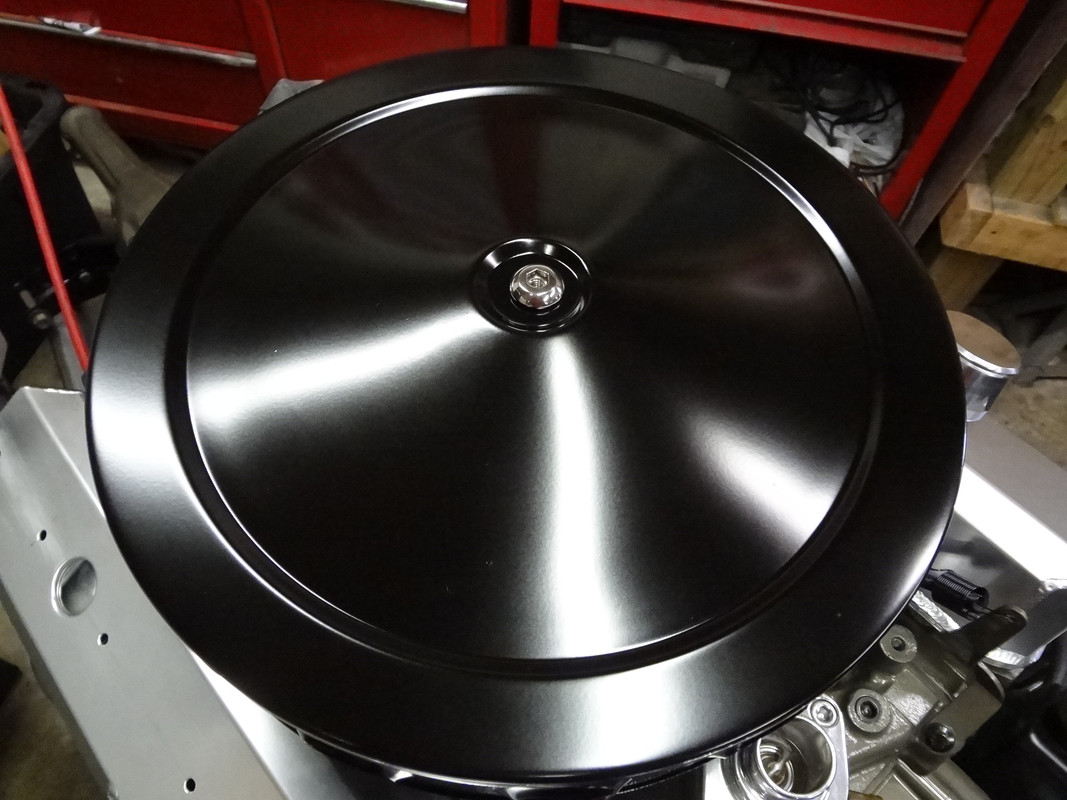
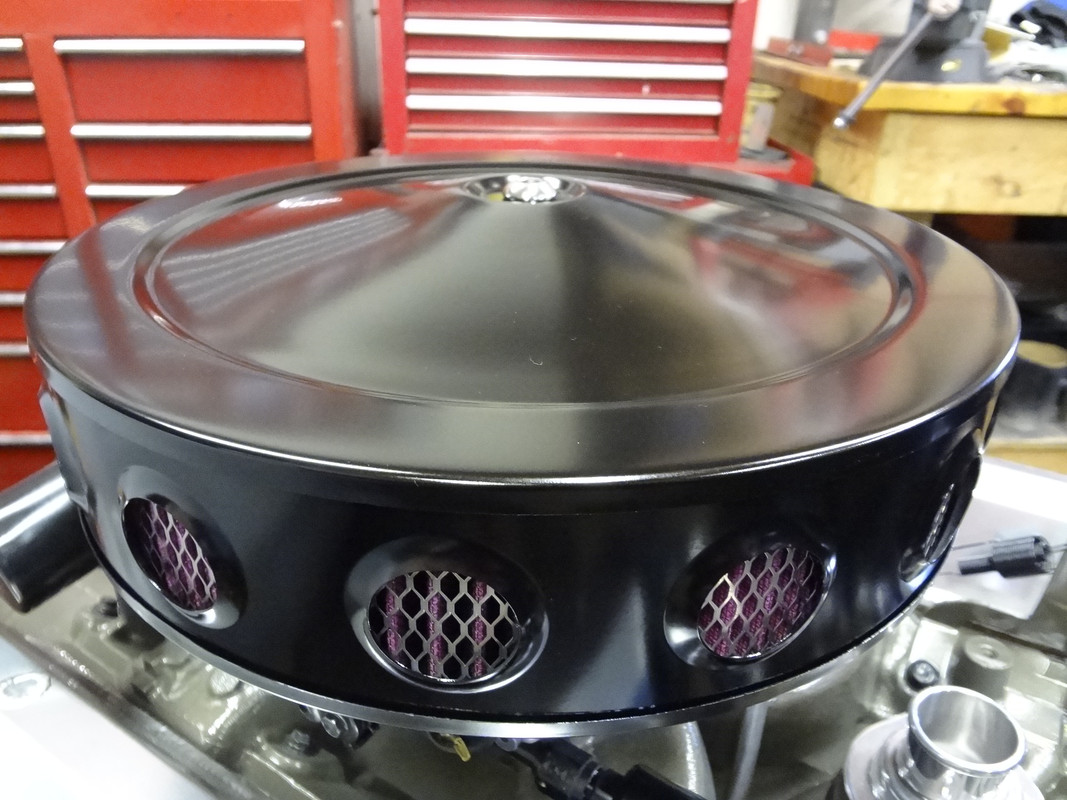
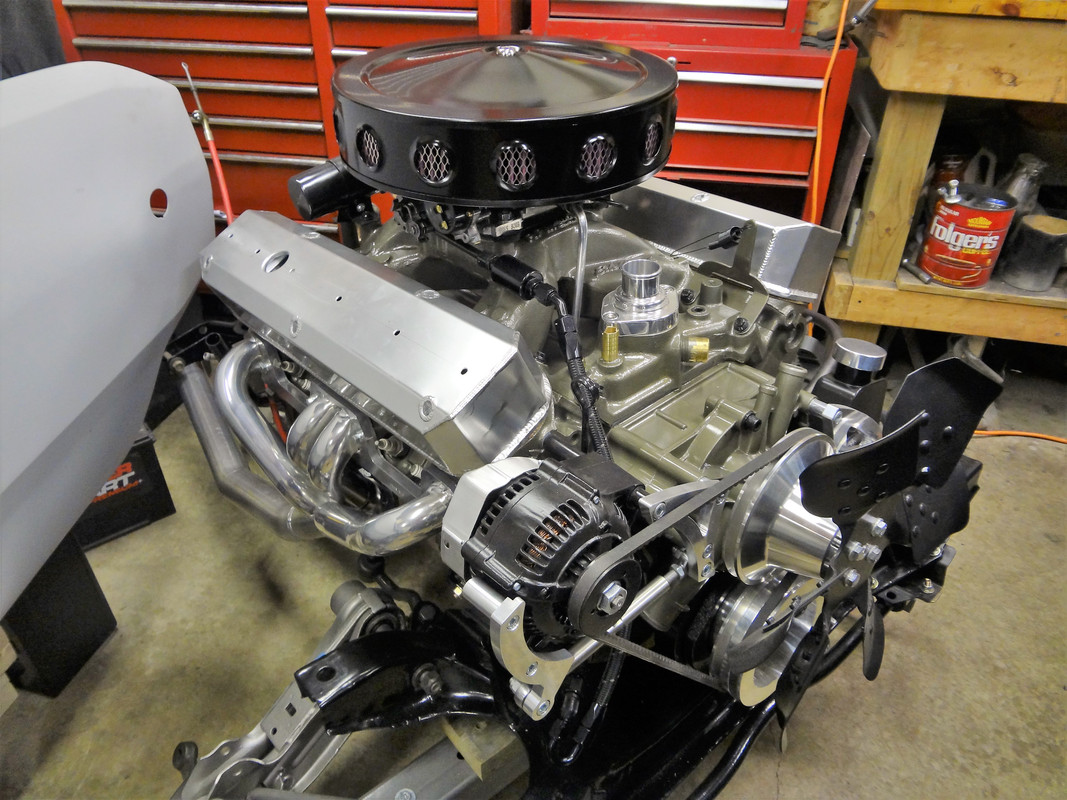
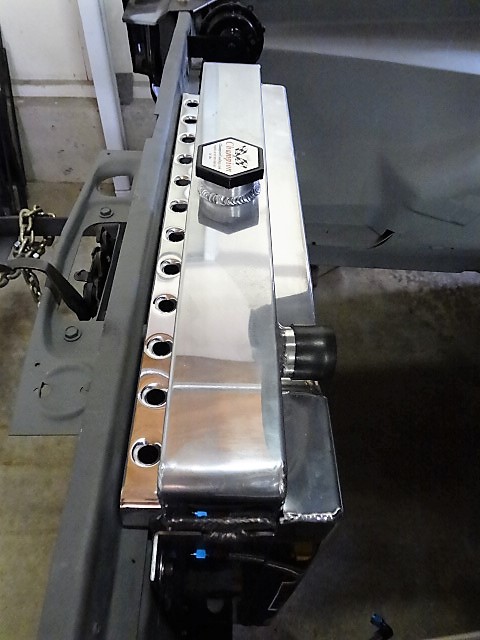
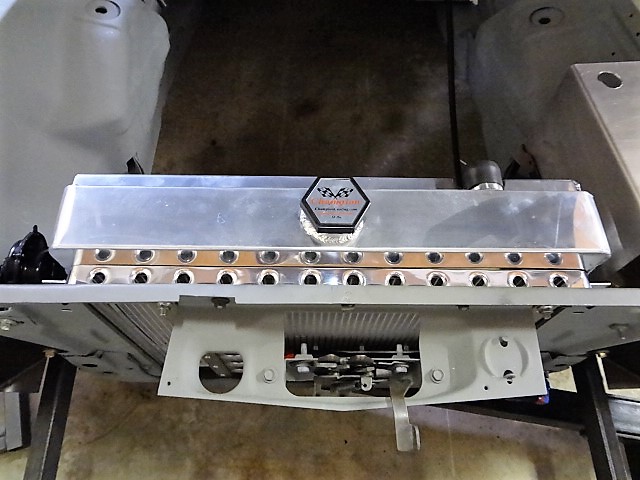
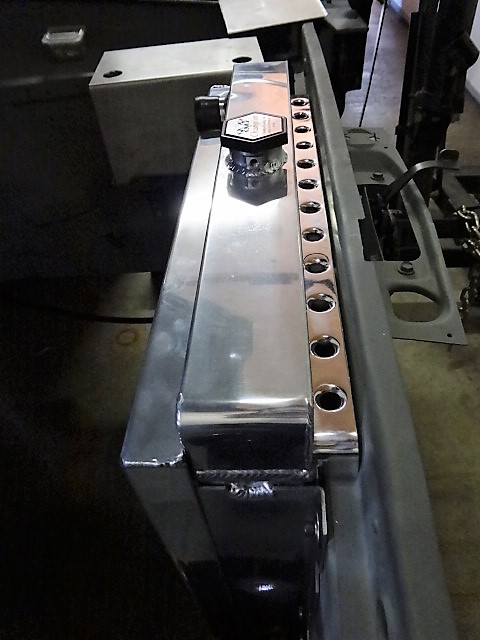
![[Linked Image]](https://i.postimg.cc/jjCzt3v7/DSC04491.jpg)
![[Linked Image]](https://i.postimg.cc/G2yGsBW3/DSC04492.jpg)
![[Linked Image]](https://i.postimg.cc/9FtPp7rr/DSC04496.jpg)
![[Linked Image]](https://i.postimg.cc/3wRsSb3P/DSC04286.jpg)
![[Linked Image]](https://i.postimg.cc/YCpKgCZ2/DSC04287.jpg)
![[Linked Image]](https://i.postimg.cc/x1trPSVv/DSC04284.jpg)
![[Linked Image]](https://i.postimg.cc/MH83qTNs/top3.jpg)
![[Linked Image]](https://i.postimg.cc/W3ZYBrWF/top2.jpg)
![[Linked Image]](https://i.postimg.cc/FzgWRvQh/top1.jpg)
![[Linked Image]](https://i.postimg.cc/mgrXbKpG/top6.jpg)
![[Linked Image]](https://i.postimg.cc/4xF8nwjH/top7.jpg)
![[Linked Image]](https://i.postimg.cc/nVY0qn6J/top8.jpg)
![[Linked Image]](https://i.postimg.cc/yNMvyx1V/top9.jpg)
![[Linked Image]](https://i.postimg.cc/763RgxrB/tach4.jpg)
![[Linked Image]](https://i.postimg.cc/Hn9jGqFH/20201004-163514.jpg)
![[Linked Image]](https://i.postimg.cc/59mGyN3y/tach6.jpg)
![[Linked Image]](https://i.postimg.cc/8PTjdCrC/20200927-135436.jpg)
![[Linked Image]](https://i.postimg.cc/YC90VyRK/20201004-162257.jpg)
![[Linked Image]](https://i.postimg.cc/SxvRp71X/20201004-162312.jpg)
![[Linked Image]](https://i.postimg.cc/ZKj0whrx/20201004-162332.jpg)
![[Linked Image]](https://i.postimg.cc/XYChKR6b/DSC04586-3.jpg)
![[Linked Image]](https://i.postimg.cc/sD8qhV8m/DSC04585-3.jpg)
![[Linked Image]](https://i.postimg.cc/pX5P90nS/DSC04599.jpg)
![[Linked Image]](https://i.postimg.cc/qvf428sv/DSC04602.jpg)
![[Linked Image]](https://i.postimg.cc/yNjKqtwD/DSC04603.jpg)
![[Linked Image]](https://i.postimg.cc/bYBzwXdb/DSC04604.jpg)
![[Linked Image]](https://i.postimg.cc/pLDxCpCY/DSC04605.jpg)
![[Linked Image]](https://i.postimg.cc/1tzQyMQJ/DSC04606.jpg)
![[Linked Image]](https://i.postimg.cc/TPfx4fH8/DSC04607.jpg)
![[Linked Image]](https://i.postimg.cc/Kj0VCmq3/20200620_105428.jpg)
![[Linked Image]](https://i.postimg.cc/gk0186jV/20200703_215109.jpg)
![[Linked Image]](https://i.postimg.cc/sfmtMJjf/20200703_215055.jpg)
![[Linked Image]](https://i.postimg.cc/DZNkpBFb/thumbnail-IMG-7476-2.jpg)
![[Linked Image]](https://i.postimg.cc/vDFRbT4Y/DSC04609-2.jpg)
![[Linked Image]](https://i.postimg.cc/Bb1WrHQ7/DSC04608-2.jpg)
![[Linked Image]](https://i.postimg.cc/CKm0T13X/egn1.jpg)
![[Linked Image]](https://i.postimg.cc/TwsX1sYc/cap2.jpg)
![[Linked Image]](https://i.postimg.cc/85cS1GD5/cap1.jpg)
![[Linked Image]](https://i.postimg.cc/y8hBjnvV/bum1.jpg)
![[Linked Image]](https://i.postimg.cc/g0YpTRT3/bum2.jpg)
![[Linked Image]](https://i.postimg.cc/y8ZgppTb/d1.jpg)
![[Linked Image]](https://i.postimg.cc/3wQysjSJ/d2.jpg)
![[Linked Image]](https://i.postimg.cc/jj6WtWm6/d4.jpg)
![[Linked Image]](https://i.postimg.cc/mrVw9rDY/FB-IMG-1636905189310.jpg)
![[Linked Image]](https://i.postimg.cc/W1GS28cf/FB-IMG-1636905179980.jpg)
![[Linked Image]](https://i.postimg.cc/fbMCkdwW/FB-IMG-1636905193301.jpg)
![[Linked Image]](https://i.postimg.cc/23Rgyr35/rear4.jpg)
![[Linked Image]](https://i.postimg.cc/Twsz8r6g/rear1.jpg)
![[Linked Image]](https://i.postimg.cc/XqyTnpjh/rear3.jpg)
![[Linked Image]](https://i.postimg.cc/Fz5gG0bS/DSC04614.jpg)
![[Linked Image]](https://i.postimg.cc/3xn1747M/DSC04655.jpg)
![[Linked Image]](https://i.postimg.cc/0y8nLGTd/DSC04663.jpg)
![[Linked Image]](https://i.postimg.cc/m23VXp5g/DSC04664.jpg)
![[Linked Image]](https://i.postimg.cc/ydwn5MKk/DSC04702.jpg)
![[Linked Image]](https://i.postimg.cc/hvTMq24M/DSC04705.jpg)
![[Linked Image]](https://i.postimg.cc/nVD37hK7/DSC04704.jpg)
![[Linked Image]](https://i.postimg.cc/MTMRPLTq/pnt1.jpg)
![[Linked Image]](https://i.postimg.cc/Qt27Rq95/pnt3.jpg)
![[Linked Image]](https://i.postimg.cc/fyYdZ0mP/pnt2.jpg)
![[Linked Image]](https://i.postimg.cc/T2bgnBFc/pnt4.jpg)
![[Linked Image]](https://i.postimg.cc/fWt3kygq/thumbnail-IMG-6689.jpg)
![[Linked Image]](https://i.postimg.cc/ryBD4TBV/IMG-6687.jpg)
![[Linked Image]](https://i.postimg.cc/fkQQRBgs/thumbnail-663461412.jpg)
![[Linked Image]](https://i.postimg.cc/WzdXLLG3/dart22a.jpg)
![[Linked Image]](https://i.postimg.cc/vTCXGqhv/dart22b.jpg)
![[Linked Image]](https://i.postimg.cc/Jn6P24Bv/dart22c.jpg)
![[Linked Image]](https://i.postimg.cc/wBfgyVLN/dart23.jpg)
![[Linked Image]](https://i.postimg.cc/rmDcSrNP/dart24.jpg)
![[Linked Image]](https://i.postimg.cc/GphbmN8r/dart25.jpg)
![[Linked Image]](https://i.postimg.cc/1t12z73M/white2.jpg)
![[Linked Image]](https://i.postimg.cc/bvt4pfps/white1.jpg)
![[Linked Image]](https://i.postimg.cc/ZRPgvP9m/white3.jpg)
![[Linked Image]](https://i.postimg.cc/dVLwGbpw/pnt9.jpg)
![[Linked Image]](https://i.postimg.cc/BnksphfD/pnt10.jpg)
![[Linked Image]](https://i.postimg.cc/D0pyTnHp/pnt13.jpg)
![[Linked Image]](https://i.postimg.cc/GmfSj79G/pnt14.jpg)
![[Linked Image]](https://i.postimg.cc/JhBYYNBg/pnt15.jpg)
![[Linked Image]](https://i.postimg.cc/d12HwJ6j/pnt16.jpg)
![[Linked Image]](https://i.postimg.cc/Y0tXSTyK/pnt17.jpg)
![[Linked Image]](https://i.postimg.cc/bJcC7Zxv/pnt18.jpg)
![[Linked Image]](https://i.postimg.cc/RVssXdjz/motor.jpg)
![[Linked Image]](https://i.postimg.cc/hvKy35DK/DSC04789.jpg)
![[Linked Image]](https://i.postimg.cc/90183Y0Z/DSC04791.jpg)
![[Linked Image]](https://i.postimg.cc/NffC6SC4/DSC04774.jpg)
![[Linked Image]](https://i.postimg.cc/h4037csv/DSC04773.jpg)
![[Linked Image]](https://i.postimg.cc/ZRfB1wpr/DSC04797.jpg)
![[Linked Image]](https://i.postimg.cc/nzV9RyjF/DSC04794.jpg)
![[Linked Image]](https://i.postimg.cc/X7vFsmHH/thumbnail-20221101-192737.jpg)
![[Linked Image]](https://i.postimg.cc/HkD0XW6F/DSC04913.jpg)
![[Linked Image]](https://i.postimg.cc/cH8kt6Y3/thumbnail-20221113-134134.jpg)
![[Linked Image]](https://i.postimg.cc/CK5QYcxm/thumbnail-20221113-150853.jpg)
![[Linked Image]](https://i.postimg.cc/cCPRDd0g/DSC04912.jpg)
![[Linked Image]](https://i.postimg.cc/CM2sMskh/DSC04917.jpg)
![[Linked Image]](https://i.postimg.cc/ncQYX9Gv/DSC04916.jpg)