Moparts

installed powergllide...

Posted By: juicedcuda

installed powergllide... - 04/23/11 06:03 PM

Installed a power glide with JW bell housing behind BB in my 'Cuda. I used the supplied spacer for the snout in the bell housing. When using the spacer you have to use the supplied starter shims obviously to be able to tighten down the two starter bolts. Once my starter snout is all the way in the spacer and the 5 supplied shims are in there, there is still a 1/8" to 3/16" gap between the bell housing and starter flange, so I added additional shims to take up the gap. Now when the starter is engaged there isn't enough gear hitting the teeth on the flywheel. What do I do? And why wouldn't JW supply enough shims to take up the gap the spacer puts the starter out?
Posted By: racingblues1426

Re: installed powergllide... - 04/23/11 09:22 PM

i've run the same combo--jwultra bell, with glide and turbo 400. I never had to use any shims. These combos were with a 9523 powermaster starter. That might be your problem--wrong starter.
Posted By: juicedcuda

Re: installed powergllide... - 04/23/11 10:37 PM

Quote:

i've run the same combo--jwultra bell, with glide and turbo 400. I never had to use any shims. These combos were with a 9523 powermaster starter. That might be your problem--wrong starter.


Do you run an 1/8" mid plate?
Posted By: chryco

Re: installed powergllide... - 04/23/11 10:38 PM

I`m also using the same set up with a Mopar mini starter sans shims here as well .
Chryco


Posted By: moparacer

Re: installed powergllide... - 04/23/11 10:54 PM

I have a 1/4 inch aluminum mid plate with a ultra bell and don't use any shims either.
Posted By: Dabee

Re: installed powergllide... - 04/24/11 03:28 AM

Quote:

I used the supplied spacer for the snout in the bell housing


Remove the snout. You don't need it. I have never been able to get one to fit all the way in the hole in the bell for it. Shim the starter so you have .100 between the stater gear and the ring gear. That will give you full engagement of the gears.
Posted By: juicedcuda

Re: installed powergllide... - 04/24/11 04:45 AM

Quote:

Quote:

I used the supplied spacer for the snout in the bell housing


Remove the snout. You don't need it. I have never been able to get one to fit all the way in the hole in the bell for it. Shim the starter so you have .100 between the stater gear and the ring gear. That will give you full engagement of the gears.


Remove the spacer or remove the snout of the starter?
Posted By: HEMIFRED

Re: installed powergllide... - 04/24/11 06:54 AM

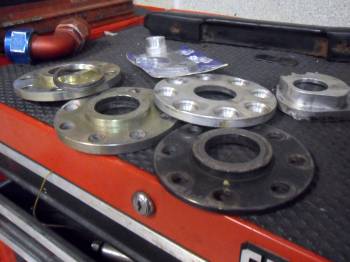
I am not sure which flywheel and center hub you are using but there are different set ups. There are some where the hub goes onto the crank flange first and the flywheel on top of it. The others mount the flywheel first and hub second. The starter ring gear winds up in a different place when compared. Pictured are various hub adapters.
Some worked better when installed first rather than the flywheel. Nearly all required a spacer to pull the starter back from the wheel. In most cases the same size as the midplate.


Attached picture 6600034-HUBS44KB.jpg
Posted By: HEMIFRED

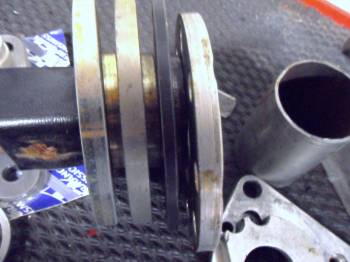
Re: installed powergllide... - 04/24/11 06:55 AM

they have come in different thicknesses

Attached picture 6600036-HUBS43KB.jpg
Posted By: HEMIFRED

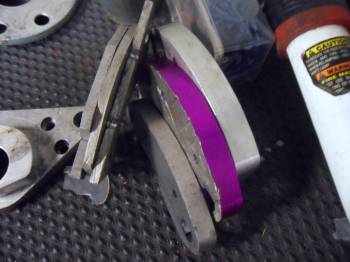
Re: installed powergllide... - 04/24/11 06:57 AM

and various spacers came with them others are home made

Attached picture 6600037-STARTERSHIMS43.4KB.jpg
Posted By: HR5058

Re: installed powergllide... - 04/24/11 07:25 AM

Remove the spacer and shim to as suggested above. That is what I ended up doing on my small block and no issues at all. Chuck
Posted By: mac56

Re: installed powergllide... - 04/24/11 12:44 PM

Quote:

I am not sure which flywheel and center hub you are using but there are different set ups. There are some where the hub goes onto the crank flange first and the flywheel on top of it. The others mount the flywheel first and hub second. The starter ring gear winds up in a different place when compared. Pictured are various hub adapters.
Some worked better when installed first rather than the flywheel. Nearly all required a spacer to pull the starter back from the wheel. In most cases the same size as the midplate.


As Fred stated sometimes you have to mix and match because of all the possible combinations of mid plates. I had to make my crank adapter but I'm using jw bell and I think it is a tci wheel.If I read your post right it sounds like the starter snout is getting hung up in the pilot hole. Did you dry fit your starter before you put the transmission in? When I fit my starter on the bench the first time it would not engage all the way. The snout and pilot needed to be cleaned up a bit. I can see having to shim the starter to get the right engagement on the ring gear but the starter should go in tight to the bell housing unless there is interference in the pilot hole.
Posted By: coronetville

Re: installed powergllide... - 04/24/11 01:23 PM

some cranks have a "end" that is longer or shorter than others,pull the trans. and measure the distance (with flywheel on) from the face of the flywheel [tranny side] to the the back of the block. Then put the converter on the transmission. VERY IMPORTANT, make sure the converter is all the way on the snout. Then measure the distance from the transmission bell housing to one of the mounting pads on the converter. There should be only 1/8 of on inch of play difference. This 1/8" has to be longer than on the transmission side than the engine side. You might have to have the converter machined for the difference like I did. Also remember if you have to take material off the converter mounting pads you must also remove the same amount off the snout of the converter (the end that fits in the crankshaft or crankshaft spacer. You can also use a different crankshaft spacer to make up the difference. I milled the converter in my case
Posted By: Leon441

Re: installed powergllide... - 04/24/11 06:03 PM

I've posted about this on small blocks before. Can't see why they would have done any better a job on BB's. Run a 1/4" mid plate. Make a new crank adapter 1/4" thicker or a 1/4" shim. Put it together and use 1/4" less shims. Worked for me. Then I got tired of chasing shims across the floor and made a starter shim or just tack the shims needed together.

Question though. Does ATI and Reid do a better job with all of this?

Oh and forget buying a midplate for a small block to space the starter as well as the bell. Why? JW put the starter in a different place than MOPAR. Make your own mid plate, problem solved.

Leon
Posted By: MagnumExpress

Re: installed powergllide... - 04/25/11 12:25 AM

I run an ATI SuperCase with ATI Bell. No starter issues at all. No shims required. bolted just like the factory.
Posted By: Leon441

Re: installed powergllide... - 04/25/11 01:14 AM

Quote:

I run an ATI SuperCase with ATI Bell. No starter issues at all. No shims required. bolted just like the factory.


Big block or small block with the ATI?

Leon
Posted By: GRAYBO

Re: installed powergllide... - 04/25/11 01:43 AM

Give me a shout when you are wrenching on this thing again. My brother and I both run 440 engines and built custom spacers. You definitly want to use the nose cone. LESS STRESS LESS HEADACHES>>>> Good luck. John EMAIL for my phone.....

Attached picture 6601298-ten0champ.jpg
Posted By: FastmOp

Re: installed powergllide... - 04/25/11 05:46 PM

If you need something made I have a milling machine

Let me know when you go to the track. I plan on going to US-60 fri night if the weather holds.
Posted By: juicedcuda

Re: installed powergllide... - 04/26/11 03:36 AM

Quote:

If you need something made I have a milling machine

Let me know when you go to the track. I plan on going to US-60 fri night if the weather holds.


We are heading to Chicago on friday morning for a no prep race. Would like to take my car to the valley the following weekend but the water level isn't looking good.

I think I have everything figured out on the starter issues. I removed the spacer, a few shims and all is well. Car is ready to go! Thanks.
Posted By: racingblues1426

Re: installed powergllide... - 04/26/11 04:36 AM

090 midplate
Posted By: lowbudget

Re: installed powergllide... - 04/26/11 05:44 PM

Hey good luck with the race....let us know how it turns out, got to be a wild time
© 2024 Moparts Forums